TUYA J5 User manual

�
�
I �
,_y
g
I
1_
\
"
I
QUICK
START
GUIDE
D


1. what’s in the box
- 1 -
2. meet the doorbell
Speakers
Hardwire Terminals
MicroSD Slot
Security Screw Hole
Micro USB Port
Reset Hole
Wall Mount Bracket
Mounting Screw Holes
Security Screw
20° Angle Mount
(Optional)
Doorbell Mounting Holes
Wall Mounting Screw Holes
Camera(2K)
Microphone
Doorbell Button
LED Indicator
3
2
1
4
6
5
8
7
10
9
12 16
11
13
14
15
10
2
1
4
5
6
3
16
13
9
8
7
12
11
15
14
User Guide
Video Doorbell
Extension Wire
& Wire Nuts
20° Angle Mount
Jumper for
Indoor Chime
Indoor Wireless Chime
Power Adapter
(DC12V 1A)
List Tools

3. Meet the chime
Speakers
Reset Button
2
1LED Indicator
USB Port (Foldable)
3
4
1
3
2
4
- 2 -
Download and install the 'SmartLife' App to your smartphone.
Launch the App and register an account with your mobile phone
number or email ID.
4. SET up your doorbell
Attach the wires from the provided power adapter to the terminals on the rear of your doorbell, and
tighten the terminal screws with screwdriver. Each wire can be connected to each power terminal.
The cable order doesn’t matter.
Plug the adapter to your AC outlet. Install the doorbell within 30 feet of your 2.4GHz WiFi router.
It is suggested to test your doorbell prior to physical installation.
2
3
1
12
Scan to download
SmartLife APP

- 3 -
4
Start the Wi-Fi configuration referring to below tutorial steps.
9:55
All Devices
No devices
Home Smart Me
Add Device
Front Door Living room
31 °C
Outdoor Temperature Excellent
Outdoor PM2.5 Excellent
Outdoor Air Quality
My Home
Partly Cloudy
9:55
Reset the device first.
Power the device on and make sure the indicator is
flashing quickly or a prompt tone is heard
Make sure the indicator is flashing quickly or
a prompt tone is heard
Perform net pairing as promoted.
Cancel QR Code
Next
Add Manually Auto Scan
Electrician
Lighting
Large Home
Appliances
Small Home
Appliances
Kitchen
Appliances
Security
& Sensors
Exercise
& Health
Gateway
Control
Energy
Entertainme
nt
Industry &
Agriculture
Others
Video
Surveillance
Video Surveillance
Access Control
Smart Camera Smart Doorbell Floodlight
Camera
Base Station
Access Control
NVR DVR
9:55 9:55
Cancel
Next
If your Wi-Fi is 5GHz, please set it to be 2.4GHz.
Common router setting method
Home wifi
Select 2.4 GHz Wi-Fi Network and
enter password.
2.4
GHz
5
GHz
Next
9:55
Cancel
Please scan the QR code from 15 to 20
cm away
No Prompts
I Heard a Prompt
9:55
Cancel
Adding device...
Ensure that the device is powered on.
1%
Scan
devices. Register
on Cloud. Initialize
the device.
9:55
Cancel
Device added successfully
Front Door
Added.
Smart Doorbell
Baby room
Living room
9:55
All Devices
Home Smart Me
Front Door Living room
31 °C
Outdoor Temperature Excellent
Outdoor PM2.5 Excellent
Outdoor Air Quality
My Home
Partly Cloudy
Smart Doorbell
Common Functions
1. Tap “Add device” 2. Select product type 3. Reset device 4. Input Wi-Fi password
5. Generate QR Code 6. Let camera scan QR code 7. Wait for connection 8. Device added

- 4 -
Tap on the Home page devices to watch live view from your doorbell.
5
LED indicator explanation:
-
Solid Red
Device is abnormal.
-
Solid Blue
Successfully connected to WiFi network.
-
Flashing Red Quickly
Device is connecting to WiFi.
-
Nothing
Power failure/
Status light is turned off in doorbell Settings.
-
Flashing Red Slowly
Ready for WiFi configuration.
-
Flashing Blue Quickly
Firmware is upgrading.
5. Live view
3
6
4
1
7
2
5
Quit live viewing
Setting menu
Date & time watermark
Wi-Fi signal status
Volume on/off
FHD/HD/SD switch
Full screen display
9
10
13
14
8
11
12
Screenshot button
Speak to the scene
Record on the phone
History playback
Cloud storage
Alarm setting
Photo Album
Note:
Live viewing will not trigger device recording at Event recording mode.
Screenshot Speak Record
Playback Cloud Storage Alarm
Smart Doorbell
Signal: 86%
HD
2020-07-17 09:55:37
2020-07-17 09:55:37
9:55
14
Photo album
Scroll
Down

- 5 -
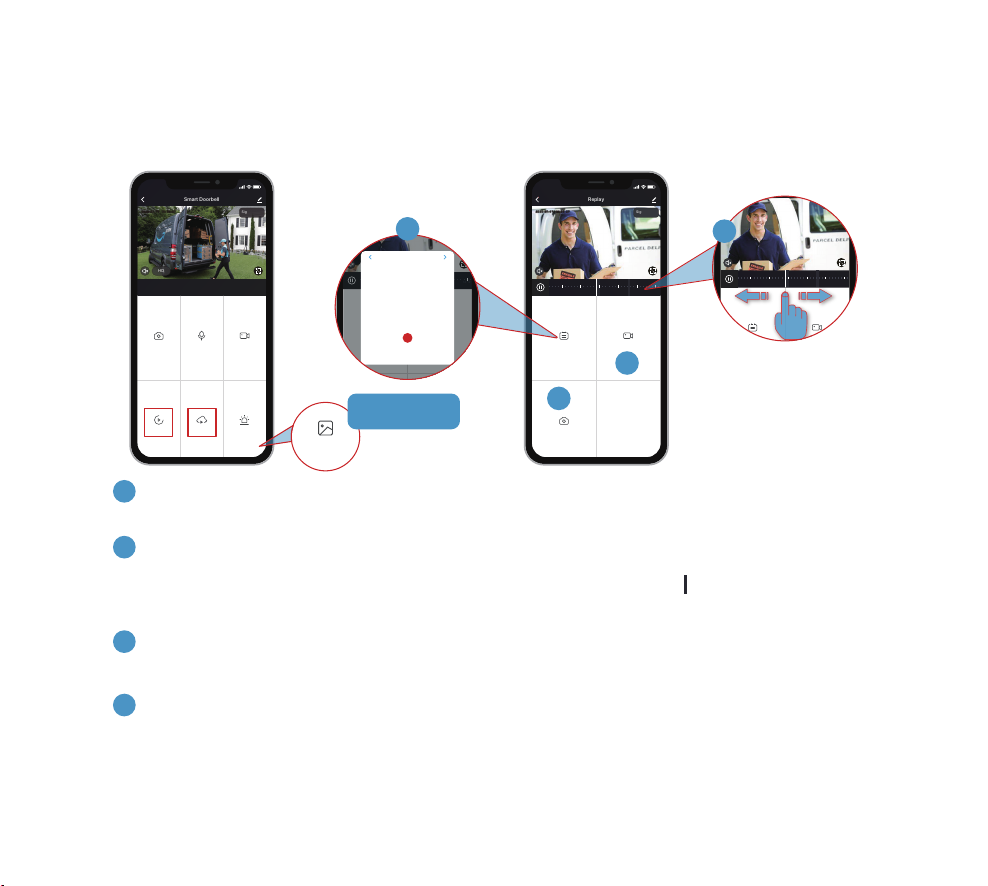
Your doorbell comes with
Event recording
by default. It will record visitor calls and motion detection
events. You can also enable
Non-stop recording
in the
Settings
->
Storage Settings
->
Recording Mode
.
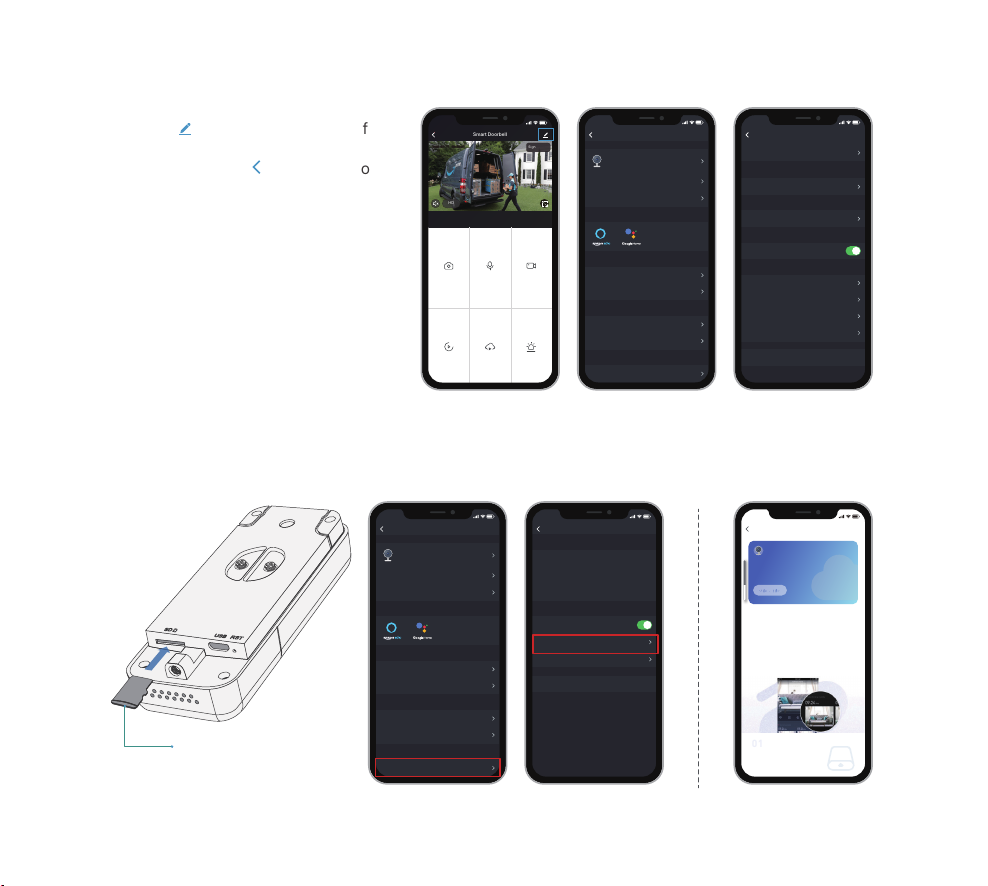
To purchase cloud storage, please go to the
Settings
->
Purchase VAS
.
Tap the ‘ ’icon on the top right of
live view interface to enter into the
Settings, and tap ‘ ’ to go back to
live view.
7. Recording
6. Settings
Micro SD Card
Max up to: 128GB
Settings
Device Information
Tap-to-Run and Automation
Smart Doorbell
9:55
Basic Function Settings
IR Night Vision
Detection Alarm Settings
Bell Settings
Storage Settings
Auto
BASIC SETTINGS
THIRD PARTY SUPPORTED
ADVANCED SETTINGS
STORAGE
Storage Settings
Total Capacity
Remaining Capacity
Used
Format
STORAGE CAPACITY
14.40G
0.06G
Local Recording
Schedule
Recording Mode
STORAGE SETTINGS
Event Recording
14.34G
9:55
Screenshot Speak Record
Playback Cloud Storage Alarm
Smart Doorbell
Signal: 86%
HD
2020-07-17 09:55:37
2020-07-17 09:55:37
9:55
Settings
Device Information
Tap-to-Run and Automation
Smart Doorbell
9:55
Basic Function Settings
IR Night Vision
Detection Alarm Settings
Bell Settings
Storage Settings
Auto
BASIC SETTINGS
THIRD PARTY SUPPORTED
ADVANCED SETTINGS
STORAGE
01
Cloud services
9:55
Overview
Device name:Smart Doorbell
Device ID: pp01eee06746892f0172
Video Cloud Storage
Video Cloud Storage
Camera will upload encrypted video data to
the cloud once the service is subscribed. You
can check the video through the App
anytime, anywhere.
Secured storage
Even if your camera is stolen or
destroyed, you can still check
the video from the cloud.
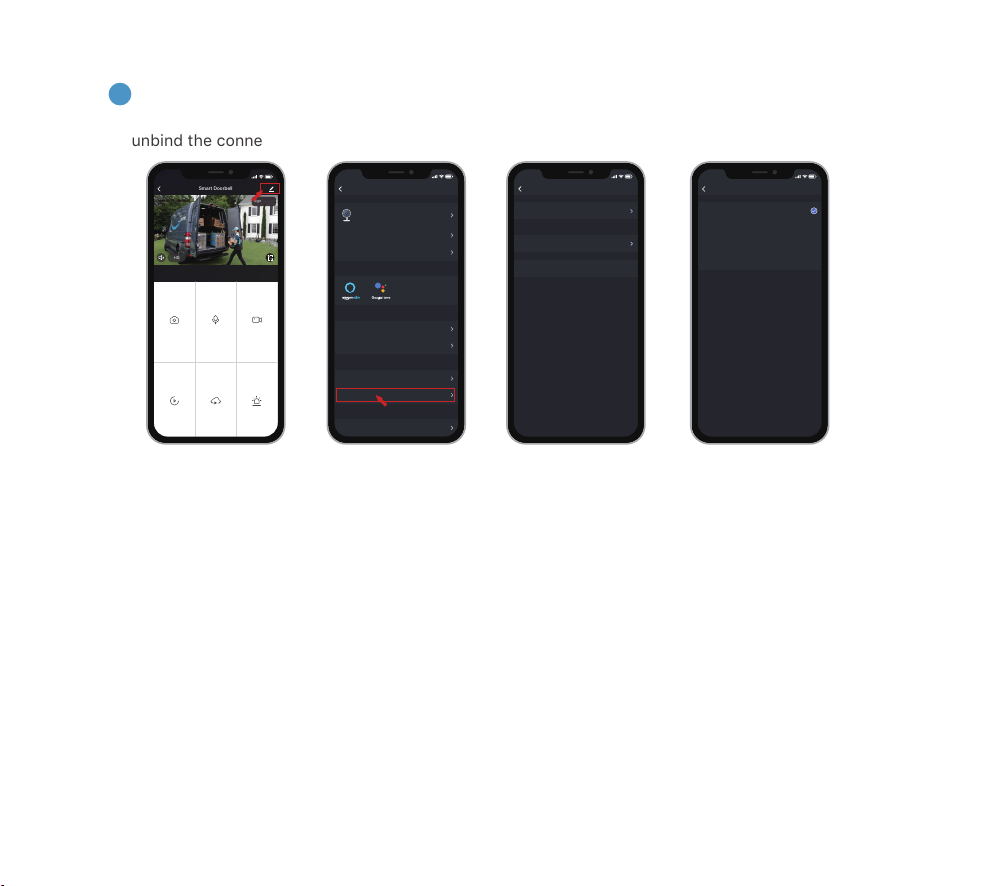
Bell Settings
Purchase VAS
Offline Notification
VAS
OFFLINE NOTIFICATION
OTHERS
Storage Settings
STORAGE
FAQ & Feedback
Share Device
Add to Home Screen
Firmware Information
Remove Device
9:55
Settings

- 6 -
Tap Playback icon to play the videos recorded in the MicroSD card. If you have purchased cloud
storage service, tap on Cloud storage to playback the recorded historical events.
8. Video Playback
1
Time Line:
Slide the timeline to the left or right to locate video recordings according to time period.
Pinch with your finger and thumb to zoom in/out the timeline. The grey bar ‘ ’ stand for a video clip that
had been recorded.
Date:
Check video history by date. The numbers in dark grey stand for the dates that have video recordings.
2
Screenshot:
Tap to capture a photo and save to Photo alnum, Where you can share it to others.
3
Record:
Tap to start recording a video, tap again to end and save to Photo alnum, Where you share the video clips
to others.
4
Screenshot
Date Record
Replay
Signal: 86%
2020-07-17 09:55:37
2020-07-17 09:55:37
9:55
13:42 13:48 13:54 14:00 14:06 14:12
3
4
Screenshot
Date Record
Replay
Signal: 86%
2020-07-17 09:55:37
2020-07-17 09:55:37
9:55
13:42 13:48 13:54 14:00 14:06 14:12
Screenshot
Date Record
Replay
Signal: 86%
2020-07-17 09:55:37
2020-07-17 09:55:37
9:55
13:42 13:48 13:54 14:00 14:06 14:12
2020 - 07
Sun Mon Tue Wed Thu Fri Sat
1 2 3 4
8 9 10 115 6 7
15 16 17 1812 13 14
22 23 24 2519 20 21
29 30 3126 27 28
2
Screenshot Speak Record
Playback Cloud Storage Alarm
Smart Doorbell
Signal: 86%
HD
2020-07-17 09:55:37
2020-07-17 09:55:37
9:55
1
Photo album
Scroll down to
get Photo album

- 7 -
9. Connect the chime
1
2 3
(not included)
(not included)
The chime can be powered by USB compatible power source(DC5V 1A), or by the USB port on your
computer.
Supply power to the chime
Click reset button Press the doorbell button
Reset Button LED Indicator
Click on RESET only once, and you will see the
chime indicator flashing blue, indicating that
the chime is in pairing mode.
Press the doorbell button, and the chime will
sound. If pairing is successful, the indicator on
the chime will be in solid blue.

Ringtone Selection
9:55
- 8 -
The video doorbell works with
12V DC
power source (power adapter provided), as well as an existing
12V~24V AC
hardwire power source. It enables you to make use of your legacy doorbell wiring for
retro-fit installation.
10. Installation
4
Chime settings
You can enter into the chime setting page following below setting steps, so as to select ringtones, or
unbind the connection with doorbell.
Step.3Step.2Step.1
NOTE:
1. Your doorbell communicates with the chime via Radio Frequency, but not WiFi.
2. You can assign different chimes as needed.
3. Press and hold
RESET
button on the chime for 5 seconds till the indicator flashes blue 3 times, and
you can also release the connection between the chime and its connected doorbell.
NOTE:
For retro-fit installation, you need to bypass your indoor mechanical chime so as to provide sufficient
power for the new video doorbell.
Step.4
Bell Settings
DIGITAL
Chime Type
Ringtone Selection
9:55
Ringtone 1
Digital
Unbind
Ringtone 1
Ringtone 2
Ringtone 3
Ringtone 4
Screenshot Speak Record
Playback Cloud Storage Alarm
Smart Doorbell
Signal: 86%
HD
2020-07-17 09:55:37
2020-07-17 09:55:37
9:55
Settings
Device Information
Tap-to-Run and Automation
Smart Doorbell
9:55
Basic Function Settings
IR Night Vision
Detection Alarm Settings
Bell Settings
Storage Settings
Auto
BASIC SETTINGS
THIRD PARTY SUPPORTED
ADVANCED SETTINGS
STORAGE

4 feet
120mm
DoorDoorbell
DoorDoorbell
- 9 -
3
Select a location for your video doorbell.
Determine the mounting position of the doorbell. Check if you can reuse the existing holes on the wall. If not
drill new holes to mount your video doorbell.
It is suggested to mount the doorbell at least 4 feet (120 cm) above the ground for optimal angle of view
and best motion detection performance.
(Optional)
Use the 20° angle mount as a supplementary mounting
bracket, to adjust the viewing angle towards to fit your viewing
preference.
Doorbell With 20° Angle Mount
2
Bypass your indoor chime with provided jumper.
In most cases, the existing doorbell circuit looks similar to the image below. Remove the cover of the indoor
chime and loosen the “
FRONT
” and “
TRANS
” terminal screws. Use the provided jumper to connect the two
terminals, and replace the chime cover.
To replace your existing doorbell and mechanical chime, please follow below installation steps:
1
Shut off the master circuit breaker in your house.
10.1
Retro-fit installation (Optional)
Existing Doorbell Button Doorbell TransformerExisting Mechanical Chime
FRONT TRANS REAR
Doorbell Without Angle Mount

- 10 -
4
Replace your existing doorbell.
5
Restore power at the breaker, and your doorbell is ready for use.
Remove the existing doorbell from
the wall and disconnect the wires.
Lead the wire through the holes on
the bracket before mounting.
Mark the screw holes location and mount
the brackets on your wall with screws.
Wall mount
screw kit
Bracket
mount
screws
Optional Optional
Attach the wires to the doorbell.
Wire extension kits are optional.
Feed the wires back to the wall and
Mount the doorbell to the brackets.
Insert the screw into the
bottom
and tighten with included tool.
Security
screw
Screwdriver

-11-
Hardwire your doorbell with the provided DC12V power adapter.
10.2
Hardwire installation
Mark the screw holes location for
doorbell installation.
Drill a hole on the wall and lead the
adapter wires out from inside.
Lead the adapter wires through the
brackets and install the brackets.
Wall mount
screw kit
Bracket
mount
screws
Attach the wires to the screws on
the rear of the doorbell.
Attach your doorbell to the brackets
and secure it with the security screw.
Plug the indoor adapter to your AC
outlet to supply power
. All set!
Security
screw
Screwdriver
Not included
Optional

- 12 -
Q1: Is the video doorbell powered by battery?
A1:
No, this video doorbell reuiquires constant hardwire power supply. Compared to battery powered
doorbells, this wired video doorbell has more advanced features, like supporting full day recording, no
delay quick response to visitor calls, and smaller in dimension, fitting into narrow door frames.
Q2: How to connect the hardwire to the doorbell? Does the cable order matter?
A2:
Your doorbell works with both DC 12V and AC 12V - 24V hardwire power source. There are 2 terminal
screws on the rear of your doobrell, and you can connect each wire to each power terminal screw. The
cable order doesn’t matter.
Q3: I found a Micro USB port near the Micro SD Slot, what’s it for?
A3:
You can power up the doorbell by the Micro USB port, using an USB compatible charger and cable. It
is designed mainly for product testing in the factory.
Q4: What’s the Wi-Fi range of the video doorbell?
A4:
The video doorbell works with any 2.4GHz wireless Wi-Fi router, mesh system or modems. In outfield
test, it works well in most 3000sqft houses. The Wi-Fi range may vary because of different WiFi transmit
power, transmission distance and wall blocks in between.
Q5: I installed my video doorbell, but the video or audio quality is poor.
A5:
In live view interface, WiFi status will be listed. It is suggested to ensure the Wi-Fi status be more
than 70%, so as to get your doorbell work as expected. If you think your problem is caused by low Wi-Fi
signal strength, try moving your Wi-Fi router closer, or add one Wi-Fi Booster to extend your Wi-Fi range.
Q6: Does the video doorbell work with existing indoor mechanical chime?
A6:
No. The doorbell comes with an USB compatible wireless chime to notify people when your vistor
presses the doorbell button. If you have an existing indoor chime, please use the provided jumper to
bypass the existing chime, so as to provide sufficient power to the new video doorbell.
11. Trouble Shooting

- 13 -
Q7: How many wireless chimes can be paired with one video doorbell?
A7:
You can add as many wireless chimes as your wish on one video doorbell.
Q8: Does it support customized Motion Detection Zones.
A8:
Yes it does. Go to
Settings
-
Detection Alarm Setting
-
Surveillance Area Setting
. Use your finger
tips to draw a motion detection zone and save your settings, and the red zone is motion detection zone.
Q9: How does the video doorbell detect the motions? Can motion detection be disabled?
A9:
The doorbell camera detects motion through the full-image pixel contrast, it will further undergo a
human-shape detection to reduce false alarm rate. You can adjust the motion detection sensitivity,
customize detection zone, schedule alarm intervals and disable motion detection accordingly due to
various user scenarios.
Q10: Does the doorbell support cloud storage?
A10:
Your doorbell support MicroSD card storage as well as cloud storage. You can activate the cloud
storage service in App. Please note that cloud storage only support event recording but not full day
recording.
Q11: Does it work with Google Home or Alexa?
A11:
Yes, it works with Google voice assistant as well as Amazon Alexa.
Cancel Save
Drag/Resize the red frame to set an activity area

Table of contents
Other TUYA Accessories manuals

TUYA
TUYA SimPal-TY130 User manual

TUYA
TUYA T23 User manual

TUYA
TUYA 96236 Instruction manual

TUYA
TUYA ATLO-P1-TUYA User manual

TUYA
TUYA Smart V10W User manual

TUYA
TUYA laxihub 6972055684105 User manual

TUYA
TUYA EC-SMART01 User manual

TUYA
TUYA M100 Pro User manual

TUYA
TUYA TM001-ZA Owner's manual

TUYA
TUYA PIR 323-Z-TY User manual
Popular Accessories manuals by other brands

socomec
socomec TE Series quick start

Eaton
Eaton Crouse-Hinds GHG 514 operating instructions

Grixx
Grixx POWERBANK 20.000mAh PD manual

MidNite Solar
MidNite Solar Whizbang Jr Installation instructions manual

Compressed Air Alliance
Compressed Air Alliance K Series user manual

sunsation
sunsation SUN 3000 installation guide