DHN DU7800 User manual
Laser Light Source Projector
User Manual
________________________________________________________________________________
Version: 1.0

1
Contents
Important safety instructions
I. Introduction
1. Characteristics of Projector
2. External Overview of Projector
3. Control and Function
II. Installation of Projector
1. Placement Method
2. Projection Size/Projection Distance Relation
III. Connection
IV. Menu System
1. Basic Settings Menu
2. Advanced Setting Menu
3. Information Menu
4. Factory Settings Menu
V. Indicator Lights
VI. Product Specification
1. Technical Indicators
2. Overall Dimensions
3. Suspended Ceiling Type Installation

2
Important safety instructions
Your projector has been designed and tested, and meets the latest safety standards for
information technology equipment. However, in order to ensure the safe use of the product, it is
essential to follow the instructions mentioned in the manual and marked on the product.
Please read the manual before using the projector and keep it for future reference.
Please do not look at the projection lens during use, as strong light beam may hurt your eyes.
In some countries/regions, the power supply voltage is unstable. The projector can operate
normally within the voltage range of 100 to 240 (volt) of the AC power supply, but in the areas
that the voltage fluctuation exceeds 10 and the power supply voltage may fluctuate or be cut
off, it is recommended that you connect the projector through a power stabilizer, a surge
protector or an uninterruptible power supply (UPS).
When the projector is working, do not use any object to block the projection lens, otherwise the
object will be heated and deformed, or even fired.
Please do not place the projector on an unstable shelf or a table, otherwise the projector may
fall and maybe seriously damaged.
Do not disassemble the projector before the power to the projector is not cut off. Dangerous
high voltage components are arranged in the projector. Electric shock and death may occur in
case of contact with human body. Therefore, you can open or remove the cover of the projector
in any case. Only qualified professional maintenance personnel can maintain the projector.
Please do not place liquid near or on the projector. If liquid splashes into the projector, the
projector may not work properly. If the projector is wet, the power cord of the projector shall be
unplugged, and then you shall call the authorization service center of the projector for the
maintenance of the projector.
3
I. Introduction
The projector series of the product is characterized of high brightness and high-definition
resolution, and widely applied to digital high-definition cinemas, large exhibition halls, private
cinemas, large-screen splicing, etc. It is also suitable for digital advertisement display, large-scale
stadium display, city image and project construction. Bright and clear images can be displayed
through the projector by virtue of high brightness output while clear and sharp images are played on
personal computers, cameras and blue-ray players from different signal sources, so that users can
enjoy the visual shocks. Not only that, the projector is conveniently and flexibly applied to large
screen splicing demonstration and used to display more applications of pictures through full control
of PC.

4
1. Characteristics of Projector
With single chip laser DLP™ projector for providing high-definition images;
The service life is 20,000 hours;
Support vertical and lateral projections;
Due to vertical digital keystone correction function, ideal symmetrical images can be easily
obtained;
Variety of lenses can be changed with one key to adapt to complicated installation
conditions;
Due to built-in color correction function, consistency of images can be guaranteed;
Rich control interfaces are suitable for multi-control protocols;
Support 3D-ready/3D color management/up, down, left, right format inpu
Liquid cooling system is applied to DLP® display chip and laser light source to dissipate
heat efficiently and ensure stable operation of the projector;
HD-BaseT supports 100m-long high definition signal transmission without signal loss;
Support direct power-off protection, so that the projector can be turned on or off
immediately;
Due to automatic temperature control, ambient temperature can be detected in real time,
fan speed can be adjusted automatically, and the projector can work with 38db low noise;
Support adjustment on up and down displacement + 100% large-scale lens displacement
and large-scale adjustment of images, so that the projector can be more flexibly installed.
2. External Overview of Projector
Front/Top/Right
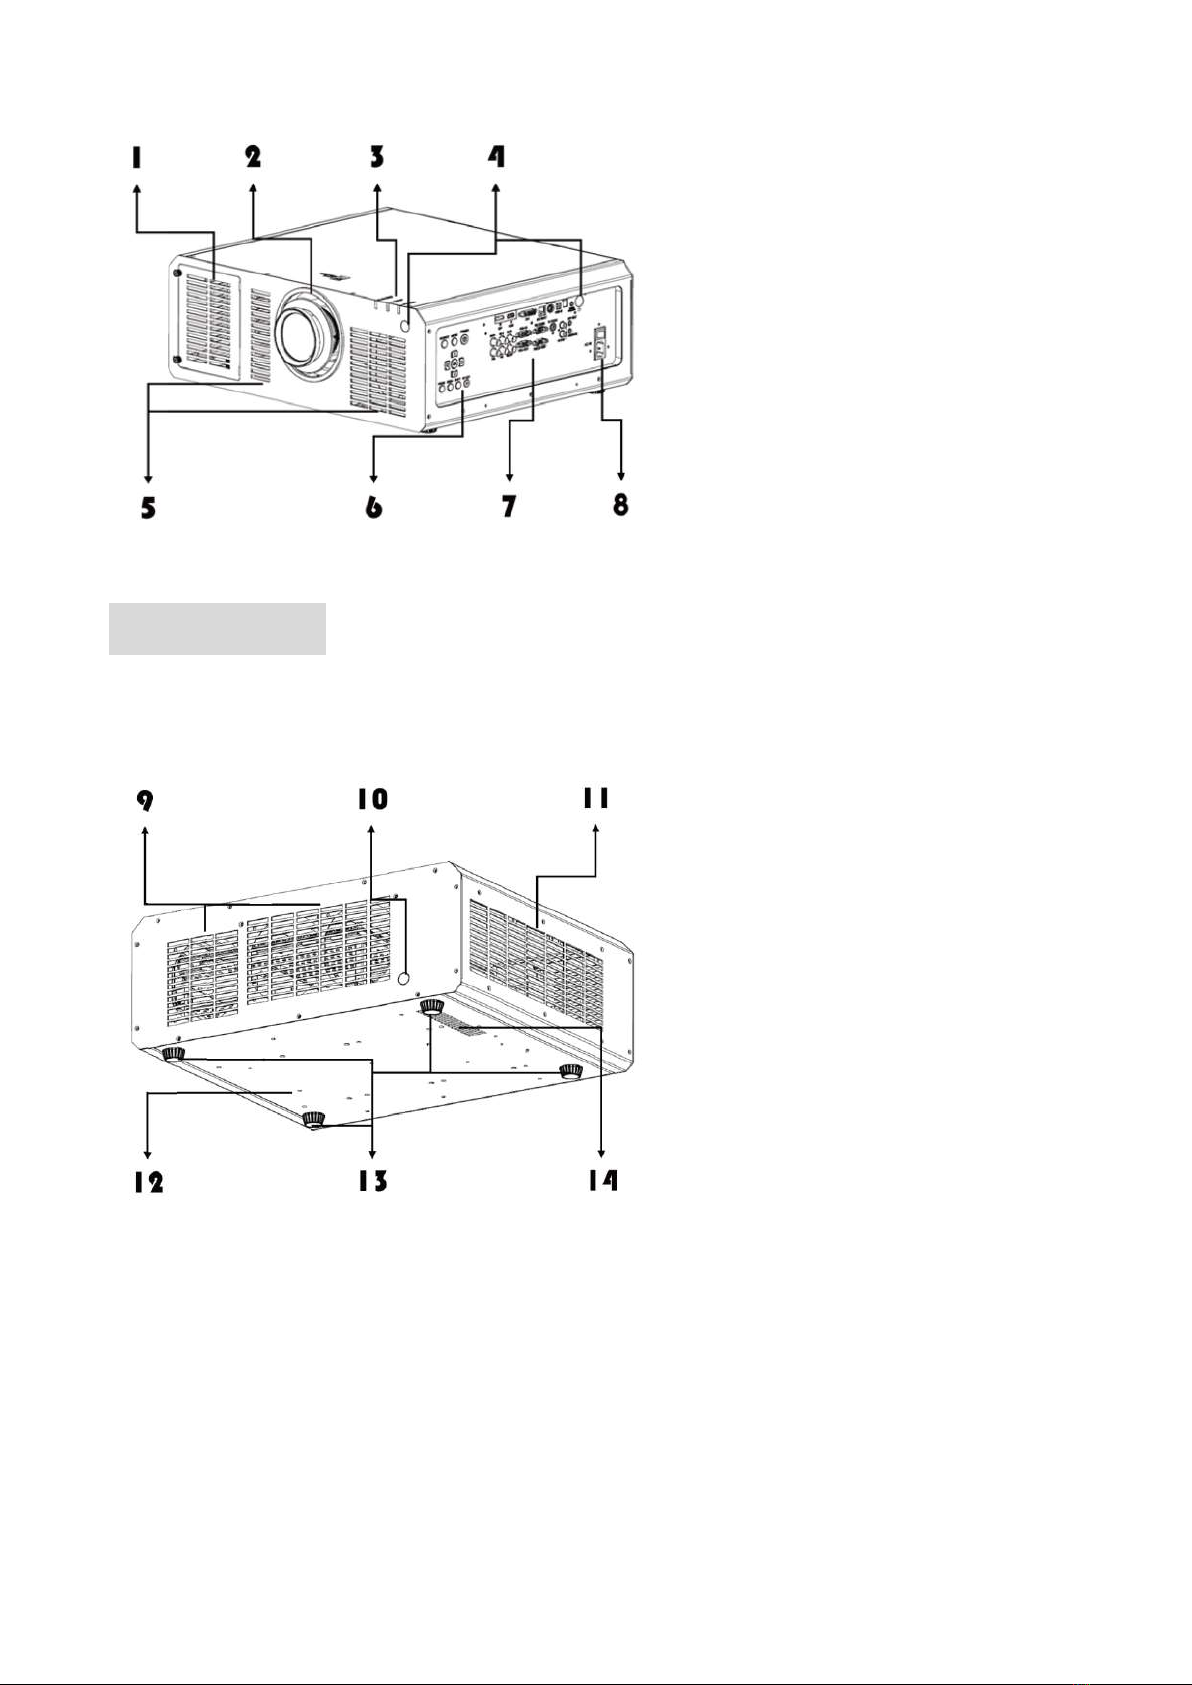
5
1 HEPA high-efficiency filter screen
2 Projection lens
3 Indicator light
4 Remote control receiver (front/side)
5 Air inlet
6 Keypad
7 Interface panel
8 Power interface/switch
Back/Bottom/Left
9 Air outlet
10 Remote controller receiver
11 Air inlet
12 Hoisting hole
13 Adjustment pin
14 Air outlet
3. Control and Function
6
Projector
1.
Warning indicator light
8.
Confirm key
2.
Temperature indicator light
9.
Focus key
3.
Power supply indicator light
10.
Zoom key
4.
Power supply key
11.
Lens displacement key
5.
OSD menu
12.
Custom key
6.
Signal selection
13.
Power switch
7.
Direction/selection key
Remote controller
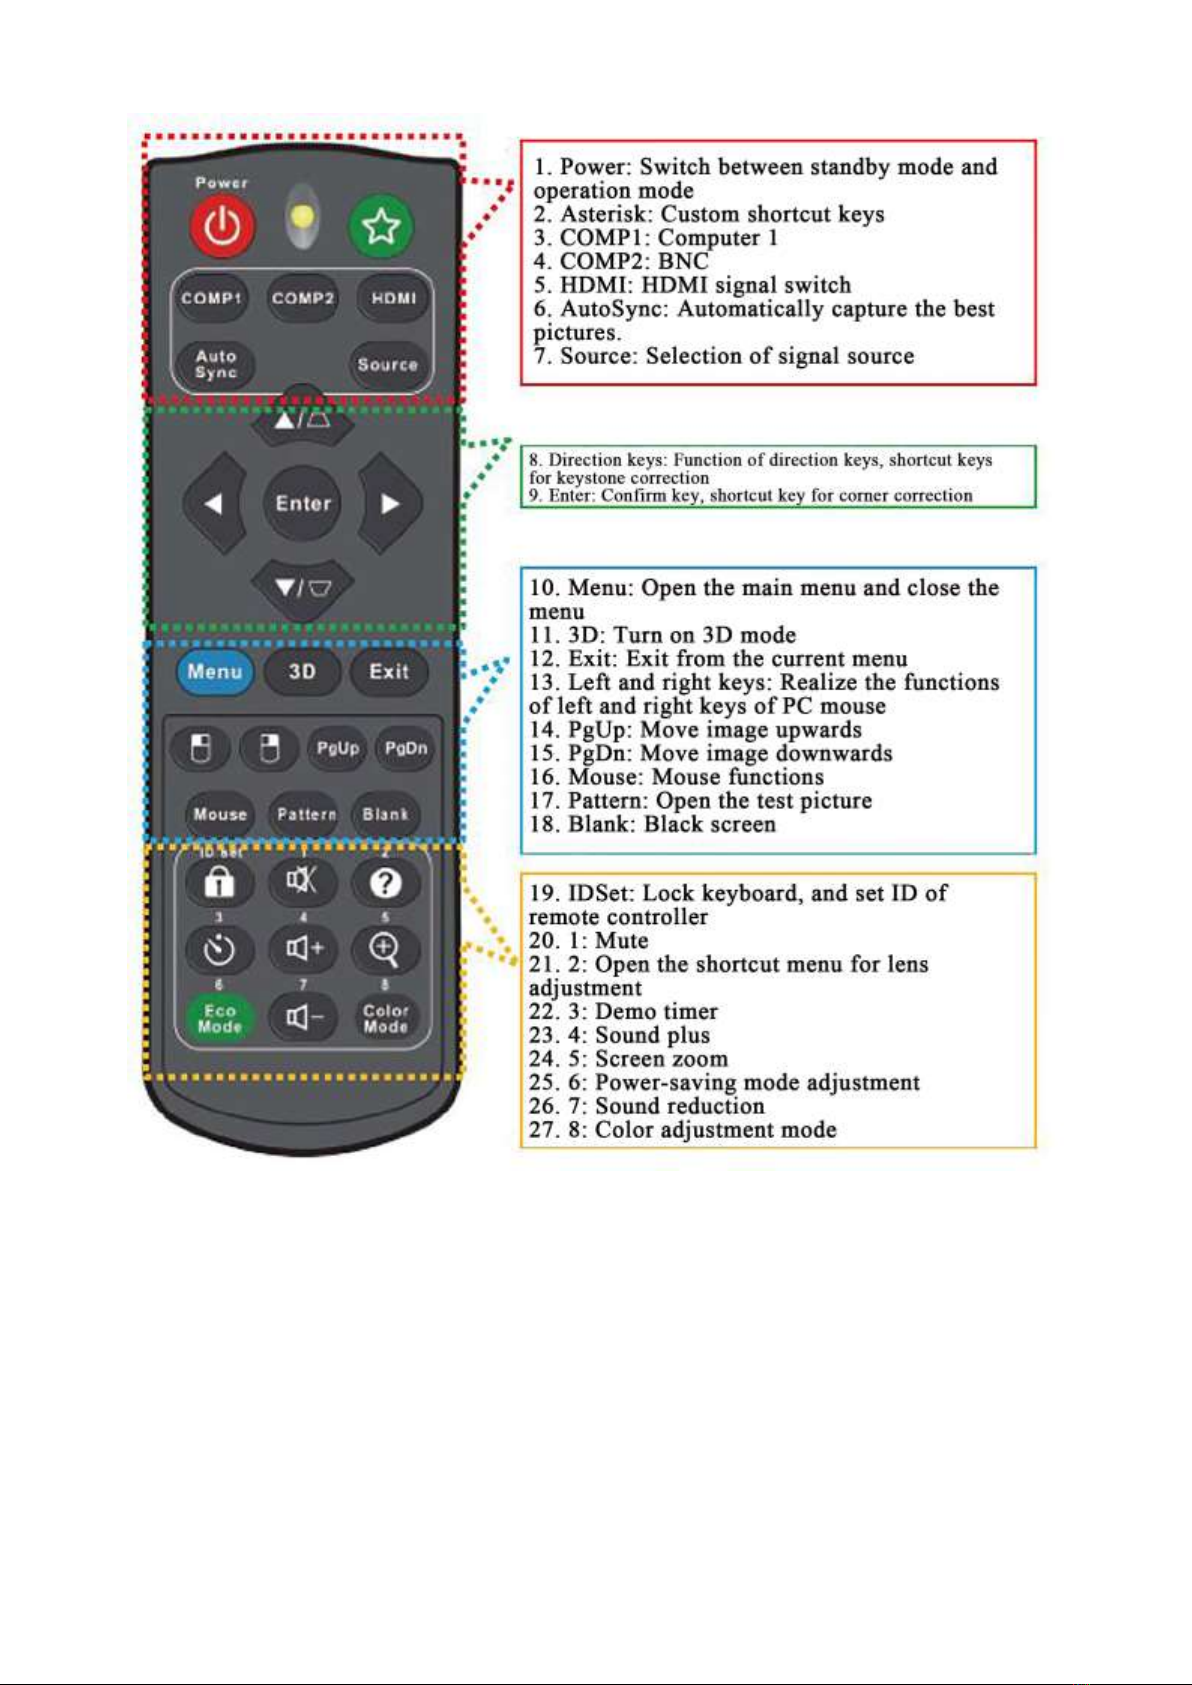
7
Infrared (IR) remote control sensors are located at front/right/rear sides of the projector. When the
remote controller is held, it is necessary to maintain an orthogonal angle between the remote
controller and the infrared remote-control sensor within 30 degrees, so that the projector can work
normally. The distance between the remote controller and the sensor must not exceed 8m (about 26
feet). Obstacles which will block the infrared beam shall not be located between the remote
controller and the infrared sensor on the projector.
- Replace the battery of the remote controller
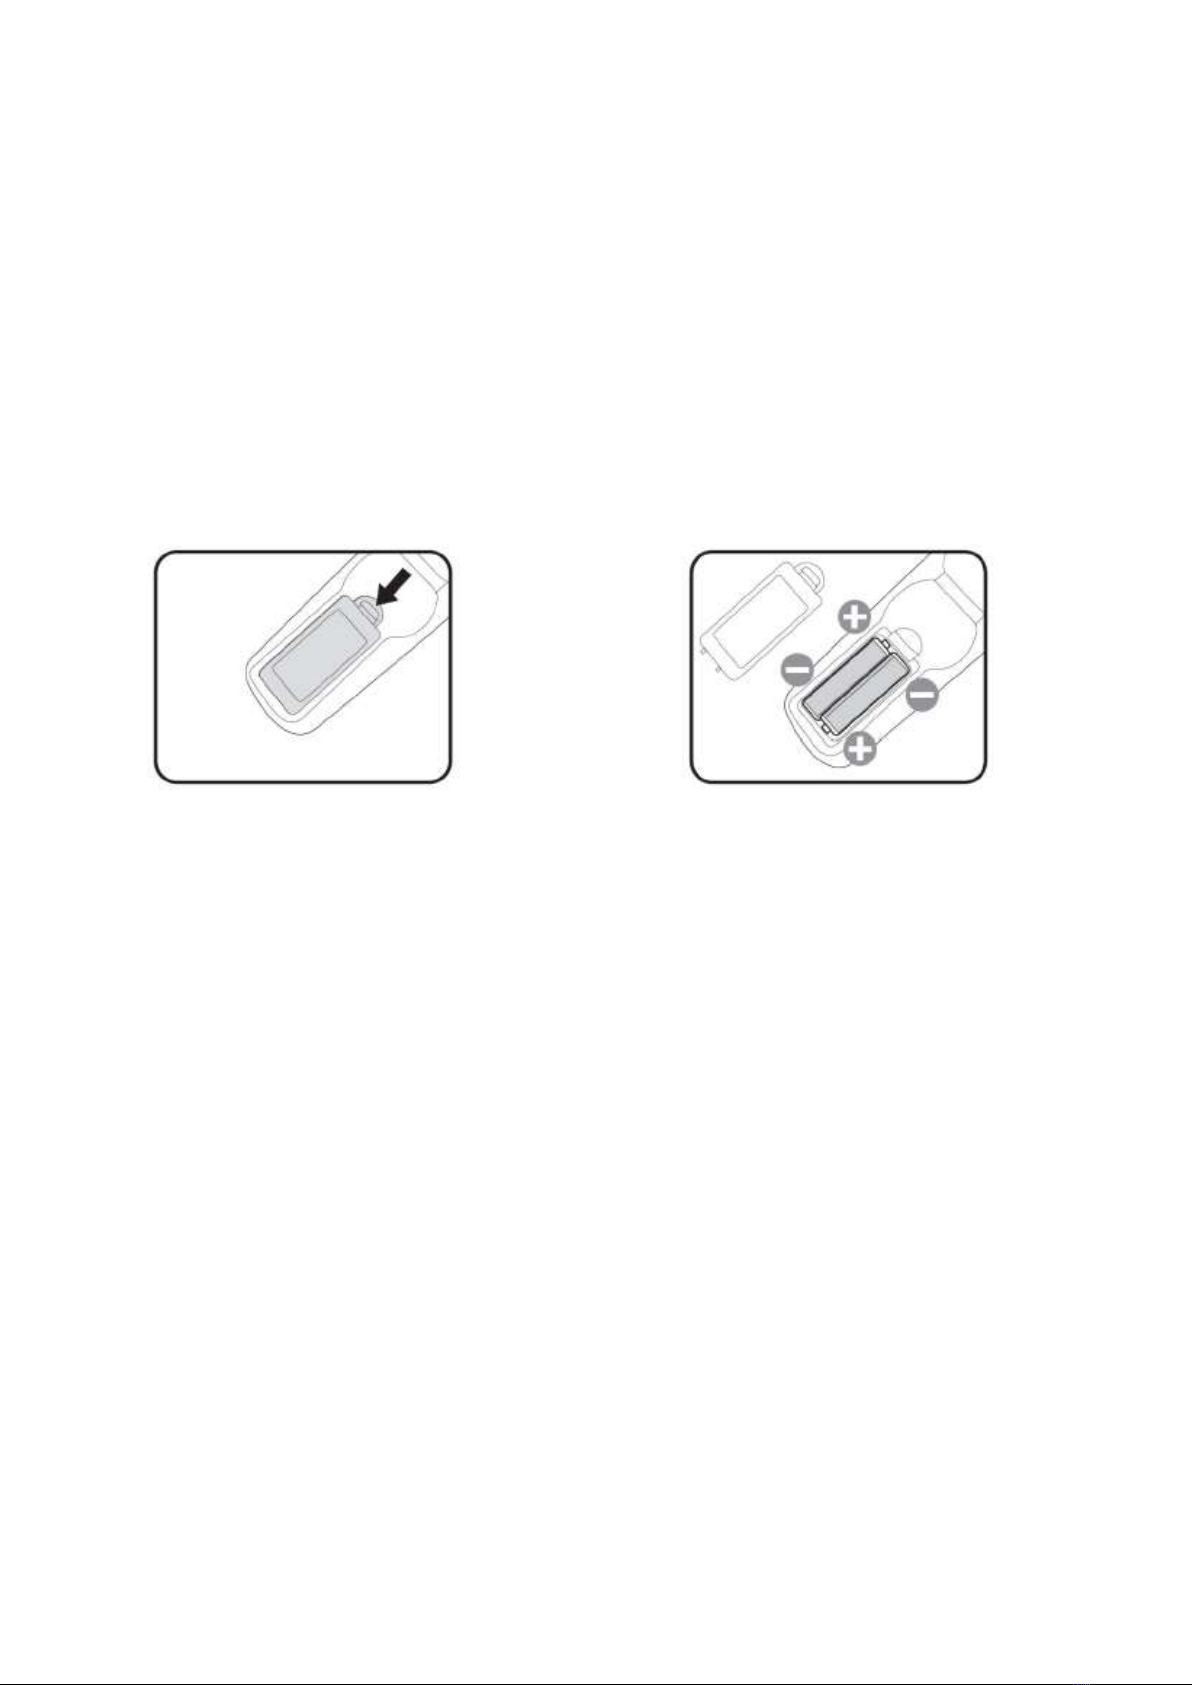
8
Open the battery cover as follows: Turn over the remote controller with the back facing up,
press and hold the handle on the battery cover with your fingers, and push the battery cover
according to the direction indicated by the arrow in figure. Open the battery cover.
Take out the existing battery (if necessary), and then put in two AAA batteries according to the
battery polarity indicated on the battery compartment. Align (+) to the positive pole and align (-
) to the negative pole.
Reinstall the battery cover on the battery compartment and push it back to its original position.
Stop pushing the battery cover after hearing a click.
Avoid overheating and overwetting
If the battery is not placed correctly, the remote controller or the battery may be
damaged.
The used batteries shall be treated according to the battery manufacturer's instructions.
Do not throw the battery into the fire, which may cause explosion hazard.
If the battery is dead or you will not use the remote controller for a long time, please take
out the battery to prevent battery leakage from damaging the remote controller.
II. Installation of Projector

9
You can choose the installation location according to your room layout or personal preference.
Factors to be considered include: the size and location of the screen, the location of an appropriate
power socket, and the location of the projector and other equipment as well as the distance between
them.
1. Placement Method
According to the design, there are four locations where the projector can be placed:
Front Desktop
When projection is carried out on the position, the projector
shall be located on the table at front of the screen. This is
the most common way to place projectors, which is fast to
install and easy to move.
Front Ceiling
When projection is carried out on the position, the projector
is hung upside down on the ceiling at front of the screen.
You can purchase a kit for suspension installation of the
projector on ceiling from the dealer, and then install the
projector on the ceiling. After the projector is started, the
mode of Front Ceiling can be set in Basic Setting Menu >
Projector Position Menu.
Rear Desktop
When projection is carried out on the position, the projector
shall be located on the table behind the screen. Please pay
attention that a dedicated rear projection screen shall be
prepared for this installation location. After the projector is
started, the mode of Rear Desktop can be set in Basic
Setting Menu > Projector Position Menu.
10
Rear Ceiling
When projection is carried out on the position, the projector
shall be hung upside down on the ceiling behind the screen.
Please pay attention that a dedicated rear projection screen
and a kit for suspension installation of the projector on
ceiling shall be prepared for this installation location. After
the projector is started, the mode of Rear Ceiling can be set
in Basic Setting Menu > Projector Position Menu.
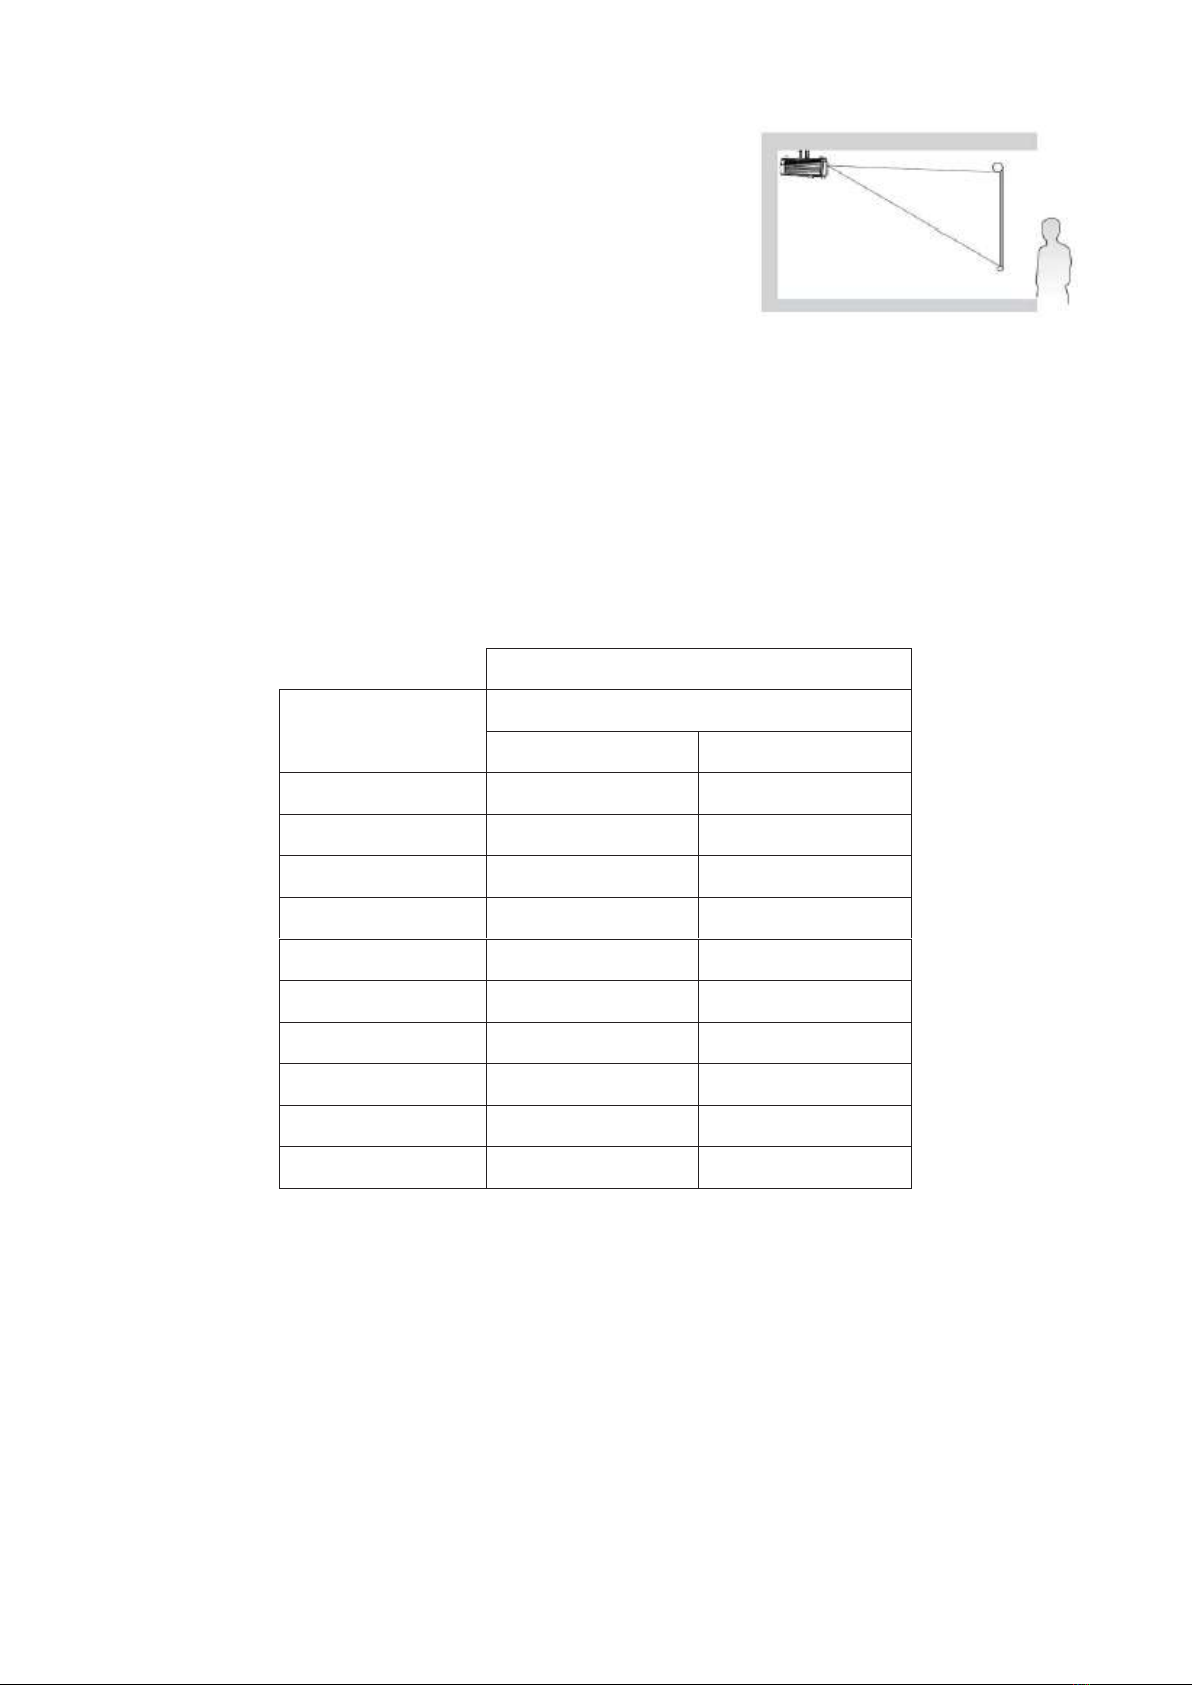
2. Projection Size/Projection Distance Relation
Projection Size/Projection Distance Comparison Table for Standard Lens with 0.65"1080P
DMD and upper offset 100%.
0.65"1080P DMD (16:9)
Projection Size
(inch)
Projection Distance (mm)
Wide
Tele
300
9321
16933
200
6119
11274
150
4638
8444
100
3077
5615
90
2765
5049
80
2452
4483
70
2140
3917
60
1828
3351
50
1516
2785
40
1203
2219
III. Connection
When the signal source is connected to the projector, the following shall be confirmed:
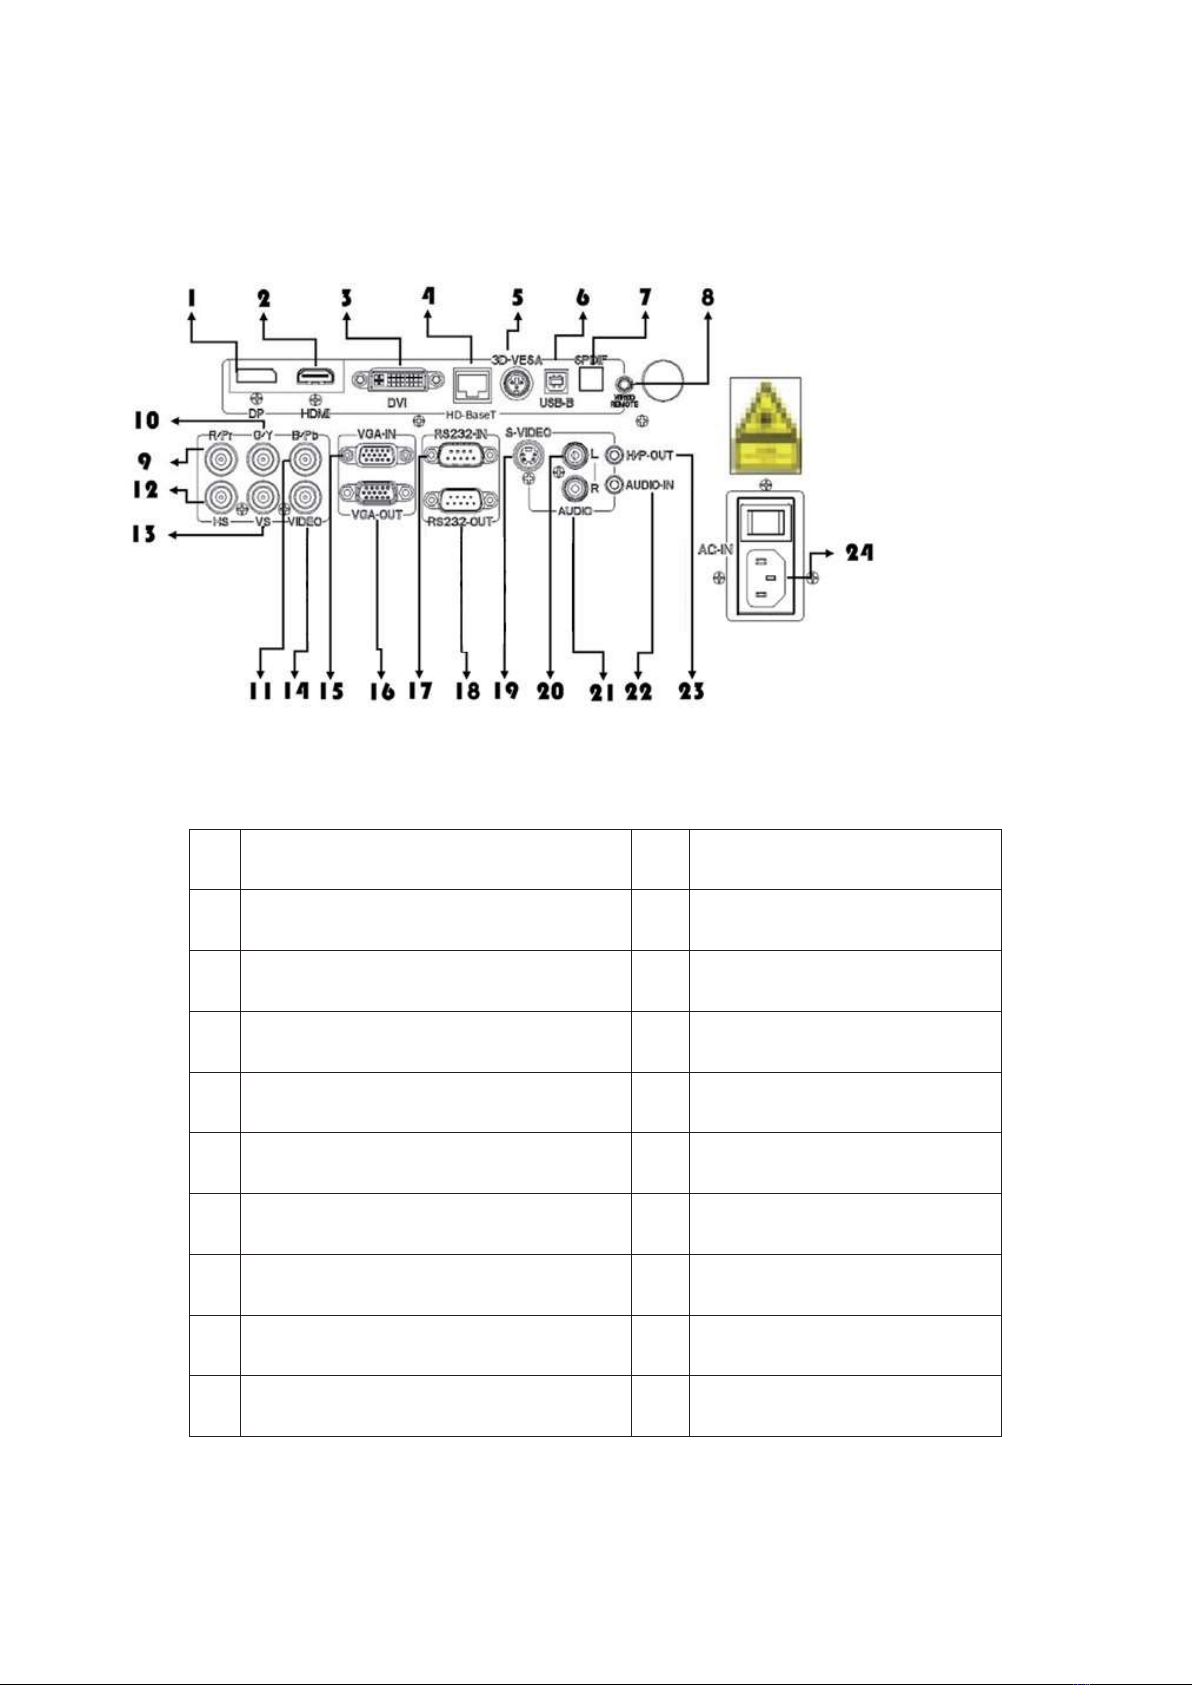
11
Shut down all equipment before any connection.
Select the correct signal line for each signal source.
Make sure the cable is firmly inserted.
1.
DP high-definition digital input interface
15.
D-SUB computer input
2.
HDMI high-definition digital input interface
16.
D-SUB computer output
3.
DVI-D digital input interface
17.
RS232 input
4.
HD-BaseT input interface
18.
RS232 output
5.
3D-VESA synchronous output interface
19.
S-VIDEO video input interface
6.
USB-B control interface
20.
Left RCA audio input
7.
SPDIF sound output interface
21.
Right RCA audio input
8.
WIREDREMOTE wire control interface
22.
3.5mm audio input
9-13
BNC video input interface
23.
3.5mm audio output
14.
VIDEO video input interface
24.
Power input interface
12
IV. Menu System
Please pay attention that OSD (on screen display) menu will vary depending on the type of signal
selected.
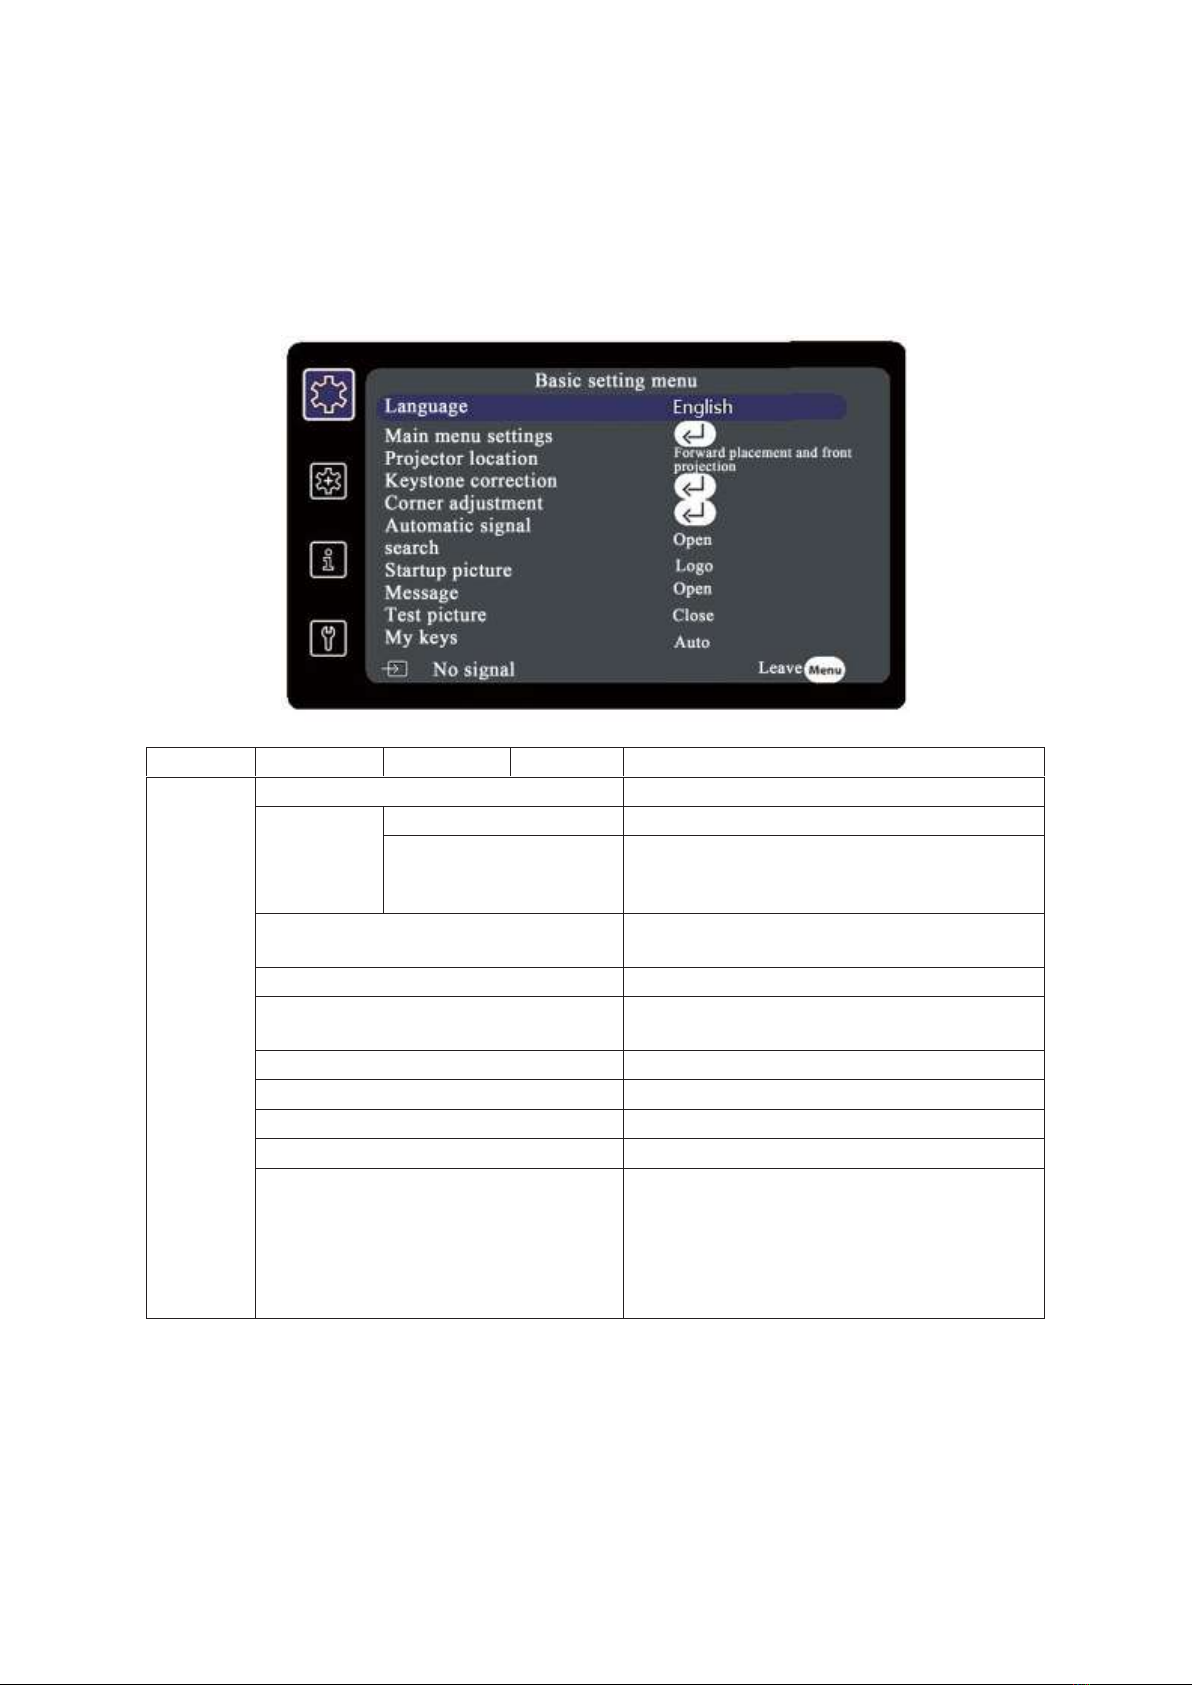
1. Basic Settings Menu
First level
Second level
Third level
Four level
Options
Basic
setting
menu
Language
English/ Simplified Chinese/Traditional Chinese
Menu settings
Menu display time
Always display/10s/20s/30s/40s/50s/60s
Menu position
Upper left corner/upper right
corner/middle/lower left corner/lower right
corner
Projector location
Front Desktop/Rear Ceiling/Front Ceiling/Rear
Desktop
Keystone distortion correction
Vertical/Horizontal -40-40
Corner adjustment
Upper left corner/upper right corner/lower left
corner/lower right corner
Automatic signal search
On/off
Startup picture
Trademark/black/white/blue
Information
On/off
Test picture
Off/1/2/3/4/5
My keys
Automatic/Projector Position/Menu
Position/Color Temperature/Brightness/Contrast
Ratio/3D Setting/Information/Automatic Signal
Search/Still/Information Menu/Image
Scale/Lens Displacement/Lens Focus/Lens
Zoom/Power Off
13
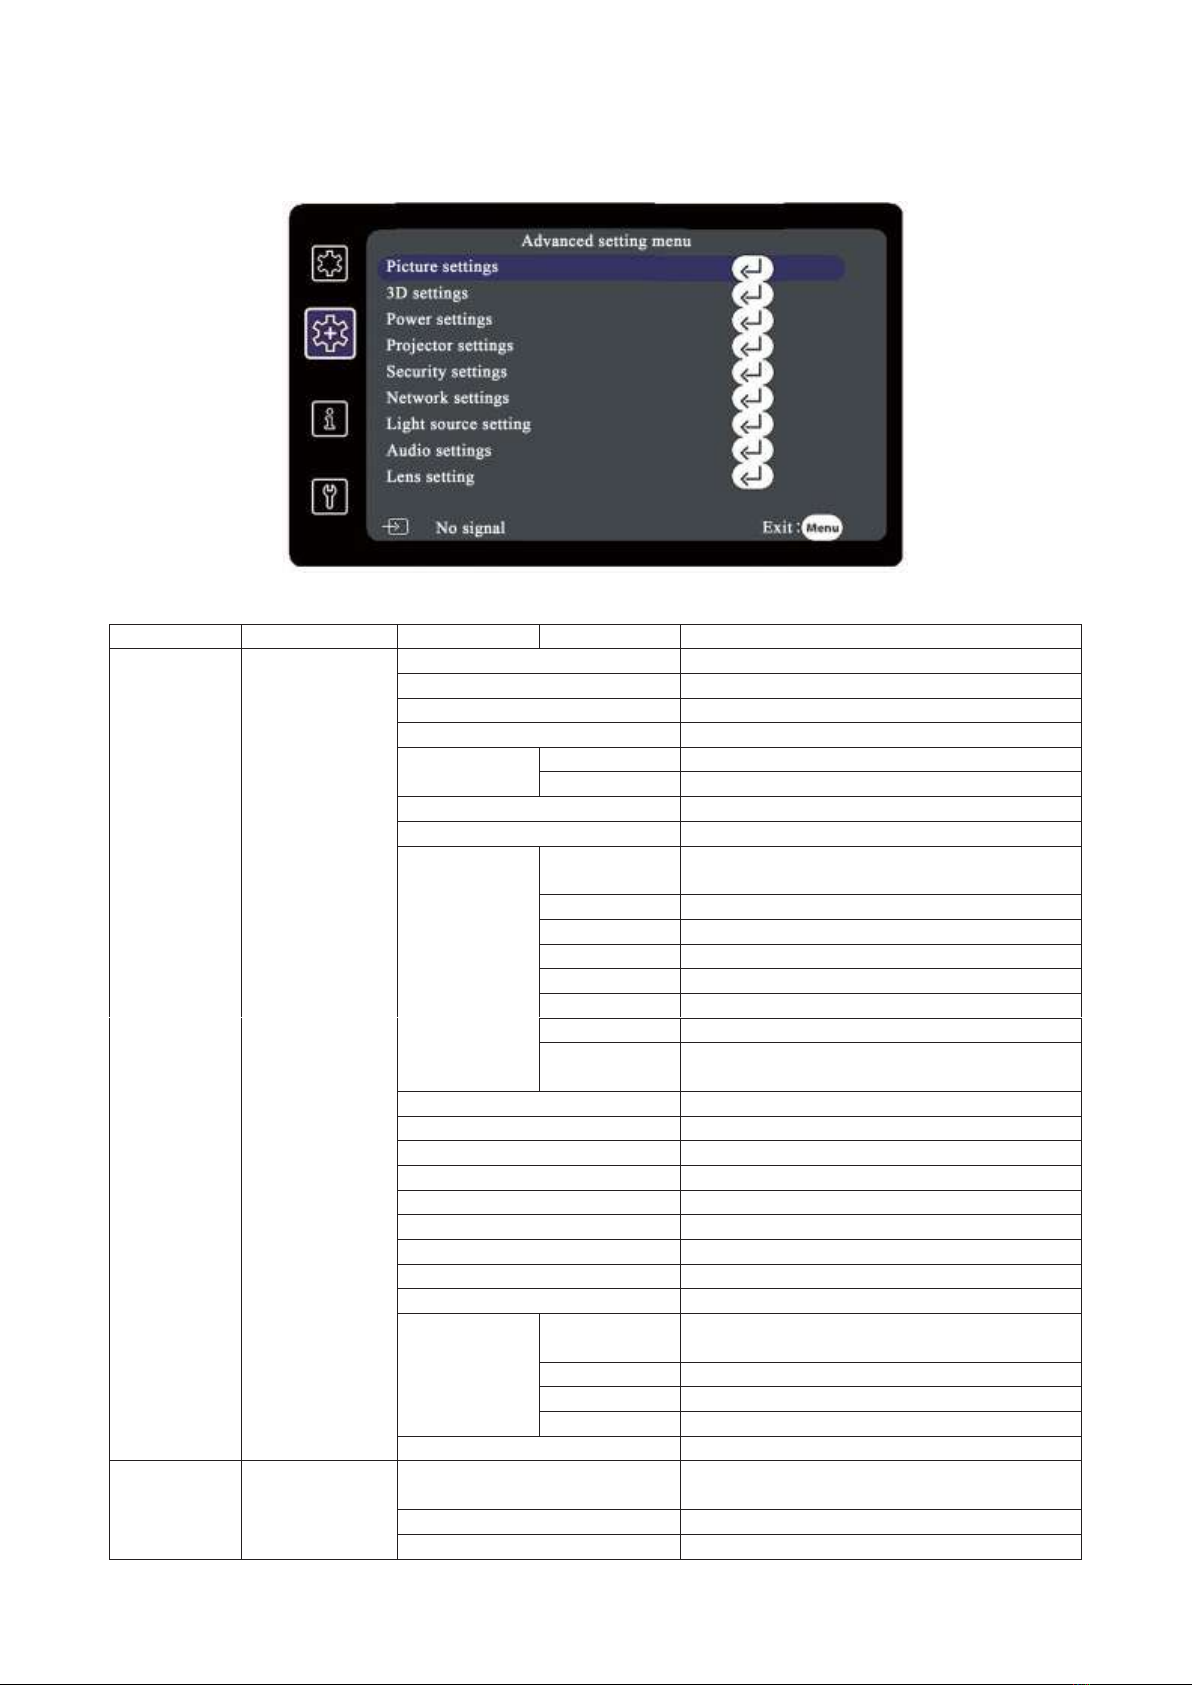
2. Advanced Setting Menu
First level
Second level
Third level
Four level
Options
Advanced
setting menu
Image setting
Color mode
Highlight/Standard/Movie/Splicing Mode
Brightness
0 - 100
Contrast ratio
0 - 100
Image scale
Auto/4:3/16:6/16:9/16:10/2.35:1
HDMI setting
HDMI format
Auto/RGB/YUV
HDMI range
Auto/Normal/Enhanced
Position
Horizontal/Vertical -5 - 5
Zoom
0.8x - 2.0x
Color
temperature
Color
temperature
Warm/Normal/Cold/Neutral
Red gain
0 - 200
Green gain
0 - 200
Blue gain
0 - 200
Red shift
0 - 100
Green shift
0 - 100
Blue shift
0 - 100
Color intensity
setting
Red/Green/Blue/Yellow 0-1024
Color
-50 - 50
Tone
-50 - 50
Sharpness
0 - 31
Reduction of image interference
0 - 31
Phase
0 - 31
Gray scale
1 - 13
White light saturation
Off/1/2/3/4/5/6/7/8/9/10
Overscan
Off/1/2/3/4/5
Closed caption
Off/CC1/CC2/CC3/CC4
Color
management
Essential color
Red/Green/Blue/Cerulean Blue
/Magenta/Yellow/
Tone
-99 - 99
Saturation
0 - 199
Gain
5 - 195
Reset of color settings
Cancel/reset
Advanced
setting menu
3D settings
3D format
Off/Split from Up to Down/Side by
Side/Frame Encapsulation/Frame Sequence
3D signal turning
Invalid/valid
Type of 3D Glasses
DLP/3D VESA
14
Power settings
High altitude mode
Invalid/valid
Screen mode
Screen mode
Invalid/valid
Screen
replacement
tips
Invalid/valid
Screen prompt
time
100/200/300/400/500
Service time of
screen
0 - 20000
Screen time
reset
Cancel/reset
Direct startup
Invalid/valid
Automatic shutdown
Invalid/valid
Fast shutdown
Invalid/valid
Green mode
Invalid/valid
HDMI CEC
Invalid/valid
Projector settings
Panel key lock
Off/On
Codes of remote controller
1/2/3/4/5/6/7/8
DCR
Off/On
Baud rate
1200/2400/4800/9600/14400/19200/38400/57
600/115200
Remote controller receiver
Invalid/Front and Back/Left and Right/All
Demo timer
Timer intervals
1-240 min
Timer display
Always display/1 min/2 min/3 min
Timer position
Upper left corner/upper right corner/lower left
corner/lower right corner
Counting
type of timer
Count backwards/count clockwise
Start counting
Off/On
Security settings
Modify passwords
Startup passwords
Off/On
Delete passwords
PPID
xxxxxxxxxx
Light source
setting
Light source mode
Normal/Power saving
Hours of light source
0 - 20000
Light source hours reset
Cancel/reset
Audio settings
Mute
Invalid/valid
Volume
0 - 20
HDMI sound output mode
All/PCM/SPDIF
Lens setting
Lens displacement
Up/Down/Left/Right
Lens focus
Left/right
Lens zoom
Up/Down
Parameter
setting
Type
Lens Displacement/Lens Focus/Lens Zoom
Motor
operation mode
Auto/Manual
Control mode
Keyboard/remote controller
Position
Up/Down/Left/Right
Operation time
0-255 ms
Waiting time
0-255 ms
Lens setting
reset
Cancel/reset

15
3. Information Menu
First level
Second level
Third level
Four level
Options
Information
menu
Signal source
VGA/BNC/DVI_D/DP/HDMI/HD-
BASET/Composite Video/S-terminal
Color mode
Highlight/Standard/Movie/Splicing Mode
Resolution ratio
1920x1080 60Hz
Color system
RGB/YUV
IP address (optional)
xxx.xxx.xxx.xxx
MAC address (optional)
xx.xx.xx.xx.xx.xx
Firmware version
Vx.xx
4. Factory Settings Menu
First level
Second level
Third level
Four level
Options
Factory
setting menu
Reset all settings
Cancel/reset
Corner adjustment and reset
Cancel/reset
Reset color settings
Cancel/reset
Screen time reset
Cancel/reset
Light source hours reset
Cancel/reset
Lens setting reset
Cancel/reset

16
V. Indicator Lights
Projector status light
Power light
Warning light
Temperature light
Standby mode
The red light always goes
on.
Close
Close
Non energy-saving
standby mode
The blue light is tunned
on for 1s and tunned off
for 5s.
Close
Close
Startup
The blue light flashes
once every 1s.
Close
Close
Normal operation mode
The blue light always
goes on.
Close
Close
Normal shutdown
The blue light flashes
once every 1s.
Close
The red light flashes
once every 1s.
The bulb fails to turn
on/off.
The blue light always
goes on.
The red light flashes
once for 1s and waits
for 2s.
Close
Service life of bulb ends
up.
The blue light always
goes on.
The red light always
goes on.
The red light always
goes on.
Fan error
The blue light always
goes on.
The red light flashes
twice for 1s and
waits for 2s.
Close
Main board temperature
error
The blue light always
goes on.
The red light flashes
once for 1s and waits
for 2s.
The red light always
goes on.
LD temperature error
The blue light always
goes on.
The red light flashes
twice for 1s and
The red light always
goes on.

17
waits for 2s.
DMD error
The blue light flashes
twice for 1s and waits for
2s.
The red light always
goes on.
The red light flashes
once for 1s and waits
for 2s.
DAD error
The blue light flashes
twice for 1s and waits for
2s.
The red light always
goes on.
The red light flashes
twice for 1s and waits
for 2s.
CW/PW error
The blue light flashes
once for 1s and waits for
2s.
The red light always
goes on.
Close
PMD1000
The blue light flashes
once for 1s and waits for
2s.
The red light always
goes on.
Close
No Lens
The blue light always
goes on.
The red light flashes
once for 1s and waits
for 2s.
The red light flashes
once for 1s and waits
for 2s.
Secret IC
The blue light always
goes on.
The red light flashes
once for 1s and waits
for 2s.
The red light flashes
twice for 1s and waits
for 2s.
Filter Hours
The blue light always
goes on.
The red light always
goes on.
Close
MTBF
The blue light flashes 3
times for 1s and waits for
2s.
The red light flashes
3 times for 1s and
waits for 2s.
The red light flashes 3
times for 1s and waits
for 2s.

18
VI. Product Specification
1. Technical Indicators
Optics
Resolution ratio
XGA: 1024*768
1080P: 1920*1080
WUXGA:1920*1200
Projection lens
Standard lens: F = 2.0~2.95, f = 20.68~37.23mm, magnification = 1.8, and projection
ratio = 1.4 ~ 2.52
(0.65 chip) alternative lens: TR: 0.65; TR: 0.8:1; TR:1.46-2.99; TR:2.9-4.7
Input interface
VGA computer input 1 (D-SUB/15 pin) × 1,
BNC*5/ (RGBHV) × 1,
Video BNC× 1,
S-terminal (Mini DIN 4 pin) × 1,
DVI-D × 1,
HDMI × 1,
DP × 1
HD BaseT × 1
Audio input left/right (RCA*2) × 1,

19
Audio input (3.5mm) × 1,
Remote controller receiver × 3
Control port
RS232 serial interface (9 pins, male) input× 1,
RS232 serial interface (9 pins, male) output× 1,
3D VESA× 1
Drive-by-wire remote controller (mini port) × 1
USB (TypeB) × 1
Environmental requirements
Operating temperature = 0°C-40°C (at sea level)
Operating relative humidity = 10%-90% (no condensing)
Operating height = 0-1499m at 0°C-35°C
1500-3000m at 0°C-30°C (on high altitude mode)
Machinery
Weight ≤26Kg
2. Overall Dimensions
462mm (length) x550mm (width) x193.5mm (height)
Excluding such protruding parts as lens and foot stand
This manual suits for next models
1
Table of contents
Other DHN Projector manuals

Popular Projector manuals by other brands


artograph
artograph Super Prism user guide

NEC
NEC LT150Z - MultiSync XGA DLP Projector Quick connect guide

Optoma
Optoma FW5200 Brochure & specs

Canon
Canon SX50 - REALiS SXGA+ LCOS Projector Specifications

Epson
Epson EB-W16SK user guide
")
Panasonic
Panasonic PT-TW341RU Operating instructions (functional manual)

Hitachi
Hitachi X308 - CP XGA LCD Projector Bedienungsanleitung

XLine Laser
XLine Laser JUNONA user manual

Hitachi
Hitachi CPX305 - XGA LCD Projector Network guide

Mitsubishi Electric
Mitsubishi Electric XD221U-G Specifications

Eiki
Eiki Projector owner's manual

Sharp
Sharp XG-PH70X - XGA DLP Projector Service manual