Diamant 4 Series User manual

40HL4330F/C
40 101cm

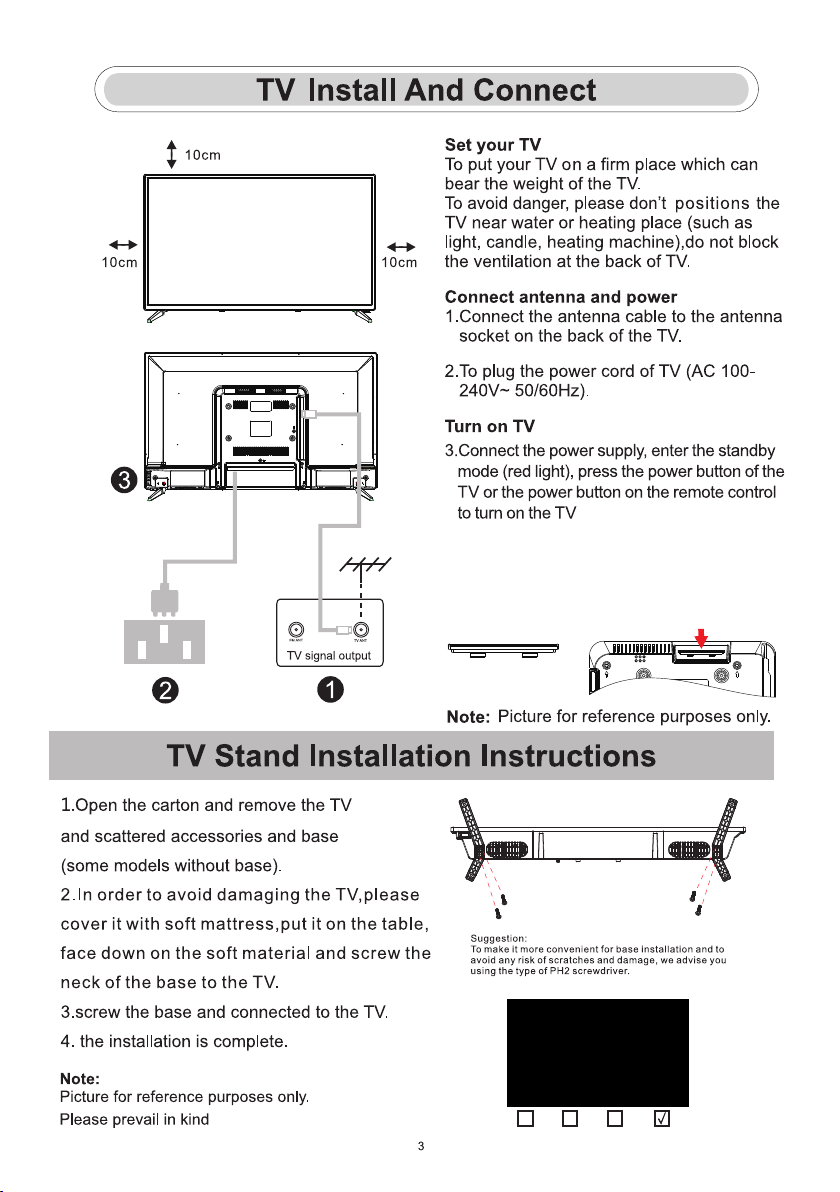
First Time Installation
HOME 5
6
9
11
INPUT 5
Initial Setup
System
Media


One key:
/
/
*Do not touch or be close to the HDMI, USB terminals, and prevent electrostatic discharge to disturb these
terminals while in USB operation mode, or it will cause the TV to stop working or abnormal status.
Seven keys:
USB
USB
PH00 PH0 PH1 PH2
X X X
Note: If the model has a CI card slot on its top, a silicone
plug for the CI card slot can be found in the accessory
bag (for models without CI card slot, there is no such
silicone plug), please insert the silicone plug into the
slot when the CI card is not in use.

First Time Installation
Please according to the Text Tip to First Time Setup.
Press 【▼】/【▲】button to select Language.
Please make sure the device has connected,
then press【▼】/【▲】/【 】/【 】button to select the primary input source
First Time Installation

HOME
HOME
Press button,you can enter HOME screen.
• You can always view the current time at the top of the Home screen.
• If your TV is connected to the Internet through a wireless connection or an Ethernet cable,then the
icon / will be displayed at the top corner of the screen.
•Manage apps
•Select the item you want to move,then press the button to manage.
Input
Press【▼】/【▲】button to select Inputs menu.
Press【▼】/【▲】/【 】/【 】button to select.
Press ENTER to select input.
INPUT

Initial Setup
Picture
Press【MENU】to enter the main menu,press【▼】/【▲】to select picture menu.
1.Press【▼】/【▲】button to select the option that you want to adjust in the PICTURE menu.
2.Press Enter button to adjust.
3.After finishing your adjustment, Press Enter button to save and return to the previous menu
Picture Mode
Press 【▼】/【▲】button to select Picture Mode, then press【▼】/【▲】&Enter button to select.
(Optional: Standard/Cinema day/Cinema night/Dynamic/Sports).
Aspect Ratio
Adjust the Aspect Ratio to stretch or zoom in on your picture.
Press ▼/▲button to select Aspect Ratio.
Press ◄ / ► button to select Automatic/16:9/4:3/Panoramic/Movie Zoom/Direct.
Game Mode
Press【▼】/【▲】to select,and press【◄】/【►】to select On/Off.
Picture Mode Settings
Press【▼】/【▲】to select,and press 【►】&ENTER to enter.

Sound
Press MENU button to display the main menu.Press 【▼】/【▲】button to select SOUND in the
main menu,
1.Press 【▼】/【▲】button to select the option that you want to adjust in the SOUND menu.
2.Press Enter button to adjust.
3.After finishing your adjustment, Press Enter button to save and return to the previous menu.
Speakers
Press 【▼】/【▲】button to select Speakers.
Press ENTER/【►】button to enter sub-menu
Network
Press MENU button to display the main menu.Press【▼】/【▲】button to select Network in the
main menu
Initial Setup
Audio Output
Press【▼】/【▲】button to select Speakers and enter, then press【▼】/【▲】button to select ARC/
TV Speaker/SPDIF Only

Press【▼】/【▲】button to select :Network Configuration/Internet Connection/Bluetooth/ Wake on
Wireless Network/Wake on LAN.
Channel
Press MENU button to display the main menu. Press【◄】/【►】button to select Channel.
1.Press 【▼】/【▲】button to select the option that you want to adjust in the Channel menu
2.Press Enter button to adjust.
3.After finishing your adjustment, Press Enter button to save and return to the previous menu.
Initial Setup
Accessibility
Press MENU button to display the main menu.
Press【◄】/【►】button to select Accessibility in the main menu.

System
Press MENU button to display the main menu.
Press【◄】/【►】button to select System in the main menu
1.Press【▼】/【▲】button to select the option that you want to adjust in the System menu.
2.Press Enter button to adjust.
3.Afterfinishing your adjustment, Press Enter button to save and return to the previous menu.
Application Settings
Press 【▼】/【▲】button to select Application Settings
System

HDMI/CEC Funtion
Press 【▼】/【▲】button to select CEC Funtion,then press Enter button to enter sub-menu to select.
Press ▼/▲button to select CEC Control/Device Auto Power On/Device Auto Power Off/
TV Auto Power On/CEC Device Lists.
Note: All the Options are available only when the CEC Control select On.
System
Advanced Settings
Press 【▼】/【▲】button to select Advanced Settings,then press ENTER / 【►】 button to enter
Support
Press 【▼】/【▲】button to select Support,then press ENTER/【►】 button to enter

Restore To Factory Default
Press 【▼】/【▲】button to select Restore To Factory Default, then press ENTER/【►】button to
enter sub-menu and select.
System
Media
Media
Press 【▼】/【▲】/【◄】 / 【►】 button to select Media on the Home page or press MEDIA
button on the remote,and press OK button to enter enter the Media Center.

Video
Press 【▼】/【▲】button to select Video or All,and press 【▼】/【▲】/【◄】 / 【►】 button to
select Movies.Press Menu button to display the setting options on the left side.
Audio
Press 【▼】/【▲】button to select Audio or All,and press 【▼】/【▲】/【◄】/ 【►】 button to
select Music.
Media
Image
Press 【▼】/【▲】button to select Image or All,and press 【▼】/【▲】/【◄】 / 【►】 button to
select Picture.

This user manual for reference only
WARNING
Never place a television set in an unstable location. A television set may fall, causing serious personal injury or death.
Many injuries, particularly to children, can be avoided by taking simpleprecautions such as:
1.Using cabinets or stands recommended by the manufacturer of the television set.
2.Only using furniture that can safely support the television set.
3.Ensuring the television set is not overhanging the edge of the supporting furniture.
4.Not placing the television set on tall furniture (for example, cupboards or bookcases).without anchoring both the
furniture and the television set to a suitable support.
5.Not placing the television set on cloth or other materials that may be located between the television set and
supporting furniture,
6.Educating children about the dangers of climbing on furniture to reach the television set or its controls.
If your existing television set is being retained and relocated, the same considerations as above should be applied.
Note:don't hang at an angle to avoid the risk of falling off.
Wall-mounted screw:22-24inch M4, 28-70inch M6, 75inch M8
LIFE TIME : 60,000 Hrs
power Consumption
36W
56W
60W/70W
Screen Size
24”
32”
39”
Main accessories
User's manual x1
Remote controller x1
Power cord x1
AAA Batteries x2 (Optional)
70W/90W
70W/80W/90W
100W
110W
42”
43”
50”
55”
120W
160W
250W
58”
65”
75”
Google, Google Play, Android TV, Chromecast built-in and other marks are trademarks of Google LLC.
70W/90W
40”
Manufactured under license fromDolbyLaboratories.
Dolby,Dolby Audio, and the double-D symbolare
trademarksofDolbyLaboratories Licensing Corporation.

Menu:DisplaystheOSD(OnScreenDisplay)
menu.
App customization:App customization (long
press under the home page)
⑤
⑨
+
-
VOL
+
-
CH
OK
SUBT
EXIT
BACK
TEXT
EPG
CH.LIST
INFO
①
②
③
⑮
⑯
⑭
⑫⑪
⑩
④
⑧
⑥
⑦
⑬
⑰⑱
⑲20
21
2223
24
25
26
27
28
①
②
③
④
⑤
⑥
⑦
⑧
⑨
⑪
⑫
⑬
⑭
⑮
⑯
⑰
⑱
⑲
POWER:Switches the TV between on and standby mode.
No effect.
MUTE:Mute or restore your TV sound.
FREE:Connects to FREE.
INFO:Displays the present channel information such as the
current time and channel name.
MEDIA:Connects to MEDIA
Inputs:Display/Select signal source options.
Navigation buttons:Cursor UP/LEFT/RIGHT/DOWN.
BACK:Press to move back through menus.
EXIT:Exit the OSD menu.
HOME:Displays the home screen.
YouTube:
Connects to YouTube (internet connection required).
NETFLIX:
Connects to NETFLIX for viewing online TV shows
and films (internet connection required).
Prime video:
Connects to Prime video (internet connection required).
0-9:Figures “0-9” are used to directly input channel number.
SUBT:SUBT.
TXT: Press to enter Teletext when play the program.
⑩
deezer:Connects to deezer.
BROWSER:Connects to BROWSER.
PLEX:Connects to PLEX.
20
VOL+/-:Press to increase / decrease the sound level.
CH+/-:Press to scan through channels.
21COLOR BUTTONS:There are related functions under EPG.
22
23EPG:EPG menu.
25
Media control:Play / Pause
24
26
CH.LIST:Channel list
28
27


1

2
This manual suits for next models
2
Table of contents


