DIGILOGIC DVDVCR User manual

Please read these instructions carefully and keep them in a safe place.
VCR/DVD player
To use the DVD player you will need to press the ‘DVD’ button on the remote control to choose DVD
mode.
To use the VCR you will need to press the ‘VCR’ button on the remote control to choose VCR mode.
The country region code for this DVD player is region ‘2’.
This player will only play discs that are labelled ‘2’ or ‘All’.
The region code is indicated on the disc and disc pac aging.
The symbol ‘ ’ will appear on the screen if you select an operation that is not available.
Please wait a few seconds and try the operation again.
If the player still displays ‘ ’ this indicates that the operation you have selected is not available on
the disc you are playing.
User’s guide
Model number DVDVCR1
P/N: 97P95600PO-52
DC-B8E11P-DA 2005.9.23 11:28 AM ˘`a

Contents
Product Information
Important Safeguards ..................................................... 1
Advantages of This Product Are .... ............................ 4
Read Carefully before sing ......................................... 5
Identification of Controls ............................................... 6
Remote Control .............................................................. 10
Installation
Setting up your player................................................... 11
Connecting your player through extra equipment
(satellite system) ............................................................12
Connecting your player to the Hi-Fi system .............13
How to connect your player to another player,
How to connect your player to a camcorder ............ 14
Connecting Dolby Digital Amp with Digital Audio
Out Jack ........................................................................... 15
2nd Scart Socket ............................................................. 16
Basic Operation
Initial Installation ........................................................... 17
Setting time and date / Auto clock ............................ 18
OSD ON & OFF / Output Select ................................ 19
DVD Playback ................................................................ 20
VCR Playback ................................................................ 21
Recording ........................................................................22
VCR Operation
Tuning in New Stations ................................................ 24
Timer Recording ............................................................ 26
More Functions .............................................................. 29
Connections and Copying ........................................... 33
DVD Operation
Playing a desired scene ................................................ 35
Confirming the current PLAY mode on screen ....... 39
Selecting an A DIO language, S BTITLE language
and 3D A DIO............................................................... 41
Selecting ZOOM and Multi Angle.............................. 42
About MP3 , JPG and MPG discs................................ 43
Displaying menus on a disc. ........................................ 47
Set-up
Language Setup.............................................................. 48
Video Setup ......................................................................50
Audio Setup..................................................................... 51
Other Setup .....................................................................52
The others
About DVD...................................................................... 54
Basic information about VCR and Videotape.......... 57
Trouble Shooting guide (VCR).................................... 58
Trouble Shooting guide (DVD) ................................... 60
Specifications .................................................................. 61
DC-B8E11P-DA 2005.9.22 9:41 AM ˘`b

1
Important Safeguards
CAUTION: TO RED CE THE RISK OF ELECTRIC
SHOCK, DO NOT REMOVE COVER (OR BACK). NO
SER-SERVICEABLE PARTS INSIDE. REFER
SERVICING TO Q ALIFIED SERVICE PERSONNEL.
CAUTION
RISK OF ELECTRIC SHOCK
DO NOT OPEN
The lightning flash with arrowhead symbol,
within an equilateral triangle, is intended to
alert the user to the presence of uninsulated
“dangerous voltage” within the product’s
enclosure that may be of sufficient magnitude
to constitute a risk of electric shock.
The exclamation point within an equilateral
triangle is intended to alert the user to the
presence of important operating and servicing
instructions in the literature accompanying the
appliance.
WARNING : TO RED CE THE RISK OF FIRE OR ELECTRIC SHOCK, DO NOT EXPOSE THIS
APPLIANCE TO RAIN OR MOIST RE.
IMPORTANT FOR LASER PRODUCTS
• LASER :
This Digital Video Disc Player employs a Laser System. To ensure proper use of this product
please read this instruction manual carefully and retain for future reference. Should the unit
require maintenance, contact an authorized service location - see service procedure.
se of control adjustments or the performance of procedures other than those specified
may result in hazardous radiation exposure.
To prevent direct exposure to the laser beam, do not try to open the enclosure. Visible laser
radiation when open and interlocks defeated.
DO NOT STARE INTO THE BEAM.
• DANGER :
Visible laser radiation when open and interlock failed or
defeated. Avoid direct exposure to beam.
• CAUTION : Do not open the top cover. There are no user
serviceable parts inside the nit; leave all servicing to
qualified service personnel.
This set complies with the EMC Di ective 89/336 and with the LVD Di ective 73/23.
CLASS 1 LASER PRODUCT
LUOKAN 1 LASERLAITE
KLASS 1 LASERAPPARAT
CA TION: Any changes or modification in construction of this device which are not expressly approved by
the party responsible for compliance could void the user’s authority to operate the equipment.
• Only use this unit in mode ate climates, not in t opical climates.
• Do not place naked flame sou ces such as candles on the unit.
• Make su e the unit is placed at least 8cm away f om the othe home appliances o obstacles in
o de to allow sufficient ventilation a ound the unit.
• This unit should not be exposed to d ips o splashes and no objects filled with liquids, such as
vases, should be placed on this unit.
• Switching it off does not disconnect it f om the mains (stand-by). To disconnect it f om the
mains, you have to unplug it.
• The system is not completely disconnected f om the mains when the / Ibutton is set to
the position.
Product information
DC-B8E11P-DA 2005.9.22 9:41 AM ˘`1

2
This set has been designed and manufactured to assure
personal safety. Improper use can result in electric shock
or fire hazard. The safeguards incorporated in this unit
will protect you if you observe the following procedures
for installation, use and servicing. This unit is fully
transistorised and does not contain any parts that can be
repaired by the user.
1 READ INSTRUCTIONS
All the safety and operating instructions should be
read before the unit is operated.
2 RETAIN INSTRUCTIONS
The safety and operating instructions should be
retained for future reference.
3 HEED WARNINGS
All warnings on the unit and in the operating
instructions should be adhered to.
4 FOLLOW INSTRUCTIONS
All operating and use instructions should be
followed.
5 ATTACHMENTS
Do not use attachments unless recommended by the
unit’s manufacturer as they may cause hazards.
6 WATER AND MOISTURE
Do not use this unit near water- for example, near a
bath tub, wash bowl, kitchen sink or laundry tub, in
a wet basement, or near a swimming pool.
7 ACCESSORIES
Do not place this unit on an unstable cart, stand,
tripod, bracket, or table. The
unit may fall, causing serious
injury to a child or adult as
well as serious damage to the
unit. se this unit only with a
cart, stand , tripod, bracket,
or table recommended by the manufacturer.
7A
A unit and cart combination should be moved
with care. Quick stops, excessive force, and uneven
surfaces may cause the product and cart
combination to overturn.
8 VENTILATION
Slots and openings in the case are provided for
ventilation to ensure reliable operation of the unit
and to protect it from overheating. These openings
must not be blocked or covered. These openings
must not be blocked by placing the unit on a bed,
sofa, rug, or other similar surface. This unit should
never be placed near or over a radiator or heat
radiator. This unit should not be placed in a built-in
installation such as a bookcase or rack unless proper
ventilation is provided or the manufacturer’s
instructions have been adhered to.
9 POWER SOURCES
This unit should be operated only from the type of
power source indicated on the rating label. If you are
not sure of the type of power supply to your home,
consult your dealer or local power company. For
units intended to operate from battery power, or
other sources, refer to the operating instructions.
10 MAINS PLUG
We have fitted this unit with a standard mains plug.
• If the mains lead gets damaged it must be replaced
by a qualified service agent with an approved lead
of the same type.
• If the plug is cut off, remove the fuse from the plug
and get rid of it safely, as if you put it into a supply
socket it would be dangerous.
• If you change the plug because the standard plug
is damaged or unsuitable, please destroy the old
plug as it would be dangerous if plugged into a
live power outlet. Follow the wiring instructions
supplied with the new plug.
11 POWER-CORD PROTECTION
You must make sure the mains lead cannot be
walked on, crushed, chafed, cut, and so on.
12 LIGHTNING
For added protection for this unit during a lightning
storm, or when the unit is left unattended and
Important Safeguards
PORTABLE CART WARNING
(symbol provided by RETAC)
DC-B8E11P-DA 2005.9.22 9:41 AM ˘`2

3
Important Safeguards
unused for long periods of time, unplug it from the
wall outlet and disconnect the antenna or cable
system. This will prevent damage to the unit due to
lightning and power line surges.
13 DISC TRAY
Keep your fingers well clear of the disc tray as it is
closing.
14 OBJECT AND LIQUID ENTRY
Never push objects of any kind into this unit
through openings as they may touch dangerous
voltage points or “short-out” parts that could result
in a fire or electric shock. Never spill liquid of any
kind on the unit.
15 BURDEN
Do not place a heavy object on or step on the
product. The object may fall, causing serious
personal injury and serious damage to the product.
16 DISC
Do not use a cracked, deformed or repaired disc.
These discs are easily broken and may cause
personal injury and product malfunction.
17 DAMAGE REQUIRING SERVICE
nplug this unit from the wall outlet and refer
servicing to qualified service personnel under the
following conditions.
A. When the power-supply cord or plug is
damaged.
B. If liquid has been spilled, or objects have fallen
into the unit.
C. If the unit has been exposed to rain or water.
D. If the unit does not operate normally by
following the operating instructions. Adjust
only those controls that are covered by the
operating instructions. Improper adjustment of
other controls may result in damage and will
often require work by a qualified technician to
restore the unit to its normal operation.
E. If the unit has been dropped or the cabinet has
been damaged.
18 REPLACEMENT PARTS
When replacement parts are required, have the
service technician verify that the replacements he
uses have the same safety characteristics as the
original parts. se of replacements specified by the
unit manufacturer.
19 SAFETY CHECK
pon completion of any service or repairs to this
unit, ask the service technician to perform safety
checks recommended by the manufacturer to
determine that the unit is in safe operating
condition.
20 HEAT
The product should be situated away from heat
sources such as radiators, stoves, or other products
(including amplifiers) that produce heat.
21 NORMAL USE
This product is only designed for household or
similar general use. Any other use may invalidate
the guarantee and could be dangerous.
MAINS FUSE IN THE UK
If you use a 13 amp (BS 1363 type) plug, you must have
a 3 amp (BS1362 type) fuse fitted. For any other type of
plug or connection, you must fit a fuse rated between 3
and 5 amps in the mains plug or adapter, or at the fuse
box feeding this unit.
EUROPEAN SYMBOLS
This unit is double insulated and
an earth connection is not
required.
This unit complies with
European safety and electrical
interference directives.
Product information
DC-B8E11P-DA 2005.9.22 9:41 AM ˘`3

4
Advantages of This Product Are
• DVD, VCD, CD, CD-R(MP3), CD-RW, VHS
• Watching DVD and eco ding b oadcasts
• Integ ated emote cont ol (VCR, DVD)
• VISS function
• Multiplex sound playback/ eco d
• High Sound Quality of 6 head Hi-Fi
• Simple eco d function
• MP3 file playback function (CD-R disc having
eco ds of MP3 files)
• GUI (G aphical Use Inte face) th ough OSD
(On Sc een Display)
By using the [DISPLAY] button on the emote
cont ol, info mation on the DVD/VCD/CD playe
and disc, can be displayed on the TV sc een.
• Sc eensave function (DVD)
• 3D sound (3D sound effect using 2 speake s)
• High bit / High sampling with 27MHz / 10bit
video encode
• High bit / High sampling with 96MHz / 24bit
Audio D/A Conve te
• Coaxial, Optical digital Audio output (PCM,
Dolby Digital, dts)
You can enjoy high-level digital audio by
connecting with an amplifie embedded with
Dolby Digital / dts decode .
• Built-in Dolby Digital decode (DVD)
• Analog audio 2-channels output fo
DOWNMIX (x1)
• Composite video output (x1)
• Slow Fo wa d / Reve se playback (DVD)
• Fast Fo wa d / Reve se playback
• Sea ch of title, chapte , and time in DVD disc,
and sea ch of time and t ack time in VCD
• Va ious TV aspect (DVD)
4:3 fo Pan and Scan, 4:3 fo Lette Box, and 16:9 fo
Wide
• Repeat playback (title, chapte , and pa t fo
DVD/ t ack, disc, and pa t fo VCD/CD)
• Selective Play (DVD/VCD/CD)
You can select and play the desi ed title / chapte
of DVD and t ack of Video CD/CD in STOP mode.
• 6 languages OSD (On Sc een Display)
function (DVD)
You can select and display OSD in 6 languages.
(E / F / S/ G/ I / D)
• Pa ental Lock function (DVD)
This function can p event playback of softwa e
that may be unsuitable fo child en.
• Multi Audio function (DVD)
The audio soundt ack can be hea d in up to 8
languages. In the case of SVCD o VCD, it depends
on the disc. (The numbe of audio languages
depends on the softwa e.)
• Multi Subtitle function (DVD)
The subtitle can be seem in up to 32 languages. In
the case of SVCD o VCD, it depends on the disc.
(The numbe of subtitle languages depends on the
softwa e.)
• Multi Angle function (DVD)
This function allows you to choose the viewing
angle of scenes which we e shot f om a numbe of
diffe ent angles. (The numbe of angles depends
on the softwa e.)
• Sc een zoom function (DVD/VCD)
DC-B8E11P-DA 2005.9.22 9:41 AM ˘`4

5
Read Carefully before Using
Cautions in use of DVD-Video player are described below.
Please read carefully before using a DVD-Video player.
✔Installation place and handling
• When you place this playe nea othe devices,
they may affect poo ly togethe .
•
When you place DVD-Video playe above o below
a TV, it may cause flicke ing of pictu es o failu e
(tape is not ejected).
• When you place this playe nea st ong magnetic
mate ials, it may affect image o voice poo ly o
damage eco ding.
•
Do not spill volatile liquids like insect sp ay ove
the playe . Do not leave ubbe o plastic p oducts in
contact with the playe fo a long time. They will
cause dete io ation o paint to peel-off.
✔Not in use
• When the unit is not in use, be su e to emove the
disc o tape and tu n off the powe .
•
If you do not use the unit fo a long pe iod, emove
batte ies in emote cont ol to p event leakage.
• If you don’t use the unit fo a long time, the unit
may not function p ope ly in the futu e. Tu n on
and use the playe occasionally.
✔Moving
• Repack the unit as it was o iginally packed at the
facto y. Alte natively, pack this p oduct with
towel to p event t ansit damage.
• Eject any videotape.
✔Cleaning
• Dust off di t in cabinet o cont ol panel pa t
smoothly with a soft cloth.
• Fo heavy di t, soak the cloth in a weak dete gent
solution, w ing it well and wipe. Use a d y cloth
to wipe it out.
• Follow inst uctions in using chemical cleane s.
• Do not use any type of solvent such as gasoline o
benzene, as they may cause dete io ation o paint
to peel-off.
✔Checking
• The video is a high p ecision device. To obtain a
clea pictu e, we ecommend egula inspection
and maintenance eve y 1,000 hou s of use by
technical enginee s.
• Fo checking, contact you deale o you nea est
se vice cent e.
✔Checking and Replacement of Antenna
• The antenna is subject to change in its di ection
o damage by wind and ain. Fo a clea pictu e,
contact and consult you nea est ae ial igge
about checking and eplacement.
✔Reco ding impo tant pictu es
•
Be su e to eco d the sc een and check whethe
eco ding is pe fo med p ope ly. Bad eco dings
can esult if using poo quality tapes.
✔Copy ight
• Do not use you eco dings without pe mission
of a copy ighte except pe sonal usage.
✔Tape and Disc Handling
•
Do not use any tape and disc in conditions listed
below. Damage of video head o cut/coiling of tape
may cause failu e.
- Tape with mold
- Tape o disc stained with juice o food pa ticles
- Tape having b eakage connection
- Disassembled tape
- Disc with seve e sc atch
• Moistu e condensation may occu on tape.
Moistu e condensation damages the tape. Only
use the tape afte the moistu e condensation has
disappea ed.
• Afte use, sto e tape ve tically in a case to
p event the tape f om becoming loose.
• Do not sto e in the following places.
- High tempe atu e and humidity
- Subject to gene ation of mold
- Subject to di ect sunlight
- In di t o dust
-
Nea st ong magnetic mate ials such as a speake
Product information
DC-B8E11P-DA 2005.9.22 9:41 AM ˘`5

6
Identification of Controls
!
POWER (STANDBY/ON) button
se to power the device on/off if AC power supply
is connected.
@
Place to inse t videotape
#
Disc t ay
$
VIDEO INPUT jack
%
AUDIO INPUT jack
^
EJECT button
&
RECORD button
*
P og amme Down/Up button
(
Ope ation Display Window
Display operation of device. For more information,
see “Operation Display Window” in 7p.
)
SELECT button
se to change DVD mode to VCR mode, and vice
versa.
1
STOP button
se to stop playing.
2
REWIND button
se to rewind currently being played, videotape or
disc; or to review.
3
Playback/PAUSE button
Playback videotape or disc.
Press this button to pause a screen.
4
FAST FORWARD button
se to wind currently being played videotape or
disc; or to playback rapidly.
5
OPEN/CLOSE T ay button
!
%& * )123 4 5
^
@#
$(
Main body (front panel)
DC-B8E11P-DA 2005.9.22 9:41 AM ˘`6

7
Identification of Controls
Timer Recording Standby
Timer Recording Error
Recording in Progress
Timer Recording in
Progress
Recording Pause
Repeat one chapter [DVD]
Repeat track [VCD]
Repeat title [DVD]
Repeat ALL [VCD]
Repeat a defined period
from A [DVD, VCD]
Repeat a defined period
from A to B [DVD, VCD]
- RECORDING MODE - - REPEAT MODE -
DVD playback
Fast playback
Fast reverse playback
Slow playback
Pause picture
- DVD OPERATION -
VCR playback
Fast forward
Rewinding
Fast playback (CUE)
Fast reverse playback
(REVIEW)
Slow playback
Still picture
Stop
Child Lock
- VCR OPERATION -
Operation Display Window
Product information
DC-B8E11P-DA 2005.9.22 9:42 AM ˘`7

8
Identification of Controls
!#
*&
^
@$
%
!
POWER CORD
It is a jack fo supplying powe to the unit.
Connect to outlet in a wall.
@
EURO AV2/DECODER sca t socket
#
VIDEO OUTPUT phono socket
$
AUDIO OUTPUT phono socket
%
DIGITAL OUTPUT (OPTICAL/COAXIAL) Jack
To enjoy sound quality of theat e level in home,
connect this jack with amp o unit embedded
with digital audio decode .
^
Connection to ANTENNA Cable
&
Connection to TV
*
EURO AV1 sca t socket
Main body (Rear Panel)
✔
Disposal of Used Electrical &Electronic Equipment
The meaning of the symbol on the product, its accessory or packaging indicates that
thisproduct shall not be treated as household waste. Please, dispose of this equipment at your
applicable collection point for the recycling of electrical & electronic equipments waste. In the
European nion and Other European countries which there are separate collection systems
for used electrical and electronic product. By ensuring the correct disposal of this product,
you will help prevent potentially hazardous to the environment and to human health, which
could otherwise be caused by unsuitable waste handling of this product. The recycling of
materials will help conserve natural resources. Please do not therefore dispose of your old
electrical and electronic equipment with your household waste. For more detailed
information about recycling of this product, please contact your local city office, your
household waste disposal service or the shop where you purchased the product.
DC-B8E11P-DA 2005.9.22 9:42 AM ˘`8
9
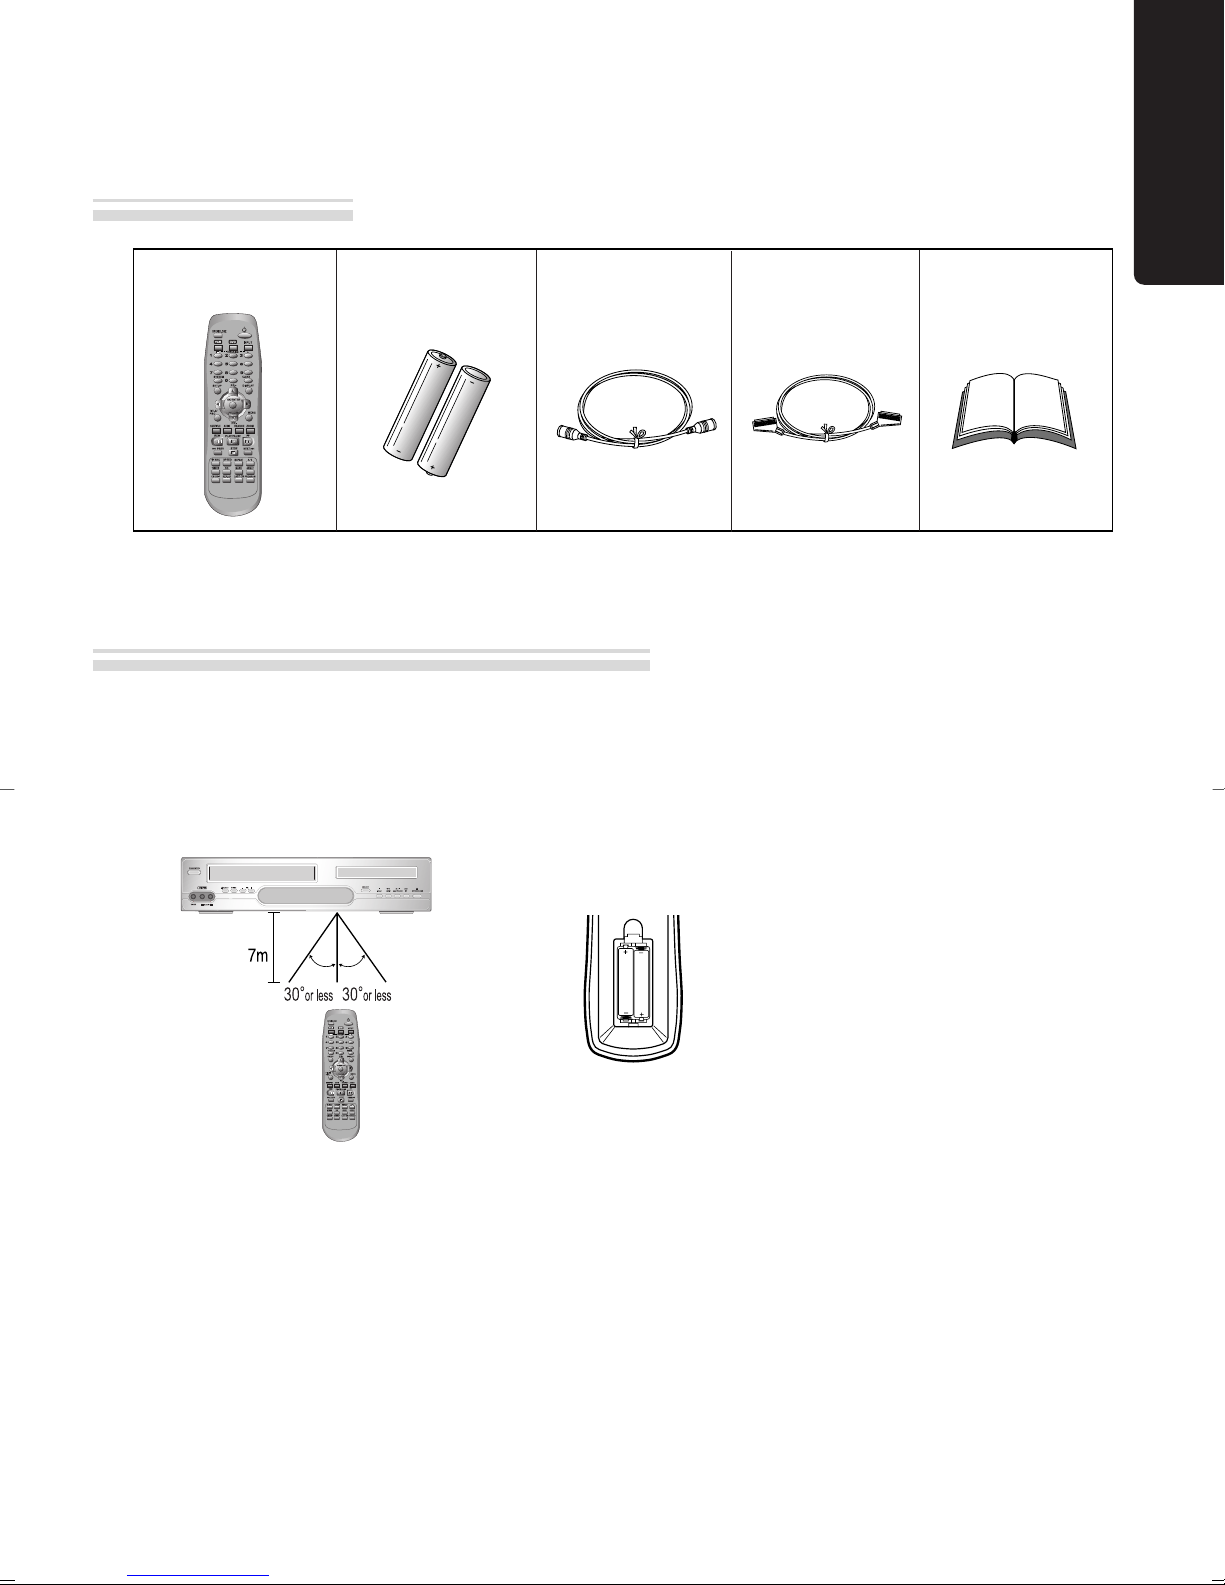
Identification of Controls
Remote cont ol 2 Batte ies RF cable Sca t cable Inst uction
Manual
• To purchase accessories or not supplied additional parts, contact your nearest dealer or service centre.
N.B.: Owner’s manual and warranty are not sold additionally.
• Ope ate emote cont ol within 7m f om the unit.
• Do not p ess 2(two) buttons at the same time.
• Excessive sun light falling on the emote eceive may cause the emote cont ol to become inope ative.
• Do not keep in the place with much dust and humidity.
Instructions in using REMOTE
Accessories
AAA
AAA
✔
Remote control battery installation
Detach the batte y cove on the ea of the
emote cont ol, and inse t two AAA
batte ies with the + and - ends aligned
co ectly.
Two “AAA”
batteries
(supplied).
Product information
✔
Caution
• Dange of explosion if batte y is inco ectly eplaced.
• Fo the best pe fo mance we ecommend the use of “Alkaline” batte ies. Do not use echa geable
batte ies.
• When installing the batte ies please obse ve the co ect pola ity as indicated in the batte y
compa tment.
• If the unit is not being used fo a long pe iod of time emove the batte ies, as batte ies may leak and
cause damage.
• When eplacing batte ies eplace all the batte ies at the same time with the same type, neve mix old
and new batte ies.
• Dispose of used batte ies safely.
DC-B8E11P-DA 2005.9.22 9:42 AM ˘`9

10
Remote Control
!
#
@
$
%
^
&
(
)
2
4
5
7
9
“
#
‘
=
q
w
eR
r
T
Y
0
+
E
y
W
Q
*
3
1
6
8
!
[DVD] OPEN/CLOSE button, [VCR] EJECT button
@
VCR SELECT button
#
[DVD, VCR] NUMBER button, [VCR] TRACKING -/+
button
$
SYSTEM button (This button is not available fo this set)
%
SETUP button
^
[DVD, VCR] MOVE/SELECT in OSD, [VCR] Channel
Up/Down button
&
[DVD] TITLE /PBC button
*
[DVD] AUDIO LANGUAGE Select, [VCR] AUDIO Select
button
(
[DVD] SUBTITLE Select button
)
REVERSE SEARCH button
1
PLAY/PAUSE button
2
[DVD] PREVIOUS button (move into a p evious chapte
o t ack)
3
[VCR] Reco d SPEED button
4
[VCR] Reco d button
5
[VCR] TV/VCR button
6
[DVD] 3D button
7
[VCR] CM SKIP
8
[VCR] Replay button
9
POWER button
0
DVD SELECT button
“
[VCR] INPUT Selection button
‘
CLEAR button
+
[DVD, VCR] OSD DISPLAY button
=
OK/ENTER button
Q
[DVD] MENU button
q
[DVD] Chapte /Title/Time SEARCH button
W
[DVD] ZOOM button
w
FORWARD SEARCH button
E
STOP button
e
[DVD] NEXT button (Move into a next chapte o t ack) ,
[VCR] F ame Advance button in pause mode
R
[DVD] REPEAT Playback button
r
[DVD] REPEAT a defined pe iod f om A to B button
T
[DVD] ANGLE button
[DVD] MARK button
Y
[DVD, VCR] PROGRAMME button
y
[VCR] LAST CHANNEL button (Retu n to the p evious
TV channel which was being watched.)
Press the power [ ] button of the remote for about
5 seconds. No buttons of front panel can be operated
now and ock indicator (“ ”) will be
displayed on window display. To release child lock,
press any button on the remote control.
POWER ON
Player will POWER ON if any button on the
remote control is pressed.
Child ock !
DC-B8E11P-DA 2005.9.22 9:42 AM ˘`10

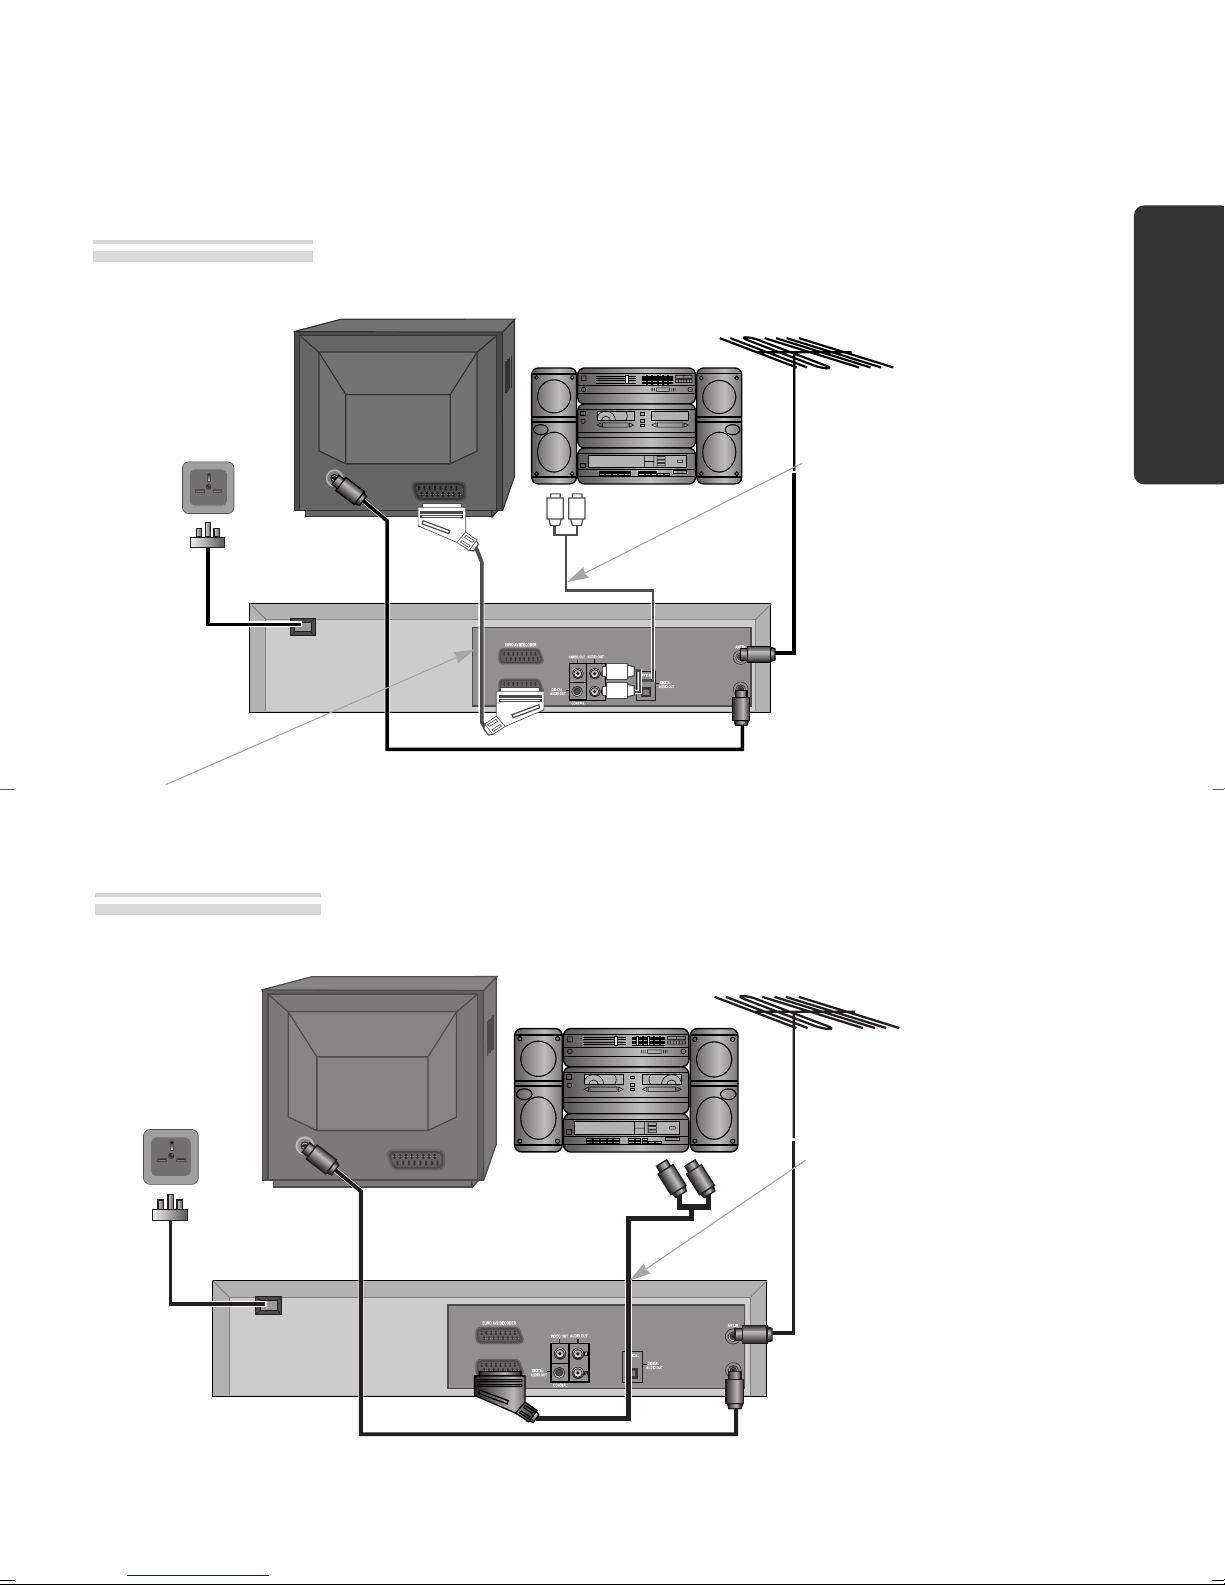
11
Setting up your player
With this connection, if your player is receiving CH BBC1 and your TV is displaying CH3, when you press the
[TV/VCR] button on the remote control, your TV will automatically display the CH BBC1. “VCR” will be
shown in the display.
In this mode, to change the viewing channels the [PR-] and [PR+] buttons on the player remote need to be used.
To switch off this mode press [TV/VCR] on the remote control, TV remote can now be used as normal. You will
get better pictures and sound quality if you connect your player using a scart lead.
■Before you start, unplug all the equipment from the mains supply.
Television
Ae ial
The type of aerial you
should use, depends on
local interference and how
far you are from the
transmitter. You should
contact a local retailer if you
have any questions about
your aerial.
Back view of you playe
200-240V~,
50/60 Hz
Television
Ae ial
Back view of you playe
200-240V~,
50/60 Hz
Sca t lead (supplied)
(Option 1) - Connecting your player through RF lead
(Option 2) - Connecting your player through a scart lead
Installation
DC-B8E11P-DA 2005.9.22 9:42 AM ˘`11

12
Connecting your player through
extra equipment (satellite system)
■Before you start, unplug all the equipment from the mains supply.
Television
Ae ial
Back view of you playe
200-240V~,
50/60 Hz
You can use this connection if your player has two scart sockets. This will improve sound and picture quality
when you are recording from satellite.
Satellite
(Option 1) - Connecting your player through RF lead
DC-B8E11P-DA 2005.9.22 9:42 AM ˘`12
13
Connecting your player to the Hi-Fi system
■Before you start, unplug all the equipment from the mains supply.
Television
Plug a phono cable into the
“Audio L/R” sockets on the
back panel and into the audio
sockets on any audio
amplifier, if needed. If your
player does not have this
connection, see page 15.
Player
200-240V~,
50/60 Hz
You can also use a sca t lead to imp ove pictu e and sound quality f om you playe .
Hi-Fi Ae ial
Television
If required, plug a scart to
phono cable into the “AV1”
socket on the back panel and
into the audio socket on any
audio amplifier.
Player
200-240V~,
50/60 Hz
Hi-Fi Ae ial
Option 1
Option 2
Installation
DC-B8E11P-DA 2005.9.22 9:42 AM ˘`13

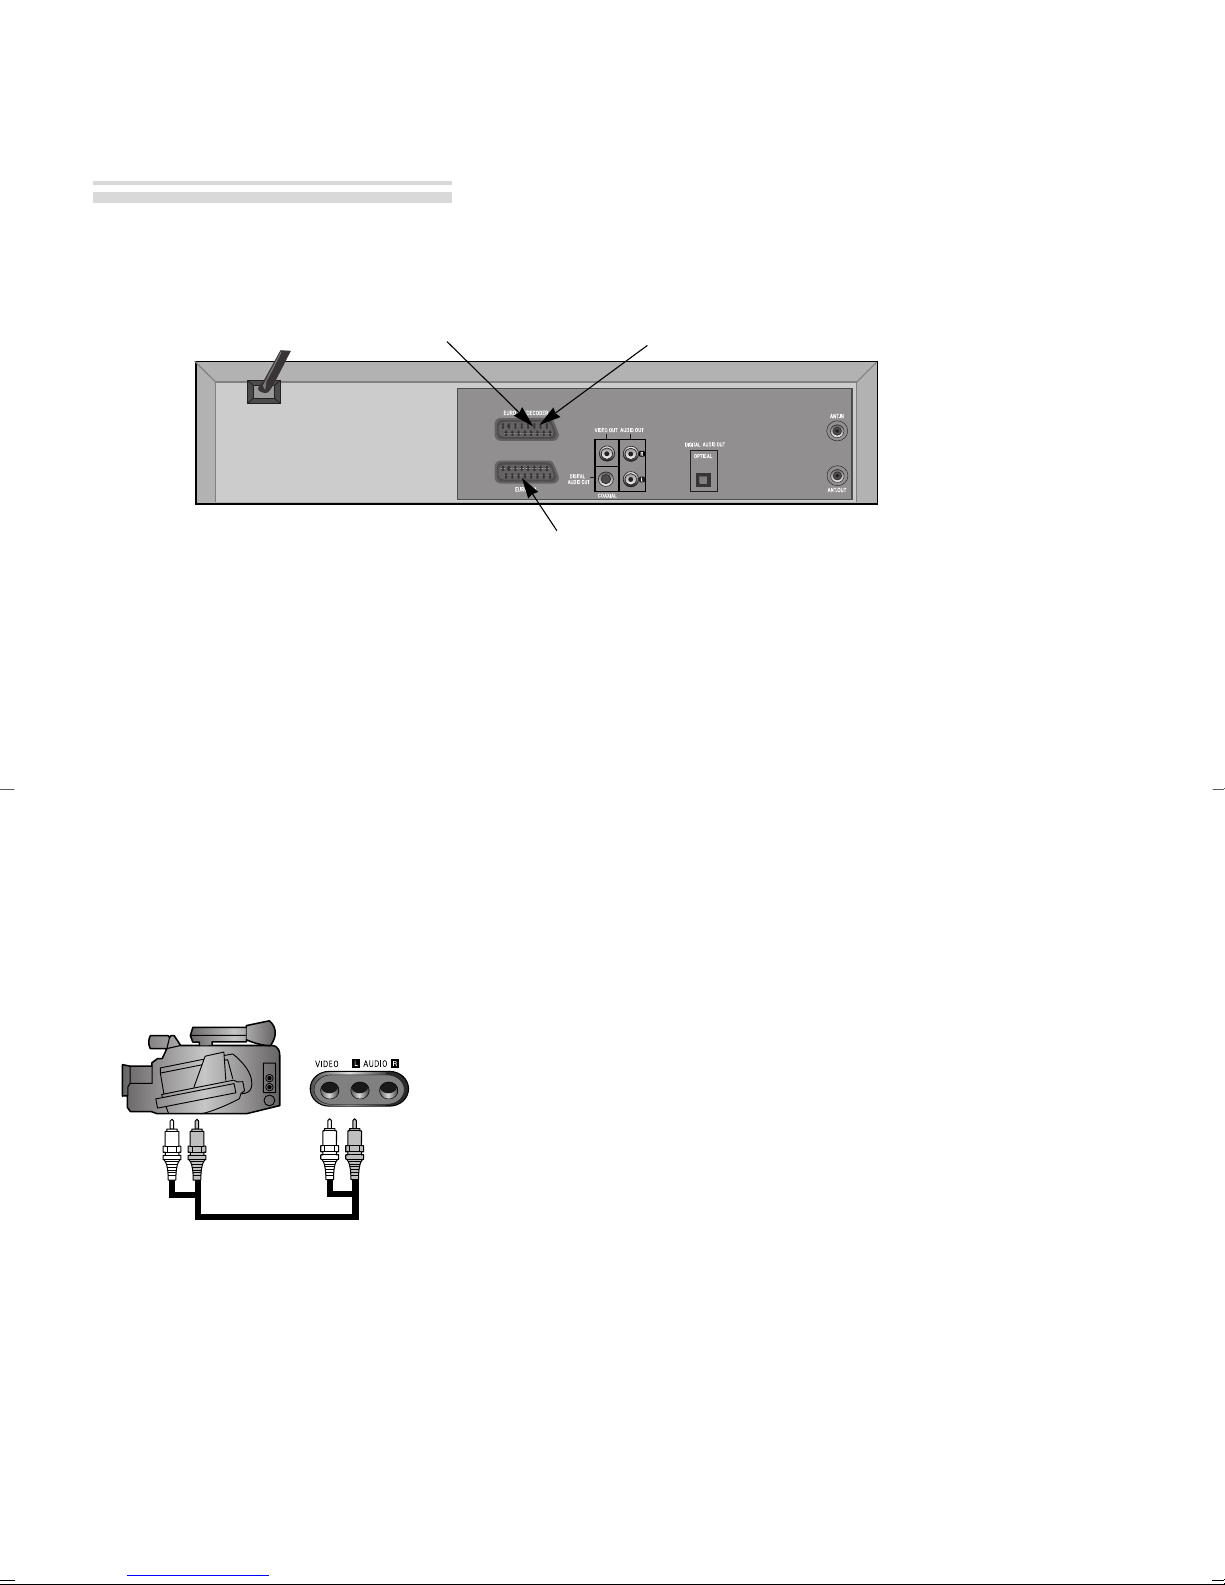
14
How to connect your player to another player
■Before you start, unplug all the equipment from the mains supply.
Fi st playe
Second playe
200-240V~,
50/60 Hz
1) Insert the tape you wish to record on into the first player and press [INP T] until “AV1” appears on the front
display.
2) Insert the tape you wish to copy from into the second player. Press the [PLAY] button on the second player.
3) Press the [RECORD] button on the first player.
The player will start recording.
If you playe has two sca t sockets, you can use the othe socket “AV2” to connect othe equipment.
To use this function, see page 16.
How to connect your player to a camcorder
■Before you start, unplug all the equipment from the mains supply.
If you have connected you camco de in this way, you can also connect a sca t lead f om “AV2” on the
back panel of the playe to the television. To use this function, see page 16.
You can also connect the camcorder by using a phono cable if your player has front input sockets.
Check the front of your player for this connection, see page 16.
Camco de
Ae ial
200-240V~,
50/60 Hz
Television
Playe
to
camcorder
Sca t Plug to
TV
How to connect
How to connect
connect a scart lead
from player to second
VCR
DC-B8E11P-DA 2005.9.22 9:42 AM ˘`14
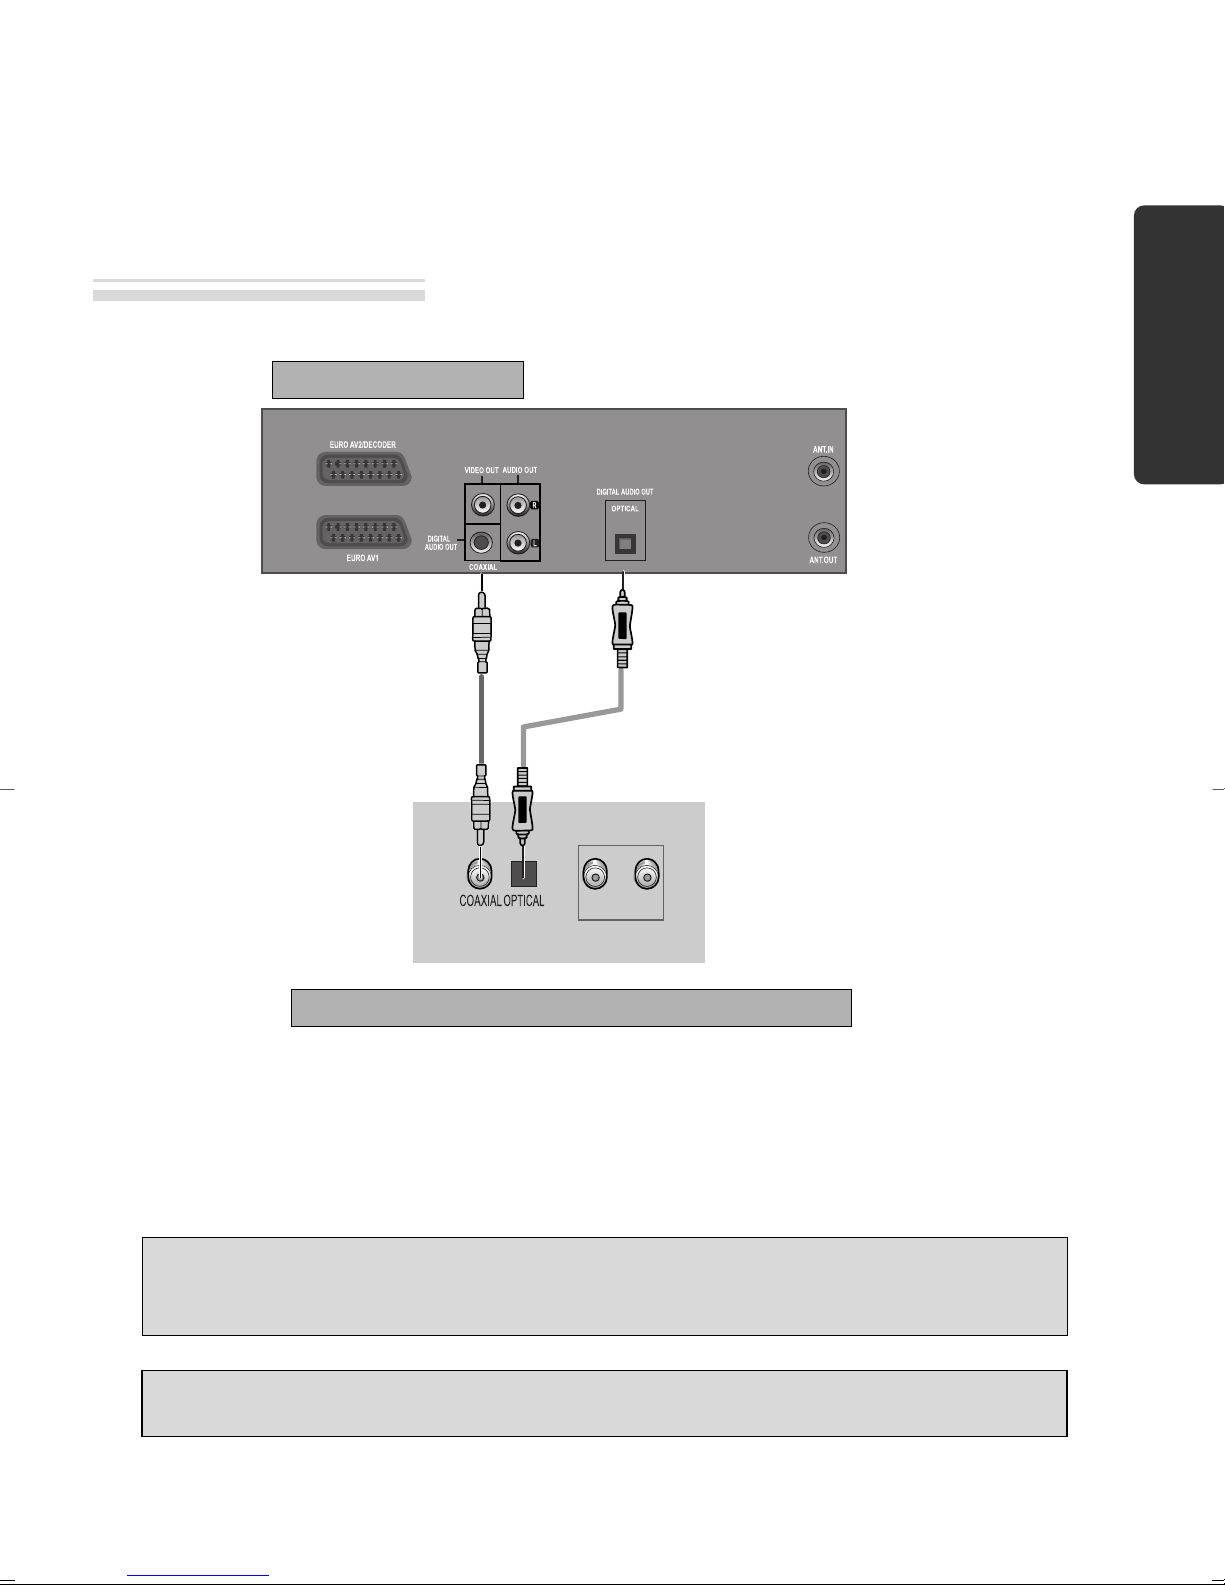
15
Connecting Dolby Digital Amp with
Digital Audio Out Jack
(L) AUDIO IN (R)
1
1Select eithe COAXIAL o OPTICAL to connect to amp of Dolby Digital.
** If you want to know about “Dolby Digital”, please efe to [About DVD] in 54-56p.
Home Theatre Receiver with Dolby Digital decoding capability
REAR PANEL OF DVD-VIDEO
CONNECTING CABLE
(Not supplied)
Manufactured under license from Dolby Laboratories.
"Dolby" and the double-D symbol are trademarks of Dolby Laboratories.
How to connect
“DTS” and “DTS Digital Out” are trademarks of Digital Theatre Systems, Inc.
Installation
DC-B8E11P-DA 2005.9.22 9:42 AM ˘`15
16
2nd scart socket
If your video has the AV2 output, shown in the diagram below, you can connect other equipment as seen on
pages 12-15.
2nd sca t INPUT ONLY
INPUT+OUTPUT
When connecting other equipment please refer to their manuals for further information. This video manual
recommends the set up as shown on page 12. If the equipment is turned off when connected by this method, the
video behaves as normal, but if the equipment is turned on the video will automatically switch over to AV2
mode and displays the channel of the other equipment, channel selection can only be performed by the other
equipment, the video PR+/PR- buttons have no effect.
To return to normal video use the other equipment must be turned off.
Reco ding f om othe Equipment.
Simple recording can be performed, ensure the equipment is turned on and is displaying the correct channel.
Timer recording, set the video to perform a timed recording ensuring AV1 is selected as the channel to be
recorded. Some equipment may have a timer which allows it to be powered on to the correct channel, if this
feature is not available the other equipment should be left powered on.
F ont AV
If the video has front input sockets, it is possible to connect devices such as a
camcorder to the video. To watch a camcorder tape the video must be in
AVF mode. Recordings of this input are the same as described on page 14.
2nd scart socket
DC-B8E11P-DA 2005.9.22 9:42 AM ˘`16

17
Initial Installation
■Switch the TV on.
■You can also start "A TO SET" in the SET P "PR PRESET"
➝
"A TO SET".
■To tune in new stations (manual tuning) and to enter station names see page 24-25.
• If you don´t see this picture, because you don´t use a SCART cable,
search this picture now (CH 52) with the station tuning functions of
your TV set (see its user manual).
• In case of interference problems on CH 52, type in an
other transmission channel between 21 and 69 using
the number buttons.
Setting up the player
SETUP:END
PLEASE WAIT...
CH 25
RF OUTPUT SET
0-9:SELECT(21-69)
OK:CONFIRM SETUP:END
CURRENT CH 52
RECOMMENDED CH 54
You should see this picture the first time you switch on the TV
and player.
1
OK fo "AUTO SET!".
"A TO SET" tunes in all the stations you can receive in your
country.
Clock is automatically set.
2
If other stations are positioned on near the current RF O TP T
CH, the guide message appears automatically.
The player recommends the optimal RF O TP T CH number
automatically.
3
Press the [OK] button to confirm the recommended PR.
Should you wish the stations to have the same numbers as those
used on the TV, follow the instructions in "Sorting programme
locations" on page 25.
Otherwise ...
exit the basic installation function and enjoy your player.
4
PLEASE CHANGE THE TV
CH TO 54.
IMPORTANT!
MANUAL SET
PR01 P-O1 PR08 P-08
PR02 P-02 PR09 P-09
PR03 P-03 PR10 P-10
PR04 P-04 PR11 P-11
PR05 P-05 PR12 ----
PR06 P-06 PR13 ----
PR07 P-07 PR14 ----
PR+/-:SELECT
OK:CONFIRM SETUP:END
OK:CONFIRM SETUP:END
AUTO SET
Basic Operation
DC-B8E11P-DA 2005.9.22 9:42 AM ˘`17

18
■Press [VCR] button on the remote control to change into VCR Mode and follow the procedure
below.
Call up the player’s "SET P" menu,
choose "VCR SET P", then "CLOCK SET".
1
Move to the position you want to change and type in the
new values.
Wait a few seconds after typing a one-digit number.
2
Store with [OK] button and exit with [SET P] button.
CLOCK SET
0-9:SETUP (HOUR)
/➝:CORRECT SETUP:END
TIME - - : - -
DATE - - / - - /- - - -
CLOCK SET
0-9:SETUP (HOUR)
/➝:CORRECT
OK:CONFIRM SETUP:END
TIME 06:05
DATE 08/05/2005(SUN)
Setting time and date
Auto clock
■Auto Clock is only available for models with the VPS/PDC function (see page 26).
Some broadcasting stations may send the time and date along with the VPS/PDC data. The video will
automatically use this time and date during the initial setting up procedure during normal use, and every
time you switch the video off at the mains. If you find that this time and date is incorrect you can remove
this feature by following the steps below changing it to OFF mode, you will then have to manually set the
time and date, see above.
AUTO CLOCK
ON
OFF
PR+/-:SELECT
OK:CONFIRM SETUP:END
VCR SETUP
CLOCK SET
RF OUTPUT SET
16:9 SET
OSD ON/OFF
AUTO CLOCK
PR+/-:SELECT
OK:CONFIRM SETUP:END
Setting time and date
Setting Auto clock
➝
➝
DC-B8E11P-DA 2005.9.22 9:42 AM ˘`18
This manual suits for next models
1
Table of contents


