DigiSender DGIMST10 User manual
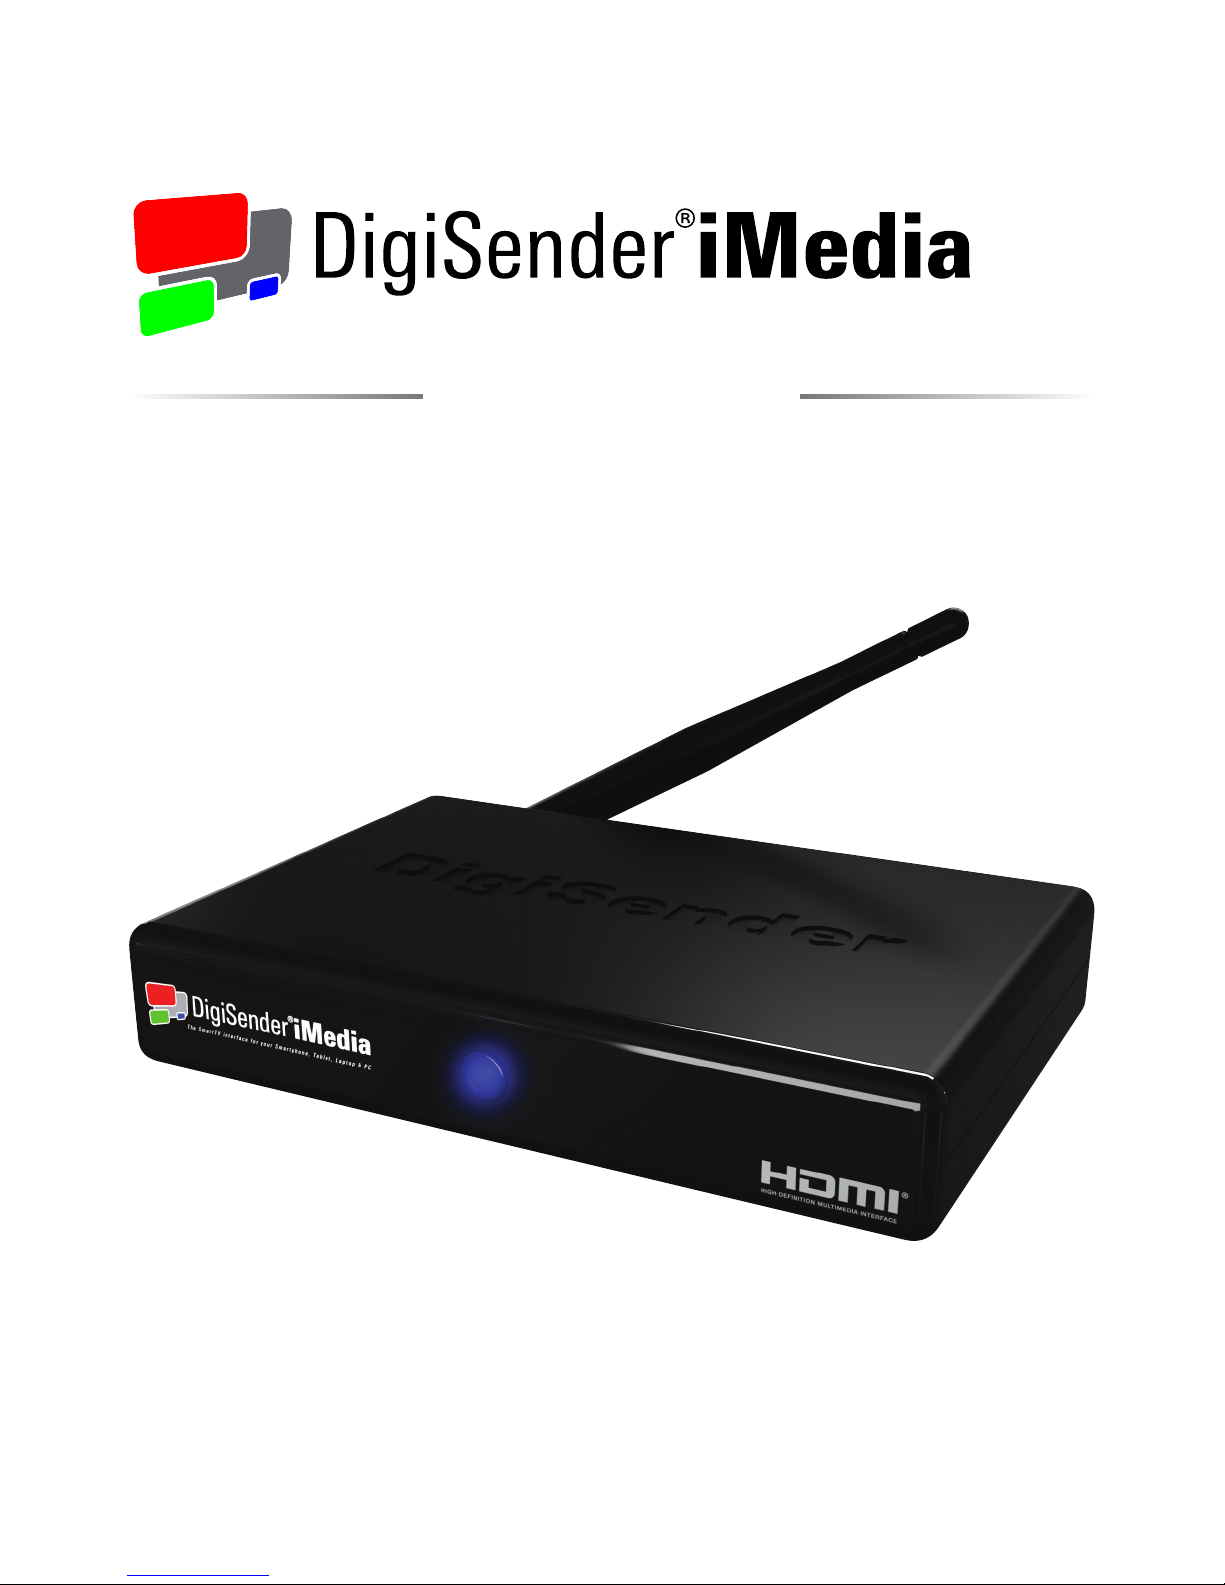
The SmartTV interface for your Smartphone, Tablet, Laptop & PC
Model: DGIMST10
Please keep this Instruction Manual for future reference
SmartSender

Page 02
DGIMST10 - DigiSender® iMedia® SmartSender™
Contents
1 Introduction
1.1 About the iMedia® SmartSender™
1.2 What’s in the Box
2 The iMedia® Utility Program
2.1 Hardware & Software
2.1.1 Hardware Recommendations
2.1.2 Supported Operating Systems
2.2 Installing the iMedia® Utility Program
2.2.1 Standard Installation
2.2.2 The Benchmarking Tool
2.3 Using the iMedia® Utility Program
2.3.1 Basic Usage
2.3.2 Advanced Options
2.4 Configuration Settings
2.4.1 Device Configuration Settings
2.4.2 Overscan Configuration Settings
2.4.3 Network Configuration Settings
AP Mode Network Configuration Settings
STA Mode Network Configuration Settings
2.5 Uninstalling the iMedia® Utility Program
3 Installing the iMedia® SmartSender™
3.1 Network Connection
3.1.1 LAN Connection
3.1.2 Station Mode Connection
3.1.3 Access Point Mode Connection
3.1.4 Supported Network Connections
3.2 Connecting to your TV
4 Using the iMedia® SmartSender™
4.1 PC Sender Mode
4.2 Media Streaming Mode
4.2.1 Hardware Recommendations
4.2.2 Streaming Media from a PC or Laptop
4.2.3 Streaming Media from a SmartPhone or Tablet
Contents
04 - 05
04
05
06 - 18
06
06
06
07 - 09
07 - 08
09
10 - 12
10 - 11
12
13 - 17
13
14
15 - 17
15 - 16
17
18
19 - 28
19 - 27
20
21 - 22
23 - 24
25 - 27
28
29 - 34
29
30 - 34
31
32 - 33
34

Page 03
DGIMST10 - DigiSender® iMedia® SmartSender™
5 Troubleshooting
5.1 Troubleshooting the iMedia® Utility Program
5.1.1 Windows Vista / 7 User Account Control
5.1.2 Network Discovery & Firewall Checking
5.2 Troubleshooting PC Sender Mode
5.2.1 Video Playback in Windows XP
5.2.2 Laggy Picture / Poor Frame Rate
5.3 Troubleshooting Media Streaming Mode
5.3.1 Windows 7 ‘Play To’ command
5.3.2 No Audio and/or Video from the TV after selecting ‘Play To’
5.3.3 Laggy Playback / Stuttery Audio / Poor Frame Rate
5.4 Frequently Asked Questions
5.5 Technical Support
6 Specifications
6.1 Display Resolutions
6.2 Supported File Formats
6.2.1 Supported Video Formats
6.2.2 Supported Audio Formats
6.2.3 Supported Picture Formats
6.3 iMedia® SmartSender™ Specifications
6.3.1 Hardware Specifications
6.3.2 System Requirements
6.4 Declaration of Conformity
Contents
35 - 43
35 - 37
35
36 - 37
38 - 40
38
39 - 40
41
41
41
41
42
43
44 - 47
44
45
45
45
45
46
46
46
47
Contents
For indoor use only. Do not expose the unit to moisture as this may
lead to faulty operation and risk of electric shock.
Risk of electric shock, do not open. None of the contents of this
DigiSender®iMedia®pack contain user-serviceable parts.
Avoid dripping or splashing liquids on the unit and do not place
objects lled with liquid on it.
The rating label is located on the base of the unit.
Page 04
DGIMST10 - DigiSender® iMedia® SmartSender™
1 Introduction
Congratulations on purchasing the new DigiSender® iMedia® SmartSender™ from AEI Security & Com-
munications Ltd.
The DigiSender® iMedia® SmartSender™ enables all manner of digital media to be played on your exist-
ing home TV and features 2 basic modes of operation.
‘PC Sender Mode’ allows you to send your PC or Laptop screen to your TV, so that whatever you see on
your computer screen, you can also see on your TV. This is great for web surfing, working on documents,
business presentations, listening to music and much more.
‘Media Streaming Mode’ allows you to play music, video and photos stored on other Digital Media
devices that are connected to your Network. Whether it is your flatmates PC, the kitchen laptop or a
friends SmartPhone, the iMedia® SmartSender™ allows you to connect them all to your TV wirelessly.
1.1 About the iMedia® SmartSender™
1.1 About the iMedia® SmartSender™
The SmartTVinterface foryour Smartphone,Tablet, Laptop & PC
Model:DGIMST10
Pleasekeep this Instruction Manual for future reference
TheSmartTV interfacefor yourSmartphone, Tablet,Laptop& PC
mar
S
T1
1
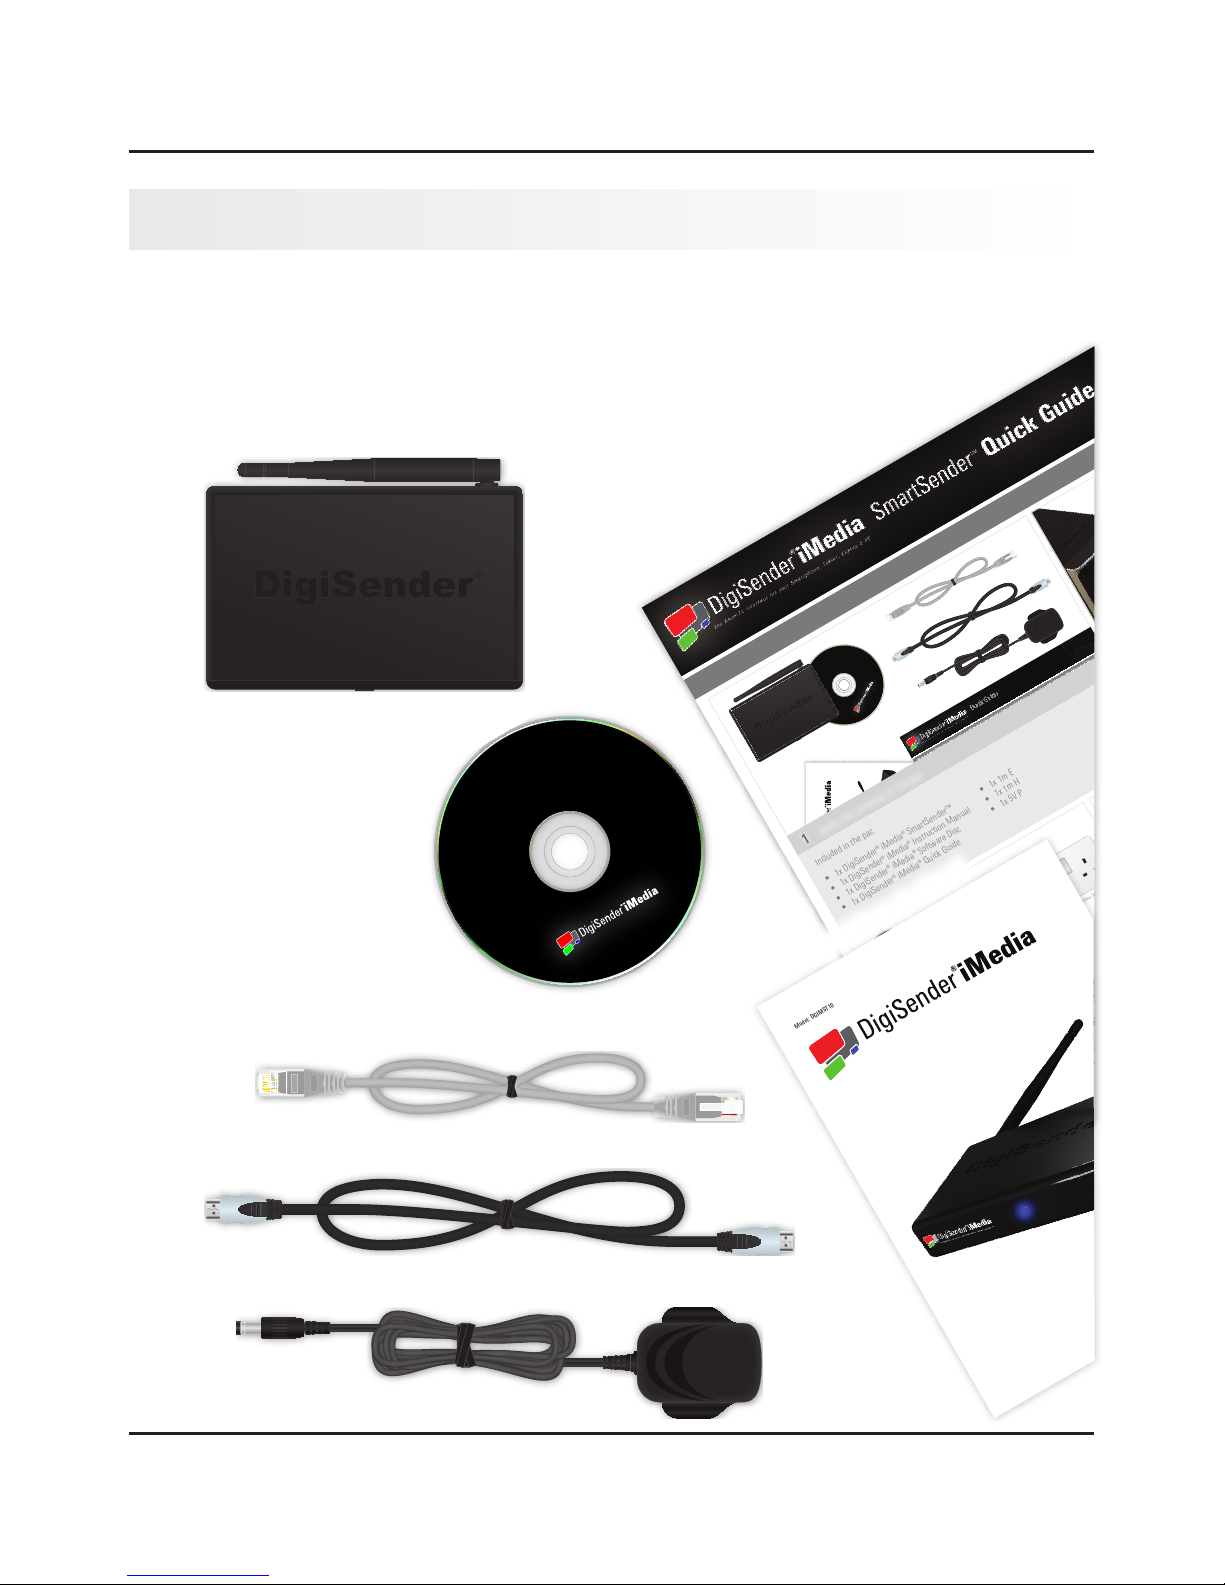
Verify the contents of the box
Included in the pack is:
2
Install the iMedia® software
• Place the iMedia® software disc into the disc tray of your PC or Laptop.
• In the AutoPlay menu, click ‘Run AUTORUN.exe’.
• Follow the on-screen instructions in the install wizard.
• After installation is complete, click Analysis on the Benchmark Tool.
Note: If the AutoPlay menu does not display, open My Computer and click on your
disc drive, then double click the AUTORUN.exe fi le to start the install wizard.
3
Connect the Ethernet cable to your wireless router
• Connect the Ethernet cable to the Ethernet socket on the back of the
iMedia® SmartSender™.
• Connect the other end of the Ethernet cable to an available Ethernet
socket on your wireless router.
4
Connect the power cable and press the power button
• Connect the power cable to the socket labelled DC 5V on the back of
the iMedia® SmartSender™.
• Plug the adaptor into an available mains socket.
• Press the power button on the back of the iMedia® SmartSender™.
5
Configure the iMedia® SmartSender™ to connect to your wireless router via Wi-Fi
• Double click the iMedia® Shortcut on your PC or Laptop
desktop.
• After a few seconds the iMedia® Utility Program will
sync with the iMedia® SmartSender™.
• Click the arrow at the bottom of the program.
• Double click the Gear symbol to bring up the Confi gura-
tion Settings page.
• Click the STA Mode tab.
• Check the tick box next to ‘Enable Station Mode’.
• Input your router SSID and Encryption type.
• Input your router WEP/WPA/WPA2 KEY.
• Click Save.
The iMedia® SmartSender™ will then reboot itself and
automatically connect to your wireless router.
Note: Please consult your router documentation to fi nd your SSID
and WEP/WPA/WPA2 KEY. Alternatively, search online for how to
fi nd the SSID and WEP/WPA/WPA2 KEY for your specific router.
• 1x DigiSender® iMedia® SmartSender™
• 1x DigiSender® iMedia® Instruction Manual
• 1x DigiSender® iMedia® Software Disc
• 1x DigiSender® iMedia® Quick Guide
• 1x 1m Ethernet Cable
• 1x 1m HDMI Cable
• 1x 5V Power Cable
This Quick Guide has been designed for use with the most popular method of connecting the iMedia® SmartSender™. For other ways of connecting, please read the included Instruction Manual.
Ethernet Cable
HDMI Cable
Power Cable
iMedia® SmartSender™
ANT
AVOUT
DC5V
HDMIOUT
ETHERNETIN
USB1USB2
POWER
DC 5V
HDMI OUT
ETHERNET IN
R
Wireless Router
iMedia® SmartSender™
AutoPlay
Install Wizard
Benchmarking Tool
ANT
AVOUT
DC5V
HDMIOUT
ETHERNETIN
USB1USB2
POWER
DC 5V ETHERNET
POWER
iMedia® Desktop Shortcut
iMedia® Utility Program
iMedia® Settings Window
iMedia® STA Mode Tab
iMedia® SmartSender™
Power Cable
Mains Socket
Ethernet Cable
Model: DGIMST10
iMedia® Software Disc
iMedia® Quick Guide
iMedia® Instruction Manual
iMedia® Quick Guide
Page 05
DGIMST10 - DigiSender® iMedia® SmartSender™
All products are computer weight checked when packed, however, it is a good idea to check that all the
kits contents are present before proceeding.
1.2 What’s in the Box
The SmartTV interface for your Smartphone, Tablet, Laptop & PC
iMedia® Software Disc
iMedia® SmartSender™
The SmartTV interface for your Smartphone, Tablet, Laptop & PC
Model: DGIMST10
Please keep this Instruction Manual for future reference
iMedia® Instruction Manual
Ethernet Cable
HDMI Cable
Power Cable
1.2 What’s in the Box

Page 06
DGIMST10 - DigiSender® iMedia® SmartSender™
2 The iMedia® Utility Program
For best results and smooth playback, please refer to the Hardware Recommendations below.
2.1.1 Hardware Recommendations
Desktop or Workstation PC
CPU: 2.0GHz Intel Core 2 Duo or better
Chipset: Intel 965 series chipset or better
Memory: 2GB DDR2-800MHz
Graphics Card: NVIDIA GeForce 8400GS / ATI Radeon X300 or better
Network: 802.11 g/n Wi-Fi and/or 100/1000 Mbps Ethernet
Notebook or Laptop PC
CPU: 2.0GHz Intel Core 2 Duo or better
Chipset: Intel 965 series chipset or better
Memory: 2GB DDR2-800MHz
Graphics Card: NVIDIA GeForce 8200M / ATI Radeon Mobility X300 / Intel X3100 Integrated
Graphics Chipset or better
Network: 802.11 g/n Wi-Fi and/or 100/1000 Mbps Ethernet
2.1.2 Supported Operating Systems
Windows 7 64bit (x64)
Windows 7 32bit (x86)
Windows Vista (Service Pack 1 or later) 32bit (x86)
Windows Vista (Service Pack 1 or later) 64bit (x64)
Windows XP (Service Pack 3 or later)
2.1 Hardware & Software
2.1.1 Hardware Recommendations
Page 07
DGIMST10 - DigiSender® iMedia® SmartSender™
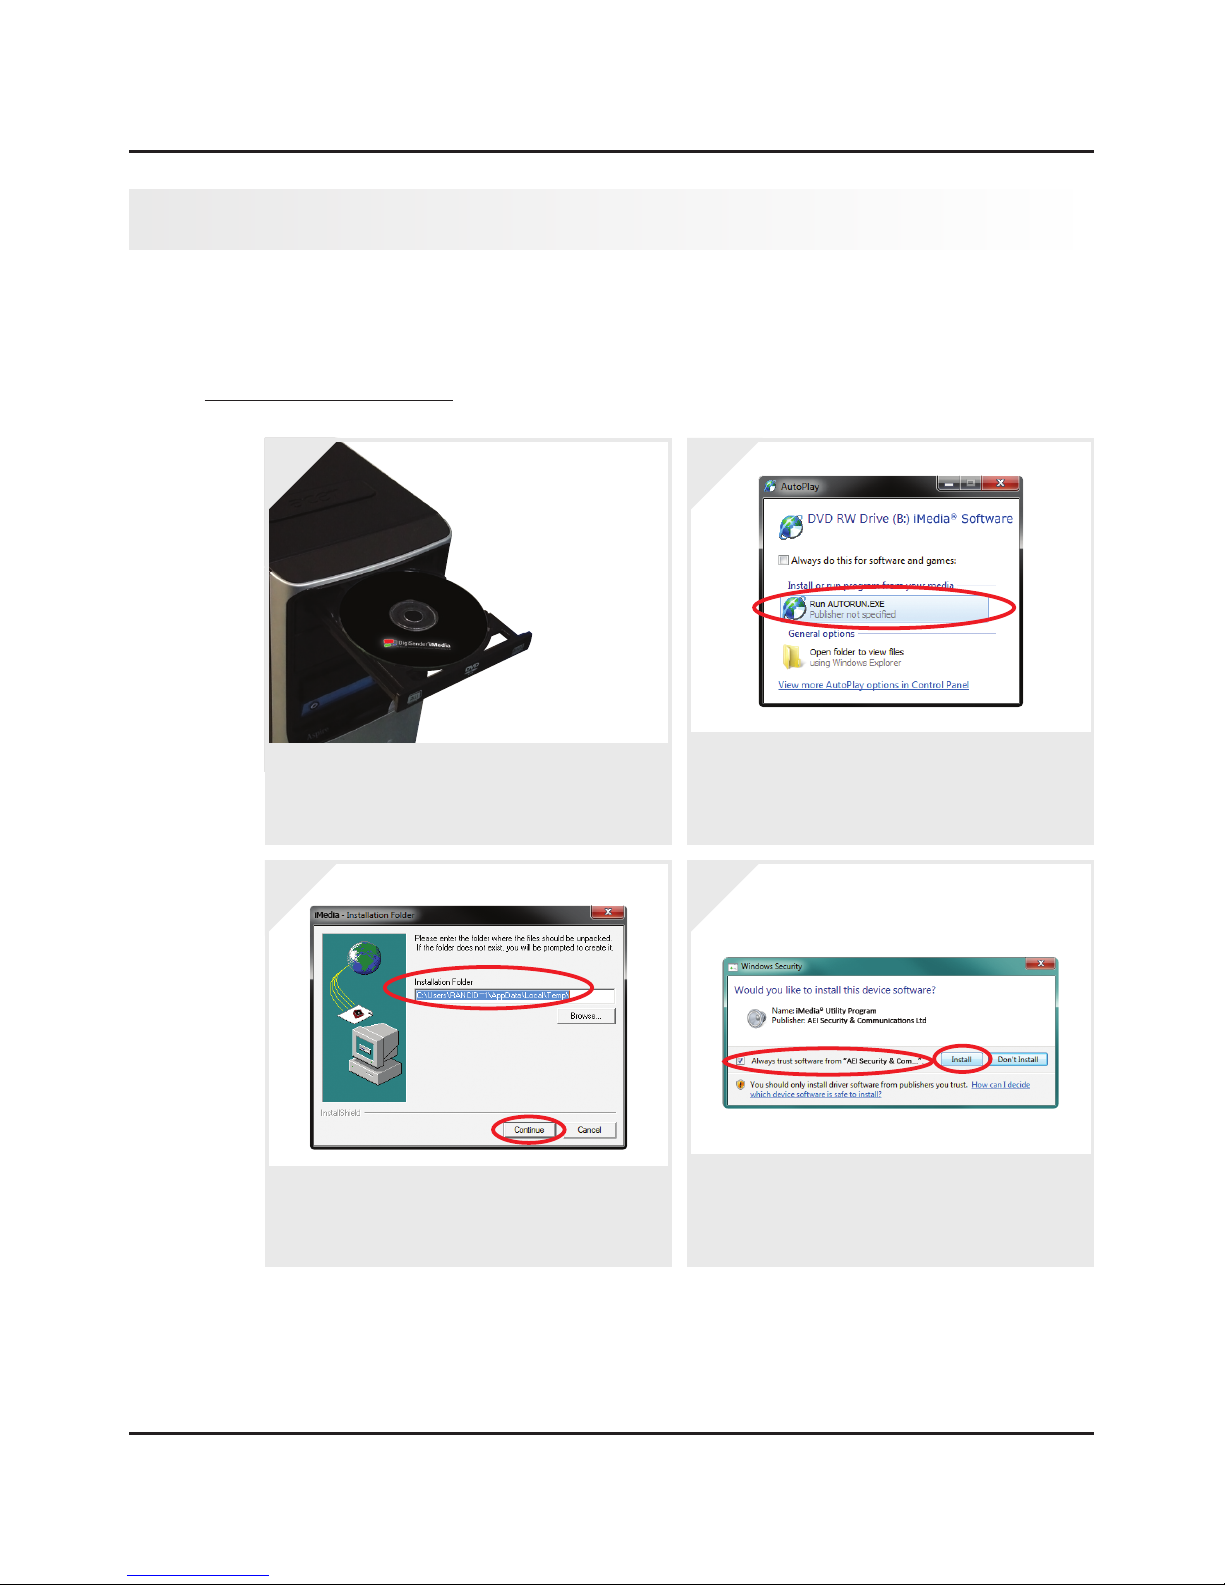
It is recommended that you close all open programs before proceeding with this installation.
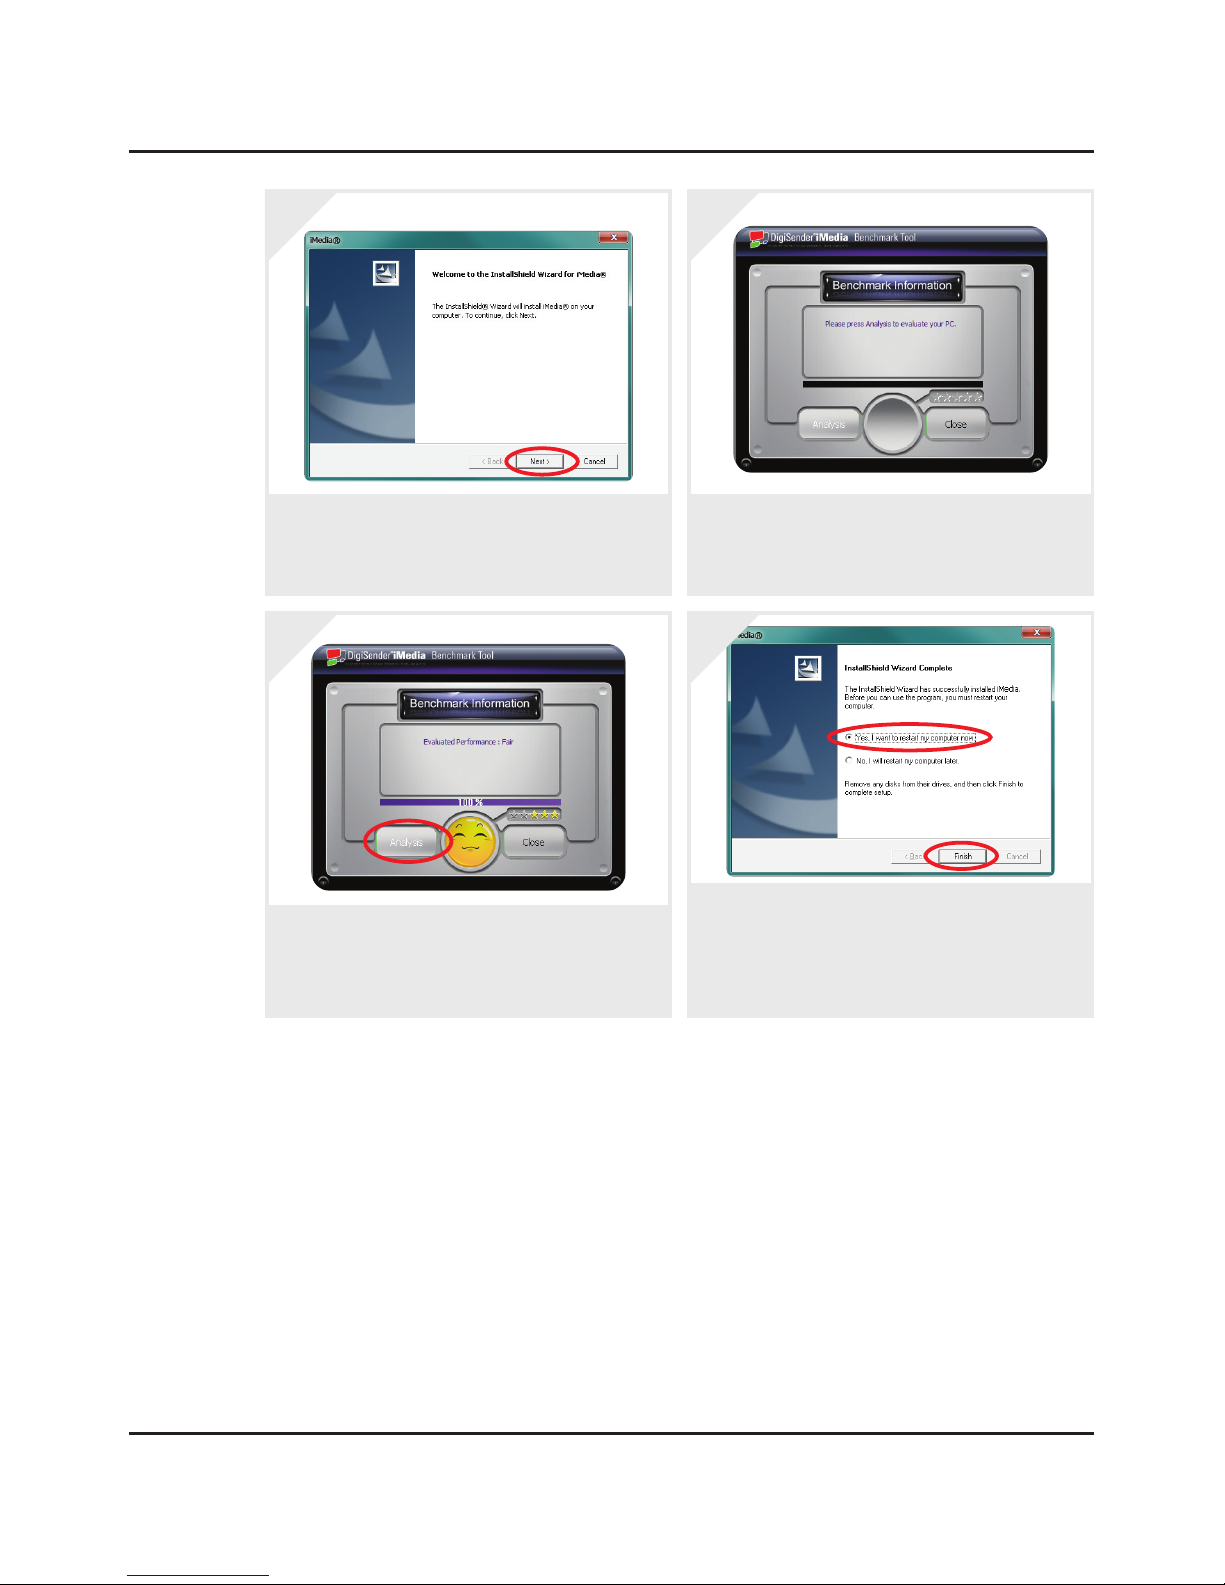
2.2.1 Standard Installation
2.2 Installing the iMedia® Utility Program
Place the iMedia® Software Disc into the disc tray
of your PC or Laptop
1.
In the AutoPlay menu, select ‘AUTORUN.exe’.
If the AutoPlay menu doesn’t appear, open My
Computer, click the disc drive and double click
the ‘AUTORUN.exe’ file.
2.
Choose a folder to unpack the files to and then
click the ‘Continue’ button.
3.
If a window appears asking “Would you like to
install this device software”, tick the box next to
‘Always trust software from ...’ and then click
the ‘Install’ button.
4.
continued on next page . . .
2.2.1 Standard Installation
Page 08
DGIMST10 - DigiSender® iMedia® SmartSender™
Click the ‘Next’ button to install the iMedia® Util-
ity Program when prompted to do so by the Install
Wizard.
5.
After the program and drivers are installed, the
Benchmark Tool will automatically start.
6.
Click the ‘Analysis’ button to perform the Bench-
mark Test. After approximately 10 seconds the
results will be displayed. See Section ‘2.2.2 The
Benchmarking Tool’ on page 09 for more information.
7.
After Benchmarking is complete, click ‘Close’ and
in the next window choose “Yes, I want to restart
my computer now.” and then click the ‘Finish’
button. Make sure to save any open documents
before restarting your computer.
8.
2.2.1 Standard Installation
2.2.2 The Benchmarking Tool
The Benchmarking Tool evaluates your PC’s capability to run the iMedia® Utility Program and send
your PC screen to your TV smoothly.
It is launched automatically during installation, but can be launched at any point by clicking the
iMedia® Benchmarking Tool shortcut in the Start menu.
The chart below outlines the various levels of performance.
Note: The level of performance can be affected by changing your PC desktop resolution or the theme settings
in Windows 7 and Windows Vista. See Section ‘5.2.2 Laggy Picture / Poor Frame Rate’ on page 39 for more
information.
Page 09
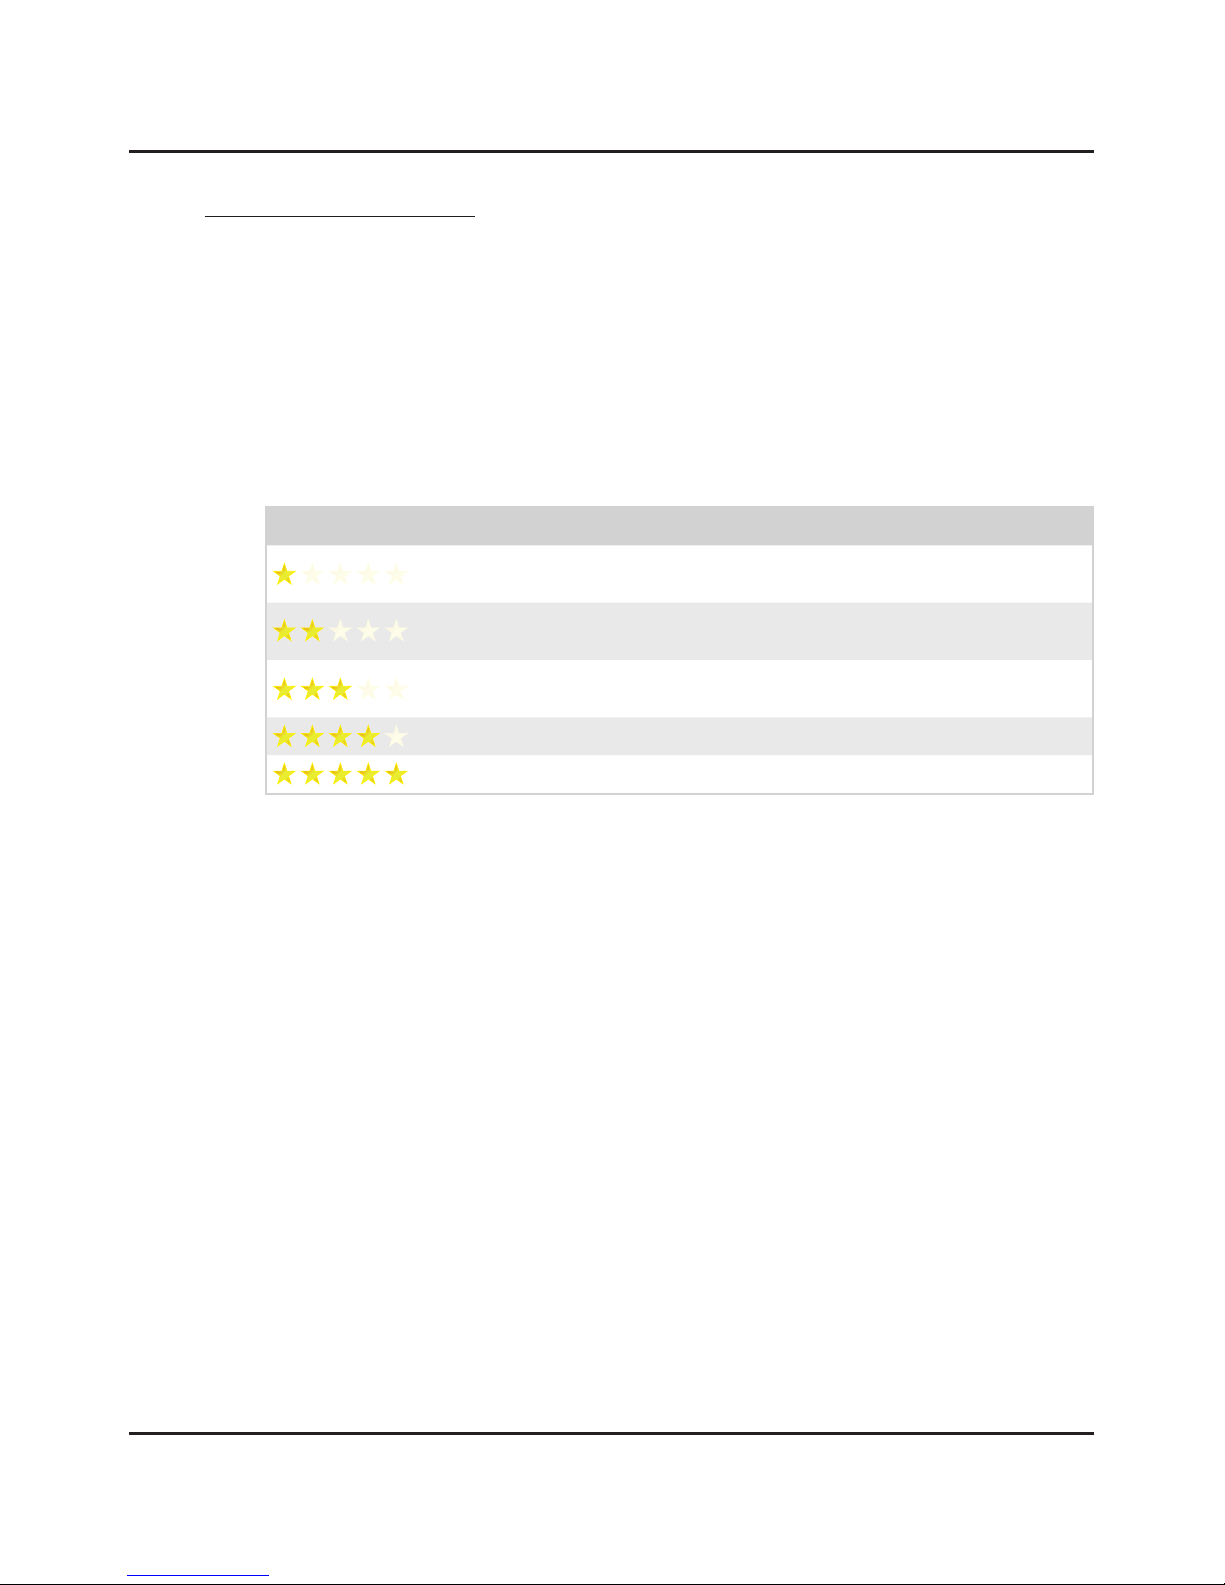
DGIMST10 - DigiSender® iMedia® SmartSender™
Stars Level Explanation
Lowest The CPU and/or Graphics Card are not supported by the iMedia® Utility
Program
Low Acceptable music/picture playback and web surfing but it is suggested
that you lower your PC desktop resolution to support video playback
Average Average music playback and picture viewing, however video playback
might be slightly laggy
Good Smooth playback of music, pictures and video
Excellent Great performance! You can expect flawless playback of most media.
2.2.2 The Benchmarking Tool
Page 10
DGIMST10 - DigiSender® iMedia® SmartSender™
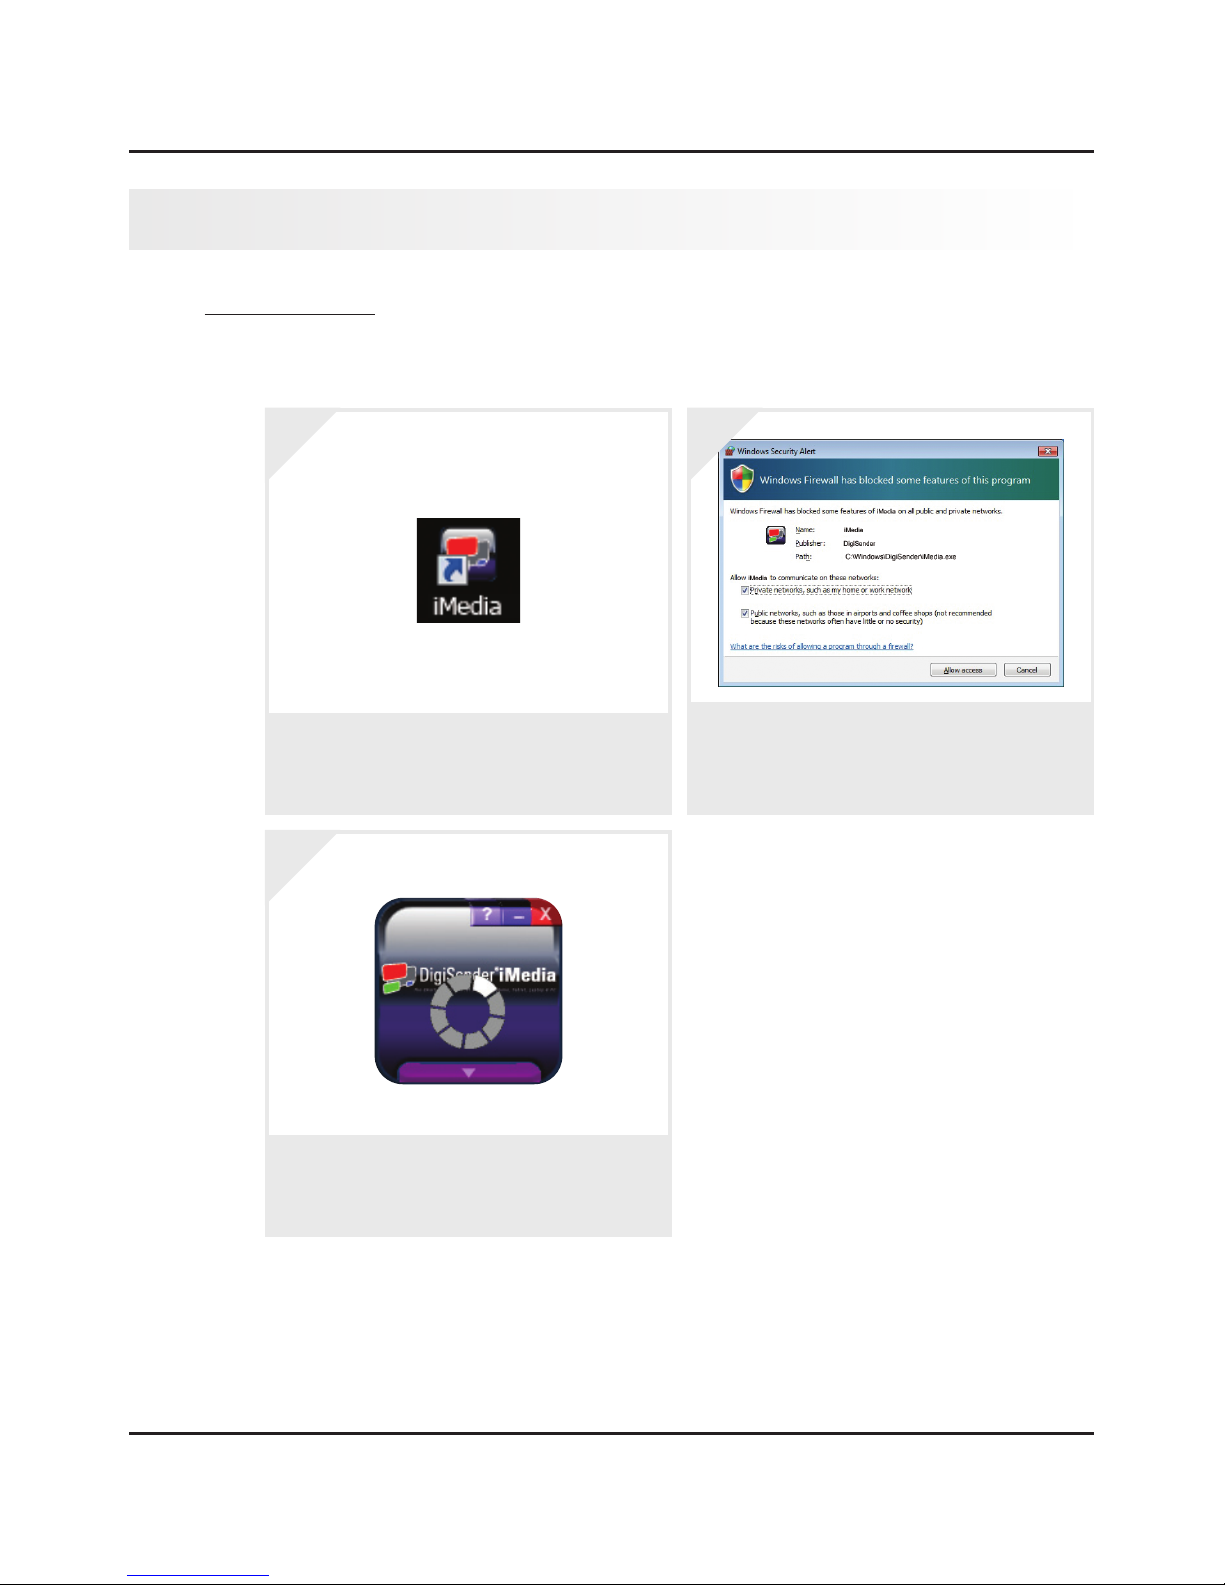
2.3.1 Basic Usage
The following section will explain the basics of using the iMedia® Utility Program.
Important Note: It can take up to several minutes for the iMedia® Utility Program and iMedia® SmartSender™
to sync. If after a few minutes they have still not synced, try disabling your Firewall. See Section ‘5.1.2 Network
Discovery & Firewall Checking’ on page 36 for more information.
2.3 Using the iMedia® Utility Program
To run the iMedia® Utility Program, double click
the iMedia® Utility Program Shortcut on your PC
or Laptop desktop.
1.
Windows Firewall may prompt you to “Allow Ac-
cess”. If it does so, tick the boxes for both ‘Private
Networks’ and ‘Public Networks’ and then click
‘Allow Access’.
2.
The iMedia® Utility Program will then start run-
ning and attempt to connect to the iMedia®
SmartSender™.
3.
continued on next page . . .
2.3.1 Basic Usage
Page 11
DGIMST10 - DigiSender® iMedia® SmartSender™
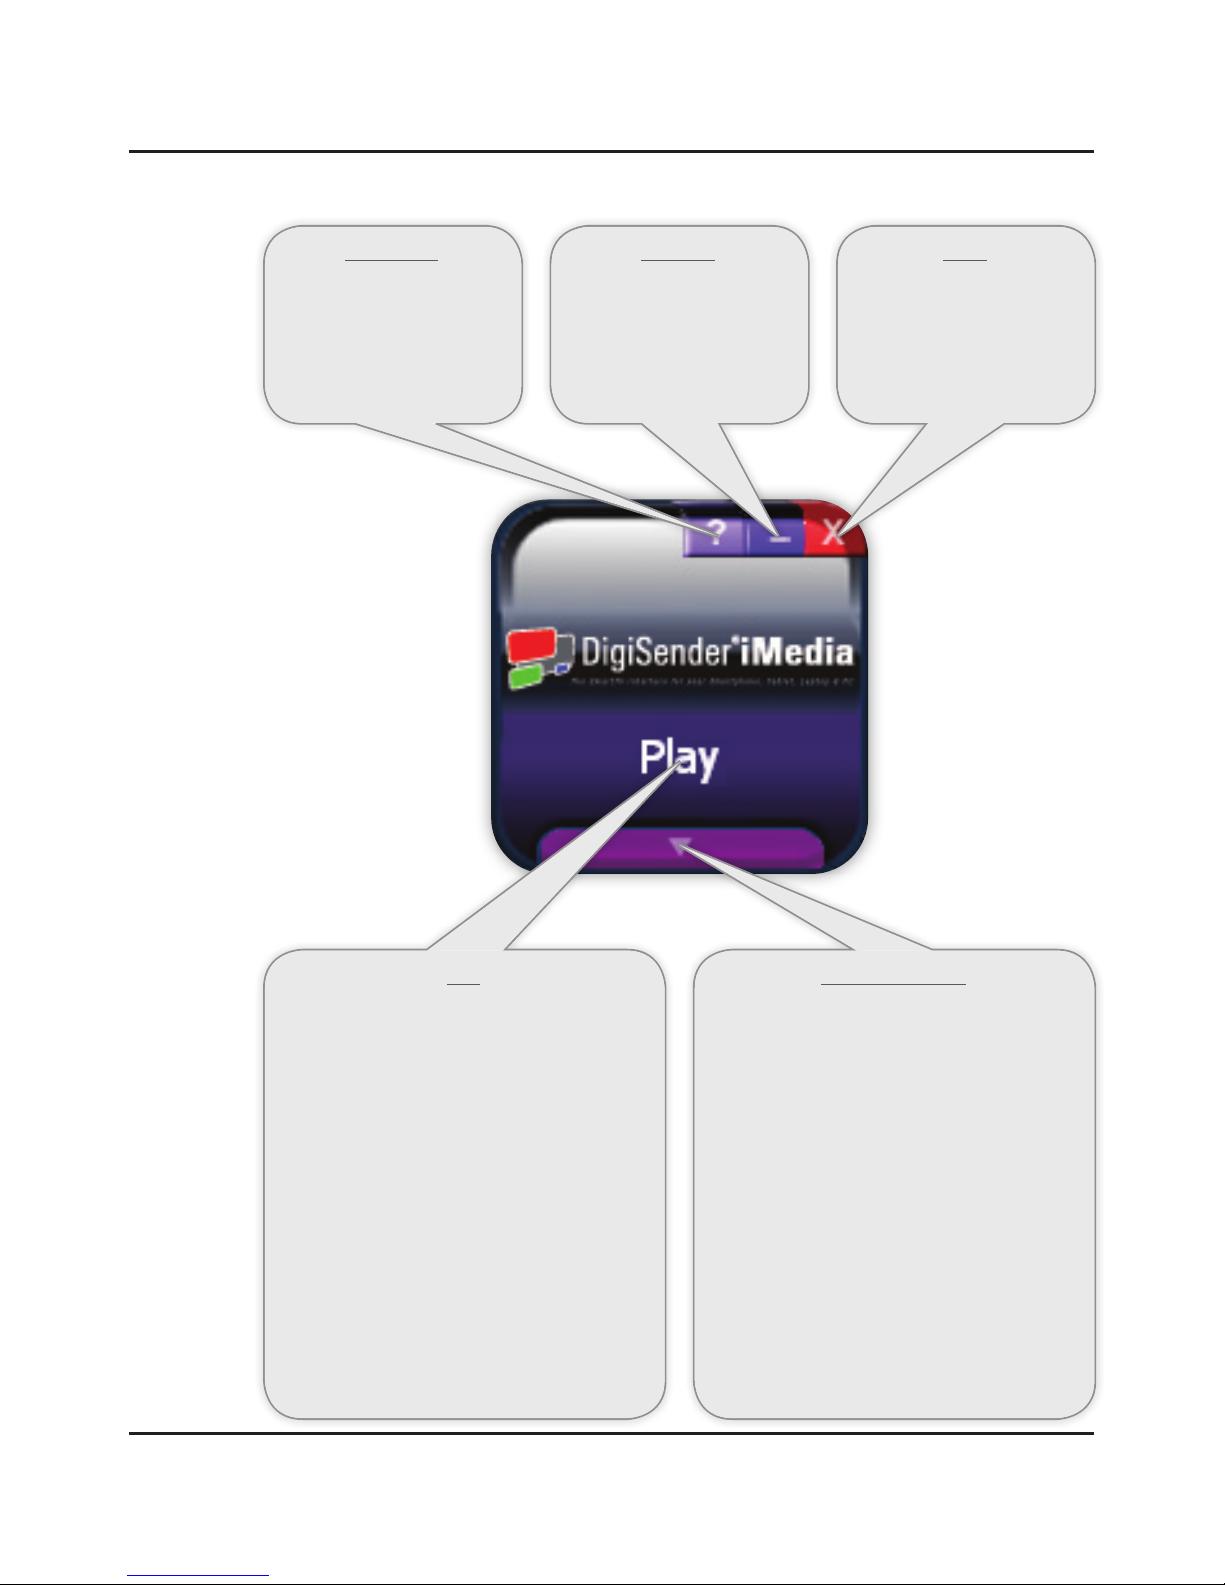
Information
Clicking this button will bring
up the program information
panel. Click the ‘X’ button to
close it.
Minimize
Clicking this button will mini-
mize the iMedia® Utility Pro-
gram to the Windows Taskbar
and System Tray.
Close
Clicking this button will close
the iMedia® Utility Program.
Play
Clicking this button will start sending your PC or
Laptop screen to your TV. This is known as ‘PC
Sender Mode’.
During ‘PC Sender Mode’, the ‘Play’ button
will be replaced by a ‘Stop’ button. Clicking
this ‘Stop’ button will stop the iMedia® Utility
Program from sending your PC or Laptop screen
to your TV.
Note: After clicking the ‘Play’ button, the iMedia® Util-
ity Program may automatically adjust your PC or Laptop
desktop resolution to optimize performance. After click-
ing the ‘Stop’ Button or closing the iMedia® Utility Pro-
gram your resolution will return to normal.
Advanced Options
Clicking this button will bring up the ‘Advanced
Options Panel’.
On this panel you will find options for:
Device Selection
Configuration Settings
Optimizing Playback
Keep PC Audio
Virtual Extend
Click this button again to close the ‘Advanced
Options Panel’.
Detailed information regarding the ‘Advanced
Options’ is available on the next page.
2.3.1 Basic Usage

Page 12
DGIMST10 - DigiSender® iMedia® SmartSender™
2.3.2 Advanced Options
The iMedia® Utility Programs Advanced Options can be accessed by pressing the arrow button at
the bottom of the program. Press ‘Apply’ to save any changes to these Advanced Options.
Optimizing Playback
This slider allows you to
optimize the iMedia® Utility
Program for what you want
to do.
It is set to ‘PC’ by default and
this is going to give you the
best results for most uses oth-
er than video playback. This
would include things such as
music playback, office work,
web surfing, etc.
The ‘Middle’ setting should
be used for video and movie
playback.
The ‘Movie’ setting can be
used for slightly better play-
back at the cost of using more
of your PC or Laptop system
resources.
Keep PC Audio
This option allows you play
sound through both your TV
and PC. By default this is not
activated, so you will only get
the audio through your TV.
Note: There may be some audio lag be-
tween the TV and PC if both ‘Keep PC
Audio’ and ‘Movie Optimized Playback’
are selected.
Virtual Extend
This setting is enabled by
default and should only be
disabled if your PC or Laptop
screen displays abnormally
during ‘PC Sender Mode’
operation.
Device Selection
If you have more than one
iMedia® SmartSender™ in-
stalled on your Network, then
you can chose which device
you wish to send your PC or
Laptop screen to from this
list.
Configuration
Settings
See next page for
more information.
2.3.2 Advanced Options

Double click the Cog Icon next to the Device Name in the Advanced Options panel. Your Web Browser
will launch and open the Configuration Settings in a new tab.
2.4.1 Device Configuration Settings
Click the ‘Device’ Tab on the left of the Configuration Settings page.
Page 13
DGIMST10 - DigiSender® iMedia® SmartSender™
2.4 Configuration Settings
Firmware Upgrade
This setting allows you to upgrade the iMedia® SmartSender™ firmware.
Click the ‘Browse’ button and navigate to the Firmware Upgrade file (.tgz). After selecting the Firmware
Upgrade file, click the ‘Start’ button to begin the upgrade. Should you wish to cancel the Firmware Up-
grade at any point, click the ‘Abort’ button.
The Firmware Upgrades progress will be displayed on your TV.
Important Notes: Do not turn the iMedia® SmartSender™ off while performing the Firmware Upgrade. Only use Firmware Upgrade files that
have been downloaded directly from www.aei.eu. Never try to upgrade your Firmware using another models Firmware Upgrade files.
Device Name
This setting allows you to
change the default name of
the iMedia® SmartSender™.
Click ‘Set’ to confirm the
name change.
2.4.1 Device Configuration Settings
Page 14
DGIMST10 - DigiSender® iMedia® SmartSender™
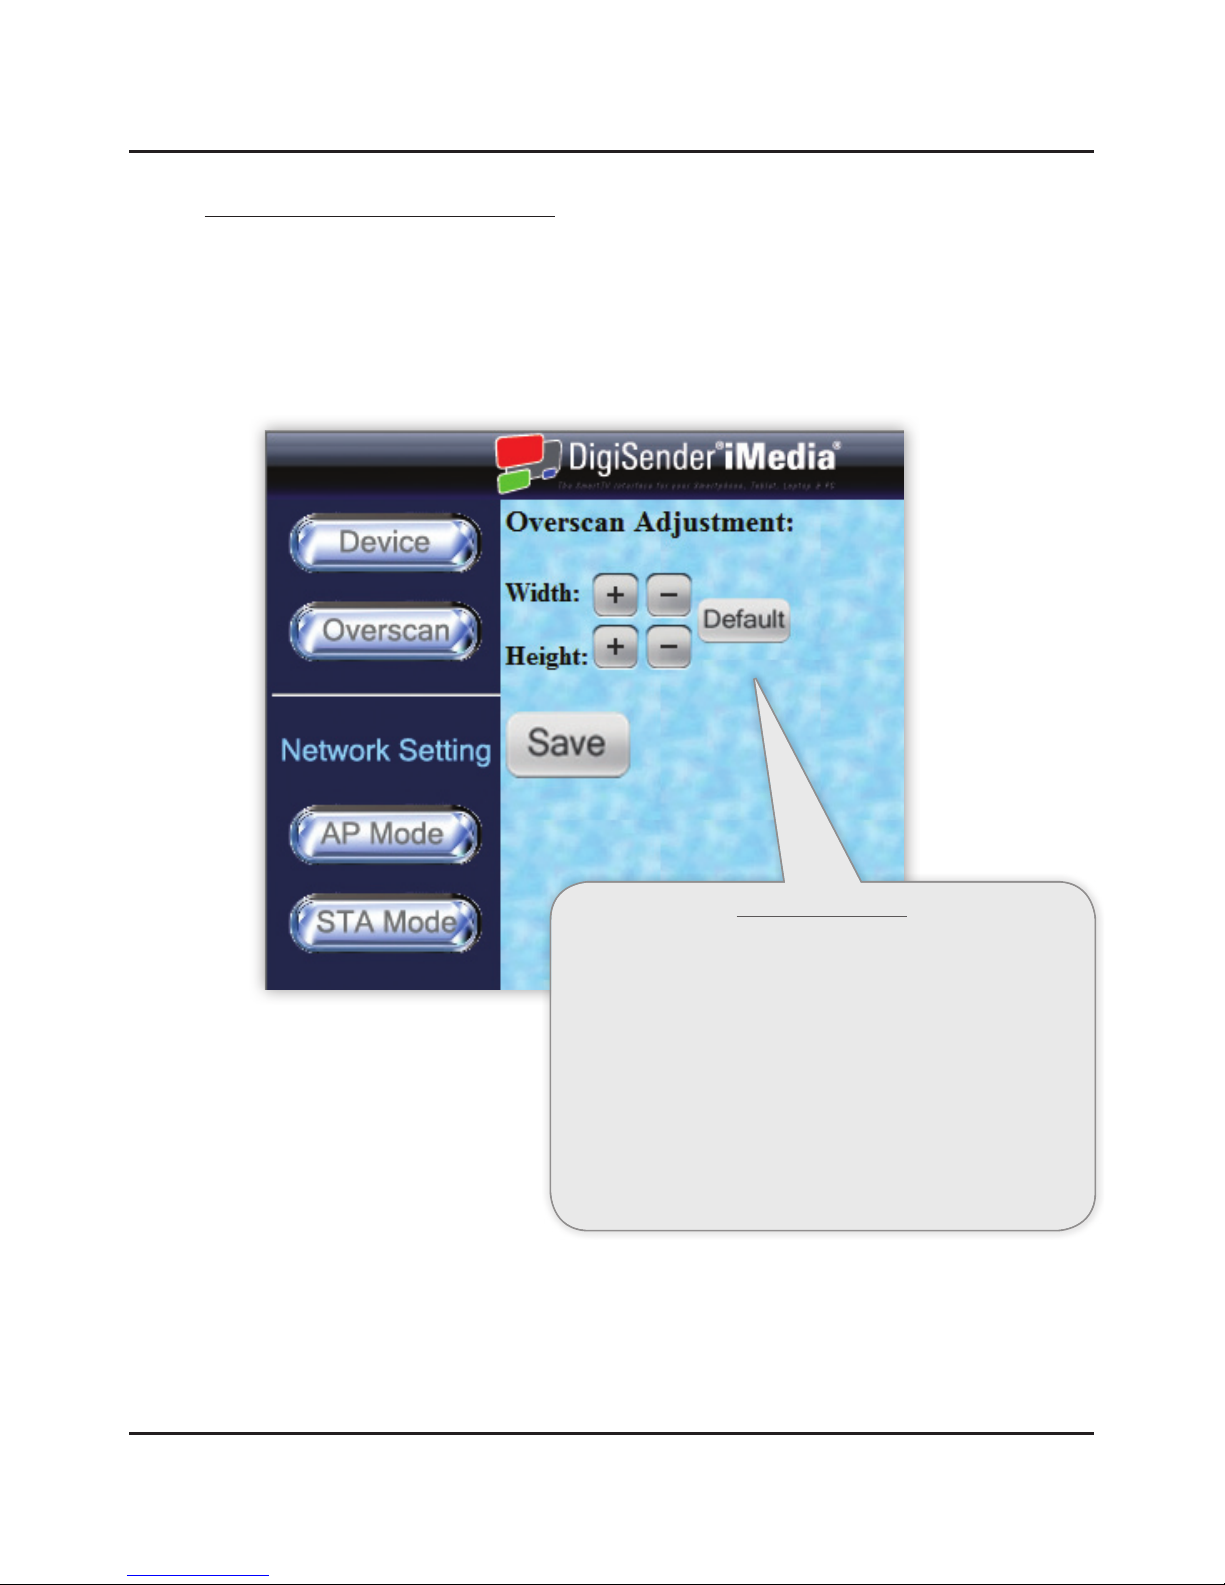
2.4.2 Overscan Configuration Settings
Click the ‘Overscan’ Tab at the top of the Configuration Settings page.
When sending your PC or Laptop screen to your TV, if you notice that it is slightly misaligned, then
this can be corrected using these settings.
Overscan Adjustment
Click the ‘Width + and Width -’ buttons to modify the width of your
PC or Laptop screen on your TV.
Click the ‘Height + and Height -’ buttons to modify the height of
your PC or Laptop screen on your TV.
Click the ‘Save’ button to confirm any adjustments you have made.
To reset the Width and Height back to their original settings, click
the ‘Default’ button.
2.4.2 Overscan Configuration Settings
Page 15
DGIMST10 - DigiSender® iMedia® SmartSender™
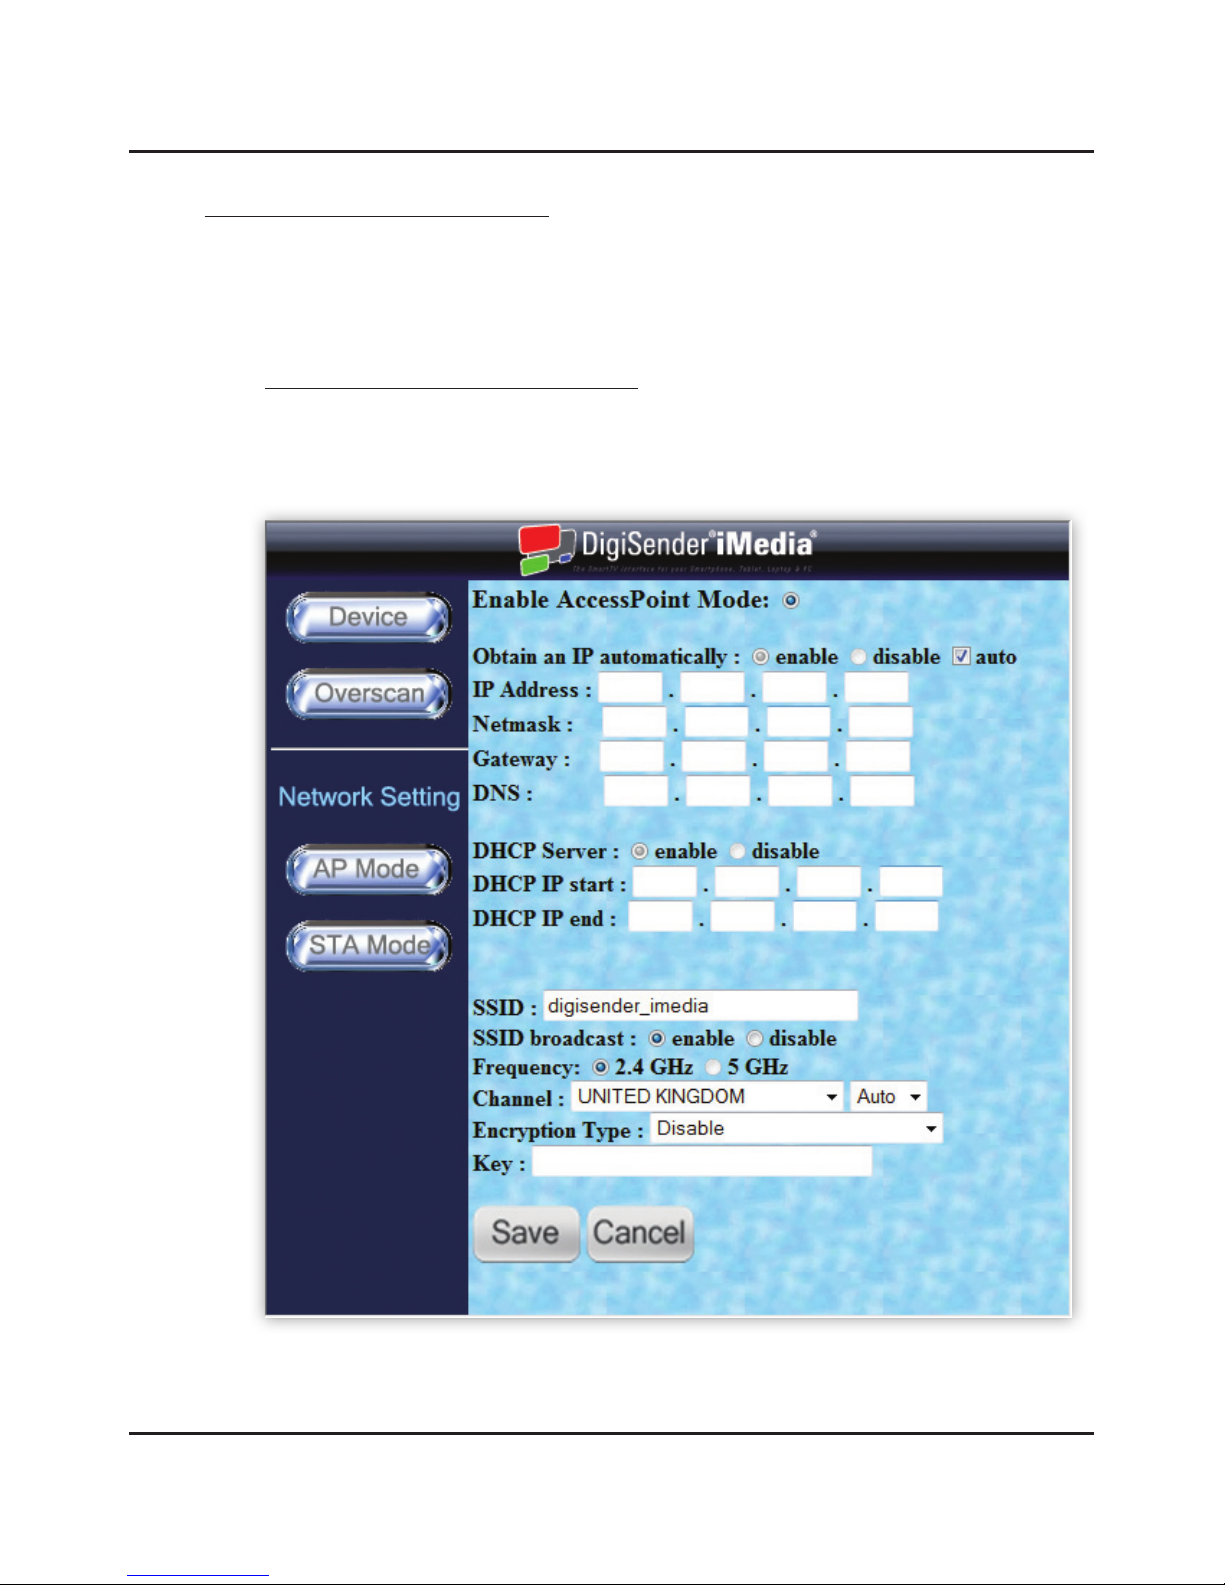
2.4.3 Network Configuration Settings
The last two Configuration Settings Tabs relate to how you connect the iMedia® SmartSender™ to
your Network. See Section ‘3.1 Network Connection’ on page 19 for more information.
AP Mode Network Configuration Settings
Click the ‘AP Mode’ Tab at the top of the Configuration Settings page.
continued on next page . . .
2.4.3 Network Configuration Settings
Page 16
DGIMST10 - DigiSender® iMedia® SmartSender™
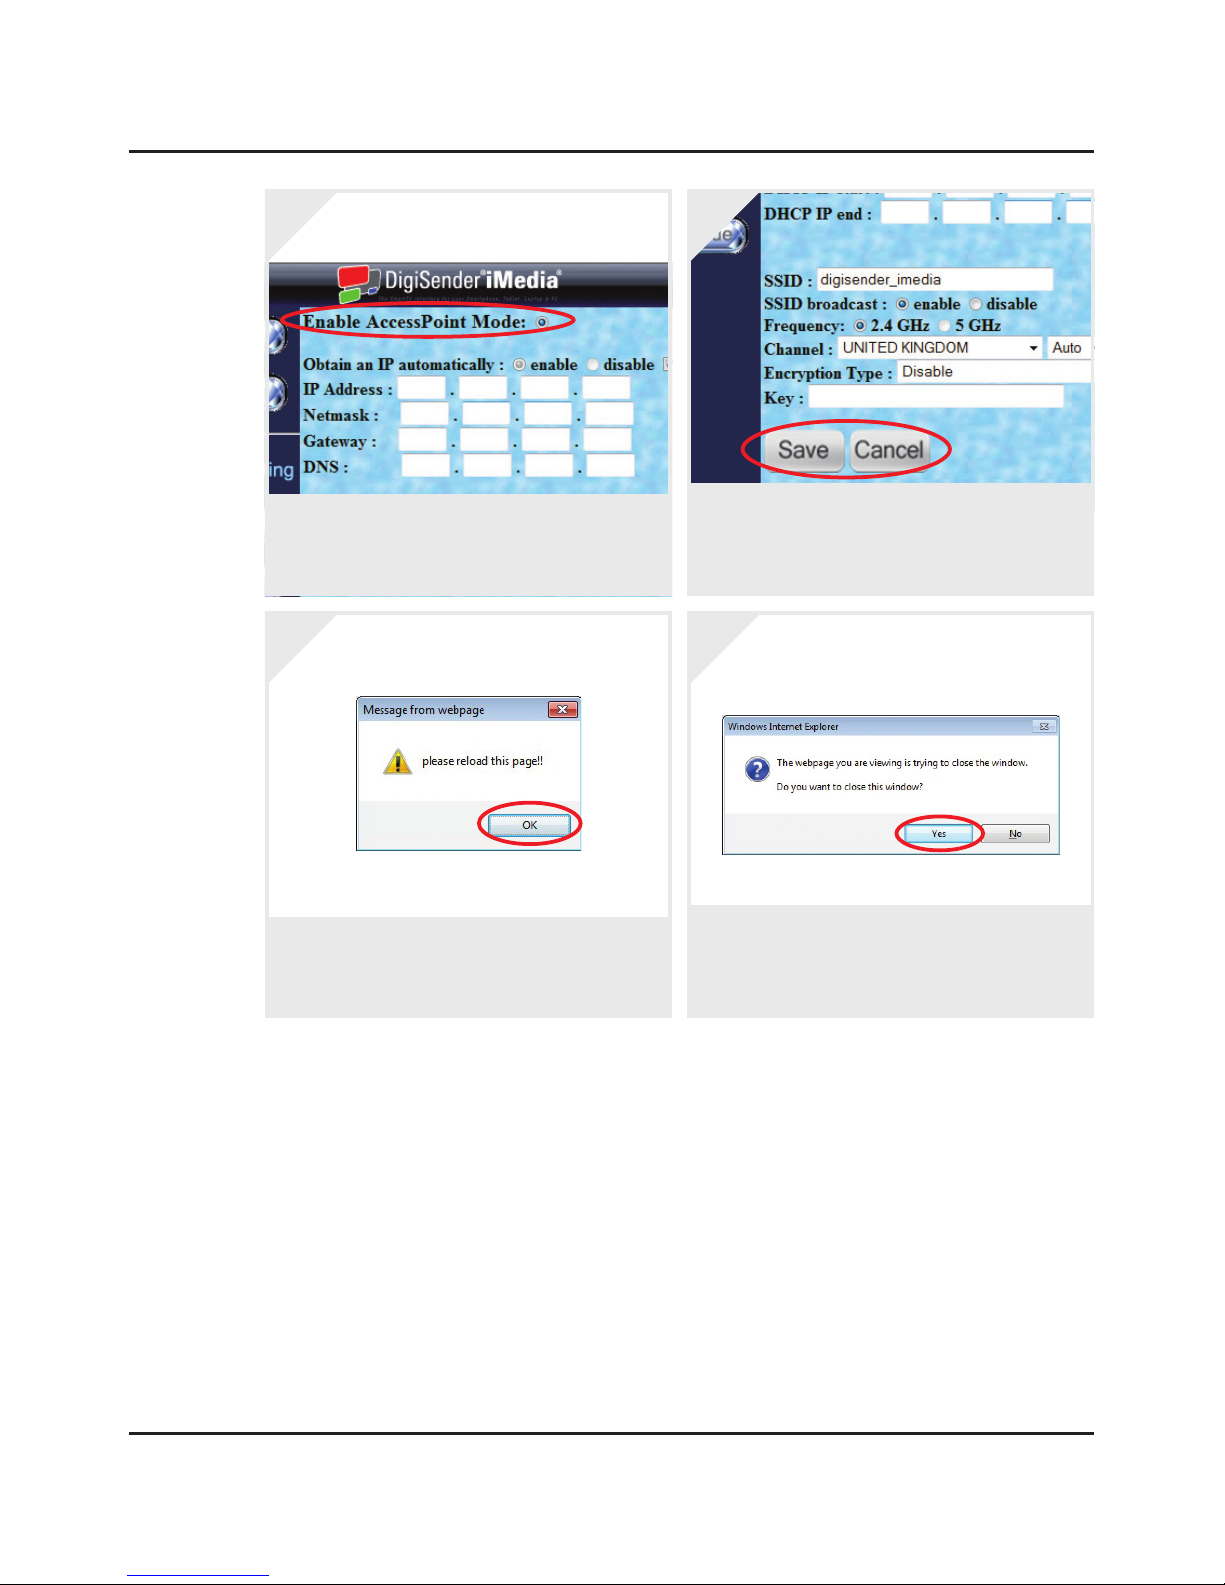
Tick the box next to ‘Enable Access Point Mode’
and then make any necessary changes to the ‘Ac-
cess Point Mode Configuration Settings’.
1.
To Cancel any changes you have made to the ‘Ac-
cess Point Mode Configuration Settings’ click
the ‘Cancel’ button. Click the ‘Save’ button to
save any changes.
2.
After clicking the ‘Save’ button a small window
will pop up prompting you to “Please reload this
page!”. Click the ‘OK’ button.
3.
If another window pops up warning you that “The
webpage you are viewing is trying to close the
window. Do you want to close this window?”
Click the ‘Yes’ button.
4.
The iMedia® SmartSender™ will then apply the new Access Point Mode Configuration Settings
and reboot itself automatically.
Important Note: If you are unfamiliar with these settings then it is advised that you leave them set to default.
Incorrect changes to these settings could cause the iMedia® SmartSender™ to lose Network Connection. Should
this occur, you will need to connect the iMedia® SmartSender™ to your Network via an Ethernet Cable (see
Section ‘3.1.1 LAN Connection’ on page 20 for more information) in order to reset the AP Mode Network
Configuration Settings back to defaults via this page.
2.4.3 Network Configuration Settings
Page 17
DGIMST10 - DigiSender® iMedia® SmartSender™
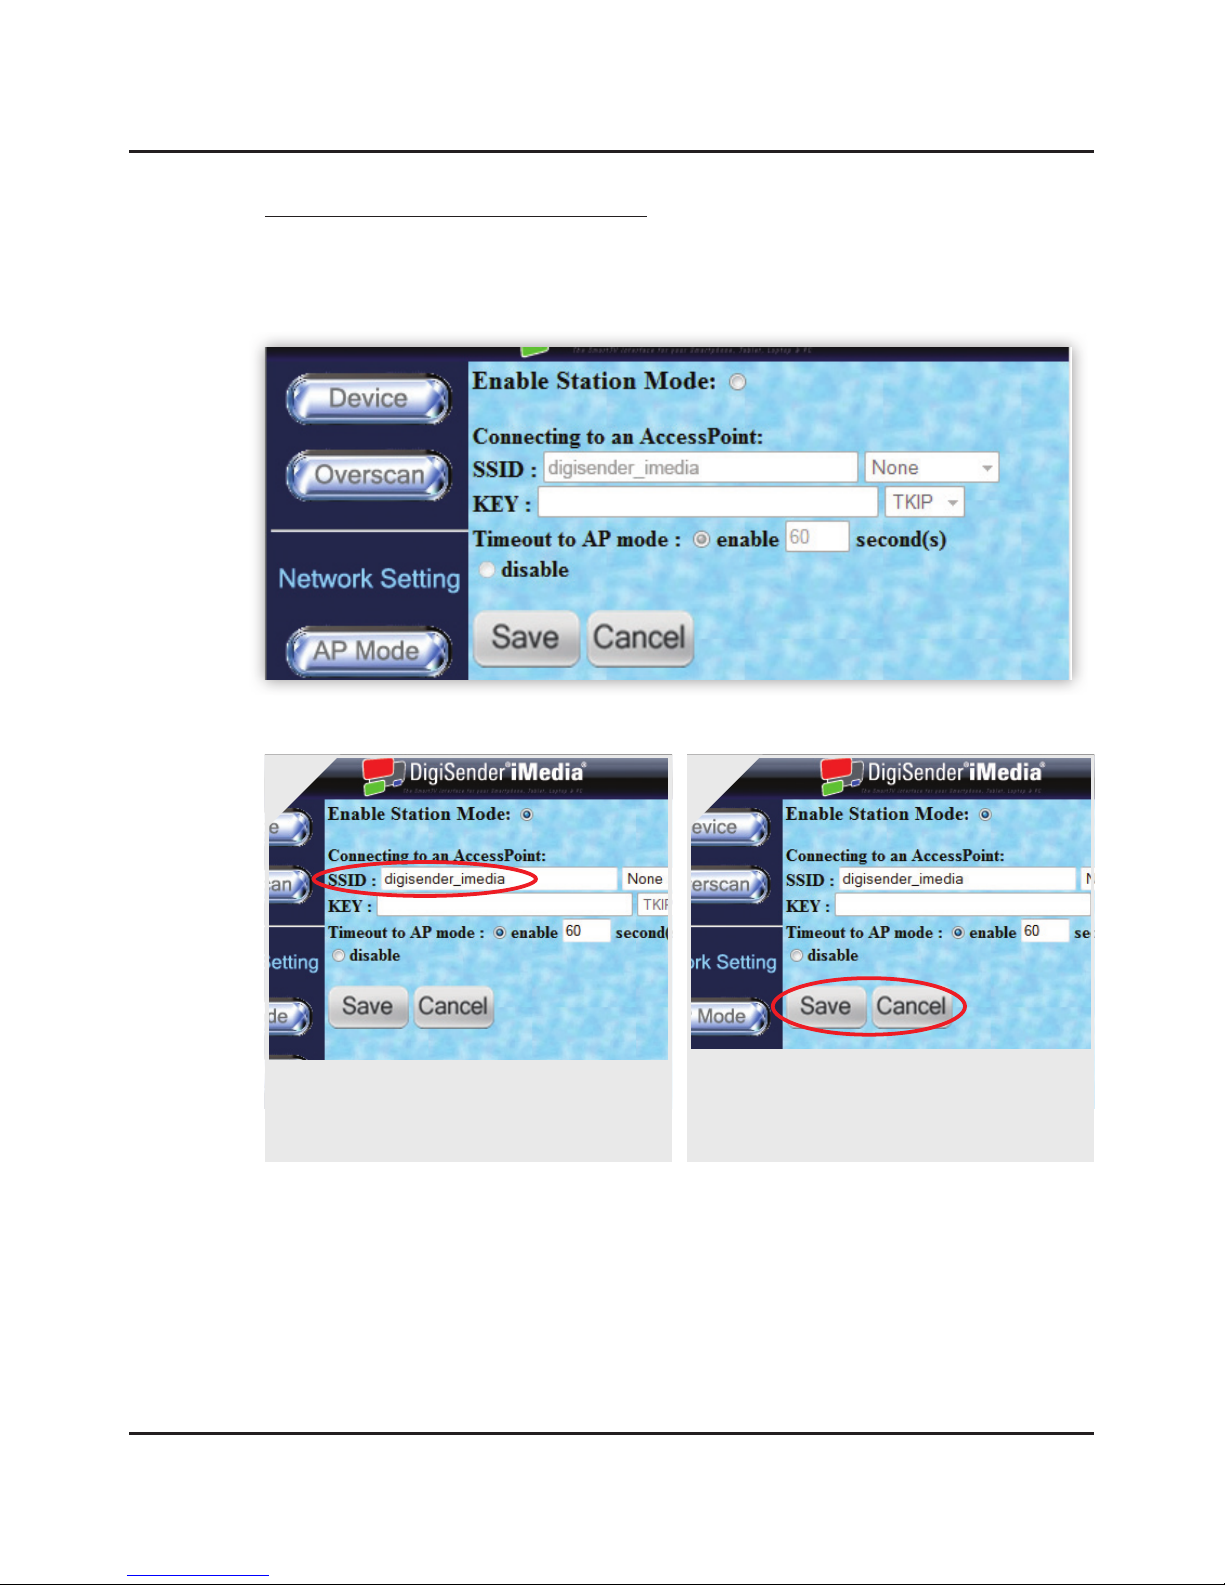
STA Mode Network Configuration Settings
Click the ‘STA Mode’ Tab at the top of the Configuration Settings page.
Tick the box next to ‘Enable Station Mode’ and
then enter the ‘SSID’ and ‘WEP/WPA/WPA2
Key’ for your router into the boxes below.
1.
To Cancel any changes you have made to the
‘Station Mode Network Configuration Settings’
click the ‘Cancel’ button. Click the ‘Save’ button
to save any changes.
2.
Important Note: Please consult your router documentation to find your routers SSID and WEP/WPA/WPA2
Key. Alternatively, search online for ‘How to find your routers SSID and WEP Key’.
2.4.3 Network Configuration Settings
Page 18
DGIMST10 - DigiSender® iMedia® SmartSender™
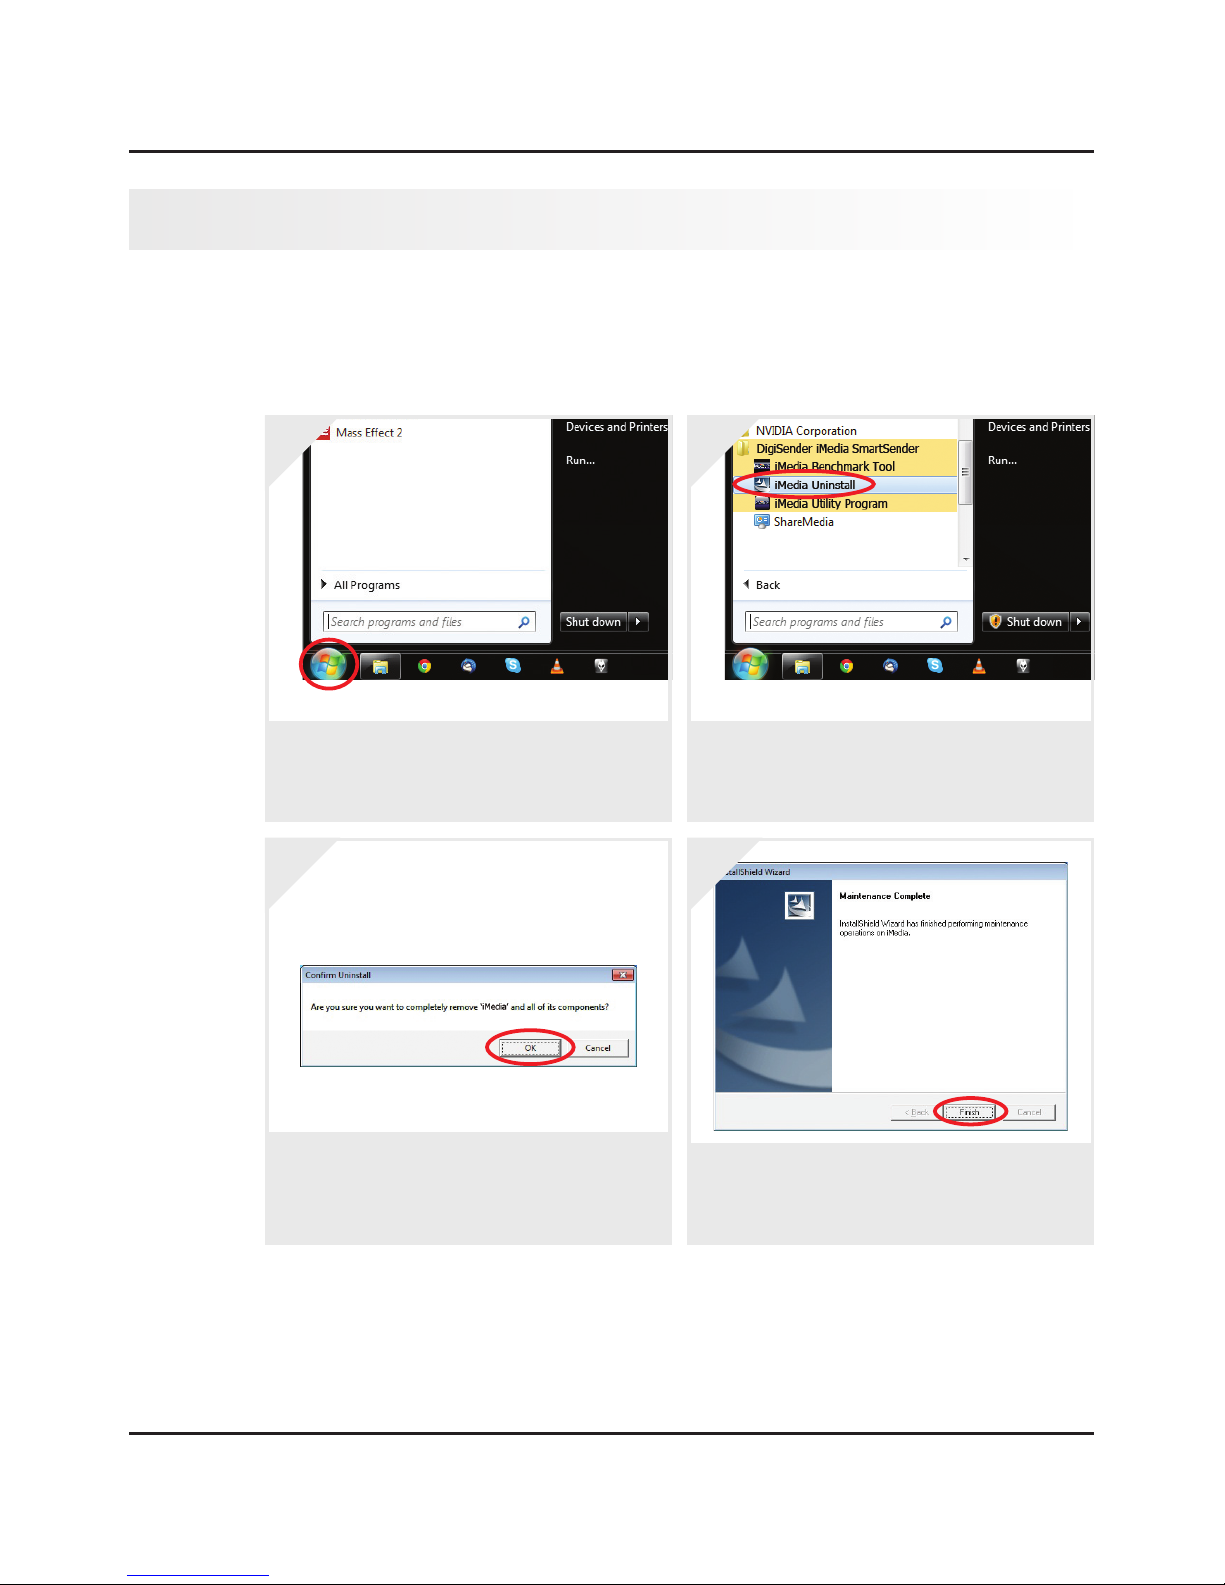
Should you wish to uninstall the iMedia® Utility Program from your PC or Laptop, then this can
easily be achieved by following the steps below.
2.5 Uninstalling the iMedia® Utility Program
Click the ‘Start’ button in the bottom left corner
of your PC or Laptop screen to bring up the ‘Win-
dows Start Menu’.
1.
Click ‘All Programs’ and scroll down to the Di-
giSender iMedia SmartSender folder. Open this
folder and click the ‘iMedia® Uninstall’ program.
2.
A window will pop up asking “Are you sure you
want to completely remove ‘iMedia® Utility Pro-
gram’ and all of its components?” Click the ‘OK’
button.
3.
Click the ‘Finish’ button and then restart your PC
or Laptop.
4.
2.5 Uninstalling the iMedia® Utility Program

Page 19
DGIMST10 - DigiSender® iMedia® SmartSender™
3 Installing the iMedia® SmartSender™
3.1 Network Connection
The first step in installing your iMedia® SmartSender™ is choosing how you want to connect it to your
Network.
There are three main methods of connecting the device to your Network and they are detailed in the
following sections:
3.1.1 LAN Connection
3.1.2 Station Mode Connection
3.1.3 Access Point Mode Connection
The following pages will detail how to connect the iMedia® SmartSender™ to your Network using each
of these methods.
3.1 Network Connection
Page 20
DGIMST10 - DigiSender® iMedia® SmartSender™
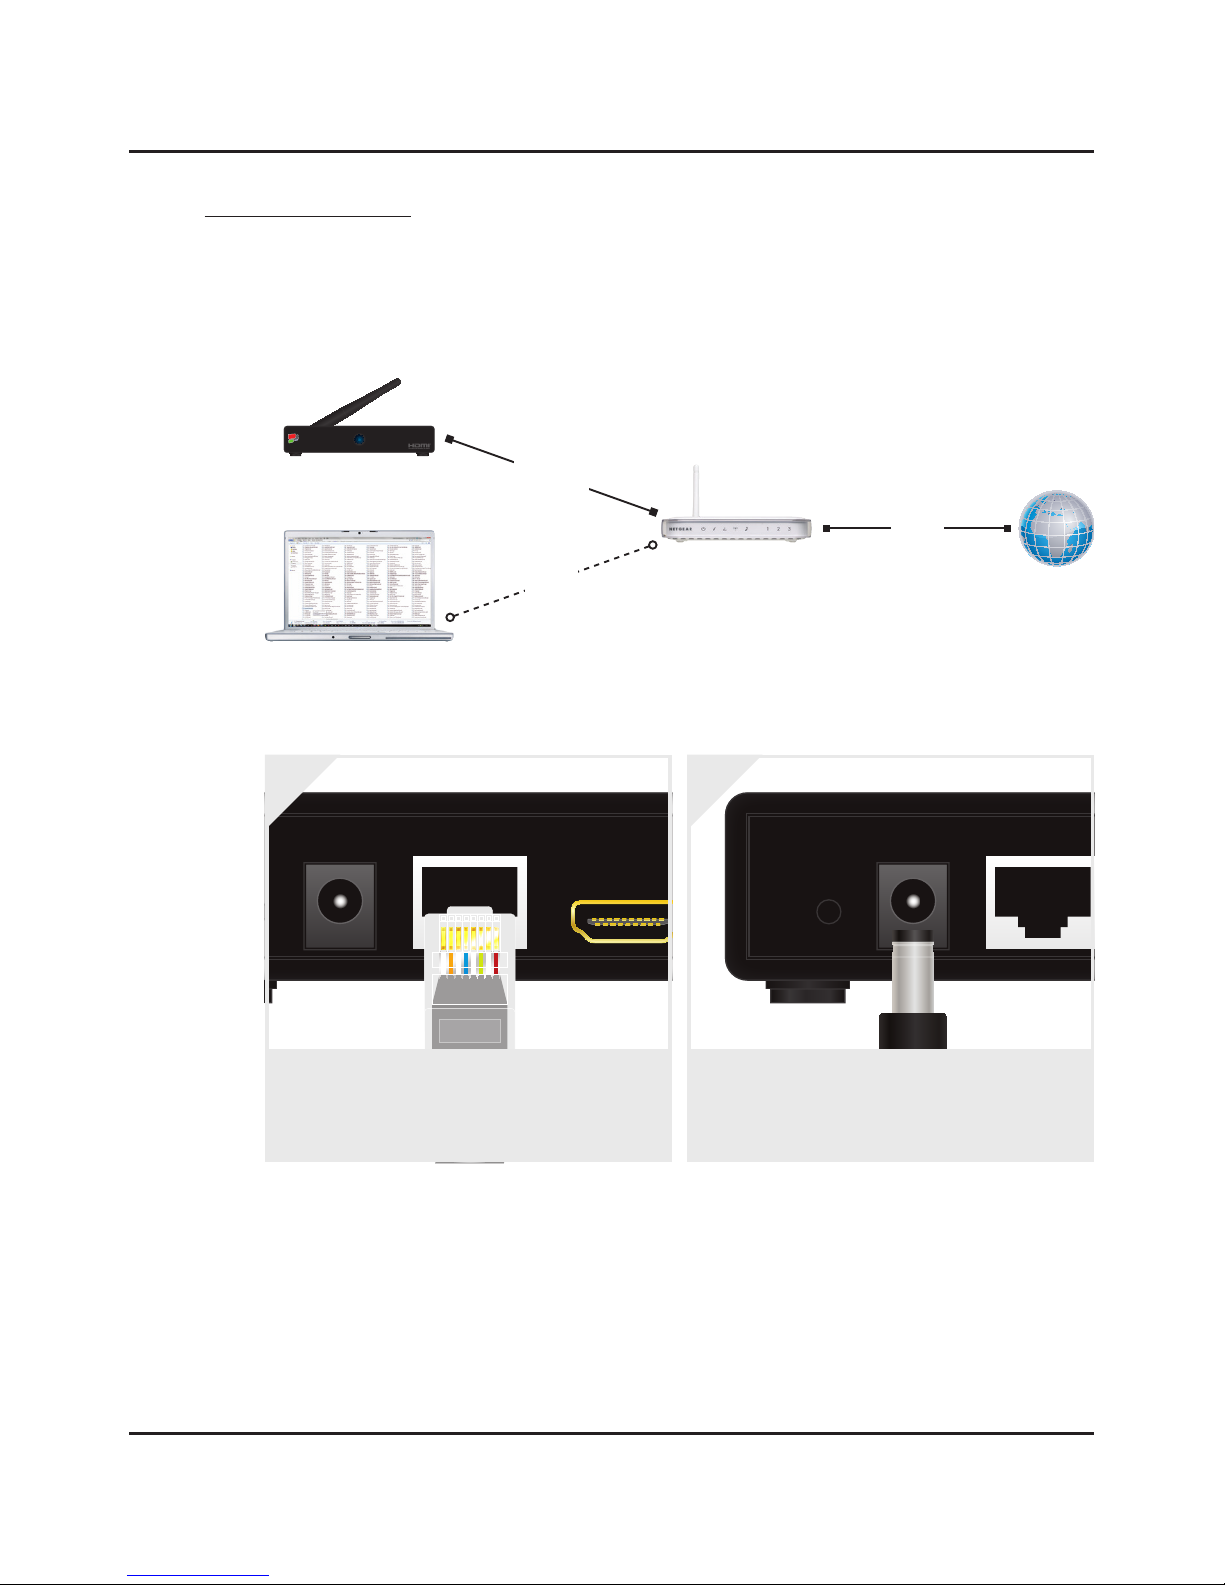
3.1.1 LAN Connection
This method of connection simply involves connecting the iMedia® SmartSender™ to your router
with an Ethernet Cable and is the first step in configuring other wireless connections.
ANT
AV OUT
DC 12V
HDMI OUT
ETHERNET IN
USB 1 USB 2
RESET
Connect the included Ethernet Cable to the sock-
et labelled ‘Ethernet’ on the back of the iMedia®
SmartSender™ and connect the other end to an
available Ethernet Socket on your Router.
1.
ANT
AV OUT
DC 12V
HDMI OUT
ETHERNET IN
USB 1 USB 2
RESET
Connect the included Power Cable to the socket
labelled ‘DC 12V’ on the back of the iMedia®
SmartSender™. Connect the plug section to an
available mains socket and switch the unit on.
2.
PC or Laptop
DigiSender®iMedia
The SmartTV interfacefor your Smartphone, Tablet, Laptop & PC
iMedia® SmartSender™
Router
Internet
Wi-Fi
ADSL
ETHERNET
3.1.1 LAN Connection
Table of contents
Other DigiSender TV Accessories manuals

Popular TV Accessories manuals by other brands


NETGEM
NETGEM i-Player and BT Digital TV adapter PC Share user guide

Sirius Satellite Radio
Sirius Satellite Radio 128-8665 installation guide

Philips
Philips CRA01/00 installation guide

Safco
Safco 8933 Assembly instructions

Grundig
Grundig DNS Universal quick start guide

Happy Wanderer
Happy Wanderer easy-tune user manual


