Digital reasures CINEMATIX User manual

1
USER GUIDE
9” Portable DVD Player
Read this instruction manual carefully before connecting or
operating the appliance and keep it for future reference.
2
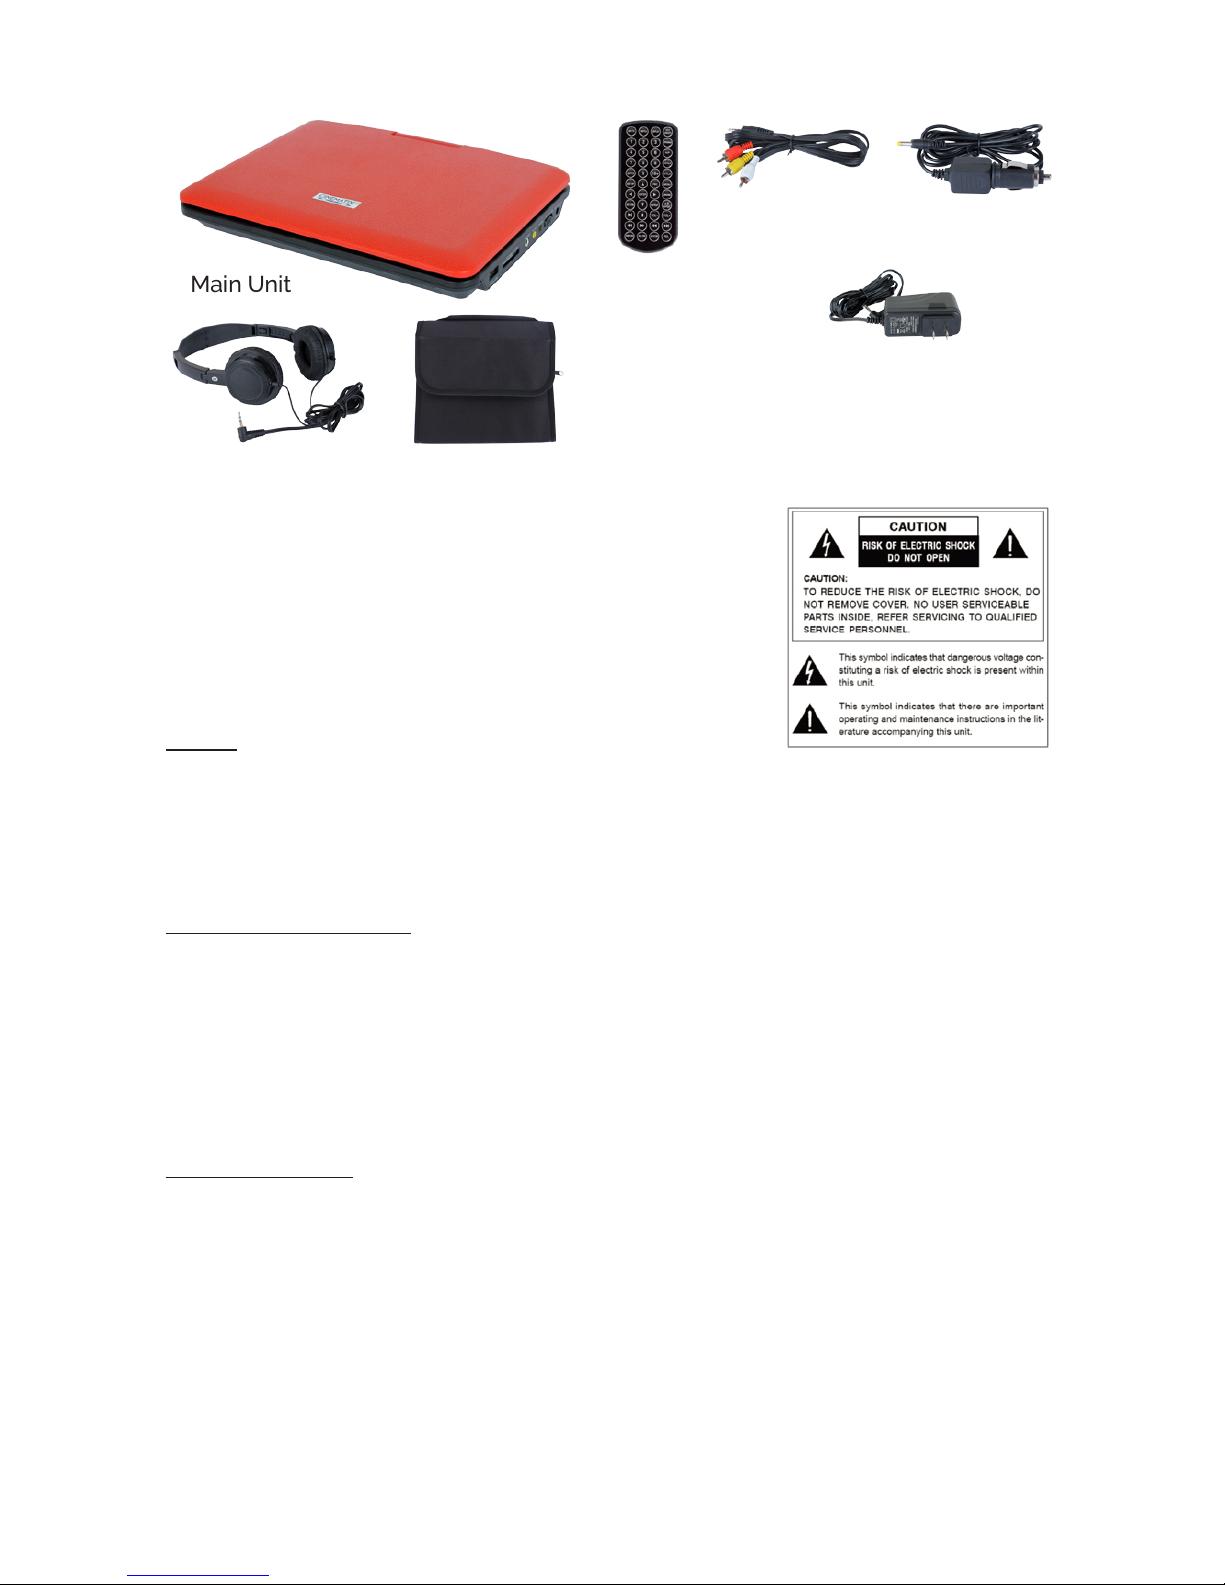
PACKAGE CONTENTS:
Main Unit
Cary Bag
Remote
Control
AV Cable Car Adaptor
AC Adaptor
2x Headphones
Warning
To prevent re or shock hazard, DO NOT expose
this appliance to rain or moisture.
High Voltage Warning
Dangerous high voltages are present inside this
enclosure. To avoid electric shock, DO NOT open
the cabinet; refer servicing to qualied personnel
only.
Laser
This player is classied as a CLASS 1 laser product. To prevent direct
exposure to the laser beam, do not try to open the appliance. Do not
attempt to dismantle the appliance. You may become exposed to invisible
laser radiation if the product is open or the interlock is failed or defeated.
Avoid direct exposure to beam.
Instruction Manual
1. To ensure the proper operation, all the safety and operating instructions
should be read carefully before connection and operation.
2. Retain instructions — Keep this manual in a safe place for further
reference.
3. All warnings on the product and in the instruction manual should be
adhered to.
4. All operating and use instructions should be followed.
Safety Caution
1. The appliance is intended for household use only, and not for
commercial or industrial use.
2. This appliance should not be exposed to dripping or splashing water and
no object lled with liquids such as vases should not be placed on the
appliance. Dry location use only.
3. Do not expose the appliance, batteries or discs to extreme temperatures,
excessive moisture, rain or sand. Never use this device in high
temperature or in high humidity. The best operating temperature is
between 5°C-40°C.
4. No naked ame sources such as lighted candles should be placed on
the appliance.
User
Guide

3
5. Do not place the unit on an unstable surface to prevent it from falling. Do
not place the unit on top of any other appliance.
6. Do not place the appliance on or near a hot gas ame, electric element,
and heaters or in areas subjected to direct sunlight.
7. Place the appliance where there is good air ventilation. Any ventilation
holes should not be impeded by covering with items, such as
newspaper, tablecloths, curtains etc.
8. Don’t put the device near a magnetic eld, e.g. speaker. The normal
function of the product may be disturbed by strong Electro-Magnetic
Interference. If so, simply reset the product to resume normal operation
by switching it off from the mains outlet and then switching it back on
after several minutes.
9. Do not operate the player if it is not working normally or has been
damaged in any way. Turn the unit off, unplug it from the power source
and consult service personnel. Do not attempt to service this unit yourself.
10. Do not listen to headphones at high volumes. The excessive sound
pressure from headphones can cause hearing loss.
11. Please observe the local regulations regarding the disposal of
packaging materials, exhausted batteries and old equipment.
Power Supply
1. Do not operate the product with wet hands. Doing so may cause electric
shock.
2. Always turn the power off and remove the adaptor from the outlet when
the appliance is not to be used for a longer period of time and before
cleaning.
3. Power supply cords should be routed so that they are not likely to be
walked on or pinched by items placed upon or against them.
4. Do not let the power cord hang over the edge of a table or bench top
or touch any hot surface. Do not operate the appliance with a damaged
cord or after the appliance has been dropped or damaged in any
manner. If damage is suspected, do not attempt to repair or disassemble
the appliance by yourself. Contact qualied service personnel if you
need help.
Operation and Position
1. Do not connect accessories, which are not dened by the manufacturer
to the player.
2. Do not increase the volume when the player is just playing at very quiet
sections of a movie. This could damage the speaker if very loud
passages suddenly follow.
3. Press the player’s buttons gently. Pressing them or the screen too hard
can damage the player.
4. Slots and openings in the cabinet are provided for ventilation and to
ensure reliable operation of the product and to protect it from
overheating and malfunction, and these openings must not be blocked
or covered.
5. Do not drop the unit or expose this product to harsh impacts. This is a
sophisticated electronic device that cannot withstand shock from drops.

4
6. Protect the player against weather high temperature and humidity. Do
not use the player in an extremely dry environment, as this can lead to
static discharge, which can damage the player.
7. Keep the appliance away from rain and any moisture.
8. Keep the player clean and never store it next to a heat source or in dirty,
humid or wet places. Do not expose the player and the remote control to
direct sunlight.
9. Ensure that your earphones are inserted into the player before it is
switched on. Inserting
them afterwards can potentially damage the earphones and the player.
10. Keep “Earbud” earphones out of reach of small children. “Earbud”
earphones may be swallowed if they are placed in mouth.
Caution: Use of controls or adjustments or performance of procedures
other than herein may result in hazardous radiation exposure or other
unsafe operation.
Service and Maintenance
1. Servicing - Do not attempt to service this product yourself as opening or
removing covers may expose you to dangerous voltage or other
hazards. Refer all servicing to qualied service personnel.
2. Damage Requiring Service - Unplug this product from the wall outlet and
refer servicing to qualied service personnel under the following
conditions:
a. When the AC adaptor or Car adaptor is damaged.
b. If liquid has been spilled, or objects have fallen into the product.
c. If the product has been exposed to rain or water.
d. If the product does not operate normally by following the operating
instructions. Adjust only those controls that are covered by the
operating instructions as an improper adjustment of other controls
may result in damage and will often require extensive work by a
qualied technician to restore the product to its normal operation.
e. If the product has been dropped or damaged in any way, and when the
product exhibits a distinct change in performance, this indicates a need for service.
Cleaning and Care
1. Always turn the power off and unplug it from the outlet before cleaning.
2. NEVER spray or pour liquids directly on the screen or plastic casing, and
clean with a dry towel only.
3. DO NOT clean the unit with strong chemical agents or abrasive cleaners.
4. DO NOT allow residue or liquids to enter any part of the appliance as
this may create a risk of electrocution.
5. Be sure to remove the disc from the player before moving the unit.
Disc Requirements
This DVD player supports playback of the following:
Type Disc Mar Content Type Disc Size Max Playback Time
DVD-Video Discs Audio+Video 12cm 133min (SS-SL)
(Moving Picture) 242min (SS-DL)
266min (DS-SL)
484min (DS-DL)
Audio Compact Discs Audio 12cm 74min
(CDs)
5
This unit can play CD/VCD/DVD/MP3/WMA/AVI/MPEG. This unit doe snot
support discs which are not listed above (e.g., PC CD-ROM, CD EXTRA,
CD-G, CD-G, CD-I, ETC.)
Connecting
1. Ensure that the player and other external equipment to be connected is
switched off before commencing connection.
2. Read the instructions carefully before connecting other external equipment.
3. Ensure that you observe the color coding when connecting audio/video cables.
Connecting External TV
Your player comes equipped with an AV output jack. Use this feature to
connect the player’s signal to external equipment (e.g. TV, monitor///////0.
Please refer to the image as below to connect them;
1. Connect the 3.5mm—RCA Cable to the AV Output on the unit and the
audio/video inputs on the Television (Red to Red, White to White, and
Yellow to Yellow).
2. Turn the unit on by switching the Power Button to the On position.
3. Change the television to the correct audio/video input setting.
4. Audio and the video played through the unit will now be seen and herd
on the connected television.
Connecting Headphones
Two stereo headphone jacks have been provided on the player for private
listening. To use the jacks, plug in the headphones with a stereo mini-jack
3.5mm plug into one of the headphone jacks and adjust the volume to a
comfortable listening level.
Note:
When headphones or earphones are connected to the earphone jack, the
main speakers will be automatically muted.
2. Be sure that your player is set at a low volume level before connecting
the headphones.
3. Increase the volume gradually for comfortable listening.
Caution
Listening at high volumes for a long period could cause hearing loss.
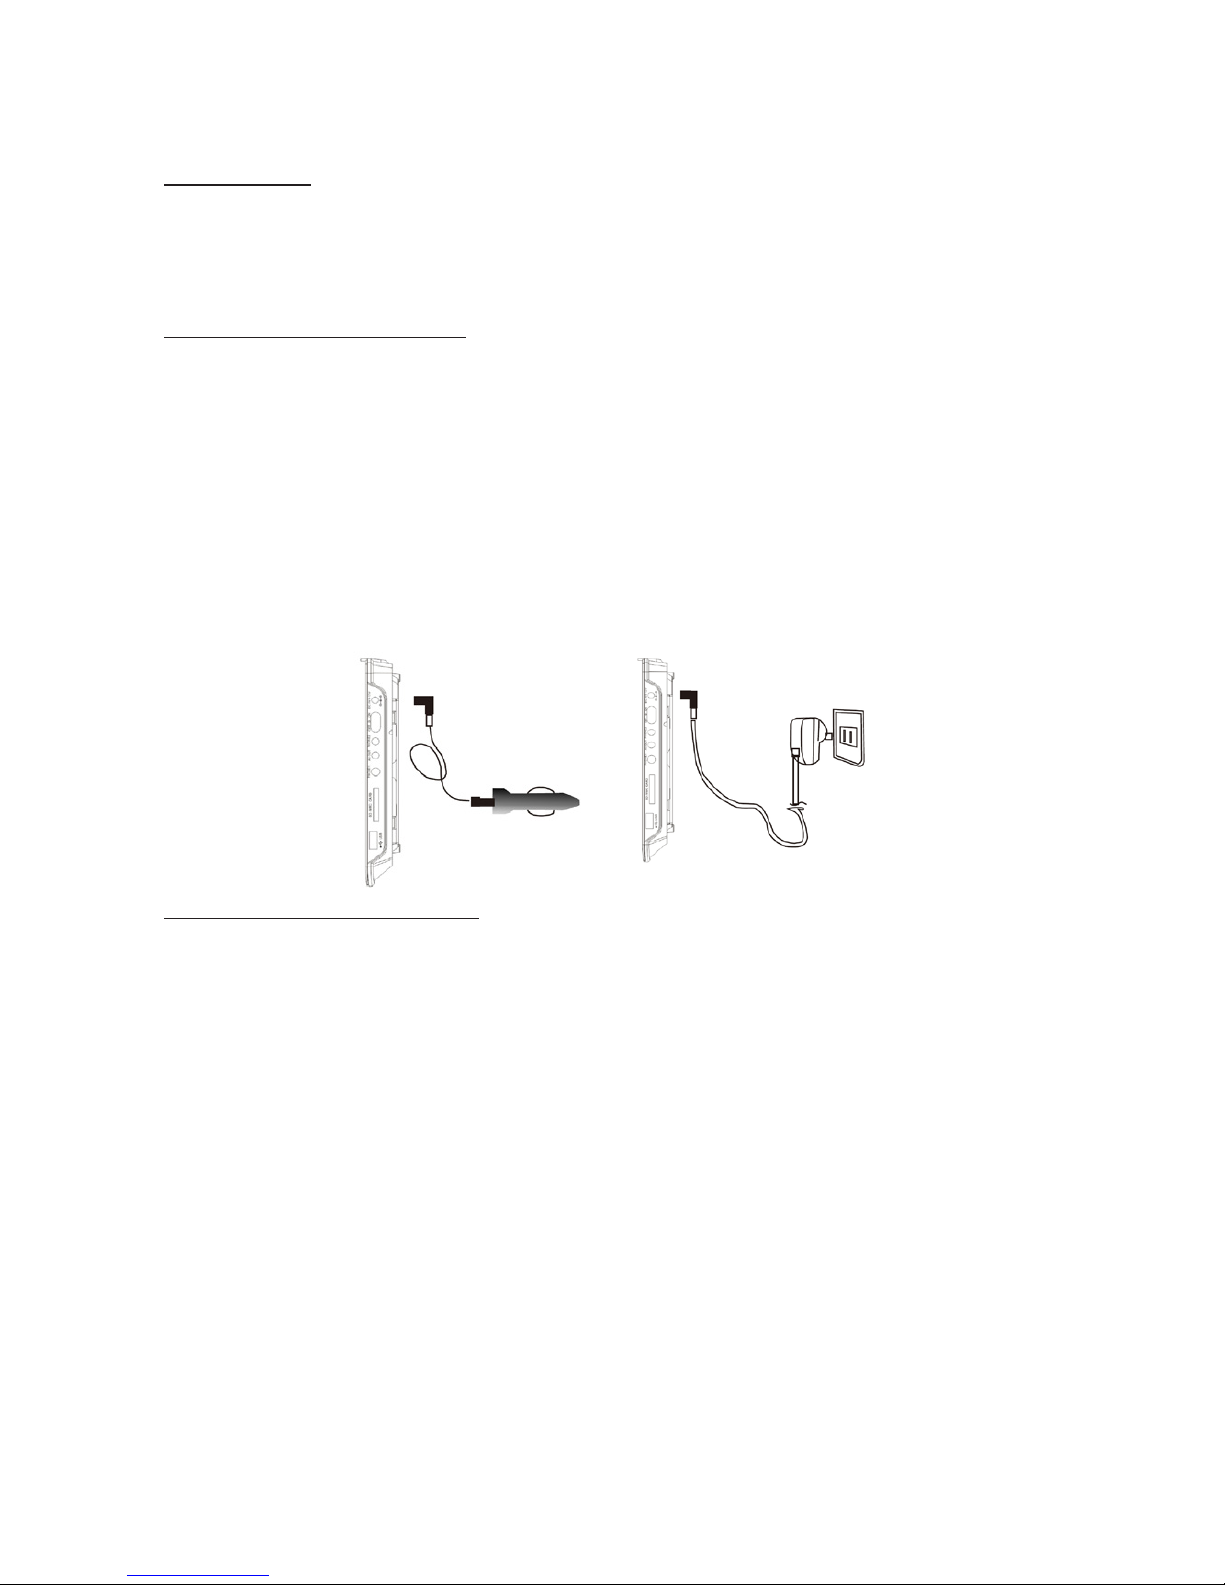
Connecting Power Supply
AC Operation
Before connecting the supplied AC adaptor to the wall outlet, ensure that all
other connections have been made.
Insert the small plug of the supplied AC adaptor rmly into the DC IN9V-
12V jack on the right side of the player, and then insert the adaptor into an
available AC 100-240V-50-60Hz wall outlet.

6
Warning
Only use the supplied adaptor. Failure to do so may cause a re or damage
to the player. Never make or change any connections with power switched
on.
Caution
• Do not connect the adaptor to a power outlet other than which is indicated
here and on the label as this may result in the risk of re or electric shock.
• Do not handle the plug of adaptor with wet hands. Doing so may cause
electric shock.
Car Adaptor Connection
Before connecting the supplied car adaptor, ensure that all other connec-
tions have been made. Insert the small plug of the supplied car adaptor
rmly into the DC IN9V-12V jack on the right side of the player, and then
insert the other end into the Cigarette lighter socket.
Warning
• Disconnect this car power adaptor when the unit is not in use for a long
period of time.
• Do not plug the car adaptor to any DC24V cigarette lighter. Only a
DC12V cigarette lighter socket can be used. Connecting the car adaptor
to a power supply with a different voltage can damage the unit.
• The Car adaptor is for in-car use only.
Battery Operation
The unit has built-in rechargeable battery. Fully charge the built-in battery
before using it for the rst time. It takes about four hours to fully charge the
battery when the player is not in use. Once charged, disconnect the AC
adaptor, and then switch on the player. The unit will operate on Battery Pack.
The unit offers four hours playback time on a full charge. The playback time
may vary depending on discs and the volume level.
Note: The player will operate on battery power when the AC/Car adaptor is
connected.
Charging the Battery Pack
To charge the built-in battery, just connect the adaptor to the player and a
specied wall outlet. The built-in battery can be charged whether the unit is
operating or powered off, and the Charge indicator will be red when charging.
The indicator will change to green when the battery is fully charged.
The built-in rechargeable battery can be used for approximately 300
charge-cycles without any noticeable change in performance.
When the built-in battery power is low, the empty battery icon will appear
on the screen and indicate the player will automatically turn off, you will
need to connect the AC adaptor for power at this time.
Note
• Only use the AC adaptor and Car adaptor supplied.
• Never dispose the battery in re.
• Do not use the unit in high temperature or near heat sources.
• Danger of explosion exists if the battery is incorrectly replaced. Replace
only with the same or equivalent type. Refer servicing to qualied service
7
personnel only.
• While using the built-in battery, the environmental temperature should be
5°C to 35°C.
• To get the longest service life of the built-in battery, charge in an
environment without excessive heat.
• The built-in battery in this device may present a risk of re or chemical
burn if mistreated. Do not disassemble or incinerate the battery or put it in
an environment above 65°C.
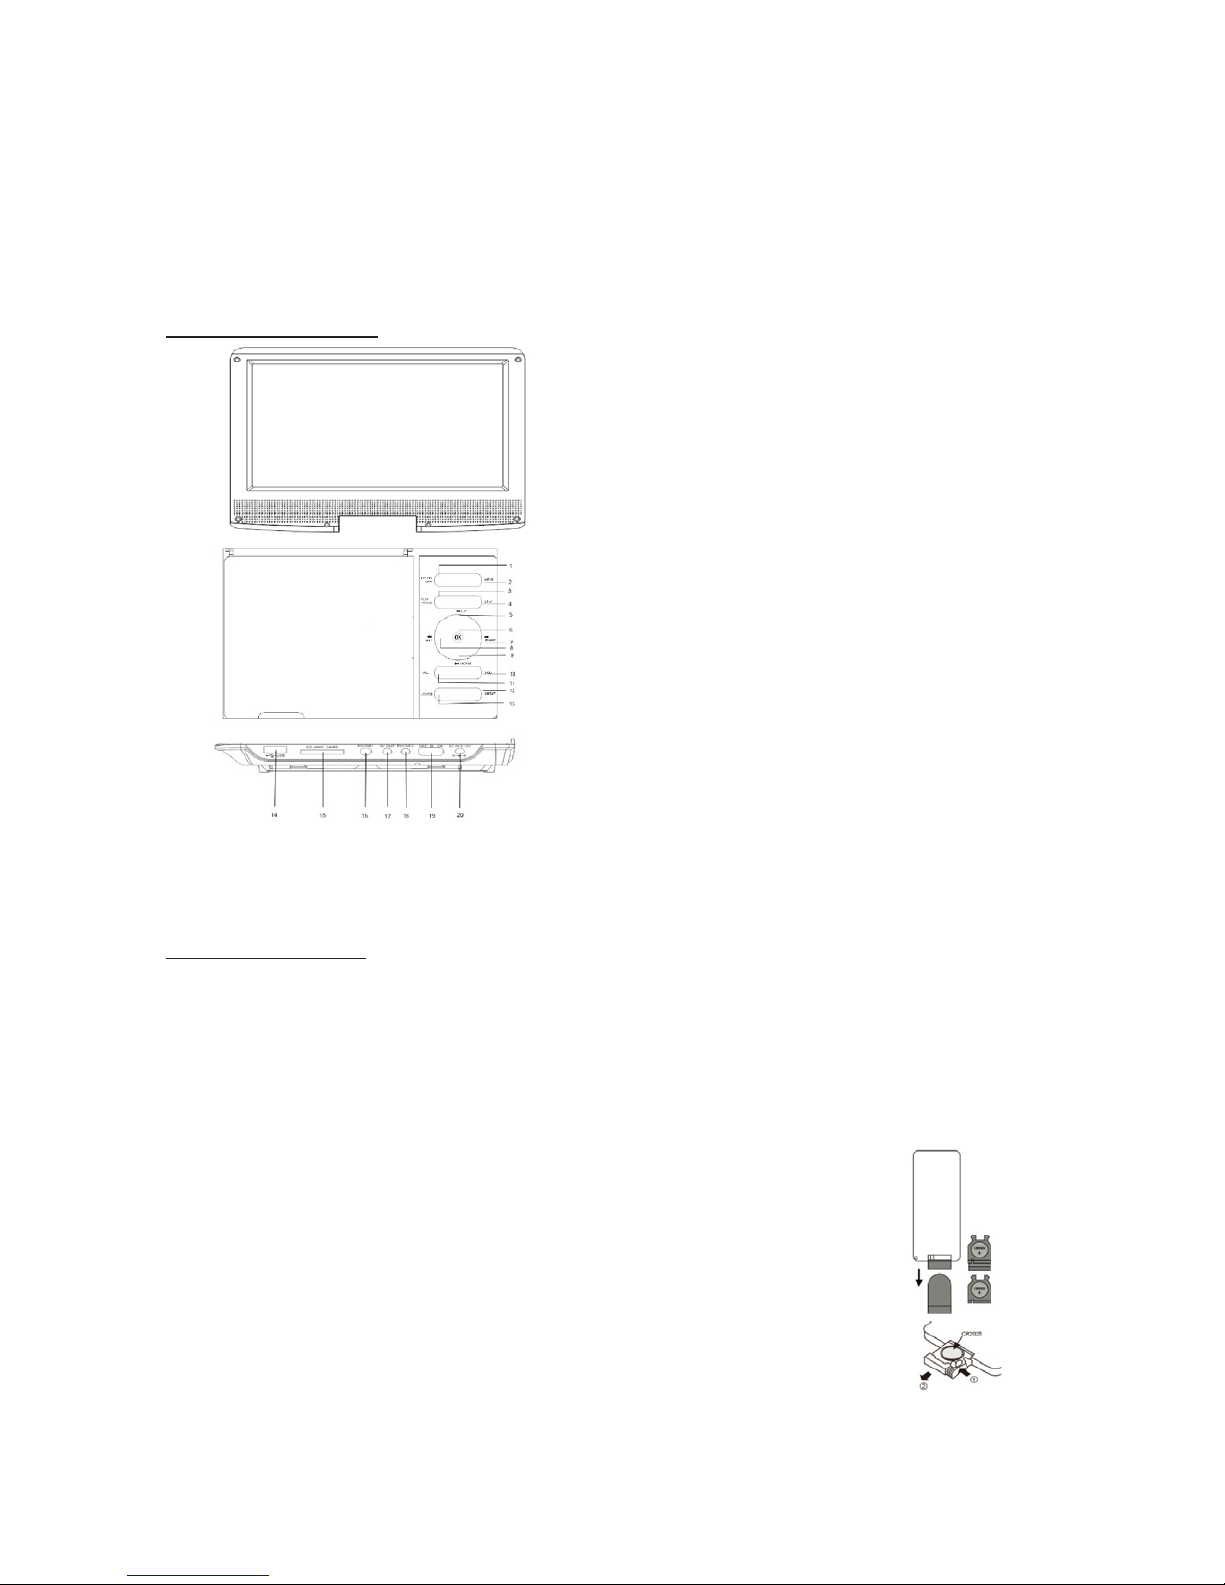
DVD Player View
In DVD mode, press the DVD/USB/CARD key repeatedly to switch
between the DVD, USB or SD/MMC mode if the disc, USB device and
memory card are all available.
Remote Control
Preparing the Remote Control
The remote control requires on CR2025 type 3V lithium battery. To extend
the battery life of the original battery, a small plastic spacer tab has been
inserted between the battery and the battery terminal. In order to get your
remote control working you must pull the tab from the battery compartment.
Place the remote control on an even surface and insert the supplied button
cell into the remote control as follows.
1. Push the button towards left.
2. Pull the battery loader out.
3. Insert the battery into the receptacle, making sure the
polarity matches the marks inside the component.
4. Replace the battery compartment cover of remote control.
Cell Data
Battery type: lx CR2025, 3 V
Service life: approximately one-year (for normal use and room temperature)
Using Of Remote Control
Point the remote control towards the sensor window on the main unit when
operating. The remote control works best at a distance less than 5 m and at
1. TFT ON/OFF
2. MENU
3. PLAY/PAUSE
4. STOP
5. PREVIOUS KEY/UP
6. ENTER/OK KEY
7. FAST FORWARD/RIGHT
8.FAST BACKWARD/LEFT
9. NEXT KEY/DOWN
10. VOL + KEY
11.VOL - KEY
12. SETUP KEY
13. DVD/USB/SD SELECT KEY
14. USB PORT
15. SD/MMC CARD PORT
16. 3.5MM HEADPHONE 1 JACK
17. AV OUT JACK
18. 3.5MM HEADPHONE 2 JACK
19. POWER ON/OFF
20. DC IN 9-12 V JACK

8
at an angle of up to 30 degrees to the front of the unit. Remote requires
line-of-sight to work, ensure no objects are between remote and infrared
sensor. Do not place the remote control in direct sunlight. If the remote
control fails to work even when it is operated near the player, replace the
battery.
Notes on Batteries
If the remote control is not used for an extended period of time, please
remove the battery from the compartment.
Do not heat batteries or dispose of them in res.
Do not dismantle, deform or modify batteries.
Remote Control Buttons
1. MUTE: Press key to mute the audio of the player. Press it
again to activate the sound.
2. 0-9 Number Keys: Use the Numeric buttons to input a
DVD chapter or CD track (invalid for some discs) and press
PLAY/PAUSE button to conrm.
3. Goto: Press to go to a specic time index/title/chapter.
4. Setup: Press it to go to the Setup menu directly in any
time(except the AV mode)
5. DIRECTION BUTTON: Press direction buttons iikla±.11’. to
move the cursor in the menu upward, downward, to the left,
or to the right, respectively.
6. RETURN: During DVD play, press this key, to main menu
7. PLAY/PAUSE / ENTER: Press to play or pause the audio/
movie playback. Conrms the selection or press it to select
the le to play.
8. STOP: Short press to stop the audio/video/photo playback.
9. Fast Forward / Fast Rewind: Skips forward, consecutive
short presses to go to 5-level speed( X2¬>X4->X8->X16-
>X32 ->PLAY);
10. USB/CARD: Press the key to switch between DVD, CARD and USB modes.
11. SLOW: Press to select the different Slow motion. First press and hold the button to select the
1/2 speed; follow the same action to select the different 1/4 speed; 1/8 speed; 1/16 speed; and
normal speed to go to the ‘PLAY’ status.
12. ZOOM: For the DVD disc, short press to access the zoom function. You can select the 2X,
3X, 4X,1/2, 1/3, 1/4. For the photo disc, press it to switch between the zoom 100%, 125%,
150%, 200%, 75%, 50% and normal status.
13. SUBTITLE: Short press changes subtitle mode.
14. DISPLAY: During play press DISPLAY, TFT panel will display the title/track number of playing
disc.
15. TFT ON/OFF: Press to switch on/off the TFT LCD panel.
16. PROGRAM: Press to program a loaded disc to play chapters and titles or tracks in a specied
order.
17. N/P: Press this button to switch the system of the DVD Player (AUTO, PAL or NTSC).
18. ANGLE: Press and hold to access different viewing angles on supported DVDs.
19. TITLE: Press to view the title menu on a loaded DVD.
20. PBC: During VCD/SVCD play back, press PBC to select mode of play back PBC ON, PBC
OFF.
21. MENU: Press to view the main menu on a loaded DVD.
22. LANGUAGE: Press to change the language when playing discs supported with
multi-languages.
23. REPEAT: Press repeatedly to cycle through repeat options for the loaded disc.
24. A-B REPEAT: Marks a section to be repeated.
25. VOLUME-/+: Press to adjust the volume.
26. PREY/NEXT: Press to play previous chapter/title/track. Press to play next chapter/title/track.
27. R/L: When playing back a CD, this button cycles through and mono(left channel), and
mono(right channel) playback.

9
Basic Operation
Depending on the discs, some operations may be different or restricted.
Do not put any objects other than disc in the disc tray. Doing so may cause
the player to malfunction.
Note:
• If a “Ø” mark appears on the screen when a button is pressed, it means
the function is not available at the moment on the current disc or at the
current section.
• Depending on the conditions of the recording equipment or the CD-R/ RW
(or DVD ±R/RW, MP3, Picture CD) disc itself, some discs cannot be
played on this player due to the conguration and characteristics of the
disc, or due to the condition of recording and authorized software that
was use.
Disc Error Messages
If there is a problem with the format of the loaded disc, then the disc cannot
be played correctly.
• The region code of the disc does not match the player’s region code.
• The parental rating level of the disc is higher than the parental rating level
setting of the player. The player will not play the disc.
• Bad/No disc: The player is equipped with automatic disc quality detection
software. If the player detects a disc that is damaged or has a format
problem, it may play the disc at a lower quality or stop playing completely,
depending on how serious the damage is.
Note: DVD disc production quality may vary and some discs may deviate
from the industry standard. Some incorrectly formatted discs may still
play, however, the playback and operational quality of the disc may be
substandard.
Playable Discs
This player will play CD, VCD, DVD etc. discs.
Note: If you have trouble with playing a certain disc, remove the disc and
try a different one. Improper, formatted discs will not play on this player.
Turn On/ Off the Player
Slide the Power switch on the right side of the player to “ON” position to
turn on the player after connecting the mains power supply. Slide the Pow-
er switch on the player to “OFF” position to turn off the player completely.
Note: If the player will not be in use for a long period of time, slide Power
switch to the “OFF” position and unplug the portable DVD player from the
power source.
Selecting the Different Mode (DVD/USB/CARD)
When the playback is in the stop mode; press the USB/CARD button on the
remote control or the unit to select DVD or USB or SD play mode if certain
discs or memory devices are connected. When a USB mass storage device
is simultaneously inserted, the USB device will be recognized.
Playing discs
1. Slide the Power switch on the player to “ON” position to turn on the
player.
2. Open the disc cover and insert a playable DVD or CD disc, Make sure

10
the label side is facing up, and then close disc cover.
3. The player will scan the disc, and then playback will start
automatically. If a disc menu appears on the screen, see “Using the disc
menu” for details.
4. If the disc is locked by parental controls, you must enter your password
(see “SYSTEM SETUP” section for details).
5. During the playback, press the STOP button to stop playback.
6. Sliding the Power switch on the player to “OFF” position will turn off the
player.
7. Press the MENU button on the remote control to activate or deactivate
the PBC function. PBC playback allows you to play Video CDs (VCD
version 2.0 only) interactively.
8. Press the MUTE button on the remote control to turn on or off the sound.
9. Press the Go To button on the remote control to select the play time
10. Short press the LANGUAGE button on the remote control to select the
audio soundtrack languages; (on DVDs recorded with this multiple
languages, some recorded DVD may not have this function). Press the
ANGLE button to use the picture angle while
playing a DVD disc that has been made with multiple angles. Only
DVDs shot with multi-angle scenes have this function.
11. Press the REPEAT/PROG on the remote control button to re-setup the
playing order.
Using the Disc Menu
Depending on the disc, a disc menu may appear on the screen once you
load the disc.
1. From the le/ folder list menu, use the Direction buttons (UP/DOWN)
to select the desired playable le and press the ENTER button to start
playback.
2. If the desired le is saved in a folder, press Direction buttons (UP/
DOWN) to select the saved folder and press the ENTER button to open
the folder.
Return to the Root Menu or Title Menu
During the disc playback, press the MENU button to return to the disc’s root
menu or title menu (depending on the disc). For MP3 DVD. Picture discs,
press it to go to the le or folder list after pressing the MENU or stop but-
ton. Use Direction buttons (UP/DOWN/LEFT/RIGHT) or Numeric buttons to
select a play option. Press the ENTER button to conrm and start playback.
Play/Pause the Playback (DVDNCD/CD/MP3)
During the playback, press the PLAY/PAUSE button on the remote control
to pause the playback. Press it again to resume playback.
Volume Control
Press the VOL+/ - button on the player or the remote control to increase or
decrease the volume level. To switch off the volume temporarily press the
MUTE button on the remote control. Playback will continue without sound.
Press it again or press the volume button to activate sound.
Selecting a Track/Chapter/Title (DVD/ VCD/ CD)
Press the PREVIOUS I or NEXT I to skip to the previous or next title/
chapter/ track. 44
44

11
Stop Playback (DVD/ VCD/ CD)
During playback, press STOP button to stop playing the disc.
Fast Forward / Fast Backward Searching (DVD/ VCD/ CD/ MP3)
During playback, press or button on the remote control repeatedly
until the desired speed is reached for fast searching within a track/chap-
ter/title (forward or backward). Press the PLAY/PAUSE button will enter
normal playback directly.
2X —> 4X—> 8X —>16X—>32X—> Normal
Note: The function is invalid on some discs. Not support the photo play-
back.
Slow Motion Playback (DVD, SVCD, VCD)
Press the SLOW button on the remote during playback. Press the button
again on the remote to play at the next speed. Slow Motion Playback has
ve speeds: 1/2, 1/4, 1/8, 1/16, and normal. Press the PLAY/PAUSE button
to resume normal playback.
Repeat A-B (DVD/ VCD/ CD/ MPS) Playback
Using this feature to repeat the playback of a specic section of a track/
chapter (loop).
Press the Repeat A-B button on the remote to set the desired start point of
the section to be repeated.
Press the Repeat A-B button on the remote again to set the desired end
point of the section to be repeated.
The section “A-B” will now be played repeatedly as a loop.
Press the Repeat A-B button a third time to cancel the repeat A-B feature
and resume normal playback.
Repeat Playback (DVDNCD/CD/ MP3/ Xvid Disc)
You can play a chapter/ title/ all/ track on a disc repeatedly. Press Repeat
button on the remote control repeatedly during playback to select a desired
repeat mode. Depending on the kind of disc (DVD, VCD, CD, MP3 or Video
photo discs), you have different repeat options.
Program Playback
For DVDNCD Disc
• During playback, press the PROG during the playback mode.
• Use navigation buttons to scroll through the different elds. Use numeric
keypad to enter valid title/chapter number. Maximum of 20 sequences can
be programmed.
• Select Play and the press ENTER to start playback.
• To clear the whole program, select Stop and press ENTER.
Note: MPEG4 program playback is not supported
Zoom (DVD/ VCD)
Press the ZOOM button on the remote control repeatedly to change the
video image during playback.
• During DVD, VCD playback, each successive press of ZOOM will change the
level of magnication. While at ZOOM 2X, 3X, 4X, 1/2, 1/3 and 1/4 and normal;
use the Direction buttons (UP/ DOWN/ LEFT/ RIGHT) on remote control or
the unit to view specic sections when the photo is magnied (2X, 3X, 4X, 1/2,
1/3 and 1/4 mode can be operated).
44
44

12
During the sideshow mode of the JPEG CD or JPEG le in the USB
device, press the ZOOM button on the remote control to Zoom in or Zoom
out the photo. Press the ZOOM button repeatedly to select the zoom
level, the screen shows the zoom level, includes the 100%, 125%, 150%,
200%, 75% and 50%. When a picture is magnied, you can press the
Direction buttons (UP/DOWN/ LEFT/ RIGHT) on the remote control to
view other panel parts of the magnied picture.
Note: Zoom may not work on some discs. The picture quality decreases as
the picture size increases.
Selecting Subtitle Languages (DVD)
While playing a DVD disc that has been mastered with multiple subtitles,
press the Subtitle button repeatedly to select the desired language of the
viewable subtitle. Note: Only DVDs recorded with multi-language subtitles
have this function.
Changing the Audio Soundtrack Languages (DVD)
Press the Language button on the remote control repeatedly during
playback to select different audio languages.
Note: Only DVDs recorded with multiple soundtrack languages have this
function. Some recorded DVD disc or video les without this function.
Changing the Audio Channel (CD/MP3NCD)
Press the Language button repeatedly during playback to select available
audio channels provided by the disc (Left Mono, Right Mono, Mix-Mono or
Stereo).
Information Display
During playback, press the DISPLAY button repeatedly to show the disc
playback information on the screen (video format, time, title and chapter
etc.)
Note: Depending on the type of disc (DVD, VCD, CD or Data discs),
different information will be shown on display.
Numeric Buttons
Use the Numeric buttons to input a DVD chapter, VCD or CD track (invalid
for some discs) and press the ENTER button to conrm.
Select “1-9”, press the numeric button directly;
Select”10-99”, press the “10+” button to select the number by tens. Press
the numbers directly to select the number on unit digit.
Using the search feature (DVDNCD/CD)
Note: The function is invalid on some discs.
1. Playing DVD Disc
Search by title, chapter or time: Stops the playback at a specic point,
pressing the GOTO button will open the search window.
Use navigation buttons to select a search option:
• Title: Enter the title number using the numeric keypad.
• Chapter: Enter the chapter number using the numeric keypad.
• Disc Time: Use navigation buttons to select a eld (minutes, seconds).
Use the numeric keypad to enter the eld values.
2. Playing VCD Disc
• Disc Time: Use navigation buttons to select a eld (minutes, seconds).
Use the numeric keypad to enter the eld values.

13
Use the numeric keypad to enter the eld values.
• Track: Enter the track number using the numeric keypad.
3. Playing CD Disc
Use navigation buttons to select a search option:
• Disc Time: Use navigation buttons to select a eld (minutes, seconds).
Use the numeric keypad to enter the eld values.
• Track: Enter the track number using the numeric keypad.
MP3IWMAIMPEG4 Playing
MP3/VVMA/DIVX disc has a directory structure as shown in the picture.
Press the Direction key to choose the root directory and then press the
ENTER button to enter into the sub-directory. Press the Direction key to
choose the desired track and then press the ENTER button to enjoy the
music or movie.
If you want to return to the upper menu, press the Direction key to choose
the icon and press the ENTER button.
Photo/picture CD Playback
The PICTURE CD disc has such a directory structure as shown in the
following picture.
Press Direction key to choose the desired picture and then press the
ENTER button to enter into the sub directory. Press Direction key to choose
the desired picture and then press the
ENTER button on the remote control to view the picture. Press Menu if you
want to return to the menu. During the playback, press the stop key to go
to the thumbnail mode, use the direction key to select the Menu icon to for
instructions on viewing features.

14
Image Rotation
During picture play, press the Direction key to rotate the picture.
Connect to USB
You can play or view the supported data les, such
as the MP3/WMA, Video les in AVI (MPEG4)Xvid
and JPEG photos. Insert the USB device into the
USB port on the right side of your portable DVD
plater. The portable DVD player supports USB
devices up to 8GB. (Note: Not all USB devices can
be read well, which may result in playback issues.)
When the disc playback is in stop mode, press the source button on the
unit or the remote control, and then press the direction button UP/DOWN
to select the USB, and press enter. Then select the le you want to play be
pressing the direction button.
USB Interface
All functions are the same as playing a disc.
Note: The USB IN port is compatible with ash drives. It is not warranted
the compatibility with MP3 players using proprietary software.
Connect to SD/MMC Memory Card
1. Plug a SD and MMC card into the SD/MMC Memory Slot.
2. Switch unit Card Mode by pressing the USB/CARD button
3. Use the Directional buttons to select videos or image. Press the Enter
button to play.
4. The portable DVD player supports the Memory Card up to 8GB.
Note: Please be sure you don’t insert the card incorrectly or it may become
damaged. Always stop the playback or change to other mode before
removing the USB/memory card device.
Rotate the Screen
The screen can be rotated right 90 degrees and rotated left 180 degrees,
when it is rotated left 180 degrees, it can be pressed down and turn into
tablet mode.
Installing DVD Player on a Vehicle’s Seat
Installation Using the Supplied Carry Bag
1. Unfold the carry bag, and place the DVD player on the bag beneath the
elastic straps.
Ensure that the player’s corners are secured by the elastic straps. Ensure
that the center strap is across the face of the DVD Player.
2. Secure the upper portion of the carry bag to the headrest support bars
using the headrest strap. Adjust the headrest strap until the bag is rmly
secured.

15
3. Secure the lower portion of the carry bag to the vehicle seat-back using
the seat-back strap. Adjust the seat-back strap until the bag is rmly
secured.
System Setup
To access the setup menu, press the setup button on the remote control.
You will be given four sub menu options to choose from. Each option is
described below. Use the arrow keys to navigate between the options.
General
The general menu allows you to modify basic setting such as language.
The general options are as follows:
• TV Display: Adjust the screen aspect ration between 4:3 Pan Scan/4:3
Letter Box/16:9
• Angle Icon: Displays a mark on the screen when multiple angles are
available.
• OSD Language: Allows you to change the menu language.
• Screen Saver: Displays a screen saver when the portable DVD player
is on but not used for a period of time.
• Last memory: Reverts back to the same spot on a DVD if the portable
DVD is turned off in the middle of a program.
• MP3 Lyric: Set MP3 Lyric Mode on or off
If you want to show the Lyrics of two songs, please load the Lyrics and the
music as the same name in the USB or Memory card before performing
this function. Choose MP3 le, for example “love music. mp3”. Download
the corresponding lyrics with extension”.lrc” from the Internet or create it
with Lyric le editor (not included).

16
Rename the lyrics le. Make sure that the lyrics lename is the same as
the music le name. For example “love music.lrc”
Audio
The Audio menu allows you to change the audio setup of the Cinematix
DVD.
• Speaker
Downmix: Set downmix to LT/RT, Stereo or V SURR
Post DRC: Set Post DRC to on, off, or auto.
(Post DRC reduces the volume, guaranteeing that the volume is below
the maximum output of the speaker “On” reduces all volume beyond
the maximum output of the speaker. “Auto” reduces
Video
The video menu allows you to change the display properties of the Cine-
matix DVD.
• Quality
Sharpness: Adjusts the screen sharpness between LOW/MID/HIGH
Brightness: Adjusts the screen brightness
Contrast: Adjusts the screen contrast
Gamma: Adjusts the screen gamma
Hue: Adjusts the screen hue
Saturation: Adjusts the screen saturation
• Panel Quality: Setup the video quality
• Panel Display: Setup panel display to 16:9 or 4:3
Preference
The preference menu option allows you to adjust the default DVD disc
setting. (The setting is only available when no media is inside the unit.)
• TV Type Set TV Type to PAL, AUTO, or NTSC
• PBC: Set PBC to on or off
• Audio: Set the default audio language
• Subtitle: Set the subtitle language

17
• Disc Menu: Set the subtitle language
• Parental: Set a maximum rating for discs that can be played without a password
• Password: Set a parental lock password (The default password is 0000)
• Default: Return the portable DVD to factory default
Troubleshooting
Carry out the problem-solving measures described in the following section before contacting Customer
Support. Do not attempt to repair the DVD player by yourself. Turn off the DVD player as soon as you
suspect a malfunction. Unplug the power plug and check whether the DVD player is unusually warm or
whether smoke is rising from it.
Other possible causes:
Static discharges or other external interferences can cause the DVD player to
malfunction. When this happens, disconnect the power plug from the main socket and plug it back in. If
the problem persists, disconnect the device from main power and contact Customer Service or a repair
shop.
Specications
Power Adaptor: AC Adaptor Input Power: AC 100-240V 50/60Hz
Output: DC 12V 1.0A (AC Adaptor Terminal)
Power Supply: DC 9V-12V 1.0A
Play Mode: NTSC/PAL/AUTO
Disc Mode: DVD, VCD, CD, MP3, CD-R, CD-RW, JPEG, DVD+ -R/W, MPEG4, etc.
Video S/N Ratio: ≥ 65db
AV Out Resolution: ≥ 500 lines
Frequency Response: fs96KHz/24bit
Audio S/N Ratio: ≥ 90db
Dynamic Range: ≥ 80db
Distortion: < 0.01%
D/A Converter 6KHz/24bit
Headphone Jack 3.5mm
AV Out Jack 3.5mm
TV Aspect Ratio 4:3/16:9
Device Display 9 inch
Problem Possible Cause Remedy
The DVD player Disc cover not closed Close disc cover
does not work No disc inserted Insert disc
Disc inserted the wrong way Insert disc with label facing up
Disc dirty or deformed Clean disc, or insert another disc
Regional code of the player does not Use DVD with corresponding
match the regional code of the DVD regional code
Moisture on lens Remove disc and turn off DVD player
for at least two hours
No sound Device not properly connected Check connections and connect
device correctly
Headphones connected (speaker off) Unplug the headphones
DVD sound settings incorrect Check sound settings and reset if
necessary
No Video TV screen is off or in the incorrect Turn on LCD screen and/or set
video mode correct video mode
Poor video and/or Disc dirty or deformed Clean disc or insert another disc
audio quality
Repeated playback Loop mode is switched on Exit the loop mode
Disc dirty or deformed Clean disc or insert another disc
Remote control does Obstacle between remote control and Remove obstacle
not work and DVD player
Remote control not pointed at DVD Point remote control directly at DVD
player player
Remote control battery inserted the Check the battery’s polarity and, if
wrong way necessary, insert battery correctly
Battery too low or completely discharged Insert new battery

FCC Compliance
This device complies with Part 15 of the FCC Rules. Operation is subject to the following two conditions:
(1) this device may not cause harmful interference, and (2) this device must accept any interference
received, including interference that may cause undesired operation.
Note 1: This equipment has been tested and found to comply with the limits for a Class B digital device,
pursuant to part 15 of the FCC Rules. These limits are designed to provide reasonable protection against
harmful interference in a residential installation. This equipment generates, uses, and can radiate
frequency energy and, if not installed and used in accordance with the instructions, may cause harmful
interference to radio communications. However, there is no guarantee that interference will not occur in a
particular installation. If this equipment does cause harmful interference to radio or television reception,
which can be determined by turning the equipment off and on, the user is encouraged to try to correct the
interference by one or more of the following measures: a) Reorient or relocate the receiving antenna b)
Increase the separation between the equipment and receiver c) Connect the equipment into an outlet on
a circuit different from that to which the receiver is
connected d) Consult the dealer or an experienced radio/TV technician for help.
Note 2: Any changes or modications to this unit not expressly approved by the party responsible for
compliance could void the user’s authority to operate the equipment.
One (1) Year Limited Warranty
PC Treasures, LLC warrants this product to be free from defects in materials and workmanship. This
warranty covers the original purchaser only, and is not transferable to anyone who subsequently buys,
leases, or otherwise obtains this product from you. Your One Year Limited Warranty begins on the date
of purchase. Your original purchase invoice or sales receipt, showing date of purchase, is your proof
of warranty period. The duration of this warranty does not extend beyond the initial period of coverage
should any repairs or replacements be made or performed.
This warranty does not extend to any product not purchased from PC Treasures, LLC, or an authorized
PC Treasures, LLC reseller. This warranty does not extend to product that has been damaged or
rendered defective as a result of use for which the product is not intended, is contrary to instructions
provided in the user guide, as a result of the use of parts not manufactured or sold by PC Treasures, LLC,
or due to any misuse, abuse, negligence, modication, or improper packing when returning product to PC
Treasures, LLC.
EXCEPT FOR THE WARRANTY SET FORTH HEREIN, PC TREASURES, LLC DISCLAIMS ALL OTHER
WARRANTIES, EXPRESSED OR IMPLIED OR STATUTORY, INCLUDING BUT NOT LIMITED TO
THE IMPLIED WARRANTIES OF MERCHANTABILITY OR FITNESS FOR A PARTICULAR PURPOSE.
ANY IMPLIED WARRANTIES THAT MAY BE IMPOSED BY APPLICABLE LAW ARE LIMITED TO THE
TERM OF THIS WARRANTY. IN NO EVENT SHALL PC TREASURES, LLC BE LIABLE FOR ANY
INCIDENTAL, SPECIAL OR CONSEQUENTIAL DAMAGES, INCLUDING BUT NOT LIMITED TO LOSS
OF BUSINESS, PROFITS, DATA OR USE, WHETHER IN AN ACTION IN CONTRACT OR TORT OR
BASED ON A
WARRANTY, ARISING OUT OF OR IN CONNECTION WITH THE USE OR PERFORMANCE OF THE
PRODUCT. YOU AGREE THAT REPAIR, AND (UPON AVAILABILITY) REPLACEMENT, AS APPLICA-
BLE, UNDER THE WARRANTY SERVICES DESCRIBED HEREIN IS YOUR SOLE AND EXCLUSIVE
REMEDY WITH RESPECT TO ANY BREACH OF THE PC TREASURES, LLC LIMITED WARRANTY
SET FORTH HEREIN.
How Do I Obtain Warranty Service?
In the event that you require warranty service, please email [email protected] or call
(248) 236-0061, at which time a PC Treasures technician will attempt to resolve any issues. If unable to
resolve your issue, you will be issued an RMA # to authorize the return of the item for repair or replace-
ment. All charges incurred while returning product, including postage, duties, export taxes, and customs
duties, are the responsibility of purchaser, and purchaser assumes all risk of loss during shipment.
Models Covered Under This Warranty: 70164, 70165, 70166, 70167, 70168, 70169, 70170, and 70171
Digital Treasures is a Division of PC Treasures, LLC, 3720 Lapeer Rd., Auburn Hills, MI 48326
Designed and packaged in the U.S.A. Made in China.
PC Treasures and the Cinematix logo are trademarks or registered trademarks of PC Treasures, LLC. All
rights reserved. © 2015 PC Treasures, LLC Cinematix Man 6-25
Table of contents


