DIGITOP MR ENTERTAINER MKP100 User manual
1
MKP100
Multi-Format Karaoke Player
Instruction Manual
Distributed by Digitop Ltd T/a Mr Entertainer
Unit 11A Bridge Trade Park
Bridge Road, Camberley, Surrey,
GU15 2QR, United Kingdom
2
For your protection, please read these instructions in full and keep this manual handy for future reference. Carefully observe and
comply with all warnings, cautions and instructions placed on the equipment or outlined in this manual to guard against injury.
SAFETY INSTRUCTIONS
1. Read Instructions –All the safety and operating instructions should be read before the appliance is operated.
2. Retain Instructions –These should be retained for future reference.
3. Heed Warnings –All warnings on the appliance and in the operating instructions should be adhered to.
4. Follow Instructions –All operating and usage instructions should be followed.
5. Attachments –Do not use attachments that are not recommended by the product manufacturer as they may cause
hazards.
6. Water & Moisture –Don not use this unit near water, for example near a bathtub or in a wet basement.
7. Carts & Stands –The appliance should be used only with a cart or stand that is recommended by the manufacturer. An
appliance and cart combination should be removed with care. Quick stops, excessive force and uneven surfaces may
cause an overturn.
8. Ventilation –The appliance should be situated so its location does not interfere with its proper ventilation. For example
the appliance should not be situated on a bed, sofa, rug, or similar surface that may block the ventilation slots.
9. Heat –The appliance should be situated away from heat sources such as radiators, heat registers, stoves or other
appliances (including amplifiers) that produce heat.
10. Power Sources –The appliance should be connected to a power supply only of the type described in the operating
instructions or as marked on the appliance.
11. Grounding or Polarization –Precautions should be taken so that the grounding or polarization means of an appliance is
not defeated.
12. Power-cord Protection –Power supply cords should be routed so that they are not likely to be walked on or pinched by
items placed upon or against them, paying particular attention to cords at plugs, convenience receptacles and the point
where they exit from the appliance.
13. Cleaning –Unplug this unit from the wall outlet before cleaning. Do not use liquid cleaners or aerosol cleaners. Use a
damp cloth for cleaning and ensure the appliance is totally dry before reconnecting.
14. Power Lines –An outdoor antenna should be located away from power lines.
15. Non-use Periods –The power cord of the appliance should be unplugged from the outlet when left unused for a long
period of time.
16. Object & Liquid Entry –Care should be taken so that objects do not fall and liquids are not spilled into the enclosure
though openings.
17. Damage Requiring Service –The appliance should be serviced by qualified service personnel when:
A. The power supply cord or plug has been damaged.
B. Objects have fallen into the appliance.
C. The appliance has been exposed to rain.
D. The appliance does not appear to operate normally or exhibits a marked change in performance.
E. The appliance has been dropped or the enclosure is damaged.
18. Servicing –The user should not attempt to service the appliance beyond that described in the operating instructions. All
other servicing should be referred to qualified personnel.
The lightning flash & arrowhead symbol
within a triangle is intended to alert you
to the presence of danger.
The exclamation point within a triangle is
intended to alert you to the presence of
important operating & servicing instructions.
NOTE: To CATV system installer’s (U.S.A): This reminder is provided to call the CATV system installers attention to Article 820-40
of the NEC that provides guidelines for proper grounding and, in particular, specifies that the cable ground shall be connected
as close to the point of cable entry as practical.

3
Descriptions and Functions
Front Panel
1. POWER –Press the button to turn the karaoke player on or off.
2. DISC TRAY –Press ‘open/close’ (button 8) to open/close the disc tray, the disc will
start playing automatically.
3. RECORD –Please see ‘Record Singing’ under ‘Basic Operation’
4. KEY- –Press this to lower the key.
5. KEY+ –Press this to raise the key.
6. MPX –Multiplex, press this to select Left Mono, Right Mono or Stereo to turn the
lead vocal on/off on multiplex enabled tracks.
7. DVD/USB –Press this to cycle through Disc/SD/USB inputs.
8. OPEN/CLOSE –Press this to open and close the disc tray.
9. PLAY/PAUSE –Press this to start playing or pause the track.
10. STOP –Press this to stop playing the track
11. DISPLAY WINDOW –Displays player status such as time, disc format and song
number. If no disc is in the tray the display window will display ‘NO DISC’. Additional
information will be displayed on the TV screen.
12. PREVIOUS –Press this to go to the previous track.
13. NEXT –Press this to go to the next track.
14. MIC VOL –Turn this clockwise to turn the microphone level up and anticlockwise to
turn the microphone volume down.
15. MIC 1 & 2 INPUT JACKS –Plug microphones in here with ¼ inch jack plug.
16. USB –Use this USB input to connect USB devices such as flash drives or external hard
drives allowing playback of MP3, MP3G, MP4 audio/video files. Also allows ripping of
CDG disc to MP3+G and recording of performances. Supports FAT32 only.
17. SD CARD –Use this SD CARD input to connect SD CARD’S and MMC cards allowing
playback of MP3, MP3G, MP4 audio/video files. Also allows ripping of CDG disc to
MP3+G and recording of performances. Supports FAT32 only.
18. REWIND –On DVD & compatible discs only, CD+G Discs will not RW or FF
19. FAST FORWARD –On DVD & compatible discs only, CD+G Discs will not RW or FF
20. MUSIC VOLUME - reduces Music Volume only, not microphones
21. MUSIC VOLUME + increases Music Volume only, not microphones
4
Descriptions and Functions
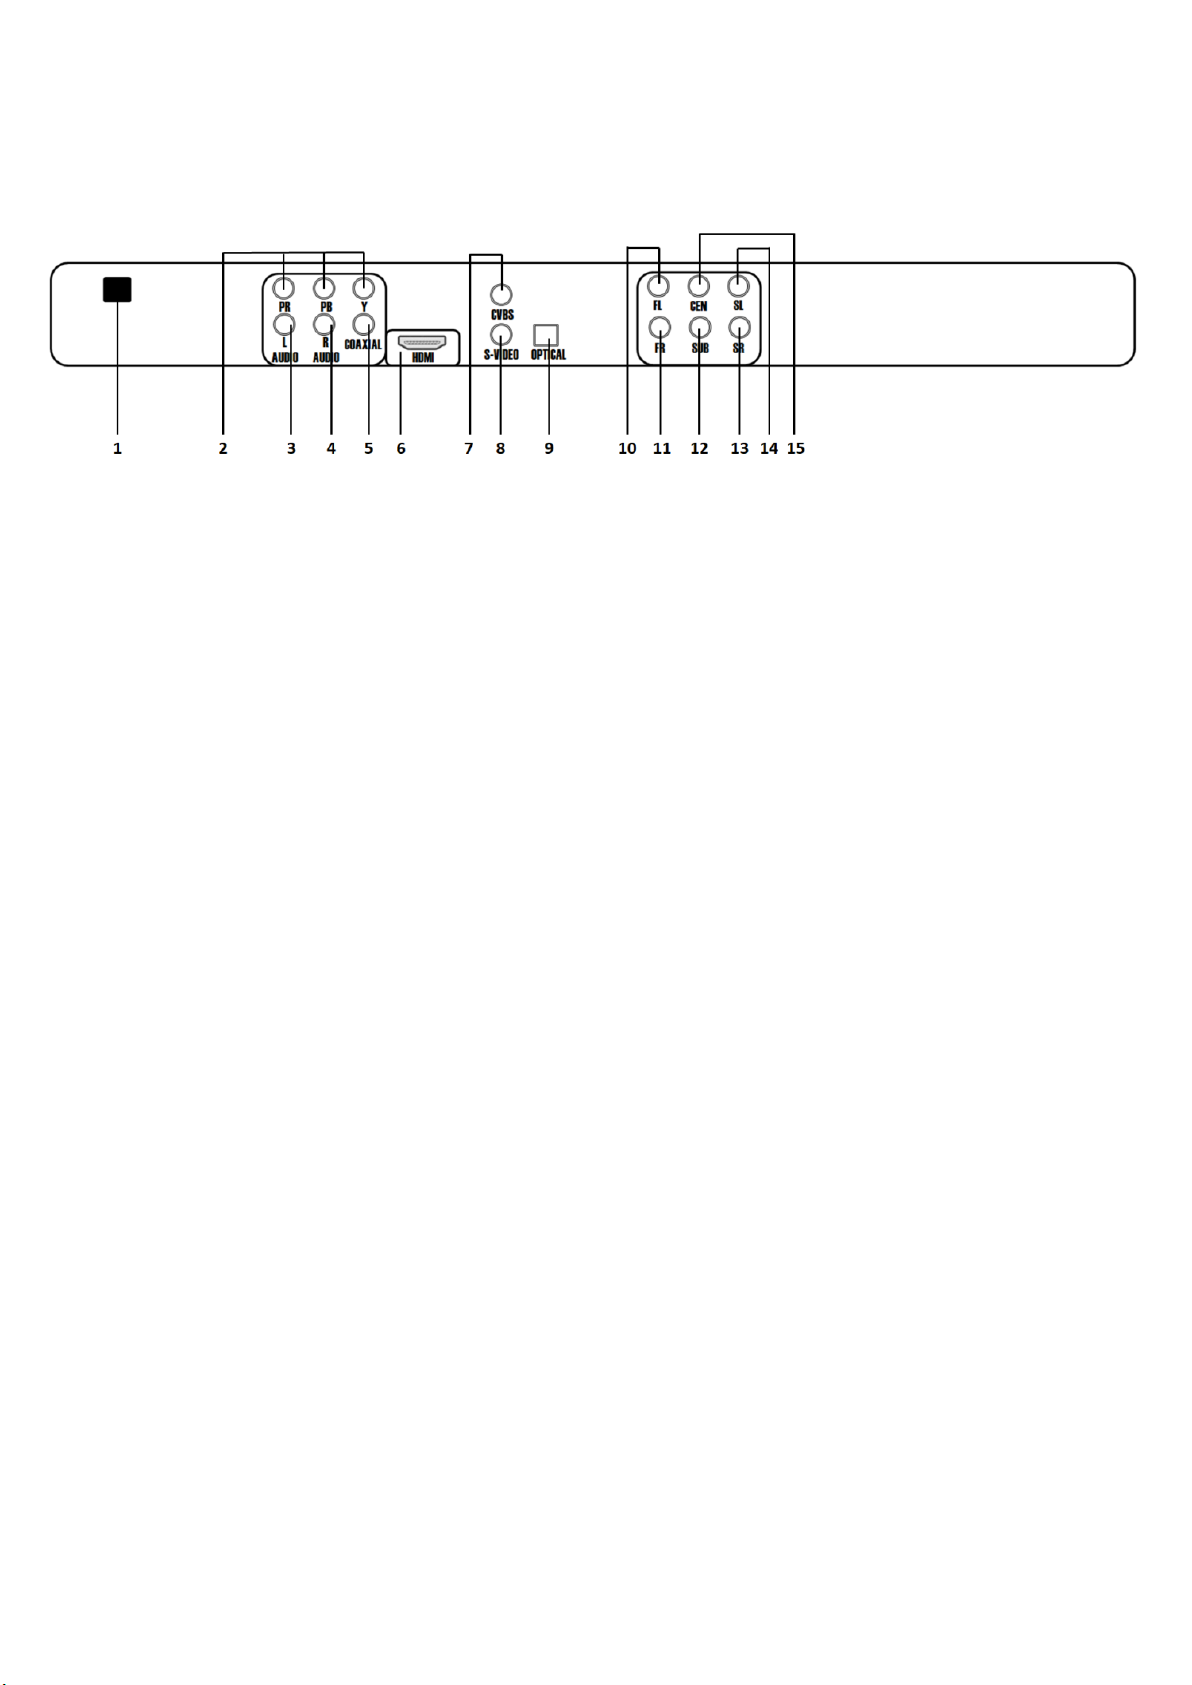
Rear Panel
1. ELECTRIC PLUG –Connect to UK MAINS.
2. COMPONENT VIDEO OUTPUT –Video output for use with Pr, Pb, Y component
cables.
3. L AUDIO –Left audio output.
4. R AUDIO –Right audio output.
5. COAXIAL –This digital output is for connecting devices with a COAXIAL cable.
6. HDMI –High Definition Media Interface, for connecting to any HDMI compatible TV,
this signal contains the video and audio and doesn’t require you to connect any
other audio cables if you are using the TV’s speakers. If you wish to use a separate
set of speakers to those on the TV please connect these via L&R AUDIO (3+4).
7. CVBS –Video only output for use via AV input on TV.
8. S-VIDEO OUTPUT –Output for use in S-VIDEO input.
9. OPTICAL –Optical output socket for digital audio.
10. FL –Front Left audio output for use via 5.1 Surround sound systems.
11. FR –Front Right audio output for use via 5.1 Surround sound systems.
12. SUB –Subwoofer audio output for use via 5.1 Surround sound systems.
13. SR - Side Right audio output for use via 5.1 Surround sound systems.
14. SL –Side Left audio output for use via 5.1 Surround sound systems.
15. CEN –Centre audio output for use via 5.1 Surround sound systems.

5
Remote Control Functions

6
Remote Control Functions
1. POWER –Turns the MKP100 on, or into standby mode, to turn completely off please
use the button on the front of the player.
2. OSD –Cycles through the different onscreen display options.
3. ANGLE –Cycles through the available viewing angles on DVD’s with multiple viewing
options available
4. SUBTITLE –Cycles through the available subtitle languages on a DVD with subtitles
available.
5. PROG –to program tracks press STOP then press PROGRAM. Enter your track
selections and press PROGRAM again to accept. Press the PLAY button to start the
programmed tracks.
6. SETUP –Use this button to access the MKP100 setup page on the video screen.
Select options using the directional buttons and make changes using the ENTER
button on the remote.
7. DIRECTIONAL BUTTONS –The UP and DOWN buttons allow you to navigate through
the DVD menu screens, Setup pages and MP3 menus and adjust the volume of the
microphone output. The LEFT and RIGHT buttons allow you to navigate through the
DVD menu screens, Setup pages and MP3 menus and adjust the amount of echo on
the microphone output. Please note the microphone and echo controls work in disc
mode only. If you want to adjust during USB/SD playback please do so via SETUP.
8. RETURN –accesses the main menu on a VCD 2.0 disc, NOTE, PBC must be turned on
and the VCD must be a VCD 2.0 disc.
9. PLAY/PAUSE –start to play the disc or temporarily suspend playback. Press again to
resume playback.
10. PREV –Skip to the previous track when playing a CDG disc
11. FWD & REV –Scans through a track when in disc mode, FWD scans forwards through
a track, REV scans backwards through a track. NOTE: This function will not work
with CDG discs.
12. RIPPING –For ripping CDG discs to MP3+G, please see ‘RIP MP3+G from CD+G discs’
under ‘Basic Operation’
13. RESUME –Resumes playback from exact spot where a disc has been stopped in
standby mode.
14. A-B –Loop button, allows you to set a section on a disc for continuous looping.
15. REPEAT –Cycles through the available repeat options.
16. MUTE –Mutes the sound from the disc
17. KEY CONTROL –Lower or raise the key of the track, b button to lower, # button to
raise.
18. OPEN/CLOSE –This button is used to open or close the disc tray.
19. NUMBER/PRESET –Use these buttons to jump directly to a specific track in disc
mode.
20. TIME –Accesses the time menu which allows you to jump directly to a specific time
on a disc.
21. TITLE –Access the title screen on a DVD disc, will only work on DVD’s that have title
screens.

7
22. ENTER –This button is used to make selections in DVD menus and the OSD when an
entry is highlighted.
23. MENU –Accesses the main menu on a DVD and other discs with main menus.
24. STOP –Stops disc playback.
25. NEXT –Skip to the next track when playing a CDG disc.
26. VOLUME +/- –Adjusts the music volume
27. RECORD –For recording performances to MP3, Please see ‘Record Singing’ under
‘Basic Operation’
28. EQ –Switch between available EQ pre-sets.
29. MPX –Multiplex button, used to turn the lead vocal on/off on multiplex tracks.
Pressing this button cycles through the different audio output settings to turn the
vocals on/off.
30. N/P –Switches between NTSC and PAL video modes
31. DISC/USB –Selects the Disc/USB/SD player as the input.
32. SLOW –cycles through the different slow motion options when in disc mode.
33. RESET –Restores the player to factory defaults.
IMPORTANT NOTICE ABOUT SETTING UP MICROPHONES
Common problem 1…
“The microphones are too quiet compared to the music ” –this can usually be easily solved by
adjusting the music & microphone levels, please follow the steps below…
1. Turn the microphones volume up to full using the remote
2. Turn the music down to volume 6 (this is roughly 50% of max volume)
3. Insrease the volume on your TV, you may have to turn it up higher than you normaly
would to allow for the reduced music volume level on the MKP100.
Hopefully your microphones should now appear much louder compared to the music, you can
keep adjusting the music, microphone & TV volumes to get the perfect balance between all three.
If your microphones are not working at all or the cables are broken, please contact us and we will
send you a replacement microphone/cable.
Common problem 2…
“I’m getting an echo / delay / latency on the microphones”
Some modern TV’s have simulated surround sound features such as movie mode, sports mode etc,
which whilst great for movies & watching TV, can cause problems when processing the sound from
a microphone as it causes a delay between when you sing, and when that sound comes out of your
TV. To solve this you need to access the sound settings on your TV and disable any surround sound
modes. You can also try turning the echo down via the MKP remote. We also recommend if
possible connecting the MKP100 (or any karaoke player) to your TV using the red/white/yellow
RCA cables included rather than HDMI, as HDMI is a digital signal which takes TV’s some time to
process, often causing a delay from the microphones. This delay can be exaggerated if your TV is
connected to a sounbdar or surround sound system due to the processing time required to receive
the audio signal from the MKP100, through the TV and out to the soundbar.
The only way to remove this delay entirely is to have a separate soundbar/speakers purely for
karaoke, which connect directly to the MKP100 therefore removing the TV processing delay.
Check our website for dedictaed karaoke soundbars & speakers, www.mrentertainershop.co.uk

8
Before Operation
Playable Media
This player supports the following disc formats, DVD, CD, CD+G, MP3, MP3+G and MP4 on
the following disc types, DVD, DVD±R, CD, CD±R. Any other form of disc media may cause
the player to display NO DISC on the display window. Future media and disc formats maybe
supported with firmware updates when available. Dirty, scratched, warped and defective
discs may cause a considerable time delay during the loading and reading of the disc. In
some cases this may result in the disc being totally unreadable by the player.
Video Signal Formats
This player supports NTSC and PAL colour systems with automatic detection and override
settings.
Audio Formats
This player accommodates stereo, surround, analogue and a few digital hi-fi audio signals. If
required these can be configured under SETUP.
Handling and cleaning discs
When handling discs always hold them from their edges and/or by the circle in the centre.
Never write or stick labels to any surface of the disc as this can unbalance, scratch or
damage the disc. Do not bend or press the disc or expose it to direct sunlight. Store discs in
a clean and dry environment. After use return the disc to its packaging, do not transport or
move the player with discs still inside, as they can dislodge and/or damage the reader. Discs
can be cleaned using a soft cloth, always wipe from the centre towards the edge, do not
clean with any other cleaning solutions unless it’s specifically made for CD’s.
Power Cord
Handle the power cord by its plug only. Do not unplug the power cord by yanking or pulling
on the cord. Touching or unplugging the cord with wet hands may lead to an electric shock
or a short circuit. If the cord becomes damaged or its wires become exposed, please replace
as soon as possible in order to prevent an electric shock or fire. It is advised that you
regularly check the cord to ensure its functioning properly.
Contents

9
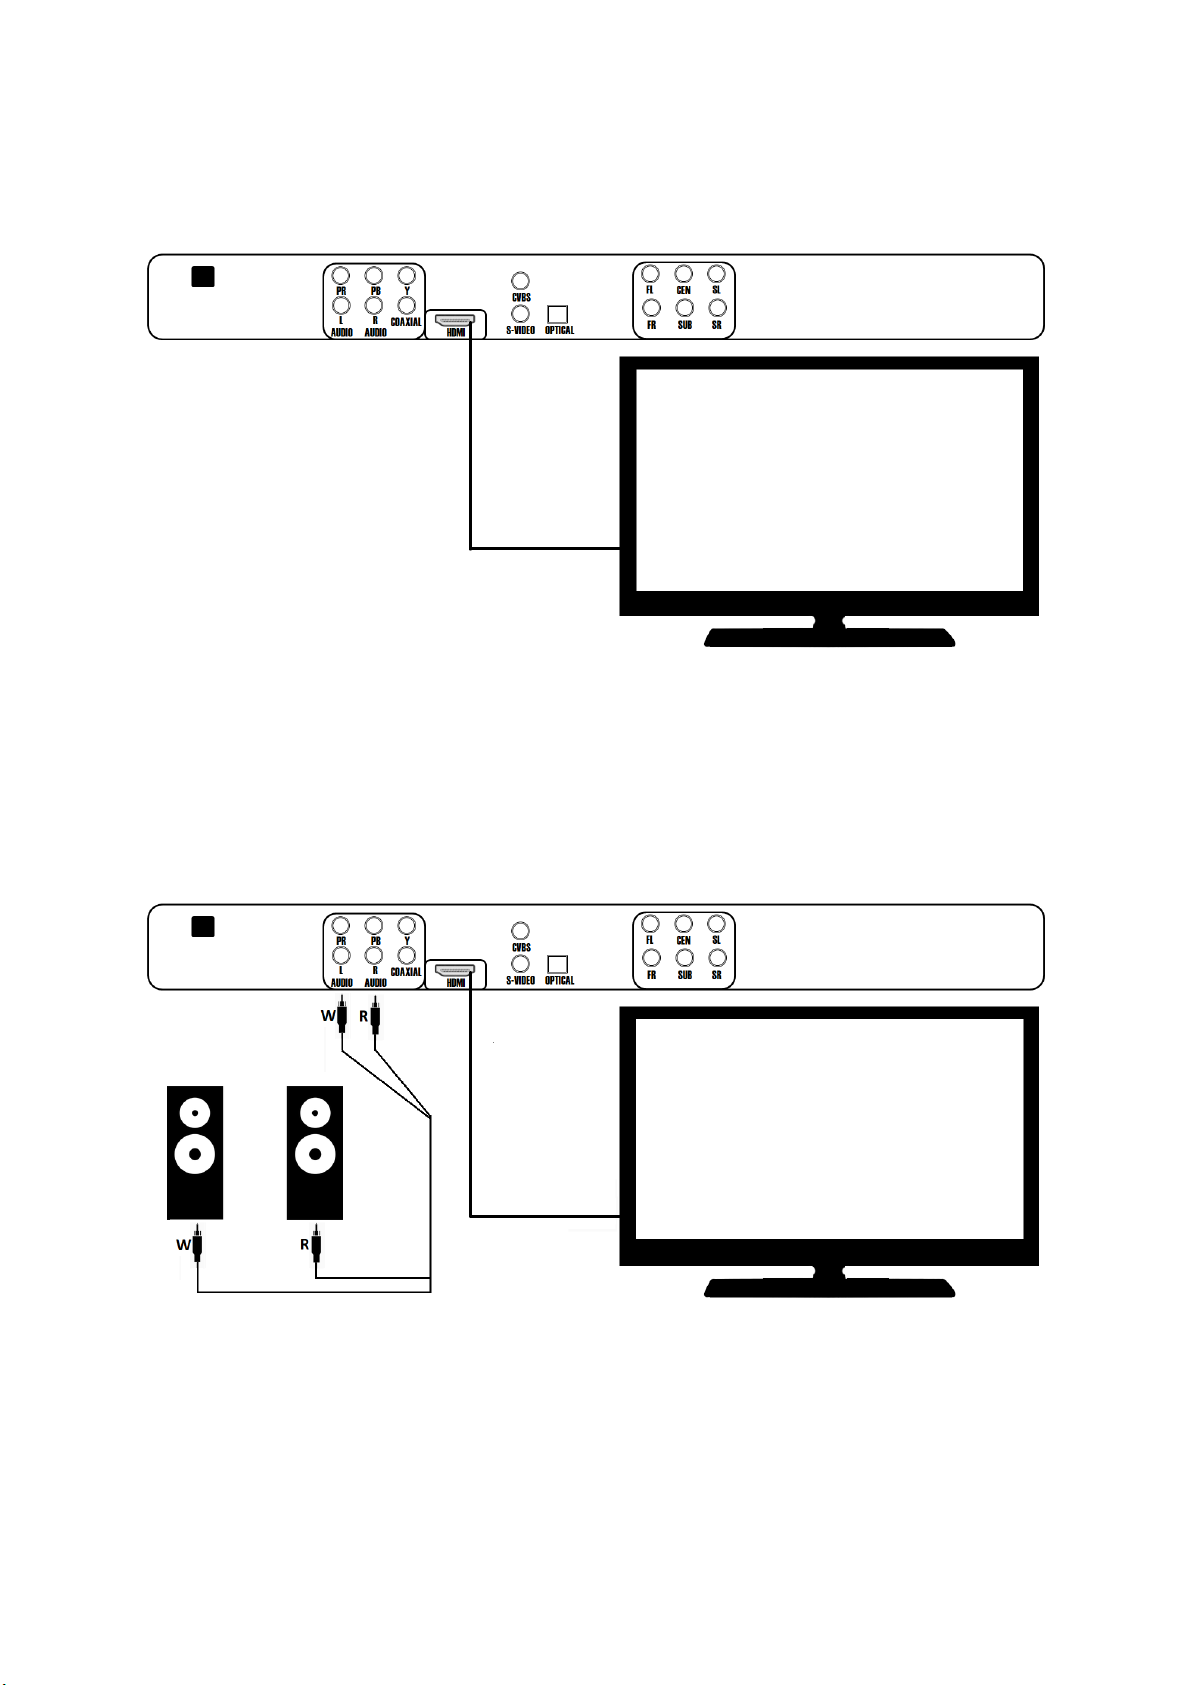
Player Connections
AV/RCA Connection using TV speakers
AV/RCA Connection using TV and separate speakers
10
Player Connections
HDMI Connection using TV speakers
HDMI Connection using TV and separate speakers

11
Basic Operation
Basic Playback
Turn the machine on using the power button
Loading and navigating a disc
1. Press EJECT to open the disc tray.
2. Place a disc in the disc tray.
3. Press EJECT to close the disc tray
4. The disc will start playing automatically
5. To end playback press STOP
6. To resume playback press PLAY
7. To stop playback completely press the STOP button twice. Now when you press PLAY
it will play from the beginning of the disc.
8. To pause playback press the PLAY/PAUSE button, to resume press PLAY/PAUSE
9. To skip a track press NEXT to go to a previous track press PREVIOUS. Alternatively if
you know the track number you can enter it on the remote.
If a menu is shown on the TV screen
When inserting a DVD disc a menu may be displayed before playback, from the menu you
can select a desired track, scene or any other displayed options using the directional arrows
on the remote control, once your selection has been highlighted press enter to commence
playback.
IMPORTANT
Please do not insert a damaged disc. If a disc takes more than usual to read or the display
window shows LOAD for a prolonged period of time please EJECT the disc and check the disc
for any dirt, fingerprints, scratches or other defects.
Playback from USB/SD
Select USB, SD or DVD by pressing the Disc/USB button on the remote. You will then need to
use the up and down navigational buttons to select either DISC, USB or SD, once selected
press ENTER to switch to that input. Alternatively you can cycle through the different input
modes ‘DISC, USB or SD’ by pressing the DVD/USB button on the front of the player until
your desired input is reached.
IMPORTANT
This player is not a computer; it cannot support large external self-powered hard drives or
any device containing more than 2000 files. It is also recommended that your USB flash
drive is formatted to FAT32. We cannot guarantee every USB flash drive will work, please try
another brand if you are experiencing compatibility issues.
Loading a track from USB/SD
Your karaoke player supports playback of MP3’s, MP3+G’s and MP4’s via USB/SD. If no disc
is being played when you insert the USB/SD it will automatically be selected and playback
will start. Otherwise if you need to switch to USB/SD you’ll need to press STOP and then

12
switch the input, details of how to do this are explained under ‘Playback from USB/SD’.
Please use the navigational buttons on the remote to navigate around the USB/SD card
menu, once you have highlighted the track you want to play press ENTER to start playback.
Pressing STOP will return you to this menu.
**Please Note” If you are getting an “UNSUPPORTED FORMAT” error when trying to play an MP4 file, this
could be a codec issue. We recommend using a file converter program to change the codec used in the MP4 file,
or even easier is to convert your MP4 files to AVI format. This is an easy process that can be done using free
software. Do a Google search for “ANY VIDEO CONVERTER” which is a great little tool for converting files.
Using the Microphones
The karaoke player has two microphone inputs. The microphone volume can be increased
or decreased using the microphone volume dial on the front of the player or on the remote
control. To get the best balance between the microphones and the music you may also need
to adjust the music volume, this can be increased or decreased on the remote control. To
enhance the vocal you may wish to add more or less echo, this can be done via the remote.
Using the Remote Control
The battery compartment is located on the back of the remote control, the remote requires
2 x AAA batteries, please ensure these are inserted with the positive (+) and negative (-)
terminals in the correct direction.
Recording Singing
1. Insert your favourite CDG karaoke disc and insert a USB stick into the USB port to
record to.
2. Select and play the song you want to record. Then press the Record button on the
remote or on the front of the player to start recording. The song will then re-play
from the beginning and start recording at the same time.
3. Press the STOP or RECORD button to stop recording or when the song has finished
the recording will automatically end.
4. Your performance will be saved to the USB stick.
RIP MP3+G from CD+G discs
1. Insert CDG disc into disc tray, insert USB stick for MP3+G storage.
2. Press RIPPING button on the remote control.
3. Under options select your desired ripping speed, either 1x or 4x and your desired
MP3 compression bit rate, 320 recommended.
4. Choose the tracks you want to rip from the TRACKS menu.
5. After you have selected your tracks go to START to start ripping your tracks.
6. Once ripping has completed please exit the window by selecting QUIT. Your songs
will now be stored on your USB stick.
**Please Note** Your files will be assigned default filenames such as Track01, Track02 etc, making them
difficult to recognise later on when browsing files. We recommend using a PC to rename the files to include the
song titles and artists making them easier to use.
Table of contents


