Disc-O-Bed trundle User manual
Assembly Instructions
Instructions de montage
discobed.com
L I T G I G O G N E
AI30008
2
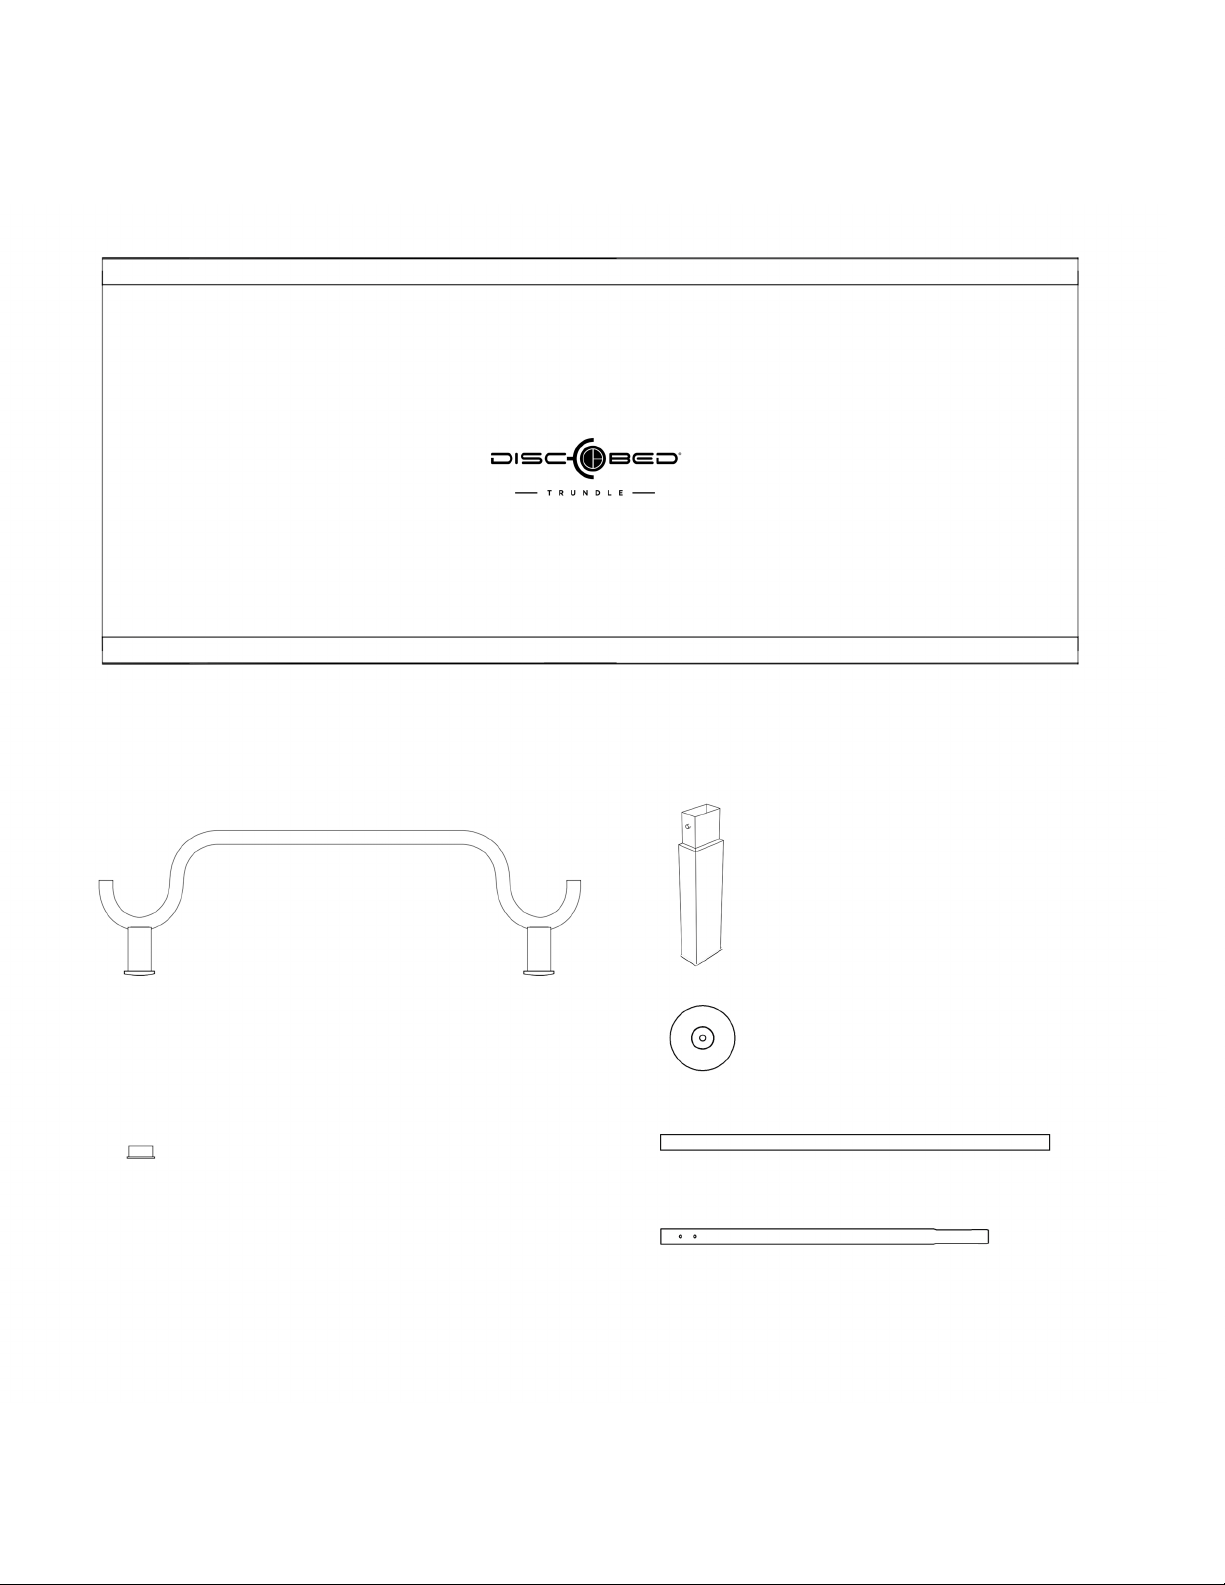
PARTS
PIÈCES
1x Sleeping Mat
1x Matelas
2x End Frames
2x Cadres d’extrémité
4x Foot Plugs
4x Bouchons de pied
4x Leg Extensions
4x Rallonges des jambes
4x Discs
4x Disques
2x Straight Side Rails / 2x Barres latérales droites
4x Swaged Side Rails / 4x Barres latérales embouties
3
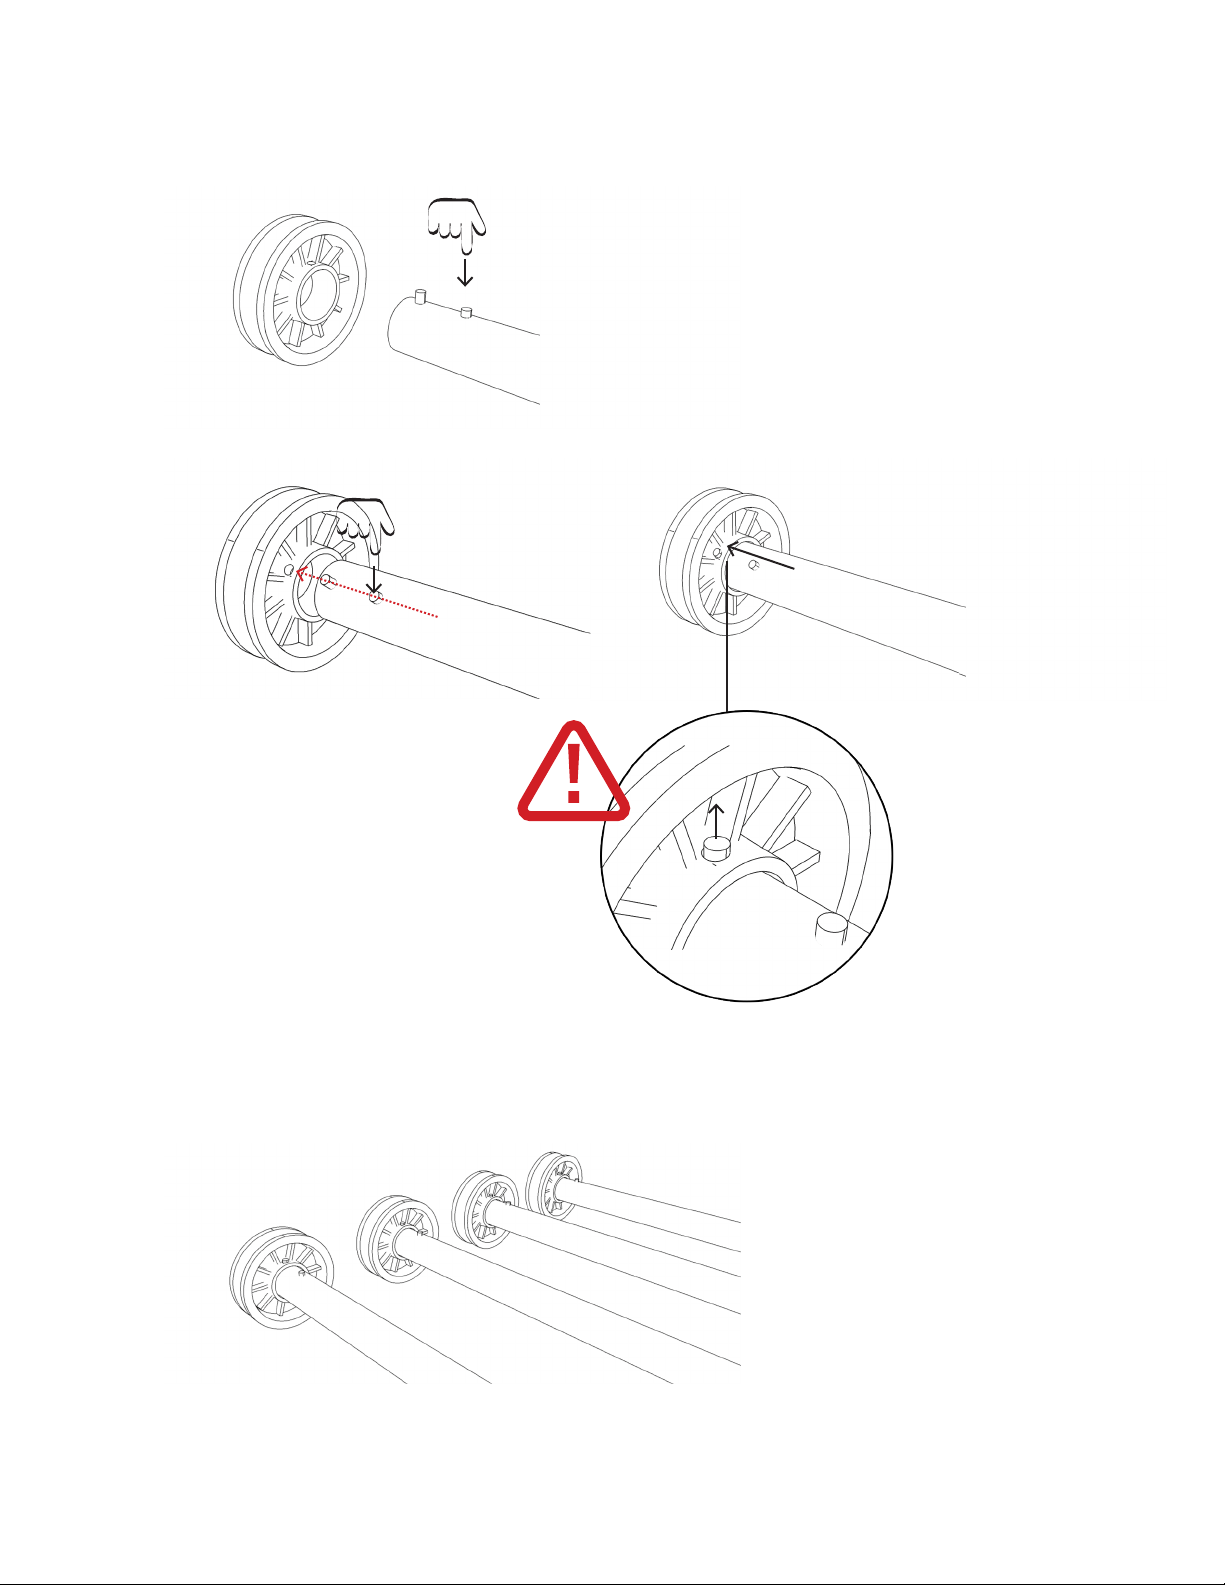
STEP 1. SECURING DISC TO SWAGED SIDE RAIL
ÉTAPE 1. FIXEZ LE DISQUE À LA BARRE LATÉRALE EMBOUTIE
1.1. Holding swaged rail, press pin (A) down and hold.
1.1. En tenant la barre emboutie, appuyez et maintenez la tige (A)
A
B
1.2. Line up pin (B) with hole in disc, insert rail into disc. Let pin (A) go.
1.2. Alignez la tige (B) avec le trou dans le disque, insérez la barre dans le disque. Relâchez la tige (A).
A
B
Pin (B) is only securely locked in when you hear
a‘click’ sound. Make sure pin (B) has popped up
before moving on.
La tige (B) est uniquement bloquée de façon sûre
quand vous entendez un“clic”. Assurez-vous que la
tige (B) a surgi avant de passer à l’étape suivante.
A
B
1.3. Repeat steps 1.1 and 1.2 with each of the swaged side rails.
1.3. Répétez les étapes 1.1 et 1.2 avec chaque barre latérale emboutie.
A
B
4x
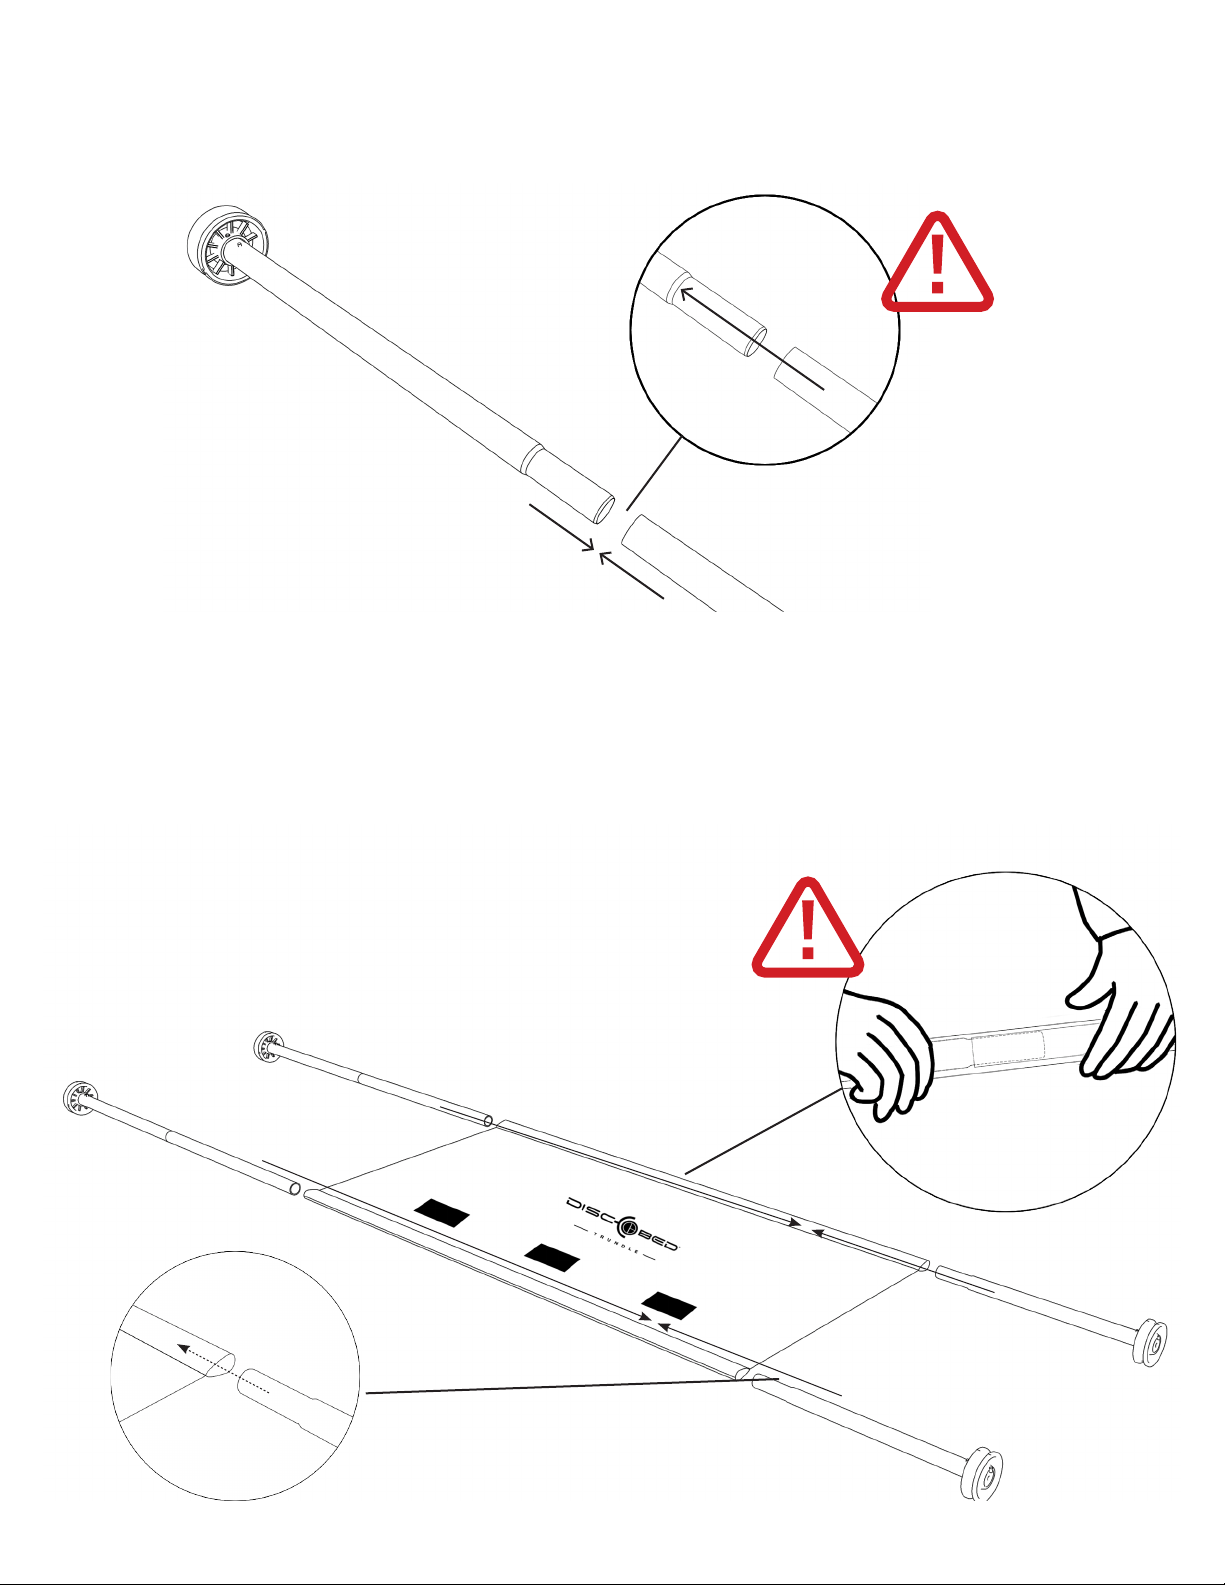
STEP 2. CONNECTING SWAGED SIDE RAIL TO STRAIGHT SIDE RAIL
ÉTAPE 2. RACCORDEZ LA BARRE LATÉRALE EMBOUTIE À LA BARRE LATÉRALE DROITE
2.1. Attach a swaged side rail (completed in step 1) to a straight rail.
2.1. Attachez une barre latérale emboutie (voir étape 1) à une barre droite.
3.2
3.2
3.3
3.3
STEP 3. ATTACHING SLEEPING MAT TO SIDE RAILS
ÉTAPE 3. ATTACHEZ LE MATELAS AUX BARRES LATÉRALES
3.1. Open out sleeping mat with the correct (logo) side up.
3.2. At one end, slide the 2 rails (completed in step 2) into the sleeves of the mat.
3.3. On the other end slide the remaining 2 rails (completed in step 1) into the sleeves of the mat.
3.1. Dépliez le matelas avec le bon côté sur le dessus (logo).
3.2. À une extrémité du matelas, faites glisser les 2 barres (montées à l’étape 2) dans les manchons.
3.3. À l’autre extrémité faites glisser les 2 autres barres (montées à l’étape 1) dans les manchons.
4
Make sure they slide into one
another completely.
Assurez-vous que les barres
soient complètement enfon-
cées l’une dans l’autre.
2.2. Repeat step 2.1.
2.2. Répétez étape 2.1 deux fois
Make sure that the rails slide into one another
completely. Do this by running your ngers
over the side rails where the connections are.
It should feel smooth to the touch.
Assurez-vous que les barres soient complète-
ment enfoncées l’une dans l’autre. Vous pou-
vez vérier en passant vos doigts au-dessus
des jonctions, elles devraient être
lisses au touché.
2x
5
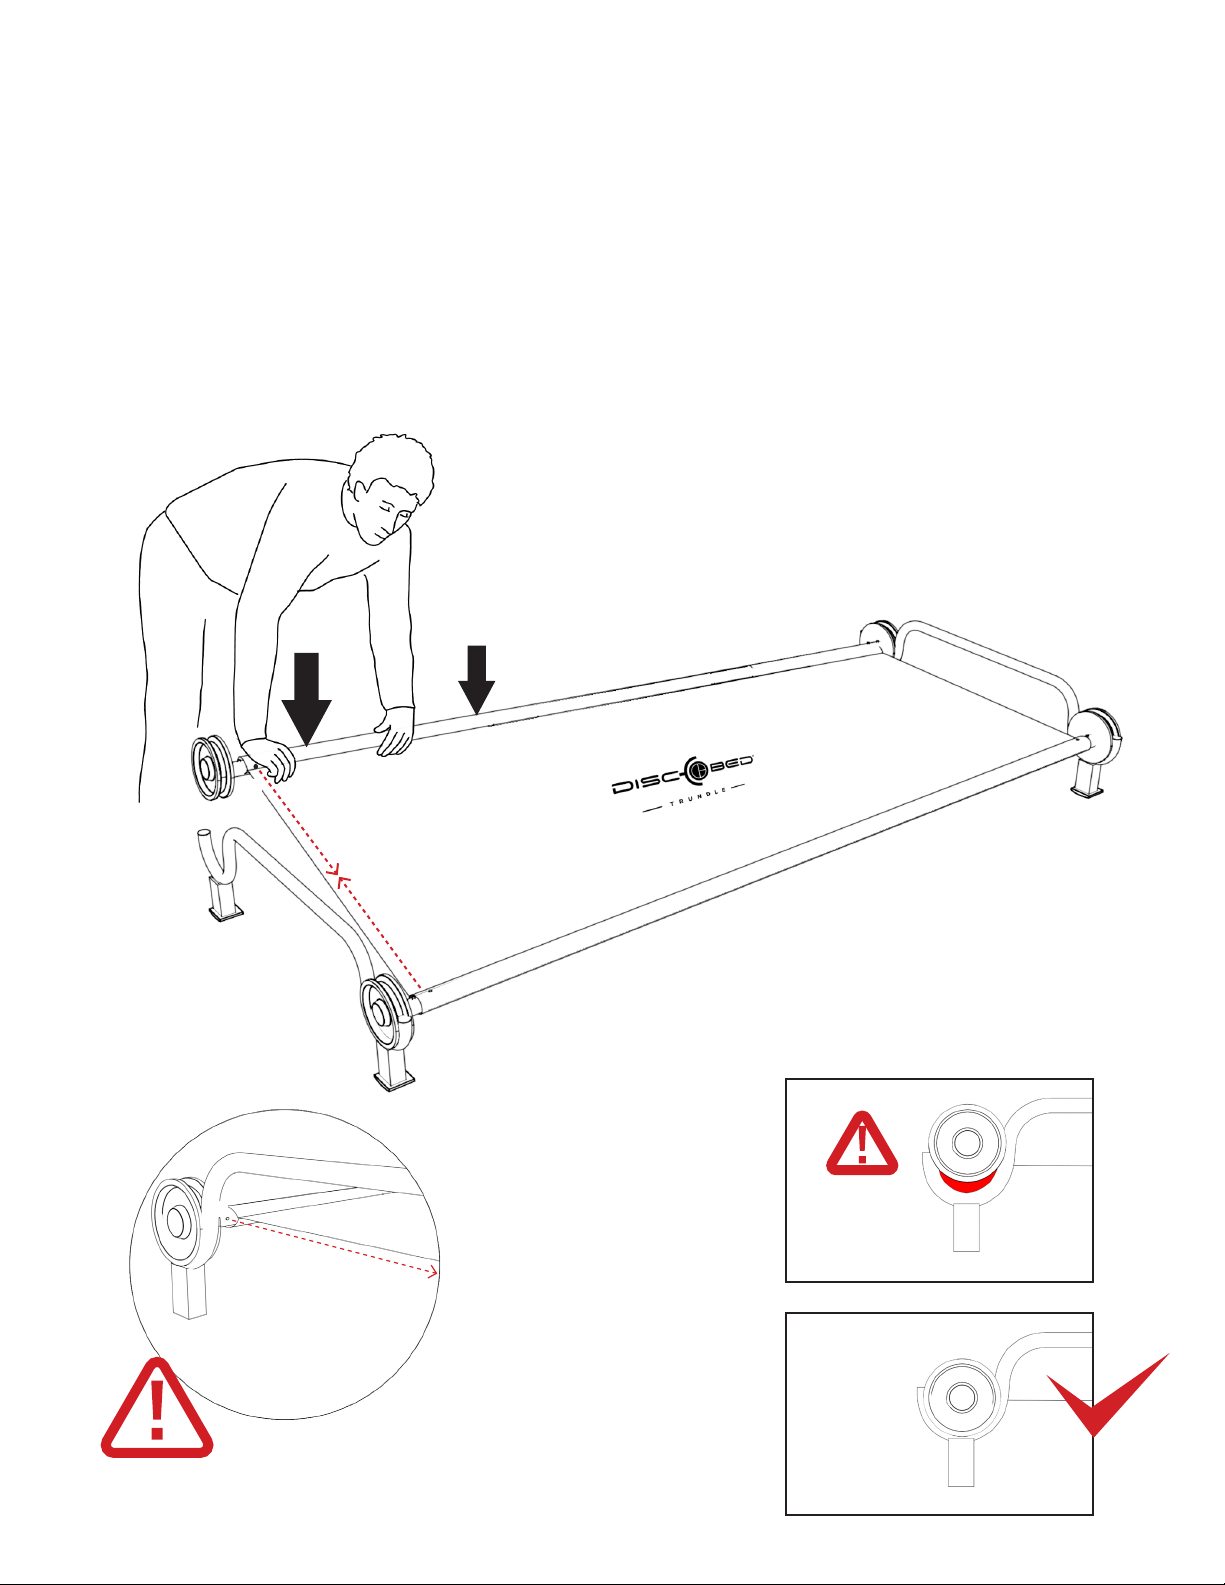
STEP 4. SECURING EACH DISC INTO THE END FRAME
ÉTAPE 4. FIXEZ CHAQUE DISQUE DANS LE CADRE D’EXTRÉMITÉ
A
1
2
3
4
Diagram 4.2
Schéma 4.2
4.1. Make sure pin (A) is visible, is not covered by the sleeping mat and is facing inwards. Check all four bed
posts (see diag. 4.1).
4.2. Loosely place each disc into the loop of the bed end frame, ensure your ngers are not in the way and
rmly push down on the side rail (see diag. 4.2).
4.3. Make sure the the disc ts completely into the bed end frame (see diag. 4.3).
4.4. Repeat steps 4.1, 4.2 and 4.3 on each bed post.
4.1. Assurez-vous que la tige (A) soit visible et non couverte par le matelas et est tournée vers l’intérieur. Vériez les 4
extrémités du lit (voir schéma 4.1).
4.2. Placez chaque disque, sans serrez, dans la boucle du cadre d’extrémité, prenez garde à vos doigts et enfoncez
fermement la barre latérale (voir schéma 4.2).
4.3. Assurez-vous que le disque soit parfaitement ajusté au cadre de lit (voir schéma4.3).
4.4 Répétez les étapes 4.1, 4.2 et 4.3 à chaque extrémité du lit.
Make sure pin (A) is facing inwards
and not covered by sleeping mat.
Diagram 4.1
Schéma 4.1
A
Diagram 4.3
Schéma 4.3
Pinch hazard
Danger de se
faire pincer X
Assurez-vous que la tige (A) soit tournée
vers l’intérieur et non couverte par le
matelas.
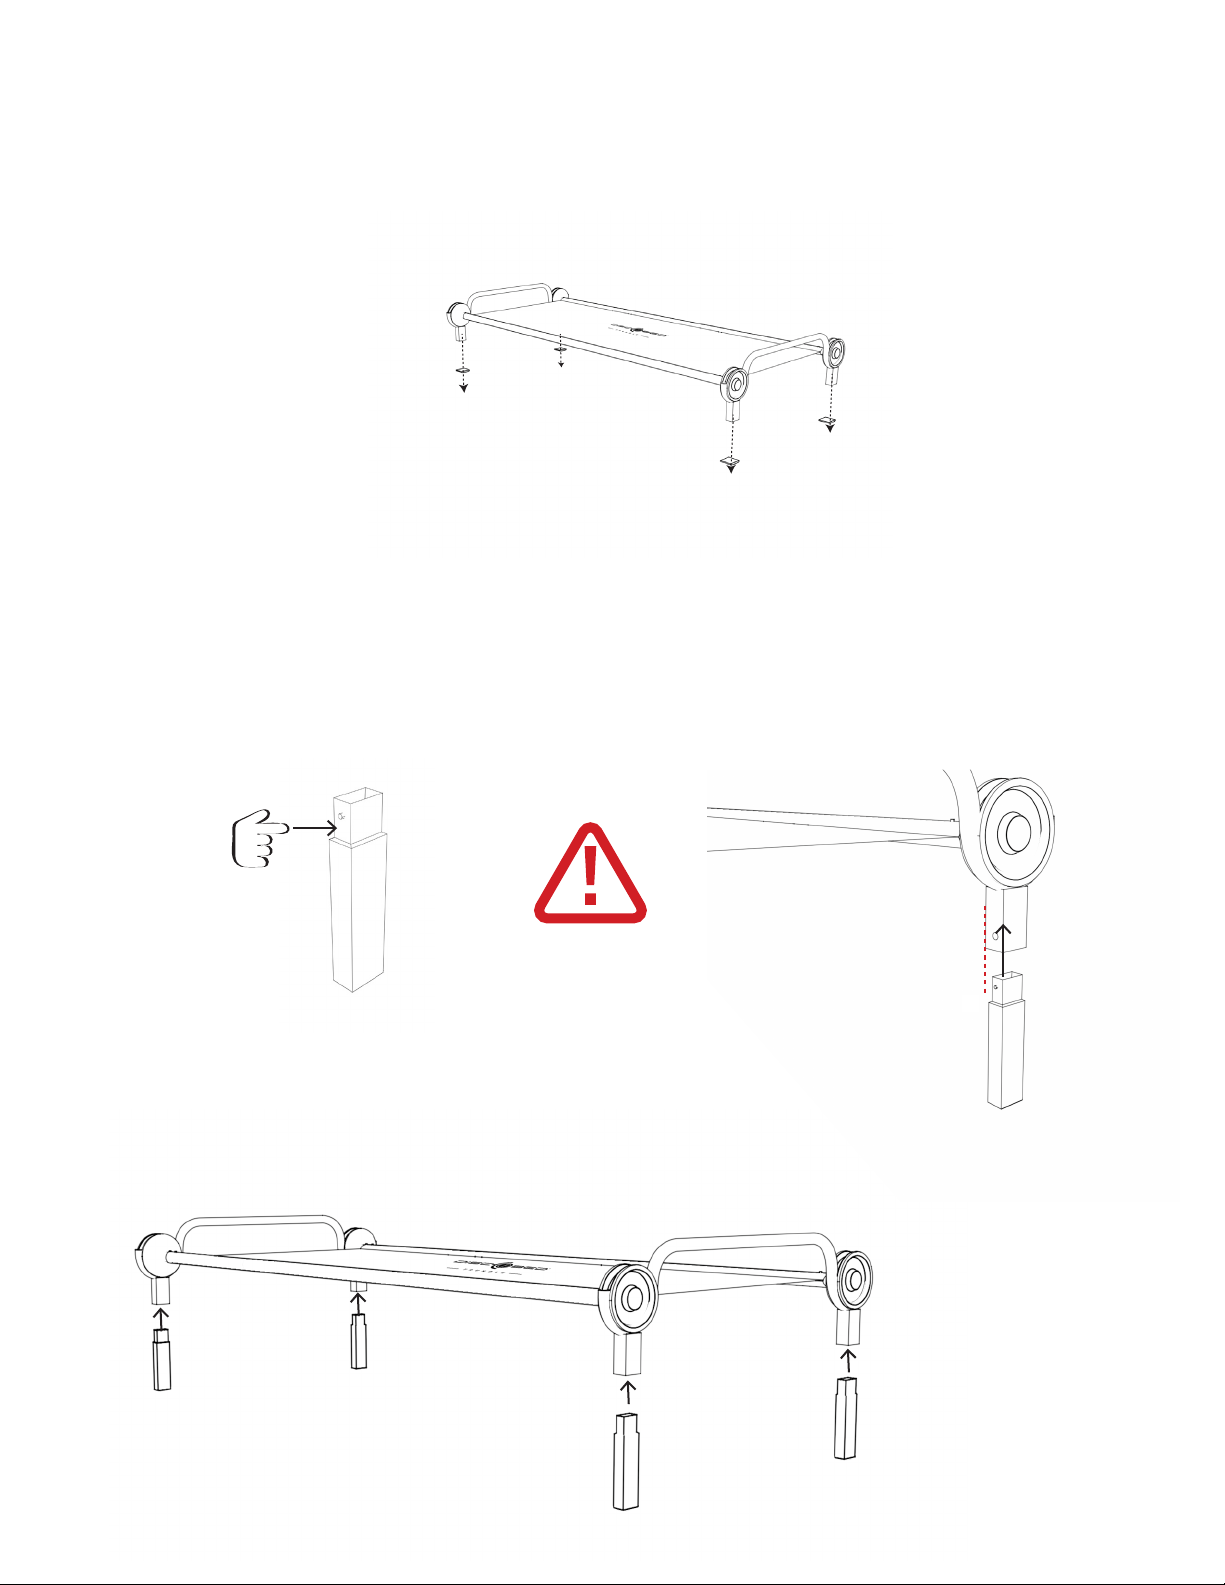
5.1. Remove the 4 foot plugs from the Trundle end frame.
5.1. Enlevez les 4 bouchons de pied du cadre d’extrémité.
6
STEP 5. REMOVE FOOT PLUGS
ÉTAPE 5. ENLEVEZ LES BOUCHONS DE PIED
12
3
4
STEP 6. ATTACH LEG EXTENSIONS TO BED END FRAME
ÉTAPE 6. ATTACHEZ LES RALLONGES DES JAMBES À L’EXTRÉMITÉ DU CADRE
2
1
3
4
6.3. Repeat steps 6.1 and 6.2 on remaining legs.
6.3. Répétez les étapes 6.1.et 6.2. sur les jambes
restantes du lit.
6.1. Press pin (A) down on leg extension and hold.
6.1. Appuyez sur la tige (A) sur la rallonge de jambe
et maintenez.
6.2. Line pin (A) with hole in leg of trundle frame.
Insert adapter into leg. Let pin (A) go.
6.2. Alignez la tige (A) avec le trou dans la jambe du cadre du lit
gigogne. Insérez l’adaptateur dans la jambe. Relâchez la tige (A).
A
Pin is only securely locked
in when you hear a‘click’
sound. Make sure pin has
popped up before moving
on.
La tige est bloquée de
façon sûre quand vous
entendez le‘clic’.
Assurez-vous que la
tige soit remontée
avant de passer à
l’étape suivante.
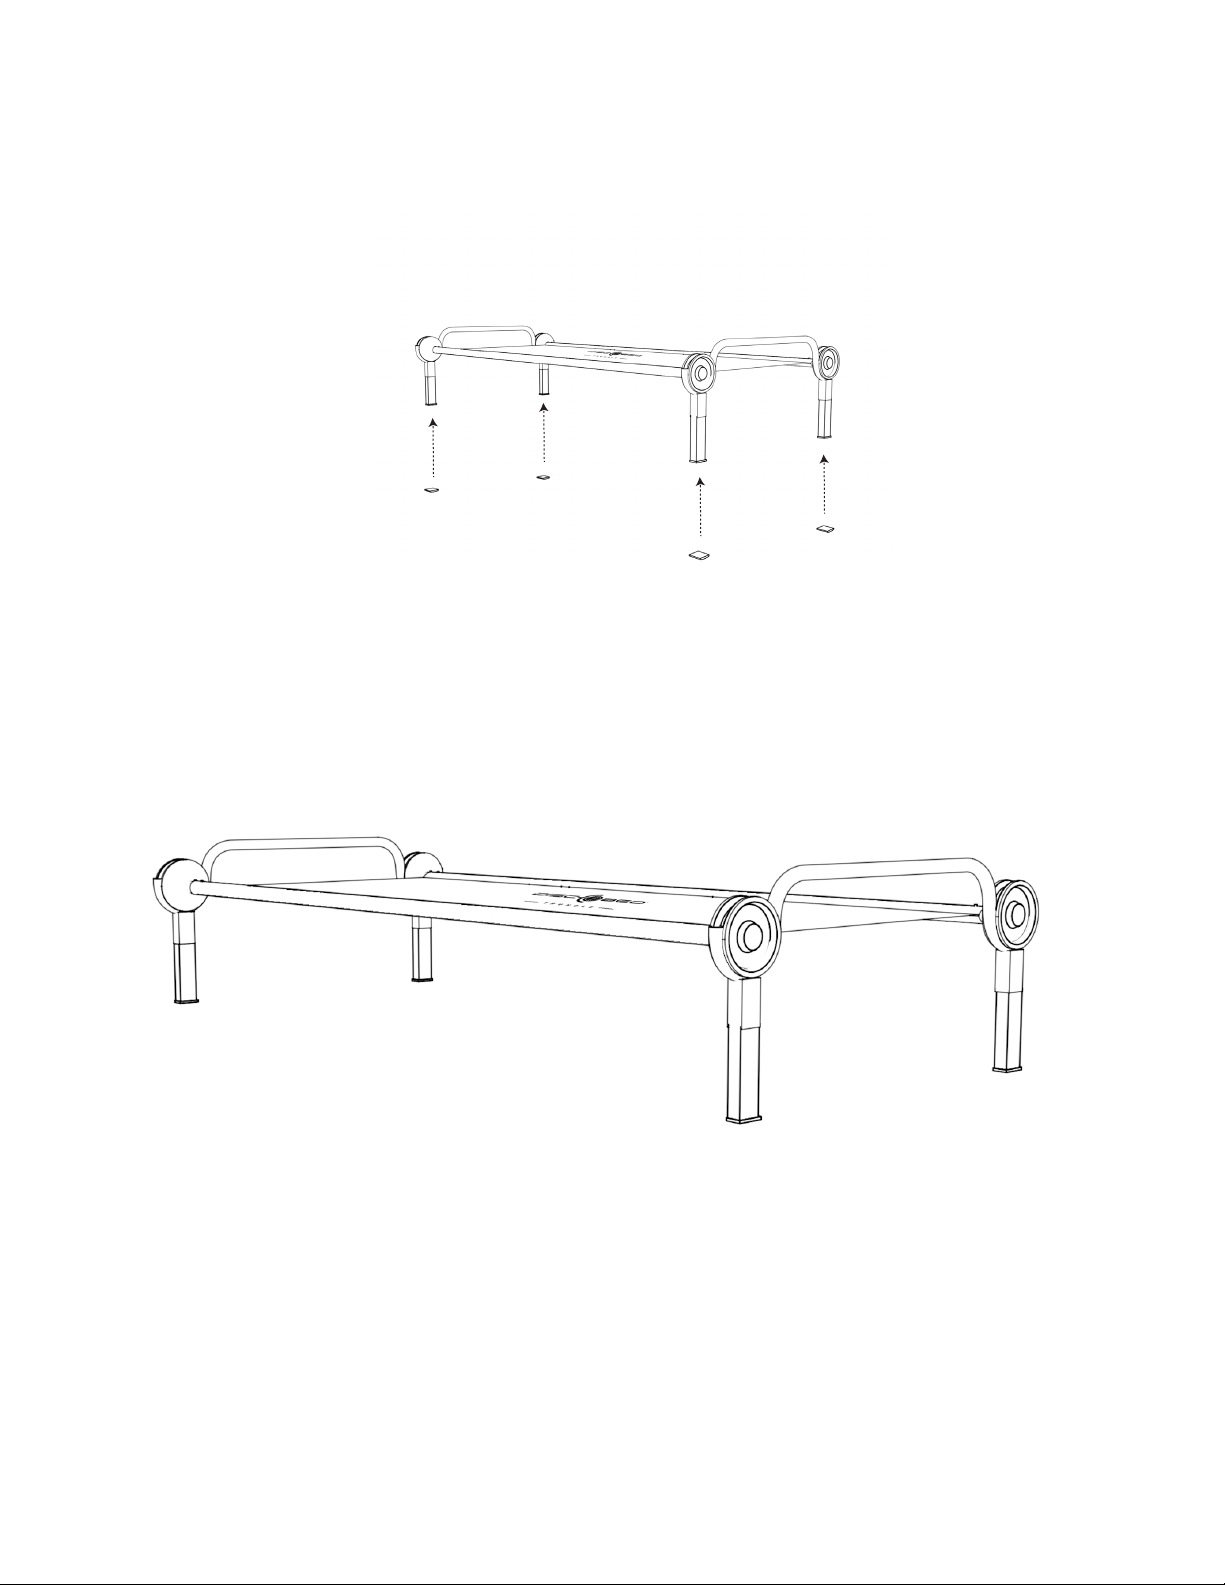
7.1. Insert the 4 foot plugs into leg extensions.
7.1. Insérez les 4 bouchons de pied dans les rallonges des jambes.
STEP 7. INSERT FOOT PLUGS INTO LEG EXTENSIONS.
ÉTAPE 7. INSÉREZ LES BOUCHONS DE PIED DANS LES RALLONGES DE JAMBES.
12
34
THE ASSEMBLY OF YOUR DISC-O-BED® TRUNDLE
COT IS NOW COMPLETE.
LE MONTAGE DE VOTRE LIT GIGOGNE DISC-O-BED® EST MAINTENANT TERMINÉ.
7
We hope that you are completely happy with our product and that it is exactly what you expected.
Nous espérons quevous êtes entièrement satisfait de notre produit et qu’il répond parfaitement à vos
attentes.
DO NOT bunk this product, or use in any way other than the intended purpose.
N’ajoutez pas d’étages à ce produit et ne l’utilisez pas d’une autre manière que celle prévue.
L I T G I G O G N E
8
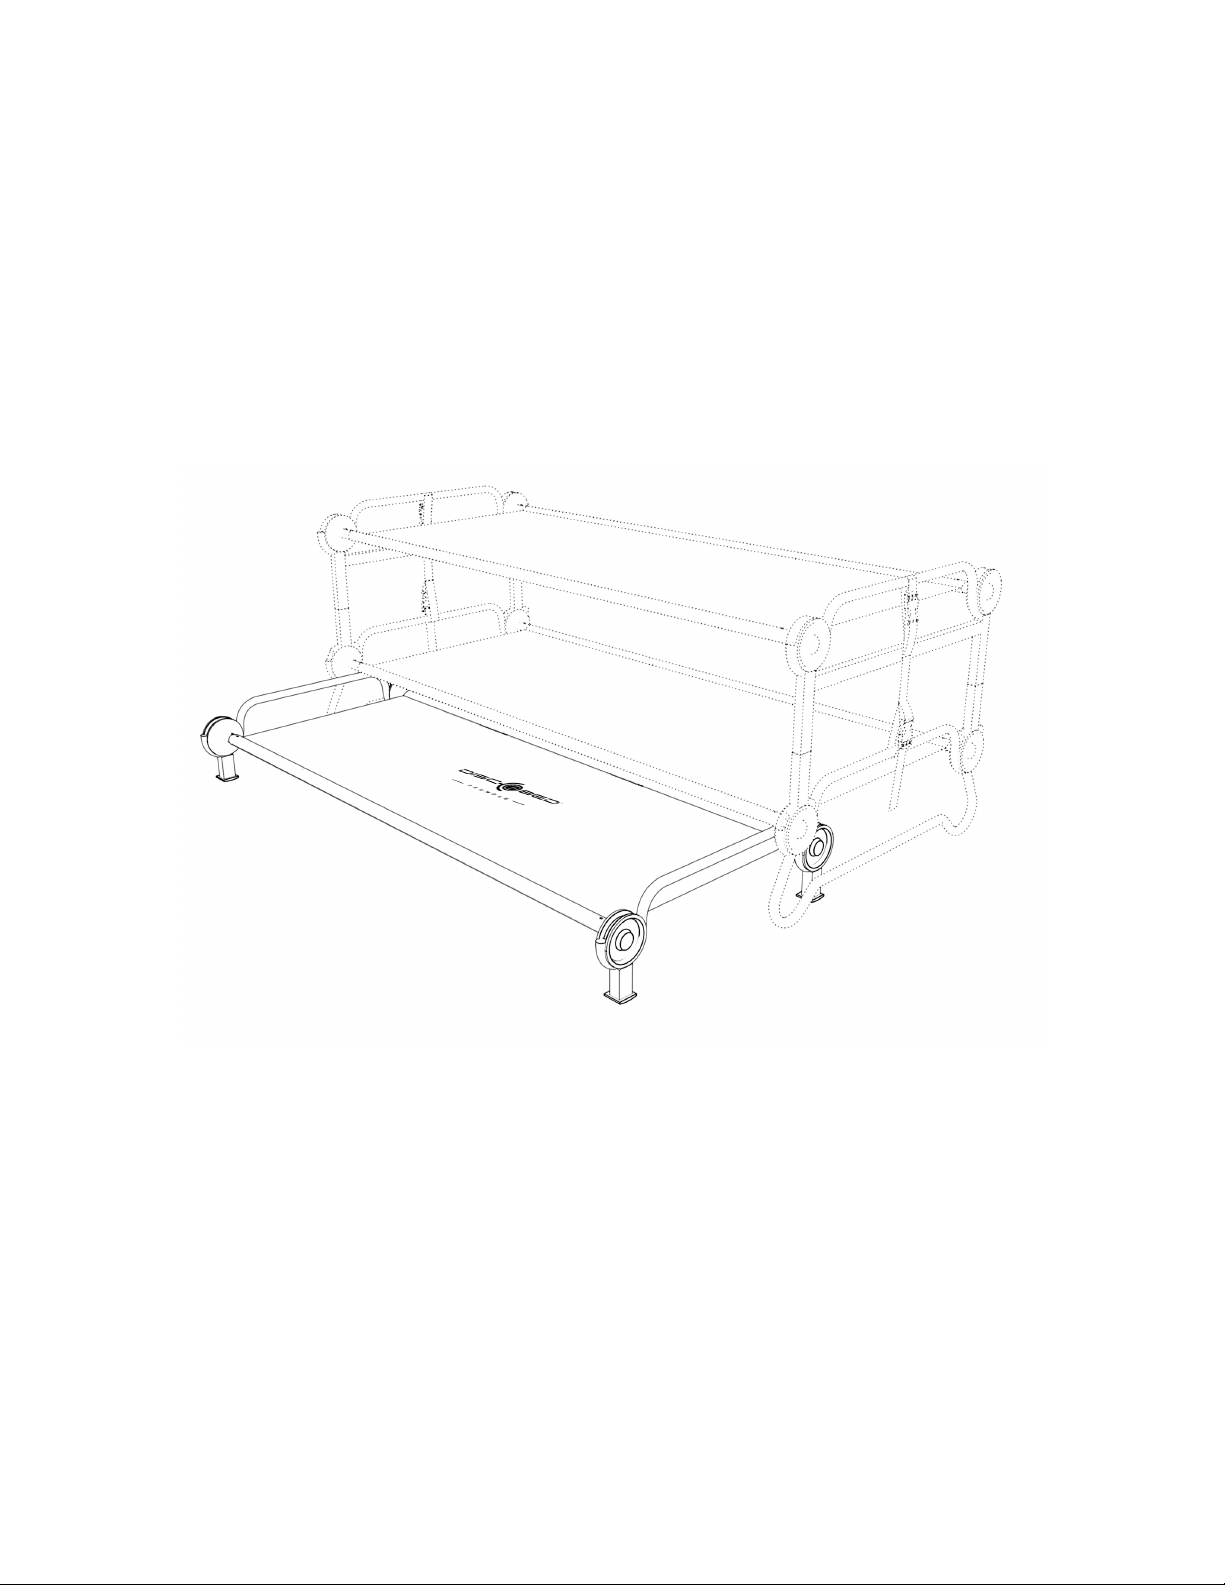
WHEN NOT IN USE, REMOVE LEG EXTENSIONS, REPLACE FOOT
PLUGS AND SLIDE THE TRUNDLE UNDER YOUR DISC-O-BED® XL
OR 2XL BUNK.
LORSQUE LE PRODUIT N’EST PAS UTILISÉ, ENLEVEZ LES
RALLONGES DES JAMBES, REMPLACEZ LES BOUCHONS DE PIED
ET GLISSEZ LE LIT GIGOGNE SOUS VOTRE DISC-O-BED® XL
OU 2XL.

L I T G I G O G N E
Package Instructions
Instructions de rangement
9

10
© 2019 Disc-O-Bed® Retail, Inc. All rights reserved
© 2019 Disc-O-Bed® Retail, Inc. Tous droits réservés
DISC-O-BED® (“MANUFACTURER”) warrants only that this product shall be free from defects in materials and workmanship for a period of one year after the date of delivery. If within the applicable warranty period, (i) the purchaser
discovers any defects in the materials or workmanship of this product and (ii) noties MANUFACTURER in writing of such defects and returns the defective product to MANUFACTURER, MANUFACTURER shall repair or replace the
defective product, or, at MANUFACTURER’s sole option, refund the purchase price for the defective product. This warranty shall not apply to any of the following:
(a) products that have been repaired or altered by anyone other than MANUFACTURER approved personnel; (b) products that have been damaged by negligence or accident or by other circumstances beyond the reasonable
control of MANUFACTURER; or (c) products that have been improperly used or maintained, or that have been subjected to abnormal conditions of use or maintenance not in conformity with MANUFACTURER’s written instructions
concerning use and maintenance. In no case whatsoever, including justied warranty claims, is the purchaser entitled to retain payments due, except upon the written consent of MANUFACTURER with respect to undisputed
claims. No claims for warranty will be processed if received after the warranty period.
IN ALL EVENTS, THE LIABILITY OF MANUFACTURER, WHETHER BASED IN TORT, BREACH OF CONTRACT, BREACH OF WARRANTY, OR OTHERWISE, SHALL NOT UNDER ANY CIRCUMSTANCES EXCEED THE PRICE OF THE DEFECTIVE
PRODUCT IN QUESTION OR WITH RESPECT TO WHICH SUCH BREACH, DEFAULT, OR NEGLIGENCE IS CLAIMED. THE PURCHASER ACKNOWLEDGES THAT THE REMEDIES PROVIDED HEREIN ARE EXCLUSIVE AND IN LIEU OF ALL OTHER
REMEDIES. THE FOREGOING LIMITED WARRANTY IS IN LIEU OF ALL OTHER WARRANTIES, EXPRESSED OR IMPLIED, INCLUDING BUT NOT LIMITED TO ANY WARRANTIES OF MERCHANTABILITY, FITNESS FOR ANY PARTICULAR PUR-
POSE, OR NON-INFRINGEMENT, ALL OF WHICH ARE HEREBY EXPRESSLY DISCLAIMED
DISC-O-BED® (ci-après le Fabricant) garanti uniquement que ce produit sera exempt de défectuosités sur les matériaux et la main-d’oeuvre pour une période d’un an après la date de livraison. Si, durant la période couverte par
la garantie (i) l’acheteur découvre n’importe quelles défectuosités sur les matériaux ou la main-d’œuvre de ce produit et (ii) qu’il avise par écrit le Fabricant de ces défectuosités et renvoie le produit défectueux au Fabricant, le
Fabricant réparera ou remplacera le produit défectueux ou, à sa discrétion, remboursera le prix d’achat du produit défectueux. Cette garantie ne s’applique pas aux situations suivantes:
(a) Les produits qui ont été réparés et modiés par toute autre personne que le personnel autorisé du Fabricant; (b) Les produits qui ont été abîmés par négligence ou accident ou toutes autres circonstances au-delà du contrôle
raisonnable du Fabricant; ou (c) Les produits qui ont été utilisés ou entretenus de manière inadéquate ou qui ont été soumis à des conditions anormales d’utilisation ou d’entretien non-conformes aux instructions écrites du
Fabricant concernant l’utilisation et l’entretien. En aucun cas, incluant des réclamations sous garantie justiées, l’acheteur ne peut retenir un paiement dû, sauf en cas d’autorisation écrite du Fabricant en ce qui concerne les
réclamations incontestées. Aucune réclamation ne sera traitée si reçue après la période de garantie.
DANS TOUS LES CAS, LA RESPONSABILITÉ DU FABRICANT, QU’ELLE REPOSE SUR UN DÉLIT, BRIS DE CONTRAT, BRIS DE GARANTIE, OU AUTRE, NE DÉPASSERA EN AUCUN CAS LE PRIX DU PRODUIT DÉFECTUEUX EN QUESTION OU PAR
RAPPORT AUQUEL UNE TELLE INFRACTION, DÉFAUT OU NÉGLIGENCE EST REVENDIQUÉE. L’ACHETEUR RECONNAIT QUE LES RECOURS FOURNIS ICI SONT EXCLUSIFS ET REMPLACENT TOUT AUTRE RECOURS. LA GARANTIE LIMITÉE
SUSMENTIONNÉE REMPLACE TOUTES AUTRES GARANTIES EXPRIMÉES OU IMPLICITES, INCLUANT, MAIS NON LIMITÉE À, TOUTES GARANTIES DE COMMERCIALIBILITÉ, D’ADAPTATION À UNE FIN PARTICULIÈRE, OU ENTORSE AU
RÉGLEMENT, TOUTES SONT PAR LA PRÉSENTE FORMELLEMENT REJETÉES.
LIMITED WARRANTY
GARANTIE LIMITÉE
“Patented / Breveté” US 8,356,369/US 7,797,772/US 7,921,483/USD600,446/USD600,469/USD611,742
ECD Reg. Nos. 001095061-0001/001095061-0002/001095020-0001
We hope that you are completely satised with our product and it is exactly what you expected. Should you have any questions,
comments or concerns, please don’t hesitate to contact us via:-
Toll Free: +1 800.613.0910 Monday – Friday 8:30 to 5:00pm (EST)
www.discobed.com
Like us on FB http://www.facebook.com/discobedworldwide
All returns of defective items shall be made to the following address:
Disc-O-Bed® Retail, Inc.
2408 Tech Center Pkwy Ste. 100
Lawrenceville GA 30043
SATISFACTION GUARANTEED
GARANTIE DE SATISFACTION
Nous espérons que vous êtes entièrement satisfait de notre produit et qu’il répond parfaitement à vos attentes. Si vous avez des ques-
tions, commentaires ou préoccupations, n’hésitez pas à nous contacter via:
Sans Frais: +1 800 613 0910 du lundi au vendredi de 8h30 à 17h (HNE)
www.discobed.com
Aimez nous sur Facebook FB http://www.facebook.com/discobedworldwide
Tous les articles défectueux doivent être retournés à l’adresse suivante:
Disc-O-Bed® Retail, Inc.
2408 Tech Center Pkwy Ste. 100
Lawrenceville GA 30043
11
IMPORTANT SAFETY WARNING
IMPORTANT - AVERTISSEMENT DE SÉCURITÉ
1. Refer to the assembly instructions and ensure that the 5 point check list is followed prior to each use. Give special care
and attention where a warning is indicated.
2. Never allow a child under 6 years of age on the top bed. Only one person allowed on each bed level.
3. DO NOT allow horseplay on or under the product. NO jumping on the product. This product is not a toy.
4. DO NOT use substitute parts. Contact the manufacturer or dealer for replacement parts.
STRANGULATION HAZARD - Never attach or hang items to any part of the product that are not designed for use with the
product; for example, but not limited to, hooks, belts and jump ropes.
1. Référez-vous au guide de montage et assurez-vous de bien suivre la liste de contrôle en 5 points avant chaque utilisation.
Des précautions et une attention particulière doivent être utilisées lorsqu’un avertissement de sécurité est indiqué.
2. Pas d’enfant de moins de 6 ans sur le lit supérieur. 1 personne par étage.
3. NE PERMETTEZ PAS les jeux sur ou sous les lits superposés. NE PAS sauter sur le produit. Ce produit N’EST PAS un jouet.
4. NE PAS utiliser des pièces de remplacement. Contactez le fabricant ou le détaillant pour des pièces de rechange.
DANGER D’ÉTRANGLEMENT - Ne jamais attacher ou suspendre des objets qui ne sont pas spéciquement conçus pour être
utilisés avec ce produit; par exemple, crochets, sangles, ceintures, cordes à danser, etc.
If you have any questions, comments or concerns, please don’t hesitate to contact us:
Disc-O-Bed® Retail, Inc. 2408 Tech Center Pkwy STE 100, Lawrenceville, GA 30043 USA
Toll Free: +1 800.613.0910 Monday – Friday 8:30 to 5:00pm (EST)
www.discobed.com
Nous espérons que vous êtes entièrement satisfait de notre produit et qu’il répond parfaitement à vos attentes. Si vous avez
des questions, commentaires ou préoccupations, n’hésitez pas à nous contacter via:
Disc-O-Bed® Retail, Inc. 2408 Tech Center Pkwy STE 100, Lawrenceville, GA 30043 USA
Numéro sans frais: +1 800 613 0910 du lundi au vendredi de 8h30 à 17h00 (HNE)
www.discobed.com
Table of contents
Other Disc-O-Bed Camping Equipment manuals


