Discovery Telecom EW1B User manual

WIRELESS ZONE & PGM OUTPUT EXPANSION MODULE
BELAIDIS ZONŲ IR PGM IŠĖJIMŲ IŠPLĖTIMO MODULIS
EW1B
Тел: +7 495 7907870
Моб: +7 965 4429948
Skype: Discoverytelecom
Mail: [email protected]
www.discoverytelecom.ru

2
Wireless expansion module EW1B is a wireless device with 2 zones and 2 PGM outputs. This expansion module connects to ELDES
wireless alarm systems and enables wireless access for to 2 wired devices such as movement PIR sensors, magnetic door contacts etc.
In addition it allows to connect and control up to 2 appliances, i.e. lighting, heating etc. After the wiring process to EW1B it is neces-
sary to bind EW1B to the alarm system by sending a corresponding command via SMS message or using software ELDES Congura-
tion Tool. It is possible to connect up to 16 EW1B devices to ELDES alarm system at a time. The maximum wireless connection range
is 150 meters (in open areas).
1. Package Content
1. EW1B.........................................................qty. 1
2. EW1B User Manual..............................qty. 1
3. 1,5V Alkaline AA Type Battery.........qty. 3
2. Technical Specications
2.1 Electrical & Mechanical Characteristics
Battery Type 1,5V Alkaline AA type
Number of Batteries 3
Battery Operation Time ~18 months*
Number of Zones 2
Zone Connection Type Normally closed (NC)
Number of PGM Outputs 2
EW1B PGM Output Circuit 1 R
OUT
Open Collector Output.
Output is pulled to COM
when turned ON.
Maximum Commuting PGM Output Values Voltage – 30V; current 500mA
Wireless Transmitter-Receiver Frequency 868 MHz
Wireless Communication Range Up to 30 meters in premises; up to 150 meters in open areas
Compatible with Alarm Systems ELDES Wireless
Range of Operating Temperatures -20...+55ºC
EW1B PCB Dimensions 38x60x12mm
EW1B Enclosure Dimensions 90x110x40mm
Enclosure rating IP65
* This operation time might vary in dierence conditions.
2.2 Connector & LED Functionality
COM Common terminal for zones
Z2, Z1 Security zone terminals
C2, C1 PGM output terminals
D1, D2 Pins for restoring default settings
LED EW1B status
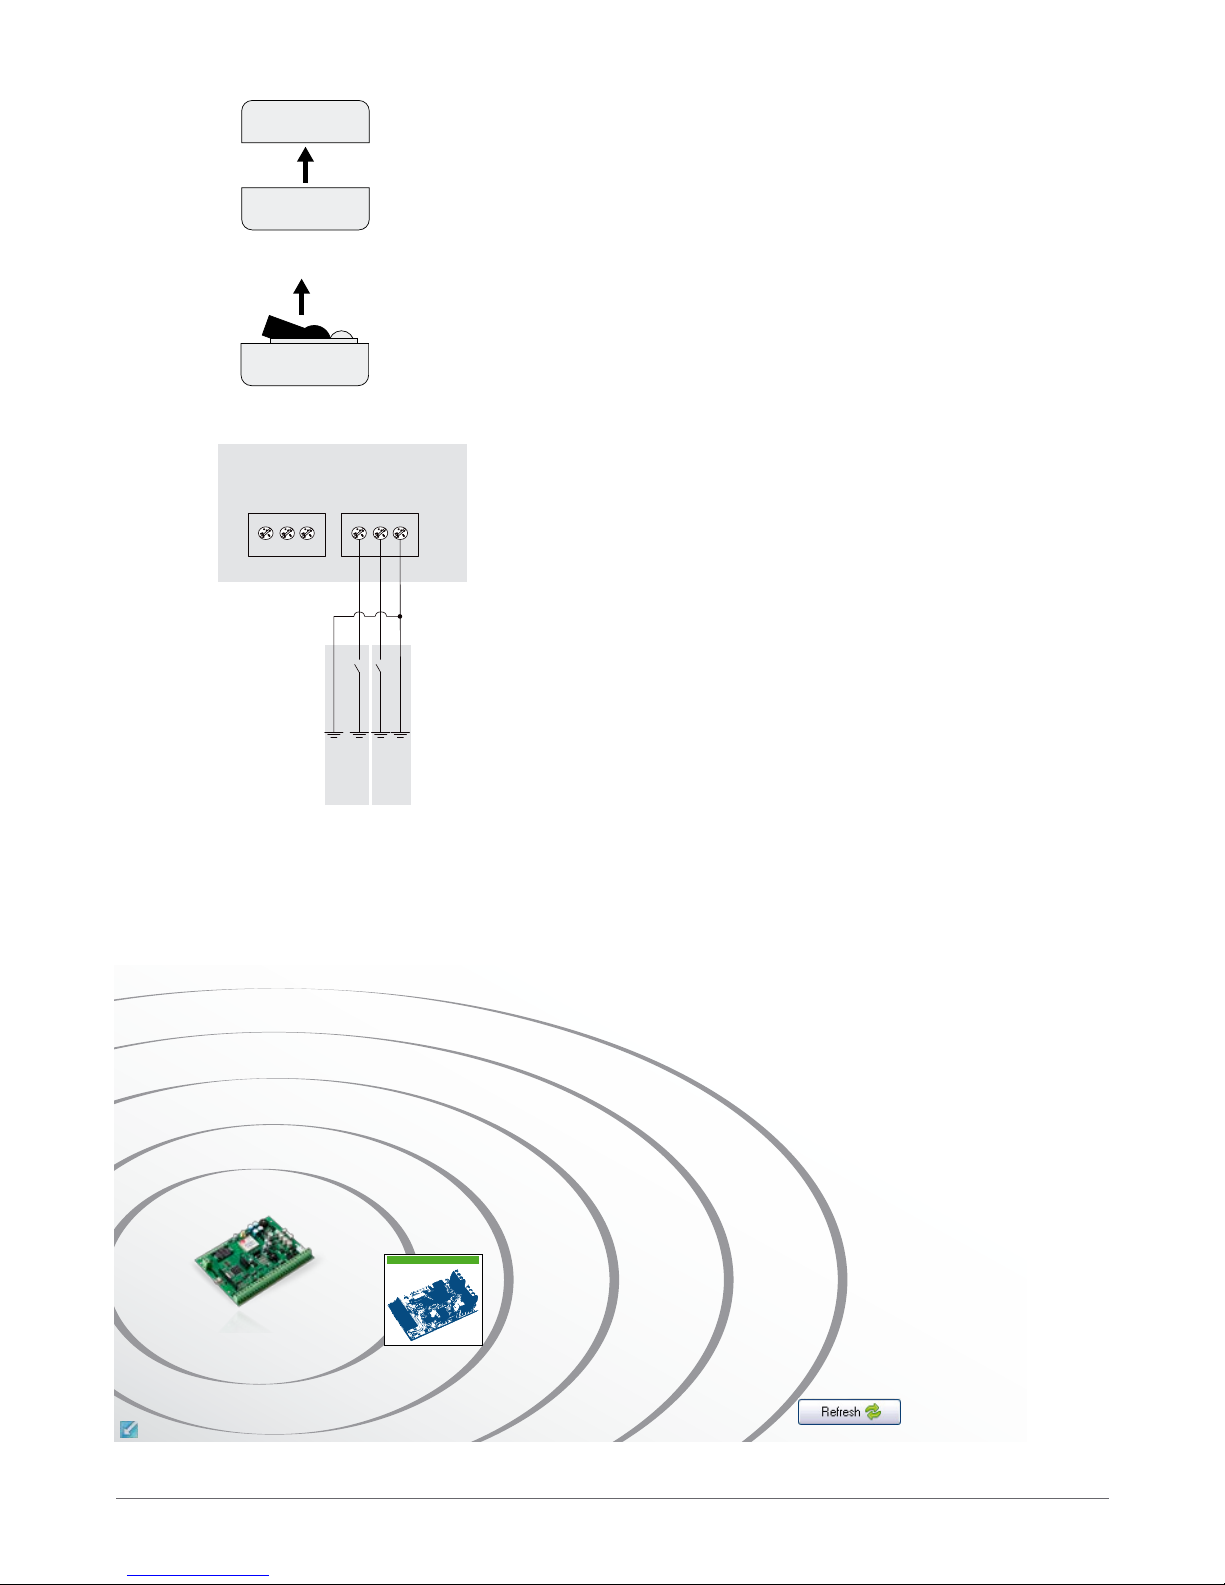
3. Installation
1. Unscrew EW1B enclosure (see Fig. No. 3)
D1
LED
D2
C2
COM
Z1
C1
Z2
Fig. No. 1
Fig. No. 2Fig. No. 3
BATTERY
BATTERY
BATTERY
+
+
–
–
–
+
User manUal eW1 v1.0
3
2. Detach the front side of the enclosure by pulling the front side up (see Fig. No. 4)
4. Remove the plastic tab inserted between one of the battery terminals and battery slot contacts (see Fig. No. 5).
5. Connect the ciruit as indicated in Fig. No. 6.
6. Close EW1B enclsoure (see Fig. No. 4, Fig. No. 3)
7. Bind the device to the alarm system using ELDES Conguration Tool software. Open Wireless Devices section and enter a
8-digit wireless device ID located on the EW1B enclosure and press Add button (see Fig. No. 7). The device can also be bind by
sending a corresponding command via SMS message. For more details, please, refer to the software‘s HELP section and ELDES
alarm system installation manual.
EW1B
Sensor
Sensor
C1 C2 Z1 Z2 COM
Fig. No. 6
Fig. No. 4
Fig. No. 5
80% 60% 40% 20%
Fig. No. 7

4
8. Upon the successful binding process of EW1B Battery Level and Signal Level become visible in ELDES Conguration Tool software
under Wireless Devices section. If attempt to bind is unsuccessful, try to move EW1B closer to the alarm system device and bind anew.
9. EW1B is ready for use.
NOTE: If you are unable to bind the wireless device, please, restore the parameters of the wireless device to default and try
again. See chapter 6. Restoring Default Parameters for more details.
ATTENTION: The minimum wireless connection range between the wireless device and wireless antenna of ELDES alarm sys-
tem can be 0,5 meters.
4. EW1B Zones, PGM Outputs & Tamper
Upon successful EW1B module binding process, the system adds 2 wireless Instant zones intended for wired sensor connection and 2
wireless PGM outputs intended for electrical appliance connection and control.
The wireless connection loss between EW1B and ELDES alarm system leads to system alarm regardless of system being armed or
disarmed. The system identies this event as a tamper violation and sends alarm by SMS message and phone call to the user (-s) by
default. The SMS message contains the violated tamper number and a star *character indicating wireless connection loss as a tamper
alarm cause.
5. Battery Replacement
1. Open EW1B enclosure.
2. Remove all 3 old batteries from the battery slots.
3. Postition the 3 new 1,5V alkaline AA type batteries according to the appropriate battery slot positive/negative terminals as indicated.
4. Insert the batteries into the battery slots.
5. Batteries replaced.
For more details, please, refer to chapter 3. Installation.
6. Restoring Default Parameters
1. Remove any battery from EW1B.
2. Short circuit (connect) pins D1 and D2.
3. Insert the battery back to EW1B.
4. Wait untill LED provides several short ashes.
5. Remove short-circuit from D1 and D2 pins.
6. Parameters restored to default.
7. Additional Information
Limited Liability
The buyer must agree that the system will reduce the risk of re, theft, burglary or other dangers but does not guarantee against such
events.“ELDES UAB” will not take any responsibility regarding personal or property or revenue loss while using the system.
“ELDES UAB” liability according to local laws does not exceed value of the purchased system. “ELDES UAB” is not aliated with any of
the Internet providers therefore is not responsible for the quality of Internet service.
Manufacturer Warranty
This device carries a 24-month warranty by the manufacturer“ELDES UAB”. Warranty period starts from the day the system has been
purchased by the end user. The warranty is valid only if the system has been used as intended, following all guidelines listed in the
manual and within specied operating conditions. Receipt must be kept as a proof of purchase date. The warranty is voided if the
system has been exposed to mechanical impact, chemicals, high humidity, uids, corrosive and hazardous environment or other
force majeure factors.
Safety instructions
Please read and follow these safety guidelines in order to maintain safety of operators and people around:
• DO NOT use the system where it can be interfere with other devices and cause any potential danger.
• DO NOT use the system with medical devices.
• DO NOT use the system in hazardous environment.
• DO NOT expose the system to high humidity, chemical environment or mechanical impacts.
• DO NOT attempt to personally repair the system.
Any additional devices linked to EW1B (electrical appliances, relays etc.) must be approved by LST EN 60950-1 standard.

The WEEE (Waste Electrical and Electronic Equipment) marking on this product (see left) or its documentation indicates
that the product must not be disposed of together with household waste. To prevent possible harm to human health
and/or the environment, the product must be disposed on in an approved and environmentally safe recycling process.
For further information on how to dispose of this product correctly, contact the system supplier, or the local authority
responsible for waste disposal in your area.

6
Belaidis modulis EW1B yra belaidis įrenginys, turintis 2 zonas ir 2 PGM išėjimus. Šis išplėtimo modulis yra jungiamas prie ELDES belai-
džių apsaugos sistemų bei suteikia belaidę prieigą 2 laidiniams davikliams – PIR judesio davikliams, magnetiniams durų kontaktams ir
pan. Taip pat šis įrenginys suteikia galimybę prijungti 2 elektrinius prietaisus ir valdyti apšvietimą, šildymą ir pan. Atlikus EW1B modu-
lio laidų prijungimo darbus prie ELDES apsaugos sistemos, yra būtina aktyvuoti modulio belaidį ryšį su apsaugos sistema. Tai galima
atlikti siunčiant SMS žinutę arba naudojantis ELDES Conguration Tool programine įranga. Vienu metu galima prijungti iki 16 EW1B
įrenginių prie ESIM264 apsaugos sistemos. Maksimalus atstumas belaidžiam ryšiui yra 150 metrų (atvirose erdvėse).
1. Pakuotės sudėtis
1. EW1B.........................................................1 vnt.
2. EW1B vartotojo vadovas...................1 vnt.
2. 1,5V Alkaline AA tipo baterija .........3 vnt.
2. Techninė specikacija
2.1 Elektrinės ir mechaninės charakteristikos
Baterijos tipas 1,5V Alkaline AA type
Baterijų skaičius 3
Baterijų veikimo trukmė ~18 mėn.*
Zonų skaičius 2
Zonų jungimo tipas Uždaras kontaktas (NC)
PGM išėjimų skaičius 2
EW1B PGM išėjimų schema 1 R
OUT
Atviro kolektoriaus PGM išėji-
mas. PGM išėjimas sujungiamas
su COM, kuomet yra įjungtas.
Maksimalios PGM išėjimų
komutuojamos reikšmės
Įtampa – 30V; srovė – 500mA
Belaidžio ryšio dažnis 868 MHz
Belaidžio ryšio atstumas Iki 30 metrų patalpose; iki 150 metrų atvirose erdvėse
Suderinamumas su apsaugos sistemomis ELDES Wireless
Darbo temperatūros diapazonas -20...+55ºC
EW1B plokštės matmenys 38x60x12mm
EW1B korpuso matmenys 90x110x40mm
Korpuso atsparumo klasė IP65
* Šis laikotarpis gali skirtis atsižvelgiant į naudojimo sąlygas.
2.2 Pagrindinių mazgų ir LED indikatorių paskirtis
COM Bendras kontaktas zonoms
Z2, Z1 Apsaugos zonų kontakta
C2, C1 PGM išėjimų kontaktai
D1, D2 Gamyklinių parametrų atstatymo kontaktai
LED EW1B būsena
3. Instaliavimas
1. Atsukite EW1B korpuso varžtus (žr. 3 pav.)
D1
LED
D2
C2
COM
Z1
C1
Z2
1 pav.
2 pav.
3 pav.
BATERIJA
+
+
–
–
–
+
BATERIJA
BATERIJA

User manUal eW1 v1.0
7
2. Nuimkite korpuso priekinę dalį, keldami ją į viršų. (žr. 4 pav.)
4. Atidarę korpusą, išimkite plastikinį tarpiklį, įterptą tarp vienos iš baterijų ir baterijos lizdo (žr. 5 pav.).
5. Sujunkite grandinę, kaip pavaizduota 6 pav.
6. Uždarykite EW1B korpusą (žr. 4 pav., 3 pav.)
7. Aktyvuokite belaidį ryšį su ELDES apsaugos sistema, naudodami ELDES Conguration Tool programinę įrangą. Atverkite Wireless
Devices skyrių ir įveskite 8 skaitmenų belaidžio įrenginio ID kodą, esantį ant EW1B korpuso (arba jo vidinėje pusėje) ir paspauskite
Add mygtuką (žr. 7 pav.). Belaidis ryšys taip pat gali būti aktyvuotas nusiuntus atitinkamą SMS žinutę. Plačiau apie tai skaitykite
programinės įrangos HELP skyriuje ir ELDES apsaugos sistemos instaliavimo vadove.
EW1B
Daviklis
Daviklis
C1 C2 Z1 Z2 COM
6 pav.
4 pav.
5 pav.
80% 60% 40% 20%
7 pav.

8
8. Sėkmingai aktyvavus belaidį ryšį tarp EW1B įrenginio ir apsaugos sistemos, EW1B piktograma, Battery Level ir Signal Level tampa ma-
tomi Wireless Devices skyriuje. Nepavykus sėkmingai aktyvuoti belaidžio ryšio, perkelkite EW1B arčiau apsaugos sistemos ir bandykite
aktyvuoti belaidį ryšį iš naujo.
9. EW1B modulis paruoštas naudojimui.
PASTABA: Nepavykus aktyvuoti belaidžio ryšio, atstatykite belaidžio įrenginio gamyklinius parametrus ir bandykite aktyvuoti
belaidį ryšį iš naujo. Plačiau apie tai skaitykite skyriuje 6. Gamyklinės kongūracijos atstatymas.
DĖMĖSIO: Minimalus belaidžio ryšio atstumas tarp belaidžio įrenginio ir ELDES apsaugos sistemos belaidžio ryšio antenos gali
būti nuo 0,5 metro.
4. EW1B zonos, PGM išėjimai ir tamperis
Sėkmingai aktyvavus belaidį ryšį, sistema sukuria 2 belaides momentinio tipo zonas, daviklių prijungimui ir 2 belaidžius PGM išėjimus,
elektros prietaisų prijungimui ir valdymui.
Pažeidus tamperį, sistema sukelia aliarmą, nepaisant tuo metu esamos apsaugos būsenos (įjungta/išjungta). Sutrikus belaidžiam ry-
šiui tarp apsaugos sistemos ir EW1B, sistema šį įvykį traktuoja kaip tamperio
pažeidimą ir, pagal gamyklinę kongūraciją, siunčia SMS žinutę bei skambina registruotam vartotojui. SMS žinutėje pateikiamas pa-
žeisto tamperio numeris ir žvaigždutės * simbolis, reiškiantis belaidžio ryšio sutrikimą, sukėlusį tamperio pažeidimą.
DĖMESIO: Išjungus abi belaides zonas, tamperis neveiks.
5. Baterijos keitimas
1. Atidarykite EW1B korpusą
2. Išimkite visas 3 senas baterijas iš lizdų.
3. Atsižvelgdami į atitinkamą baterijos lizdo teigiamo/neigiamo polio žymėjimą įstatykite 3 naujas 1,5V alkaline AA tipo baterijas.
4. Baterijos pakeistos.
Daugiau informacijos pateikta skyriuje 3. Instaliavimas.
6. Gamyklinių parametrų atstatymas
1. Išimkite vieną bateriją iš EW1B.
2. Užtrumpinkite (sujunkite) D1 ir D2 kontaktus.
3. Įstatykite atgal bateriją į EW1B.
4. Palaukite, kol LED indikatorius keletą kartų trumpai sumirksės.
5. Pašalinkite užtrumpinimą nuo D1 ir D2 kontaktų
6. Gamykliniai parametrai atstatyti.
7. Papildoma informacija
Atsakomybės ribojimas
Pirkėjas sutinka, kad sistema sumažina gaisro, plėšimo, vagystės ar kitą riziką, tačiau tai nėra draudimas ar garantija, kad paminėti
veiksniai neįvyks, bei nebus asmenų sužeidimų, ar turto praradimo, ar sunaikinimo atvejų. UAB„ELDES“ neprisiima jokios atsakomy-
bės už tiesioginę ar netiesioginę žalą ar nuostolius, taip pat negautas pajamas, naudojantis sistema. UAB„ELDES“ atsakomybė, kiek tai
leidžia galiojantys įstatymai, neviršija produkto įsigijimo kainos. Korinio ryšio paslaugas teikiantys GSM operatoriai nėra susiję su UAB
„ELDES“ bendrove. Todėl bendrovė neprisiima jokios atsakomybės už tinklo paslaugas, jo aprėptį bei funkcionavimą.
Garantinis laikotarpis
UAB „ELDES“ suteikia įsigytam produktui 24 mėn. Garantiją. Garantinis laikotarpis pradedamas skaičiuoti nuo produkto pardavimo
pirmam galutiniam vartotojui datos. Garantija taikoma tik jei sistema buvo naudota pagal paskirtį, laikantis visų vartotojo vadovo
instrukcijų, bei techninėje specikacijoje nustatytų sąlygų ir maksimalių leistinų reikšmių. Pardavimo data laikoma čekio, sąskaitos ar
kito pardavimo dokumento data. Garantija taikoma tik kartu su paminėtais dokumentais pateikus užpildytą garantinį taloną. Garan-
tija netaikoma jei sistema buvo paveikta mechaniškai, cheminių medžiagų, drėgmės, korozijos, skysčių, ekstremalių aplinkos veiksnių
ar kitokių force majeure aplinkybių.
Saugos informacija
Kad užtikrinti Jūsų ir aplinkinių saugumą prašome perskaityti šias taisykles bei laikytis visų vartotojo vadove esančių montavimo
instrukcijų ir nurodymų:
• Nenaudokite sistemos ten, kur ji gali sukelti trikdžius ar pavojų.
• Nemontuokite sistemos prie medicininės aparatūros ar prietaisų, jei to reikalauja jų instrukcijos.
• Nenaudokite sistemos sprogiose vietose.
• Sistema nėra atspari drėgmei, cheminei aplinkai, bei mechaniniams poveikiams.
• Neremontuokite sistemos patys.
Kiekvienas prie EW1B prijungtas susietasis irenginys (elektriniai prietaisai, reles ir pan.) privalo tenkinti LST EN 60950-1 stan-
darto reikalavimus.
Pagal WEEE direktyvą, perbrauktos šiukšlių dėžės su ratais ženklas reiškia, kad nebetinkamą naudoti gaminį Europos Są-
jungoje reikia atiduoti perdirbti atskirai nuo kitų atliekų. Siekiant apsaugoti žmonių sveikatą ir aplinką nuo galimos žalos,
gaminys privalo būti perdirbtas patvirtintu ir aplinkai saugiu perdirbimo proceso metu. Dėl išsamesnės informacijos apie
teisingą gaminio perdirbimą, prašome kreiptis į sistemos teikėją arba įstaigą, atsakingą už atliekų perdirbimą Jūsų gyve-
namojoje vietoje.
Table of contents
Languages:


