IMPORTANTI ISTRUZIONI DI SICUREZZA
Il produttore declina ogni responsabilità per usi differenti da quelli indicati nelle istruzioni d’uso o in caso di modifiche non autorizzate dell’apparecchio.
Leggete attentamente le istruzioni d’uso e le precauzioni e conservatele nelle vicinanze dell’apparecchio. La mancata osservanza delle precauzioni potrebbe causare
incidenti e seri danni alla salute.
1. Leggere queste istruzioni.
2. Conservare queste istruzioni.
3. Prestare la massima attenzione a tutte le avvertenze.
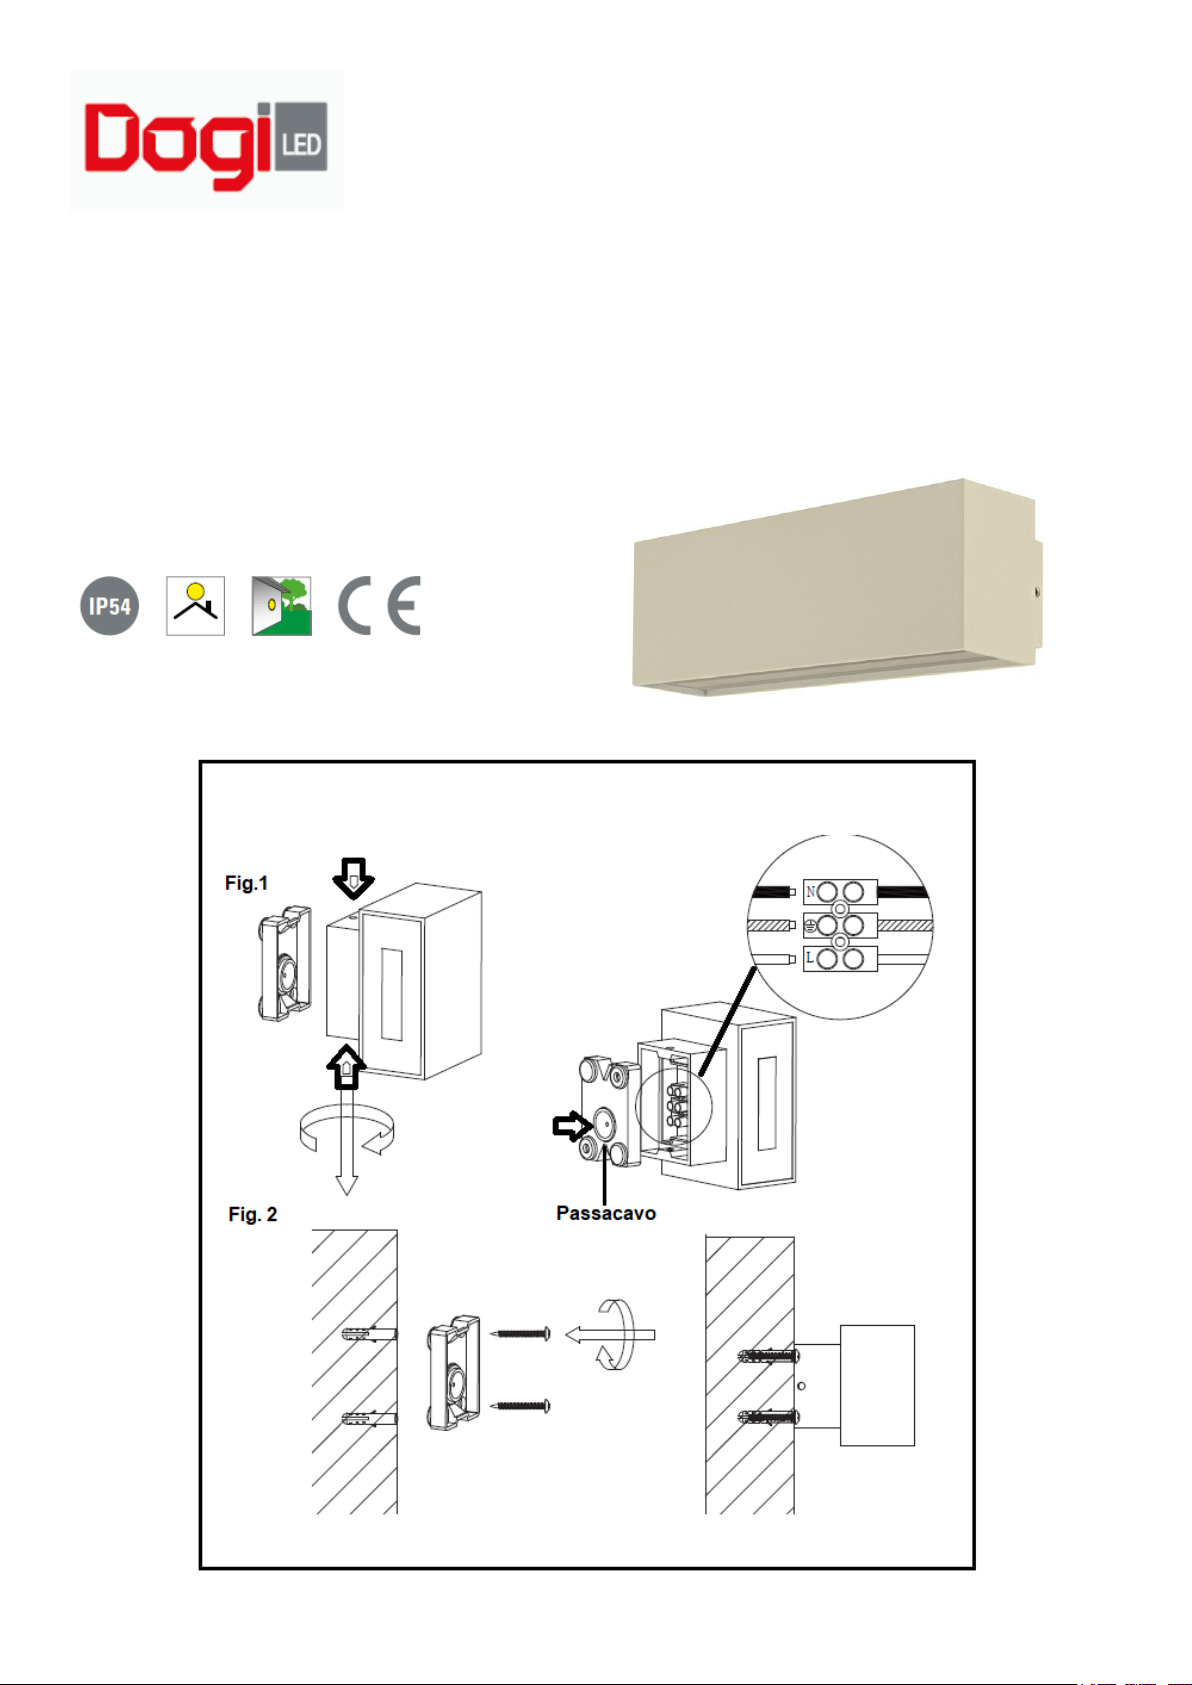
4. Prima di iniziare qualsiasi lavoro sulla lampada, scollegare sempre l’alimentazione.
5. Non installare la lampada su superfici infiammabili.
6. L’installazione deve essere effettuata da personale tecnico qualificato e nel rispetto delle norme di sicurezza.
7. Collegare l’apparecchio ad una fonte di alimentazione del tipo indicato nelle istruzioni o sull’apparecchio stesso.
8. Non inserire o disinserire l’alimentazione con le mani bagnate.
9. Qualsiasi riparazione o modifica deve essere eseguita da un tecnico qualificato / centro di assistenza autorizzato.
10. Usare l’apparecchio solamente per lo scopo previsto e descritto nel presente manuale.
11. Non usare accessori diversi da quelli approvati dal produttore.
12. Tenete l’apparecchio lontano dalla portata dei bambini.
13. In caso di guasti o rotture accidentali, scollegate immediatamente l’alimentazione e contattate un tecnico qualificato o centro di assistenza autorizzato.
14. Non fissate mai i led con gli occhi, in quanto un’esposizione diretta e prolungata potrebbe causare danni alla vista.
15. Non toccare l’apparecchio durante il funzionamento e lasciarlo raffreddare dopo l’uso prima di toccarlo per evitare di scottarsi.
IMPORTANT SAFETY INSTRUCTIONS
The manufacturer declines all responsibility for uses other than those indicated in the instructions for use or in the event of unauthorized modifications to the appliance.
Read the instructions for use and precautions carefully and keep them near the appliance. Failure to observe the precautions could cause
accidents and serious damage to health.
1. Read these instructions.
2. Save these instructions.
3. Pay close attention to all warnings.
4. Before starting any work on the lamp, always disconnect the power supply.
5. Do not install the lamp on flammable surfaces.
6. The installation must be carried out by qualified technical personnel and in compliance with safety standards.
7. Connect the appliance to a power source of the type indicated in the instructions or on the appliance itself.
8. Do not turn the power on or off with wet hands.
9. Any repairs or modifications must be performed by a qualified technician / authorized service center.
10. Use the device only for the intended purpose and described in this manual.
11. Do not use accessories other than those approved by the manufacturer.
12. Keep the appliance out of the reach of children.
13. In the event of accidental breakdowns or breakages, immediately disconnect the power supply and contact a qualified technician or authorized service center.
14. Never stare at the LEDs with your eyes, as direct and prolonged exposure could cause damage to eyesight.
15. Do not touch the appliance during operation and allow it to cool after use before touching it to avoid burns.
Specifiche tecniche / Techincal Specification:
Alimentazione / supply………………………………………........................230Vac 50/60hz
Tipo Led / Led type……………………………………………………………SMD2835
Numero Led / Led number……………………………………………………56
Potenza / power……………………………………………………………….8W
Colore luce / Color light………………………………………………………4000K (neutra/neutral)
Lumen/Lumen…………………………………………………………………1000 Lumen/m
Dimmerabile / Dimmerable…………………………………………………...No
Angolo illuminazione / Illumination angle…………………………………...120°
Vita operativa / Operation life…………………………………………………25.000h
Materiale corpo / Body Material………………………………………………Alluminio/DieCut –vetro / Glass
IP rating………………………………………………………………………....P54
Dimensioni e peso / dimension and weight…………………………………180x65x65mm –570g
Prodotto contenitore con sorgente di classe D - Container product with class D source
A causa della continua evoluzione dei prodotti, le caratteristiche ed il design di questo modello possono da variare senza preavviso.
Due to the continuous evolution of the products, the features and design of this model may be subject to change without notice.
DOGI GROUP S.r.l. –Via Marconi 105/107 –20020 –Magnago –MI –Italy
MADE IN CHINA