Dolby Digital Atmos Instruction sheet

Dolby Atmos®Home Theater Installation Guidelines
July 2017

2
Contents
Preface: How to Use This Guide
1. Background on Dolby Atmos
2. General Dolby Atmos Home Setup Guidelines
•Dolby Atmos Home Playback
•Dolby Atmos Home Theater Speaker Options
•Use of Existing Speakers
•Overhead Speakers
•Use of Existing Overhead Speakers
•Alternatives to Overhead Speakers
•Dolby Atmos Enabled Speakers
•Combination: Overhead and Dolby Atmos Enabled Speakers
•AVR Connection and Setup
•Speaker-Level Calibration and EQ
3. Standard Speaker Configurations
•Dolby Conventions for Speaker Configurations
•Standard Setup for Both Overhead Speakers and Dolby Atmos Enabled Speakers
4. Additional Speaker Placement Guidelines
•Listener-Level Speaker Placement Guidelines
•Height Speaker Placement Guidelines
5. Dolby Surround Upmixer

3
Preface: How to Use this Guide
This document contains recommendations and best practices for setting up a Dolby Atmos®home theater
system. The guidelines are intended to cover a typical home theater in a standard listening space. This
document does not cover all possible variables, room layouts, and factors for specific installations;
adaptations and deviations may be required in particular situations.
Dolby Atmos is a highly flexible solution, so minor variations from these recommendations are unlikely to
materially detract from the immersive Dolby Atmos experience.
1. Background on Dolby Atmos
Many leading Hollywood movies, including recent Academy Award®winning films, are presented in Dolby
Atmos, as this revolutionary sound technology allows filmmakers unprecedented realism and creative
freedom. With Dolby Atmos, content creators can precisely place and move sounds almost anywhere,
including overhead, to create an immersive listening experience.
Dolby Atmos technology is now available for the home and produces a listening experience never before
experienced in a home theater. You’ll get a great immersive experience, no matter what kind of Dolby
Atmos home theater setup you have. Dolby Atmos content is mixed as audio objects instead of traditional
channels. This means the content is not tied to any specific playback configuration. Further, the
technology automatically adapts the object audio to take full advantage of the number and placement of
your speakers, from systems with five speakers on the floor and two speakers producing overhead sound
up to a Dolby Atmos system with as many as 24 speakers on the floor and 10 overhead speakers.
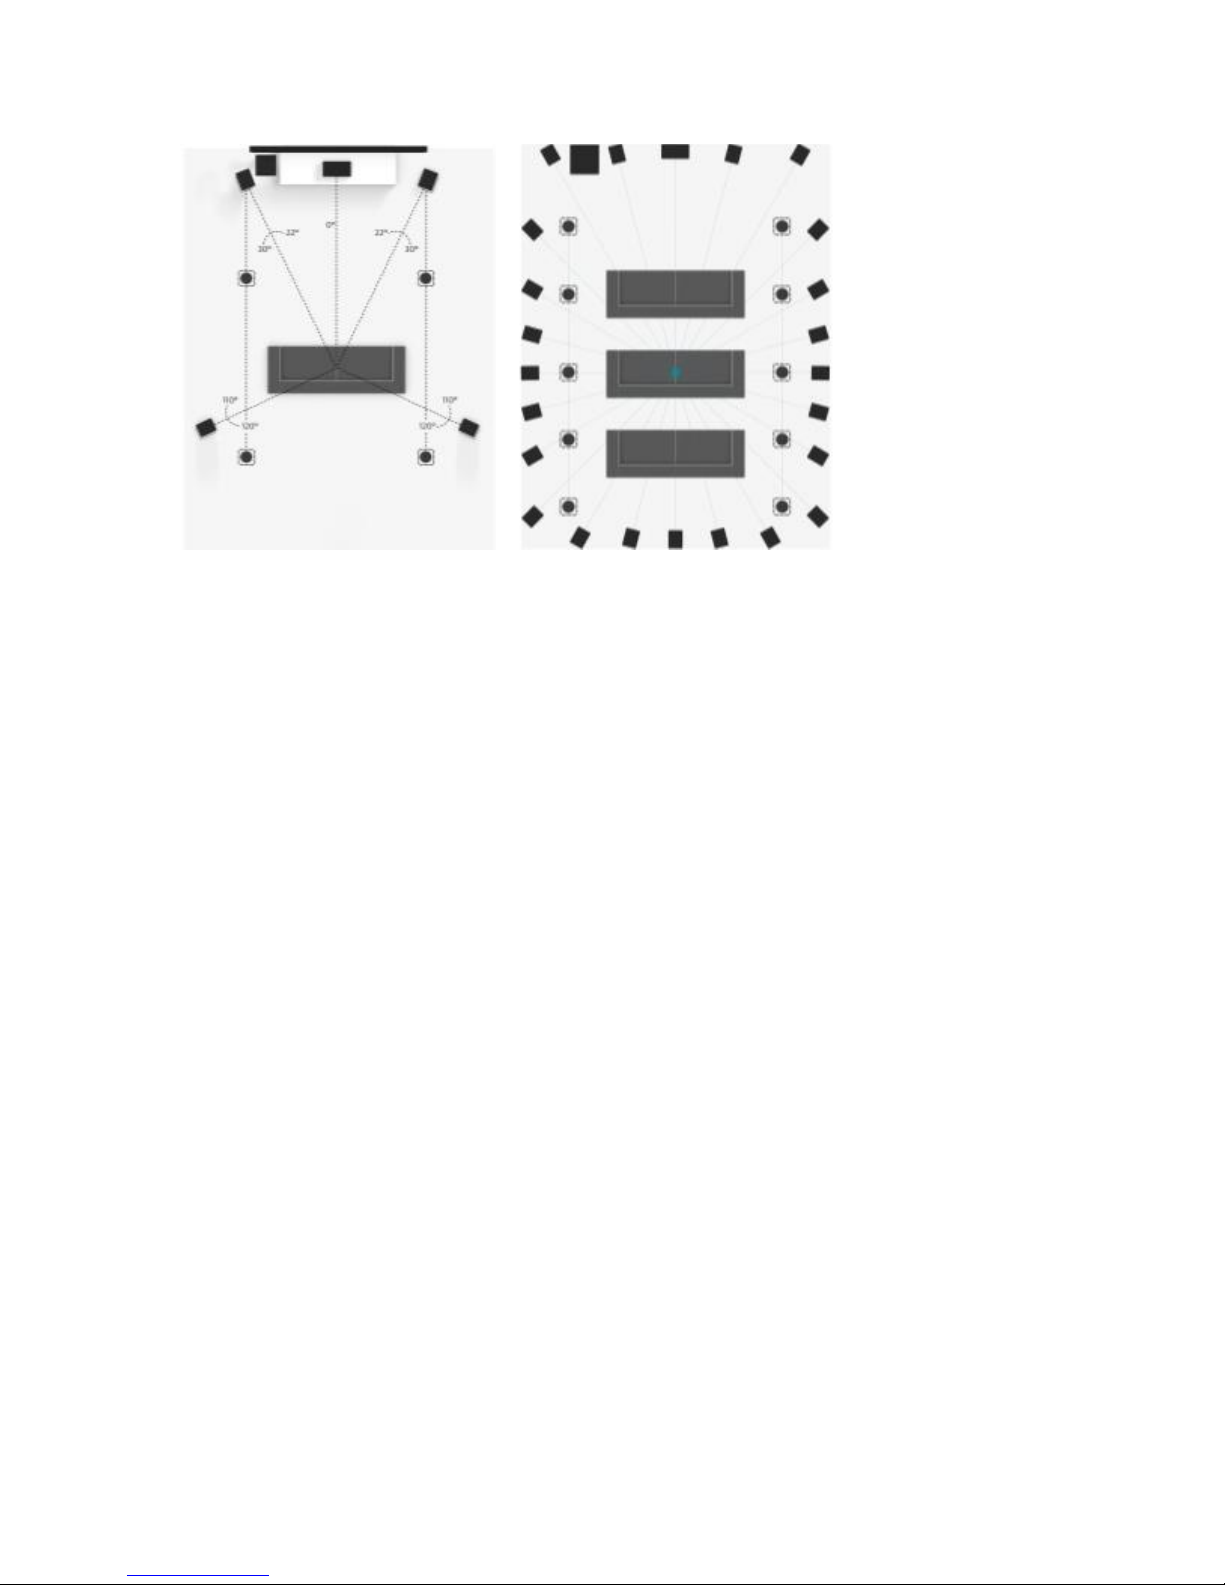
The naming of Dolby Atmos speaker configurations is based on the standard nomenclature (stereo, 5.1,
and 7.1) but adds a number at the end to specify the number of height speakers in the playback system.
For example, when we refer to a 5.1.4 setup, the 5 indicates the left, center, right, left surround, right
surround, left rear surround, and right rear surround speakers; the .1 indicates the subwoofer; and the .4
indicates the four speakers that play overhead sound (left top front, right top front, left top rear, and right
top rear).

4
Figure 1: At left is a Dolby Atmos system with five speakers on the floor and four overhead speakers; at
right is a Dolby Atmos system with up to 24 speakers on the floor and 10 overhead speakers.
Additionally, a new Dolby®surround upmixer allows for channel-based content that has not been mixed
for Dolby Atmos to be expanded to fill the flexible speaker layouts of a Dolby Atmos system.
These installation guidelines are intended to be a resource for integrating Dolby Atmos into a home
theater system and unlocking the potential of this revolutionary audio format. Details include the use of
conventional overhead speakers and Dolby Atmos enabled speaker technology, which enables you to
architect a system capable of reproducing overhead sound, even if you’re not able to put speakers in or
on the ceiling.

5
2. General Dolby Atmos Home Setup Guidelines
The following components are needed to set up a Dolby Atmos home theater system:
•A source device to play Dolby Atmos content. Many existing devices will work.
•An A/V receiver (AVR) or processor unit capable of supporting Dolby Atmos.
•Speakers to reproduce overhead audio.
•Speakers to reproduce listener-level audio. Note: In many cases, you can use existing speakers in a
Dolby Atmos home theater.
1
Dolby Atmos Home Playback
Source device options to play or stream content
To experience this sound revolution, you’ll need a way to play or stream Dolby Atmos content. There are
a few pathways into the home theater:
•You can play Dolby Atmos content encoded on a Blu-ray Disc™ through an existing Blu-ray Disc
player. Be sure you have a recent player that is fully compliant with Blu-ray™ specifications.
2
•You can stream Dolby Atmos content from a compatible game console, Blu-ray, or streaming-
media player, or from an application built into certain smart TVs.
•You can play games with Dolby Atmos soundtracks from a PC via HDMI®connected to your Dolby
Atmos enabled AVR or processor.
•You can play Dolby Atmos content from your Dolby Atmos enabled cable set-top box if you are in
a region where this is available.
In all cases, be sure to set the audio output of your device to bitstream output and ensure that secondary
audio functionality is disabled. Connect the devices to your Dolby Atmos enabled AVR using an HDMI
connection.
3
AVR or processor capable of supporting Dolby Atmos
You can assemble a system from a wide range of available A/V components, starting with an AVR or
preprocessor that supports Dolby Atmos decoding and rendering. Almost all leading AVR manufacturers
have multiple product offerings available that support Dolby Atmos playback for the home.
1
With the exception of the center and center surround speakers, all speakers in a Dolby Atmos playback system (listener level,
overhead, and Dolby Atmos enabled) must be added in pairs.
2
You will not need to replace your Blu-ray player as long as it fully conforms to the Blu-ray specification. Current-generation Blu-ray
players, and most recent players, are compatible. You should check with the Blu-ray player manufacturer if you encounter problems.
3
Decoding and rendering of Dolby Atmos content is managed entirely by the AVR. To properly pass the Dolby Atmos audio to the
AVR, source devices must be connected to the AVR via HDMI 1.4 or later and set to audio bitstream out. For Blu-ray players, the
secondary audio mixing option must be disabled.

6
Dolby Atmos Home Theater Speaker Options
The dimension of height—hearing sounds coming from above you—is key to the Dolby Atmos experience.
Reproducing overhead sounds requires new thinking about home theater design.
You have several different speaker options for a Dolby Atmos home theater system, and you will not likely
have to replace all of your current speakers.
Many channel-based home theater systems have either five or seven speakers positioned at about ear
level and a subwoofer. In this document, we refer to these speakers as being at the listener level. Any
speaker type that is capable of accurately representing a stereo pan is suitable to reproduce objects.
As in the past, the placement of all listener-level speakers should follow these recommendations, which
are based on ITU-R BS.775-3:
•The speakers located in the front of the room shall be used as a reference point. All speakers in
the listener plane should ideally be equidistant from the listener position. If this is not possible,
compensating for distance may be used to time align the arrival of audio from each speaker to
the listener.
•All listener speakers should be at the same height, typically 3.9 feet (1.2 meters), which is ear
level for the average seated listener (as defined in ITU-R BS.1116-1).
If possible, the height of the rear speakers should be the same as the height of the front speakers. If the
room design makes this impractical or impossible, the rear speakers may be positioned higher than the
front speakers. However, we suggest that the height of the rear speakers not be more than 1.25 times the
height of the front speakers.
Use of Existing Speakers
Most existing speakers within current home theaters will work for Dolby Atmos playback. Floor-standing,
stand-mounted, on-wall, and in-wall speakers that currently produce audio at the listener level can be
complemented with overhead speakers and/or Dolby Atmos enabled speakers to generate the height
plane of overhead sounds. You can also add more speakers at listener level or above, if the AVR or
preprocessor supports them, to add greater precision to object audio placement and movement. With the
exception of the center and center surround speakers, all speakers in a Dolby Atmos playback system
must be added in pairs.
Note: Dipole surround speakers are not recommended for use for Dolby Atmos playback.

7
Overhead Speakers
Overhead sound is a vital part of the Dolby Atmos experience. There are a variety of options for adding
this capability to a room.
One solution is to install speakers overhead. Most conventional overhead speakers with wide dispersion
characteristics will work in a Dolby Atmos home theater.
Overhead speaker characteristics
Dolby Atmos audio is mixed using discrete, full-range audio objects that may move around anywhere in
three-dimensional space. With this in mind, overhead speakers should complement the frequency
response, output, and power-handling capabilities of the listener-level speakers. Choose overhead
speakers that are timbre matched as closely as possible to the primary listener-level speakers. Overhead
speakers with a wide dispersion pattern are desirable for use in a Dolby Atmos system. This will ensure
the closest replication of the cinematic environment, where overhead speakers are placed high above the
listeners.
Mounting considerations
If the chosen overhead speakers have a wide dispersion pattern (approximately 45 degrees from the
acoustical reference axis over the audio band from 100 Hz to 10 kHz or wider), then speakers may be
mounted facing directly downward. For speakers with narrower dispersion patterns, those with aimable
or angled elements should be angled toward the primary listening position.
The overhead speakers should be at a height (shown as H3 in Figure 2) between two and three times the
vertical position of the listener-level speakers. The angle of elevation from the listening position to the left
top front/right top front and left top rear/right top rear overhead speakers in a 7.1.4 reference layout
should be 45 degrees. This may be adjusted between 30 and 55 degrees if needed, as shown in Figure 2.
Figures 3 and 4 show the preferred locations of the four overhead speakers as seen from above. The
horizontal width should be about the same as the horizontal separation of left and right speakers placed
at ±30 degrees. If this guidance is followed, the overhead side-to-side separation should be 0.5 to 0.7 of
the width of the overall layout, depending on the distance to the screen and the front three speakers,
relative to the surrounds. It is best to keep the overhead arrangement centered, front to back, over the
listening area, even if the front speakers and screen are at a greater distance than the surround speakers.

8
Figure 2: Vertical position of front, surround, and overhead speakers.
Figure 3: Top view, listener-level and height (overhead) speakers in a 7.1.4 configuration.

9
Figure 4: Top view, height (overhead) speaker positioning.
Room treatment considerations for use of overhead speakers
To improve sound quality and reduce unwanted audio reflection, we recommend using sound-absorbing
and sound-diffusing treatment to handle reflections from the walls, floor, and ceiling.
Use of Existing Overhead Speakers
In some existing home theater systems, overhead speakers are employed to generate audio that would
otherwise be created by listener-level speakers (for example, left/right surround speakers). When
transitioning to Dolby Atmos, you should repurpose existing overhead speakers as overhead outputs only
if you can add a corresponding listener-level speaker to assume the previous overhead speaker feed.
For example, if two overhead speakers located toward the rear of the room are currently used to
reproduce left/right surround outputs, they should be used as overhead speakers only if replacement
left/right surrounds can be added at the listener level. If this is not possible, the overhead speakers can
continue to be used for left/right surround outputs, although not recommended.
4
In this case, overhead
sound can be achieved by installing additional overhead speakers, Dolby Atmos enabled speakers, or add-
on modules in the front speaker locations.
Alternatives to Overhead Speakers
Installing overhead speakers may not be possible or desirable, and running the necessary wiring can be
expensive and time consuming. If you rent the home, the property owner may not allow the change. If the
4
To get the best Dolby Atmos experience, there must be separation between the listener-level speakers and overhead speakers.
Installing all of the speakers in the ceiling will not give the optimal experience and is not recommended.

10
ceiling is made of a material such as concrete or brick, installing speakers overhead may not be possible.
Finally, you may not like the look of overhead speakers.
Dolby Atmos Enabled Speakers
Through our knowledge of psychoacoustics and sound physics, we’ve developed technology that enables
speakers to create overhead sound even though they’re only a few feet off the floor. Dolby specifies the
angle of incidence in the speaker cabinet, directivity, frequency response (including height-cue filtering),
and other performance characteristics to ensure that the majority of acoustic energy is directed toward
the ceiling, generating audio that the listener perceives as coming from overhead. All of these speaker
characteristics work together to ensure that the re-creation of overhead sound is highly accurate and
produces a lifelike height image. The performance of Dolby Atmos enabled speakers, whether integrated
or add-on modules, must be experienced to be believed.
Integrated speakers
You can select integrated Dolby Atmos enabled speakers that include both traditional front-firing speakers
and upward-firing speakers in a single speaker cabinet or in-wall configuration. (These speakers have two
sets of speaker binding posts, one for the traditional speaker and one for the upward-firing Dolby Atmos
enabled speaker.)
5
5
The height terminals of an integrated Dolby Atmos enabled speaker or an add-on module must be individually connected to the
corresponding output terminals on the AVR via their own speaker wire pair. Bridging the height terminals with the main speaker
terminals will result in an inaccurate audio experience, and the height audio will not be correctly produced.

11
Figure 5: Dolby Atmos enabled integrated speakers include both traditional front-firing speakers and
upward-firing speakers. Both sets of speakers have their own binding posts to connect to your AVR.
Add-on modules
If you already have conventional speakers that you prefer to maintain, one option is to install Dolby
Atmos enabled add-on speaker modules. These modules include only the upward-firing elements and can
be in the form of a cabinet or in-wall speaker. You can place the add-on modules on top of the current
speakers or nearby on or in another wall or surface.
Note: To ensure optimal performance, be sure to employ proper bass management when installing and
calibrating Dolby Atmos enabled integrated speakers and add-on modules in your home theater system.
Typically, these speakers are not full range. Please refer to the bass management subsection later in this
section.
Figure 6: Dolby Atmos enabled add-on modules include only upward-firing elements. You can place them
on top of your traditional front-firing speakers or on another surface near them.
Comparison to overhead speakers
Dolby Atmos enabled speakers produce a slightly more diffuse overhead audio experience that is quite
lifelike and, in some cases, may be preferable to the sound that originates from overhead speakers.
If the ceiling is low or you have to mount the speakers on overhead trusses or brackets, overhead
speakers may be too close to you as you listen. The audio may be distracting because you’ll hear and

12
notice the output from each speaker instead of feeling immersed in an atmosphere in which sounds occur
naturally overhead.
In this environment, Dolby Atmos enabled speakers may be a better solution for reproducing the height
plane of sound, similar to what you would hear in a cinema. In a cinema, the overhead speakers are
located high in the auditorium and naturally create a more diffuse experience. Using Dolby Atmos enabled
speakers produces a similar experience: the reflection of sound off the ceiling makes the overhead effect
sound diffuse, which results in the room sounding larger. Audio mixers and experts who have auditioned
Dolby Atmos enabled speakers agree that the sound these speakers produce can be preferable to the
sound of dedicated overhead speakers.
Dolby Atmos enabled speaker positioning
We recommend installing four Dolby Atmos enabled speakers whenever possible. The use of four
speakers will make the placement of overhead sounds more accurate, and you’ll get more precise,
realistic sounds when an object, such as a helicopter, passes overhead. Two of the Dolby Atmos enabled
speakers (whether they are integrated speakers or add-on modules) should be placed in the left front and
right front speaker locations of your system. The other two should be positioned ideally in the rear
surround speaker locations or alternatively in the surround sound speaker locations.
If you are using only two Dolby Atmos enabled speakers, place them at the left front and right front
speaker locations.
Note: With the exception of the center and center surround speakers, all speakers in a Dolby Atmos
playback system (listener level, overhead, and Dolby Atmos enabled) must be added in pairs.
Placement height
For optimal effect and to minimize direct radiating audio at listener level, place Dolby Atmos enabled
speakers at or slightly above the height of your ears when seated. Avoid placing the Dolby Atmos enabled
speakers higher than one-half the height of your wall.
Note: For some Dolby Atmos enabled in-wall speakers, if the placement is above one-half the height of
your wall, you may need to adjust the vertical angle, if the manufacturer implements this feature. Please
consult the manufacturer’s user manual for guidance.
Placement relative to listeners
To avoid an unwanted proximity effect, make sure the speakers are at least 3 feet (0.9 meter) away from
listening positions, ideally 5 feet (1.5 meters) or more. This distance may be less than 5 feet if the upward-
firing driver(s) of the Dolby Atmos enabled speaker is placed well above the level of the closest listener’s
head.

13
Positioning of add-on modules
If you’re using add-on modules, place them either on top of the front and surround (ideally, rear
surround) speakers or within 3 feet (0.9 meter) of those speakers. Place on-wall or in-wall add-on
modules in the same position. Dolby Atmos enabled speakers should be mounted so that the driver is
facing toward the ceiling.
Combination: Overhead and Dolby Atmos enabled speakers
In some instances, a home theater system may already have overhead speakers that can be used to
generate overhead audio. In this case, Dolby Atmos enabled speakers may be used to complement
existing overhead speakers to create a full four-speaker height experience. If existing overhead speakers
are in the front of the room, then Dolby Atmos enabled speakers may be used in the rear of the room,
and vice versa.
Room treatment considerations for use of Dolby Atmos enabled speakers
For optimal performance, the ceiling should be flat (not angled or vaulted), with a height between 7.5 and
14 feet (2.3 to 4.3 meters), and made of an acoustically reflective material (drywall, plaster, hardwood, or
another rigid, non–sound-absorbing material). The ideal ceiling height is between 7.5 and 12 feet (2.3 to
3.66 meters).
To improve sound quality and system performance, we recommend using sound-absorbing and sound-
diffusing treatment to reduce unwanted reflections from the walls and floor. When using Dolby Atmos
enabled speakers, first audio reflection from the ceiling is desired; audio reflections from elsewhere
within the room should be avoided.
Note: If your room has acoustic ceiling tiles, replace the tiles where the reflection from the Dolby Atmos
enabled speakers will occur with foam-core board or other reflective material.
Front height mounted speakers
Most AVRs will support the use of front height (Dolby®Pro Logic®IIz) mounted speakers with Dolby Atmos
playback; however, we recommend the use of either overhead or Dolby Atmos enabled speakers to
create the most lifelike and enveloping audio experience. Front height speakers may be used in
conjunction with overhead speakers in larger room installations that can support a greater number of
overhead/height outputs.
AVR connection and setup
Speaker connections

14
Most AVRs that support Dolby Atmos have speaker connections labeled HEIGHT, as shown in Figure 7.
Some AVRs do not use the HEIGHT label for all capable channels, but they instead allow you to assign
specific terminals for the height speaker outputs through the graphical user interface in the setup menu.
Connect overhead speakers or Dolby Atmos enabled speakers to those height-capable outputs.
6
Figure 7: Rear panel of AVR; the height speaker connections are at right.
If you’re using four overhead or Dolby Atmos enabled speakers (or think you might add these in the
future), you will need an AVR capable of four height outputs.
Most AVRs will require the user to set up the AVR through the user interface, or microphone detection, in
order to properly set the speaker type and speaker locations in the room playback configuration. Be sure
to complete this step so that Dolby Atmos audio objects are accurately placed using the available
speakers.
Bass management
Bass management settings should be set correctly to correspond to the speaker capabilities in the system.
A Dolby Atmos playback system may consist of dedicated overhead speakers, Dolby Atmos enabled
speakers, or a combination. Be sure to keep in mind the low-frequency extension of each speaker in the
layout when calibrating and setting up bass management. Be mindful to employ proper bass management
when installing Dolby Atmos enabled speakers in the system. These speakers are not full range, so please
consult the manufacturer’s documentation for specific details on each model.
Note: If you use the automatic calibration system included in your AVR or processor to set up your
system, be sure to double-check the bass management results to ensure that the speakers are set to the
low-frequency specification that the manufacturer recommends.
Setting distance
It is important to properly set the distance for all speakers to ensure that audio signals arrive at the
listening position at the right time. The distance can be set manually or with the automatic calibration
system that is included with almost all AVRs or processors. When manually setting the distance for Dolby
Atmos enabled speakers, make sure to include the distance from both (a) the speaker to the ceiling and
(b) the ceiling to the listening position. Autocalibration systems can sometimes incorrectly set the
6
The height terminals of an integrated Dolby Atmos enabled speaker or an add-on module must be individually connected to the
corresponding output terminals on the AVR via their own speaker wire pair. Bridging the height terminals with the main speaker
terminals will result in an inaccurate audio experience, and the height audio will not be correctly produced.

15
distance for Dolby Atmos enabled speakers, so make sure to double-check the settings in the speaker
setup menu if you run autocalibration.
Speaker-Level Calibration and EQ
You should perform standard calibration (EQ, levels, and delay) on Dolby Atmos playback systems, just as
you would with traditional systems. Most home AVR systems feature autocalibration technologies that
handle level setting, delays, and frequency response correction adequately for the home theater.
However, such systems are not perfect, and we recommend that you or a professional home theater
installer combine a manual calibration sweep with skilled listening and adjustment of the system’s
responses to ensure accurate reproduction capability and consistency of channel-to-channel timbre.
Manual calibration
Each full-range speaker should be calibrated to produce the same C-weighted sound pressure level (SPL).
The target SPL can range from 79 dB to 82 dB SPL(C) at the central listening position, depending on the
room size, when driven with pink noise with an RMS level of –20 decibels relative to full scale (dBFS).
Calibrate the subwoofer level to give the same level for redirected bass content from full-range speakers
as those speakers produce in their pass bands. The target SPL can range from 79 dB to 82 dB SPL(C) at the
central listening position, depending on the room size.
Note: If you use the autocalibration setup included in your AVR or processor, be sure to manually check
the levels on the subwoofer and the Dolby Atmos enabled speakers. Some home theater systems do not
correctly set the levels for these speakers.

16
3. Standard Speaker Configurations
Dolby Conventions for Speaker Configurations
With the debut of Dolby Atmos, there is a new method of referring to surround sound speaker
configurations (see the “Dolby Atmos for the Home Theater” white paper for more details). As we
mentioned earlier, it is based on the standard nomenclature (stereo, 5.1, and 7.1) but adds a number at
the end to specify the number of height speakers in the playback system (for example, 7.1.4).
While manufacturers may decide to support more than one subwoofer output, Dolby Atmos technology
generates a single Low-Frequency Effects (LFE) signal. Figures 8, 9, and 10 show the most common
speaker layouts in a Dolby Atmos home theater system.
Figure 8: A traditional 7.1 speaker layout with four Dolby Atmos enabled speakers (7.1.4).
Figure 9: A traditional 5.1 speaker layout with four overhead speakers (5.1.4).

17
Figure 10: A traditional 5.1 speaker layout with two Dolby Atmos enabled speakers (5.1.2).
Standard Setups for Both Overhead Speakers and Dolby Atmos Enabled Speakers
The following pages contain images of standard and hybrid setups for the most common speaker
configurations and are provided for both overhead speakers and Dolby Atmos enabled speakers: 5.1.2
(Fig. 11, Fig. 12), 5.1.4 (Fig. 13, Fig. 14, Fig. 15, Fig. 16), 7.1.2 (Fig. 17, Fig. 18), 7.1.4 (Fig. 19, Fig. 20, Fig. 21,
Fig. 22), 9.1.2 (Fig. 23, Fig. 24), and 9.1.4 (Fig. 25, Fig. 26).

18
Figure 11: Standard 5.1.2 setup with overhead speakers.

19
Figure 12: Standard 5.1.2 setup with Dolby Atmos enabled speakers.

20
Figure 13: Standard 5.1.4 setup with overhead speakers.
Table of contents