Dolmar EM411 User manual

EN Electric Lawn Mower INSTRUCTION MANUAL 10
FR Tondeuse Electrique MANUEL D’INSTRUCTIONS 18
DE Elektro-Rasenmäher BETRIEBSANLEITUNG 26
IT Tosaerba elettrico ISTRUZIONI PER L’USO 35
NL Elektrische grasmaaier GEBRUIKSAANWIJZING 44
ES Cortadora Eléctrica de
Césped
MANUAL DE
INSTRUCCIONES 53
PT Cortador de Grama Elétrico MANUAL DE INSTRUÇÕES 62
DA Elektrisk plæneklipper BRUGSANVISNING 70
EL Ηλεκτρική μηχανή γκαζόν ΕΓΧΕΙΡΙΔΙΟ ΟΔΗΓΙΩΝ 78
TR Elektrikli Çim Biçme Makinesi KULLANMA KILAVUZU 87
PL Elektryczna kosiarka do
trawy INSTRUKCJA OBSŁUGI 95
HU Elektromos fűnyíró HASZNÁLATI KÉZIKÖNYV 103
SK Elektrická kosačka NÁVOD NA OBSLUHU 111
CS Elektrická sekačka na trávu NÁVOD K OBSLUZE 119
UK Електрична газонокосарка ІНСТРУКЦІЯ З
ЕКСПЛУАТАЦІЇ 127
RO Maşină electrică de tuns iarba MANUAL DE INSTRUCŢIUNI 136
EM411
EM462
EM463S

1
Fig.1
1
Fig.2
1
2
3
4
Fig.3
1
1
2
Fig.4
1
1
Fig.5
1
2
1
Fig.6
2

1
Fig.7
1
Fig.8
Fig.9
1
2
Fig.10
1
2
Fig.11
2
1
Fig.12
1
2
Fig.13
2
1
Fig.14
3

1
2
Fig.15
1
2
Fig.16
1
Fig.17
1
Fig.18
1
Fig.19
1
Fig.20
4

1
2
Fig.21
2
1
Fig.22
1
Fig.23
1
Fig.24
1
Fig.25
3
2
1
Fig.26
Fig.27
Fig.28
5

Fig.29
1
2
Fig.30
Fig.31
Fig.32
12
33
Fig.33
Fig.34
Fig.35
Fig.36
6

1
Fig.37
1
Fig.38
1
Fig.39
3
2
1
Fig.40
1
Fig.41
1
2
3
Fig.42
1
Fig.43
7

Fig.44
1
2
3
Fig.45
1
2
3
4
5
Fig.46
3
1
2
Fig.47
1
3
2
Fig.48
1
2
Fig.49
8

1
Fig.50
1
2
Fig.51
1
2
Fig.52
9

10 ENGLISH
ENGLISH (Original instructions)
SPECIFICATIONS
Model: EM411 EM462 EM463S
No load speed 3,400 min-1 2,950 min-1
Cutting height 20 mm - 75 mm
Cutting width 410 mm 460 mm
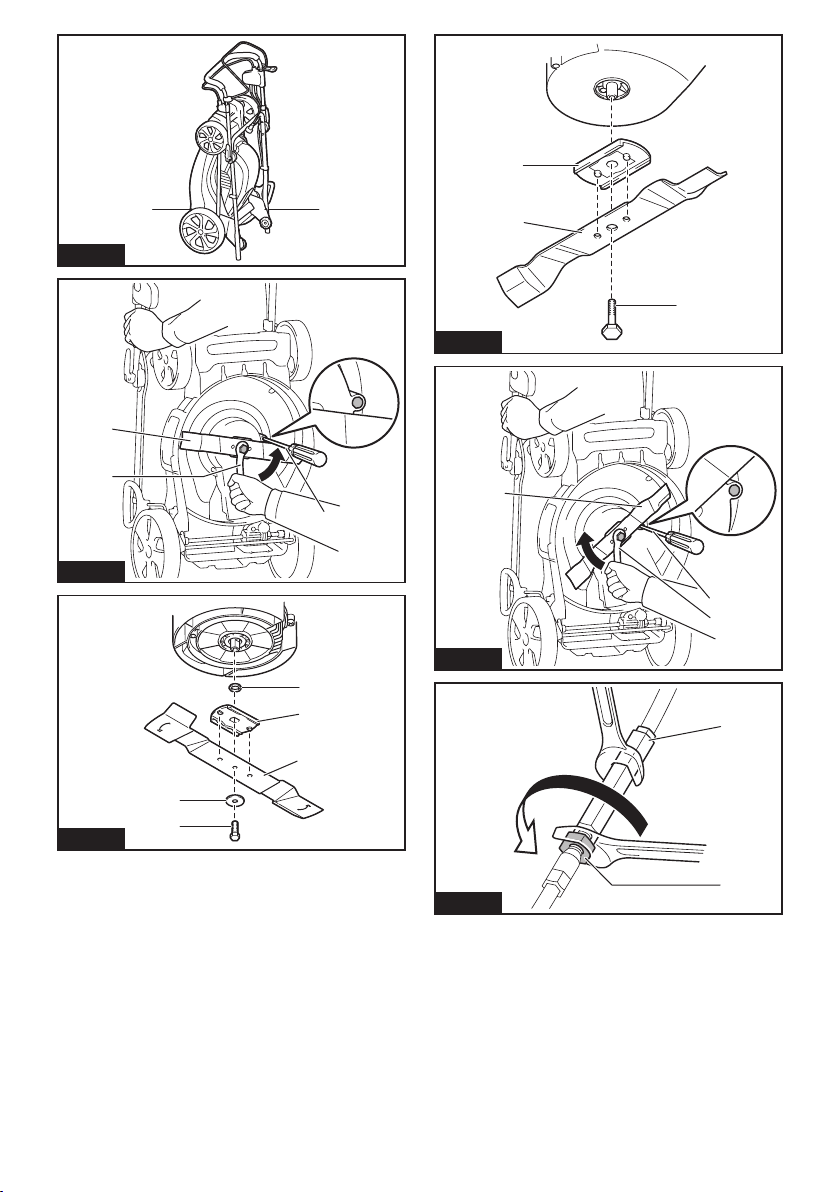
Part number of replacement mower blade YA00000734 YA00000742
Dimensions
(L x W x H)
During operation
(with grass basket)
L: 1,290 mm to 1,465 mm
W: 530 mm
H: 905 mm to 1,135 mm
L: 1,535 mm to 1,700 mm
W: 570 mm
H: 950 mm to 1,165 mm
L: 1,630 mm to 1,790 mm
W: 570 mm
H: 950 mm to 1,165 mm
When stored
(without grass basket)
390 mm x 530 mm x
1,070 mm
515 mm x 570 mm x
1,125 mm
590 mm x 570 mm x
1,220 mm
Net weight 17.5 - 19.1 kg 27.7 - 29.2 kg 30.5 - 32.2 kg
Safety class /II
• Duetoourcontinuingprogramofresearchanddevelopment,thespecicationshereinaresubjecttochange
without notice.
• Specicationsmaydifferfromcountrytocountry.
• Theweightmaydifferdependingontheattachment(s).Thelightestandheaviestcombination,accordingto
EPTA-Procedure01/2014,areshowninthetable.
Symbols
Thefollowingsshowthesymbolsusedfortheequip-
ment. Be sure that you understand their meaning before
use.
Takeparticularcareandattention.
Read the instruction manual.
DOUBLEINSULATION
Danger;beawareofthrownobjects.
Thedistancebetweenthetooland
bystanders must be at least 15 m.
Waituntilallmachinecomponentshave
completely stopped before touching them.
Keepthesupplyexiblecordawayfrom
the cutting blades.
Beware of sharp blades. Blades continue
to rotate after the motor is switched off.
Removetheplugfromthemachinebefore
maintenance or if cord is damaged.
Thenoiseofthemachineisnotmorethan
96 dB.
Keep hands and feet away. Do not operate
mower unless the guards and attachments
are in proper place.
Only for EU countries
Donotdisposeofelectricequipment
together with household waste material! In
observanceoftheEuropeanDirective,on
WasteElectricandElectronicEquipment
and its implementation in accordance with
nationallaw,electricequipmentthathave
reached the end of their life must be col-
lectedseparatelyandreturnedtoanenvi-
ronmentally compatible recycling facility.
Intended use
Themachineisintendedforlawnmowing.Donotuse
the machine for other purposes. Use of the machine for
operations other than the intended use could result in a
hazardous situation.
Power supply
Thetoolshouldbeconnectedonlytoapowersupplyof
thesamevoltageasindicatedonthenameplate,and
canonlybeoperatedonsingle-phaseACsupply.They
are double-insulated and can, therefore, also be used
from sockets without earth wire.
If the supply cord is damaged, it must be replaced by the
manufactureroritsserviceagentinordertoavoidahazard.
For public low-voltage distribution
systems of between 220 V and 250 V
Switchingoperationsofelectricapparatuscausevolt-
ageuctuations.Theoperationofthisdeviceunder
unfavorablemainsconditionscanhaveadverseeffects
totheoperationofotherequipment.Withamains
impedanceequalorlessthan0.422Ohms(forEM411),
itcanbepresumedthattherewillbenonegative
effects.Themainssocketusedforthisdevicemustbe
protectedwithafuseorprotectivecircuitbreakerhaving
slow tripping characteristics.

11 ENGLISH
Noise
Applicable standard : EN60335
Model Soundpressurelevel Soundpowerlevel
LPA(dB(A)) Uncertainty K
(dB(A))
LPA(dB(A)) Uncertainty K
(dB(A))
EM411 84 395 1
EM462 83 395 1
EM463S 83 395 1
NOTE:Thedeclarednoiseemissionvalue(s)hasbeenmeasuredinaccordancewithastandardtestmethodand
may be used for comparing one tool with another.
NOTE:Thedeclarednoiseemissionvalue(s)mayalsobeusedinapreliminaryassessmentofexposure.
WARNING: Wear ear protection.
WARNING: The noise emission during actual use of the power tool can differ from the declared val-
ue(s) depending on the ways in which the tool is used especially what kind of workpiece is processed.
WARNING: Be sure to identify safety measures to protect the operator that are based on an estimation
of exposure in the actual conditions of use (taking account of all parts of the operating cycle such as the
times when the tool is switched off and when it is running idle in addition to the trigger time).
Vibration
Thevibrationtotalvalue(tri-axialvectorsum)deter-
mined according to EN60335:
Model EM411
Vibration emission (ah) : 2.5 m/s2or less
Uncertainty (K) : 1.5 m/s2
Model EM462
Vibration emission (ah) : 2.5 m/s2or less
Uncertainty (K) : 1.5 m/s2
Model EM463S
Vibration emission (ah) : 2.5 m/s2or less
Uncertainty (K) : 1.5 m/s2
NOTE:Thedeclaredvibrationtotalvalue(s)hasbeen
measured in accordance with a standard test method
and may be used for comparing one tool with another.
NOTE:Thedeclaredvibrationtotalvalue(s)mayalso
be used in a preliminary assessment of exposure.
WARNING: The vibration emission during
actual use of the power tool can differ from the
declared value(s) depending on the ways in which
the tool is used especially what kind of workpiece
is processed.
WARNING: Be sure to identify safety mea-
sures to protect the operator that are based on an
estimation of exposure in the actual conditions of
use (taking account of all parts of the operating
cycle such as the times when the tool is switched
off and when it is running idle in addition to the
trigger time).
EC Declaration of Conformity
For European countries only
TheECdeclarationofconformityisincludedasAnnexA
to this instruction manual.
SAFETY WARNINGS
IMPORTANT SAFETY
INSTRUCTIONS
WARNING: Read all safety warnings and
all instructions. Failure to follow the warnings and
instructionsmayresultinelectricshock,reand/or
seriousinjury.
Save all warnings and instruc-
tions for future reference.
1. Children should be supervised to ensure that
they do not play with the mower.
2. Never allow children or people unfamiliar with
these instructions to use the mower. Local
regulations can restrict the age of the operator.
3. Never operate the mower while people, espe-
cially children, or pets are nearby.
4. Keep in mind that the operator or user is
responsible for accidents or hazards occurring
to other people or their property.
5. While operating the mower, always wear sub-
stantial footwear and long trousers. Do not
operate the mower when barefoot or wearing
open sandals. Avoid wearing clothing or jew-
elry that is loose tting or that has hanging
cords or ties. They can be caught in moving
parts.
6. Always wear protective goggles to protect
your eyes from injury when using power tools.
The goggles must comply with ANSI Z87.1 in
the USA, EN 166 in Europe, or AS/NZS 1336
in Australia/New Zealand. In Australia/New
Zealand, it is legally required to wear a face
shield to protect your face, too.

12 ENGLISH
It is an employer's responsibility to enforce
the use of appropriate safety protective equip-
ments by the tool operators and by other per-
sons in the immediate working area.
7.
Before use, check the supply and power cord for
signs of damage or aging. If the cord becomes
damaged during use, disconnect the cord from
the supply immediately. Do not touch the cord
before disconnecting the supply. Do not use the
mower if the cord is damaged or worn.
8. Operate the mower only in daylight or in good
articial light.
9. Avoid operating the mower in wet grass.
10. Never operate the mower in the rain.
11. Always keep a rm hold on the handle.
12. Always be sure of your footing on slopes.
13. Walk, never run.
14.
Don't grasp the exposed cutting blades or cutting
edges when picking up or holding the mower.
15. Physical condition - Do not operate mower
while under the inuence of drugs, alcohol, or
any medication.
16. Keep hands and feet away from rotating
blades. Caution - Blades coast after the mower
is switched off.
17. Use only the manufacturer genuine blades
specied in this manual.
18. Check the blades carefully for cracks or dam-
age before operation. Replace cracked or
damaged blades immediately.
19. Be sure the area is clear of other people before
mowing. Stop mower if anyone enters the area.
20. Remove foreign matters such as rocks, wire,
bottles, bones and large sticks from the work
area before mowing to prevent personal injury
or damage to the mower.
21. Stop operation immediately if you notice
anything unusual. Switch off the mower and
unplug the power cord from the power supply.
Then inspect the mower.
22. Never attempt to make wheel height adjust-
ments while mower is running.
23. Release switch lever and wait for blade rota-
tion to stop before crossing driveways, walks,
roads, and any gravel-covered areas. Also
unplug the power cord from the power supply
if you leave the mower, reach to pick up or
remove something out of your way, or for any
other reason that may distract you from what
you are doing.
24. Objects struck by the mower blade can cause
severe injuries to persons. The lawn should
always be carefully examined and cleared of
all objects prior to each mowing.
25. If the mower strikes a foreign object, follow
these steps:
- Stop the mower, release the switch lever and
wait until the blade comes to a complete stop.
- Unplug the power cord from the power
supply.
- Thoroughly inspect the mower for any
damage.
- Replace the blade if it is damaged in any way.
Repair any damage before restarting and con-
tinuing to operate the mower.
26. Check the grass basket frequently for wear or
deterioration. For storage, always make sure
the grass basket is empty. Replace a worn
grass basket with a new factory replacement
for safety.
27. Use extreme caution when reversing or pulling
the mower towards you.
28. Stop the blade(s) if the mower has to be tilted
for transportation when crossing surfaces
other than grass, and when transporting the
mower to and from the area to be used.
29. Never operate the mower with defective
guards or shields, or without safety devices,
for example deectors and/or grass basket, in
place.
30. Switch on the mower carefully according to
instructions and with feet well away from the
blade(s).
31. Do not tilt the mower when switching on the
motor, except if the mower has to be tilted
for starting. In this case, do not tilt it more
than absolutely necessary and lift only the
part, which is away from the operator. Always
ensure that both hands are in the operating
position before returning the appliance to the
ground.
32. Do not start the mower when standing in front
of the discharge opening.
33. Do not put hands or feet near or under rotating
parts. Keep clear of the discharge opening at
all times.
34. Do not transport the mower while the mower is
turned on.
35. Stop the mower, and remove plug from the
socket. Make sure that all moving parts have
come to a complete stop
- whenever you leave the mower,
- before clearing blockages or unclogging
chute,
- before checking, cleaning or working on the
mower,
- after striking a foreign object. Inspect the
mower for damage and make repairs before
restarting and operating the mower.
36. If the mower starts to vibrate abnormally
(check immediately)
- inspect for damage,
- replace or repair any damaged parts,
- check for and tighten any loose parts.

13 ENGLISH
37. Be careful during adjustment of the mower
to prevent entrapment of the ngers between
moving blades and xed parts of the mower.
38. Mow across the face of slopes, never up and
down. Exercise extreme caution when chang-
ing direction on slopes. Do not mow exces-
sively steep slopes.
39. Do not wash with a hose; avoid getting water
in motor and electrical connections.
40. Check the blade mounting bolt at frequent
intervals for proper tightness.
41. Keep all nuts, bolts, and screws tight to
be sure the equipment is in safe working
condition.
42. Take care as rotating one blade can cause
other blades to rotate.
43. Always allow the mower to cool down before
storing.
44. When servicing the blades be aware that, even
though the power source is switched off, the
blades can still be moved.
45. Replace worn or damaged parts for safety.
Use only genuine replacement parts and
accessories.
46. Have your power tool serviced by a qualied
repair person using only identical replacement
parts.Thiswillensurethatthesafetyofthepower
tool is maintained.
47. Follow instruction for lubricating and chang-
ing accessories.
48. Keep handles dry, clean and free from oil and
grease.
49. Check to make sure that the voltage and fre-
quency of the power supply correspond to the
specications given on the identication plate.
We recommend the use of a residual-current-op-
erated circuit breaker (ground-fault circuit inter-
rupter) with a tripping current of 30 mA or less, or
an earth leakage current protector.
50. This machine can be used by children aged
from 8 years and above and persons with
reduced physical, sensory or mental capabil-
ities or lack of experience and knowledge if
they have been given supervision or instruc-
tion concerning use of the machine in a safe
way and understand the hazards involved.
Cleaning and user maintenance shall not be
made by children without supervision.
Residual risks
Evenifyouareoperatingthisproductinaccordance
withallthesafetyrequirements,potentialrisksofinjury
anddamageremain.Thefollowingdangerscanarisein
connection with the structure and design of this product.
1. Healthdefectsresultingfromvibrationemission
iftheproductisbeingusedoverlongperiodsof
timeornotadequatelymanagedandproperly
maintained.
2. Injuriesanddamagetopropertyduetobroken
application tools or the sudden impact of hidden
objectsduringuse.
3. Dangerofinjuryandpropertydamagecausedby
yingobjects.
WARNING: This product produces an elec-
tromagnetic eld during operation. This eld may
under some circumstances interfere with active
or passive medical implants. To reduce the risk
of serious or fatal injury, we recommend persons
with medical implants to consult their doctor and
the medical implant manufacturer before operat-
ing this product.
SAVE THESE INSTRUCTIONS.
WARNING: DO NOT let comfort or familiarity
with product (gained from repeated use) replace
strict adherence to safety rules for the subject
product.
MISUSE or failure to follow the safety rules stated
in this instruction manual may cause serious
personal injury.
ASSEMBLY
CAUTION: Always be sure that the tool is
switched off and unplugged before carrying out
any work on the tool.
Assembling the handle
1. Unload the upper handle from the main unit of the
machine.
►Fig.1: 1. Upper handle
2. Loosen the thumb nuts.
►Fig.2: 1.Thumbnut
3. Widen the handle outside a little, then raise the
handle, then insert the protrusions of the handle into the
holes, and then tighten the thumb nuts.
►Fig.3: 1. Handle 2. Protrusion 3. Hole 4.Thumbnut
4. Attachtheupperhandlebyinsertingthelevers
from the outside of the handle, and then tighten the nuts
with the wrench to secure the handle.
►Fig.4: 1.Lever2. Nut
5. Secure the cords with the clamps as shown in the
gure.
►Fig.5: 1. Clamp
Installing the grass basket
1. Attach the pipes of the grass basket to the frame.
►Fig.6: 1. Pipe 2. Frame
2. Opentherearcover.
►Fig.7: 1.Rearcover
3. Insert the grass basket from the front side through
the inside of the handle, and then hook the grass basket
onto the rear side of the machine.
►Fig.8: 1. Grass basket
►Fig.9
Toremovethegrassbasket,performtheinstallation
procedureinreverse.

14 ENGLISH
Connecting extension cord
WARNING: When connecting the extension
cord to the power plug of the machine, make sure
that the switch lever is released and the cord is
unplugged from the power supply.
WARNING: Do not connect or disconnect the
extension cord with wet hands.
NOTICE: When connecting the extension cord to
the power plug of the machine, be sure to insert it
fully into the socket.
Whenconnectingtheextensioncord,hookitoverthe
hookonthehandleasshownintheguretoprevent
inadvertentunpluggingbyexcessivestrainontheplug.
For EM411/EM462
►Fig.10: 1. Hook 2. Extension cord
For EM463S
►Fig.11: 1. Hook 2. Extension cord
Attaching the mulching attachment
1. Opentherearcover,andthenremovethegrass
basket.
►Fig.12: 1.Rearcover2. Grass basket
2. Attach the mulching attachment while holding
downthelever,andthenreleasethelevertolockthe
mulching attachment.
►Fig.13: 1.Mulchingattachment2.Lever
Attaching the discharge attachment
For EM462/EM463S
1. Opentherearcover,andthenremovethegrass
basket.
►Fig.14: 1.Rearcover2. Grass basket
2. Attach the mulching attachment while holding
downthelever,andthenreleasethelevertolockthe
mulching attachment.
►Fig.15: 1.Mulchingattachment2.Lever
3. Opentherightsidecover,andthenattachthe
discharge attachment.
►Fig.16: 1. Discharge attachment 2.Rightsidecover
NOTICE: Be sure to insert the discharge attach-
ment until the latch snaps into place.
►Fig.17: 1. Latch
FUNCTIONAL
DESCRIPTION
Adjusting the mowing height
WARNING: Before adjusting the mowing
height, unplug the extension cord from the power
supply, and check that the blades have come to a
complete halt.
WARNING:
Never put your hand or leg under
the mower body when adjusting the mowing height.
Youcanadjustthemowingheightintherangeof20
mmto75mm.Themowingheightcanbeadjustedin7
levels(forEM411)or8levels(forEM462/EM463S).
For EM411
►Fig.18: 1.Adjustinglever
For EM462/EM463S
►Fig.19: 1.Adjustinglever
Holdthehandlewithonehand,andthenmovethelever
with the other hand.
►Fig.20: 1.Adjustinglever
NOTE:Tryatestmowingofgrassinalessconspicu-
ous place to get your desired height.
Switch action
WARNING: Before plugging in the tool,
always check that the switch lever actuates
properly and returns to the “OFF” position when
released.
WARNING: For your safety, this machine is
equipped with the lock-off button which prevents
the tool from unintended starting. Never use the
machine if it starts when you pull the switch lever
without pressing the lock-off button. Ask your
local Makita/Dolmar Service Center for repairs.
WARNING: Never disable the lock function or
tape down the lock-off button.
NOTICE: Do not pull the switch lever forcibly
without pressing the lock-off button. The switch
may break.
For EM411/EM462
Tostartthemachine,pressthelock-offbutton,and
thensqueezeintheswitchlever.Tostopthemachine,
releasetheswitchlever.
►Fig.21: 1.Switchlever2. Lock-off button
For EM463S
Tostartthemachine,pressthelock-offbutton,andthen
squeezeintheswitchlever.Whilesqueezingtheswitch
lever,squeezethedrivelevertodrivetherearwheels.To
stopthemachine,releasetheswitchleveranddrivelever.
►Fig.22: 1.Switchlever2. Lock-off button
►Fig.23: 1.Drivelever

15 ENGLISH
Level indicator of grass basket
Thelevelindicatorofthegrassbasketopensduring
mowing if the grass basket is not full. If the grass basket
isfull,thelevelindicatorclosesduringmowing.Ifit's
full, empty the grass basket before starting mowing.
►Fig.24: 1.Levelindicator
►Fig.25: 1.Levelindicator
Using mulching attachment
Themulchingattachmentallowsyoutoreturnthecut
grass to the ground without gathering the cut grass in
the grass basket. When you operate the machine with
themulchingattachment,besuretoremovethegrass
basket.
Using discharge attachment
For EM462/EM463S
Thedischargeattachmentallowsyoutodischarge
the cut grass to the ground from the right side of the
machine without gathering the cut grass in the grass
basket. When you operate the machine with the dis-
charge attachment, be sure to install the mulching
attachmentandremovethegrassbasket.
Adjusting the handle height
CAUTION: Before opening the levers, hold
the upper handle rmly. Otherwise, the handle
may fall and cause an injury.
Thehandleheightcanbeadjustedinthreelevels.Open
theleversofthehandleoutsidewhileholdingtheupper
handle,thenadjustthehandleheight,andthenclose
thelevers.
►Fig.26: 1.Lever2.Mark3. Arrow
Motor protection system (Over
current relay)
WARNING: If the machine suddenly stops
while operating it, release the switch lever
and unplug the extension cord. Otherwise, the
machine may suddenly restart and cause an
injury.
CAUTION: Before removing an object that is
jamming the blade, be sure to wear gloves and
unplug the extension cord from the power socket.
Ifthecutoffgrassordirtisjamminginsideofthemain
body, the machine stops automatically to protect the
motor(overcurrentrelay).Inthiscase,unplugthe
extensioncordfromthepowersocket,thenremovethe
materialcausingthejam,andthenletthemachinecool
down for a few minutes before turning on the machine.
NOTE:Theovercurrentrelaymaybeactivatedwhen
wet or long grass gets caught up inside of the main
body.
OPERATION
Mowing
WARNING: Before mowing, clear away sticks
and stones from the mowing area. Furthermore,
clear away any weeds from the mowing area in
advance.
►Fig.27
WARNING: Always wear the safety goggles or
safety glasses with side shields when operating
the mower.
CAUTION: If the cut grass or foreign object
blocks up inside of the mower body, be sure to
turn the power off, and then unplug the extension
cord from the power socket. Before removing the
grass or foreign object, be sure to wear gloves.
CAUTION: Be sure to install the grass bas-
ket or mulching attachment when operating the
machine.
NOTICE: Use this machine for mowing lawn only.
Do not mow weeds with this machine.
Firmly hold the handle with both hands when mowing.
►Fig.28
Themowingspeedguidelineisapproximatelyone
meter per four seconds.
►Fig.29
Start mowing near the power socket to ensure that the
extension cord does not become an obstacle.
►Fig.30: 1. Power socket 2. Extension cord
Do not allow the extension cord to pass under or
become entangled beneath the machine.
►Fig.31
►Fig.32
Thecenterlinesofthefrontwheelsareguidelinesto
mowing width. Using the center lines as guidelines,
mowinstrips.Overlapbyonehalftoonethirdtheprevi-
ousstriptomowthelawnevenly.
►Fig.33: 1.Mowingwidth2.Overlappingarea
3. Center line
Changethemowingdirectioneachtimetopreventthe
grassgrainpatternfromforminginjustonedirection.
►Fig.34
Periodically check the grass basket for mowed grass.
Emptythebasketbeforeitbecomesfull.Beforeevery
periodic check, be sure to stop the machine.
NOTE: Using the mower with the grass basket full
preventssmoothbladerotationandplacesanextra
load on the motor, which may cause a breakdown.

16 ENGLISH
Mowing a long-grass lawn
Do not try to cut long grass all at once. Instead, mow
thelawninsteps.Leaveadayortwobetweenmowings
untilthelawnbecomesevenlyshort.
►Fig.35
NOTE:Mowinglonggrasstoashortlengthallat
oncemaycausethegrasstodie.Thecutgrassmay
also block up inside of the mower body.
Edge mowing
When mowing at the edge, be sure to face the left side
ofthemachinetowardtheedge,andthenmovethe
machine along the edge.
►Fig.36
MAINTENANCE
WARNING: Before performing the mainte-
nance, unplug the extension cord from the power
supply, and conrm that the blades have come to
a complete halt.
CAUTION: When performing the mainte-
nance, always wear gloves.
TomaintainproductSAFETYandRELIABILITY,
repairs,anyothermaintenanceoradjustmentshould
beperformedbyMakita/DolmarAuthorizedorFactory
ServiceCenters,alwaysusingMakita/Dolmarreplace-
ment parts.
Maintenance after mowing
After mowing, wipe the machine with a dry cloth or a
cloth dipped in soapy water. Also, use a soft brush to
brush off grass cuttings and dirt from blades.
NOTICE: Never use gasoline, benzine, thinner,
alcohol or the like. Discoloration, deformation or
cracks may result.
Storing
1. Disconnect the extension cord.
►Fig.37: 1. Extension cord
2. Removethegrassbasket.
3. Setthemowingheightwiththeadjustinglever.
For EM411:
Set the mowing height to "2".
►Fig.38: 1.Adjustinglever
For EM462/EM463S:
Set the mowing height to "4".
►Fig.39: 1.Adjustinglever
4. Opentheleversofthehandleoutsidewhilehold-
ing the upper handle, then set the handle height to the
middle,andthenclosethelevers.
►Fig.40: 1.Lever2.Mark3. Arrow
CAUTION: Before opening the levers, hold
the upper handle rmly. Otherwise, the handle
may fall and cause an injury.
5. Loosen the thumb nuts while holding the handle.
►Fig.41: 1.Thumbnut
6. Widen the handle outside a little, and then fold the
handle and insert the protrusions on the handle into the
holes.
►Fig.42: 1. Handle 2. Protrusion 3. Hole
CAUTION: When folding the handle, be care-
ful not to pinch your hand or ngers.
7. Tightenthethumbnuts.
►Fig.43: 1.Thumbnut
8. Placethemachineasshowninthegure.
►Fig.44
CAUTION: Be sure to store this machine
indoors and place it on a at surface. Otherwise,
themachinemayfallandcauseaninjury.
Replacing the mower blade
CAUTION: Do not use any wrench other than
the standard hex wrench when replacing the
mower blade. Using a different wrench may lead to
over-tighteningorlooseness,whichmaycauseinjury.
1. Unplug the extension cord and stand up the
machine. (Refer to the instructions for storing.)
2. Insert the pin into the hole, and then hold the han-
dle with one hand and loosen the bolt with the wrench
counterclockwise.
►Fig.45: 1. Blade 2. Wrench 3. Pin
3. Removethemowerblade.
For EM411
Removethebolt,washer,mowerblade,bracket,and
spacer in order.
►Fig.46: 1. Spacer 2. Bracket 3.Mowerblade
4. Washer 5. Bolt
For EM462/EM463S
Removethebolt,mowerblade,andbracketinorder.
►Fig.47: 1. Bracket 2.Mowerblade3. Bolt
4. Attach a new mower blade, then insert the pin into
the hole, and then hold the handle with one hand and
tightentheboltwiththewrenchclockwisermly.
►Fig.48: 1.Mowerblade2. Wrench 3. Pin
Adjustment of cable
For EM463S
If the rear wheels do not rotate or do not rotate smoothly
whenyousqueezethedrivelever,adjustthelengthof
the cable.
1. Loosen the nut with a wrench while holding the
sleevewithanotherwrench.
►Fig.49: 1.Sleeve2. Nut

17 ENGLISH
2. Rotatethesleeve.
►Fig.50: 1.Sleeve
3. Rotatethenutuntilthenutreachesthesleeve.
►Fig.51: 1.Sleeve2. Nut
4. Tightenthenutwithawrenchwhileholdingthe
sleevewithanotherwrench.
►Fig.52: 1.Sleeve2. Nut
5. Turnonthemachineandcheckthattherear
wheelsrotatesmoothlywhenyousqueezethedrive
lever.
Iftherearwheelsdonotrotatesmoothly,adjustthe
length of the cable again.
Extension cord
You should only use extension cords for outdoor use,
PVC or rubber cord ordinary duty with a cross sectional
area not less than 1.5 mm2.
Before and during use, check the supply and extension
cords for damage. Do not use the appliance if the cord
is damaged or worn. Keep extension cord away from
cutting elements. If the cord is damaged during use,
disconnect the cord from the supply immediately. Do not
touch the cord before disconnecting the supply.
OPTIONAL
ACCESSORIES
CAUTION: These accessories or attachments
are recommended for use with your Makita/
Dolmar tool specied in this manual.Theuseof
any other accessories or attachments might present
ariskofinjurytopersons.Onlyuseaccessoryor
attachment for its stated purpose.
If you need any assistance for more details regard-
ingtheseaccessories,askyourlocalMakita/Dolmar
ServiceCenter.
• Mowerblade
NOTE: Some items in the list may be included in the
toolpackageasstandardaccessories.Theymay
differ from country to country.

18 FRANÇAIS
FRANÇAIS (Instructions originales)
SPÉCIFICATIONS
Modèle : EM411 EM462 EM463S
Vitesseàvide 3 400 min-1 2 950 min-1
Hauteur de coupe 20 mm - 75 mm
Largeur de coupe 410 mm 460 mm
Numéro de référence de la lame de tondeuse de remplacement YA00000734 YA00000742
Dimensions
(L x l x H)
En fonctionnement
(aveclebacàherbe)
L : 1 290 mm à 1 465 mm
l : 530 mm
H : 905 mm à 1 135 mm
L : 1 535 mm à 1 700 mm
l : 570 mm
H : 950 mm à 1 165 mm
L : 1 630 mm à 1 790 mm
l : 570 mm
H : 950 mm à 1 165 mm
Pendant le stockage
(sans le bac à herbe)
390 mm x 530 mm x
1 070 mm
515 mm x 570 mm x
1 125 mm
590 mm x 570 mm x
1 220 mm
Poids net 17,5 - 19,1 kg 27,7 - 29,2 kg 30,5 - 32,2 kg
Catégorie de sécurité /II
• Étantdonnél’évolutionconstantedenotreprogrammederechercheetdedéveloppement,lesspécications
contenuesdanscemanuelsontsujettesàmodicationsanspréavis.
• Lesspécicationspeuventvariersuivantlespays.
• Lepoidspeutêtredifférentselonlesaccessoires.Lesassociationslapluslégèreetlapluslourde,conformé-
mentàlaprocédureEPTA01/2014,sontindiquéesdansletableau.
Symboles
Voustrouverezci-dessouslessymbolesutiliséspour
l’appareil.Veillezàcomprendreleursignicationavant
toute utilisation.
Veuillezêtreprudentetresterattentif.
Lirelemoded’emploi.
DOUBLEISOLATION
Danger;prendregardeauxprojections
d’objets.
Ladistanceentrel’outiletlespersonnes
présentesdoitêtred’aumoins15m.
Attendezquetouslescomposantsdela
machinesoienttotalementarrêtésavantde
les toucher.
Gardezlecordond’alimentationsoupleà
l’écartdeslamesdecoupe.
Méez-vousdeslamestranchantes.Les
lames continuent de tourner une fois le
moteur coupé. Débranchez le connecteur
delamachineavanttoutentretienousile
cordon est endommagé.
Leniveausonoredelamachinene
dépasse pas les 96 dB.
Éloignezvosmainsetvospieds.N’utilisez
latondeusequesilescartersdeprotection
et les accessoires sont bien en place.
Uniquementpourlespaysdel’Union
européenne
Nepasjeterlesappareilsélectriquesavec
lesorduresménagères!Conformément
àladirectiveeuropéennerelativeaux
déchetsd’équipementsélectriqueset
électroniquesainsiqu’àsonapplication
enconformitéaveclesloisnationales,
lesappareilsélectriquesquiontatteintla
ndeleurduréedeservicedoiventêtre
collectésséparémentetrenvoyésàun
établissement de recyclage respectueux
del’environnement.
Utilisations
La machine est conçue pour tondre la pelouse.
N’utilisezpaslamachineàd’autresns.L’utilisationde
lamachinepourdesopérationsautresquel’utilisation
prévuepourraitentraînerunesituationdangereuse.
Alimentation
L’outilnedevraêtreraccordéqu’àunealimentation
delamêmetensionquecellequiguresurlaplaque
signalétique,etilnepourrafonctionnerquesurun
courantsecteurmonophasé.Réaliséavecunedouble
isolation,ilpeutdecefaitêtrealimentéparuneprise
sans mise à la terre.
Silecordond’alimentationestendommagé,ildoitêtre
remplacéparlefabricantousonprestatairedeservice
and’évitertoutdanger.

19 FRANÇAIS
Pour les systèmes de distribution
publics à basse tension, entre 220 V
et 250 V
La mise sous tension et hors tension des appareils
électriquesprovoquedesuctuationsdetension.
L’utilisationdecetappareildansdesconditions
d’alimentationélectriqueinadéquatespeutavoirdes
effetsnéfastessurlefonctionnementdesautreséqui-
pements.Toutefois,ilnedevraitpasyavoird’effets
négatifssil’impédancedel’alimentationestégaleou
inférieureà0,422ohm(pourleEM411).Laprisede
courantutiliséepourcetappareildoitêtreprotégéepar
unfusibleouundisjoncteurdeprotectionàdéclenche-
ment lent.
Bruit
Norme applicable : EN60335
Modèle Niveaudepressionacoustique Niveaudepuissancesonore
LPA(dB(A)) Incertitude K
(dB(A))
LPA(dB(A)) Incertitude K
(dB(A))
EM411 84 395 1
EM462 83 395 1
EM463S 83 395 1
NOTE :Laoulesvaleursd’émissiondebruitdéclaréesontétémesuréesconformémentàlaméthodedetest
standardetpeuventêtreutiliséespourcomparerlesoutilsentreeux.
NOTE :Laoulesvaleursd’émissiondebruitdéclaréespeuventaussiêtreutiliséespourl’évaluationpréliminaire
del’exposition.
AVERTISSEMENT : Portez un serre-tête antibruit.
AVERTISSEMENT : L’émission de bruit lors de l’usage réel de l’outil électrique peut être différente de
la ou des valeurs déclarées, suivant la façon dont l’outil est utilisé, particulièrement selon le type de pièce
usinée.
AVERTISSEMENT : Les mesures de sécurité à prendre pour protéger l’utilisateur doivent être basées
sur une estimation de l’exposition dans des conditions réelles d’utilisation (en tenant compte de toutes
les composantes du cycle d’utilisation, comme par exemple le moment de sa mise hors tension, lorsqu’il
tourne à vide et le moment de son déclenchement).
Vibrations
Valeurtotaledevibrations(sommedevecteurtriaxial)
déterminée selon EN60335 :
Modèle EM411
Émissiondevibrations(ah) : 2,5 m/s2ou moins
Incertitude (K) : 1,5 m/s2
Modèle EM462
Émissiondevibrations(ah) : 2,5 m/s2ou moins
Incertitude (K) : 1,5 m/s2
Modèle EM463S
Émissiondevibrations(ah) : 2,5 m/s2ou moins
Incertitude (K) : 1,5 m/s2
NOTE :Laoulesvaleursdevibrationtotalesdécla-
rées ont été mesurées conformément à la méthode
deteststandardetpeuventêtreutiliséespourcom-
parer les outils entre eux.
NOTE :Laoulesvaleursdevibrationtotalesdécla-
réespeuventaussiêtreutiliséespourl’évaluation
préliminairedel’exposition.
AVERTISSEMENT : L’émission de vibrations
lors de l’usage réel de l’outil électrique peut être
différente de la ou des valeurs déclarées, suivant
la façon dont l’outil est utilisé, particulièrement
selon le type de pièce usinée.
AVERTISSEMENT : Les mesures de sécurité
à prendre pour protéger l’utilisateur doivent être
basées sur une estimation de l’exposition dans
des conditions réelles d’utilisation (en tenant
compte de toutes les composantes du cycle
d’utilisation, comme par exemple le moment de
sa mise hors tension, lorsqu’il tourne à vide et le
moment de son déclenchement).
Déclaration de conformité CE
Pour les pays européens uniquement
La déclaration de conformité CE est fournie en Annexe
Aàcemoded’emploi.

20 FRANÇAIS
CONSIGNES DE SÉCURITÉ
IMPORTANTES
AVERTISSEMENT : Lisez toutes les
consignes de sécurité et toutes les instructions. Il
yarisqued’électrocution,d’incendieet/oudegraves
blessures si les mises en garde et les instructions ne
sont pas respectées.
Conservez toutes les mises en
garde et instructions pour réfé-
rence ultérieure.
1. Les enfants doivent être sous la surveillance
d’un adulte an de s’assurer qu’ils ne jouent
pas avec la tondeuse.
2.
Ne laissez jamais les enfants ou les personnes qui ne
sont pas familiarisées avec ces instructions utiliser
la tondeuse. Les réglementations locales peuvent
spécier un âge minimum pour l’utilisation.
3.
N’utilisez jamais la tondeuse alors que des per-
sonnes — et tout particulièrement des enfants — ou
des animaux domestiques se trouvent à proximité.
4. Gardez à l’esprit que l’opérateur ou l’utilisa-
teur est responsable des accidents ou risques
encourus par les personnes ou leur propriété.
5. Pendant l’utilisation de la tondeuse, portez
toujours des chaussures résistantes et un
pantalon long. N’utilisez pas la tondeuse
pieds nus ou avec des sandales qui laissent
les pieds partiellement découverts. Évitez
de porter des vêtements et bijoux amples ou
dotés de cordons ou attaches qui pendent. Les
pièces mobiles risqueraient de les happer.
6.
Pour protéger vos yeux des blessures lorsque vous
utilisez un outil électrique, portez toujours des lunettes
de protection, lesquelles doivent être conformes à
ANSI Z87.1 aux États-Unis, EN 166 en Europe ou AS/
NZS 1336 en Australie/Nouvelle-Zélande. En Australie/
Nouvelle-Zélande, la loi exige également le port d’un
écran facial pour se protéger le visage.
L’employeur est responsable d’imposer le
port d’équipements de sécurité appropriés
par les utilisateurs de l’outil et par les autres
personnes se trouvant à proximité de la zone
de travail.
7. Avant utilisation, vériez que le cordon
d’alimentation ne présente pas de signes
d’endommagement ou d’usure. Si le cordon
est endommagé pendant l’utilisation, débran-
chez-le immédiatement du secteur. Ne touchez
pas le cordon avant qu’il soit déconnecté du
secteur. N’utilisez pas la tondeuse si le cordon
est endommagé ou usé.
8. N’utilisez la tondeuse qu’à la lumière du jour
ou sous un bon éclairage articiel.
9. Évitez d’utiliser la tondeuse sur de l’herbe
mouillée.
10. N’utilisez jamais la tondeuse sous la pluie.
11. Tenez toujours la poignée fermement.
12. Assurez-vous toujours d’être en position
stable dans les pentes.
13. Ne courez jamais ; marchez.
14. Ne saisissez pas les lames de coupe exposées
ou les bords tranchants pour soulever ou tenir
la tondeuse.
15. Condition physique - N’utilisez pas la ton-
deuse après avoir consommé une drogue, de
l’alcool ou un médicament.
16. Gardez mains et pieds à l’écart des lames en
rotation. Attention - Les lames continuent de
tourner une fois la tondeuse éteinte.
17.
Utilisez exclusivement les lames authentiques
du fabricant spéciées dans ce mode d’emploi.
18. Vériez soigneusement l’absence de ssures
ou de dommages sur les lames avant l’utili-
sation. Remplacez immédiatement les lames
ssurées ou abîmées.
19. Assurez-vous qu’il n’y a personne à proximité
avant de commencer à tondre. Arrêtez la ton-
deuse si quelqu’un s’approche.
20.
Pour éviter de vous blesser ou d’abîmer la ton-
deuse, enlevez les corps étrangers tels que
pierres, câbles, bouteilles, os et gros bouts de bois
de la zone de travail avant de commencer à tondre.
21. Cessez immédiatement l’utilisation si vous
remarquez quoi que ce soit d’inhabituel.
Coupez le contact de la tondeuse et débran-
chez le cordon d’alimentation du secteur.
Inspectez ensuite la tondeuse.
22. N’essayez jamais de régler la hauteur des
roues pendant que la tondeuse tourne.
23.
Libérez le levier d’interrupteur et attendez que
la lame ait cessé de tourner avant de traverser
une allée, un trottoir, une route ou une zone
recouverte de gravier. Pensez également à
débrancher le cordon d’alimentation du secteur
si vous laissez la tondeuse sans surveillance,
si vous vous penchez pour ramasser ou enlever
un objet qui fait obstacle, ou pour toute autre
raison pouvant vous distraire de votre travail.
24.
Les objets heurtés par la lame de tondeuse
peuvent provoquer de graves blessures. Pensez
toujours à inspecter soigneusement le gazon et à
retirer tous les objets avant de tondre.
25. Si la tondeuse heurte un corps étranger, pro-
cédez comme suit :
- Arrêtez la tondeuse, libérez le levier d’inter-
rupteur et attendez que la lame ait complète-
ment cessé de tourner.
This manual suits for next models
2
Table of contents
Languages:
Other Dolmar Lawn Mower manuals

Dolmar
Dolmar PM-46 B User manual

Dolmar
Dolmar EM-461 User guide

Dolmar
Dolmar EM-41 User guide

Dolmar
Dolmar RM-72.13 H User manual

Dolmar
Dolmar PM-5360 S3CP User manual

Dolmar
Dolmar PE-254.4 User guide

Dolmar
Dolmar EM-4816 User manual

Dolmar
Dolmar AM-3738 User manual

Dolmar
Dolmar PM-4660 S1 User manual

Dolmar
Dolmar PM-46 NB User manual

Dolmar
Dolmar AM3846 User manual

Dolmar
Dolmar PM-42 User manual

Dolmar
Dolmar TM-92.14 H User manual

Dolmar
Dolmar PM-5175 S1 User manual

Dolmar
Dolmar PM-462 User guide

Dolmar
Dolmar PM-4810 User guide

Dolmar
Dolmar TM-85.13 User manual

Dolmar
Dolmar AM-3738 User manual

Dolmar
Dolmar TM-92.14-H User manual

Dolmar
Dolmar PM-4600 S3 User manual