Domain DM-CR3138USB User manual

1
mm
1:1
A4
1 of 1
数量
单位
比例
规格
页数
惠州华阳通用电子有限公司
物料编码
编码描述
担当确认
部门批准
检 查
课室审核
营业确认
材 质
加工工艺
型 号
设 计
F
1
E
D
2 3
C
B
A
1 32 4
6 7 8
F
E
D
5 76
C
B
A
8
RM7239109A,INSTRUCTION MANUAL
9480RM7239109A
127075005204
2013-5-31
温惠娟
鲍静芳
罗中强/温海平
2013-5-31
2013-5-31
2013-5-31
莫宪贵
2013-5-31
胡知先
2013-5-31
版本 更改内容 日期 签名
注:
尺寸 210x142.5mm:
材质:70g书写纸
颜色:黑色
封面
封底
空白
P1
装订:共24P,骑马订
101 mm
69 mm
210mm
142.5mm
P20
空白
叶红慧

DM-CR3138USB
Operation Instructions
MP3/MP4/MP5/USB/SD/MMC PLAYER
WITH FM/AM TUNER

1
Safety Precautions
To ensure safe driving, please adjust the
volume to a safe & comfortable level in case
of emergency situations.
Never expose this unit, amplifier, and
speakers to moisture or water for preventing
electric sparks or fires.
Please don't change the fuse on the power
cord without professional guidance, using
improper fuse may cause damage to this unit
or even cause fire.
Please power off this unit at once and send it
back to the after-sales service center or the
dealer/distributor you purchased from if one
of the following symptoms is found:
(a). No audio output;
(b). No image output;
(c). Water or other obstacle enters the unit;
(d). Smoking;
(e). Peculiar smell.
Only connect the unit to a 12-volt power
supply with negative grounding.
MUTE
OK
MUTE
OK
Never install this unit where the operation &
condition for safety driving is restrained.
MUTE
OK
MUTE
OK
Never use the video display function in the
front when driving to prevent the violation of
laws & regulations and also to reduce the
risk of traffic accident except using for rear
view video camera.
MUTE
OK
MUTE
OK
MUTE
OK
MUTE
OK
Thank you for purchasing this product.
Please read through these operating
instructions so you will know how to operate
your model properly. After you have finished
reading the instructions, keep this manual in
a safe place for future reference.
To provide a clear demonstration and an
alternative for easy understanding of the
operation of this unit, graphic illustration
was used. However, this illustration is not
necessary printed as the actual image found
on the unit.

2
Contents
Safety Precautions .........................................1
Features .........................................................3
Panel Controls................................................4
Remote Controls.............................................5
Basic Operation..............................................6
Rotary Knob Menu...................................... 7-8
Radio Mode ....................................................9
USB/SD/MMC Mode............................... 10-13
Device Connections................................ 14-16
Installation Guide.................................... 16-18
Anti-Theft System.........................................18
Troubleshooting............................................19
Specications ...............................................20

3
Button Operation Explanations
Some frequent operations
1) Move cursor
Note:
In Setting mode, the VOL knob has the same
function as the / button to select setting
items.
2) Conrm
WMA and MP3 Compatibility
It is possible to playback WMA and MP3 files.
About WMA
The unit can playback WMA data.
Windows Media and the Windows logo are
trade marks or registered trademarks of
Microsoft Corporation in the United States
and/or other countries.
This unit may not operate correctly depending
on the application used to encode WMA files.
About MP3
Supply of this product only conveys a license
for private, non-commercial use and does not
convey a license nor imply any right to use
this product in any commercial (i.e.revenue-
generating) realtime broadcasting (terrestrial,
satellite, cable and/or any other media),
broad-casting/streaming via internet, intranets
and/or other networks or in other electronic
content distribution systems, such as pay-
audio or audio-on-dem and applications.
An independent license for such use is
required. For details, please visit http://www.
mp3licensing.com.
Features
Press the button to open the panel.

4
Panel Controls
Power on/off: Press to turn on/off the unit.
1. Power on/off
2. Press to select Volume-BAS-TRE-BAL-FAD-
EQ-LOUND, rotate the knob to adjust.
3. - Rotate the knob to adjust volume level.
- Confirm operation (in settings mode).
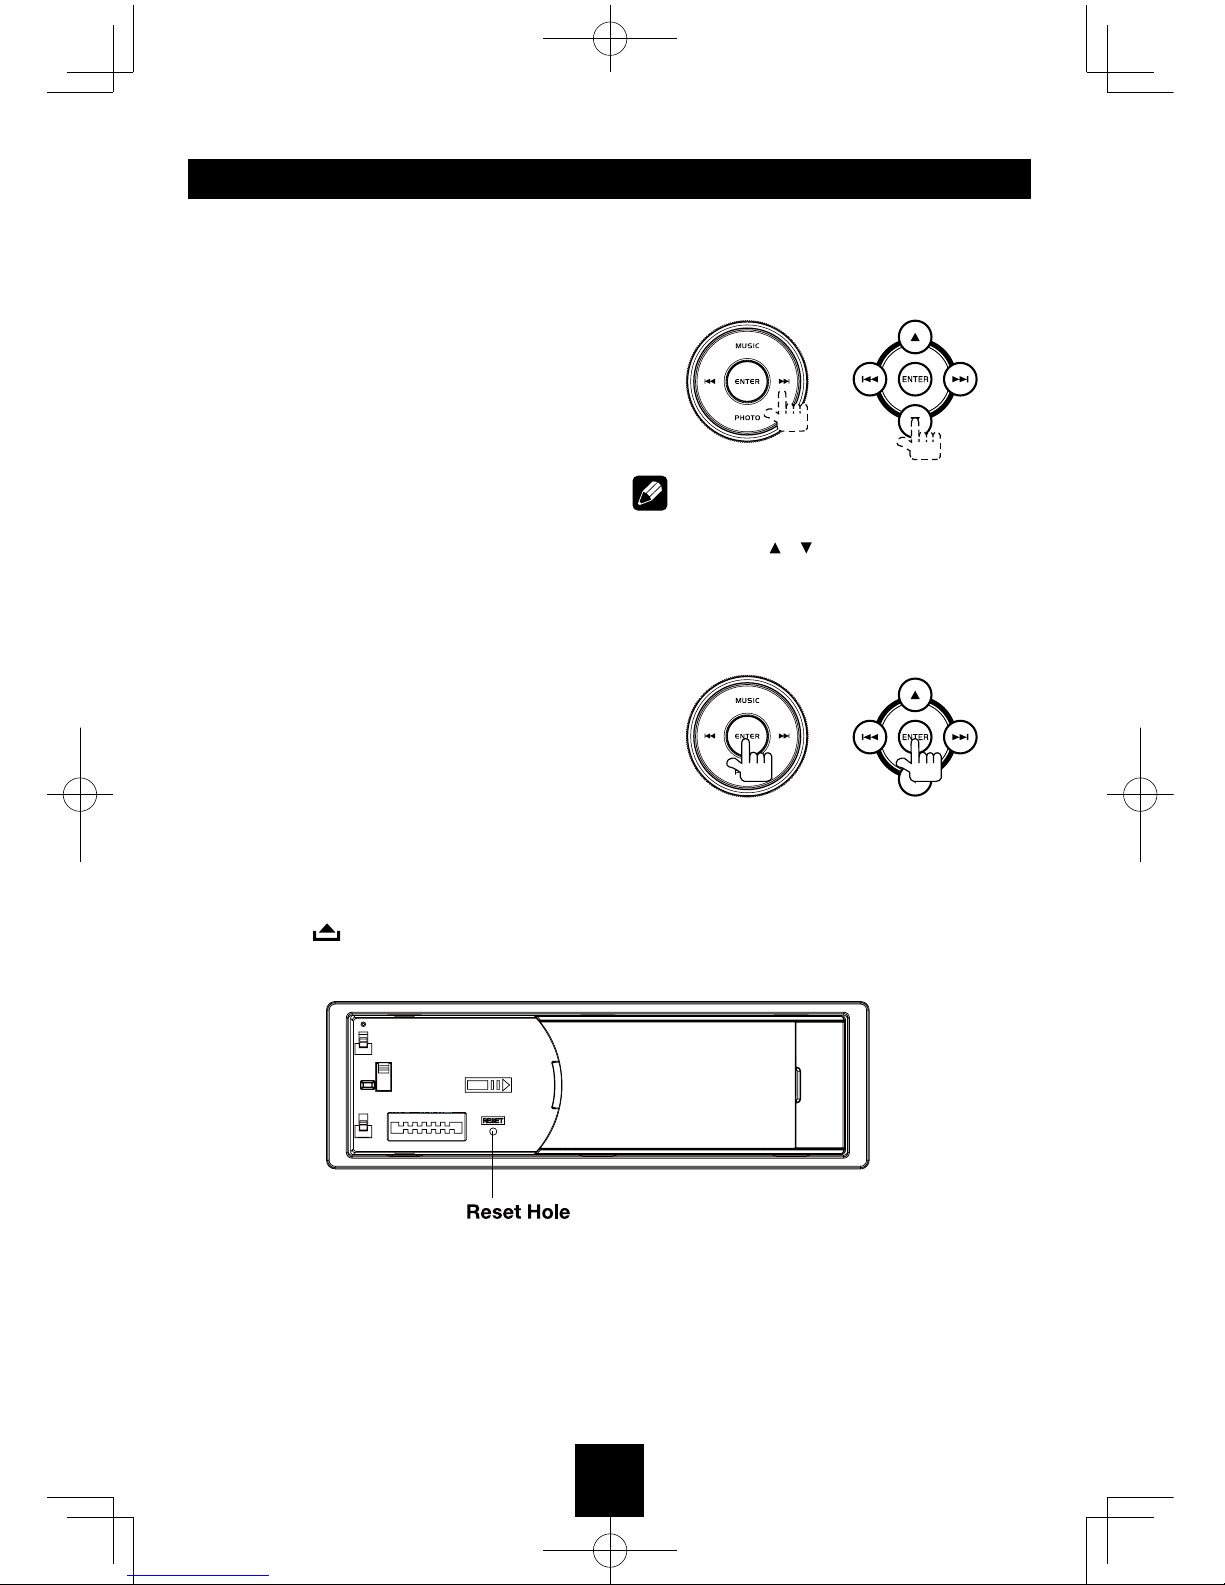
4. - Press for quick access to music playing.
- In music playing interface, press for selecting
the USB or SD source.
5. - Band switch: FM1-FM2-FM3-AM1-AM2.
- Long press to auto seek stations
- In the other mode, short press to enter the
radio mode quickly.
6. Mute on/off
7. Remote sensor
8. 3 inch TFT display
9. SD/MMC card slot
10. USB connector
11. Panel open
12. - Press to the home page, and rotate the
knob to select playing mode (in Radio
mode).
• Radio
• Music
• Movie
• Photo
• Avin(front audio&video input.External
peripheral devices can be connected with
the unit.)
• Setting
- Cancel source select menu and return to
previous menu (in MP3 / WMA mode).
13. - Search the previous station manually, and
each press to seek step by step (press
briefly, in Radio mode).
- Search the previous station automatically
(press more than 2 seconds, in Radio
mode).
- Press to search the previous track or
chapter (in MP3/WMA mode).
- Fast backward (press more than 2
seconds, in MP3/WMA mode).
14. - Press for quick access to Photo List.
- In Photo List, press for selecting the USB
or SD source.
15. - Search the next station manually, and each
press to seek step by step (press briefly, in
Radio mode).
- Search the next station automatically
(press more than 2 seconds, in Radio
mode).
- Search the next track or chapter (in MP3 /
WMA mode).
- Fast forward (press more than 2 seconds,
in MP3/WMA mode).
16. - Press for quick access to Movie List.
- In Movie List, press for selecting the USB
or SD source.
17. AV in

5
Remote Controls
Replacing the lithium battery
When the range of operation of the card
remote control becomes short or no function,
replace the lithium battery with a new one.
Make sure the battery polarity replacement is
correct.
1. Pull out the battery holder while pressing
the stopper.
2. Insert the button-type lithium battery with
the (+) mark facing upward. Insert the battery
holder into the remote control.
1 2
(CR 2025)
Remote Control Operating Range
The remote control can operate within a
distance of 3~5m.
Warning
• Storethebatterywherechildrencannot
reach. If a child accidentally swallows the
battery, consult a doctor immediately.
• Donotrecharge,short,disassembleorheat
the battery or dispose it in a fire.
• Donotleavethebatterywithothermetallic
materials. Otherwise, the battery may start
to give off heat, crack or catch fire.
• Whenthrowingawayorsavingthebattery,
wrap it in tape and insulate.
1. Menu
2. Mute
3. Volume
4. Radio band (in Radio mode)
5. Tone
6. Music
7. Menu cursor
8. Play/Pause
9. - Radio tune
- Track skip/seek
10. Repeat
Zoom
11. Photo
12. Enter
13. Movie

6
Basic Operation
Turn on/off the Power
1. Press to turn on the unit.
The unit goes back to the last status after
power on.
2. Press more than two secnonds to power
off.
Mute
Press the MUTE button to cut the sound.
Note:
•Doingtheoperationaboveagainor
adjusting volume will release muting.
•MuteiconappearsontheTFTduring
muting.
Adjust the Volume
Rotate the knob on the panel or press VOL +/-
on the remote control to increase or decrease
the volume.
The adjustable range of volume is 00 to 40.
Playing Source Selection
1. Press the MENU button on the panel or
remote control to display the home menu.
2. Rotate the knob on the panel or press the
/ button on the remote control to select
the desired mode, press the knob on the
front panel or ENTER button on the remote
control to confirm.
Note:
•Whensomedevicesarenotready,they
cannot be selected.
• Youshouldstopswitchingwhentheplaying
source you desired has been selected and
wait for some seconds, the unit will auto
enter the playing source mode you have
selected.
When Parking Brake Applied
1. If 'PRK SW' cable is connected to hand
brake switch, the video display of the TFT
monitor will be controlled by driving status,
system setup and input video sources.
2. When the car is moving ahead, if the video
file is played, the screen appears “Parking
is enabled, No video in driving.”. The above
warning screen will prevent the driver
watching images.
When Reverse Driving
If the rear view video camera is connected,
the unit automatically switches to CAMERA
source during reverse driving. The unit returns
to the original work mode after the reverse
driving is done.

7
Rotary Knob Menu
Each press the TONE button to change the
AUDIO mode: Volume/BAS/TRE/BAL/FAD/
EQ/LOUD, rotate the knob to adjust level.
Volume
Display shows the volume level.
Volume and number from 00 to 40.
BAS
Display shows the BASS level.
BASS range: -7 to +7.
TRE
Display shows the TREBLE level.
TREBLE range: -7 to +7.
BAL
Display shows the BALANCE level.
BALANCE range: L07 (full left) to R07 (full
right).
L = left speaker, R = right speaker.
FAD
Display shows the FADER level.
FADER range: R07 (full rear) to F07 (full
front).
R = rear speaker, F = front speaker.
EQ: Rock/Pop/Flat/Classic
The Equalizer function applies preset sound
effects to the unit’s audio output signal. Turn
the rotary encoder to select from the following
equalizer options: Rock, Pop, Flat, Classic.

8
LOUDNESS: ON/OFF
When listening to music at low volumes, this
feature will selectively boost certain bass and
treble frequencies.
General Setting
1. Press the MENU button on the panel or
remote control to display the home menu.
2. Rotate the knob on the panel or press the
/ button on the remote control to select
the Setting List, press the knob on the
front panel or ENTER button on the remote
control to confirm.
Language Setting
Select one language that you are familiar with
to display system menu.
Date Setting
Press / or / button to set year,
month and date, then press ENTER button
on the front panel or on the remote control to
confirm.
Clock Mode
12 HOUR MODE: the clock displays in the
type of 12 hours such as 11:18 AM.
24 HOUR MODE: the clock displays in the
type of 24 hours such as 20:18.
Time Mode
Rotate the knob on the panel or press /
or / button to set hour and minute.
Each time you press the knob on the front
panel or ENTER button on the remote control
to select one segment of the clock display:
Hour-Minute
As you select segments of the clock display
the segment selected will be highlighted. Then
you can rotate the knob on the panel or press
/ or / button to put a clock right.
SWC: Volume+/Volume-/Mute/Prev/Next/
Menu/Play/pause
Press the knob on the front panel or ENTER
button on the remote control to select steering
wheel control function.
Parking: On/Off
When it is in Parking “On” mode, if you play
the video disc, the screen will show “Parking
is enabled, No video in driving.”.
Factory default: Restore
If this item is selected, the unit will return to
original setting.
Rotary Knob Menu

9
Radio Mode
Accessing Radio Mode
Press the RADIO button on the front panel or
remote control to switch to the Radio source.
Selecting a Band
Press RADIO once or more to select FM1-
FM2-FM3-AM1-AM2.
Display shows wave band and frequency if
already stored.
Selecting a Station
Press the or tuning button to tune to
another station.
Tuning
- AUTO SEEK
Press and hold the or buttons to seek
the next/previous station automatically.
- MANUAL SEEK
Press the or buttons to enter manual
tuning mode. Press the buttons again to move
the radio frequency number up or down one
step.
Storing Stations
- Auto storing
1. Select a band (if needed).
2. Hold RADIO more than 2 seconds, the
6 strongest available stations will be
automatically saved.
Recalling a Station
1. Select a band (if needed).
2. Long press the knob on the front panel until
the circle flashed, then rotate the knob to
select the corresponding stored station,
and press the knob to confirm.
1. Source Indicator
2. Time/Clock
3. Radio Station Frequency
4. AM/FM Band
5. EQ Indicator
1 2 3
4
5

10
1. Load SD/MMC Card
Open the cap, insert the SD/MMC card
into the slot. The unit will play the music
automatically.
2. Take out SD/MMC Card
Press RADIO button to non-SD mode,
press the SD/MMC card to pop out. Take
out the card, close the cap.
3. Load USB Device
Open the cap, insert USB device into the
USB jack. The unit will play the music in
the USB memory automatically.
4. Take out USB Device
Press RADIO button to non-USB mode
and take out the USB device from the USB
jack, close the cap.
USB/SD/MMC Notes
USB functions (flash memory type) MP3
music play
1. SD/MMC card support
2. USB flash memory 2 in 1 (SD/MMC)
support
3. FAT 12/FAT 16, FAT 32 is possible
- FAT 12/16 (dir: 180 support, file: 1500
support)
- FAT 32 (dir: 180 support, file: 1500
support)
4. Tag (id3 tag ver 2.0)
- Title/artist/album: 30 byte support
5. Multi card reader not support
6. USB 1.1 support
USB 2.0 support
(it can not support USB 2.0 speed. Just, get
the same speed with USB 1.1)
Note:
Not all kinds of USB devices are compatible
with the unit.
USB/SD/MMC Mode

11
USB/SD/MMC Mode
Accessing USB/SD Card Mode
To play les from an SD or USB that is already
inserted, choose the SD or USB source. The
playback screen is indicated below:
File Type Supported
Audio le: MP3(*.mp3), WMA(*.wma)
Video le:
MP4 (*.avi, DIVX3.11/4.0/5.0/6.0)
MP5 (*.rmvb)
MPEG 1 (*.dat)
Picture le: JPEG (*.jpg)
MP3 le:
ISO 9660 or ISO 9660 + Joliet format - Max.
30 characters.
Max. nested directory is 8 levels.
The max. album number is 99.
The max. length of each track is 99 minutes
59 seconds.
Supported sampling frequency for MP3: 8KHz
to 48KHz (44.1KHz preferably).
Supported bit-rates of MP3 are: 32 - 320 kbps
(128 kbps preferably).
File NOT Supported
*.AAC, *.DLF, *.M3U, *.PLS, MP3 PRO files
and files with DRM.
Audio/Video/Picture File Playback
When AUDIO/VIDEO/PICTURE file is played,
Category/Folder/File list will be displayed on
the screen, and file/folder name being played
will be displayed on top. Current selected item
will be highlighted.
The list lets you see the list of track titles or
folder names. If you select a folder on the list,
you can view its contents.
For Audio Files
1. Press the MENU button on the panel or
remote control to display the home menu.
2. Rotate the knob on the panel or press the
/ button on the remote control to select
MUSIC AUDIO folders
3. Press the knob on the front panel or
ENTER, on the remote control to display
all available audio file folders.
4. Use / to enter file list and use / to
select desired file, press the knob on the
front panel or ENTER, on the remote
control to start play.
5. During the file playing, press the knob on
the front panel or on the remote control
to stop, press MENU to return to previous
menu.
1. Source Indicator
2. Name of the Song Display
3. Audio/Video/Picture Folder
4. Current Track Track
43
1
2

12
USB/SD/MMC Mode
For Video les
1. Press the MENU button on the panel or
remote control to display the home menu.
2. Rotate the knob on the panel or press the
/ button on the remote control to select
MOVIE VIDEO folders
3. Press the knob on the front panel or
ENTER, on the remote control to display
all available video file folders.
4. Use / to enter file list and use / to
select desired file, press the knob on the
front panel or ENTER, on the remote
control to start play.
For Picture les
1. Press the MENU button on the panel or
remote control to display the home menu.
2. Rotate the knob on the panel or press the
/ button on the remote control to select
PHOTO PICTURE folders
3. Press the knob on the front panel or
ENTER, on the remote control to display
all available picture file folders.
4. Use / to enter file list and use / to
select desired file, press the knob on the
front panel or ENTER, on the remote
control to slide show the pictures.
Note:
1. If the selected folder does not contain
any playable track, the track list is not
displayed.
2. During the folder selecting, press MENU
to the upper folder (parent folder). If the
uppermost folder is listed, MENU cannot be
used.
MP3/WMA Notes
MP3 and WMA (Windows Media Audio) music
files are digital audio files that are compressed
to allow more files to be stored. This unit can
play MP3/WMA and video directly from files
contained on a SD card or USB Device. Many
types of software are available for converting
audio files into MP3/WMA formats. This unit
can play MP3 (MPEG1, 2, 2.5 Audio Layer
3). However, the MP3 recording media and
accepted formats are limited.
Entering ID3 Tag
This unit supports ID3 tag version 2.0.
For character codes, refer to the table to the
below.
Entering File and Folder Names
Names using the code list characters are the
only file names and folder names that can
be entered and displayed. Using any other
character will cause the file and folder
names to be displayed incorrectly. The unit
recognizes and plays only les with the MP3/
WMA extension.
Note:
A le name entered with characters not on the
code list may not play correctly.

13
USB/SD/MMC Mode
MP3 Playing Order
When selected for play, files and folders
(Folder Search, File Search or Folder Select)
are accessed in the order in which they were
written to the media. As a result, the order in
which they are expected to be played may
not match the order in which they are actually
played. You may be able to set the order in
which MP3/WMA files are to be played by
assigning file names beginning with play
sequence numbers such as "01" to "99". For
example, a medium with the following folder/
le hierarchy is subject to Folder Search, File
Search or Folder Select as shown below.
(
)
0
1
2♪①
♪②
5
♪⑧
♪⑦
6
7♪⑨
♪③
3
4
♪④
♪⑤
♪⑥
Layer1 Layer 2 Layer 3 Layer 4 Layer5
○Root Folder
Folder
♪File
The player will only recognize three folder
levels and does not display folders containing
only other folders. In the example above, the
unit will display folders 3, 4, 6, and 8, but not
2 and 7 since they do not contain any tracks
directly. Folder 5 is not recognized at all since
it is at the fourth level.
Electronic Shock Protection
• >45secondsforMP3recordedat44.1kHz,
128kbps
• >90secondsforWMArecordedat44.1kHz,
128kbps
Stop Playback
- During playback, press to pause
playback.
- The sound will be muted.
- Display " " in the TFT screen.
Press again to continue playback.
To resume normal play, repeat the operation.
Select Desired Track
- Press or to skip to the next track.
Fast Forward/Backward During
Playback
Press or for more than 2 seconds once
or more to fast backward or forward track
during playback.
- During the fast forward or backward
operation, the volume will be muted.
Repeat
During Audio/Video playback, press RPT on
the remote control once or more.
- RPT icon will appear on the display.
- For File: Display appears Repeat One
Repeat All Repeat Off
ZOOM
During Photo playback, press RPT button on
the remote control, the picture will be zoomed
accordingly, then press / or / button
on the remote control to move the picture.

14
Device Connections
Notes of connection
• Toavoidshortcircuitintheelectrical
system, ensure that the negative battery
cable is disconnected before installation.
• Topreventshortcircuitinthewiringand
damaging to this unit, secure all wirings
with cable clamp or adhesive tape. Route
the wirings in a secured, out of heating
place without touching any moving parts
such as gear shift, handbrake, and seat
rails to prevent the wiring insulation being
melted / wore off.
• Neverpasstheyellowpowercordthrough
the installation hole into the engine
compartment and connect to the car
battery. Otherwise, a high possibility of
serious short circuit to the electrical system
may be occurred.
• Replacing a new fuse with 15A rating
when the old one is broken, using no
fuse or fuse with improper rating may
cause damage to this unit or even fires.
If a proper fuse is installed and electrical
problems still occur, please contact with
any professional car shops for inquiry.
• DONOTconnectotherequipmentswiththe
car battery to avoid battery overheating.
• Pleasemakesureallthewiringconnections
& the cables of the Speakers are well-
insulated. Otherwise, this unit may be
damaged by short circuit.
• IfthereisnoACCavailable,pleaseconnect
ACC lead to the power supply with a switch.
• Ifanexternalpoweramplifierisconnected,
please don't connect P.CONT lead to the
power lead of the external power amplifier,
otherwise, electric spark or other damage
may be resulted.
• Nevergroundthespeakeroutputtoprevent
the damage to the built-in power amplifier.
• Theminimumratingofthespeakers
connectedtothisunitis50Wwith4to8Ω
impedance.
Reverse Driving Cable Connections
Parking Brake Cable Connections

15
Device Connections
Wiring Diagram
Radio Antenna
Fuse 15A
Orange Illumination
Rear Line-out(Gray)
ISO Connector
Amplifier
Connector
L(White)
R(Red)
(Yellow)
Camera-in
(Pink)
Reverse
(Active high level input)
(Black)
(Black)
(Brown)
(Gray)
GND
GND
SWC1
SWC2
(Orange)
Parking SW
(Active low level input)

16
Installation Guide
Preparation
1. Disconnect battery
Before you begin, always disconnect the
battery negative terminal.
Note:
If the unit is to be installed in a car equipped
with an on-board drive or navigation computer,
do not disconnect the battery cable. If the
cable is disconnected, the computer memory
may be lost. Under these conditions, use extra
caution during installation to avoid causing a
short circuit.
2. Remove unit from sleeve
Lift latches on both sides of sleeve to remove
half-sleeve from the unit.
Mounting Sleeve Installation
1. Slide the mounting sleeve off the chassis.
If it is locked into position, use the removal
tools (supplied) to disengage it.
2. Check the dashboard opening size by
sliding the mounting sleeve into it.
If the opening is too small, carefully cut or
file as necessary until the sleeve easily
slides into the opening. Do not force the
sleeve into the opening or cause it to bend
or bow. Check for sufficient space behind
the dashboard for the unit chassis.
This unit can be installed in any dashboard
with a suitable 183 mm (W) x 53 mm (H)
opening as shown above. The dashboard
should be 4.75 mm - 5.56 mm thick in order
to be able to support the unit.
3. Locate the series of bend tabs along the
top, bottom, and sides of the mounting
sleeve. With the sleeve fully inserted into
the dashboard opening, bend as many of
the tabs outward as necessary to firmly
secure the sleeve to the dashboard.
4. Place the unit in front of the dashboard
opening so the wiring can be brought
through the mounting sleeve. Follow the
Device Connections
Using the ISO Connector
1. If your car is equipped with the ISO
connector, then connect the ISO connectors
as illustrated.
2. For connections without the ISO
connectors, check the wiring in the vehicle
carefully before connecting, incorrect
connection may cause serious damage to
this unit.
Cut the connector; connect the colored
leads of the power cord to the car battery,
as shown in the color code table below for
speaker and power cable connections.
Location Connector A Connector B
Rear Right (+) - Purple
Rear Right (-) - Purple /
Black Stripe
Front Right (+) - Gray
Front Right (-) - Gray /
Black Stripe
Front Left(+) - White
Front Left(-) - White /
Black Stripe
Rear Left (+) - Green
Rear Left (-) - Green/
Black Stripe
1
2
3
4
5
6
7ACC+/Red
Illumination / Orange
ANT/Amp control
/Blue
Battery 12V(+)/Yellow
Ground/Black
8
Function

17
wiring diagram carefully and make certain
all connections are secure and insulated
with wire nuts or electrical tape. After
completing the wiring connections, turn the
unit on to confirm operation (vehicle ignition
must be on). If the unit does not operate,
re-check all wiring until the problem is
corrected.
5. Make sure the radio is right-side up, then
carefully slide the radio into the mounting
sleeve until it is fully seated and the spring
clips lock it into place.
6. Secure the rear of the unit to the car
body using the mounting bolt and rubber
cushion.
7. Test the unit using the “Operation”
instructions that follow.
Kit Installation
If your vehicle requires the use of an
installation kit to mount this unit, follow the
instructions included with the installation kit to
attach the unit to the mounting plate supplied
with the kit.
1. Wire and test the unit as outlined in the
Mounting Sleeve Installation instructions.
2. Install the radio/mounting plate assembly
to the sub-dashboard according to the
instructions in the installation kit.
3. Replace the dashboard trim panel.
Installation Guide
ISO Installation
This unit has threaded holes in the chassis
side panels which may be used with the
original factory mounting brackets of some
vehicles to mount the radio to the dashboard.
Please consult with your local car stereo shop
for assistance on this type of installation.
1. Remove the existing factory radio from the
dashboard or center console mounting.
Save all hardware and brackets as they will
be used to mount the new radio.
2. Carefully unsnap the plastic frame from the
front of the new unit chassis. Remove and
discard the frame.
3. Remove the factory mounting brackets and
hardware from the existing unit and attach
them to the new unit. Do not exceed M5 x
9mm maximum screw size. Longer screws
may damage components inside the
chassis.
4. Wire the new unit as outlined in the
Mounting Sleeve Installation instructions.
5. Mount the new unit assembly to the
dashboard or center console using the
reverse procedure of step 1.
1. Mounting sleeve
2. The unit
3. Trim plate

18
Anti-Theft System
This unit is equipped with a detachable panel.
Panel can be detached and taken with you,
helping to deter theft.
Remove the panel
1. Press button to switch off the power of
the unit.
2. Press button to flip down the panel.
3. At an angle hold the panel to pull it out.
4. Place the panel into the case and take it
with you when you leave the car.
Installing the Panel
1. Hold the panel and ensure the panel faces
toward you, and set the right side of the
panel in the panel bracket.
2. Press the left side of the panel until it locks.
Removing the Unit
1. Remove the panel and the trim plate.
2. Remove the trim ring by firmly grasping one
side and pulling.
3. Insert the removal keys straight back until
they lock, then pull the radio out. If the
removal keys are inserted at an angle, they
will not lock properly and will not release
the unit.
Reset
The RESET button is located behind the front
panel and can only be accessed with the front
panel opened. Resetting the unit will erase
the time and preset memories. It should only
be activated upon initial installation after all
wiring is complete, or if there is a malfunction
of any of the switches on the unit. In these
circumstances, pressing the RESET button
will clear the system and return the unit to
default operation.
Fuse
When replacing a fuse, make sure the new
fuse is the correct type and amperage. Using
an incorrect fuse could damage the radio.
Reconnect Battery
When wiring is complete, reconnect the
battery negative terminal.
Installation Guide
Table of contents
Other Domain Car Receiver manuals
Popular Car Receiver manuals by other brands

Blaupunkt
Blaupunkt Hamburg MP68 OPERATING AND INSTALLATION Manual

Panasonic
Panasonic CQ5335U - AUTO RADIO/CD TRUCK operating instructions

Yamaha
Yamaha CRX-E150 owner's manual

Clarion
Clarion BD169R owner's manual

Axxera
Axxera AXD130 Installation & owner's manual

Pioneer
Pioneer Suepr Tuner III DEH-P7200 installation manual

Profile
Profile MP9900 Installation instructions and owner's manual

Audiovox
Audiovox Rampage ACD-70 owner's manual

JVC
JVC KW-XG500J Service manual

Pioneer
Pioneer Super Tuner III D DVH-P5850MP Operation manual

Voxx Electronics
Voxx Electronics ADVP10 owner's manual

JVC
JVC GET0558-001A Instructions & installation