Donner N-32 User manual


English
Français
Deutsche
Italiano
Español
日本語
01-10
11-19
20-28
29-37
38-46
47-55
CONTENTS

ENGLISH
We are very grateful to have you purchasing our product.
Please take a few minutes to read the instructions for operating this product,
which will show you how to use it and explain the function and operation of the device,
ensuring a trouble-free installation.
Please keep these operating instructions properly for reference in the future.
Welcome to DONNER
SHOCK HAZARD. DO NOT OPEN.
TO REDUCE THE RISK OF FIRE OR ELECTRIC SHOCK, DO NOT EXPOSE THIS EQUIPMENT TO RAIN OR MOISTURE.
TO REDUCE THE RISK OF FIRE, ELECTRIC SHOCK AND ANNOYING INTERFERENCE, PLEASE USE ONLY THE RECOMMENDED
ACCESSORIES. FOR UNINTERRUPTED SERVICE OF THIS DEVICE!
*DESIGN AND SPECIFICATIONS MAY CHANGE WITHOUT NOTICE
WARNING:
WARNING
01

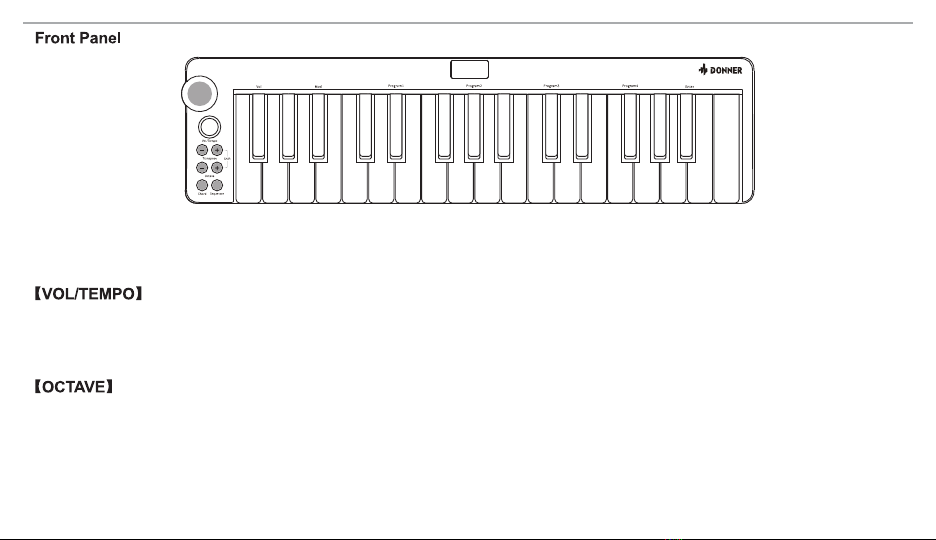
Thank you for purchasing the N-32 MIDI Keyboard. In order to take full advantage of the rich features of the N-32 MIDI
keyboard for excellent, it is strongly recommended that you read this user manual before using it. Please keep this user
manual in a safe place for future reference.
Please read these instructions.
Please keep these instructions.
Please heed all warnings.
Please follow all instructions.
Please keep this instrument away from rain and wetness.
Clean only with dry cloth.
Do not install near any heat sources such as radiators, heat registers, stoves, or other apparatus (including amplifiers) that
produce heat.
Protect the power cord from being walked on or pinched particularly at plugs, convenience receptacles, and the point where
they exit from the apparatus.
Unplug this apparatus during lightning storms or when unused for long periods of time.
Unplug this apparatus immediately and refer all servicing to qualified service personnel. Servicing is required when the
apparatus has been damaged in any way, such as power supply cord or plug is damaged, liquid has been spilled or objects
1
2
3
4
5
6
7
8
9
10
02

N-32 MIDI Keyboard
USB Cable
User Manual
Product: 423*108*33mm
Product weight: 0.46kg
Product weight(Package included): 0.64kg
11
12
have fallen into the apparatus, the apparatus has been exposed to rain or moisture, does not operate normally, or has been
dropped.
Never apply excessive force to the instrument.
Keep all volumes to the minimum before use, and gradually increase the volume while playing the instrument to achieve the
desired auditory experience.
If any of the items above are missing, please let us know via email: www.donnerdeal.com
Cubase/Nuendo
Kontakt
Reaper
Logic
Waveform
Ableton Live
Garageband
Audition
FL studio
Reason
Pro Tools
Cakewalk/Sonar
03

Plug the USB cable provided with your N-32 MIDI keyboard to a USB port on your computer.
Plug the other end of the USB cable into the USB input on the N-32 MIDI keyboard.
1
2
The USB cable not only powers the keyboard but also sends MIDI data to computer system or receives MIDI data from
computer system.
Using a passive USB hub may not provide enough power for instrument.
You can also use N-32 MIDI Keyboard with your iPad to control supported music creation apps. Connecting your N-32 MIDI
Keyboard to an iPad requires the iPad Camera Connection Kit.
- Once you have finished the installation, you will need to configure your music software for use with Donner N-32.
- Connect Donner N-32 to your computer and then open your software.
- In your software’s Preferences, Options, or Device Set-Up menu, select Donner N-32.
(Windows and MacOS will recognize the device as Donner N-32.)
- For further information about configuring your software to receive MIDI data from your Donner N-32, and using
software instruments with the application, refer to the documentation provided with that product.
1
3
2
04

USB/ DC IN
Provides the power and data by connecting this instrument to a computer via a USB cable.
MIDI OUT
Use a 3.5MM MIDI cable (sold separately) to connect this jack to the MIDI IN of an external sound module.
- You can connect an external MIDI instrument with a standard MIDI cable (commercially available) and control it from this
instrument. Likewise, you can use an external MIDI device (such as a keyboard or sequencer) to control the sounds on this
instrument.
SUSTAIN
Accept a momentary-contact foot pedal(sold separately), pedal will sustain the sound you are playing.
1
3
2
13
2
05

The keyboard range of the N-32 MIDI is approximately in the middle of an 88-note keyboard. Using the Octave “+” or “-”
buttons, you can access the full 88-note keyboard range of a large piano. The initial range is F1-C4.
● Adjust the current volume in track.
● Adjust the speed and time within【Sequencer】by turning the knob.
● Whenever you power up the keyboard, the octave setting will be at the default value of “0”.
● Press the Octave “+” and “-” buttons to adjust octave level.
● The button light is triggered when the octave is adjusted up or down, and the “+” and “-” buttons are pressed simultaneously
to reset to the initial state.
06

● When the transposition function is turned on, transposition value of the keyboard can be adjusted by pressing “+” and
“-” button.
● After turning it on, the button light will always be on. The “+” button or “-” button lights up when a semitone increased
or decreased.
● Press “+” and “-” buttons at the same time to return the initial state.
● You can play an entire chord by pressing【Chord】button on the keyboard. The chord will transpose automatically as you
play different notes. If you play a C2, and then play its component notes C2, G2, C3.
● Press the single note, the value is 1/8; When pressing the double notes, the value is 1/8.
(Double notes are playing in the order in which it is pressed).
● The default beat of the sequencer is 1/8 note.
● When the Sequencer is on, the digital tube directly displays the current speed, which can be adjusted by the encoder itself.
● The default is 120 Bpm and it can be adjusted by the encoder and the diode screen display, the value is 60 Bpm-240Bpm.
● The initial range is F1-C4. The highest range can reach C8, and the lowest range can reach F-2. A total of 5 octaves can be
added or subtracted from top to bottom.
07

● 【Shift】Button can used to access all the advanced functions of the keyboard. When the【Shift】combination button is
pressed, the keyboard goes into “Edit Mode”. In Edit Mode, the keys on the keyboard are used for selecting functions
and entering data.
● When the two lights of the【Shift】combination button are on, it is in edit mode. In Edit Mode, the black keys on the
keyboard are used for selecting functions, while the white keys are used for data entry, function selection.
● Your keyboard will exit out of Edit Mode as soon as a function is selected, or ENTER button is pressed (the【Shift】
button light will turn off). The keyboard can then be used to play notes again.
● Program 1-4 are used to change the instrument program or voice you are using. For example, you could use this function
to change the instrument to a bass sound.
● You can send a program change by:
If your MIDI hardware or software can receive MIDI Program changes, Press【Shift】to enter Edit mode, select one of
Program 1-4, then rotate the encoder and confirm your code through 0-127, at last press ENTER to confirm.
● MOD: After the 【SHIFT】function is turned on, it enters the modulation function. The initial state is OFF. Press it again
to change to ON. You can select through the rotary encoder. At this time, there will be a numeric display of 0-127 on the
screen. Press the confirm key to save..
● VOL: Adjust VOLUME in edit mode.
08

● The assignable pitch bend joystick is primarily used to bend the notes played on the keyboard up or down.
● The aperture flicker rate will follow the speed of the current specific function.
● Infinite encoder can be used to adjust the volume and sequencer (speed), Modulation value.
● You can adjust the sequencer speed, octave “+”and “-”, transpose “+”and “-”, and numerical adjustment of the
Modulation function.
09

10
Changes or modifications not expressly approved by the party responsible for compliance could void the user's authority to operate the
equipment.
This equipment has been tested and found to comply with the limits for a Class B digital device, pursuant to Part 15 of the FCC Rules. These
limits are designed to provide reasonable protection against harmful interference in a residential installation. This equipment generates uses
and can radiate radio frequency energy and, if not installed and used in accordance with the instructions, may cause harmful interference to
radio communications. However, there is no guarantee that interference will not occur in a particular installation. If this equipment does cause
harmful interference to radio or television reception, which can be determined by turning the equipment off and on, the user is encouraged to
try to correct the interference by one or more of the following measures:
-- Reorient or relocate the receiving antenna.
-- Increase the separation between the equipment and receiver.
-- Connect the equipment into an outlet on a circuit different from that to which the receiver is connected.
-- Consult the dealer or an experienced radio/TV technician for help.
This device complies with part 15 of the FCC rules. Operation is subject to the following two conditions (1)this device may not cause harmful
interference, and (2) this device must accept any interference received, including interference that may cause undesired operation.
This equipment complies with FCC radiation exposure limits setforth for an uncontrolled environment. This equipment should be installed and
operated with minimum distance 20cm between the radiator & your body.
FCC STATEMENT

FRANÇAIS
Merci beaucoup d'avoir acheté notre produit.
Veuillez prendre quelques minutes pour lire le mode d’emploi de ce produit,
qui vous expliquera comment l'utiliser et vous décrira les fonctions et l'opération de l'appareil,
contribuerant à garantir une installation sans problème.
Veuillez conserver ce mode d’emploi pour référence ultérieure.
Bienvenue chez DONNER
Risque de choc electrique. Ne pas démonter
Avertissement: Afin de réduire le risque d'incendie ou de choc électrique, n’exposez pas cet appareil à la pluie ou à l'humidité.
Afin de réduire le risque d'incendie ou de choc électrique et d'interférences gênantes, veuillez utiliser uniquement les
accessoires recommandés pour un fonctionnement continu de cet appareil!
* La conception et les spécifications peuvent être modifiées sans préavis.
Avertissement
11

Merci d'avoir acheté le clavier MIDI N-32. Il est recommandé de lire attentivement le manuel d'instructions avant utilisation,
afin d'utiliser pleinement les riches fonctions du clavier MIDI N-32 et d'obtenir un excellent. Après avoir lu le manuel
d'instructions, veuillez vous assurer de le conserver dans un endroit sûr et facilement accessible pour référence ultérieure.
Veuillez lire ce manuel.
Veuillez conserver ce manuel en lieu sûr.
Veuillez prêter attention à chaque avertissement.
Veuillez suivre toutes les instructions.
N'exposez pas l'instrument à la pluie et ne l'utilisez pas près de l'eau ou dans un environnement humide.
Nettoyer uniquement avec un chiffon sec.
Ne pas installer à proximité de sources de chaleur telles que radiateurs, aérothermes, poêles ou autres appareils générant
de la chaleur (y compris les amplificateurs).
Veuillez protéger le cordon d'alimentation contre tout piétinement ou pincement, surtout au niveau des fiches, des prises de
courant et des points de contact dérivés de ce produit.
Veuillez débrancher le produit par temps orageux avec du tonnerre et des éclairs ou si vous prévoyez de ne pas utiliser ce
produit pendant une longue période.
1
2
3
4
5
6
7
8
9
12

10
Clavier MIDI N-32
Câble USB
Manuel de l’utilisateur
Dimensions du produit: 423*108*33mm
Poids net du produit: 0.46 kg
Poids du produit avec emballage: 0.64 kg
11
12
S'il manque des pièces au déballage, veuillez nous contacter par e-mail: www.donnerdeal.com.
Cubase/Nuendo
Kontakt
Reaper
Logic
Waveform
Ableton Live
Garageband
Audition
FL studio
Reason
Pro Tools
Cakewalk/Sonar
Le produit est endommagé, comme des dommages au cordon d'alimentation ou à la fiche, des éclaboussures de liquide ou
des objets étrangers tombant dans le produit, de la pluie, de l'humidité, un dysfonctionnement ou une chute du produit, etc.
En cas de situation, veuillez débrancher immédiatement la fiche et contacter le revendeur ou le centre de service.
Ne placez pas d'objets lourds sur l'instrument.
Veuillez régler tout le volume au minimum avant utilisation et augmenter progressivement le volume lorsque vous jouez de
l'instrument, afin d'obtenir l'expérience auditive idéale.
13

Branchez le câble USB du clavier MIDI N-32 dans un port USB de votre ordinateur.
Insérez l'autre extrémité du câble USB dans le port d'entrée USB du clavier MIDI N-32.
1
2
Le câble de données USB alimente non seulement le clavier, mais transmet également des données MIDI vers le système
informatique ou reçoit des données MIDI du système informatique.
L'utilisation d'un concentrateur USB passif peut ne pas fournir suffisamment de puissance à l'instrument de musique.
Vous pouvez utiliser l'iPad et le clavier MIDI N-32 pour faire fonctionner des applications prenant en charge l'arrangement
musical. Le kit de connexion de caméra iPad est requis.
- Après avoir terminé l'installation, vous devez configurer et utiliser votre logiciel d'arrangement musical avec le clavier
Donner N-32.
- Connectez le clavier Donner N-32 à votre ordinateur, puis ouvrez votre logiciel.
- Sélectionnez le clavier Donner N-32 dans le menu «Préférences», «Options» ou «Réglages de l'appareil» du logiciel.
- Windows et MacOS reconnaîtront l'appareil comme un clavier Donner N-32.
- Concernant des informations détaillées sur la réception des données MIDI à partir du clavier Donner N-32 pour configurer le
logiciel et l'utilisation du logiciel de l'instrument avec des applications, veuillez vous reporter à la documentation fournie avec
le produit.
1
3
2
14

USB/ DC IN
Connectez cet instrument à un ordinateur via un câble USB pour fournir l'alimentation et les données.
MIDI OUT
Utilisez un câble MIDI de 3.5 mm (vendu séparément) pour connecter cette prise à l'interface d'entrée MIDI d'une carte son
externe.
- Vous pouvez utiliser un câble MIDI standard (disponible dans le commerce) pour connecter un instrument MIDI externe et
le contrôler via cet instrument. De même, vous pouvez utiliser un périphérique MIDI externe (tel qu'un clavier ou un
séquenceur) pour contrôler le son de cet instrument.
SUSTAIN
Il peut être connecté à une pédale de sustain (vendue séparément) qui utilise un contact momentané pour prolonger les
notes pendant la performance.
1
3
2
13
2
15

La plage du clavier MIDI N-32 est approximativement au milieu des notes du clavier à 88 touches. En utilisant le bouton
d'octave «+» ou «-», vous pouvez utiliser la gamme complète de 88 touches du piano à queue. La plage initiale est F1-C4.
● Vous pouvez régler le volume actuel dans DAW.
● Vous pouvez régler la vitesse et la durée dans le [Sequencer] en tournant le bouton.
● La valeur du paramètre Octave est par défaut «0» lors du démarrage du clavier.
● Appuyez sur le bouton Octave «+» ou «-» pour augmenter ou diminuer l'octave actuelle.
● L'indicateur du bouton peut être déclenché lorsque l'octave est ajustée de haut en bas et il se réinitialise à l'état initial
lorsque les deux boutons sont enfoncés en même temps.
16

● Après avoir activé la fonction Transpose, vous pouvez régler la hauteur actuelle à l'aide des boutons «+» et «-».
● L'indicateur du bouton s'allumera toujours lorsque cette fonction est activée, l'indicateur du bouton «+» ou «-» s'allumera
lors de l'augmentation ou de la diminution d'un demi-ton.
● Lorsque les boutons «+» et «-» sont enfoncés en même temps, il revient à l'état initial.
● Vous pouvez jouer l'intégralité de l'accord en appuyant sur le bouton 【Chord】du clavier. Lorsque vous jouez différentes
notes, l'accord changera automatiquement. Si vous jouez C2, alors les notes composantes de ce jeu sont respectivement
C2, G2, C3.
● Lorsqu'une seule tonalité est enfoncée, la valeur temporelle de la tonalité unique est 1/8; lorsque la double tonalité est
enfoncée, la double tonalité apparaît selon l'ordre dans lequel elle est enfoncée, et la valeur temporelle est 1/8; et ainsi
de suite.
● Le temps par défaut du séquenceur est 1/8 de note.
● Lorsque la fonction Sequencer est activée, le tube numérique affiche directement la vitesse actuelle, qui peut être ajustée
par l'encodeur.
● La valeur par défaut est 120bpm, qui peut être ajustée par l'encodeur et l'affichage à diode, la plage de valeur est de
● La plage initiale est F1-C4. La gamme la plus élevée peut atteindre C8 et la gamme la plus basse peut atteindre F-2. Un
total de 5 octaves peut être augmenté ou diminué de haut en bas.
17
Table of contents
Languages:
Other Donner Keyboard manuals