DOT DW01 User manual

Dot Watch Manual
DW01

1
[Table of Contents]
1. Before using your Dot Watch……………………………………2p
-Basic Components, Name and Function of Parts, Dot Watch User Tutorial
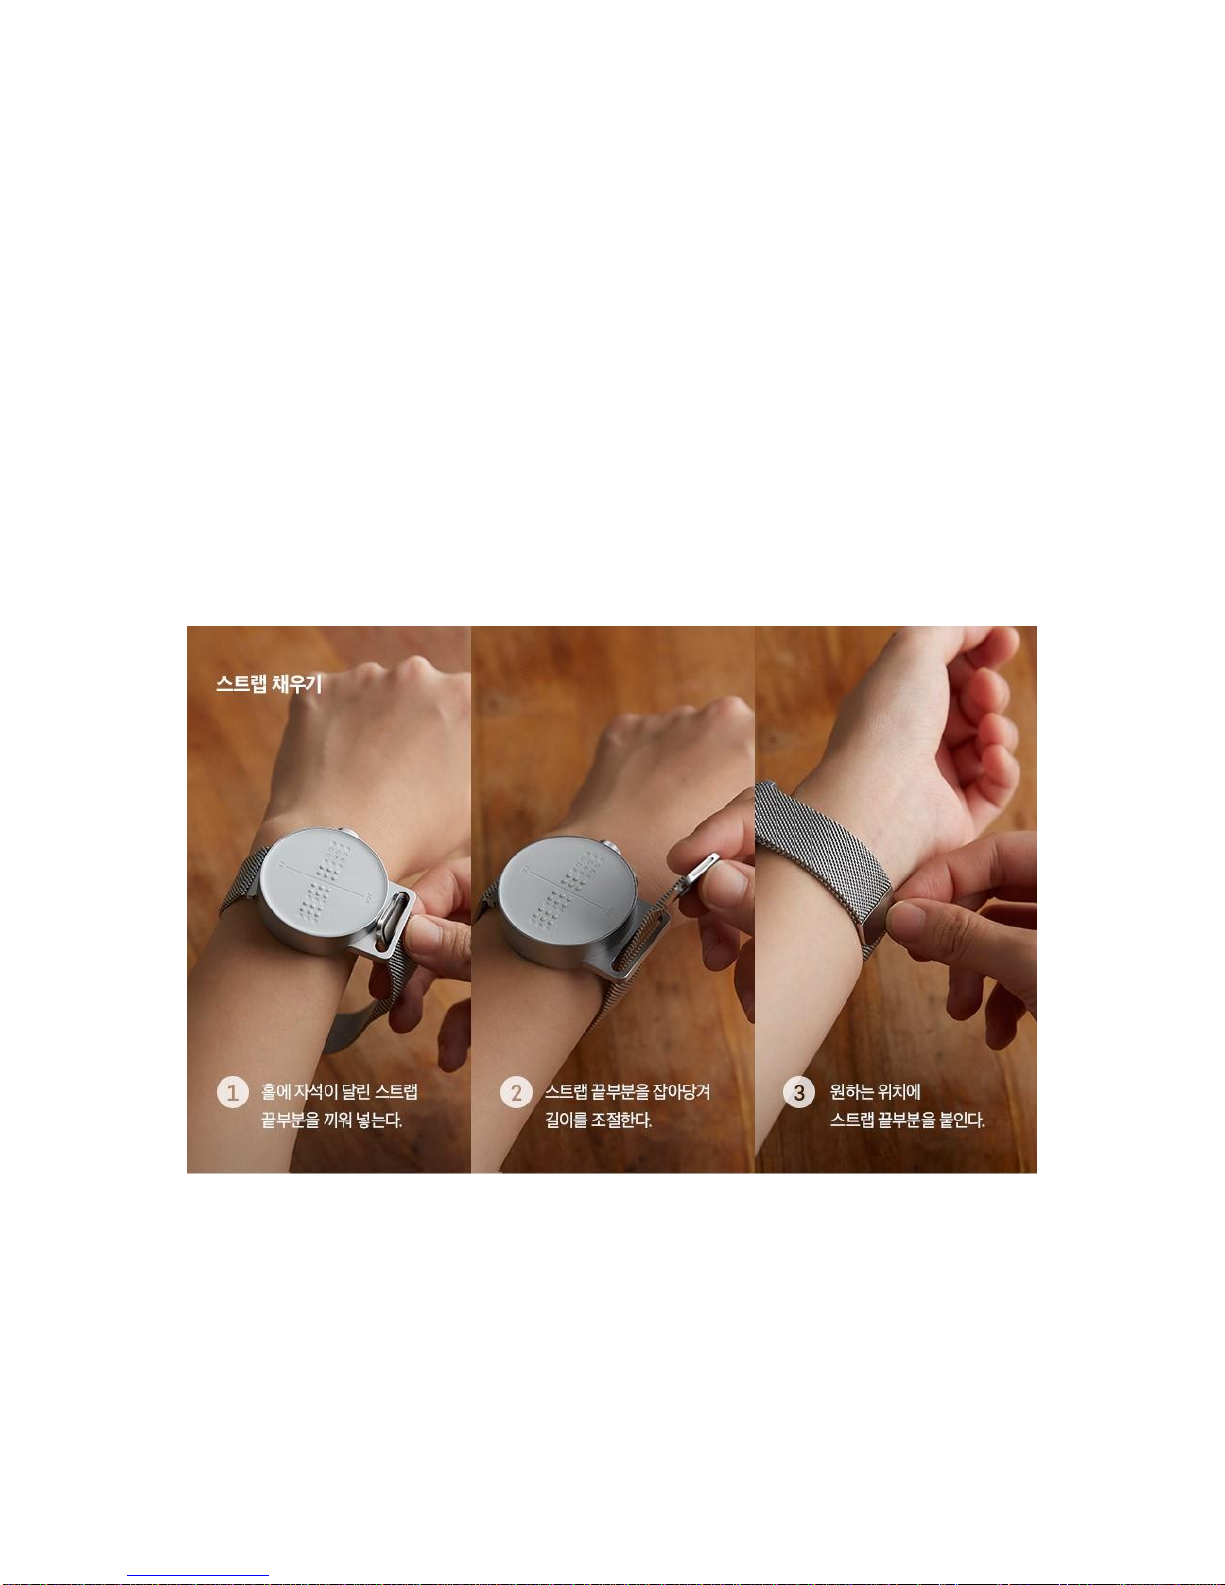
2. Wearing the Dot Watch……………………………………4p
3. Using the Dot Watch……………………………………5p
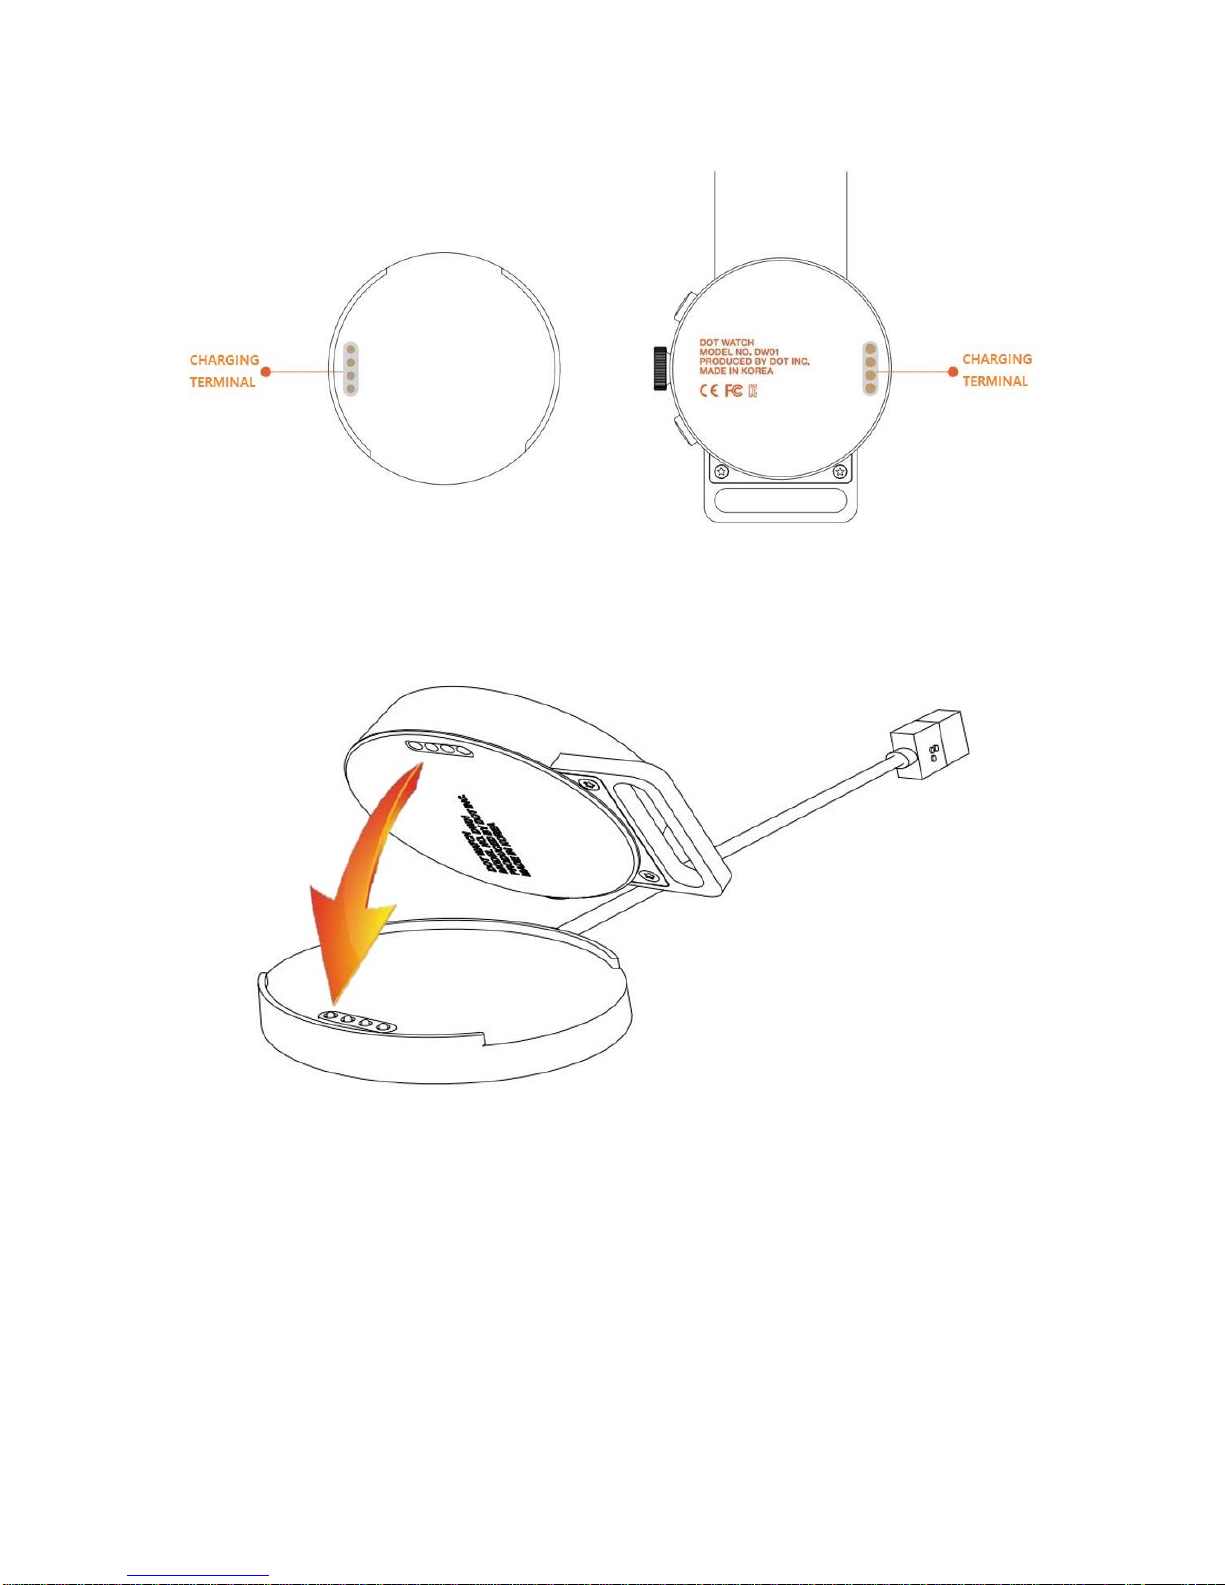
-Turn On/Off, Charging the Battery, Checking the Battery Status, Sleep Mode, Reverse Screen Mode
4. Using the Dot Watch –App Installation and Bluetooth Pairing……………………………………
7p
-Downloading the Dot Watch App, Pairing via Bluetooth, Unpairing the Bluetooth Connection, Connecting
the Dot Watch to a New Smartphone
5. Dot Watch App……………………………………8p
-Register, Log-in, Resetting your Password, Dot Watch User Tutorial
-Dot Watch App Functions –Hi! User, Dot Watch, Functions, Settings, Help
6. Dot Watch Functions –Braille Mode, Tactile Mode
6-1) Common Functions……………………………………12p
-Learning Braille, Finding My Smartphone, Remaining Battery Indicator, Battery Warnings, Reading
Notifications, Methods of Reading Notifications, Saving Notifications onto the Dot Watch App,
Checking Saved Notification Messages, Alarm Function, Resetting the Dot Watch
6-2) Braille Mode……………………………………15p
-Time, Date, Setting the Time Manually, Setting the Date Manually, Receiving Phone Calls, Stopwatch,
Timer, Bluetooth Connection Status Menu
6-3) Tactile Mode……………………………………18p
-Switching to Tactile Mode, Time, Setting the Time Manually, Receiving Phone Calls Stopwatch,
5 Minute Timer, Bluetooth Connection Status Menu
7. Precautions……………………………………22p
7-1) Safety Precautions
7-2) Handling Precautions
8. Dot Watch Specifications……………………………………26p
9. Regulatory Notices……………………………………27p

2
Be sure to read this manual thoroughly before using your Dot Watch!
As the Dot cells are entirely of a different nature, it does require a certain level of a learning curve to
grow comfortable with using the Dot Watch.
- The user input (e.g. pressing the buttons) and the actual user reading should be offset by about one
second.
- Please note that, there can't be any pressure and/or blocked cells by fingers and/or foreign objects
by the time the pins are trying to display, following input command.
- The user is responsible for understanding the above information, as incorrect displaying due to user
error does not equate to a defective device.
- If your device unpairs from your smartphone due to any reasons (proximity, obstacles, powering
off/on, etc.), refer to the steps in “Bluetooth Connection Status Menu” section to resume connection
trials.
- To pair the Dot Watch with a new smartphone, the Bluetooth information stored in both the previous
smartphone and the Dot Watch needs to be reset. Refer to the steps in “Connecting the Dot Watch to
a New Smartphone” section to pair with the new smartphone.
This User's Guide is based on the default settings of the device. The contents of this manual may
differ from the actual experience depending on the software version of the device, telecommunication
service, model specifications, and the user's settings. The device is not supported on Tablet PCs such
as iPad or Galaxy Tab.
1. Before Using Your Dot Watch
Dot Watch is a smart watch that connects to the user's smartphone via Dot Watch App and outputs all
information in braille. Although Dot Watch can be operated as a standalone analog watch, the Dot
Watch App and BLE (Bluetooth Low Energy) connection is recommended. iOS 9 or its later versions
and Android 4.4.4 or a later version is required to run the Dot WatchApp.
With the Dot Watch you can:
1) Check the time and date
2) Use the stopwatch
3) Use the timer
4) Check the notification messages on your smartphone
5) Save and store important notification messages in your Dot Watch App
6) Locate your smartphone
7) Set the alarm using the Dot Watch App
8) Use all the features that the Dot Watch App provides, and even learn the Braille
9) Count the number of pins to tell the time by using the “Tactile Mode”

3
[Basic Components]
- Dot Watch
- Magnetic Charging Cradle (charger)
- Braille Quick User Guide
- Warranty Card
* If you have any missing basic components, please contact the store where your purchase was made.
* Visit the official Dot Website (www.dotincorp.com) for purchasing optional devices that are not supplied
as basic components.
[Name and Function of Parts]
The body of Dot Watch is round in shape. The front of the body is called “Dot Watch Screen”. There
are total 4 dot cells on the screen; a vertical line at center divides the 2 cells on the left, and the other
2 on the right. Each cell represents one character; therefore, up to 4 characters can be displayed at a
time. Below the cells are left and right “Touch Sensors”. The “Dot Crown” is located on the right of the
center of the body. The "Select Button" is located above Dot Crown, and the "Home Button" is located
below Dot Crown.
Figure 1. above highlights both of the buttons, Dot Crown and the Touch Sensor locations.

4
-Select Button: Press once to enter or operate each function.
-Home Button: Press once to go to “Standby” status. Press and hold the button for 3
seconds to turn the power on or off.
-Dot Crown: Turn upwards or downwards to navigate between functions.
-Touch Sensor: Press the Touch Sensor under the cells to scroll back and forth (left and
right) through the braille while reading notifications.
.
2. Wearing the Dot Watch
Put the band around your wrist, and adjust it by pulling it to a comfortable level. If the band slips out
from the metal loop, put the magnetic end of the band through the loop and adjust to fit. Be warned
that pulling the band excessively may separate the band from the watch and/or cause damage to the
band itself.
Figure 2 above illustrates how to wear the Dot Watch

5
3. Using the Dot Watch
[Turning On]
Press and hold the “Home Button" for 3 seconds to turn on the device. The device will vibrate, and all
the braille cells will come up for 3 seconds, and then go down.
[Turning Off]
Press and hold the “Home Button” for 3 seconds while powered on. The device will turn off after a
vibration.
[Charging the Battery]
The battery should be fully charged before using the device for the first time. Charge the battery using
the magnetic charging cradle (charger) supplied with the device for optimal charging. Personal
computer or USB adapter can also be used to charge the battery.
1) Check the position of the metallic charging terminal on the back of the device and on the
charger. This is outlined by a small indention on the back panel of the Dot Watch.
2) Face the charging terminal of the charger exactly to the charging terminal of the device,
this protrudes from the flat cradle face slightly.
- The charger has a built-in magnet that assists with the positioning of the device when
attempting to charge.
3) Connect the charger to an applicable USB terminal. Unless fully discharged, the device will
vibrate when start charging.
4) When you connect the device with the charger, the device will vibrate and display “chrg”
[dots 1,4/ dots 1,2,5/ dots 1,2,3,5/ dots 1,2,4,5] (⠉⠓⠗⠛) on the screen. Once the battery is
fully charged, the device will vibrate twice and display to show the battery is full (⠿⠿⠿⠿).
5) In the case of the magnetic mesh band, the charger and the band may stick to each
other, and may prevent proper charging. Check for alerts (vibration and cell movements)
when start charging.

6
Figure 3. above illustrates the charging terminals
Figure 4. above illustrates connecting the charging terminal of the Dot Watch to the charging cradle
[Checking the Battery Status]
(While charging) Removing the device from the charger will display its remaining battery status.
(While on “Standby”) Turn the Dot Crown upwards once to display the remaining battery status.

7
[Sleep Mode]
If there is no operation or input for a user-specified “Standby Time”, all cells are automatically kept
inside the display as the device enters “Sleep Mode”, which optimizes battery life.
While in “Sleep Mode”, Dot Crown operation is deactivated. To re-activate, press either buttons. The
watch automatically re-activates when a buttons is pressed, receives alarms, notifications, or
warnings.
The default “Standby Time” is set to 30 seconds.
[Reverse Screen Mode]
Dot Watch offers the Reverse Screen Mode for your convenience.
Press the buttons in the following order to switch between the “Standard” and the “Reverse Screen
Mode”:
Press the “Home Button” twice – “Select Button” twice – “Home Button” twice – “Select Button” twice –
then press and hold the “Select Button”.
* Note that the left and right side of the “Touch Sensor” is reversed, however, the function or the
direction of the “Select / Home Buttons” and the “Dot Crown” will remain the same.
4. Using the Dot Watch –App Installation and Bluetooth Pairing
[Downloading the Dot Watch App]
You can install our Dot Watch App on your smartphone by searching “Dot Watch” on iOS App Store or
Google Play Store. You can use the Dot Watch as a standalone watch without having it paired with
your smartphone; however, pairing the Dot Watch via Dot Watch App and BLE is recommended to
fully enjoy all the functions and features.
[Pairing via Bluetooth]
1) Turn on the Bluetooth in your smartphone settings. Then, press and hold the “Home
Button” of the Dot Watch to turn it on.
2) Run the Dot Watch App, choose “Start Pairing”, and search for the device under “Select
your Dot Watch”. “Dot Watch DW-01,” and the last 4 digits of the product serial number will
appear on the list, and selecting it will pair your Dot Watch to your smartphone.
3) Once connected, the device will display the braille output as described below:
Braille Mode: “conn” [dots 1,4/ dots 1,3,5/ dots 1,3,4,5/ dots 1,3,4,5] (⠉⠕⠝⠝)/ Tactile Mode:

8
(⠗⠒⠒⠺)
4) Even if the Bluetooth connection may be disconnected, the time and date will still be
displayed on the device as synchronized with the smartphone.
*Repeat the procedures above if the connection fails. If the problem persists, please contact us
through the official Dot Website at www.dotincorp.com for assistance.
[Unpairing the Bluetooth Connection]
From the Dot Watch App on your smartphone, go to “Dot Watch”. Choose “Unpair”, and select “Yes” to
proceed to unpairing. “Unpairing” automatically deletes the Dot Watch information on your App, and
resets your Dot Watch.
* Note that “Unpairing” is not advised unless attempting to connect the device to a new smartphone or
replacing your Dot Watch.
* If your device unpairs from your smartphone due to any reasons (proximity, obstacles, powering
off/on, etc.), refer to the steps in “Bluetooth Connection Status Menu” section to resume connection
trials.
[Connecting the Dot Watch to a New Smartphone]
To pair the Dot Watch with a new smartphone, the Bluetooth information stored in both the previous
smartphone and the Dot Watch needs to be reset. If you have paired your Dot Watch with a
smartphone before, follow the steps below to reset and pair with a new one.
1) From the Dot Watch App –Dot Watch –choose “Unpair” to disconnect the Dot Watch
from your smartphone. Here, both the Dot Watch and the Dot Watch information stored
in your smartphone will reset.
2) To manually reset your Dot Watch, turn the “Dot Crown” upwards (clockwise) twice to
navigate to the “Bluetooth Connection Status Menu”. Here, press and hold the “Home
Button” for more than three seconds to reset your Dot Watch.
3) Once the Dot Watch is reset, it is ready to pair with another smartphone.
5. Dot Watch App
[Register]

9
After installing the Dot Watch App through the App Store (iOS) or Play Store (Android), register your
account to fully enjoy the complete Dot Watch experience. Please register with correct information for
us to verify your order information, and to provide quality customer support.
[Log-in]
You can use the Dot Watch App after logging in with your account. Please note that it is a one-time
log-in, and you can also log-in with either your Facebook or Google account.
[Resetting Your Password]
If you have forgotten your password, choose “Forgot password?” at the bottom of the screen. Enter
your e-mail address and choose “Next” to continue. An instructional e-mail will be sent to your e-mail
address. Please follow the steps to reset your password.
[Dot Watch User Tutorial –Basic]
The Dot Watch Tutorial is available to assist the first time users to locate the braille cells, and to make
it easy to understand how the "Select / Home Buttons", the "Dot Crown" and the "Touch Sensors"
work.
Once the Dot Watch is paired with your smartphone, the tutorial begins, starting with “Checking the
Braille Cells of the Dot Watch”.
1) Checking the Display
Check the position and the height of the braille cells. Press the “Raise the Pins” and
“Drop the Pins” buttons on your Dot Watch App to raise and lower the braille cells on the
Dot Watch Screen. When you have finished checking the braille cells, press “Next” to
learn how to use the buttons.
2) Using the Buttons
Go through the guide carefully to learn the functions of the “Select Button”, and the
“Home Button”. Each time you press the “Select Button”, you will notice the display
changes from the current time (hour and minutes) to the seconds, and to the current date.
Press “Next” to move to learn how to use the “Dot Crown”.
3) Using the Dot Crown
Each time you turn the “Dot Crown” up or downwards, you will notice the braille display
changes with vibration to notify. Press “Next” to learn how to use the “Touch Sensors”.
4) Using the Touch Sensors
Try reading the numbers displayed on the screen, while navigating between the numbers

10
using the “Touch Sensors”. Press the right “Touch Sensor” to see the next contents of
the message, and the left “Touch Sensor” to see the previous contents. Press “Next” to
start using the Dot Watch.
NOTE
-Pressing the left “Touch Sensor” at the beginning of the message, or pressing the
right “Touch Sensor” at the end of the message will produce vibration to notify that
it is either the beginning or the end of the message.
-The “Touch Sensors” are programmed not to work while the pins are still in the
movement; therefore, pressing the “Touch Sensors” repetitively while the pins are still
moving may cause the sensors not to fully respond. In this case, give it about one
second, and scroll with the “Touch Sensors” again.
[Dot Watch User Tutorial –Advanced]
The Auto-Scroll is the feature that allows the braille display to be automatically refreshed without
having to use the “Touch Sensors”. This feature is recommended for advanced users who are familiar
with using the Dot Watch. Customize the settings to create your own, distinctive Dot Watch
Experience.
1) Auto-Scroll Speed
Set the movement speed of auto-scrolled cells
2) Number of Cell(s) Scrolled
Set the number of cell(s) automatically refreshed at a time
Select “1” to move and refresh the braille per 1 cell.
Select “4” to move and refresh the braille per 4 cells.
3) Refresh Rate
Set the refresh rate of pin display output
This is a function that readjust the braille output that has not correctly displayed. If set to 0,
the braille display receives one signal to raise or drop the pin. Likewise, setting it to 1 or 2 will
receive additional one or two more signals to raise or drop the pin.
* Increasing the “Number of Pin Repetitions” may consume more battery.
Lastly, press the “Confirm” button located on the bottom right to save and apply the changes.
You can come back to this Tutorial again at any time from the “Support” on the Dot Watch App
[Dot Watch App Functions]

11
1. Hi! User
Here, you can view or change your user account information.
You can change your username and password, or log-out.
2. Dot Watch
You can check your Dot Watch’s product serial number and its current battery status, or “Unpair” with
your smartphone.
Note that “Unpairing” resets both the Dot Watch and its information stored on your smartphone.
3. Functions
You can use the “Alarm”, “Saved Message”, and “Study Braille” functions.
[Alarm] You can set up to 2 alarms at a time.
[Saved Messages] You can save and easily access the message here by pressing and holding the
“Select Button” while reading the message on your Dot Watch.
[Study Braille] You can type any texts on your smartphone to display in Braille on your Dot Watch.
4. Settings
You can either check your Dot Watch information or change the settings here.
[About Dot] You can check your specific device details: i.e. “Dot Device Type”, “Firmware Version”,
“Protocol Version”, and “Serial No.”.
[Watch Modes] You can choose and switch between the “Braille Mode”and the “Tactile Mode”. The
“Tactile Mode”is our unique braille representation for people who are not familiar with the standard
formats of braille.
[Notification] you can specifically set which notifications to be received and displayed on your Dot
Watch. Make sure that your desired applications are checked to receive the notifications on your Dot
Watch.
(iOS) You can choose to either turn on or off all notifications from messages, phone calls, and other
applications.
(Android) You can choose to turn on or off each and every applications available (phone calls,
messages, and mobile applications).
[Firmware Update] You can check the current firmware version, and update to its latest version.
Once a new firmware version is available, a notification window will pop up to notify when opening the
Dot Watch App. The firmware update is not possible if the device is not paired with your smartphone
via the Dot Watch App. Please check and maintain your mobile network connection when updating.
After an update, reconnect the device with your smartphone.
[Languages] You can choose the language of the braille and its grades. The device supports up to

12
two different languages at a time, and each language’s grade (if supported) can also be selected.
[Display Output] You can change the “Auto-scroll Speed”, “Vibration Intensity”, “Standby Time”,
“Number of Pin Repetitions”, “Refresh Rate” and “Number of Cell(s) Auto-scrolled”.
-Auto-Scroll Speed to set the movement speed of auto-scrolled cells
-Vibration Intensity to set the intensity of vibrations that occur
-Standby Time to set the user-specified time before entering the “Sleep Mode”. You can
set from a minimum of 5 seconds to a maximum of unlimited Standby Time.
-Refresh Rate and Number of Cell(s) Scrolled to customize reading to user’s preference.
5. Help
Here, you can “Contact Us”to find out more about the Dot Watch, read the “User Guide”, or run the
“Tutorial”.
In addition, you can read more about our Terms of Service, Privacy Policy, and Open Source Licenses.
6. Dot Watch Functions –Braille Mode, Tactile Mode
6-1) Common Functions
[Learning Braille]
From the Dot Watch App - Functions –Study Braille, you can type any message on your smartphone
to display it in braille on the device. Try this method of learning the Braille with the Dot Watch.
[Finding My Smartphone]
While the device is paired with your smartphone, you can call up the smartphone by pressing both the
“Select Button” and the “Home Button” twice at the same time in quick succession. The smartphone
will vibrate with alarming sound. Use this function to easily locate your smartphone.
[Remaining Battery Indicator]
From “Standby” status, turn the Dot Crown upward once to check the remaining battery. The
remaining battery is displayed with the numbers of pin raised on the screen. For example, if all 24
braille pins are raised, it means the battery is fully charged. If half of the total pins are raised, it means
the battery is at 50%. The bottom row is always displayed to let you know the base of the remaining

13
battery level.
E.g.) 100%: (⠿⠿⠿⠿), 50%: (⠿⠿⠤⠤)
[Battery Warnings]
Once the remaining battery level is down to 20% and 10%, the device will vibrate 3 times and displays
its battery status. Battery charging is recommended at this time.
[Reading Notifications]
With the Dot Watch, you can check the content of text messages, application notifications, social
media notifications, and etc., as well as its sender, and the time of receipt.
1) Upon receiving a notification, the device briefly vibrates twice.
2) Press the “Select Button” to begin reading the notification - in the order of the application name,
sender information, contents, and timestamp.
[Methods of Reading the Notifications]
There are two ways of reading the notifications.
1) Touch-Assisted Scroll Mode
-Press the right “Touch Sensor”once to display the next 4 characters of the message. Press
the left “Touch Sensor” to read the previous 4 characters. When at the end of the message,
vibration will occur to notify that it is the end of the message. Here, press the “Select Button”
to go back to the beginning of the message.
-Note that the “Touch Sensors” are programmed not to work while the pins are still in the
movement; therefore, pressing the “Touch Sensors” repetitively while the pins are still moving
may cause the sensors not to fully respond. In this case, give it about one second, and scroll
again.
2) Auto Scroll Mode (Advanced Option)
-Auto Scroll is a way to read the notification without having to use the “Touch Sensor”. Press
the “Select Button” while reading the notification to begin auto-scrolling. Press the “Select
Button” once more to go back to the “Touch-Assisted Scroll Mode”.
◼Adjusting the number of moving cells and output speed
You can use the Auto Scroll in a variety of ways depending on your reading skill.

14
From the Dot Watch App –Settings –Display Output –Auto-scroll Speed, you can
customize the speed of the auto scrolling. Also, you can choose between whether to
refresh 1 character or 4 characters of the message at a time, under “the Number of
Cell(s) Auto-scrolled”.
◼Going back to the beginning of the message
When at the end of the message, vibration will occur to notify that it is the end of the
message. Here, press the “Select Button” to go back to the beginning of the message.
[Saving Notifications on the Dot Watch App]
While reading the notification, if you feel a need to save the message, press and hold the “Select
Button” to save. You can check your saved messages through the Dot Watch App, under Functions –
Saved Message.
[Checking Saved Notification Messages]
Up to 100 smartphone notification messages can be stored in the device. Notification messages are
displayed in the following order: name of the app, sender information, notification content, and
timestamp. If no notifications are found, “none” [dots 1,3,4,5/ dots 1,3,5/ dots 1,3,4/ dots 1,5] (⠝⠕⠝⠑)
is displayed.
1) From the “Standby” status, turn the Dot Crown downward once to browse notification
messages –“noti” [dots 1,3,4,5/ dots 1,3,5/ dots 2,3,4,5/ dots 2,4] (⠝⠕⠞⠊) will appear on the
display.
2) Press the “Select Button” and turn the “Dot Crown”to check the notification numbers in the
latest received order.
3) Press the “Select Button" to view the message.
4) While reading the notification, turn the “Dot Crown” up or downwards to access next or
previous notification message.
[Alarm Function]
From the Dot WatchApp - Functions - Alarm, you can set up to 2 alarms at a time.
The device will vibrate and the alarm number will be displayed as it goes off.
[Braille Mode] the alarm number is shown in braille.
[Tactile Mode] the first alarm is indicated as (⠯⠽⠀⠈)and the second alarm is indicated as
(⠯⠽⠀⠠).

15
[Resetting the Dot Watch]
From the “Standby” status on your Dot Watch, turn the Dot Crown upwards twice to navigate to the
Bluetooth Connection Status Menu. Press and hold the "Home Button" to reset all the Dot Watch
settings.
6-2) Braille Mode
[Time]
The time of your smartphone is automatically synchronized to your Dot Watch when paired. The time
function continues to operate even after the connection to the smartphone is lost. By default, the time
is displayed in 24 hours.
While at “Standby” status, press the “Select Button" once to display the time. The left two cells
indicate the hours and the right two cells indicate the minutes. Press the “Select Button" once more to
check the seconds.
To switch the time displaying in 24 hours to 12 hours, press and hold the “Select Button” while viewing
the time (hours and minutes). Press the “Select Button” to check the current second and AM or PM.
Here, the left two cells indicates the seconds, and the right two cells tell “am” [dot 1, dots 1,3,4] (⠁⠍)
or “pm” [dots 1,2,3,4, dots 1,3,4] (⠏⠍).
[Date]
The date of your smartphone is automatically synchronized to your Dot Watch when paired. The date
function continues to operate even after the connection to the smartphone is lost.
While at “Standby” status, press the “Select Button" three times to display the current date. The left
two cells reads the months, the right two cells reads the date. Pressing and holding the “Select
Button” while viewing he date will switch the order of the months and date –from MMDD to DDMM.
[Setting the Time Manually]
You can also use all the basic watch functions while the Dot Watch is unpaired.
1) Press and hold both the “Select Button” and the “Home Button” at the same time to set the
time manually –“set”[dots 2,3,4/ dots 1,5/ dots 2,3,4,5] (⠎⠑⠞) will appear on the screen.
2) Press the “Select Button” to set the first cell (the first digit of hours in 24, which is 0~2).
Turn Dot Crown to adjust. Once set, press the “Select Button” to move on to the second cell
(the second digit of hours in 24, which is 0~9). Respectively, set the third cell (the first digit of
minutes in 59, which is 0~5), and the fourth cell (the second digit of minutes in 59, which is
0~9).

16
3) After setting the hours and minutes, press the “Select Button" and repeat the above
procedures to set the seconds on the third and fourth cells: third cell (the first digit of seconds
in 59, which is 0~5), and the fourth cell (the second digit of seconds in 59, which is 0~9).
4) Upon setting the seconds, press the “Select Button”, it will vibrate to signal completion of
the time setting.
[Setting the Date Manually]
1) Press and hold both the “Select Button” and the “Home Button” at the same time to set the
time manually –“set”[dots 2,3,4/ dots 1,5/ dots 2,3,4,5] (⠎⠑⠞) will appear on the screen.
2) Press and hold the “Select Button” to move onto the date setting. The year of the default
date will appear as “2017” [dots 1,2/ dots 2,4,5/ dot 1/ dots 1,2,4,5] (⠃⠚⠁⠛)
3) Turn the Dot Crown up (+1 year) or down (-1 year) to set the year, then press the “Select
Button" to move on to set the month and date.
4) Set the first cell (the first digit of months in 12, which is 0~1). Turn Dot Crown to adjust.
Once set, press the “Select Button” to move on to the second cell (the second digit of months
in 12, which is 0~9). Respectively, set the third cell (the first digit of date in 31, which is 0~3),
and the fourth cell (the second digit of date in 31, which is 0~9).
5) Upon setting the last cell, press the “Select Button”. The device vibrates, and date setting
(month and date) is completed.
[Receiving Phone Calls]
While the device is paired with your smartphone, you can be notified of incoming calls on its braille
display. Upon receiving a call, the device will vibrate repeatedly and “call” [dots 1,4/ dot 1/ dots 1,2,3/
dots 1,2,3] (⠉⠁⠇⠇) appears.
Press the “Home Button” to reject the call immediately, or press the “Select Button” to check the caller
information. If the contact is saved on the smartphone, you can check the caller's name in Braille. If
the contact is not saved, you can check the number in Braille. Use the “Touch Sensor” to view the
caller information.
While checking the caller information, press the “Home Button” to reject the call, or press the “Select
Button” to answer. Please note that the Dot Watch does not have a microphone! You will need your
smartphone to carry out the call after receiving it.
(iOS) While checking the caller information, press the "Select Button" to receive the call, or press the
"Home Button" to reject the call. Receiving or declining a call will take the device back to its “Standby”
status.
(Android) Depending on your smartphone, reception and rejection functions may be restricted.

17
[Stopwatch] (from 1 second to maximum 23hours 59 minutes)
Follow the guideline below to use the Stopwatch function. The stopwatch will still run in the
background when left un-paused. The four cells will display minutes and seconds up to 59 minutes
and 59 seconds. From 1 hour and on, the four cells will display only the hours and minutes up to 23
hours and 59 minutes.
1) From the “Standby” status, turn the Dot Crown downward twice to access the stopwatch
function –“stop”[dots 2,3,4/ dots 2,3,4,5/ dots 1,3,5/ dots 1,2,3,4] (⠎⠞⠕⠏) will appear on the
screen.
2) Press the “Select Button” to enter the stopwatch –“0000”[dots 2,4,5/ dots 2,4,5/ dots 2,4,5/
dots 2,4,5] (⠚⠚⠚⠚) will appear on the screen.
3) Press the “Select Button” to start/pause/resume the stopwatch.
4) Press and hold the “Select Button” to reset – “0000” [dots 2,4,5/ dots 2,4,5/ dots 2,4,5/ dots
2,4,5] (⠚⠚⠚⠚) will appear on the screen.
5) After 23 hours and 59 minutes, a new cycle begins from 0 seconds.
[Timer]
Follow the guideline below to use the Timer function (the count limit is 59 minutes and 59 seconds).
The timer will still run in the background when left un-paused.
1) From the “Standby” status, turn the Dot Crown downward 3 times to browse the timer
function –“timr”[dots 2,3,4,5/ dots 2,4/ dots 1,3,4/ dots 1,2,3,5] (⠞⠊⠍⠗) will appear on the
screen.
2) Press the “Select Button” to enter the timer. Here, the left two cells are indicate the minutes,
and the right two cells indicate the seconds. Turn the Dot Crown to set the digit, and press the
“Select Button” to move onto the next cell. After settings the seconds, press the “Select
Button” to start the countdown.
4) While counting down, press the “Select Button” to pause. Press it again to resume.
5) When the countdown is completed, timeout “tout”[dots 2,3,4,5/ dots 1,3,5/ dots 1,3,6/ dots
2,3,4,5] (⠞⠕⠥⠞) will appear with vibrations to notify. Press the “Home Button” to dismiss the
timer notification, or it will be dismissed automatically after 5 minutes.
[Bluetooth Connection Status Menu]
Follow the guideline below to check the Bluetooth pairing status or resume Bluetooth connection trials.
1) Turn the Dot Crown upwards twice to display the Bluetooth Connection Status Menu.
If connected, “conn” is displayed [dots 1,4/ dots 1,3,5/ dots 1,3,4,5/ dots 1,3,4,5] (⠉⠕⠝⠝)

18
If disconnected, “disc” is displayed [dots 1,4,5/ dots 2,4/ dots 2,3,4/ dots 1,4] (⠙⠊⠎⠉)
2) If there hasn’t been any Bluetooth connection activities for 36 minutes, the Dot Watch stops
the Bluetooth signaling to optimize the battery life.
3) If your device unpairs from your smartphone due to any reasons (proximity, obstacles,
powering off/on, etc.), follow the steps below to resume connection trials.
- Run the Dot Watch App on your smart phone
- Press the “Select Button” while on the Bluetooth Connection Status Menu to resume
connection trials.
6-3) Tactile Mode
- Bluetooth ⠗⠒⠒⠺ / ⠇⠀⠀⠸
- Battery Check ⠿⠿⠤⠤
- Time (e.g. 03:40) ⠋⠀⠿⠉
- Notification⠸⠢⠔⠇
- Stop watch ⠀⠸⠇⠀
- Timer ⠯⠭⠀⠀ / ⠀⠀⠭⠽
Tactile mode is a feature that allows users who are not familiar with the Braille to use the Dot Watch.
[Switching to Tactile Mode]
Anyone not familiar with Braille can still use all the basic watch functions with Tactile Mode.
(Switching via the Dot Watch App) From the Dot Watch App –Settings –Watch Modes, you can
change between the Braille Mode and the Tactile Mode.
(Switching without using the App) Press the “Home Button” - “Select Button” - “Home Button” - press
and hold “Select Button” to shift into Tactile Mode. The device will vibrate and notify that the mode is
changed. You can switch back to its default, Braille Mode by repeating the above command.

19
While in Tactile Mode, the pins are always raised to display the time (unless the “Home Button” is
pressed to go to “Standby”).
[Time]
The time of your smartphone is automatically synchronized to your Dot Watch when paired. The time
function continues to operate even after the connection to the smartphone is lost.
1) Press the “Select Button” to check the time. The left two cells indicate the hours, and the
right two cells indicate the minutes.
2) The number of pins on the left two cells indicate the hour. 3 pins tell 3 o'clock E.g.) 03:42
(⠋⠀⠿⠉)
3) Each pin on the right two cells indicates 5-minute intervals of the hour. 8 pins tell minutes
between 40~44 minutes. E.g.) 03:42 (⠋⠀⠿⠉)
4) Press the “Select Button” one more time to check the exact minutes. The left two cells here
display the minutes in tens, while the right two cells display minutes in ones. E.g.) 42 minutes:
(⠛⠀⠉⠀)
[Setting the Time Manually]
1) Press and hold both the “Select Button” and the “Home Button” at the same time to set the
time manually –(⠯⠭⠭⠽)will appear on the screen. Press the “Select Button” to set the left
two cells (hours).
2) Turn the Dot Crown to set the hours between 0~12, press the “Select Button” to move on to
set the minutes.
3) Set the first cell (minutes in tens, between 0~5), press the “Select Button” to set the third
and fourth cells (minutes in ones, 0~9).
4) Press the “Select Button” to complete. A vibration will notify that the time is set.
[Receiving Phone Calls]
While the device is paired with your smartphone, you can be notified of incoming calls on its braille
display. Upon receiving a call, the device will vibrate repeatedly and the dots in the middle lane is
raised. The dot 4 of the 4th cell pointing the “Select Button”, and the dot 6 of the 4th cell pointing the
“Home Button” are raised and dropped alternately (⠒⠒⠒⠪). “call” [dots 1,4/ dot 1/ dots 1,2,3/ dots
1,2,3] (⠉⠁⠇⠇) appears.
Press the “Home Button” to reject the call immediately, or press the “Select Button” to check the caller
information. If the contact is saved on the smartphone, you can check the caller's name in Braille. If
Table of contents