Dr. Brown's BF100 User manual


Questions? Please visit www.drbrownsbaby.com/contact/ or call 1-800-778-9001
3
Table of Contents
1. Important Safeguards
2. Product Description
3. Getting Started
4. Product Assembly
5. Power Adaptor
6. Operating the Pump
7. Storing Breastmilk
8. Preparing and Feeding Breastmilk
9. Technical Data
10. Troubleshooting
11. Important Symbols
12. Warranty

1.Important Safeguards
READ ALL INSTRUCTIONS BEFORE USING THIS PRODUCT.
PLEASE SAVE THESE INSTRUCTIONS.
WARNING: Read this ENTIRE “Instructions For Use” manual to become
familiar with the features of the product before operating. Failure to operate
the product correctly can result in damage to the product, personal property
and cause serious injury. Failure to operate this Product in a safe and
responsible manner could result in injury or damage to the product or other
property. This product is not intended for use by children. Do not attempt
disassembly or use with incompatible components. This manual contains
instructions for safety, operation and maintenance. It is essential to readand
follow all the instructions and warnings in the manual, prior setup or use, in
order to operate correctly and avoid damage or serious injury.
DANGER: To reduce the risk of electrocution:
• Always unplug electrical product immediately after use.
• Do not use while bathing.
• Do not place or store product where it can fall or be pulled into a tub orsink.
• Do not place or drop into water or other liquid.
• Do not reach for a product if it has fallen into water. Immediately unplug
from electrical outlet.
WARNING: To avoid fire, electrocution, or injury:
• Danger of electrocution! Keep the device dry! Never immerse in water or
other liquids! Do not run water over the pump.
• The breast pump and accessories are not heat-resistant: keep away from
radiators, open flame and sunlight.
• Keep the power adaptor away from heated surfaces.
• Do not reach for any electrical device if it has fallen into water.Unplug
immediately.
• Do not use outdoors, or operate where aerosol (spray) products arebeing
used or where oxygen is being administered.
4

• The breast pump should never be left unattended when plugged intoa
power source.
• Never operate an electrical device if it has a damaged cord, plug orbattery
pack, if it is not working properly, if it has been dropped or damaged, or
dropped into water. If damage is found, immediately discontinue use of
power adaptor or battery pack and call Dr. Brown’s Customer Service at 1-
800-778-9001.
• Do not use the breast pump while bathing or showering.
• Close supervision is necessary when the breast pump is used in the vicinity of
children.
• Follow the exact order of the steps in powering breast pump as listedon
page 15 of this instructions for use.
• Only use the power adaptor supplied with the breast pump.
• The power adapter supplied with this unit is polarized (one prong islarger
than the other). Always connect to a polarized outlet.
• Do not modify the polarized plug to fit into a non-polarized outlet.
• Make sure the voltage of the power adaptor is compatible with the power
source.
• Do not use force to push the battery into the battery compartment.
CAUTION: To avoid risk of minor injury:
• Wash hands thoroughly with soap and water before touching breast pump,
kit and breasts and avoid touching the inside of containers orlids.
• Separate and wash all parts that come in contact with breastmilk
immediately after use to avoid dry up of breastmilk residue and prevent
growth of bacteria. Always inspect breast flanges, connectors, valves,
membranes and tubing prior to use for cleanliness.
• Only use drinking-quality tap or bottled water for cleaning your breast pump
and parts.
Questions? Please visit www.drbrownsbaby.com/contact/ or call 1-800-778-9001 5

• Repairs must be performed only by an authorized service agency. Do not
repair yourself! Do not modify this device or accessories.
• Never use a damaged device. Replace damaged or worn parts.
• Use the breast pump only for its intended use as described in this manual.
• Do not use the breast pump while sleeping or overly drowsy.
• This is a single user product. Use by more than one person may present a
health risk.
• Do not drive while pumping.
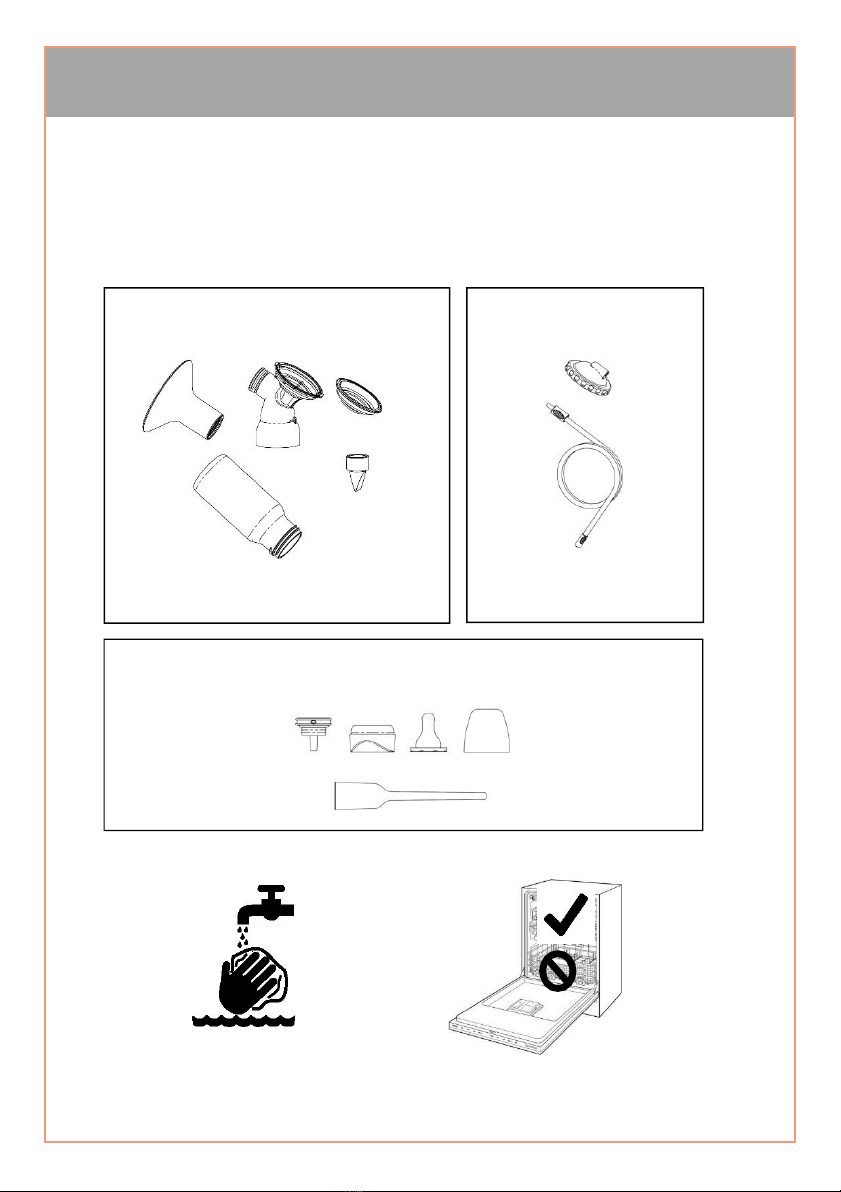
• Inspect all appropriate pump components before each use.
• The power adapter supplied with this unit is polarized (one prong is larger
than the other). Always connect to a polarized outlet.
• Do not thaw frozen breastmilk in a microwave or in a pan of boiling water.
• If tubing becomes moldy, discontinue use and replace tubing.
• Never use while pregnant, as pumping can induce labor.
• Clean and sanitize all parts that come into contact with your breast and
breastmilk prior to first use.
• Wash all parts that come into contact with your breast and breastmilk after
every use.
• If you are a mother who is infected with Hepatitis B, Hepatitis C, or Human
Immunodeficiency Virus (HIV), pumping breastmilk will not reduce orremove
1.Important Safeguards (cont.)
WARNING: To avoid health risk and reduce the risk of injury:
• Do not store wet or damp parts as mold may develop.
• Do not run pump with wet tubing. Doing so will harm the pump motor.
• While some discomfort may be felt when first using a breast pump, using a
breast pump should not cause pain.
• If you are experiencing discomfort at the base of the nipple due to
rubbing of your breast tissue with the breast flange tunnel, discontinue
use and contact your healthcare professional or breastfeedingspecialist.
• For assistance with correct breast flange sizing and comfort please
contact customer support at www.drbrownsbaby.com/contact/or
contact a lactation consultant/breastfeeding specialist.
• Contact your healthcare professional or breastfeeding specialist if you can
express only minimal or no milk or if expression is painful. See Section 8 for
more information.
• Do not try and express with vacuum that is too high and uncomfortable
(painful). The pain, along with potential breast and nipple trauma, may
decrease milk output.
• Make sure tubing is not kinked or pinched while pumping. • Do not holdthe
pump kit by the bottle. This can lead to blockage of the milk ducts and
engorgement.
• Do not thaw frozen breastmilk in a microwave or in a pan of boiling water. •
Do not microwave breastmilk. Microwaving can cause severe burns to
baby’s mouth from hot spots that develop in the milk during microwaving.
(Microwaving can also change the composition of breastmilk.)
6

Questions? Please visit www.drbrownsbaby.com/contact/ or call 1-800-778-9001
7
Narrow Neck Travel Cap
Membrane Membrane Co
Tubi
nnector
Valve
ottle X 2
Includes (2) complete 4oz (120
ml) Dr. Brown’s® Options +™
bottles:
X 2
Included Accessories:
X 4
“Narrow” Storage Cap
X 2
2. Product Description
Dr. Brown’s™ breast pump includes (2) collection kits:
Breast ver
Flange
ng
X 2
Co
B
Dr. Brown’s Feeding Parts (x 2)

8
Wide Neck Adaptor
Bottle Holder
Time
rts Port P
(for sin
Your Dr. Brown’s™ Double breast pump motor:
Bottle Holder
Storage Area
Elapse
Bottle Holder
Mode
Indicator
Power On-Run-Off
Display Light
On-Off
Cycle Rate Display
Pump-Release
Cycles Per Minute
Up / Down
LetDown
Expression Mode
Vacuum Level
Display
Vacuum Level
Up / Down
Hose Po
lug
gle breast pumping)
Handle
Storage Flex Net
Power Port
Power
Adaptor

10
Milk Contact Components
X 2
Non-Milk Contact
(Wash If Required)
X 2
See section 3-6 for special
tubing care instructions.
Dr. Brown’s Feeding Parts: Wash, Sanitize and save for bottle
feeding. (See separate instructions for bottle assembly)
X 2
3-2. Wash
Separate and wash all milk contact components by hand in warm
water with mild detergent and rinse with clear water or place in the
top rack of dishwasher.
Only use drinking quality water for cleaning!
Hand Wash or place in Top Rack of Dishwasher

Questions? Please visit www.drbrownsbaby.com/contact/ or call 1-800-778-9001
11
3. Getting Started continued
Do not submerge the pump motor in water! Wipe
clean with a damp cloth only.
3-3. Dry
If not for immediate use or sanitizing: Allow all parts to air dry on a
clean surface or towel.
NEVER store wet or damp parts. Store clean, dry pump kit in a clean
bag or container until next use. Sanitize parts before each use.
3-4. Sanitize Before Use.
Separate all parts to be sanitized.
Method #1: Boil parts in a clean pot of water for 10 minutes.
Method #2: Use one of these Dr. Brown’s™ Sterilizer Products.
Microwave Steam
Sterilizer Bags Microwave Deluxe Electric
Steam Sterilizer Steam Sterilizer

12
3-5. Dry after Sanitizing.
Allow all parts to air dry on a clean surface or towel.
NEVER store wet or damp parts. Store clean, dry pump kit in a clean
bag or container until next use. Sanitize parts before each use.
3-6. Tubing Care.
The Tubing does not contact breastmilk.
Tubing should only be washed if dirty or condensation is
present.
If the condensation is from a previous washing process, there is no
need to wash again.
Use warm soapy water and rinse with clean clear water.
Allow water to drain from tubing completely after washing. Shake out
any remaining water droplets and hang to dry. A small amount of
condensation is ok; however, a tube filled with water droplets may
damage the pump motor.

14
4-2. Tubing Connection
Male End
Connects to
Collector
Female End
Connects to Pump
If pumping in single mode, use
port plug to block the unused
port.

Questions? Please visit www.drbrownsbaby.com/contact/ or call 1-800-778-9001
15
5. Power Adaptor
5-1. Power Connection
The power adapter supplied with this unit is polarized (one prong is larger than
the other). Always connect to a polarized outlet.
6 VDC
115 V TO 6 VDC
POWER ADAPTOR
5-2. Power Adapter Care
To prevent damage to your power adapter cord, always grasp the body of
the adapter as shown below. Never pull by the cord to unplug.

16
6. Operating the Pump
6-1. Pumping Modes
Two Modes are available:
1)
Letdown Mode- Used to stimulates the release
of milk from the breast. This mode helps prompt the
reflex that happens when nerves in your breasts are
stimulated (usually by your baby's sucking).
2)
Expression Mode- Used after the breast is stimulated
to release milk.
6-2. Using Letdown Mode
Mode Elapse Time Letdown Mode
Displayed Indicator
Power On-Run-Off Mode Selector
Button Button
Cycle Displayed Vacuum Level
Displayed
Cycle Rate Vacuum Level
Up Up
Cycle Rate Vacuum Level
Down Down
Letdown Mode uses a single (unchangeable) rapid 63 “pumps per
minute” cycle setting, with (5) user selectable vacuum levels.

Questions? Please visit www.drbrownsbaby.com/contact/ or call 1-800-778-9001
Down Down
6. Operating the Pump
6-2. Using Letdown Mode (continued)
1) Select the [Power Button] to turn the unit on.
The pump will automatically display Letdown Mode at the last
used vacuum level used (this pump has a memory feature that
recalls the last used settings for both modes).
2) Adjust the vacuum level to your preferred comfort level using
the Vacuum Level [Up] or [Down]. There are five settingsfrom
which to choose, L1 thru L5.
3) Press the [Power Button] again to start pumping.
4) Letdown Mode will automatically change to ExpressionMode
after 2 minutes. See Mode Elapse Time on display.
6-3. Using Expression Mode Mode Elapse Time
Displayed Mode Selector
Button
Vacuum Level
Cycle Displayed Displayed
Cycle Rate Vacuum Level
Up Up
Cycle Rate Vacuum Level
Expression Mode has (6) “pump-release cycles” per minute rates,
each with (12) user selectable vacuum levels.
17

18
6-3. Using Expression Mode (continued)
4. Select the [Mode Selector Button]. When in Expression mode,
the Letdown mode symbol will disappear.
The pump will automatically start in the last used cycle and
vacuum levels (this pump has a memory feature that recalls the
last used settings for both modes).
5. Adjust the vacuum level to your preferred comfort level usingthe
Vacuum Level [Up] or [Down]. There are twelve settings from
which to choose, L1 thru L12.
6. Adjust the cycle rate to your preferred comfort level using the
Cycle Rate [Up] or [Down]. There are five settings from whichto
choose: 36, 40, 43, 46 and 49.
7. Letdown Mode will automatically change to ExpressionMode
after 2 minutes. See Mode Elapse Time on display.
6-4. Pumping with a Single Collector
Plug a hose into either port on the front of the pump. Place the
port plug in the empty port. Select the vacuum level for
performance and comfort. You will need to use a lower vacuum
level setting than for pumping with two collectors.

Questions? Please visit www.drbrownsbaby.com/contact/ or call 1-800-778-9001
19
6. Operating the Pump
6-5. Placement of the Collection Assembly
Center the breast Flange on your breast sothat the nipple is aligned
with the tunnel portion. Make sure your breast completely fills the
Flange to ensure a seal and that a vacuum can form.
While you may feel some discomfort when first breast pumping, it
should not cause pain. Adjust the Cycle and Vacuum levels to lower
settings to achieve your comfort level and milk flow.
If you continue to have problems, please contact us at:
www.drbrownsbaby.com/contact/
or call 1-800-778-9001
For hands free pumping, consider using a pumping bra.

20
6-6. Storing a Collection Assembly
Often when double pumping, one side is finished before the other.
The completed side may be removed from the breast and placed in
the convenient half-moon bottle holders or large storage space in
the back of the pump housing. The expandable netting will secure
the bottle and assembly without risk of spillage.
You will need to adjust the vacuum level after removing one
collection unit from a breast to maintain performance and
comfort level of the remaining unit.
Helpful tip for one handed operation:
When using Narrow Bottles for collection, easily place the finished
assembly in the half-moon holders.
When using the optional Wide Bottles for collection, easily place the
finished assembly in the rear storage area.
Wide Bottle Holder /
Storage Area
Pull Grips Narrow / Wide Bottle
(for storing Wide Holders
Bottles-two hands
required)
This manual suits for next models
1
Table of contents
Other Dr. Brown's Breast Pump manuals