DT Light e DePadova User manual

DT Light ––
Phil Luithlen
Schema di Montaggio – – Assembly Instructions

32
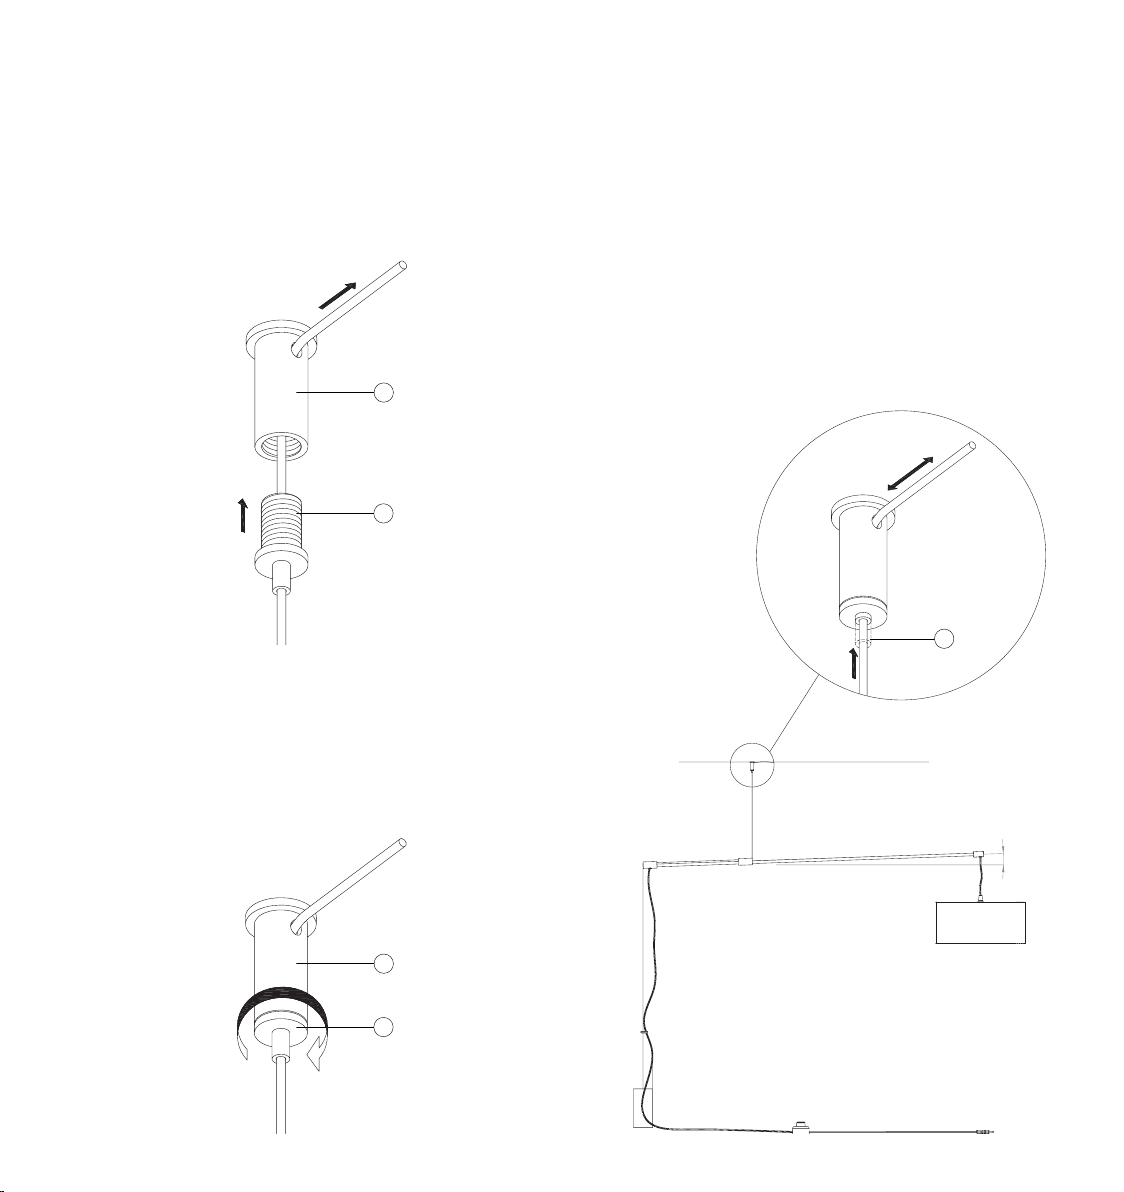
Componenti e ferramenta in dotazione:
Components and hardware supplied:
aAsta (1 pz.) b Chiave #1.5 (solo JDTM
Bar (1 pc.) e JDT) (1 pz.)
JDT= 0,65 kg Allen wrench #1.5
JDTM= 0,63 kg (only JDTM
JDT/S= 0,56 kg and JDT) (1 pc.)
c Set di fissaggio a sotto (1 pz.) d Vite + tassello (1 pz.)
Ceiling mounting set (1 pc.) Screw + anchor (1 pc.)
e Contrappeso (1 pz.) f Paralume (1 pz.)
Counterweight (1 pc.) Lampshade (1 pc.)
JDTM, JDT= 1,4 kg JDTM, JDT= 0,29 kg
JDT/S= 0,85 kg JDT/S= 0,22 kg
Lampade a sospensione o da
terra per applicazioni civili.
– –
Costruita conforme alle norme di
riferimento del prodotto.
Suspension or floor lamps for
personal and civil use.
– –
Built in accordance with product
reference standards.
Attenzione:
– –
. Dopo aver tolto l’imballaggio
assicurarsi dell’integrità del pro-
dotto.
. In caso di dubbio non utilizzare
l’apparecchio e rivolgersi a per-
sonale professionalmente quali-
ficato.
. Tenere lontano dalla portata dei
bambini.
. Lampadina non inclusa.
. Assicurarsi che la lampadina
abbia una potenza massima
non superiore a:
Versione EU
JDTM e JDT: max 100 W (E27)
JDT/S: max 60 W (E14)
Versione USA
JDTM e JDT: max 60 W (E26)
JDT/S: max 40 W (E11)
. Non tirare mai il cavo per scol-
legarlo dalla presa di corrente
elettrica.
. Non utilizzare con il cavo dan-
neggiato.
. In caso di guasto e/o malfun-
zionamento dell’apparecchio,
spegnerlo e non manometterlo.
. Per la riparazione rivolgersi sola-
mente a personale qualificato.
Please note:
– –
. After unpacking check the en-
tirety of the product.
. Should you have any doubts, do
not use the product and con-
tact a qualified professional.
. Keep out of the reach of chil-
dren.
. Light bulb is not included.
. Make sure that the light bulb
has a maximum wattage equal
to or lower than:
EU version
JDTM and JDT: max 100 W (E27)
JDT/S: max 60 W (E14)
USA version
JDTM and JDT: max 60 W (E26)
JDT/S: max 40 W (E11)
. Never stretch the cable to dis-
connect it from the socket.
. Do not use the product if the
cable is damaged.
. If the product is broken and/or
damaged, switch it o and do
not tamper with it.
. For product repair, contact only
a qualified professional.
IP20
Alimentazione/ Voltage: 220/240 V, 50/60 Hz - (EU)
100/120 V, 50/60 Hz - (USA)

54
A
Per assemblare le aste
(solo per JDTM e JDT):
– –
Assemblare le due aste, (a1) e
(a2), e tirare verso l’esterno il cavo
all’estremità di (a1).
Assicurarsi che l’incavo presente
su (a2) sia alloggiato corretta-
mente in sede come indicato nel
disegno.
Fissare gli elementi con la chiave
esagonale #1.5 in dotazione (b).
A
Mounting the bars
(for JDTM and JDT only):
– –
Mount the two bars, (a1) and
(a2), then pull the cable out to the
end of (a1).
Make sure the cavity on (a2) is
correctly set in place as indicated
in the drawing.
Fasten the elements with the sup-
plied allen wrench #1.5 (b).
Attenzione:
– –
. Il punto di fissaggio a sotto
per la sospensione deve essere
collocato ad una distanza mi-
nima da ogni muro e angolo
perimetrale e in modo da per-
mettere il completo movimento
della lampada come indicato
nel disegno.
. Accertarsi che in prossimità del-
la foratura per il fissaggio non ci
siano attraversamenti elettrici o
idrici.
. Il sistema di attacco al sotto
della DT Light è l’unico consi-
gliato.
. De Padova non si assume al-
cuna responsabilità in caso di
danni dovuti a montaggio o uso
scorretto della lampada.
. In caso di incertezza sulla natu-
ra del sotto, rivolgersi ad uno
specialista.
Please note:
– –
. The fixing of suspension to the
ceiling should be placed at a
minimum distance from all pe-
rimeter walls and corners, so the
light can turn as indicated in the
drawing.
. Verify there are no plumbing
pipes or electric wires near the
fastening drilling.
. We suggest using exclusively
our ceiling mounting set when
mounting DT Light.
. De Padova is not responsible for
damages caused by improper
assembly or misuse of the lamp.
. In case of uncertainty on ceiling
durability, call a skilled techni-
cian.
b
a1
a1
a2
a2
JDT= 65 cm
JDTM= 55 cm
JDT/S= 43 cm
JDT= 163 cm
JDTM= 140 cm
JDT/S= 101 cm

76
B
Per montare il set di fissaggio
a sotto:
– –
Svitare e separare i due elementi
del set di fissaggio a sotto (c).
Fissare la boccola filettata al tas-
sello con la vite (d).
B
Mounting the ceiling mount-
ing set:
– –
Unscrew and separate the two
parts of ceiling mount (c).
Fasten the threaded bush to the
anchor with the screw (d).
C
Per montare il contrappeso:
– –
Far passare l’estremità libera del
cavo d’acciaio per sospensione
prima nel contrappeso (e), poi nel
disco (x) e infine nei due cilindri
(y).
L’elemento (x) deve essere posi-
zionato poco sopra il contrappe-
so.
C
Mounting the counter-
weight:
– –
Insert the free end of the steel
suspension cable into the coun-
terweight (e) from the bottom,
through the disk (x), and then
trough the two cylinders (y).
The component (x) must be
placed slightly above the coun-
terweight.
c
d
d
y
y
x
e

98
D
Per montare l’asta al sot-
to:
1 – –
Inserire l’estremità libera del cavo
prima nell’elemento (d1), poi in
(d2) e farlo fuoriuscire dal foro,
come indicato nel disegno.
D
2 – –
Inserire (d1) in (d2) e avvitarli in-
sieme.
D
Mounting the bar to the ceil-
ing:
1 – –
Insert the free end of the cable
into the element (d1), then into
(d2) and guide it out from the
hole, as indicated in the drawing.
D
2 – –
Insert (d1) into (d2) and screw
them together.
E
Per regolare la tensione del
cavo:
– –
Spingere verso l’alto il cilindro (w)
e sbloccare il cavo d’acciaio.
Regolare la tensione e la lunghez-
za del cavo.
Quando si compie questa ope-
razione, assicurarsi che nessun
oggetto ostruisca l’asta della
lampada.
Indicativamente l’asta dovrebbe
essere inclinata di circa +5° /+10°.
E
Adjusting the cable tension:
– –
Lift the cylinder (w) up and un-
block the steel cable.
Adjust the tension and the length
of the cable.
During this operation, assure
nothing obstructs the lamp bar.
The bar should slanted to approx-
imately +5°/ +10°.
d2
d2
d1
d1
w
+5°/ +10°

1110
F
Per montare il paralume:
1 – –
Svitare la ghiera dal portalampa-
da.
F
2 – –
Fissare il paralume (f) con la
ghiera.
F
Mounting the lampshade:
1 – –
Unscrew the ring nut on the
lampshade.
F
2 – –
Fasten the lampshade (f) by
tightening with the ring nut.
G
Per regolare l’altezza:
– –
Con una mano tenere l’asta e con
l’altra accompagnare il cavo.
Regolare la lampada all’altezza
desiderata.
G
Adjusting the height:
– –
With one hand hold the bar and
with the other hand guide the
cable.
Adjust the lamp to the desired
height.
f

1312
H
Per regolare l’inclinazione
dell’asta:
1 – –
Per regolare l’inclinazione dell’a-
sta, modificare la lunghezza del
cavo.
H
Adjusting the bar inclina-
tion:
1 – –
To adjust the bar inclination,
modify the cable length.
H
2 – –
Alzare il cilindro (w). Con una
mano tenere l’asta (a) e con l’al-
tra accompagnare il cavo. Rego-
lare la lampada all’altezza desi-
derata.
H
2 – –
Lift the cylinder (w). With one
hand hold the bar (a) and with
the other hand guide the cable.
Adjust the lamp to the desired
height.
H
3 – –
Once the desired height and incli-
nation is reached, pull the cable
taut and lower the cylinder (w) in
order to fix the cable in place.
H
3 – –
Raggiunta l’altezza e l’inclinazio-
ne desiderata, accompagnare il
cavo finché teso e fermarlo ab-
bassando il cilindro (w).
w
w

1514
Attenzione:
– –
. Fare sempre attenzione alla
tensione del cavo, non deve mai
essere eccessivamente teso.
L’eccessiva tensione può causa-
re incurvamenti o danni ai com-
ponenti della lampada.
. Mentre si eseguono le operazio-
ni G, H, I, fare attenzione allo
spazio e a tutto ciò che circonda
la lampada.
Please note:
– –
. Pay special attention to the ca-
ble tension; it should never be
too stretched.
Excessive cable tension could
cause the lamp components to
become curved or damaged.
. During the G, H, I, operations,
be careful to the space sur-
rounding the lamp.
I
Per regolare l’angolo di rota-
zione:
– –
Spostando il contrappeso si mo-
difica l’orientamento della lam-
pada.
Sollevando delicatamente il con-
trappeso e il cavo, è possibile ruo-
tare di 360° il braccio intorno al
punto di fissaggio a sotto.
I
Adjusting the rotation angle:
– –
The orientation of the lamp can
be adjusted by moving the coun-
terweight.
By carefully lifting the coun-
terweight and cable from the
ground, it is possible to turn
the bar 360° around the ceiling
mounting point.
360°
A++
A+
A
B
C
D
E
A
874/2012
6÷100 kWh/1000h
JDT00BI
Questo dispositivo è
compatibile con lam-
padine di classi ener-
getiche:
Il disposivo è venduto con
una lampadina di classe ener-
geca:
A++
A+
A
B
C
D
E
A
874/2012
6÷60 kWh/1000h
JDTS0BI
Questo dispositivo è
compatibile con lam-
padine di classi ener-
getiche:
Il disposivo è venduto con
una lampadina di classe ener-
geca:

_01.2019_
De Padova srl
Strada Padana Superiore 280A
20090 Vimodrone (Mi) –– Italy
T+39 02 27 43 97 95
www.depadova.com
Popular Outdoor Light manuals by other brands

NX
NX Smart Home NX-GL4 user manual

LUG
LUG URBANO LED Installation instruction

Cooper Lighting
Cooper Lighting FE13PC Series instruction manual

ferm living
ferm living OYSTER Assembly manual

Schrack Technik
Schrack Technik EVO LED Round Up mit PIR Sensor Series Assembly instructions

WAC Lighting
WAC Lighting dweLED 578 Series installation instructions

Glatz
Glatz OSYRION Spot Installation and operating instructions

nordlux
nordlux Fuse Mounting instruction

Crystorama
Crystorama AND-9204-CL-MK Assembly instruction

&Tradition
&Tradition JOURNEY SHY2 User instructions

LIGMAN
LIGMAN FORREY 24 FOR-30072 installation manual

urban ambiance
urban ambiance UQL1100 installation instructions