manuals.online logo
Brands
  1. Home
  2. •
  3. Brands
  4. •
  5. DualLite
  6. •
  7. Outdoor Light
  8. •
  9. DualLite Spectron LZ15I User manual

DualLite Spectron LZ15I User manual

LED Indicators
Two Status LED indicators, one red and one green are provided
on the control panel of all models equipped with the Spectron
option
Red Service Alert LED
Under normal operating
conditions, the Service
Alert LED indicator will
remain off. In the event the
Spectron Controller detects
a malfunction, the Service Alert LED will blink at a 1 Hz.
rate based on the following table:
Red Status LED Code Description
One blink ON/pause Battery not connected
Two blinks ON/pause Battery fault
Three blinks ON/pause Charger fault
Four blinks ON/pause Transfer circuit fault
Five blinks ON/pause Emergency Lamp Fault
Green Operating Status LED
The green Operating Status
LED serves as both an AC
power and a self-test
indicator. During normal
operation, the Operating
Status LED will be illuminated indicating the presence of
AC power. During all automatic or manual self-test cycles,
the Operating Status LED will blink at a 1 Hz. rate.
Manual Tests
Using the unit test switch, users can initiate different duration test
cycles based on the following table:
Initiating Action Test Cycle
Press test switch once 1 minute
Press test switch twice 5 minute
Press test switch 3 times 30 minute
Press test switch 4 times 60 minute
NOTE: Pressing test switch at any time after a test cycle has begun
cancels remainder of test and returns unit to normal operation.
Spectron®
Self-Diagnostic Electronics Option
Lamp Sensing Adjustment Procedure
Procedure 1 - LZ15I, LZB15IModels Only
LZ15Iand LZB15ISpectron models are shipped from the factory
with a load sensing jumper provided as shown in position "A"
of the illustration below. In this position, the diagnostic circuitry
can sense a failure in any of the unit's three connected lamps
(2 integral and 1 remote).
IMPORTANT
If the third (remote) lighting head is not to be connected (for the
purpose of extended run time or other reasons), the load sensing
jumper must be reinstalled as shown in Position "B" below to
prevent a false lamp failure indication.
Procedure 2 - All Other Remote Capacity
Models
Remote capacity models provide sufficient battery power to
operate the unit's two integral lighting heads plus one or more
remote lighting fixtures. In order for the electronics module to
detect a lamp failure in any of the connected fixtures, the lamp
sensing circuit must be adjusted in the following manner:
NOTE: Models without remote fixture capacity are supplied
with the lamp sensing circuit factory set and do not require
this procedure.
1. Depending on the total amount of connected load, one of
four different "RANGE" switch settings will need to be selected
(See Fig. 1). Calculate the total connected wattage load and
refer to the RANGE Switch Selector Chart below to determine
the appropriate setting.
IMPORTANT: In calculating total connected wattage load,
be sure to include the unit's two integral lighting heads.
RANGE Switch Selector Chart
Operating Instructions
Spectron Electronics
All models ordered with the Spectron® option provide:
❑Visual indication of AC power status
❑Visual Indication of all self-diagnostic test cycles
❑Visual indication of unit malfunctions including:
• Battery fault
• Charger fault
• Transfer fault
• Lamp fault
❑User initiated test cycles of 1, 5, 30 or 60 minutes
❑Temperature compensated charger for longer battery life
❑15 minute retransfer delay
Load Jumper Settings
"A"
(3 Lamp Position)
"B"
(2 Lamp Position)
operating status
on = ready
off = ac off
blinking = test in process
Total Connected
Load Wattage
Load "RANGE"
Switch Setting
15 1
16 - 30 2
31 - 45 3
46 - 60 4
Operating Instructions (Cont.)
7. Allow the 1 minute self-test to end (or press the test switch
again to cancel self-test cycle).
8. Press the test switch again. Verify that the "Lamp Fail" LED
and the "Service Alert" LED are not illuminated.
Operation
SPECTRON electronics operation is fully automatic. Accidental
discharge of the unit battery prior to energization is prevented by
an AC lockout circuit. The unit's green "Operating Status" LED,
located on the Spectron display panel, illuminates to indicate
the presence of AC power. The unit's red "Service Alert" LED
will blink after application of AC power if the battery connection
is not completed. During normal operation, the unit's charging
circuit maintains the battery at full capacity and the Spectron
Controller constantly monitors charger performance. Should the
terminal voltage vary from design parameter values, the unit's
red "Service Alert" LED will blink , indicating a malfunction of
the battery or charger. Upon interruption of normal AC power,
or brownout condition, the Spectron Controller automatically
switches the emergency lighting load to the battery. Emergency
power will be provided for a minimum of 90 minutes. During
emergency operation, the battery is protected from deep
discharge by a low voltage battery disconnect circuit. Upon
return of normal AC power, a 15 minute retransfer delay holds
the unit in emergency operation mode allowing utility voltage
to stabilize prior to reconnection. The charger will then begin a
recharge cycle. A temperature compensated float type charger
is provided in LZ models utilizing Pure-Lead or Lead-Calcium
batteries. This charger is designed to adjust charging voltage
with changes in ambient temperature to maximize the life and
performance of the unit's batteries. LZ Series models utilizing
Nickel-Cadmium batteries require no temperature compensation
as they utilize a constant current type charger design to maintain
the unit's batteries. The charger will bring the battery to full
capacity within acceptable U.L. time standards. The Spectron
Controller automatically initiates a one minute discharge/
diagnostic test every 28 days ± 3.5 hours and a 30-minute
discharge/diagnostic test every 6 months ± 1 day. These tests
exercise the unit’s battery to optimize its capacity and allows
the SPECTRON Controller to analyze emergency operation
performance. Any malfunction of the unit’s transfer circuit or
emergency lamps will cause the red "Service Alert" LED on
the unit's display panel to blink. During normal operation, all
red "Service Alert" LED blinking indications of unit malfunction
remain latched until corrected and retested. A manual test
switch allows a user programmable 1, 5, 30 or 60-minute
diagnostic/discharge test at any time. During all automatic and
user initiated self-tests, the unit's green "Operating Status" LED
will blink to indicate a diagnostic cycle in process.
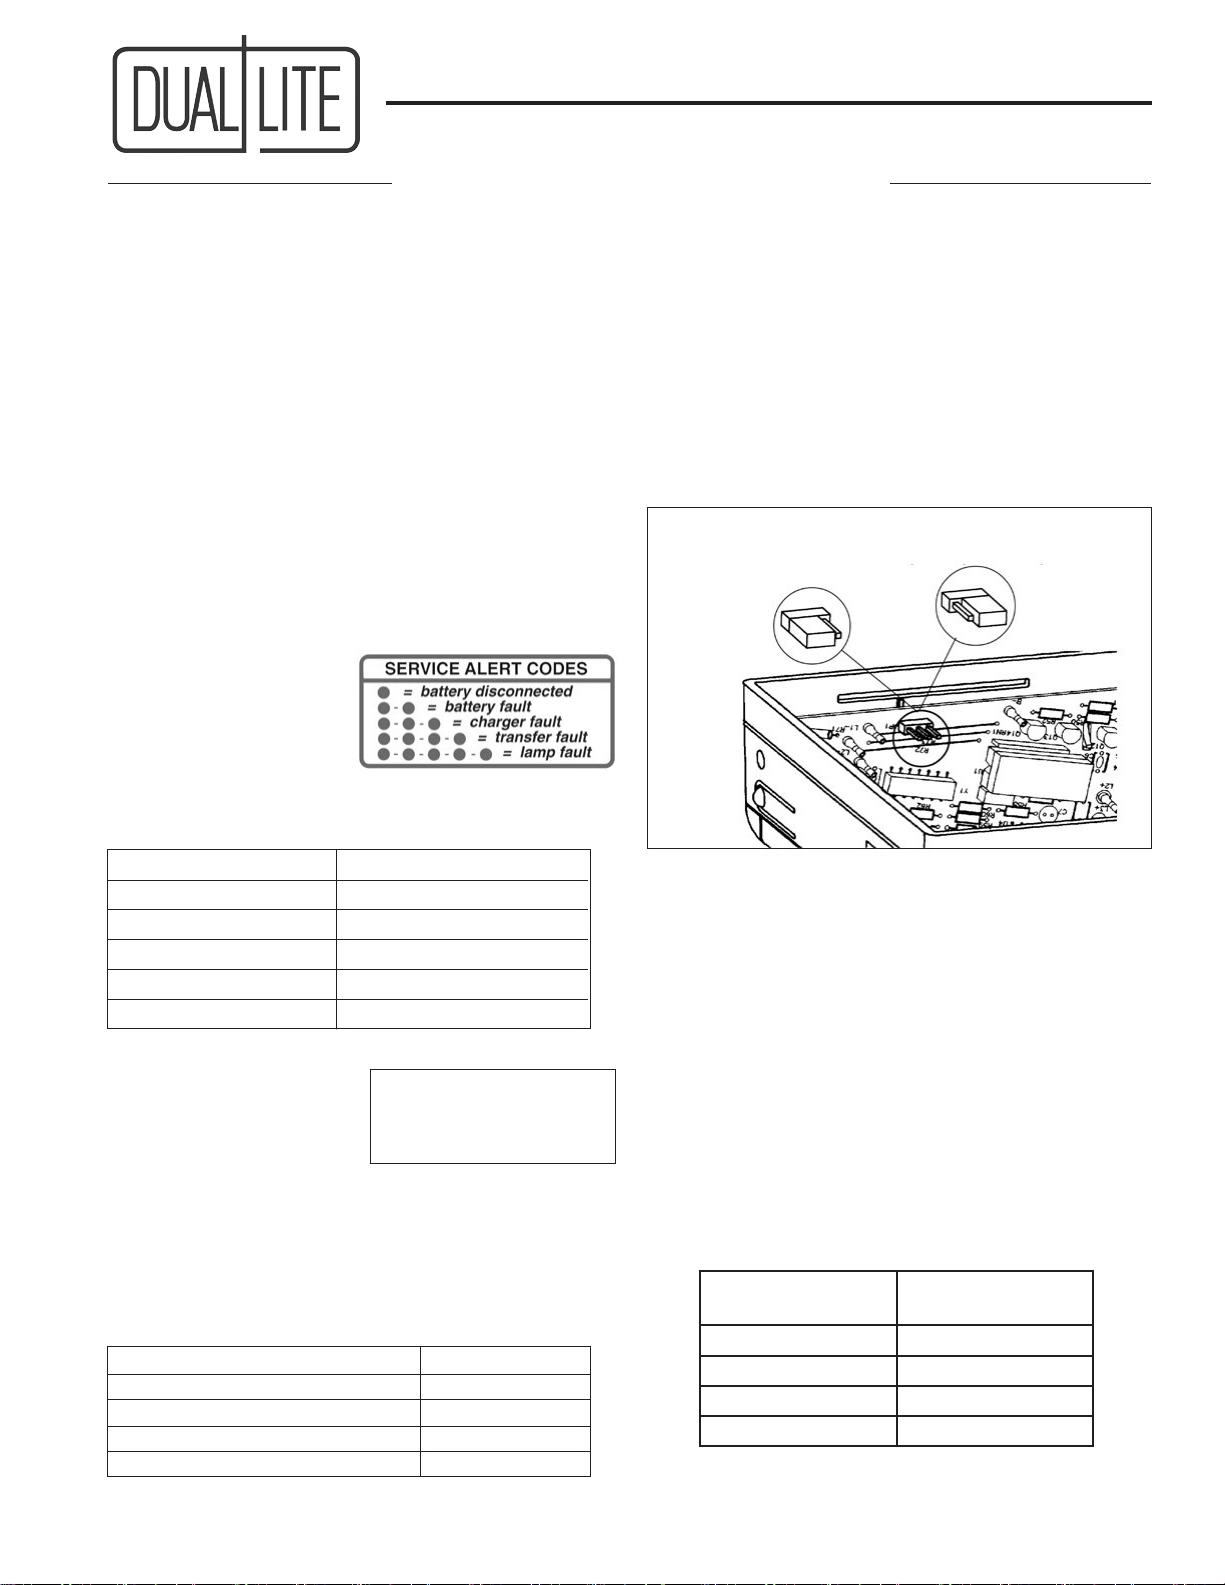
2. Using a pen or a small screwdriver, select the proper load
range by pressing the appropriate rocker switch to the left as
shown in the Fig. 1 example above.
CAUTION: Only one rocker must be selected.
3. With a small screwdriver, turn the Lamp Sense Adjust
potentiometer fully clockwise.
4. Press the unit test switch once. The emergency lamps will
illuminate and a 1 minute self-test will begin. The green
"Operating Status" LED on the unit's Spectron control
panel will also begin to flash. The "Lamp Fail" LED located
on the charger/distribution board (see Fig.1) should not be
illuminated at this time. If "Lamp Fail" LED is illuminated,
select the next lower load range. Example: If load range "4"
was selected, select load range "3".
5. Slowly turn the "Lamp Sense Adjust" potentiometer
counterclockwise until the "Lamp Fail" LED on the charger/
distribution board illuminates. Then turn the adjustment pot
back clockwise just slightly beyond the point where the
"Lamp Fail" LED turns off to avoid false failure indications. At
this point, the red "Service Alert" LED on the unit's Spectron
control panel will begin a repetitive cycle of flashing 5 times
followed by a pause ("lamp fault" service alert).
6. While the self-test is still in progress, disconnect one of the
emergency lamp wires from the charger/distribution board.
The "Lamp Fail" LED on the charger/distribution board
should turn on. Reconnect the lamp wire and observe that
the "Lamp Fail" LED goes out. If "Lamp Fail" LED remains
illuminated, turn the "Lamp Sense Adjust" potentiometer fully
clockwise and repeat step 5.
1234
OPEN
Lamp Fail LED
Lamp Sense Adjust
Potentiometer
Example:
Press here to select load
"RANGE" switch setting "1".
*
Fig. 1 Charger Distribution Board
Spectron®
Self-Diagnostic Electronics Option
0601570 E
currentlighting.com/dual-lite
© 2022 HLI Solutions, Inc. All rights reserved. Information and specifications subject to change
without notice. All values are design or typical values when measured under laboratory conditions.
Page 2 of 2
Rev 06/06/22
spectronopinstr-units-0601570_e-092508_R01

This manual suits for next models

1

Popular Outdoor Light manuals by other brands

Platek TRIS Assembly instructions

Platek

Platek TRIS Assembly instructions

RUSTA Amsterdam manual

RUSTA

RUSTA Amsterdam manual

Jula Anslut 422-352 operating instructions

Jula

Jula Anslut 422-352 operating instructions

Profile PLI-172 manual

Profile

Profile PLI-172 manual

iGuzzini SPOT PALCO FRAMER manual

iGuzzini

iGuzzini SPOT PALCO FRAMER manual

Maxim Lighting Sutton Place VX manual

Maxim Lighting

Maxim Lighting Sutton Place VX manual

Anslut 422-304 operating instructions

Anslut

Anslut 422-304 operating instructions

JONATHAN Y JYL1023A quick start guide

JONATHAN Y

JONATHAN Y JYL1023A quick start guide

NOMA 052-1602-8 instruction manual

NOMA

NOMA 052-1602-8 instruction manual

Larson Electronics ATEX-EHL-447-LED-WG-12M-220X12.ZL-2M-EPP.CE16A instruction manual

Larson Electronics

Larson Electronics ATEX-EHL-447-LED-WG-12M-220X12.ZL-2M-EPP.CE16A instruction manual

Kettal MIA LAMP S Battery Assembly instructions

Kettal

Kettal MIA LAMP S Battery Assembly instructions

Gama Sonic GS-94S instruction manual

Gama Sonic

Gama Sonic GS-94S instruction manual

Monzana Skab manual

Monzana

Monzana Skab manual

IKEA UPPLYST manual

IKEA

IKEA UPPLYST manual

MOOD GOTEBORG SL487 Installation and operating instructions

MOOD

MOOD GOTEBORG SL487 Installation and operating instructions

BEGA 84 699 Instructions for use

BEGA

BEGA 84 699 Instructions for use

SLV Elektronik WETSY instruction manual

SLV Elektronik

SLV Elektronik WETSY instruction manual

Safavieh TBL4158 manual

Safavieh

Safavieh TBL4158 manual

manuals.online logo
manuals.online logoBrands
  • About & Mission
  • Contact us
  • Privacy Policy
  • Terms and Conditions

Copyright 2025 Manuals.Online. All Rights Reserved.