Guía de uso y cuidado
Conducto de respiradero
para secadoras
Instalación
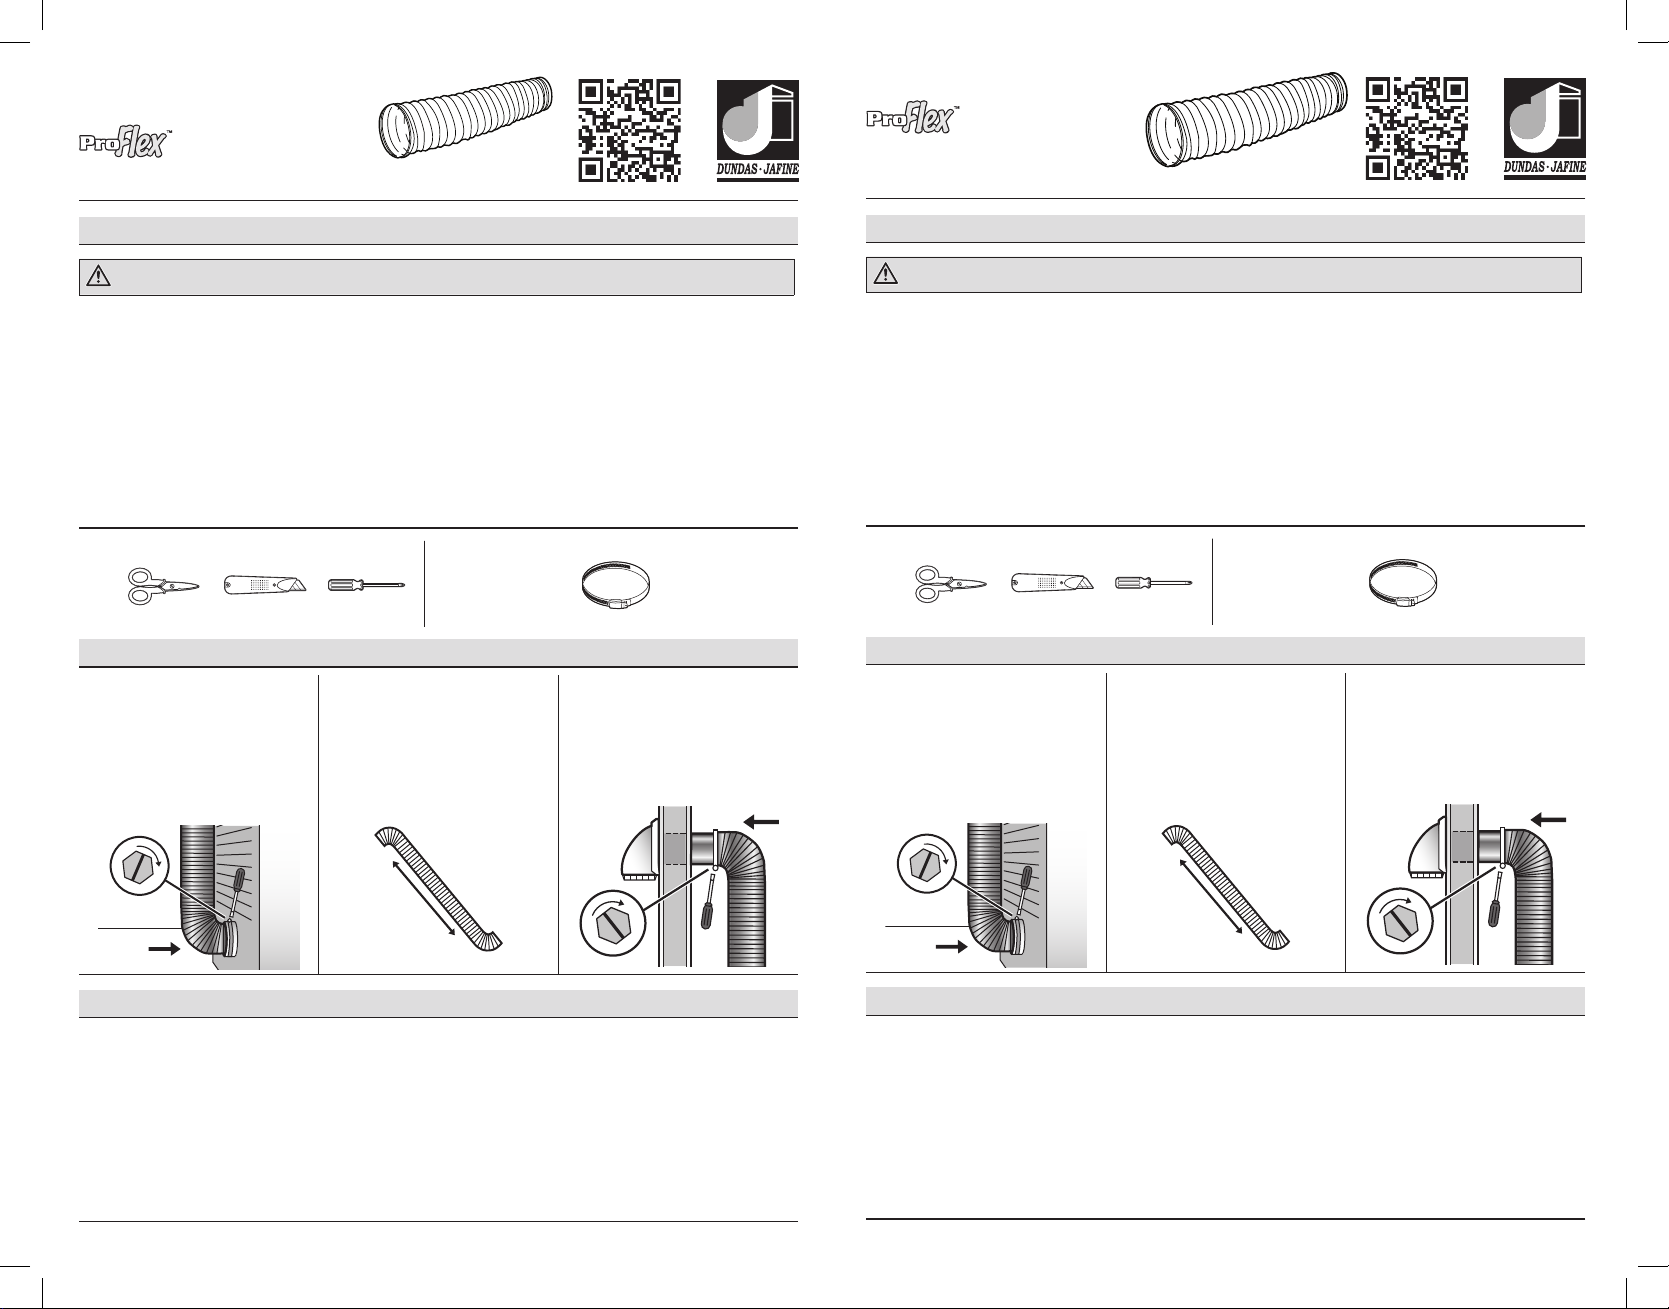
1 FIJAR EL CONDUCTO A LA
SECADORA
□Deslice un extremo del conducto
sobre la salida de escape de la
secadora de ropa en su posición
permanente y fíjelo con una
abrazadera de tornillo sinfín (no
incluida).
2 2 EXTENDER EL CONDUCTO
FLEXIBLE
□Extienda el conducto exible a
la longitud requerida para que
alcance el conducto existente
que va hacia el exterior. Corte el
conducto sobrante con un cuchillo
de uso general o con tijeras.
3 FIJAR EL CONDUCTO AL
SISTEMA DE CONDUCTOS
□Fije el conducto al sistema de
conductos existente con una
abrazadera de tornillo sinfín (no
incluida).
Garantía
¿QUÉ SE CUBRE?
Toda la mercancía se garantiza contra defectos de fabricación y de los materiales durante un año a partir de la fecha de compra. Esto incluye el desgaste
y las fallas en el desempeño normales de los artículos. El fabricante reemplazará o reparará el artículo a su criterio.
¿QUÉ NO SE CUBRE?
Esta garantía cubre únicamente el desgaste y las fallas en el desempeño normales. No cubre el mal funcionamiento, las fallas en el desempeño ni los
defectos que surjan debido al mal uso, el abuso, la negligencia o la modicación del producto. No están cubiertos los daños ni el mal funcionamiento que
se cause al producto por parte del usuario u otras fuentes externas, ni las fallas debidas al incumplimiento de las advertencias y las instrucciones.
Para obtener más ayuda visite www.DundasJane.com.
Información de seguridad
ADVERTENCIA: Para reducir el riesgo de incendio o lesiones personales, siga las precauciones básicas, incluyendo las siguientes:
1) Úselo en secadoras de ropa solamente, no lo utilice para ningún otro n.
2) Mantenga el área alrededor de la abertura de escape y las áreas adyacentes libres de pelusa, polvo o tierra.
3) Personal calicado debe limpiar periódicamente la parte interior del conducto de escape.
4) El escape de las secadoras de gas siempre debe dar hacia el exterior.
5) Examine sistemáticamente el conducto de escape para vericar que no esté comprimido u obstruido.
CONSERVE ESTAS INSTRUCCIONES
AVISO:
• El escape de la secadora de ropa no debe dar hacia una chimenea, una pared, un cielorraso o un espacio oculto de un edicio.
• Para unir piezas de conductos no se debe usar tornillos que puedan atrapar pelusas.
• Los conductos exibles deben extenderse hasta alcanzar su longitud total; el conducto sobrante debe quitarse, y el conducto debe mantenerse lo más
derecho posible.
• En las instalaciones deben seguirse los códigos de construcción locales.
• La longitud máxima del conducto es de 8 pies No se debe efectuar una interconexión entre conductos.
DUNDASJAFINE.COM
HERRAMIENTAS NECESARIAS
Tijera Navaja Destornillador
MATERIAL Y HERRAJES NECESARIOS (NO SE INCLUYEN)
Abrazaderas de tornillo sinfín (2)
Installation
1 FIXER LE CONDUIT À LA
SÉCHEUSE
□Glissez l’une des extrémités du
conduit sur la sortie d’évacuation
de la sécheuse dans sa position
dénitive et xez-la à l’aide d’un
collier de serrage à vis sans n
(non compris).
2 ÉTIRER LE CONDUIT FLEXIBLE
□Étirez le conduit exible jusqu’à la
longueur requise pour le raccorder
au réseau de conduits menant vers
l’extérieur. Coupez l’excédent de
conduit à l’aide d’un couteau ou
de ciseaux.
3 FIXER LE CONDUIT AU RÉSEAU
DE CONDUITS
□Fixez le conduit au réseau de
conduits existant à l’aide d’un
collier de serrage à vis sans n
(non compris).
Garantie
CE QUI EST COUVERT
Il est garanti que toute la marchandise est exempte de défauts de fabrication et de matériel pendant un an après la date de l’achat. Cela comprend l’usure
normale et la défaillance des pièces. Le fabricant procédera au remplacement ou à la réparation, à son choix.
CE QUI N’EST PAS COUVERT
Cette garantie ne couvre que l’usure normale et la défaillance. Elle ne couvre aucune anomalie, défaillance ou défectuosité découlant de la mauvaise
utilisation, de l’abus, de la négligence ou de la modication du produit. Les dommages et les anomalies inigés au produit par l’utilisateur ou une autre
source extérieure et les manquements au respect des avertissements et les instructions ne sont pas couverts.
Pour obtenir de l’aide, rendez-vous à l’adresse www.DundasJane.com.
Renseignements relatifs à la sécurité
AVERTISSEMENT : an de réduire le risque d’incendie ou de blessure corporelle, suivez les précautions d’usage, notamment :
1) À n’utiliser qu’avec des sécheuses, ne pas utiliser à d’autres ns, quelles qu’elles soient.
2) Évitez les accumulations de charpie, de poussière ou de saletés près de la sortie d’évacuation et des zones environnantes.
3) L’intérieur du conduit d’évacuation doit être nettoyé régulièrement par un membre du personnel d’entretien qualié.
4) Le conduit d’évacuation d’une sécheuse à gaz doit toujours déboucher à l’air libre.
5) Contrôlez régulièrement le conduit d’évacuation pour vous assurer qu’il n’est pas comprimé ou obstrué de quelque façon que ce soit.
CONSERVEZ CES INSTRUCTIONS
AVIS :
• Le conduit d’évacuation de la sécheuse ne doit pas déboucher dans une cheminée, un mur, un plafond ou dans un vide de construction du bâtiment.
• Les vis qui peuvent retenir des peluches ne doivent pas être utilisées pour attacher des parties du conduit ensemble.
• Les conduits exibles doivent être étirés jusqu’à leur longueur maximale; conservez uniquement la longueur dont vous avez besoin et maintenez le
conduit le plus droit possible.
• Les codes du bâtiment locaux doivent être respectés pour l’installation.
• La longueur maximale du conduit est de 8 pi. Il ne doit y avoir aucune interconnexion entre les conduits.
DUNDASJAFINE.COM
OUTILS REQUIS
Ciseaux Couteau universel Tournevis
MATÉRIEL REQUIS (NON COMPRIS) :
Collier de serrage à vis sans n (2)
Mode d’emploi et
d’entretien
Conduit de ventilation pour sécheuse


