Dutch originals DO-SV-BTSB3-B User manual


EN 01
User Manual
Model: DO-SV-BTSB3-B
English
1) PACKAGE CONTENTS
Wireless BT detachable soundbar
(left & right)
Remote control
Stand (left & right)
3.5 mm – 3.5 mm audio cable
Power cord
User manual
Wall mount brackets, plug, screw
(2 pcs each)
Rubber feet (3 pcs)
2) SAFETY INSTRUCTIONS
Always take the following basaaic precautions before using the “wireless BT
detachable soundbar”, hereinafter referred to as the ‘device’.
General information
• Read the instructions for use carefully and keep them safe. If you give this device
to other people, please also pass on this manual.
• Only use this device in accordance with the instructions in this user manual.
• The device is not a toy. Keep it out of the reach of children and pets.
• All warnings on the device and in the operating instructions should be adhered to.
• WARNING! Do not leave packaging material lying around carelessly.
This may become dangerous playing material for children.
Risk of suffocation!
TABLE OF CONTENT:
1) Package contents
2) Safety instructions
3) Installing and using the product
4) Specication
5) Cleaning and maintenance
6) Storage & transportation
A
A
BB
CC
D
D
E
E
F
F
G
G
H
H

EN 02
Electricity and heat
• Prior to use, check that the mains voltage is the same as the mains voltage stated
on the device.
• Make sure your hands are dry before touching the device, power cord / plug.
• Insert the power plug into an electrical outlet that is easily accessible at all times
and a socket designed for 2 round pins (Types C, E, F, J, K and L).
• Do not operate the device using an external time switch or a separate remote
control system.
• WARNING! Never cover the device & power cord with cloths, curtains or
any other material to prevent overheating and possible re hazards.
• To reduce or prevent the risk of personal injury, electrical shock, re or damage;
never insert metal objects into any openings of the device, power cord or power
socket.
• When removing the power plug from the electrical outlet, always pull the power
plug, never pull the cord.
• Check the power cord regularly for damage.
• Never use the device if the power cord shows signs of damage, if the device has
fallen on the ground or shows any other signs of damage.
• Remove the power plug from the socket when the device is not in use or is being
cleaned.
• Make sure the power cord cannot be trodden on or pinched.
• Do not allow the power cord to hang over sharp edges and keep it away from hot
objects and naked ames.
• When plugging in the power cord, make sure people cannot accidentally pull it out
or trip over it.
• Remove the power cord from the power socket during lighting storms or if unused
for long periods of time.
• This device is a Class ll or double insulated electrical device. As a result, it does
not need to be electrically earthed.
Batteries and heat
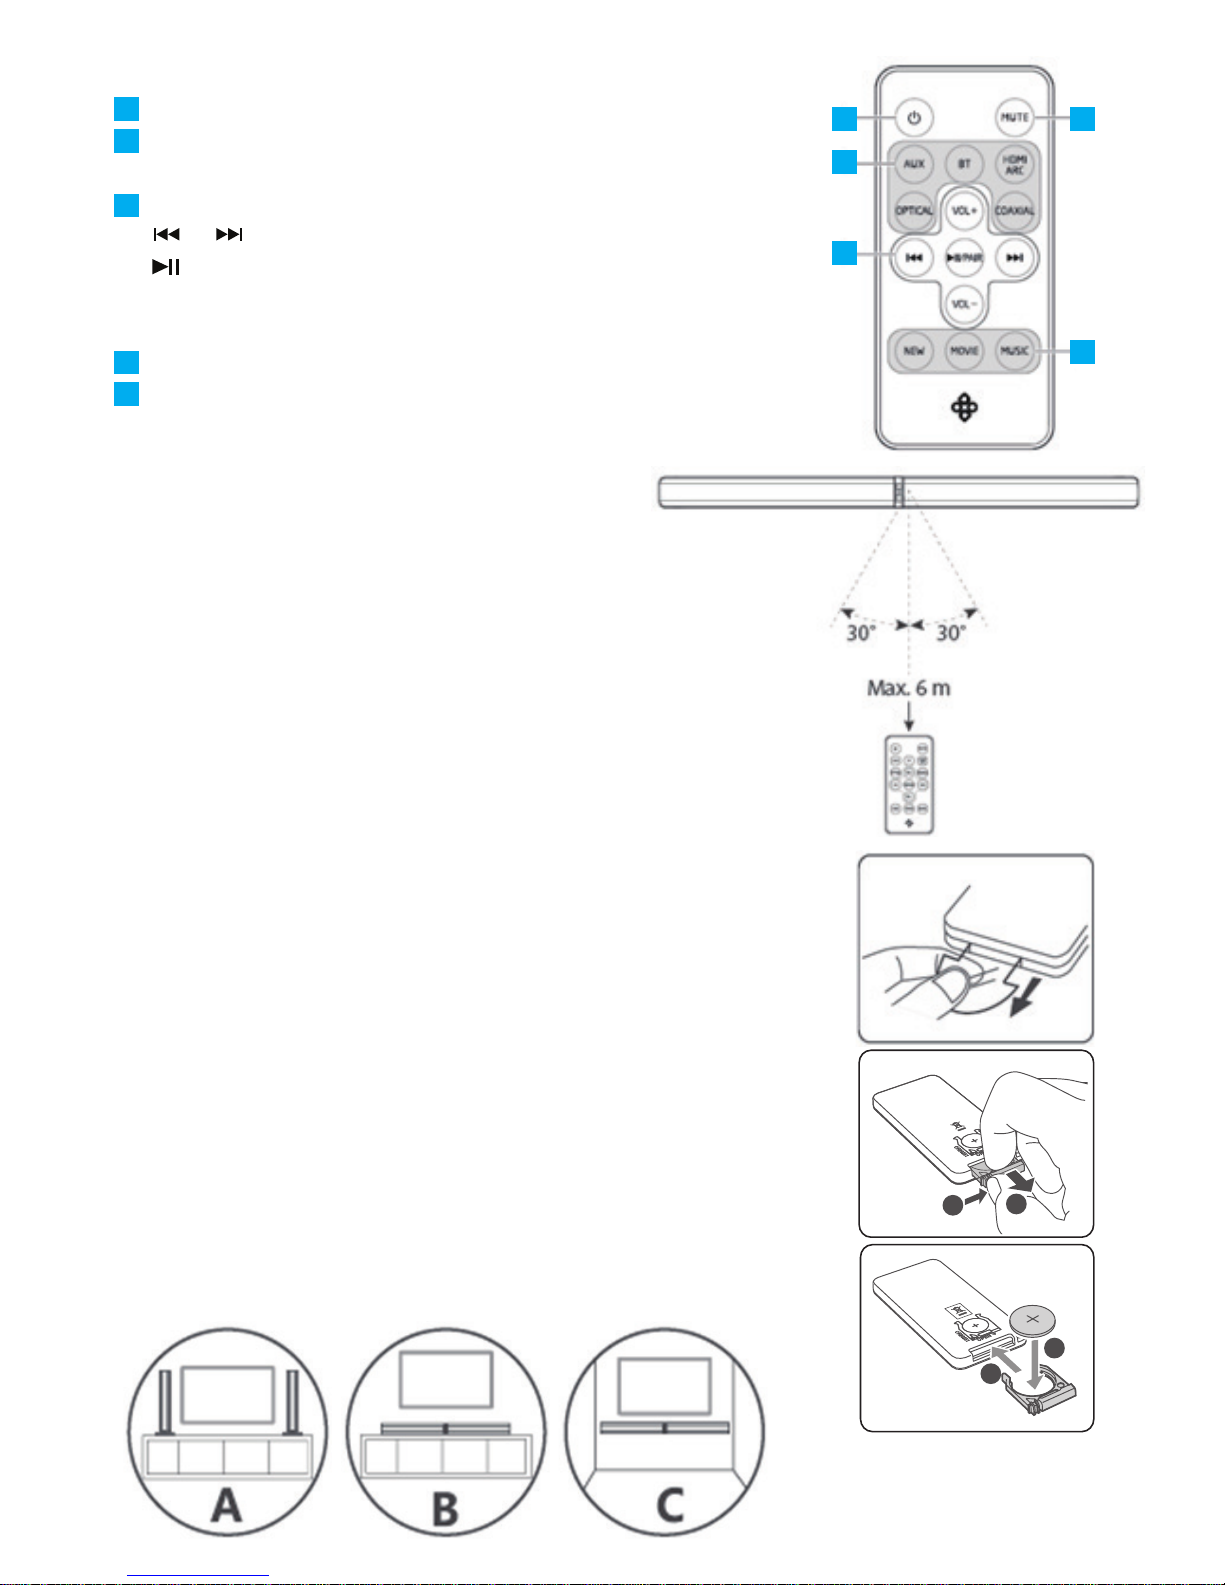
• Make sure the remote control battery compartment is secured.
• Only use batteries specied in the battery compartment (CR2025 / 3V).
• Make sure you respect the polarity when placing batteries.
• Do not short-circuit contacts inside the battery compartment or any batteries.
• To avoid leakage, remove the battery if the remote control is not used for a long
period of time.
• Empty batteries should be removed from the remote control to avoid leakage.
• If the battery leaks, do not allow battery uid to come into contact with the skin or
eyes. If contact has been made, wash the affected area with copious amounts of
water and seek medical advice.
• Keep batteries out of the reach of children.
• Do not expose the remote control to excessive heat sources like fire or direct
sunlight (including ampliers).

EN 03
• Do not crush, puncture or dismantle the remote control; this might damage the
battery.
• Damaging the casing of the remote control and/or piercing it can lead to explosion
or re!
• Do not throw the remote control or battery into a re because it may explode!
• Do not dispose of batteries in your household waste. Batteries can be disposed of
by taking them to your local recycling centre. Contact your local government ofces
for details.
Use
• This device is intended for domestic or similar use.
• Only use the device indoors, in dry areas and not in the vicinity of water, other
liquids or humidity.
• Avoid locations subject to vibrations, excessive dust, cold or humidity.
• Do not install near heat sources like radiators, heaters, stoves, or other equipment
(including ampliers) that produces heat.
• Do not expose the device to direct sunlight, excessive humidity or corrosive
environments.
• Do not block ventilation openings.
• Minimum distance around the apparatus for sufcient ventilation is 5 cm.
• Ventilation should not be impeded by covering ventilation openings with items like
newspapers, tablecloths, curtains, etc.
• Do not place the device under mechanical stress.
• Do not use or store the device in an environment subject to strong static electricity
or magnetic elds.
• Improper use of the device could damage the product.
• Please handle the device carefully. Impacts or falls, even from a low height, can
damage the device.
• Do not use the device if it has fallen into water or any kind of uid.
• Do not open the cabinet as this may result in electric shock.
• Do not attempt to disassemble or repair the device, or modify it in any manner.
• The device must be serviced if it has been damaged in any way, i.e. the power
supply cord is damaged; liquid has been spilled; objects have fallen into it; it has
been exposed to rain or moisture; has been dropped or does not operate normally.
• WARNING! To reduce the risk of re or electric shock, protect the device
from dripping or splashing water, and keep away from objects filled with
liquids, such as vases. These objects should not be placed on or near the device.
• Do not use abrasive cleaning solvents to clean the device.
• Do not use foreign objects to clean the device.
• WARNING! To prevent possible hearing damage, do not listen at high
volume for long periods.

EN 04
3) INSTALLING AND USING THE DEVICE
Open the packaging carefully before taking out the device. Make sure the device is
complete and undamaged. If any components are missing or damaged, contact the
vendor and do not use the product. Retain the packaging or recycle it in accordance
with local regulations.
Parts & features device
Speakers
Remote control sensor
Wall bracket screws
SRC button, select the input source
Power ON/OFF button (Standby mode)
LED indicators
VOL+/VOL- buttons, decrease/increase the volume level
AUX port (3.5 mm audio input jack)
Coaxial port
OPTICAL out port
HDMI ARC port
AC power socket
1
1 1
2
2
3
3
4
4
5
5
9
9
10
10
11
11
12
12
6
6
7
7
8
8

EN 05
Parts & features remote control
Power ON/OFF button (Standby mode)
Input source selection button
(AUX-BT-HDMI-OPTICAL-COAXIAL)
VOL+/VOL- buttons, increase/decrease the volume level.
& buttons, skip to previous/next track in BT mode.
/PAIR button, play/pause playback in BT mode &
press and hold to activate the pairing function in
BT mode or disconnect the existing paired BT device.
Mute button, mute or resume the sound
Music EQ button, equalizer, select a pre-set sound effect
Initial setup remote control
The provided remote control allows
the device to be operated from a distance.
Even if the remote control is operated within the
effective range (<6m), remote control operation may be
impossible if there are obstacles between the device
and the remote control.
The device may operate incorrectly if the remote
control is operated near other products that generate
infrared rays, or if other remote control devices using
infra-red rays are used near the device. Conversely,
the other products may operate incorrectly.
First-time use:
The remote control has a pre-installed lithium CR2025
battery. Remove the protective tab to activate the
remote control battery.
Inserting the remote control battery:
1) Push the security lock
2) Pull out the battery tray and remove the old battery.
3) Place a new CR2025 battery into the battery tray
with correct polarity (+/-) as indicated.
4) Replace battery tray in the slot.
Placement / mounting of the device
The device can be placed vertically on its stand,
horizontally on a table or TV stand, or attached to a
wall.
A
B
C
D
E
A
B
C
D
E
12
4
3

EN 06
B. If your TV is placed on a table or TV stand, you can place the device on it directly
in front of the TV, centred with the TV screen.
To avoid and absorb vibrations, install the rubber feet supplied under the device.
To install the rubber foot:
Note: Ensure the surface is clean prior to sticking the rubber foot to the bottom of the
device.
1. Turn the device upside down.
2. Remove the backing paper from the rubber foot.
3. Stick the rubber foot to the bottom of the device as shown in the illustration below.
Note: The device will increase a bit in height due to the placement of the foot.
A. Stand mounting (vertical)
Place the device on the stand and turn it counter-clockwise until it is solidly attached
to the stand.
Connect the cables of the stand with each other.

C. If your TV is attached to the wall, you can mount the device centred on the wall
directly below the TV screen.
Installation must only be carried out by qualied personnel. Incorrect assembly can
result in severe personal injury and damage.
If you intend to install this device yourself, you must check for installations such
as electrical wiring and plumbing that may be buried inside the wall. The installer
is responsible for verifying whether the wall will safely support the total load of the
device and wall brackets.
Additional tools (not included) are required for installation.
Do not over-tighten screws.
Use an electronic stud nder to check the wall before drilling and mounting.
1) Remove the screws from the device.
2) Attach the wall brackets to the device using the screws removed from the device.
3) Drill 2 parallel holes (Ø 3-8 mm each according to wall type) in the wall. The
distance between the holes should be 767 mm.
4) Firmly x 1 plug into each hole in the wall if necessary.
5) Insert 1 screw into each hole or plug. Leave a 5 mm gap between the wall and
the screw head. Lift the device with the attached wall brackets over the heads of the
screws and slot into place.
EN 07

Connections
HDMI ARC port
You can connect the device to any AV and TV featuring a HDMI ARC (Audio Return
Channel) port.
The ARC function allows you to send audio from your ARC compliant TV to your
device through a single HDMI connection. To use the ARC function, please make
sure your TV is equipped with HDMI-CEC and ARC.
When correctly set up, you can use your TV remote control to adjust the volume of
the connected device.
Connect the HDMI cable (not included) from the device’s HDMI port to the HDMI
(ARC) port on your TV (minimum HDMI 1.4).
Then press the SOURCE button on the device until the LED indicator ashes
green or press the HDMI ARC button on the device’s remote control to select
HDMI ARC source mode. The LED indicator will ash green.
Please note:
• Your TV must support the HDMI-CEC and ARC function. HDMI-CEC and ARC
must be set to ON, on your TV.
• The setting method for HDMI-CEC and ARC may differ depending on your TV. For
details about the ARC function, please refer to the manual of your TV.
• Only HDMI 1.4 cables can support the ARC function!
Optical port
You can connect the device to any AV and TV featuring an optical port.
The optical port allows you to send audio from your TV to your device via an optical
connection. To use the optical function, please make sure your TV features an optical
port.
EN 08
11
4 6
6
B

Remove the protective cap from the optical port ; then connect an optical cable
(not included) between the TV’s optical out port and the optical port on the device.
Then press the SOURCE button on the device until the LED indicator lights
up orange or press the OPTICAL button on the device’s remote control to select
optical mode. The LED indicator will light up orange.
Please note:
If there is no sound output and the indicator ashes, make sure the audio setting
on the input source (e.g. TV, game console, DVD player, etc.) is changed to "PCM"
with optical and coaxial output.
Coaxial port
You can connect the device to any coaxial AV and TV out port via the coaxial port.
The coaxial port allows you to send audio from your TV to your device via a coaxial
connection. To use the coaxial function, please make sure your TV features a
coaxial port.
Connect a coaxial cable between the TV’s coaxial out port and the coaxial port
on the device.
Then press the SOURCE button on the device until the LED indicator ashes
orange or press the COAXIAL button on the device’s remote control to select
coaxial mode. The LED indicator ashes orange.
AUX port
You can connect the device to any AV and TV via the AUX port.
The AUX port allows you to send audio from your TV to your device via an AUX (3.5
mm) connection. To use the AUX function, please make sure your TV features an
AUX port.
EN 09
10
4
4
6
6
9
6
6
5
B
B

Connect an AUX cable between the TV’s AUX out port and the AUX port on the
device.
Then press the SOURCE button on the device until the LED indicator lights
up green or press the AUX button on the device’s remote control to select AUX
mode. The LED indicator will light up green.
A. Use a RCA to 3.5 mm audio cable (included) to connect the TV’s audio output port
to the AUX port on the device.
B. Use a 3.5 mm to 3.5 mm audio cable (included) to connect an external audio
device headphone socket to the AUX socket on the device.
Power connection
Before connecting the AC power cord, make sure you have completed all other
connections.
• Prior to use, check that the mains voltage is the same as the mains voltage stated
on the device.
• Plug the power plug into the mains supply.
• Plug the power plug of the power cord into the AC power socket of the device .
• The device is now in standby mode. The standby LED indicator will light up red.
Power ON/OFF – Standby
Press the power button on the device or press the power button on the
device’s remote control to switch it ON.
The LED indicator of the last used source mode will light up.
Press the power button on the device or press the power button on the
device’s remote control to switch the device to standby mode. The LED Indicator
will light up red.
Disconnect the power plug from the mains supply if you want to switch the device
OFF completely.
Please note:
If the device is not in use (no input), it will automatically go into standby mode
after 15 minutes.
If the device’s external input signal is too low, it will automatically go to standby
mode after 15 minutes. Please increase the input signal of your externally connected
device.
EN 10
4 6
6
6
6
5
5
8
8
6
B
A
A
12

MODE selection
Press the SOURCE button on the device, or the desired AUX – BT - HDMI ARC –
OPTICAL – COAXIAL button on the device’s remote control to select the desired
input mode.
The selected mode will be shown on the devices LED indicator :
• RED: standby mode.
• GREEN: AUX mode.
• GREEN FLASH: HDMI ARC mode.
• BLUE: BT mode.
• ORANGE: optical mode.
• ORANGE FLASH: coaxial mode.
Please note:
If the device source is in BT mode, and the BT connection is no longer active or out
of range, the LED indicator will ash blue.
If the device source is in HDMI ARC mode, and there is no active input signal, the
LED indicator will ash green.
Volume control
• Press the volume + & - buttons on the device, or the VOL+ & VOL- buttons
on the device’s remote control to adjust the volume.
• If you wish to turn the sound OFF, press the MUTE button on the remote control.
Press the MUTE button again or press the VOL+ or VOL- button to resume
normal volume.
• While adjusting the volume, the LED indicator of the selected source mode will
ash quickly.
• When the volume level reaches maximum, and you try to increase it further, the
LED indicator for the selected source will ash once.
• When the volume level reaches its minimum, and you try to decrease it further, the
LED indicator of the selected source will ash once.
Select a pre-set sound effect
While playing, press the NEWS, MOVIE, MUSIC buttons on the device’s remote
control to select the desired pre-set equalisers.
Pre-set modes
• Movie (recommended for viewing movies).
• Music (recommended for listening music).
• NEWS (recommended for listening news / talk).
While selecting a pre-set sound effect, the LED indicator of the selected source
ashes quickly.
MODE selection (AUX / COAXCIAL / HDMI ARC / OPTICAL)
Make sure that the device is connected to the TV or audio device.
EN 11
4
6
B
C
C
E
D
D
6
6
6
6
6
6
7

While the device is powered ON, press the SOURCE button on the device,
or AUX – HDMI ARC – OPTICAL - COAXIAL button on the remote control to
select the desired source mode. The LED indicator will light up in the colour of the
selected source.
You can operate your sound and playback features directly from your connected
audio device.
Please note:
If there is no sound output and the LED indicator of the selected source mode
is ashing, make sure the audio setting of the input source (e.g. TV, game console,
DVD player, etc.) is changed to "PCM" on your audio device (e.g. CD, DVD, Blu-ray).
Making a BT connection
You will need to pair your BT enabled audio player with the device when you use it
for the rst time.
• Press the SOURCE button on the device or the BT button on the device’s
remote control to select BT mode. The LED Indicator will ash blue slowly. The
device is now in pairing mode.
• Keep your BT enabled audio player within 1 m (3 ft) of the device during the pairing
process.
• Make your BT enabled audio player search for compatible BT devices and select
”DO-SV-BTSB3” from the list of found devices. Once successfully paired, you will
hear the voice prompt “paired“ and the LED indicator will light up blue.
• If you cannot nd the device in the list of available BT connections, you can start
the pairing process manually. Press and hold the /PAIR button on the device
remote control. You will hear the voice prompt “pairing“ from the device. The LED
Indicator will ash blue rapidly.
• Select ”DO-SV-BTSB3” from the list of found devices. After the “paired” voice
prompt, the BT connection will be successfully established and the LED indicator
will light up blue.
• If you want to connect another BT enabled audio player to the device, press the /
PAIR button on the remote control to disconnect the active paired connection,
until you hear the voice prompt “disconnected”.
• If you want to play and/or pause music on your connected BT audio player, open
your media player and press play/pause.
• To control your music, use the play, track & volume buttons on your connected BT
audio player or use the “control buttons” on the control panel of the device or remote
control.
• If a paired BT audio player is within range, it will automatically connect to the
device.
Please note:
• If a PIN code is requested when making a BT connection, enter 0000.
EN 12
B
B
C
C
4
4
6
6
6
6
6
6

• If there is an existing BT connection, press and hold the /PAIR button on
the remote control to re-activate the pairing mode. The existing connection will be
interrupted and you will hear the voice prompt “disconnected”.
• If a paired BT audio player gets out of range, it will disconnect from the device and
you will hear the voice prompt “disconnected”.
• If no other BT device pairs with the device within two minutes, the player will restore
its previous connection/mode.
Listening to music from BT enabled audio player.
You can listen to your music of the connected BT enabled audio player, if it supports
Advanced Audio Distribution Prole (A2DP).
The device supports Audio Video Remote Control (AVRCP), which means you can
use the device’s remote control to play music on the BT enabled audio player.
• To play music of your connected audio player, you can use the control buttons of
your media player.
• To play/pause music of your connected audio player, you can use the /PAIR
button on the device’s remote control.
• To play the next or previous track of your connected audio player, you can use the
& buttons on the device’s remote control.
4) SPECIFICATIONS
• Power input: 220-240 Vac – 50/60Hz
• Power consumption: 30W (<0.5W in standby mode)
• Stereo speakers: 50W (2x 25W)
• Speaker resistance: 2x 8 Ω
• Frequency response: 40 Hz – 20 kHz
• BT version 4.2
• Transmission power: class II
• Maximum power transmitted: <5dbm
• Operation distance: up to 10 m
• Frequency: 2.4 Ghz. – 2.48 Ghz
• BT proles: A2DP, AVRCP
• Remote control distance: 6m, angle 30°
• Dimensions: 80 x 6 x 6 cm (L x W x H) horizontal - soundbar
• Dimensions: 12.8 x 12.8 x 46.7 cm (L x W x H) vertical – stand/tower speaker
• Weight: 1.4 Kg. horizontal - soundbar
• Weight: 1.6 Kg. vertical – stand/tower speaker
5) CLEANING AND MAINTENANCE
Warning
Before cleaning the device, always switch it OFF, disconnect it from the mains
electricity and allow it to cool down fully.
EN 13
C
C
C

Your product has been manufactured using high quality materials and components
which can be recycled and used again. At the end of its service life, this product
cannot be disposed of in normal domestic waste, but must be taken to a special
collection point for recycling electrical and electronic equipment. This is indicated in
the user manual and in the packaging by the waste container marked with a cross
symbol. Used raw materials are suitable for recycling.
By recycling used appliances or raw materials, you are playing an important role in protecting
our environment. You can ask your local council about the location of your nearest collection
point.
INSTRUCTIONS FOR PROTECTING THE ENVIRONMENT
(WEEE, the waste electrical and electronic equipment directive)
Cleaning
• Never use aggressive or abrasive cleaning materials, cleaning alcohol or sharp
objects like hard brushes.
• Clean the exterior of the casing and the power cord with a damp cloth.
• Then dry the exterior with a dry cloth.
6) STORAGE & TRANSPORTATION
• When storing the device, it should first be cleaned in accordance with this user
manual. The device should be stored in its original packaging.
• Always store the device in a dry and well-ventilated room and beyond the reach of
children.
• Protect the device against vibrations and shocks during transport.
All contents and specications mentioned in this manual are subject to change without prior notice.
EN 14

GEBRUIKSHANDLEIDING
DO-SV-BTSB3-B
Nederlands
A B C
D E F
G H
NL 01
1) INHOUD VERPAKKING
Draadloze scheidbare BT soundbar
(links en rechts)
Afstandsbediening
Standaard (links en rechts)
3,5 mm – 3,5 mm audiokabel
Stroomsnoer
Gebruikershandleiding
Beugels, pluggen, schroeven (van elk 2)
voor montage aan de muur
Rubber pootjes (3 stuks)
2) VEILIGHEIDSINSTRUCTIES
Tref altijd de volgende algemene voorzorgsmaatregelen voordat u de ‘Draadloze
scheidbare BT soundbar’ gebruikt (hierna ‘apparaat' te noemen).
Algemene informatie
• Lees de gebruiksaanwijzingen zorgvuldig en bewaar ze op een veilige plek. Als u
dit apparaat aan iemand anders geeft, geef deze handleiding daar dan bij.
• Gebruik dit apparaat uitsluitend volgens de instructies in deze gebruikshandleiding.
• Dit apparaat is geen speelgoed! Houd het buiten bereik van kinderen en
huisdieren.
• Houd u aan alle waarschuwingen weergegeven op het apparaat en in de
handleiding.
• WAARSCHUWING! Laat verpakkingsmateriaal niet onbeheerd
rondslingeren. Het kan gevaar opleveren wanneer kinderen ermee spelen.
Kans op verstikking!
INHOUDSOPGAVE:
1) Inhoud verpakking
2) Veiligheidsinstructies
3) Het product installeren en gebruiken
4) Specicaties
5) Reiniging en onderhoud
6) Opslag en transport
A
B
C
D
E
F
G
H

NL 02
Elektriciteit en warmte
• Controleer vóór gebruik of de netspanning gelijk is aan de spanning vermeld op
het apparaat.
• Zorg ervoor dat uw handen droog zijn als u het apparaat, het stroomsnoer of de
stekker gaat reinigen.
• Steek de stekker in een stopcontact dat gemakkelijk toegankelijk is en dat is
bedoeld voor 2 ronde pinnen (type C, E, F, J, K en L).
• Gebruik het apparaat niet met een externe tijdschakelaar of een afzonderlijke
afstandsbediening.
• WAARSCHUWING! Bedek het apparaat en het stroomsnoer nooit met
doeken, gordijnen of enig ander materiaal om oververhitting en mogelijk zelfs
brand te voorkomen.
• Om het risico van persoonlijk letsel, elektrische schok, brand of schade te
verminderen of voorkomen, moet u nooit metalen voorwerpen in een opening van
het apparaat, het stroomsnoer of het stopcontact steken.
• Wanneer u de stekker uit het stopcontact haalt, trek dan aan de stekker zelf en
nooit aan het snoer.
• Controleer het stroomsnoer regelmatig op beschadigingen.
• Gebruik het apparaat niet als het snoer of de stekker beschadigingen vertoont of
als het apparaat op de grond is gevallen of andere sporen van schade vertoont.
• Haal altijd de stekker uit het stopcontact wanneer u het apparaat niet gebruikt of
wilt reinigen.
• Zorg ervoor dat niemand op het stroomsnoer kan staan of dat het snoer anderszins
kan worden bekneld.
• Laat het stroomsnoer niet over scherpe randen hangen en houdt het uit de buurt
van warme objecten en open vuur.
• Wanneer u de stekker van het stroomsnoer in het stopcontact steekt, zorg er dan
voor dat niemand de stekker per ongeluk los kan trekken of over het snoer kan
struikelen.
• Haal de stekker van het stroomsnoer uit het stopcontact als het onweert of als u
het apparaat gedurende langere tijd niet gebruikt.
• Dit apparaat is een klasse II of dubbel geïsoleerd elektrisch apparaat. Het apparaat
hoeft daarom niet te worden geaard.
Batterijen en warmte
• Zorg ervoor dat het batterijvakje van de afstandsbediening goed dicht zit.
• Gebruik alleen de batterijen die worden aangegeven in het batterijvakje (CR2025 /
3V).
• Let bij het plaatsen van de batterijen op de juiste polariteit.
• Voorkom kortsluiting tussen de contactpunten in het batterijvakje of tussen
batterijen.
• Om lekkage van batterijen te voorkomen, raden wij aan de batterijen te verwijderen
als u het apparaat gedurende langere tijd niet gebruikt.
• Lege batterijen moeten uit de afstandsbediening worden verwijderd om te
voorkomen dat ze gaan lekken.

NL 03
• Wanneer een batterij lekt, zorg er dan voor dat er geen batterijvloeistof terecht
komt op uw huid of in uw ogen. Wanneer batterijvloeistof in contact is gekomen
met de huid of ogen, moet het betreffende gebied worden afgespoeld met grote
hoeveelheden water en moet u een arts raadplegen.
• Houd batterijen buiten bereik van kinderen.
• Zorg ervoor dat de afstandsbediening niet wordt blootgesteld aan extreme
warmtebronnen, zoals versterkers, vuur of rechtstreeks zonlicht.
• Zorg ervoor dat de afstandsbediening niet wordt beschadigd of gedemonteerd;
hierdoor kan de batterij beschadigd raken.
• Beschadiging van de behuizing van de afstandsbediening kan leiden tot een
explosie of brand!
• Gooi de afstandsbediening of de batterij ervan nooit in een vuur omdat deze
kunnen ontploffen!
• Gooi batterijen nooit weg bij het huishoudelijk afval. U kunt batterijen inleveren bij
het lokale recycle-centrum. Neem contact op met de lokale overheidsinstanties voor
nadere informatie.
Gebruik
• Dit apparaat is uitsluitend bedoeld voor huishoudelijk of vergelijkbaar gebruik.
• Gebruik het apparaat uitsluitend binnenshuis, in droge gebieden en niet in de buurt
van water, andere vloeistoffen of vocht.
• Vermijd locaties die blootstaan aan trillingen, vrieskou, een te hoge luchtvochtigheid
of een buitensporige hoeveelheid stof.
• Plaats het apparaat niet in de buurt van warmtebronnen, zoals radiatoren,
verwarmingselementen, kachels of andere producten (waaronder versterkers) die
warmte produceren.
• Bescherm het apparaat tegen direct zonlicht, overmatige vochtigheid en corrosieve
omgevingen.
• Zorg ervoor dat ventilatie-openingen niet worden geblokkeerd.
• De minimum afstand rond het apparaat voor voldoende ventilatie is 5 cm.
• De ventilatie mag niet worden gehinderd door het afdekken van ventilatie-
openingen met dingen zoals kranten, tafelkleden en gordijnen.
• Zorg ervoor dat het apparaat niet wordt blootgesteld aan enige mechanische
belasting.
• Gebruik of bewaar het apparaat niet in een omgeving met sterke statische
elektriciteit of magnetische velden.
• Het apparaat kan beschadigd raken als het verkeerd wordt gebruikt.
• Ga voorzichtig met het apparaat om. Het apparaat kan beschadigd raken door een
stoot of val, zelfs van een geringe hoogte.
• Gebruik het apparaat niet als het in water of een andere vloeistof is gevallen.
• Bij het openen van de behuizing bestaat de kans op een elektrische schok.
• Probeer het apparaat niet te demonteren, te repareren of anderszins aan te
passen.
• Het apparaat moet worden gerepareerd als er sprake is van enige vorm van
schade, wanneer bijvoorbeeld het stroomsnoer is beschadigd, er vloeistof op

1 12
3
NL 04
het apparaat is gemorst, voorwerpen op het apparaat zijn gevallen, het apparaat
is blootgesteld aan regen of vocht, het apparaat is gevallen of het apparaat niet
normaal functioneert.
• WAARSCHUWING! Om de kans op brand of elektrische schokken te
verminderen moet u het apparaat beschermen tegen druppelend of
opspattend water en uit de buurt houden van met water gevulde voorwerpen, zoals
vazen. Dergelijke voorwerpen mogen niet op of in de buurt van het apparaat worden
geplaatst.
• Gebruik geen schurende schoonmaakmiddelen om het apparaat te reinigen.
• Gebruik geen vreemde voorwerpen om het apparaat te reinigen.
• WAARSCHUWING! Om gehoorschade te voorkomen, raden wij aan het
volume niet langdurig op een hoog niveau te houden.
3) INSTALLATIE EN GEBRUIK VAN HET APPARAAT
Open de verpakking voorzichtig en haal het apparaat eruit. Controleer of het
apparaat volledig en onbeschadigd is. Mochten er onderdelen beschadigd zijn
of ontbreken, neem dan contact op met de verkoper en gebruik het product niet.
Bewaar de verpakking of recycle deze zoals voorgeschreven door lokale regelgeving.
Onderdelen en functies van het apparaat
Speakers
Sensor afstandsbediening
Schroeven voor de muurbeugel
SRC-knop, voor het selecteren van de ingangsbron
Aan/uit-knop (standby-modus)
LED-indicatielampjes
Knoppen VOL+/VOL- voor het verlagen/verhogen van het volume
AUX-poort (3,5 mm audio-ingangstekker)
Coax-poort
OPTISCHE uitgang
HDMI ARC-poort
Stopcontact (wisselstroom)
1
2
3
4
5
9
10
11
12
6
7
8
Table of contents
Languages:
Other Dutch originals Speakers System manuals