Dutch originals DO-SV-BTSB6-B User manual


EN 01
User Manual
Model: DO-SV-BTSB6-B
English
1) PACKAGE CONTENTS
Soundbar with wireless BT function
3.5 mm – 3.5 mm AUX IN audio cable
3.5 mm – RCA cable
Power adapter
Remote control
Mounting screws (2 pcs)
User manual
2) SAFETY INSTRUCTIONS
Always take the following basic precautions before using the “Soundbar with wireless
BT function”, hereinafter referred to as the ‘device’.
General information
• Read the instructions for use carefully and keep them safe. If you give this device
to other people, please also pass on this manual.
• Only use this device in accordance with the instructions in this user manual.
• The device is not a toy. Keep it out of the reach of children and pets.
• All warnings on the device and in the operating instructions should be adhered to.
• WARNING! Do not leave packaging material lying around carelessly.
This may become dangerous playing material for children.
Risk of suffocation!
TABLE OF CONTENT:
1) Package contents
2) Safety instructions
3) Installing and using the product
4) Specication
5) Cleaning and maintenance
6) Storage & transportation
A
B
C
D
E
F
G
A
B C D E F G

EN 02
Electricity and heat
• Prior to use, check that the mains voltage is the same as the mains voltage stated
on the device.
• Make sure your hands are dry before touching the device, power cord / plug.
• Insert the power plug into an electrical outlet that is easily accessible at all times
and a socket designed for 2 round pins (Types C, E, F, J, K and L).
• Do not operate the device using an external time switch or a separate remote
control system.
• WARNING! Never cover the device & power cord with cloths, curtains or
any other material to prevent overheating and possible re hazards.
• To reduce or prevent the risk of personal injury, electrical shock, re or damage;
never insert metal objects into any openings of the device, power cord or power
socket.
• When removing the power plug from the electrical outlet, always pull the power
plug, never pull the cord.
• Check the power cord regularly for damage.
• Never use the device if the power cord shows signs of damage, if the device has
fallen on the ground or shows any other signs of damage.
• Remove the power plug from the socket when the device is not in use or is being
cleaned.
• Make sure the power cord cannot be trodden on or pinched.
• Do not allow the power cord to hang over sharp edges and keep it away from hot
objects and naked ames.
• When plugging in the power cord, make sure people cannot accidentally pull it out
or trip over it.
• Remove the power cord from the power socket during lighting storms or if unused
for long periods of time.
• This device is a Class ll or double insulated electrical device. As a result, it does
not need to be electrically earthed.
Batteries and heat
• Make sure the remote control battery compartment is secured.
• Only use batteries specied in the battery compartment (CR2025 / 3V).
• Make sure you respect the polarity when placing batteries.
• Do not short-circuit contacts inside the battery compartment or any batteries.
• To avoid leakage, remove the battery if the remote control is not used for a long
period of time.
• Empty batteries should be removed from the remote control to avoid leakage.
• If the battery leaks, do not allow battery uid to come into contact with the skin or
eyes. If contact has been made, wash the affected area with copious amounts of
water and seek medical advice.
• Keep batteries out of the reach of children.
• Do not expose the remote control to excessive heat sources like fire or direct
sunlight (including ampliers).

EN 03
• Do not crush, puncture or dismantle the remote control; this might damage the
battery.
• Damaging the casing of the remote control and/or piercing it can lead to explosion
or re!
• Do not throw the remote control or battery into a re because it may explode!
• Do not dispose of batteries in your household waste. Batteries can be disposed of
by taking them to your local recycling centre. Contact your local government ofces
for details.
Use
• This device is intended for domestic or similar use.
• Only use the device indoors, in dry areas and not in the vicinity of water, other
liquids or humidity.
• Avoid locations subject to vibrations, excessive dust, cold or humidity.
• Do not install near heat sources like radiators, heaters, stoves, or other equipment
(including ampliers) that produces heat.
• Do not expose the device to direct sunlight, excessive humidity or corrosive
environments.
• Do not block ventilation openings.
• Minimum distance around the apparatus for sufcient ventilation is 5 cm.
• Ventilation should not be impeded by covering ventilation openings with items like
newspapers, tablecloths, curtains, etc.
• Do not place the device under mechanical stress.
• Do not use or store the device in an environment subject to strong static electricity
or magnetic elds.
• Improper use of the device could damage the product.
• Please handle the device carefully. Impacts or falls, even from a low height, can
damage the device.
• Do not use the device if it has fallen into water or any kind of uid.
• Do not open the cabinet as this may result in electric shock.
• Do not attempt to disassemble or repair the device, or modify it in any manner.
• The device must be serviced if it has been damaged in any way, i.e. the power
supply cord is damaged; liquid has been spilled; objects have fallen into it; it has
been exposed to rain or moisture; has been dropped or does not operate normally.
• WARNING! To reduce the risk of re or electric shock, protect the device
from dripping or splashing water, and keep away from objects filled with
liquids, such as vases. These objects should not be placed on or near the device.
• Do not use abrasive cleaning solvents to clean the device.
• Do not use foreign objects to clean the device.
• WARNING! To prevent possible hearing damage, do not listen at high
volume for long periods.

EN 04
3) INSTALLING AND USING THE DEVICE
Open the packaging carefully before taking out the device. Make sure the device is
complete and undamaged. If any components are missing or damaged, contact the
vendor and do not use the product. Retain the packaging or recycle it in accordance
with local regulations.
Parts & features device
Right side panel
[POWER] button: Power ON/OFF
[MODE] button: AUX IN 1 – AUX IN 2 - BT
[VOL - / ] button:
• Decrease volume
• Skip to previous track
[ ] button: Play/Pause
[VOL + / ] button:
• Increase volume
• Skip to next track
LINE IN 1: AUX IN Jack port
LINE IN 2: AUX IN Jack port
DC14V: Power adapter input
Front panel
LINE IN 1: Line in 1 LED indicator light
LINE IN 2: Line in 2 LED indicator light
BT: BT LED indicator light
IR: Infrared sensor
Remote control
[ ] button: press this button to turn ON/OFF the
device (standby mode)
[MODE] button: input source selection:
AUX IN 1 - AUX IN 2 - BT
[ ] button: to mute or resume the sound
[ ] button: Skip to previous track
[ ] button: Play/Pause sound
[ ] button: Skip to next track
[ - ] button: Decrease volume
[ + ] button: Increase volume
[RESET] button: Restore settings
1
2
3
4
5
9
10
11
12
6
7
8
1
2
3
4
5
6
7
8
9
1
2
3
4
5
6
7
8
9
10
11
12
1
4
7
2
3
5
6
8
9

EN 05
Initial setup remote control
The provided remote control allows the device to be operated from a distance.
Even if the remote control is operated within the effective range (<7m),
remote control operation may be impossible if there are obstacles between the
device and the remote control.
The device may operate incorrectly if the remote control is operated near
other products that generate infrared rays, or if other remote control devices using
infra-red rays are used near the device. Conversely, the other products may operate
incorrectly.
First-time use:
The battery for the remote control (CR2025 Lithium battery) is included in the remote
control.
The remote control is packed with a plastic protection tab. Before operating the
remote, gently pull the protective tab that extends out of the remote control’s battery
hatch.
Replacing the battery:
To replace the battery, open the battery hatch, lift out the old battery, and insert a new
CR2025 battery with the positive (+) polarity facing upwards. Slide the battery hatch
back into the remote control.
Keep the remote control within a distance of 7 metres (without obstructions) and
within a 30 degree angle to aim to the unit.
Precautionary note
Remove the battery when the unit is not being used for a long period of time.
Placement / mounting of the device
The device can be placed horizontally on a table or TV stand, or attached to a wall.
If your TV is placed on a table or TV stand, you can place the device on it directly in
front of the TV, centred with the TV screen.

EN 06
If your TV is attached to the wall, you can mount the device centred on the wall
directly below the TV screen.
Installation must only be carried out by qualified personnel. Incorrect assembly
can result in severe personal injury and damage. If you intend to install this device
yourself, you must check for installations such as electrical wiring and plumbing that
may be buried inside the wall. The installer is responsible for verifying whether the
wall will safely support the total load of the device. Additional tools (not included) are
required for installation. Do not over-tighten screws. Use an electronic stud nder to
check the wall before drilling and mounting.
1) Measure a width of 80 cm (31.5 inches) on the wall.
2) Mark the position of the mounting screws on the wall using a pencil.
3) Drill 2 parallel holes (Ø 7-8 mm each according to wall type) in the wall. The
distance between the holes should be 80 cm.
4) Firmly x 1 plug into each hole in the wall if necessary.
5) Insert 1 screw into each hole or plug. Leave a 7 to 8 mm gap between the wall and
the screw head. Lift the device over the heads of the screws and slot into place.
Connections
Power connection
Before connecting the power adapter, make sure you have completed all other
connections.
• Prior to use, check that the mains voltage is the same as the mains voltage stated
on the device.
• Plug the power adapter into an electrical outlet.
• Plug the power plug of the power adapter into the power socket of the device .
• The device is now in standby mode.
Making a wireless BT connection
You will need to pair your BT enabled audio player with the device when you use it
for the rst time.
• Turn the device ON by pressing the power [ON/OFF] button on the remote
control.
• Press the [MODE] button on the device or press the [MODE] button on the
D
D
1
2 2
8

device’s remote control to select the BT mode. A tone will sound and The BT LED
indicator light will ash blue quickly, indicating it’s in pairing mode.
• Keep the device and your BT enabled audio player within 1 M (3 ft) of each other
during the pairing process.
• Make your BT enabled audio player search for compatible BT devices and select
”DO-SV-BTSB6” from the list of found devices.
• If required, enter the password 0000 (four times zero). Select “OK” or “YES” on your
BT enabled audio player to pair the two units.
• A tone will sound to indicate successful pairing. The BT LED indicator light will
stop ashing and will turn blue, indicating that your device is connected.
• If you want to connect another BT enabled audio player to the device, you must
disconnect the active paired connection from the active BT enabled audio player.
Go to your device’s BT settings, select “DO-SV-BTSB6”, and select “disconnect” or
“unpair”. You can also switch OFF the BT function on BT enabled audio player. When
the device has been unpaired and/or does not have an active paired BT connection,
repeat the pairing process with the (new) BT enabled audio player you want to
connect to the device.
• If you want to play and/or pause music on your connected BT audio player, open
your media player and press play/pause.
• To control your music, use the play, track & volume buttons on your connected BT
audio player or use the “control buttons” on the control panel of the device or remote
control.
• If a paired BT audio player is within range, it will automatically connect to the
device.
Please note:
If there are no paired BT audio players in range when the device is turned ON, it will
automatically go into BT pairing mode.
Listening to music from BT enabled audio player.
You can listen to your music of the connected BT enabled audio player, if it supports
Advanced Audio Distribution Prole (A2DP).
The device supports Audio Video Remote Control (AVRCP), which means you can
use the device’s remote control to play music on the BT enabled audio player.
• To play music of your connected audio player, you can use the control buttons of
your media player.
• To play/pause music of your connected audio player, you can use the play/
pause button on the device’s remote control.
• To play the next or previous track of your connected audio player, you can use the
previous track & next track buttons on the device’s remote control.
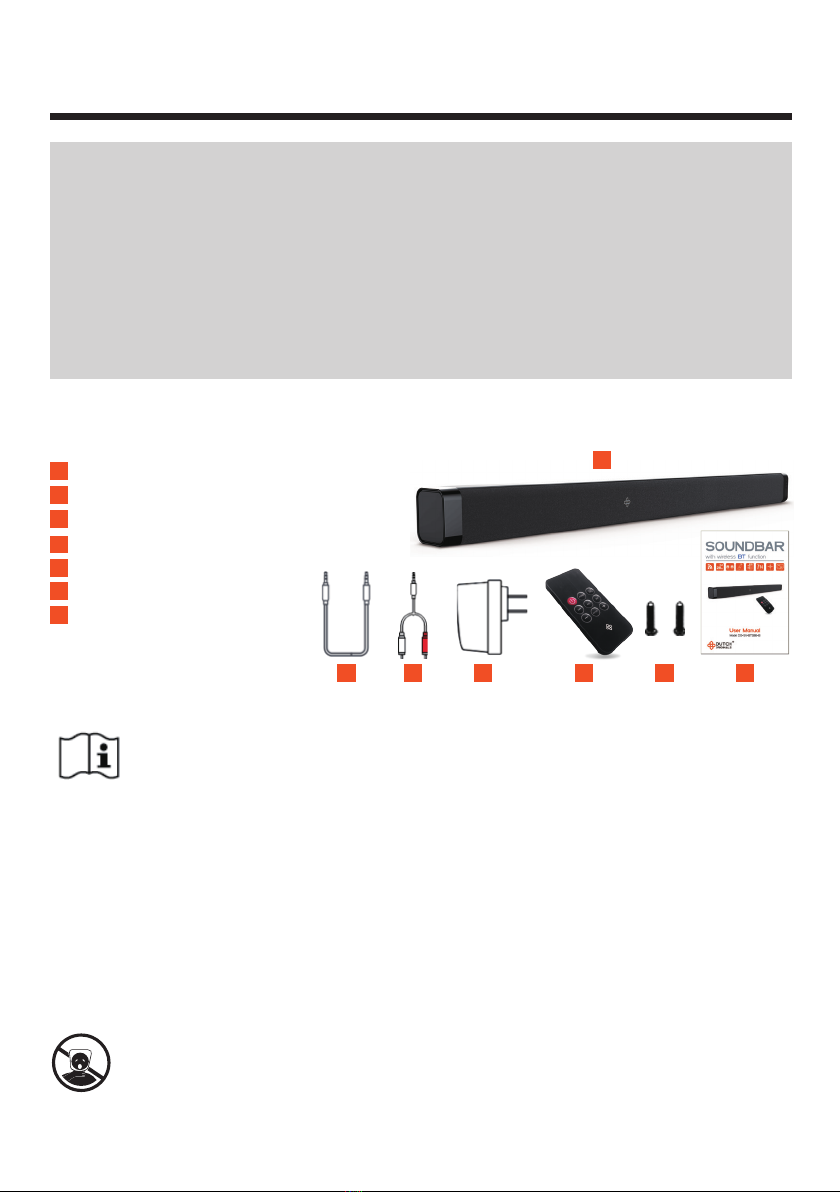
Making a wired connection
• Connect the power adapter into an electrical outlet, and the connector into the
device .
• Turn the device ON by pressing the power [ON/OFF] button on the remote
EN 07
D
1
11
11
4
5
6
8

control.
• Press the [MODE] button on the device or press the [MODE] button on the
remote control to enter one of the desired connected modes (AUX IN 1 – AUX IN 2 -
BT)
AUX 1 mode
Insert the 3.5 mm auxiliary cable into the device LINE IN 1 port .
Connect the other end of the 3.5 mm auxiliary cable to an external headphone 3.5
mm jack port (MP3 player – TV - smartphone or tablet).
Then press the [MODE] button on the device or press the [MODE] button on
the remote control until the LED indicator ashes slowly blue.
AUX 2 mode
Insert the 3.5 mm RCA cable into the device LINE IN 2 port .
Connect the other end of the RCA cable to an external audio device.
Then press the [MODE] button on the device or press the [MODE] button on
the remote control until the LED indicator ashes slowly blue.
Open the media player on your connected audio player and press PLAY to start
playing your music.
You can use the control buttons of the connected audio player or the device’s remote
control to control music playback and volume functions.
Power ON/OFF – Standby
Press the ON/OFF button on the device’s remote control to switch it ON.
The LED indicator of the last used source mode or will light up.
Press the ON/OFF button on the device’s remote control to switch the device
to standby mode.
Disconnect the power adapter from the mains supply if you want to switch the device
OFF completely.
Please note:
If the device is not in use (no input), it will automatically go into standby mode
after ±15 minutes.
If the device’s external input signal is too low, it will automatically go to standby
mode after ±15 minutes. Please increase the input signal of your externally
connected device.
MODE selection
Press the [MODE] button on the device or press the [MODE] button on the
remote control to select the desired input mode, which will be shown on the devices
LED indicator or :
Please note:
If the device source is in BT mode, and the BT connection is no longer active or out
EN 08
2
2
2
3 2
2
2
2
B
C
C
B
6
7
9
10
1
1
910 11
910 11

of range, the LED indicator will ash blue.
Volume control
• Press the volume + & - buttons & on the device, or the [VOL+] & [VOL-]
buttons on the device’s remote control to adjust the volume.
• If you wish to turn the sound OFF, press the [MUTE] button on the remote
control. Press the [MUTE] button again or press the [VOL+] & [VOL-]
button to resume normal volume.
Select a pre-set sound effect
While playing, press the [EQ] button on the device’s remote control to select the
desired pre-set equalisers.
4) SPECIFICATIONS
• Power input: 14Vdc – 2A
• Stereo speakers: 28W (2x 14W)
• Speaker resistance: 4 Ω
• BT version 4.2
• Transmission power: Class II
• Operation distance: up to 10 m
• Frequency: 2.4 Ghz. – 2.48 Ghz
• BT proles: A2DP, AVRCP, HFP, HSP
• Remote control distance: 7m, angle 30°
• Dimensions: 7 x 9.4 x 7.4 cm (H x W x D)
• Weight: 2.1 Kg
5) CLEANING AND MAINTENANCE
Warning
Before cleaning the device, always switch it OFF, disconnect it from the mains
electricity and allow it to cool down.
Cleaning
• Never use aggressive or abrasive cleaning materials, cleaning alcohol or sharp
objects like hard brushes.
• Clean the exterior of the casing and the power cord with a damp cloth.
• Then dry the exterior with a dry cloth.
6) STORAGE & TRANSPORTATION
• When storing the device, it should rst be cleaned in accordance with this user
manual. The device should be stored in its original packaging.
• Always store the device in a dry and well-ventilated room and beyond the reach
of children and pets.
• Protect the device against vibrations and shocks during transport.
All contents and specications mentioned in this manual are subject to change without prior notice.
EN 09
11
3
3
3
5
7
7
8
8
10

EN 10
Your product has been manufactured using high quality materials and components
which can be recycled and used again. At the end of its service life, this product
cannot be disposed of in normal domestic waste, but must be taken to a special
collection point for recycling electrical and electronic equipment. This is indicated in
the user manual and in the packaging by the waste container marked with a cross
symbol. Used raw materials are suitable for recycling.
By recycling used appliances or raw materials, you are playing an important role in protecting
our environment. You can ask your local council about the location of your nearest collection
point.
INSTRUCTIONS FOR PROTECTING THE ENVIRONMENT
(WEEE, the waste electrical and electronic equipment directive)

A
B C D E F G
GEBRUIKSHANDLEIDING
DO-SV-BTSB6-B
Nederlands
INHOUDSOPGAVE:
1) Inhoud verpakking
2) Veiligheidsinstructies
3) Het product installeren en gebruiken
4) Specicaties
5) Reiniging en onderhoud
6) Opslag en transport
1) INHOUD VERPAKKING
Soundbar met draadloze BT-functie
3,5 mm – 3,5 mm AUX IN-audiokabel
3,5 mm – RCA-kabel
Voedingsadapter
Afstandsbediening
Montageschroeven (2 stuks)
Gebruikshandleiding
2) VEILIGHEIDSINSTRUCTIES
Tref altijd de volgende algemene voorzorgsmaatregelen voordat u de ‘Soundbar met
draadloze BT-functie’ gebruikt (hierna ‘apparaat’ te noemen).
Algemene informatie
• Lees de gebruiksaanwijzingen zorgvuldig en bewaar ze op een veilige plek. Als u
dit apparaat aan iemand anders geeft, geef deze handleiding daar dan bij.
• Gebruik dit apparaat uitsluitend volgens de instructies in deze gebruikshandleiding.
• Dit apparaat is geen speelgoed! Houd het buiten bereik van kinderen en
huisdieren.
• Houd u aan alle waarschuwingen weergegeven op het apparaat en in de
handleiding.
• WAARSCHUWING! Laat verpakkingsmateriaal niet onbeheerd
rondslingeren. Het kan gevaar opleveren wanneer kinderen ermee spelen.
Kans op verstikking!
NL 01
A
B
C
D
E
F
G

Elektriciteit en warmte
• Controleer vóór gebruik of de netspanning gelijk is aan de spanning vermeld op
het apparaat.
• Zorg ervoor dat uw handen droog zijn als u het apparaat, het stroomsnoer of de
stekker gaat reinigen.
• Steek de stekker in een stopcontact dat gemakkelijk toegankelijk is en dat is
bedoeld voor 2 ronde pinnen (type C, E, F, J, K en L).
• Gebruik het apparaat niet met een externe tijdschakelaar of een afzonderlijke
afstandsbediening.
• WAARSCHUWING! Bedek het apparaat en het stroomsnoer nooit met
doeken, gordijnen of enig ander materiaal om oververhitting en mogelijk zelfs
brand te voorkomen.
• Om het risico van persoonlijk letsel, elektrische schok, brand of schade te
verminderen of voorkomen, moet u nooit metalen voorwerpen in een opening van
het apparaat, het stroomsnoer of het stopcontact steken.
• Wanneer u de stekker uit het stopcontact haalt, trek dan aan de stekker zelf en
nooit aan het snoer.
• Controleer het stroomsnoer regelmatig op beschadigingen.
• Gebruik het apparaat niet als het snoer of de stekker beschadigingen vertoont of
als het apparaat op de grond is gevallen of andere sporen van schade vertoont.
• Haal altijd de stekker uit het stopcontact wanneer u het apparaat niet gebruikt of
wilt reinigen.
• Zorg ervoor dat niemand op het stroomsnoer kan staan of dat het snoer anderszins
kan worden bekneld.
• Laat het stroomsnoer niet over scherpe randen hangen en houdt het uit de buurt
van warme objecten en open vuur.
• Wanneer u de stekker van het stroomsnoer in het stopcontact steekt, zorg er dan
voor dat niemand de stekker per ongeluk los kan trekken of over het snoer kan
struikelen.
• Haal de stekker van het stroomsnoer uit het stopcontact als het onweert of als u
het apparaat gedurende langere tijd niet gebruikt.
• Dit apparaat is een klasse II of dubbel geïsoleerd elektrisch apparaat. Het apparaat
hoeft daarom niet te worden geaard.
Batterijen en warmte
• Zorg ervoor dat het batterijvakje van de afstandsbediening goed dicht zit.
• Gebruik alleen de batterijen die worden aangegeven in het batterijvakje (CR2025 /
3V).
• Let bij het plaatsen van de batterijen op de juiste polariteit.
• Voorkom kortsluiting tussen de contactpunten in het batterijvakje of tussen
batterijen.
• Om lekkage van batterijen te voorkomen, raden wij aan de batterijen te verwijderen
als u het apparaat gedurende langere tijd niet gebruikt.
• Lege batterijen moeten uit de afstandsbediening worden verwijderd om te
voorkomen dat ze gaan lekken.
NL 02

• Wanneer een batterij lekt, zorg er dan voor dat er geen batterijvloeistof terecht
komt op uw huid of in uw ogen. Wanneer batterijvloeistof in contact is gekomen
met de huid of ogen, moet het betreffende gebied worden afgespoeld met grote
hoeveelheden water en moet u een arts raadplegen.
• Houd batterijen buiten bereik van kinderen.
• Zorg ervoor dat de afstandsbediening niet wordt blootgesteld aan extreme
warmtebronnen, zoals versterkers, vuur of rechtstreeks zonlicht.
• Zorg ervoor dat de afstandsbediening niet wordt beschadigd of gedemonteerd;
hierdoor kan de batterij beschadigd raken.
• Beschadiging van de behuizing van de afstandsbediening kan leiden tot een
explosie of brand!
• Gooi de afstandsbediening of de batterij ervan nooit in een vuur omdat deze
kunnen ontploffen!
• Gooi batterijen nooit weg bij het huishoudelijk afval. U kunt batterijen inleveren bij
het lokale recycle-centrum. Neem contact op met de lokale overheidsinstanties voor
nadere informatie.
Gebruik
• Dit apparaat is uitsluitend bedoeld voor huishoudelijk of vergelijkbaar gebruik.
• Gebruik het apparaat uitsluitend binnenshuis, in droge gebieden en niet in de buurt
van water, andere vloeistoffen of vocht.
• Vermijd locaties die blootstaan aan trillingen, vrieskou, een te hoge luchtvochtigheid
of een buitensporige hoeveelheid stof.
• Plaats het apparaat niet in de buurt van warmtebronnen, zoals radiatoren,
verwarmingselementen, kachels of andere producten (waaronder versterkers) die
warmte produceren.
• Bescherm het apparaat tegen direct zonlicht, overmatige vochtigheid en corrosieve
omgevingen.
• Zorg ervoor dat ventilatie-openingen niet worden geblokkeerd.
• De minimum afstand rond het apparaat voor voldoende ventilatie is 5 cm.
• De ventilatie mag niet worden gehinderd door het afdekken van ventilatie-
openingen met dingen zoals kranten, tafelkleden en gordijnen.
• Zorg ervoor dat het apparaat niet wordt blootgesteld aan enige mechanische
belasting.
• Gebruik of bewaar het apparaat niet in een omgeving met sterke statische
elektriciteit of magnetische velden.
• Het apparaat kan beschadigd raken als het verkeerd wordt gebruikt.
• Ga voorzichtig met het apparaat om. Het apparaat kan beschadigd raken door een
stoot of val, zelfs van een geringe hoogte.
• Gebruik het apparaat niet als het in water of een andere vloeistof is gevallen.
• Bij het openen van de behuizing bestaat de kans op een elektrische schok.
• Probeer het apparaat niet te demonteren, te repareren of anderszins aan te
passen.
• Het apparaat moet worden gerepareerd als er sprake is van enige vorm van
schade, wanneer bijvoorbeeld het stroomsnoer is beschadigd, er vloeistof op
NL 03

het apparaat is gemorst, voorwerpen op het apparaat zijn gevallen, het apparaat
is blootgesteld aan regen of vocht, het apparaat is gevallen of het apparaat niet
normaal functioneert.
• WAARSCHUWING! Om de kans op brand of elektrische schokken te
verminderen moet u het apparaat beschermen tegen druppelend of
opspattend water en uit de buurt houden van met water gevulde voorwerpen, zoals
vazen. Dergelijke voorwerpen mogen niet op of in de buurt van het apparaat worden
geplaatst.
• Gebruik geen schurende schoonmaakmiddelen om het apparaat te reinigen.
• Gebruik geen vreemde voorwerpen om het apparaat te reinigen.
• WAARSCHUWING! Om gehoorschade te voorkomen, raden wij aan het
volume niet langdurig op een hoog niveau te houden.
3) INSTALLATIE EN GEBRUIK VAN HET APPARAAT
Open de verpakking voorzichtig en haal het apparaat eruit. Controleer of het
apparaat volledig en onbeschadigd is. Mochten er onderdelen beschadigd zijn
of ontbreken, neem dan contact op met de verkoper en gebruik het product niet.
Bewaar de verpakking of recycle deze zoals voorgeschreven door lokale regelgeving.
Onderdelen en functies
Rechter zijpaneel
[POWER]-knop: Power AAN/UIT
[MODE]-knop: AUX IN 1 – AUX IN 2 - BT
[VOL - / ]-knop:
• Volume verlagen
• Naar vorige track
[ ] knop: Afspelen/pauze
[VOL + / ] knop:
• Volume verhogen
• Naar volgende track
LINE IN 1: AUX IN-aansluiting
LINE IN 2: AUX IN-aansluiting
DC14V: Ingang voedingsadapter
Voorpaneel
LINE IN 1: LED-indicatielampje Line in 1
LINE IN 2: LED-indicatielampje Line in 2
BT: BT LED-indicatielampje
IR: infrarood-sensor
1
2
3
4
5
9
10
11
12
6
7
8
NL 04
1
2
3
4
5
6
7
8
9
10
11
12

Afstandsbediening
[ ] knop: druk op deze knop om het apparaat
AAN/UIT te zetten (stand-by-modus)
[MODE] knop: selectie invoerbron:
AUX IN 1 - AUX IN 2 - BT
[ ] knop, om het geluid uit of weer aan te zetten
[ ] knop: Naar vorige track
[ ] knop: Geluid afspelen/pauzeren
[ ] knop: Naar volgende track
[ - ] knop: Volume verlagen
[ + ] knop: Volume verhogen
[RESET] knop: Herstel instellingen
Eerste instelling afstandsbediening
Met de meegeleverde afstandsbediening kan het apparaat op afstand worden
bediend.
Zelfs als de afstandsbediening binnen het effectieve bereik (< 7m) wordt gebruikt,
kan de werking van de afstandsbediening worden belemmerd door obstakels tussen
het apparaat en de afstandsbediening.
Het apparaat werkt mogelijk niet goed wanneer de afstandsbediening wordt gebruikt
in de buurt van
andere producten die infraroodstralen genereren, of wanneer een andere
afstandsbediening met infraroodstralen wordt gebruikt in de buurt van het apparaat.
In het omgekeerde geval is het ook mogelijk dat andere apparaten niet goed werken.
Het eerste gebruik:
De batterij voor de afstandsbediening (CR2025 Lithium-batterij) zit al in de
afstandsbediening.
De afstandsbediening bevat een plastic beschermingslipje. Voordat u de
afstandsbediening gebruikt, moet u aan het beschermende lipje trekken dat uit het
batterijdeksel van de afstandsbediening steekt.
De batterij vervangen:
Om de batterij te vervangen, opent u het batterijdeksel, verwijdert u de oude batterij
en plaatst u een nieuwe CR2025-batterij met de positieve (+) pool naar boven
gericht. Schuif het batterijdeksel weer terug op de afstandsbediening.
1
2
3
4
5
6
7
8
9
NL 05
1
4
7
2
3
5
6
8
9

NL 06
Houd de afstandsbediening binnen een afstand van 7 meter (zonder obstakels) en
richt deze op het apparaat op een hoek van 30 graden.
Voorzorgsmaatregel
Verwijder de batterijen wanneer de eenheid langere tijd niet wordt gebruikt.
Het apparaat plaatsen / bevestigen
Het apparaat kan horizontaal op een tafel of TV-standaard worden geplaatst, of
worden bevestigd aan een muur.
Als uw TV op een tafel of TV-standaard is geplaatst, kunt u het apparaat daarop
plaatsen, vlak vóór en in het midden van het TV-scherm.
Als uw TV aan de muur is bevestigd, kunt u het apparaat aan de muur hangen, vlak
onder en in het midden van het TV-scherm.
De installatie mag uitsluitend worden uitgevoerd door een gekwaliceerde monteur.
Een verkeerde installatie kan leiden tot ernstig lichamelijk letsel en schade. Als u van
plan bent dit apparaat zelf te installeren, dan moet u controleren of er in de muur
geen elektrische bedrading of leidingen zijn geïnstalleerd. Degene die het apparaat
installeert is ervoor verantwoordelijk te controleren of de muur de totale belasting
van het apparaat veilig kan dragen. Voor de installatie is extra gereedschap vereist
(niet inbegrepen). Draai de schroeven niet te strak aan. Gebruik voorafgaand aan het
boren en monteren een elektronische balkzoeker om de muur te controleren.
1) Meet een breedte af van 80 cm (31,5 inch) op de muur.
2) Markeer met een potlood de positie van de bevestigingsschroeven op de muur.
3) Boor 2 parallelle gaten in de muur (elk Ø 7-8 mm, afhankelijk van het type muur).
De afstand tussen de gaten moet 80 cm zijn.
4) Steek - indien nodig - in elk gat in de muur 1 plug.
5) Draai in elk gat of elke plug 1 schroef. Laat tussen de muur en de schroefkop een
ruimte open van 7 tot 8 mm. Til het apparaat over de schroefkoppen en hang het
apparaat op.

NL 07
Aansluitingen
Voedingsaansluiting
Voordat u de stroomadapter aansluit, moet u controleren of alle overige verbindingen
tot stand zijn gebracht.
• Controleer vóór gebruik of de netspanning overeenkomt met de op het apparaat
vermelde netspanning.
• Steek de stekker van de stroomadapter in een stopcontact.
• Steek de stekker van de stroomadapter in de stroomaansluiting van het apparaat
.
• Het apparaat staat nu in de stand-by-modus.
Een draadloze BT-verbinding maken
Wanneer u het apparaat voor de eerste keer gebruikt, moet u het koppelen met uw
BT-audiospeler.
• Zet het apparaat AAN door op de [ON/OFF]-knop op de afstandsbediening te
drukken.
• Druk op de [MODE]-knop op het apparaat of op de [MODE]-knop op de
afstandsbediening van het apparaat om de BT-modus te selecteren. U hoort een
geluid en het BT LED-indicatielampje gaat snel blauw knipperen om aan te geven
dat het apparaat in de koppelingsmodus staat.
• Houd het apparaat en uw BT-audiospeler tijdens het koppelingsproces op een
afstand van maximaal één meter van elkaar.
• Laat uw BT-audiospeler naar compatibele BT-apparaten zoeken en selecteer ‘DO-
SV-BTSB6’ in de lijst met gevonden apparaten.
• Voer indien nodig het wachtwoord 0000 (viermaal nul) in. Selecteer ‘OK’ of ‘JA’ op
uw BT-audiospeler om de twee apparaten te koppelen.
• Een toon geeft aan dat de koppeling geslaagd is. Het BT LED-indicatielampje
stopt met knipperen en wordt blauw. Dit betekent dat het apparaat is verbonden.
• Als u een andere BT-audiospeler wilt verbinden met het apparaat, moet u de actief
gekoppelde verbinding van de actieve BT-audiospeler ontkoppelen. Ga naar de BT-
instellingen van uw apparaat, selecteer 'DO-SV-BTSB6' en selecteer 'Verbinding
verbreken' of 'Ontkoppelen'. U kunt ook de BT-functie op de BT-audiospeler
uitschakelen. Als het apparaat ontkoppeld is en/of geen actieve BT-verbinding heeft,
herhaal dan het koppelingsproces met de (nieuwe) BT-audiospeler die u met het
apparaat wilt verbinden.
• Wanneer u muziek wilt afspelen en/of pauzeren op uw verbonden BT-apparaat,
opent u uw mediaspeler en drukt u op ‘play/pause’ (afspelen/pauzeren).
• Om uw muziek te regelen, gebruikt u de knoppen play, track en volume op
uw verbonden BT-audiospeler of gebruikt u de bedieningsknoppen op het
bedieningspaneel van het apparaat of op de afstandsbediening.
• Wanneer er een gekoppelde BT-audiospeler binnen bereik is, zal deze automatisch
verbinding maken met het apparaat.
D
D
1
2 2
11
11
8

NL 09
Let op:
Wanneer er geen gekoppelde BT-audiospeler binnen bereik is als het apparaat wordt
ingeschakeld, gaat het apparaat automatisch in de BT-koppelingsmodus.
Naar muziek luisteren van een BT-audiospeler.
U kunt naar uw muziek luisteren van de verbonden BT-audiospeler, als deze het
Advanced Audio Distribution Prole (A2DP) ondersteunt.
Het apparaat ondersteunt Audio Video Remote Control (AVRCP), wat betekent dat u
de afstandsbediening van het apparaat kunt gebruiken om muziek af te spelen op de
BT-audiospeler.
• Om muziek van uw verbonden audiospeler af te spelen, kunt u de
bedieningsknoppen gebruiken van uw mediaspeler.
• Om muziek van uw verbonden audiospeler af te spelen/te pauzeren, kunt u de
play/pause-knop op de afstandsbediening van het apparaat gebruiken.
• Om de vorige of volgende track af te spelen vanaf uw verbonden audiospeler, kunt
u de knoppen vorige track en volgende track op de afstandsbediening
van het apparaat gebruiken.
Een bekabelde verbinding maken
• Steek de stekker van de stroomadapter in een stopcontact en de connector in
het apparaat .
• Zet het apparaat AAN door op de [ON/OFF]-knop op de afstandsbediening te
drukken.
• Druk op de [MODE]-knop op het apparaat of druk op de [MODE]-knop op de
afstandsbediening om één van de gewenste verbindingsmodi (AUX IN 1 – AUX IN 2
- BT) in te voeren.
AUX 1-modus
Steek de stekker van de 3,5 mm aux-kabel in de LINE IN 1-poort van het
apparaat.
Sluit de stekker aan de andere kant van de 3,5 mm aux-kabel aan op de 3,5 mm
jack-poort van een externe hoofdtelefoon (MP3-speler, TV, smartphone of tablet).
Druk daarna op de [MODE]-knop op het apparaat of druk op de [MODE]-knop
op de afstandsbediening totdat het LED-indicatielampje langzaam blauw knippert.
AUX 2-modus
Steek de stekker van de 3,5 mm RCA-kabel in de LINE IN 2-poort van het
apparaat.
Sluit het andere uiteinde van de RCA-kabel aan op het externe audio-apparaat.
Druk daarna op de [MODE]-knop op het apparaat of druk op de [MODE]-knop
op de afstandsbediening totdat het LED-indicatielampje langzaam blauw
knippert.
Open de mediaspeler op uw verbonden audiospeler en druk op PLAY om te
beginnen met het afspelen van uw muziek.
2
2
2
2
2
2
B
C
C
B
6
7
9
10
D
1
4
5
6
8
Table of contents
Languages:
Other Dutch originals Speakers System manuals