EarthWise CS30116 User manual

PDF
A5(148.5x210mm)
2016-6-7
9张A4纸说明书 8458-4365001-011
ᕖ⨃〦ᯏ享ᮦUS005
K
80g双胶纸黑白印刷

23(5$725¶60$18$/ELECTRIC CHAIN SAW
This product is covered by U.S. patents and other international patents
Copyright. All Rights Reserved.
CS30116
Your chain saw has been engineered and manufactured to our high standard for dependability, ease of
operation, and operator safety. Properly cared for, it will give you years of rugged, trouble-free performance.
WARNING7RUHGXFHWKHULVNRILQMXU\WKHXVHUPXVWUHDGDQGXQGHUVWDQGWKHRSHUDWRU¶VPDQXDObefore using this product.
Thank you for your purchase.
DO NOT RETURN THIS PRODUCT TO THE STORE. OPERATING, ASSEMBLY, PART, SERVICE QUESTIONS? Call 1-800-313-5111
BETWEEN 7:30AM-4:30PM EST FOR ASSISTANCE.
SAVE THIS MANUAL FOR FUTURE REFERENCE

TO REDUCE RISK OF INJURY:
Before any use, be sure everyone using this tool reads and
understands all safety instructions and other information contained
in this manual.
CAUTION: Wear appropriate personal hearing protection during
use. Under some conditions and duration of use, noise from this
product may contribute to hearing loss.
Save these instructions and review frequently prior to use and in
instructing others.
WARNING: When using electric gardening appliances, basic safety
precautions should always be followed to reduce risk of fire, electric
shock, and personal injury, including the following:
READ ALL INSTRUCTIONS
GENERAL SAFETY
IMPORTANT SAFETY WARNINGS
AVOID DANGEROUS ENVIRONMENTS ±'RQ¶WXVHFKDLQVDZLQrain, damp or wet locations. Do not operate chain saw in gaseous
or explosive atmospheres. Motors in these tools normally spark,
and the sparks might ignite fumes.
DRESS PROPERLY ±'RQ¶WZHDUORRVHFORWKLQJRUMHZHOU\:HDUprotective hair covering to contain long hair. They can be caught in
moving parts. Use of rubber gloves and substantial footwear is
recommended when working outdoors.
USE SAFETY GLASSES ±Wear safety glasses with side shields
or goggles that are marked to comply with ANSI Z87.1 standard
when operating this product. Use face or dust mask if environment
is dusty.
DANGER: Risk of cut. Keep hands away from blades. Keep both
hands on handles when power is on.
USE RIGHT APPLIANCE ±Do not use appliance for any job ex-
cept that for which it is intended.
GROUND FAULT CIRCUIT INTERRUPTER (GFCI) protection
should be provided on the circuit (s) or outlet (s) to be used for the
chain saw. Receptacles are available having built-in GFCI protec-
tion and may be used.
EXTENSION CORD. Make sure your extension cord is in good
condition. When using an extension cord be sure it is heavy
enough to carry the current your product will draw. An undersized
extension cord will cause a drop in line voltage resulting in loss of
power and overheating. The following table shows the correct size
to use depending on cord length and nameplate ampere rating. If
in doubt, use the next heavier gage. The smaller the gage number,
the heavier the cord.
Minimum Gage for Cord Sets
Volts Total Length of cord in Feet
120V 0-25 26-50 51-100 101-150
Ampere Rating
More Not More American wire Gage
Than Than
0 - 6 18 16 16 14
6 - 10 18 16 14 12
10 - 12 16 16 14 12
12 - 16 14 12 Not Recommended
WARNING: Use outdoor extension cords marked SW-A, SOW-A,
STW-A, STOW-A, SJW-A, SJTW-A, or SJTOWA. These cords are
rated for outdoor use and reduce the risk of electric shock.
It is possible to tie the extension cord and power
cord in a knot to prevent them from becoming
disconnected during use. Make the knot as
shown, then connect the plug end of the power
cord into the receptacle end of the extension cord.
This method can also be used to tie two extension
cords together.
DOUBLE INSULATION ±Double Insulation is a concept in safety in
electric power tools, which eliminates the need for the usual three-
wire grounded power cord. All exposed metal parts are isolated
from the internal metal motor components with protecting insulation.
Double insulated tools do not need to be grounded.
NOTE: The double insulated system is intended to protect the user
IURPVKRFNUHVXOWLQJIURPDEUHDNLQWKHWRRO¶VLQWHUQDOLQVXODWLRQObserve all normal safety precautions to avoid electrical shock.
DISCONNECT CHAIN SAW from the power supply when not in use
or when servicing or cleaning. Do not leave unattended.
AVOID UNINTENTIONAL STARTING ±'RQ¶WFDUU\WKHFKDLQVDZwith finger on switch. Be sure switch is off before plugging in.
CAUTION: Never use guard as a handle. Never grasp the unit by
the guard. Failure to heed this warning can result in serious
personal injury.
KEEP CHILDREN AWAY - All visitors, children and pets should
stay at a safe distance from the work area.
STORE IDLE CHAIN SAW INDOORS ±When not in use, the chain
saw should be stored indoors in a dry and high or locked-up place,
out of reach of children.
DO NOT ATTEMPT to remove cut material or hold material to be
cut when blades are moving. Make sure switch is off when clearing
jammed material from blades. Do not grasp the exposed cutting
blades or cutting edges when picking up or holding the saw.
CAUTION: Chain coasts after turned off
'21¶7)25&(&+$,16$:±It will do the job better and with less
likelihood of a risk of injury at the rate for which it was designed.
STAY ALERT ±Watch what you are doing. Use common sense. Do
not operate chain saw when you are tired or under the influence of
medications, drugs or alcohol.
DANGER: If chain jams on any electrical cord or line, DO NOT
TOUCH THE BAR AND CHAIN! THEY CAN BECOME ELECTRI-
CALLY LIVE AND VERY DANGEROUS. Release the unit in the
safest manner possible. Disconnect the damaged electrical cord or
line from the power source. If possible, do so safely. If in doubt, call
an electrician or the electrical contractor for assistance. Failure to
heed this Danger will result in serious personal injury and possible
death.
LIGHTING - Only operate saw in daylight or good artificial light.
'21¶729(55($&+±Keep proper footing and balance at all
times.
DANGER: Make sure power source is removed when clearing
jammed material from blades.
2

UNPACKING
This product requires no assembly.
Carefully remove the product and any accessories from the box.
Make sure that all items listed in the packing list are included.
Inspect the product carefully to make sure no breakage or damage
occurred during shipping. Do not discard the packaging material
until you have carefully inspected and satisfactorily operated the
product.
PACKING LIST
-Chain Saw - Blade Cover
-Instruction Manual
WARNING: If any parts are damaged or missing do not operate this
product until the parts are replaced. Failure to heed this warning could
result in serious personal injury. Call 1-800-313-5111 for assistance.
INSTALLING/REPLACING THE GUIDE BAR AND CHAIN
GENERAL SAFETY
CHECK DAMAGED PARTS ±Before further use of the chain saw,
a guard or other part that is damaged should be carefully checked
to determine that it will operate properly and perform its intended
function. Check for alignment of moving parts, binding of moving
parts, breakage of parts, mounting and any other condition that may
affect its operation. A guard or other part that is damaged should be
properly repaired or replaced. Call our customer service help line at
1-800-313-5111Always wear ear plugs or mufflers to protect your hearing. Regular
users should have hearing checked regularly as chain saw noise can
damage hearing.
MAINTAIN SAW WITH CARE ±Keep cutters sharp and clean for
best performance and to reduce the risk of injury. Keep handles
dry, clean and free from oil and grease.
CALIFORNIA PROPOSITION 65 WARNING: This product contains
chemicals known to the State of California to cause cancer and birth
defects or other reproductive harm.
POLARIZED PLUGS ±To reduce the risk of electric shock, this
equipment has a polarized plug (one blade is wider than the other).
This equipment must be used with a suitable polarized 2 wire or 3
wire extension cord. Polarized connections will fit together only one
way. Make sure that the receptacle end of the extension cord has
large and small blade slot widths. If the plug does not fit fully into the
extension cord, reverse the plug. If it still does not fit, obtain a suitable
extension cord. If the extension cord does not fit fully into the outlet,
contact a qualified electrician to install the proper outlet. Do not
change the tool plug or extension cord in any way.
WARNING: Some dust and debris created by this product could con-
tain chemicals known to the State of California to cause cancer, birth
defects or other reproductive harm. Some examples of these chemi-
cals are:
-chemicals in fertilizers
-compounds in insecticides, herbicides and pesticides
-arsenic and chromium from chemically treated lumber
Your risk from exposure to these chemicals varies, depending on how
often you do this type of work. To reduce your exposure, work in a
well ventilated area and with approved safety equipment, such as
dust masks that are specially designed to filter out microscopic parti-
cles.
DANGER: Never start the motor before installing the guide bar,
and chain. Without these parts in place, the clutch can fly off or
explode, exposing the user to possible serious injury.
WARNING: To avoid serious personal injury, read and understand
all the safety instructions provided.
DANGER: Before performing any maintenance, make sure the tool
is unplugged from the power supply. Failure to heed this warning
could result in serious personal injury.
CAUTION: Always wear gloves when handling the bar and chain;
these components are sharp and may contain burrs.
WARNING: Never touch or adjust the chain while the motor is
running. The saw chain is very sharp; always wear protective gloves
when performing maintenance to the chain to avoid possible serious
lacerations.
NOTE: When replacing the guide bar and chain, use only identical
replacement parts.
xDisconnect chain saw from power supply.
xUnscrew the nut by turning the knob counter-clockwise.
xRemove the chain cover.
xRemove the bar and chain from the mounting surface.
3
ASSEMBLY

INSTALLING/REPLACING THE GUIDE BAR AND CHAIN
4
xRemove the old chain from the bar.
xLay out the new saw chain in a loop and straighten any kinks.
The cutters should face in the direction of the chain rotation. If
they face backwards, turn the loop over.
xReplace the chain drive links into the bar groove.
NOTE: Make certain of the direction of chain.
xPosition the chain so there is a loop at the back of the bar.
xHold the chain in position on the bar and place the loop around
the sprocket.
xTighten the chain tension by turning the tensioning wheel.
xReplace the chain cover.
xScrew on by turning the knob clockwise.
The chain is correctly tensioned when there is no sag on the
underside of the guide bar, the chain is snug, but it can be turned
by hand without binding.
NOTE: If chain is too tight, it will not rotate. Loosen by turning the
tensioning wheel. Ensure that the chain will rotate without binding.
NOTE: A new chain tends to stretch, check chain tension frequently
and tension as required.

CHAIN TENSION AND MAINTENANCE
CHAIN TENSION
Stop the engine before setting the chain tension. Make sure the
guide bar screw is loosened to finger tight, turn the tensioning wheel
up or down to tension the chain. A cold chain will be correctly
tensioned when there is no slack on the underside of the guide bar,
the chain is snug, but it can be turned by hand without binding.
Chain must be re-tensioned whenever the flats on the drive links
hang out of the bar groove.
During normal saw operation, the temperature of the chain will
increase. The drive links of a correctly tensioned warm chain will
hang approximately .050 in. (1.25mm) out of the bar groove. Be
aware that chain tensioned while warm, may be too tight upon
FRROLQJ&KHFNWKH³FROGWHQVLRQ´EHIRUHQH[WXVHNOTE: A new chain tends to stretch, check chain tension frequently
and tension as required.
CHAIN MAINTENANCE
CAUTION: Disconnect from the power supply and make sure the
chain has stopped before you do any work on the saw.
For smooth and fast cutting, chain needs to be maintained properly.
The chain requires sharpening when the wood chips are small and
powdery, the chain must be forced through the wood during cutting,
or the chain cuts to one side. During maintenance of your chain
remember:
- Improper filing angle of the side plate can increase the risk of
severe kickback.
- Raker (depth gauge) clearance.
- Too low increases the potential for kickback.
- Not low enough decreases cutting ability.
- If cutter teeth have hit hard objects such as nails and stones, or
have been abraded by mud or sand on the wood, have service
dealer sharpen chain.
NOTE: Inspect the drive sprocket for wear or damage when
replacing the chain. If signs of wear or damage are present in the
areas indicated, have the drive sprocket replaced by a qualified
individual. Call our customer service help line at 1-800-313-5111
for assistance.
HOW TO SHARPEN THE CUTTERS
Be careful to file all cutters to the specified angles and to the same
length, as fast cutting can be obtained only when all cutters are
uniform.
Wear gloves for protection. Properly tension the chain prior to
VKDUSHQLQJ5HIHUWR³&KDLQ7HQVLRQ6HFWLRQ´HDUOLHULQWKLVPDQXDODo all of your filing at the midpoint of the bar.
Use a 5/32 in. diameter round file and holder.
Keep the file level with the top plate of the tooth. Do not let the file
dip or rock. Using light but firm pressure, stroke towards the front
corner of the tooth.
Lift file away from the steel on each return stroke.
Put a few firm strokes on every tooth. File all left hand cutters in one
direction. Then move to the other side and file the right hand cutters
in the opposite direction. Occasionally remove filing from the file with
a wire brush.
WARNING: Improper chain sharpening increases the potential of
kickback.
WARNING: Failure to replace or repair damaged chain can cause
serious injury.
WARNING: The saw chain is very sharp, always wear protective
gloves when performing maintenance to the chain.
TOP PLATE FILING ANGLE
Correct 30 degrees ±File holders are marked with guide marks to
align file properly to produce top plate angle.
Less than 30 degrees ±for
cross cutting.
More than 30 degrees ±
feathered edge dulls quickly.
SIDE PLATE ANGLE
Correct ±80 degrees produced automatically if correct diameter file
is used in file holder.
Hook ±³*UDEV´DQGGXOOVTXLFNO\Increases potential of kickback.
Results from using a file with a
diameter too small, or file held to
low.
Backward Slope ±Needs too much feed pressure, causes excessive
wear to bar and chain. Results from using a file with a diameter too
large, or file held too high.
DEPTH GAUGE CLEARANCE
The depth gauge should be
maintained at a clearance of .025
in. (0.6 mm). Use a depth gauge
tool for checking the depth gauge
clearances.
Every time the chain is filed, check the depth gauge clearance
Use a flat file and a depth gauge
jointer to lower all gauges uniformly.
Depth gauge jointers are available
in .020 in. to .035 in. (0.5 mm to 0.9
mm). Use a .025 in. (0.6 mm) depth
gauge jointer. After lowering each
depth gauge, restore original shape
by rounding the front. Be careful not
to damage adjoining drive links with
the edge of the file.
Depth gauges must be adjusted with
the flat file in the same direction the
adjoining cutter was filed with the round file. Use care not to contact
cutter face with flat file when adjusting depth gauges.
Approx. .050 (1.25mm)
5

OPERATING
TO TURN THE TOOL ON
Push the lock button in with your thumb and then squeeze the trigger
with your fingers. (Once the tool is running, you can release the lock
button). To turn the tool OFF, release the trigger.
WARNING: To guard against injury, observe the following:
Read instruction manual before using, save instruction
manual.
Keep hands away from chain.
.HHSKDQGVRQKDQGOHV'RQ¶WRYHUUHDFKA good, firm grip on the saw with both hands will help you maintain
FRQWURO'RQ¶WOHWJR*ULSWKHUHDUKDQGOHZLWK\RXUULJKWKDQGZKHWKHUyou are right or left handed. Wrap the fingers of your left hand over
and around the front handlebar, and your left thumb under the front
handlebar.
WARNING: Do not operate chain saw in a tree, on a ladder, or on a
scaffold; this is extremely dangerous.
CAUTION: Chain coasts after turned off.
Do not use under wet conditions.
Use extreme caution when cutting small size brush, saplings or limbs
under tension, because slender and tense material may catch the saw
and be whipped toward you, pull you off balance or spring back.
Do not cut vines and/or small underbrush.
WARNING: Do not allow familiarity with this type of tool to make you
careless. Remember that a careless fraction of a second is sufficient to
inflict serious injury.
Before you start the unit, make sure the chain saw is not contacting any
object.
WARNING: Do not cut trees near electrical wires or buildings.
Make sure you follow the instructions in maintenance for putting oil in
the chain saw.
CAUTION: Failure to lubricate the chain will cause damage to the
bar and chain. Use only a good quality bar and chain oil or, if not
available, unused SAE 30 weight motor oil may be substituted. One
minute of use will consume approx. 0.2 fl. oz. (6ml) of oil.
NOTE: It is normal for oil to seep from the saw when not in use. To
prevent seepage, empty the oil tank after each use. When storing the
unit for a long period of time (3 months or longer) be sure the chain is
lightly lubricated; this will prevent rust on the chain and bar sprocket.
WARNING: Do Not use the chain saw with any type of accessory or
attachment. Such usage might be hazardous.
WARNING: Kickback may occur when the moving chain contacts an
object at the upper portion of the tip of the guide bar or when the wood
closes in and pinches the chain saw in the cut. Contact at the upper
portion of the tip of the guide bar can cause the chain to dig into the
object and stop the chain for an instant. The result is a lightening fast,
reverse reaction which kicks the guide bar up and back toward the
operator. If the chain saw is pinched along the top of the guide bar,
the guide bar can be driven rapidly back toward the operator. Either
of these reactions can cause loss of saw control which can result in
serious injury. Do not rely exclusively upon the safety devices built into
the saw. As a chain saw user, you should take several steps to keep
your cutting jobs free from accident or injury.
The following precautions should be followed to minimize
kickback:
1. Always grip the saw firmly with both hands. Hold the saw firmly
with both hands when the unit is running. Place your right hand
on the rear handle and your left hand on the front handle with
your thumbs and fingers encircling the chain saw handles. A
firm grip together with a stiff left arm will help you maintain
control of the saw if kickback occurs.
2. Make sure that the area in which you are cutting is free from
obstructions. Do not let the nose of the guide bar contact a log,
branch, fence or any other obstruction that could be hit while
you are operating the saw.
3. Always cut with the unit running at full speed. Fully squeeze the
throttle trigger and maintain a steady cutting speed.
Push and Pull ±This reaction force is always opposite to the direction
the chain is moving where wood contact is made. Thus, the operator
must be ready to control the PULL when cutting on the bottom edge
of the bar, and PUSH when cutting along the top edge.
Wear non-slip gloves for maximum grip and protection.
Proper Cutting Stance
Weight should be balanced with both feet on solid ground.
.HHSOHIWDUPZLWKHOERZORFNHGLQD³VWUDLJKWDUP´SRVLWLRQWRwithstand any kickback force.
Your body should always be to the left of the chain line.
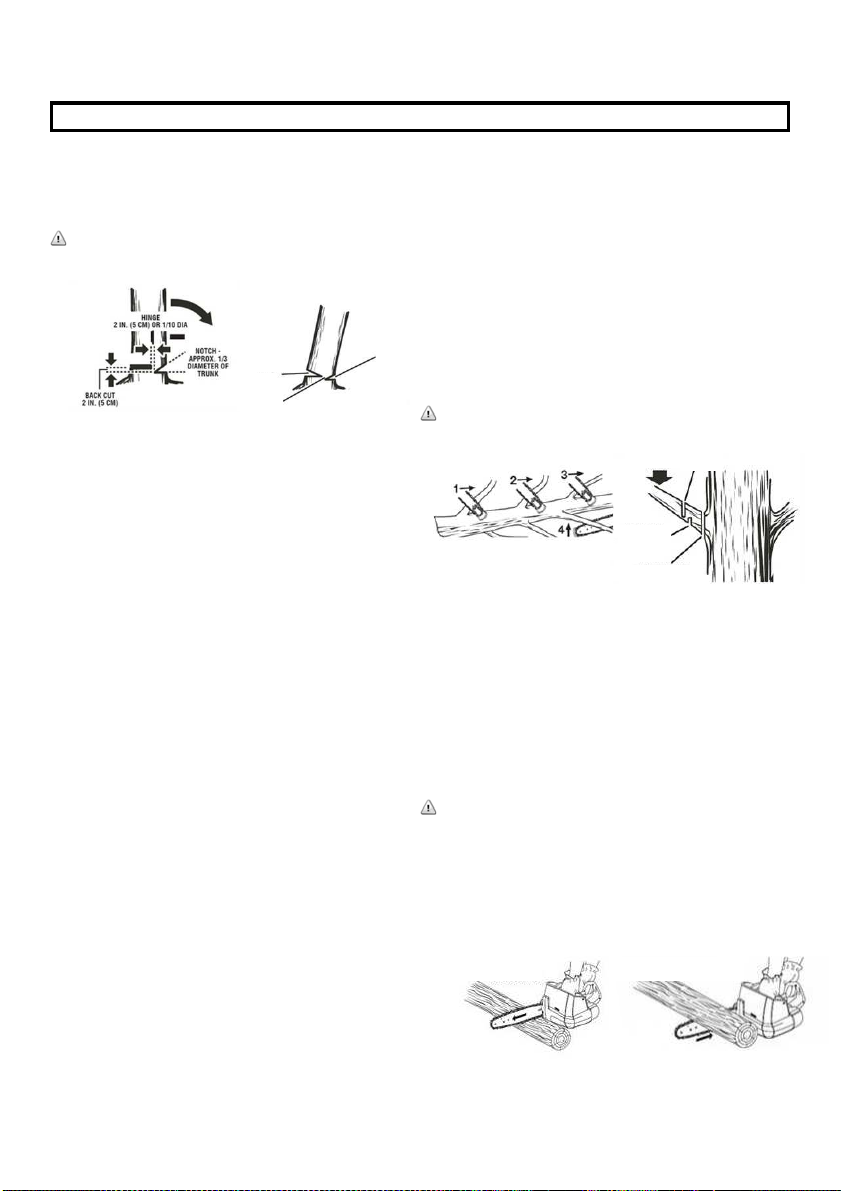
Basic Cutting Procedure
Small trees up to 6-7inches in diameter are usually cut in a single cut.
Large trees require notch cuts. Notch cuts determine the direction the
tree will fall.
WARNING: If the tree starts to fall in the wrong direction, or if the
saw gets caught or hung up during the fall, leave the saw and save
yourself.
WARNING: Periodically glance at the top of the tree during the
back-cut to assure the tree is going to fall in the desired direction.
Practice cutting a few small logs using the following technique to
JHWWKH³IHHO´RIXVLQJWKHVDZEHIRUH\RXEHJLQDPDMRUVDZLQJoperation.
Take the proper stance in front of the wood with the saw off.
Squeeze the trigger and let the chain accelerate to full speed before
entering the cut.
Hold the saw firmly with both
hands. Always keep your left
hand on the front handle and
your right hand on the rear
handle so that your body is to
the left of the chain line.
Keep the unit running the
entire time you are cutting,
maintain a steady speed.
Allow the chain to cut for you; exert only light downward pressure. If
you force the cut, damage to the bar, chain, or unit can result.
Do not put pressure on the saw at the end of the cut.
When felling a tree, keep everyone a safe distance from the cutting
area. During felling operations, the safe distance should be at least
twice the height of the largest trees in the felling area. If the tree
makes contact with any utility line, the utility company should be
notified immediately.
Always cut with both feet on solid ground to prevent being pulled off
balance.
Do not cut above chest height, as a saw held higher is difficult to
control against kickback forces.
6

OPERATING
FELLING A TREE
When bucking and felling operations are being performed by two
or more persons, at the same time, the felling operation should be
separated from the bucking operation by a distance of at least twice
the height of the tree being felled. Trees should not be felled in a
manner that would endanger any person, strike any utility line or
cause any property damage. If the tree does make contact with any
utility line, the utility company should be notified immediately.
WARNING: Check the tree for damaged or dead branches that could
fall and hit you during felling.
Before any cuts are started, pick your escape route (or routes in case
the intended route is blocked); clear the immediate area around the
tree and make sure there are no obstructions in your planned path of
retreat. A clear path of safe retreat is approximately 135 degrees
from planned line of fall. The retreat path should extend back and
diagonally to the rear of the expected line of fall.
Before felling is started, consider the force and direction of the
wind, the lean and balance of the tree, and the location of large
limbs. These things influence the direction in which the tree will
fall. Do not try to fell a tree along a line different from its natural
line of fall.
The chain saw operator should keep on the uphill side of the
terrain as the tree is likely to roll or slide downhill after it is felled.
Remove dirt, stones, loose bark, nails, staples, and wire from the
tree where felling cuts are to be made.
NOTCHED UNDERCUT ±Cut a notch about 1/3 diameter of the
tree, perpendicular to the direction of the fall. Make the cuts of the
notch so they intersect at a right angle to the line of fall. This notch
should be cleaned out to leave a straight line. To keep the weight
of the wood off the saw, always make the lower cut of the notch
before the upper cut.
WARNING: Do not fell trees during periods of high wind or heavy
precipitation. Wait to do your cutting until the hazard has ended.
WARNING: Do not cut down trees having an extreme lean or large
trees that have rotten limbs, loose bark, or hollow trunks. Have these
trees pushed or dragged down with heavy equipment, then cut them
up.
FELLING BACK-CUT
The back-cut is always made level and horizontal, and at a minimum
of 2 inches (5cm) above the horizontal cut of the notch.
Never cut through to the notch. Always leave a band of wood be-
tween the notch and back-cut (approximately 2 inches (5cm) or 1/10
WKHGLDPHWHURIWKHWUHH7KLVLVFDOOHG³KLQJH´RU³KLQJHZRRG´,Wcontrols the fall of the tree and prevents slipping or twisting or
shoot-back of the tree off the stump.
On large diameter trees, stop the back cut before it is deep enough
for the tree to either fall or settle back on the stump. Then insert soft
wooden or plastic wedges into the cut so they do not touch the chain.
The wedges can be driven in, little by little, to help jack the tree over.
7

OPERATING
CUTTING INSTRUCTIONS
LIMBING
Limbing is removing branches from a fallen tree.
Work slowly, keeping both hands on the chain saw with a firm
grip. Always make sure your footing is secure and your weight is
distributed evenly on both feet.
Leave the larger support limbs under the tree to keep the tree off the
ground while cutting.
Limbs should be cut one at a time. Remove the cut limbs from the
work area often to help keep the work area clean and safe.
Branches under tension should be cut from the bottom up to avoid
binding the chain saw.
Keep the tree between you and the chain saw while limbing. Cut from
the side of the tree opposite the branch you are cutting.
WARNING: Never climb into a tree to limb or prune. Do not stand on
ladders, platforms, a log, or in any position which can cause you to
lose your balance or control of the saw.
PRUNING
Pruning is trimming limbs from a live tree.
Work slowly, keeping both hands on the chain saw with a firm
grip. Always make sure your footing is secure and your weight is
distributed evenly on both feet.
When pruning trees it is important not to make the finishing cut next
to the main limb or trunk until you have cut off the limb further out to
reduce the weight. This prevents stripping the bark from the main
member.
Under-buck the branch 1/3 through for your first cut.
Your second cut should over-buck to drop the branch off.
Now make your finishing cut smoothly and neatly against the main
member so the bark will grow back to seal the wound.
WARNING: SPRINGPOLES
A springpole is any log, branch, rooted stump, or sapling which is
bent under tension by other wood so that it springs back if the wood
holding it is cut or removed. On a fallen tree, a rooted stump has
a high potential of springing back to the upright position during
the bucking cut to separate the log from the stump. Watch out for
springpoles, they are dangerous. They could result in severe or
fatal injury.
As the tree starts to fall, stop the chain saw and put it down
immediately. Retreat along the cleared path, but watch the action
in case something falls your way. Be alert for overhead limbs or
branches that may fall and watch your footing.
WARNING: Never cut through to the notch when making a
back-cut. The hinge controls the fall of the tree, this is a section
of wood between the notch and back-cut.
BUCKING
Bucking is the term used for cutting a fallen tree to the desired log
length.
Always make sure your footing is secure and your weight is
distributed evenly on both feet.
Cut only one log at a time. Support small logs on a saw horse or
another log while bucking.
Keep a clear cutting area. Make sure that no objects can contact
the guide bar nose and chain during cutting, this can cause kick-
back.
When bucking on a slope, always stand on the uphill side of the
log. To maintain complete control of the chain saw when cutting
through the log, release the cutting pressure near the end of the
cut without relaxing your grip on the chain saw handles. Do not let
the chain contact the ground. After completing the cut, wait for the
saw chain to stop before you move the chain saw. Always stop the
motor before moving from tree to tree.
BUCKING LOGS UNDER STRESS
When the log is supported along its entire length, it should be cut
from the top or over-bucking.
When the log is supported on one end, cut 1/3 diameter from the
underside or under-bucking. Then make the finishing cut by over-
bucking to meet the first cut.
As the log is being cut, it will tend to bend. The saw can become
pinched or hung in the log if you make the first cut deeper than 1/3
of the diameter of the log.
Give special attention to logs under stress to prevent the bar and
chain from pinching.
OVERBUCKING ±Begin on the top side of the log with the bottom
of the saw against the log; exert light pressure downward. Note
that the saw will tend to pull away from you.
UNDER-BUCKING ±Begin on the under side of the log with the
top of the saw against the log; exert light pressure upward. During
under-bucking, the saw will tend to push back at you. Be prepared
for this reaction and hold the saw firmly to maintain control.
8
OVERBUCKING UNDERBUCKING
CUT LIMBS ONE AT A TIME AND LEAVE
SUPPORT LIMBS UNDER TREE UNTIL
LOG IS CUT
LOAD
SECOND
CUT
FIRST CUT
1/3 DIA.
FINISHING CUT
NOTCH
BACK CUT
HINGE

MAINTENANCE
If you drop the chain saw, carefully inspect it for damage. If the
blade is bent, housing cracked, or handles broken or if you see
DQ\RWKHUFRQGLWLRQWKDWPD\DIIHFWWKHVDZ¶VRSHUDWLRQFDOORXUcustomer service line at 1-800-313-5111 for assistance.
Make sure the unit is disconnected from the power supply, then
use only mild soap and a damp cloth to clean the tool. Never let
any liquid get inside the tool; never immerse any part of the tool
into a liquid.
IMPORTANT: To assure product SAFETY and RELIABILITY,
repairs, maintenance and adjustment should be performed by a
qualified individual always using identical replacement parts.
CAUTION: Do not at any time let brake fluids, gasoline, petroleum
based products, penetrating oils, etc., come in contact with plastic
parts. They contain chemicals that can damage, weaken or de-
stroy plastic.
Ensure that the plastic bar cover is in place when storing.
Fertilizers and other garden chemicals contain agents which
greatly accelerate the corrosion of metals Do not store the tool on
or adjacent to fertilizers or chemicals.
For smooth and fast cutting, chain needs to be maintained prop-
erly. The chain requires sharpening when the wood chips are small
and powdery, the chain must be forced through the wood during
cutting, or the chain cuts to one side. Refer to instructions earlier
in this manual for instructions on properly sharpening the chain.
TROUBLESHOOTING
Possible Cause
- Extension cord not connected to the plug
- Cord not connected to power source
- Lock off button not fully depressed
Possible Solution
- Check extension cord is fully connected to tool
- Check extension cord is fully connected to a live receptacle
- Check that lock off is fully depressed prior to engaging trigger
switch
- Bar and chain running hot and
smoking
- Check tension for over-tight condition
- Chain oil tank empty
- Chain installed in wrong direction
- Adjust chain tension
- Fill tank with chain oil
- Reverse chain so that cutters face the right direction
Call us first with questions about operating or maintaining your chain
saw at 1.800.313.5111 between 7:30 a.m. ±4:30 p.m. Eastern
CALL US FIRST !!
- Chain tension too tight
- Check guide bar and chain for damage
- Motor runs but chain is not rotating - Adjust chain tension
- Replace damaged bar and chain with identical replacement
parts or contact our customer service center at 1-800-313-5111
for assistance.
LUBRICATION SYSTEM
BEFORE USING : Fill oil well with new quality bar and chain oil, or
if unavailable, unused SAE 30 weight motor oil may be substituted.
The chain is automatically lubricated.
Use only new bar and chain oil or unused SAE 30 weight motor oil
may be substituted. Never use wasted oil, low quality oil, or insufficient
oil. This could damage the pump; the bar and the chain which may
result in serious personal injury. Check oil level before each work
session, refill if less than ¼ full.
If the lubrication system does not work properly, check if the oil filter and
all oil-ways are clean and free from obstructions. If it is still not working,
call our customer service line at 1-800-313-5111 for assistance.
GUIDE BAR MAINTENANCE
When the guide bar shows signs of wear, reverse it on the saw to
distribute the wear for maximum bar life. The bar should be cleaned
every day of use and checked for wear and damage.
Feathering or burring of the bar rails is a normal process of bar wear.
Such faults should be smoothed with a file as soon as they occur.
A bar with any of the following faults should be replaced.
- Wear inside the bar rails which permits the chain to lay over sideways.
- Bent guide bar
- Cracked or broken rails
- Spread rails
In addition, guide bars with a sprocket at their tip must be lubricated
weekly with a grease syringe to extend the guide bar life. Using a
grease syringe, lubricate weekly in the lubricating hole.
Turn the guide bar and check that the lubrication holes and chain
groove are free from obstructions.
Problem
- Unit does not run
9

Chain...........................................................91PJ057X/Oregon

NOTES
_______________________________________________________________________________
_______________________________________________________________________________
_______________________________________________________________________________
_______________________________________________________________________________
_______________________________________________________________________________
_______________________________________________________________________________
_______________________________________________________________________________
_______________________________________________________________________________
_______________________________________________________________________________
_______________________________________________________________________________
_______________________________________________________________________________
_______________________________________________________________________________
_______________________________________________________________________________
_______________________________________________________________________________
_______________________________________________________________________________
_______________________________________________________________________________
_______________________________________________________________________________
_______________________________________________________________________________
_______________________________________________________________________________
_______________________________________________________________________________
_______________________________________________________________________________
_______________________________________________________________________________
_______________________________________________________________________________
_______________________________________________________________________________
_______________________________________________________________________________
_______________________________________________________________________________
_______________________________________________________________________________
_______________________________________________________________________________
11

www.earthwisetools.com
05/30/2016

MANUAL DEL OPERARIO
MOTOSIERRA ELÉCTRICA
Este producto está amparado por patentes de EE. UU. y otras patentes internacionales.
Copyright. Todos los derechos reservados.
CS30116
Este producto ha sido diseñado y fabricado de acuerdo con nuestros altos estándares de confiabilidad, facilidad de operación
y seguridad para el operario. Si se trata con cuidado, esta herramienta le otorgará años de óptimo rendimiento y resistencia.
ADVERTENCIA: 3DUDUHGXFLUHOULHVJRGHVXIULUDOJXQDOHVLyQHOXVXDULRGHEHOHHU\FRPSUHQGHUHOPDQXDOGHOoperario antes de usar este producto.
GUARDE ESTE MANUAL PARA CONSULTAS FUTURAS
Muchas gracias por su compra.
NO DEVUELVA ESTE PRODUCTO A LA TIENDA. ¿TIENE PREGUNTAS SOBRE FUNCIONAMIENTO, MONTAJE, PIEZAS O SERVICIO
TÉCNICO? LLAME AL 1-800-313-5111 ENTRE LAS 7:30 AM Y LAS 4:30 PM, HORA DEL ESTE DE LOS ESTADOS UNIDOS.

SÉCURITÉ GÉNÉRALE
ADVERTENCIAS DE SEGURIDAD IMPORTANTES
PARA REDUCIR EL RIESGO DE LESIONES:
Antes de poner en uso la herramienta, asegúrese de que todos los
usuarios lean y comprendan las instrucciones de seguridad y la
demás información incluida en este manual.
PRECAUCIÓN: Use protección auditiva apropiada mientras
trabaja. En ciertas condiciones y con cierta duración de uso, el
ruido generado por este producto puede contribuir a la pérdida
de la audición.
Guarde estas instrucciones y revíselas con frecuencia antes de usar
la herramienta y para impartirlas a otros.
ADVERTENCIA: Al utilizar aparatos eléctricos para el jardín, se
recomienda respetar las precauciones de seguridad básicas que se
detallan a continuación, a fin de reducir riesgos de incendios,
descargas eléctricas y lesiones personales.
LEA TODAS LAS INSTRUCCIONES
2
EVITE AMBIENTES PELIGROSOS. No utilice esta herramienta en
la lluvia ni en lugares húmedos o mojados. Tampoco trabaje en
entornos donde existan gases o sustancias explosivas. Por lo
general, los motores de estas herramientas producen chispas que
podrían inflamar los gases.
USE ROPA ADECUADA. No use prendas sueltas ni artículos de
joyería. Use protección para cubrir y contener el cabello largo, ya
que puede quedar atrapado en las piezas móviles. Se recomienda
usar guantes de goma y calzado resistente cuando se trabaja al aire
libre.
USE GAFAS DE SEGURIDAD. Al trabajar con este producto, use
gafas de seguridad con protectores laterales que cumplan la norma
ANSI Z87.1. Protéjase la cara con una mascarilla antipolvo si hay
polvo en el ambiente.
PELIGRO: Riesgo de corte. Mantenga las manos alejadas de las
cuchillas. Mantenga ambas manos en los mangos mientras la
herramienta está encendida.
USE LA HERRAMIENTA EN FORMA CORRECTA. No utilice esta
herramienta en trabajos para los que no esté indicada.
INTERRUPTOR DE CIRCUITO POR FALLA A TIERRA (ICFT).
Los circuitos o tomacorrientes que se usen para la motosierra deben
contar con esta protección. Se pueden utilizar receptáculos que
tengan la protección de ICFT incorporada.
CABLE DE EXTENSIÓN. Asegúrese de que el cable de extensión
esté en buenas condiciones. Además, compruebe que tenga el
grosor suficiente para transportar la corriente que necesitará el
producto.
Un cable de extensión muy pequeño provocará una disminución en
la tensión de la línea y, como resultado, una pérdida de potencia y
recalentamiento. La siguiente tabla muestra el tamaño correcto que
se debe usar según la longitud del cable y el amperaje de la
etiqueta. Ante la duda, utilice el siguiente calibre más grueso.
Cuanto más bajo es el número de calibre, más grueso es el cable.
Calibre mínimo para los cables
Voltios Longitud del cable en pies
120 V 0-25 26-50 51-100 101-150
Amperaje
Más No más Calibre AWG
de de
0 - 6 18 16 16 14
6 - 10 18 16 14 12
10 - 12 16 16 14 12
ADVERTENCIA: Use cables de extensión para exteriores
rotulados con las siguientes inscripciones: SW-A, SOW-A, STW-A,
STOW-A, SJW-A, SJTW-A, o SJTOWA. Estos cables están
especificados para usar al aire libre y reducir el riesgo de
descarga eléctrica.
El cable de extensión y el cable de alimentación se
pueden atar para evitar que se desconecten
durante el uso. Realice el nudo como se muestra
en la imagen y después conecte el enchufe del
cable de alimentación en el receptáculo del cable
de extensión. Este método también se puede
aplicar para unir dos cables de extensión.
DOBLE AISLAMIENTO. El doble aislamiento es un concepto de
seguridad en las herramientas eléctricas que elimina la necesidad
del acostumbrado cable de alimentación puesto a tierra mediante el
sistema de tres cables. Todas las piezas metálicas expuestas están
separadas de los componentes del motor metálico interno por un
aislamiento protector. Las herramientas con doble aislamiento no
necesitan la conexión a tierra.
NOTA: La finalidad del sistema de doble aislamiento es proteger al
usuario de una descarga eléctrica provocada por una rotura del
aislamiento interno de la herramienta. Respete todas las
precauciones generales de seguridad para evitar una descarga
eléctrica.
DESCONECTE LA MOTOSIERRA de la fuente de alimentación
cuando no esté en uso o durante el servicio de mantenimiento o la
limpieza. No deje la herramienta sin vigilancia.
EVITE EL ENCENDIDO ACCIDENTAL. No transporte la motosierra
con el dedo en el interruptor. Asegúrese de que el interruptor esté en
la posición de apagado antes de enchufar el cable de la herramienta.
PRECAUCIÓN: Nunca utilice el protector como mango, ni tome
la unidad por el protector. Si lo hiciera, podría sufrir lesiones
personales graves.
MANTENGA ALEJADOS A LOS NIÑOS. Todos los visitantes, niños
y mascotas deben mantenerse a una distancia segura de la zona
de trabajo.
GUARDE LA MOTOSIERRA BAJO TECHO. Cuando no esté en uso,
la motosierra se deberá guardar en un lugar cerrado, seco y elevado
o fuera del alcance de los niños.
NO INTENTE extraer el material de corte ni sostener el material que
desea cortar mientras las cuchillas están en movimiento. Asegúrese
de que el interruptor esté en posición de apagado antes de quitar el
material atascado en las cuchillas. No tome la motosierra por las
cuchillas de corte expuestas ni por los bordes filosos al tratar de
levantar o sostener la herramienta.
PRECAUCIÓN: La cadena se mueve por inercia después de apagar
el motor.
NO FUERCE LA MOTOSIERRA. Realizará mejor el trabajo con
menor probabilidad de lesiones si maneja la motosierra a la
velocidad para la que fue diseñada.
PONGA ATENCIÓN. Observe lo que está haciendo. Use el sentido
común. No opere la motosierra si está cansado o bajo la influencia
de medicamentos, drogas o alcohol.
PELIGRO: Si la cadena se atasca en algún cable o línea eléctrica,
NO TOQUE LA BARRA NI LA CADENA. PUEDEN ESTAR
ELECTRIFICADAS Y SER PELIGROSAS. Suelte la unidad de la
forma más segura posible. Desconecte el cable o línea eléctrica
dañada del suministro eléctrico. Si es posible, hágalo de una manera
segura. Si tiene dudas, llame a un electricista o al contratista
eléctrico para obtener ayuda. El no prestar atención a este aviso de
peligro podría causar lesiones personales de gravedad y,
posiblemente, la muerte.
ILUMINACIÓN. Trabaje sólo con luz natural o buena luz artificial.
NO ADOPTE UNA POSTURA INCÓMODA. Mantenga una base y
equilibro apropiados en todo momento.
PELIGRO: Desconecte la herramienta de la fuente de alimentación
antes de quitar el material atascado en las cuchillas.

3
PELIGRO: Nunca encienda el motor antes de instalar la barra
guía, la cadena y la tapa de la cadena. Si estas piezas no están
en su lugar, el embrague puede salir disparado o explotar, lo que
expondrá al usuario a una posible lesión grave.
ADVERTENCIA: Para evitar lesiones personales graves, lea y
comprenda las instrucciones de seguridad provistas.
ADVERTENCIA:Antesderealizaralgunatareademantenimiento,
asegúrese de que la herramienta esté desconectada del suministro
eléctrico. De locontrario, podría sufrir lesiones personales de gravedad.
PRECAUCIÓN: Use siempre guantes al manipular la barra y la
cadena. Estos componentes son filosos y pueden contener rebabas.
ADVERTENCIA: Nunca toque o ajuste la cadena mientras el
motor está en funcionamiento. La cadena de la motosierra es
muy filosa; por lo tanto, siempre utilice guantes de protección al
realizar el mantenimiento de la cadena para evitar posibles
laceraciones graves.
NOTA: Use únicamente piezas de reemplazo idénticas al
reemplazar la barra guía y la cadena.
xDesconecte la motosierra del suministro eléctrico.
xDesenrosque la tuerca girando la perilla en sentido contrario a
las agujas.
xRetire la tapa de la cadena.
xRetire la barra y la cadena de la superficie de montaje.
MONTAJE
DESEMBALAJE
Este producto requiere no montaje.
Extraiga la herramienta y los accesorios de la caja con cuidado.
Asegúrese de que estén incluidos todos los elementos detallados en
la lista de embalaje.
Inspeccione el producto detenidamente para corroborar que no
existan roturas ni averías ocurridas durante el envío. No deseche el
material de embalaje hasta haber inspeccionado exhaustivamente el
producto y comprobar que funciona en forma satisfactoria.
ADVERTENCIA: Si falta alguna pieza o está dañada, no utilice este
producto hasta reponer la pieza en cuestión. De lo contrario, podría
sufrir lesiones personales de gravedad. Si falta alguna pieza o está
dañada, llame al 1-800-313-5111 para obtener asistencia.
LISTA DE EMBALAJE
xMotosierra con funda de cuchillas
xManual del operario
VERIFIQUE LAS PIEZAS DAÑADAS. Antes de seguir usando la
motosierra, se deberán revisar los protectores u otras piezas dañadas en
forma exhaustiva para determinar si la herramienta funcionará
correctamente y realizará el trabajo previsto. Compruebe la alineación y las
uniones de las piezas móviles, el montaje, averías de componentes y otros
factores que puedan afectar el funcionamiento. Un protector o cualquier
otra pieza dañada deben ser reparados en forma adecuada o
reemplazados. Llame al 1-800-313-5111 para obtener asistencia.
Siempre use tapones o silenciadores para proteger los oídos.
Los usuarios frecuentes deben someterse a exámenes auditivos periódicos
debido a que el ruido generado por las motosierras puede dañar la
audición.
MANTENGA LA HERRAMIENTA EN BUENAS CONDICIONES.
Las cuchillas siempre deben estar afiladas y limpias para lograr un óptimo
funcionamiento y reducir el riesgo de lesiones. Mantenga los mangos
secos, limpios y libres de grasa y aceite.
ADVERTENCIA: Proposición 65 de California: Este producto contiene
sustancias químicas al estado de california como causantes de cáncer,
defectos de nacimiento u otros problemas reproductivos.
ENCHUFES POLARIZADOS. Para reducir el riesgo de una descarga
eléctrica, este equipo tiene un enchufe polarizado (un contacto es más
ancho que el otro). Se debe utilizar un cable de extensión polarizado
adecuado de dos o tres cables. Las conexiones polarizadas encajan de
una sola manera. Cerciórese de que el extremo del receptáculo del
cable de extensión tenga ranuras de anchos diferentes para los
contactos. Invierta el enchufe si no encaja exactamente en el cable de
extensión. Si aún así no encaja, consiga un cable de extensión
adecuado. Si el cable de extensión no se adapta bien al tomacorriente,
llame a un electricista competente para que instale un tomacorriente
adecuado. No modifique el enchufe de la herramienta ni el cable de
extensión de ningún modo.
ADVERTENCIA: Parte del polvo generado por este producto contiene
químicos reconocidos por el Estado de California como causantes de
cáncer, defectos de nacimiento u otros efectos nocivos para el aparato
reproductor. Algunos ejemplos de estos productos químicos son:
- compuestos presentes en fertilizantes;
- compuestos presentes en insecticidas, herbicidas y pesticidas; y
- arsénico y cromo de maderas tratadas químicamente.
Para reducir la exposición a estos químicos, use equipo de protección
aprobado, como mascarillas antipolvo especialmente elaboradas para
eliminar partículas microscópicas mediante un proceso de filtrado.
INSTALACIÓN / REEMPLAZO DE LA BARRA GUÍA Y LA CADENA
SÉCURITÉ GÉNÉRALE

xVuelva a montar la tapa de la cadena.
xAtornille girando la perilla en el sentido de las agujas del reloj.
La cadena tendrá la tensión correcta si no hay comba en la parte
inferior de la barra guía y la cadena está ajustada pero se puede girar
a mano sin que se trabe.
NOTA: Si la cadena está demasiado ajustada, no girará. Asegúrese de
que la cadena gire sin trabarse.
NOTA: Una cadena nueva tiende a estirarse; por lo tanto, revise la
tensión de la cadena periódicamente y ajústela según sea necesario.
INSTALACIÓN / REEMPLAZO DE LA BARRA GUÍA Y LA CADENA
4
xRetire la cadena vieja de la barra.
xExtienda la nueva cadena de la sierra formando círculo y enderece
todo retorcimiento presente en la misma. Los dientes de corte de-
ben estar orientados en la dirección desplazamiento de la cadena.
Si están orientados en la dirección opuesta, invierta la posición de
la cadena.
xColoque los eslabones impulsores de la cadena en la ranura de la
barra.
NOTA: Verifique TXHODGLUHFFLyQGHODFDGHQDVHDODFRUUHFWD
xColoque la cadena de manera que haya un lazo en la parte
posterior de la barra.
xSostenga la cadena en posición sobre la barra y coloque el lazo
alrededor de la rueda dentada.
xAjuste la tensión de la cadena girando la rueda tensora.
Dirección de corte

5
TENSIÓN DE LA CADENA Y MANTENIMIENTO
TENSIÓN DE LA CADENA
Detenga el motor antes de ajustar la tensión de la cadena. Asegúrese
de que el tornillo de la barra guía se pueda ajustar a mano, gire el
tensor de la cadena en el sentido de las agujas del reloj para aplicar
tensión a la cadena. Una cadena fría tendrá la tensión correcta si no hay
holgura en la parte inferior de la barra guía y la cadena está ajustada
pero se puede girar a mano sin que se trabe.
La cadena se debe volver a tensar cuando la línea horizontal de los
eslabones impulsores sobresalga de la ranura de la barra.
Durante el funcionamiento normal de la motosierra, la temperatura
de la cadena aumentará. Los eslabones impulsores de una cadena
caliente y con la tensión correcta colgarán aproximadamente a
1,25 mm (0,05 pulg.) de la ranura de la barra. Tenga en cuenta que
la tensión de la cadena caliente puede resultar demasiado ajustada
DOHQIULDUVH9HULILTXHOD³WHQVLyQHQIUtR´DQWHVGHOSUy[LPRXVR
NOTA: Una cadena nueva tiende a estirarse; por lo tanto, revise
la tensión de la cadena periódicamente y ajústela según sea necesario.
MANTENIMIENTO DE LA CADENA
PRECAUCIÓN: Desconecte la herramienta del suministro eléctrico y
asegúrese de que la cadena se haya detenido antes de realizar
cualquier trabajo de mantenimiento en la motosierra.
Para lograr un corte uniforme y rápido, la cadena debe tener un
mantenimiento adecuado. Es necesario afilar la cadena cuando
la madera tiene astillas pequeñas y produce mucho polvo. Se debe
aplicar fuerza para que la cadena penetre en la madera durante el corte;
de lo contrario, la cadena cortará hacia un costado. Durante el
mantenimiento de la cadena, recuerde:
- Un ángulo de limado incorrecto de la placa lateral puede aumentar
el riesgo de retroceso intenso.
- La separación del puntal inclinado (calibre de profundidad).
- Si es demasiado baja aumenta el riesgo de fuerza de retroceso.
- Si no es lo suficientemente baja, la capacidad de corte disminuye.
- Si los dientes de las cuchillas han golpeado objetos duros como
clavos y piedras o se erosionaron por la acción del barro o la arena
presentes en la madera, el proveedor del servicio técnico deberá
afilar la cadena.
NOTA: Al reemplazar la cadena, inspeccione la rueda dentada para
verificar si está gastada o dañada. Si existen signos de desgaste o
daños en las áreas indicadas, llame a una persona calificada para que
reemplace la rueda dentada.
AFILADO DE LAS CUCHILLAS
Asegúrese de limar todas las cuchillas según los ángulos específicos y
a la misma longitud; la rapidez en el corte se logra sólo cuando todas
las cuchillas están uniformes.
Use guantes para protegerse las manos. Tense la cadena en la forma
FRUUHFWDDQWHVGHODILODGR&RQVXOWHODVHFFLyQ³7HQVLyQGHODFDGHQD´que aparece anteriormente en este manual. Realice el trabajo de limado
en la mitad de la barra.
Utilice una lima redonda de 5/32 pulg. de diámetro y un soporte.
Mantenga el nivel de la lima con la placa superior del diente. No permita
que la lima se hunda ni se balancee. Aplique una presión leve pero
firme; dirija la lima hacia el ángulo frontal del diente.
Levante la lima del acero en cada pasada de vuelta.
Realice algunas pasadas firmes en cada diente. Lime todas las cuchillas
izquierdas en una misma dirección. A continuación, siga con el otro lado y
lime las cuchillas derechas en la dirección opuesta. De vez en cuando,
retire las limaduras con un cepillo de alambre.
ADVERTENCIA: El afilado incorrecto de la cadena aumenta el riesgo de
fuerza de retroceso.
ADVERTENCIA: La falta de reparación o reemplazo de una cadena
dañada puede provocar lesiones de gravedad.
ADVERTENCIA: La cadena de la motosierra es muy filosa; por lo tanto,
siempre utilice guantes de protección al realizar el mantenimiento de
la cadena.
ÁNGULO DE LIMADO DE LA PLACA SUPERIOR
Ángulo correcto de 30 grados: los soportes de la lima están señalizados
con marcas guía para alinear la lima correctamente y lograr el ángulo
adecuado de la placa superior.
Menos de 30 grados: se obtiene
un corte cruzado.
Más de 30 grados: se obtiene un
borde en bisel que pierde filo
rápidamente.
ÁNGULO DE LA PLACA LATERAL
Correcto: 80 grados se producen automáticamente si se utiliza la lima del
diámetro correcto en el soporte
de la lima.
*DQFKRVH³WUDED´\SLHUGHILORrápidamente. Aumenta el riesgo de
retroceso. Esto se produce al usar
una lima de un diámetro demasiado
pequeño o que se sostiene en una posición baja.
Inclinación hacia atrás: necesita demasiada presión de alimentación,
causa un desgaste excesivo a la barra y cadena. Esto se produce al usar
una lima de un diámetro demasiado grande o que se sostiene en una
posición muy alta.
SEPARACIÓN DEL CALIBRE
DE PROFUNDIDAD
El calibre de profundidad se debe
mantener a una distancia de 0,6 mm
(0,025 pulg.). Utilice una herramienta
para verificar las separaciones del
calibre de profundidad.
Después de limar la cadena,
compruebe la separación del
calibre de profundidad.
Utilice una lima plana y una
empalmadora para bajar todos los
calibres de manera uniforme. Existen en
el mercado empalmadoras de calibre de
profundidad de 0,5 mm a 0,9 mm
(0,020 a 0,035 pulg.). Utilice una
empalmadora de 0,6 mm (0,025 pulg.).
Después de bajar cada calibre de
profundidad, restituya la forma original redondeando el frente. Tenga
cuidado de no dañar los eslabones impulsores contiguos con el borde de
la lima.
Los calibres de profundidad se deben ajustar con la lima plana en
la misma dirección en que se afiló la cuchilla contigua con la lima
redonda. Tenga la precaución de no tocar la cara de la cuchilla con
la lima plana al ajustar los calibres de profundidad.
CUCHILLAS IZQUIERDAS
Aprox. 1,25 mm (0,05 pulg.)
CUCHILLAS DERECHAS
APROX. 0,05 (1,25 ).
LÍNEA HORIZONTAL DE LOS ESLABONES
PLACA
SUPERIOR
ORIFICIO DE
REMACHE
LOMO
GARGANTA
BASE
CALIBRE DE
PROFUNDIDAD
ÁNGULO DE CORTE
PLACA
LATERAL

6
FUNCIONAMIENTO
ENCENDIDO DE LA HERRAMIENTA
Presione el botón de bloqueo con el dedo pulgar y después apriete el gatillo
con los dedos. (Una vez que la herramienta está en marcha, puede soltar el
botón de bloqueo). Para apagar la máquina, suelte el gatillo.
ADVERTENCIA: Para prevenir daños personales, tenga en cuenta las
siguientes recomendaciones:
Lea el manual de instrucciones antes de usar el producto
y guárdelo para consultas futuras.
Mantenga las manos alejadas de la cadena.
Sostenga la herramienta con ambas manos en los
mangos. No adopte una postura incómoda.
Sujete la motosierra de manera adecuada y firme con ambas manos para
mantener el control. No la suelte. Tome la empuñadura trasera con la mano
derecha, independientemente de ser diestro o zurdo. Rodee el manillar
delantero con los dedos de la mano izquierda por arriba y el pulgar izquierdo
por debajo del manillar.
ADVERTENCIA: No opere la motosierra en un árbol, en una escalera ni en
un andamio; esto es sumamente peligroso.
PRECAUCIÓN: La cadena se mueve por inercia después de apagar
el motor.
No trabaje en condiciones de humedad.
Tenga suma precaución al cortar malezas pequeñas, vástagos o ramas con
cierta tensión, debido a que los materiales delgados y tensos,
al entrar en contacto con la motosierra, pueden salir proyectados hacia
usted, hacerle perder el equilibrio o saltar hacia atrás.
No corte enredaderas ni malezas.
ADVERTENCIA: No permita que la familiaridad con este tipo de
herramientas termine en negligencia. Recuerde que un segundo de
descuido es suficiente para provocar una lesión grave.
Antes de encender la unidad, asegúrese de que no esté en contacto con
ningún objeto.
ADVERTENCIA: No corte árboles cerca de cables eléctricos ni de
edificaciones.
Asegúrese de seguir las instrucciones de mantenimiento para aplicar aceite
a la motosierra.
PRECAUCIÓN: La falta de lubricación de la cadena provocará daños a
la barra y la cadena. Use sólo un aceite de buena calidad para la barra y
la cadena, si no hubiera, se puede reemplazar por aceite de motor de
viscosidad SAE 30 sin usar. El consumo aproximado de aceite durante un
minuto de uso es de 0,15 onzas líquidas (5 ml).
NOTA: Es normal que la motosierra pierda parte del aceite cuando no está
en uso. Para evitarlo, vacíe el tanque de aceite después de cada uso.
Cuando almacene la unidad durante un período prolongado (tres meses o
más) asegúrese de que la cadena esté ligeramente lubricada; esto evitará
que se oxide la rueda dentada de la barra y la cadena.
ADVERTENCIA: No aplique ninguna clase de accesorio o dispositivo de
sujeción a la motosierra. Dicha práctica podría resultar peligrosa.
ADVERTENCIA: Es posible que se produzca una fuerza de retroceso
cuando la cadena en movimiento toca un objeto con la parte superior de la
punta de la barra guía o cuando la madera atrapa y aprieta la motosierra en
el corte. El contacto con la parte superior de la punta de la barra guía puede
provocar que la cadena se incruste en el objeto y se detenga por un
instante. El resultado es una rapidísima reacción inversa que impulsa la
barra guía hacia arriba y hacia atrás en dirección al operario. Si se aprieta la
motosierra a lo largo de la parte superior de la barra guía, ésta puede salir
proyectada rápidamente hacia atrás en dirección al operario. Cualquiera de
estas dos reacciones puede provocar la pérdida del control de la
herramienta y, en consecuencia, causar lesiones graves. No dependa
exclusivamente de los dispositivos de seguridad integrados a la motosierra.
Como usuario, deberá tomar varias medidas para evitar accidentes y
lesiones en sus trabajos de corte.
Se deben tener en cuenta las siguientes precauciones para evitar
que se produzca una fuerza de retroceso:
1. Siempre sujete la motosierra con ambas manos y con firmeza.
Sostenga la unidad firmemente con ambas manos cuando está en
funcionamiento. Coloque la mano derecha en el mango trasero y
la izquierda en el delantero con los pulgares y dedos rodeando los
mangos de la motosierra. Un firme agarre y una posición rígida del
brazo izquierdo ayudarán a mantener el control de la motosierra en
caso de que ocurra una fuerza de retroceso.
2. Asegúrese de que no haya obstrucciones en el área donde está
trabajando. No permita que la punta de la barra guía toque ningún
tronco, rama, cerca ni otra obstrucción con la que la motosierra
pudiera entrar en contacto mientras trabaja.
3. Siempre corte con la unidad funcionando a toda velocidad. Apriete
el gatillo del acelerador hasta el fondo y mantenga una velocidad de
corte constante.
Empuje y tracción: esta fuerza de reacción siempre es opuesta a
la dirección del movimiento de la cadena donde la herramienta entra en
contacto con la madera. Por lo tanto, el operario debe estar preparado
para controlar la fuerza de TRACCIÓN al cortar con el borde inferior
de la barra y la fuerza de EMPUJE al cortar a lo largo del borde superior.
Use guantes antideslizantes para lograr un máximo agarre y una
protección adecuada.
Posición de corte correcta
El peso debe estar equilibrado, con ambos pies apoyados en suelo firme.
&RORTXHHOEUD]RL]TXLHUGRFRQHOFRGRWUDEDGRHQODSRVLFLyQGH³EUD]RH[WHQGLGR´SDUDVRSRUWDUODIXHU]DGHUHWURFHVR
Su cuerpo siempre debe estar a la izquierda de la línea de la cadena.
Procedimiento básico de corte
Habitualmente, para los árboles pequeños de hasta 15 ó 18 cm (6 ó
7 pulgadas) de diámetro se necesita un solo corte. Los árboles grandes
requieren cortes con muescas. Las muescas determinan la dirección en
la que caerá el árbol.
ADVERTENCIA: Si el árbol comienza a caer en la dirección incorrecta o
si la motosierra queda atrapada o colgada durante la caída, deje
la herramienta y póngase a salvo.
ADVERTENCIA: Cada tanto, eche una mirada a la parte superior del
árbol durante el corte posterior para asegurarse de que va a acaer en
la dirección deseada.
Practique cortando algunos troncos pequeños con la técnica que se
describe a continuación para familiarizarse con el uso de la motosierra
antes de comenzar una operación de tala importante.
Adopte la postura adecuada delante de la madera con la motosierra
apagada.
Apriete el gatillo y permita que la cadena acelere hasta la velocidad
máxima antes de comenzar a cortar.
Sostenga la motosierra
firmemente con ambas manos.
Siempre mantenga la mano
izquierda en el mango delantero
y la derecha en el mango
trasero, de modo que el cuerpo
quede a la izquierda de la línea
de la cadena.
La unidad debe estar
funcionando durante todo el tiempo que esté cortando; mantenga una
velocidad constante.
Permita que la cadena realice el corte por usted; ejerza sólo una ligera
presión hacia abajo. Si fuerza el corte, se dañará la barra, la cadena o la
unidad.
No aplique presión sobre la motosierra al final del corte.
Al talar un árbol, las demás personas deben mantenerse a una distancia
segura de la zona de corte. Durante las operaciones de tala, la distancia
segura deberá ser al menos el doble de la altura de los árboles más
grandes que se encuentran en la zona de tala. Si el árbol entra en
contacto con algún cable de servicios, se deberá notificar a la empresa
del servicio inmediatamente.
Siempre corte con ambos pies bien apoyados en suelo firme para evitar
la pérdida del equilibrio.
No realice ningún corte por encima de la altura del pecho, ya que es difícil
controlar las fuerzas de retroceso cuando se sujeta la motosierra en una
posición más elevada.

7
FUNCIONAMIENTO
TALA DE UN ÁRBOL
Cuando dos o más personas realizan operaciones de tala y serrado al
mismo tiempo, la tala debe estar apartada del área donde se está
serrando por una distancia mínima del doble de la altura de los árboles
que se están talando. La tala de los árboles no debe poner en riesgo a
ninguna persona, golpear ningún cable de servicios ni causar daños a
la propiedad. Si el árbol entra en contacto con algún cable de servicios,
se deberá notificar a la empresa del servicio inmediatamente.
ADVERTENCIA: Compruebe que no haya ramas dañadas o muertas que
pudieran caer y golpearlo durante el procedimiento de tala.
Antes de comenzar a cortar, planifique su ruta de escape (o rutas, en
caso de que la ruta elegida esté bloqueada); despeje el área inmediata
alrededor del árbol y asegúrese de que no haya obstrucciones en el
camino de retirada planeado. Un camino despejado de retirada segura es
el que se encuentra aproximadamente a 135 grados de la línea de caída
planeada. El camino de retirada debe extenderse hacia atrás y
diagonalmente hacia la zona posterior de la línea de caída prevista.
Antes de comenzar a talar, considere la fuerza y la dirección del viento,
la inclinación y el equilibrio del árbol y la ubicación de las ramas
grandes. Estos factores influyen en la dirección en la que caerá el
árbol. No intente talar un árbol por una línea distinta a su línea natural
de caída.
El usuario de la motosierra debe ubicarse en el lado ascendente del
terreno, ya que es probable que el árbol ruede o se deslice cuesta
abajo después de ser talado.
Elimine el polvo, piedras, corteza suelta, clavos, grapas y alambres del
árbol donde se realizarán los cortes de tala.
CORTE DE MUESCA. Corte una muesca de aproximadamente 1/3 del
árbol, perpendicular a la dirección de la caída. Realice los cortes de
la muesca de tal forma que se crucen en ángulo recto con la línea de
caída. La muesca debe limpiarse hasta dejar una línea recta. Para que
el peso de la madera no caiga sobre la motosierra, siempre realice el
corte inferior de la muesca antes que el corte superior.
ADVERTENCIA: No tale árboles durante períodos de viento fuerte ni
precipitaciones intensas. Espere hasta que pase el peligro para realizar
el trabajo.
ADVERTENCIA: No tale árboles que tengan una inclinación excesiva o
árboles grandes que tengan ramas en mal estado, corteza floja o troncos
huecos. Estos árboles se deben empujar o arrastrar con equipos pesados
para después cortarlos.
CORTE POSTERIOR DE TALA
El corte posterior siempre se realiza en forma recta y horizontal, a un
mínimo de 5 cm (2 pulgadas) sobre el corte horizontal de la muesca.
Nunca corte hasta llegar a la muesca. Siempre deje una franja de madera
entre la muesca y el corte posterior (aproximadamente 5 cm [2 pulgadas]
RGHOGLiPHWURGHOiUERO(VWRVHGHQRPLQD³ELVDJUD´R³ELVDJUDGHPDGHUD´&RQWURODODFDtGDGHOiUERO\SUHYLHQHHOGHVOL]DPLHQWRJLURRproyección hacia atrás del árbol al desprenderse del tronco cortado.
En árboles de gran diámetro, detenga el corte posterior antes de que sea
lo suficientemente profundo para que el árbol caiga o se vuelva a asentar
sobre el tronco cortado. A continuación, coloque cuñas blandas de
plástico o madera dentro del corte de tal modo que no toquen la cadena.
Las cuñas se pueden empujar hacia el interior, poco a poco, para que
ayuden a levantar el árbol.
Table of contents
Languages:
Other EarthWise Chainsaw manuals

EarthWise
EarthWise CVPS44010 User manual

EarthWise
EarthWise LCS32412 User manual

EarthWise
EarthWise LCS0620 User manual

EarthWise
EarthWise CCS30008 User manual

EarthWise
EarthWise CS33016 User manual

EarthWise
EarthWise NVPS42108 User manual

EarthWise
EarthWise LCS32010 User manual

EarthWise
EarthWise LCS34014 User manual

EarthWise
EarthWise CS33014 User manual

EarthWise
EarthWise CS31014 User manual