Ecofrost 7950.5115 User manual

(HC-Gas R600a Used)
Refrigerated Counter Tops
7950.5115 - 7950.5117 - 7950.5118 - 7950.5119
7950.5121 - 7950.5123 - 7950.5125 - 7950.5127
7950.5128 - 7950.5129 - 7950.5131 - 7950.5133
User Manual
Gebruikershandleiding
Gebrauchsanweisung
Le mode d’emploi

2
CONTENT
GLASS ASSEMBLY GUIDE ..................................................................................................................................... 4
ENGLISH
SAFETY TIPS.........................................................................................................................................................5
INTRODUCTION...................................................................................................................................................5
PACK CONTENTS ................................................................................................................................................. 5
INSTALLATION .....................................................................................................................................................6
FIT GLASS PANELS (OPTIONAL) ........................................................................................................................... 6
OPERATION .........................................................................................................................................................7
MANUAL DEFROST..............................................................................................................................................7
CLEANING, CARE & MAINTENANCE....................................................................................................................7
CLEANING THE CONDENSER ............................................................................................................................... 7
TROUBLESHOOTING............................................................................................................................................ 8
TECHNICAL SPECIFICATIONS ............................................................................................................................... 8
ELECTRICAL WIRING............................................................................................................................................ 9
DISPOSAL ............................................................................................................................................................ 9
COMPLIANCE ...................................................................................................................................................... 9
NEDERLANDS
VEILIGHEIDSTIPS ............................................................................................................................................... 10
INLEIDING ......................................................................................................................................................... 10
VERPAKKINGSINHOUD ...................................................................................................................................... 10
INSTALLATIE....................................................................................................................................................... 11
PLAATSEN VAN DE GLASPANELEN..................................................................................................................... 11
BEDIENING........................................................................................................................................................12
HANDMATIG ONTDOOIEN ................................................................................................................................ 12
REINIGING, ZORG & ONDERHOUD....................................................................................................................12
REINIGING VAN DE CONDENSOR ...................................................................................................................... 12
OPLOSSEN VAN PROBLEMEN............................................................................................................................13
TECHNISCHE SPECIFICATIES ..............................................................................................................................14
ELECTRISCHE BEDRADING................................................................................................................................. 14
AFVALVERWERKING .......................................................................................................................................... 14
PRODUCTCONFORMITEIT ................................................................................................................................. 14

3
DEUTSCH
SICHERHEITSHINWEISE .....................................................................................................................................15
EINFÜHRUNG....................................................................................................................................................15
LIEFERUMFANG................................................................................................................................................. 15
MONTAGE .........................................................................................................................................................16
GLASER EINSETZEN ...........................................................................................................................................16
BETRIEB.............................................................................................................................................................17
MANUELLES ABTAUEN ...................................................................................................................................... 17
REINIGUGN, PFLEGE UND WARTUNG...............................................................................................................17
REINIGEN DES KONDENSATORS ........................................................................................................................ 17
STÖRUNGSSUCHE ............................................................................................................................................. 18
TECHNISCHE SPEZIFIKATIONEN......................................................................................................................... 19
ELEKTROANSCHLÜSSE.......................................................................................................................................19
ENTSORGUNG...................................................................................................................................................19
KONFORMITÄT ..................................................................................................................................................19
FRANÇAIS
CONSEILS DE SECURITE.....................................................................................................................................20
INTRODUCTION.................................................................................................................................................20
CONTENU DE L’EMBALLAGE ............................................................................................................................. 20
INSTALLATION ...................................................................................................................................................21
INSTALLATION DES PAROIS DE VERRE ............................................................................................................... 21
FONCTIONNEMENT .......................................................................................................................................... 22
DÉCONGÉLATION MANUELLE ........................................................................................................................... 22
NETTOYAGE, ENTRETIEN ET MAINTENANCE.....................................................................................................22
NETTOYAGE DU CONDENSATEUR ..................................................................................................................... 22
DEPANNAGE...................................................................................................................................................... 23
SPÉCIFICATIONS TECHNIQUES .......................................................................................................................... 24
RACCORDEMENT ELECTRIQUE..........................................................................................................................24
MISE AU REBUT.................................................................................................................................................24
CONFORMITE.................................................................................................................................................... 24

4
GLASS ASSEMBLY GUIDE

5
SAFETY TIPS
Position on a flat, stable surface.
A service agent/qualified technician should carry out installation and any repairs if required. Do not
remove any components or service panels on this product. Consult Local and National Standards to
comply with.
The following:
oHealth and Safety at Work Legislation
oBS EN Codes of Practice
oFire Precautions
oIEE Wiring Regulations
oBuilding Regulations
DO NOT use jet/pressure washers to clean the appliance.
DO NOT use the appliance outside.
DO NOT use this appliance to store medical supplies.
DO NOT use electrical appliances inside the appliance. (e.g. heaters, ice-cream makers etc.)
DO NOT stand or support yourself on the base, drawers or doors.
DO NOT allow oil or fat to come into contact with the plastic components or door seal. Clean
immediately if contact occurs.
Bottles that contain a high percentage of alcohol must be sealed and placed vertically in the
refrigerator.
Always carry, store and handle the appliance in a vertical position and move by holding the base of the
appliance.
Always switch off and disconnect the power supply to the unit before cleaning.
Keep all packing away from children. Dispose of the packaging in accordance with the regulations of
local authorities.
If the power cord is damaged, it must be replaced by an agent or a recommended qualified technician
in order to avoid a hazard.
INTRODUCTION
Please take a few moments to carefully read through this manual. Correct maintenance and operation of this
machine will provide the best possible performance from your product.
PACK CONTENTS
The following is included:
Refrigerator or Freezer
Top glass panel
Rear glass panel
Side glass panels x2
Instruction manual
Collars x6
Bolt assembly x14 sets
Brackets x7
Grub screws x7
Screws x12
Plugs x14
Gastronorm adaptor bar
Adjustable feet x4
We pride ourselves on quality and service, ensuring that at the time of packing the contents are supplied fully
functional and free of damage. Should you find any damage as a result of transit, please contact your dealer
immediately.

6
INSTALLATION
Note: If the unit has not been stored or move in an upright position, let it stand upright for approximately 12
hours before operation. If in doubt allow to stand.
1. Remove the appliance from the packaging. Make sure that all protective plastic film and coatings
are thoroughly removed from all surfaces.
2. Maintain a distance of 20 cm (7 inches) between the unit and walls or other objects for ventilation
increase this distance if the obstacle is a heat source.
Note: Before using the appliance for the first time, clean the shelves and interior with soapy water.
3. Level the appliance by adjusting the screw feet.
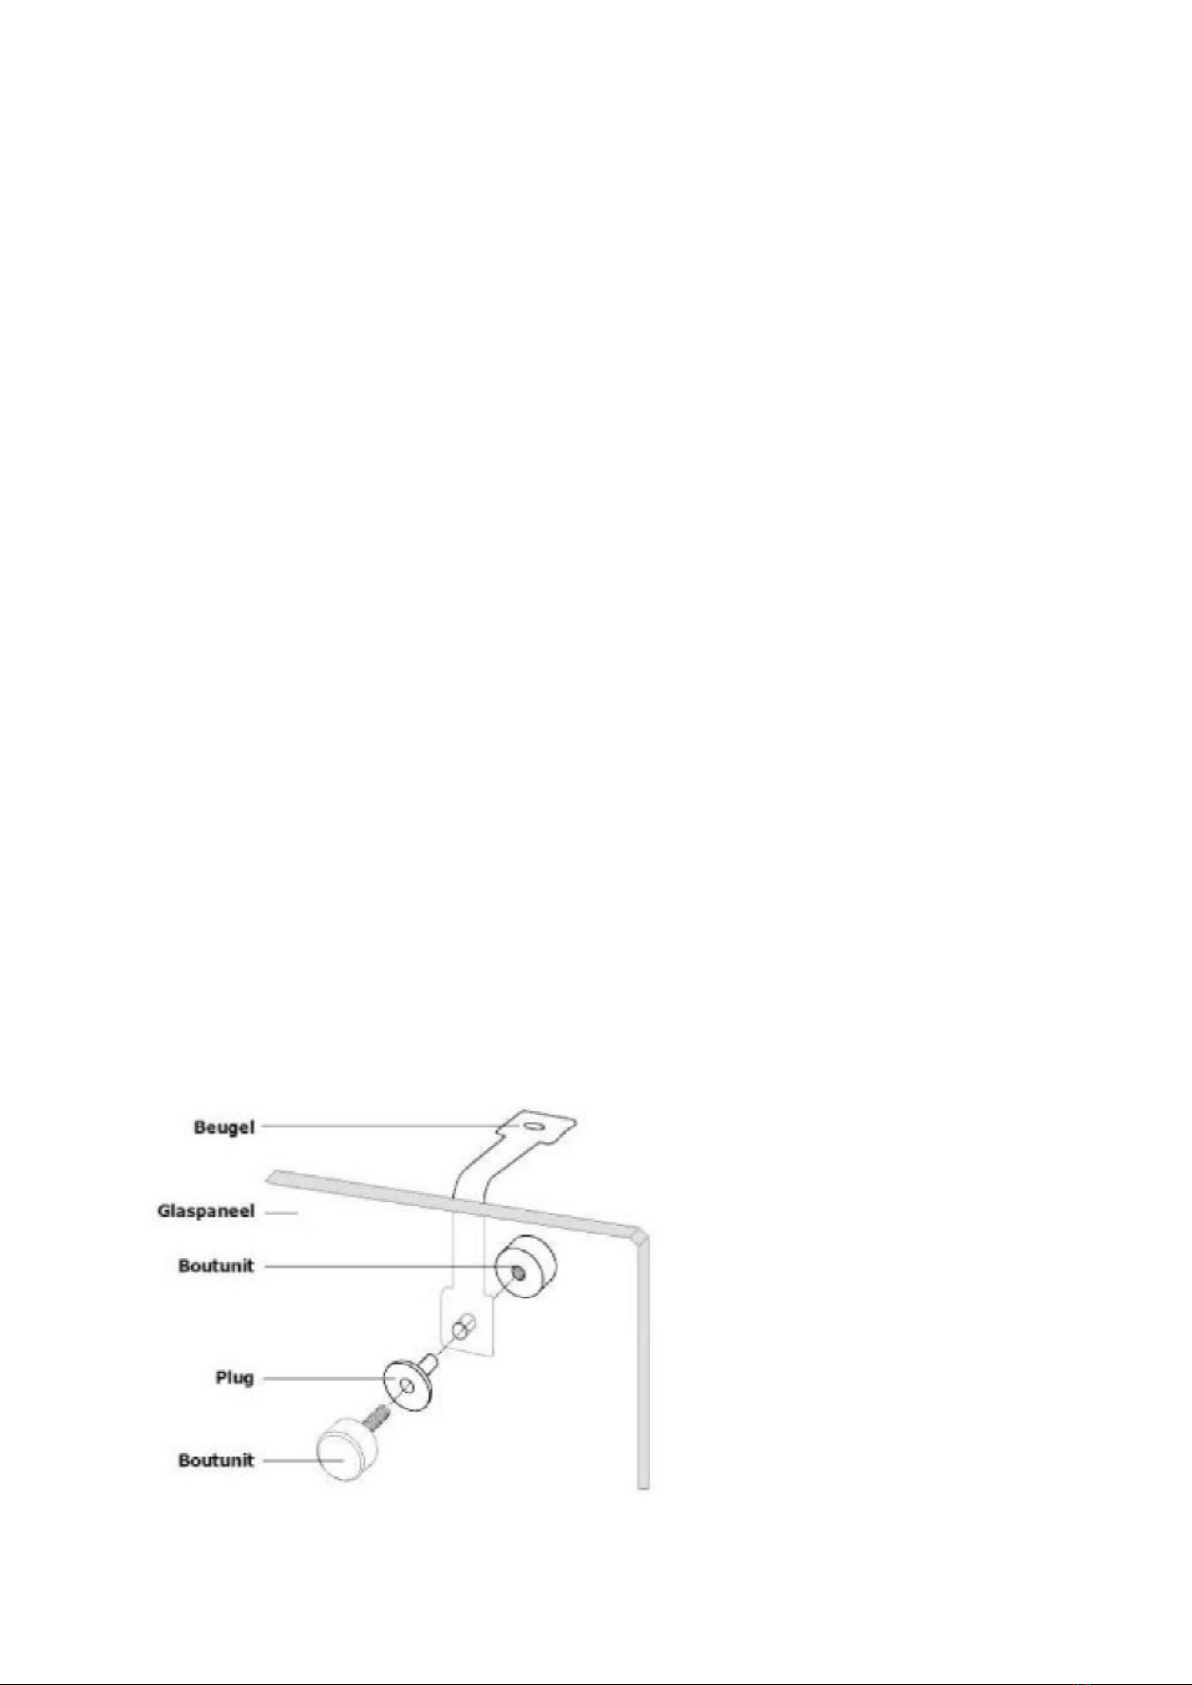
FIT GLASS PANELS (OPTIONAL)
1. Screw the collars to the rim of the appliance.
Note: Ensure the hole in the collar for the grub screw face Inwards.
2. Slot the two side panels into the collars, with the holes in The glass at the top.
Note: Ensure the screw hole furthest from the edge of the panel goes to the back of the appliance.
3. Screw a grub screw into each collar to secure the panels.
Note: Ensure the soft end of the grub screw is the end making contact with the glass.
4. Slot the rear panel into the collars, with the holes in the glass at the top.
5. Screw a grub screw into each collar to secure the panel.
6. Slot the plastic plugs into each of the holes.
7. Screw the brackets to the inside of each pane using the bolt assemblies.
Note: Ensure the short end of the bolt assembly is on the outside of the panels.
8. Place the top panel onto the brackets, ensuring all holes line up.
9. Insert the plugs and attach the top panel to brackets with the bolt assemblies.

7
OPERATION
Storing Food
To get the best result from your appliance, follow these instruction:
Only store foodstuffs in the appliance when it has reached the correct operating temperature.
Ensure gastronorm bays are full at all times, even if the gastronorms are unused or empty. Empty bays
will greatly reduce efficiency of the appliance.
Do not obstruct the fans inside the appliance.
Turn on
1. Close the door(s) of the appliance.
2. Ensure the power switch is set to [O] and turn on at the socket.
3. Switch on the power [l]. The current temperature within the appliance is displayed.
MANUAL DEFROST
The appliance will automatically run a defrost cycle every six hours.
Note: The cycle starts from the time the appliance is initially powered up.
To manually defrost the appliance:
1. Press and hold the DEFROST button for 5 seconds.
2. The defrost cycle will start immediately and the Defrost LET illuminates. The defrost will last a maximum of
30 minutes
Note: Starting a manual defrost also resets the automatic defrost timer. The next automatic defrost will start
six hours after the manual defrost has finished.
3. Waste water is collected in the waste water tray.
CLEANING, CARE & MAINTENANCE
Switch off and disconnect from the power supply before cleaning.
Clean the interior of the appliance as often as possible.
Do not use abrasive cleaning agents. These can leave harmful residues.
Clean the door seal with water only.
Always wipe dry after cleaning.
Take care when cleaning the rear of the appliance. Sharp edges can cut.
An agent or qualified technician must carry out repairs if required.
CLEANING THE CONDENSER
Periodically cleaning the condenser can extend the life of the appliance. We recommend that our agent or
qualified technician clean the condenser.

8
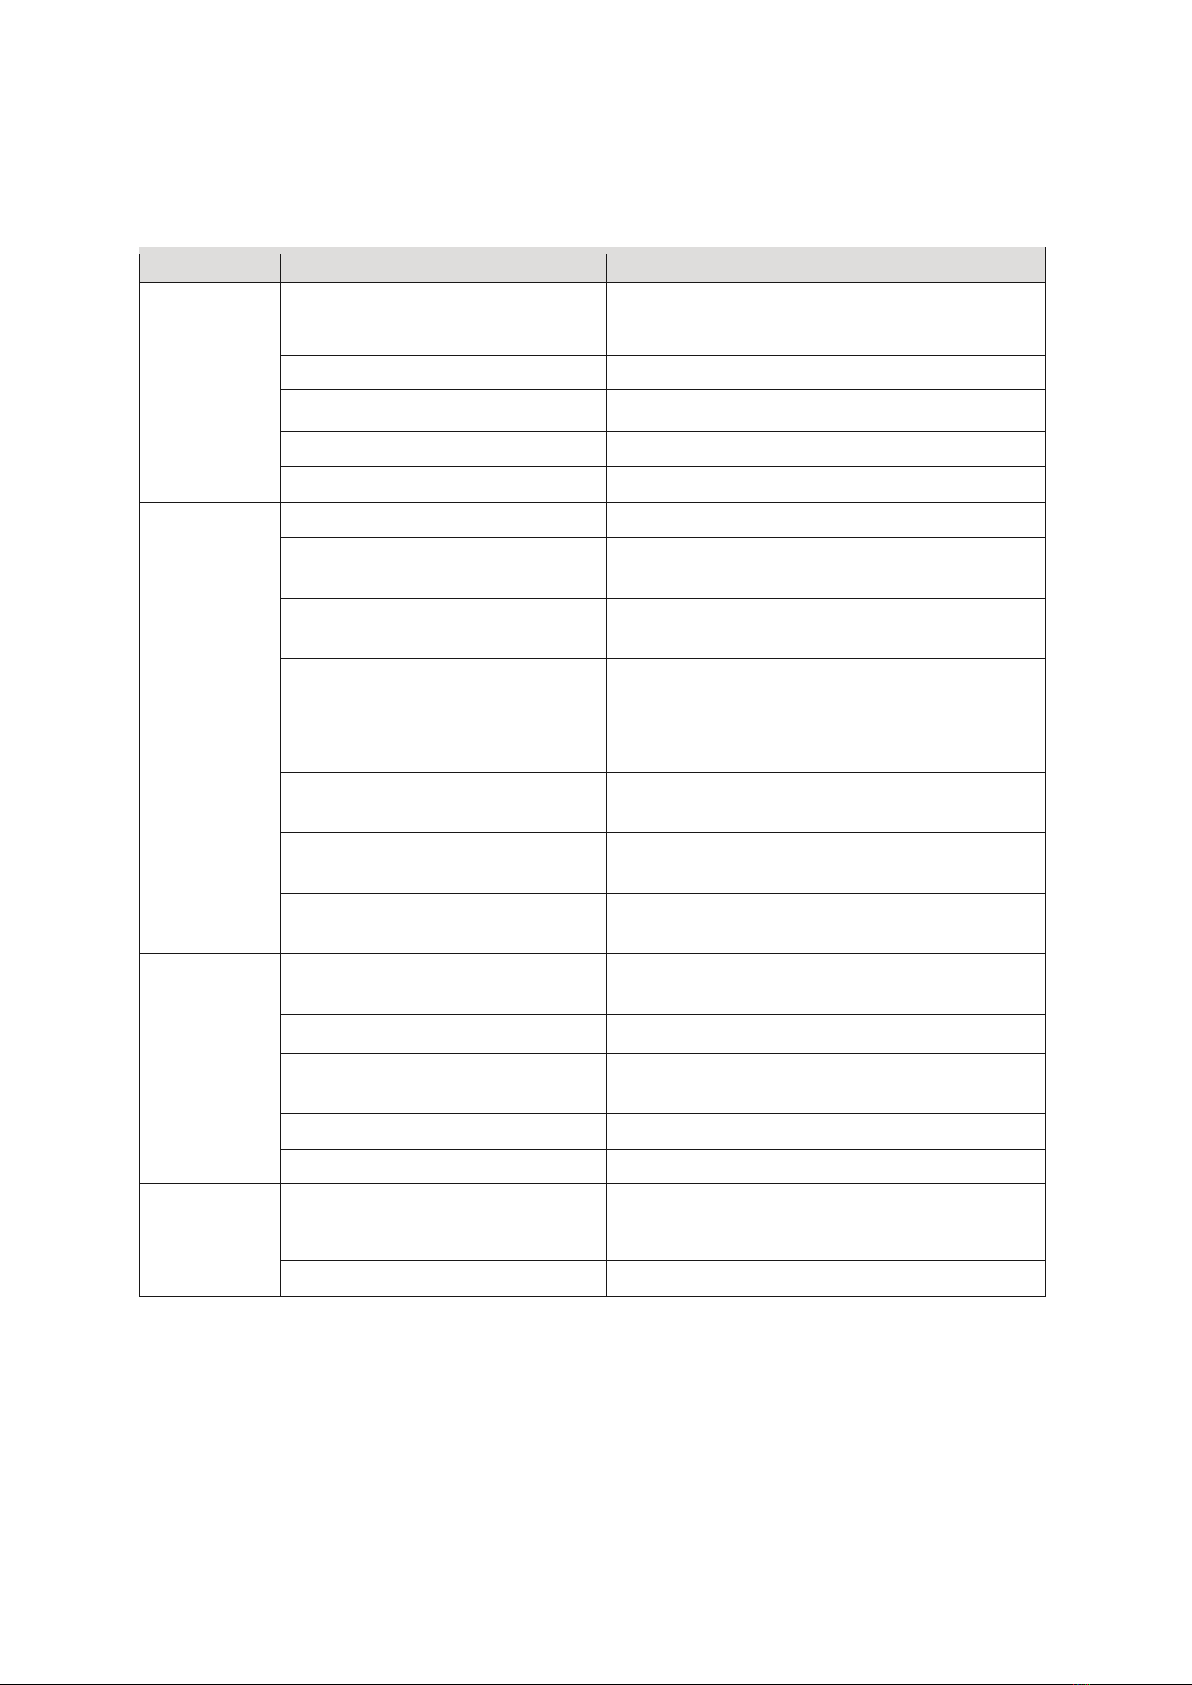
TROUBLESHOOTING
If your appliance develops a fault, please check the following table before making a call to your retailer.
Fault
Probable Cause
Action
The appliance is
not working
The unit is not switch on
Check the unit is plugged in correctly and
switched on
Plug and lead are damaged
Call your agent or qualified technician
Fuse in the plug has blown
Replace the fuse
Power supply
Check power supply
Internal wiring fault
Call your agent or qualified technician
The appliance
turns on, but the
temperature is
too high/low
Too much ice on the evaporator
Defrost the appliance
Condenser blocked with dust
Call your agent or qualified technician
Doors are not shut properly
Check doors are shut and seals are not
damaged
Appliance is located near a heat source
or air flow to the condenser is being
interrupted
Move the refrigerator to a more suitable
location
Ambient temperature is too high
Increase ventilation or move appliance to a
cooler position
Unsuitable foodstuffs are being stored in
the appliance
Remove any excessive hot foodstuffs or
blockages to the fan
Appliance is overloaded
Reduce the amount of food stored in the
appliance
The appliance is
leaking water
The appliance is not properly levelled
Adjust the screw feet to level the appliance(If
applicable)
The discharge outside is blocked
Clear the discharge outlet
Movement of water to the drain is
obstructed
Clear the floor of the appliance (if applicable)
The water container is damaged
Call your agent or qualified technician
The drip tray is over flowing
Empty the drip tray(if applicable)
The appliance is
unusually loud
Loose nut/screw
Check and tighten all nuts and screws
The appliance has not been installed in a
level or stable position
Check installation position and change if
necessary
TECHNICAL SPECIFICATIONS
Model
Voltage
Power
(W)
Current
(A)
Temperature
Range
Capacity
Dimensions
HxWxD(mm)
Weight
(kg)
7950.5115
220~240V/50Hz
110
0.8
2~10℃
5xGN1/4 Container
430x1200x335
25
7950.5117
220~240V/50Hz
110
0.8
2~10℃
6xGN1/4 Container
430x1400x335
27
7950.5118
220~240V/50Hz
110
0.8
2~10℃
7xGN1/4 Container
430x1500x335
29
7950.5119
220~240V/50Hz
110
0.8
2~10℃
7xGN1/4 Container
430x1600x335
30
7950.5121
220~240V/50Hz
110
0.8
2~10℃
8xGN1/4 Container
430x1800x335
32
7950.5123
220~240V/50Hz
110
0.8
2~10℃
10xGN1/4 Container
430x2000x335
34
7950.5125
220~240V/50Hz
110
0.8
2~10℃
4xGN1/3 Container
430x1200x395
28
7950.5127
220~240V/50Hz
110
0.8
2~10℃
6xGN1/3 Container
430x1400x395
30
7950.5128
220~240V/50Hz
110
0.8
2~10℃
6xGN1/3 Container
430x1500x395
31
7950.5129
220~240V/50Hz
110
0.8
2~10℃
7xGN1/3 Container
430x1600x395
32
7950.5131
220~240V/50Hz
110
0.8
2~10℃
8xGN1/3 Container
430x1800x395
34
7950.5133
220~240V/50Hz
110
0.8
2~10℃
9xGN1/3 Container
430x2000x395
36

9
ELECTRICAL WIRING
Appliances are supplied with a 3 pin, moulded, BS1363 plug and lead, with a 13 amp fuse as standard. The plug
is to be connected to a suitable mains socket. Appliances are wired as follows:
Live wire (coloured brown) to terminal marked L
Neutral wire (coloured blue) to terminal marked N
Earth wire (coloured green/yellow) to terminal marked E
All appliances must be earthed, using a dedicated earthing circuit. If in doubt consult a qualified electrician.
Electrical isolation points must be kept clear of any obstructions. In the event of any emergency disconnection
being required they must be readily accessible.
DISPOSAL
EU regulations require refrigeration product to be disposed of by specialist companies who remove or recycle
all gasses, metal and plastic components. Consult your local waste collection authority regarding disposal of
your appliance. Local authorities are not obliged to dispose of commercial refrigeration equipment but may be
able to offer advice on how to dispose of the equipment locally.
COMPLIANCE
Parts have undergone strict product testing in order to comply with regulatory
standards and specification set by international, independent, and federal
authorities. Products have been approved to carry the following symbol:

10
VEILIGHEIDSTIPS
Plaatsen op een vlakke en stabiele ondergrond.
De installatie en eventuele reparaties zijn door een servicetechnicus/vaktechnicus uit te voeren.
Verwijder geen componenten of servicepanelen van dit product.
Raadpleeg en volg de plaatselijk en nationale regelgeving op m.b.t. het volgende:
oWetgeving van gezondheid en veiligheid op de werkplaats
oWerkregels
oBrandpreventie
oIEE bekabelingsnormen
oBouwverordeningen
Dit product NIET reinigen met spuit-/drukreinigers.
Dit product NIET gebruiken voor de berging van medische producten.
In dit product GEEN elektrische apparaten gebruiken (zoals verwarmers, ijsmakers, etc.)
NIET op de kastbasis, lades en deuren staan of als ondersteuning gebruiken.
Laat NIET toe dat olie of vet in contact komt met plastic componenten of deurafdichtingen.
Onmiddellijk reinigen indien dit wel gebeurt.
Uitsluitend geschikt voor gebruik binnenshuis.
Flessen met een hoog alcoholpercentage moeten goed worden gesloten en verticaal in de koelkast
worden bewaard.
Dit product altijd in een verticale positie vervoeren, opbergen en gebruiken. Het product aan de
kastbasis vervoeren.
Alvorens dit product te reinigen dient men altijd de stroomvoorziening uit te schakelen.
Laat verpakkingsmateriaal niet binnen handbereik van kinderen. Verpakkingsmateriaal in
overeenstemming met de regelgeving van de plaatselijke overheden als afval laten verwerken.
Indien de stroomkabel beschadigd raakt, dient men deze door een technicus of een aanbevolen
vaktechnicus te laten vervangen om gevaarlijke situaties te verhinderen.
INLEIDING
Neem de tijd en lees deze handleiding aandachtig door. Een correct gebruik en onderhoud van deze machine
waarborgt de beste prestatie van uw product.
VERPAKKINGSINHOUD
De verpakking bevat het volgende:
Koelkast of vrieskast
Glazen bovenpaneel
Glazen achterpaneel
Glazen zijpanelen x2
Handleiding
Tussendelen x6
Boutunit x14 sets
Beugels x7
Fixeerschroeven x7
Schroeven x12
Pluggen x14
Gastronorm aanpasbare stang
Verstelbare poten x4
Trots op de haar productkwaliteit en dienstverlening en controleer de inhoud van de verpakkingen, tijdens de
verpakkingsfase, op functionaliteit en schade. Mocht u product door transport zijn beschadigd, neem dan
onmiddellijk contact op met uw dealer.
11
INSTALLATIE
Opmerking: indien het apparaat niet in een rechtopstaande positie is opgeslagen of vervoerd, dient men het
product 12 uur vóór gebruik in de rechtopstaande positie te plaatsen. Bij twijfel dient men het product in
een rechtopstaande positie te plaatsen.
1. Haal het product uit de verpakking. Zorg ervoor dat u de beschermingsfolie en -lagen van alle
oppervlakken heeft verwijderd.
2. Voor een adequate ventilatie dient men een afstand van 20cm aan te houden tussen dit product
of muren en andere objecten. Vergroot deze afstand indien het object een warmtebron is.
Opmerking: Voor het eerste gebruik van dit product dient u de lades en de binnenzijde met zeepwater te
reinigen.
3. Level het product door de verstelbare poten aan te passen.
PLAATSEN VAN DE GLASPANELEN
1. Schroef de tussendelen vast aan de rand van het product.
Opmerking: zorg dat het gat in het tussendeel voor de fixeerschroeven naar binnen is gericht.
2. Schuif de twee zijpanelen in de tussendelen met de gaten in het glas naar boven gericht.
Opmerking: zorg dat het schroefgat dat het meest ver weg van de rand van het paneel zit naar de achterzijde
van het apparaat gaat.
3. Schroef een fixeerschroef in elk van de tussendelen om de panelen te bevestigen.
Opmerking: zorg dat het zachte uiteinde van de fixeerschroef in contact staat met het glas.
4. Schuif het achterpaneel in de tussendelen met de gaten in het glas naar boven gericht.
5. Schroef een fixeerschroef in elk van de tussendelen om het paneel te bevestigen.
6. Schuif een plastic plug in elk van de gaten.
7. Schroef de beugels met behulp van de boutunits vast aan de binnenzijde van elk panel.
Opmerking: zorg dat het kortste uiteinde van de boutunit aan de buitenkant van de panelen zit.
8. Plaats het toppaneel in de beugels en zorg dat alle gaten een lijn vormen.
9. Plaats de pluggen en bevestig het toppaneel aan de beugels met behulp van de boutunits.

12
BEDIENING
Opslag van levensmiddelen
Volg de volgende aanwijzingen voor de beste resultaten met uw product:
Bewaar uitsluitend levensmiddelen in het product wanneer het product de juiste gebruikstemperatuur
heeft bereikt.
Zorg dat alle gastronorm bakken altijd vol zijn, zelfs wanneer de gastronorms niet gebruikt of leeg zijn.
Lege bakken zullen de efficiëntie van het product aanzienlijk verminderen.
Niet de interne ventilatoren in het product blokkeren.
Inschakelen
1. Sluit de deur(en) van het apparaat.
2. Controleer of de stroomschakelaar in de positie [O] staat en de stekker in het stopcontact zit.
3. Zet de stroom aan [l]. De actuele interne temperatuur van het product wordt weergegeven.
HANDMATIG ONTDOOIEN
Het product zal om de zes uur een automatische ontdooicyclus draaien.
Opmerking: de cyclus gaat in wanneer het product voor het eerst opgestart wordt.
Voor handmatige ontdooiing van het product:
1. De DEFROST (ontdooier) knop indrukken en gedurende 5 seconden ingedrukt houden.
2. De ontdooicyclus start onmiddellijk en het DEFROST (ontdooier) LED licht op. Het ontdooiproces duurt
maximaal 30 minuten.
Opmerking: het starten van een handmatig ontdooiproces zorgt tevens voor een automatische reset van de
timer van de ontdooier. Het volgende automatische ontdooiproces start zes uur ná beëindiging van de
handmatige ontdooiing.
3. Afvoerwater wordt opgevangen in de afvoerwaterlade.
REINIGING, ZORG & ONDERHOUD
Alvorens het apparaat te reinigen dient men de stroomvoorziening uit te schakelen.
Reinig zo vaak mogelijk de binnenkant van het product.
Gebruik géén schurende reinigingsmiddelen. Dergelijke middelen kunnen schadelijke resten
achterlaten.
Reinig de deurafdichting uitsluitend met water.
Na reiniging altijd droogmaken.
Het voor reiniging gebruikte water mag niet door het afvoergat naar de verdampingspan stromen.
Ga voorzichtig te werk bij het reinigen van de achterzijde van het product. Scherpe randen kunnen
snijwonden veroorzaken.
Eventuele reparaties moeten door een technicus of een vaktechnicus worden uitgevoerd.
REINIGING VAN DE CONDENSOR
De periodieke reiniging van de condensor kan de technische levensduur van het product verlengen. Het is
aanbevolen om de reiniging van de condensor door een technicus of een vaktechnicus te laten uitvoeren.
13
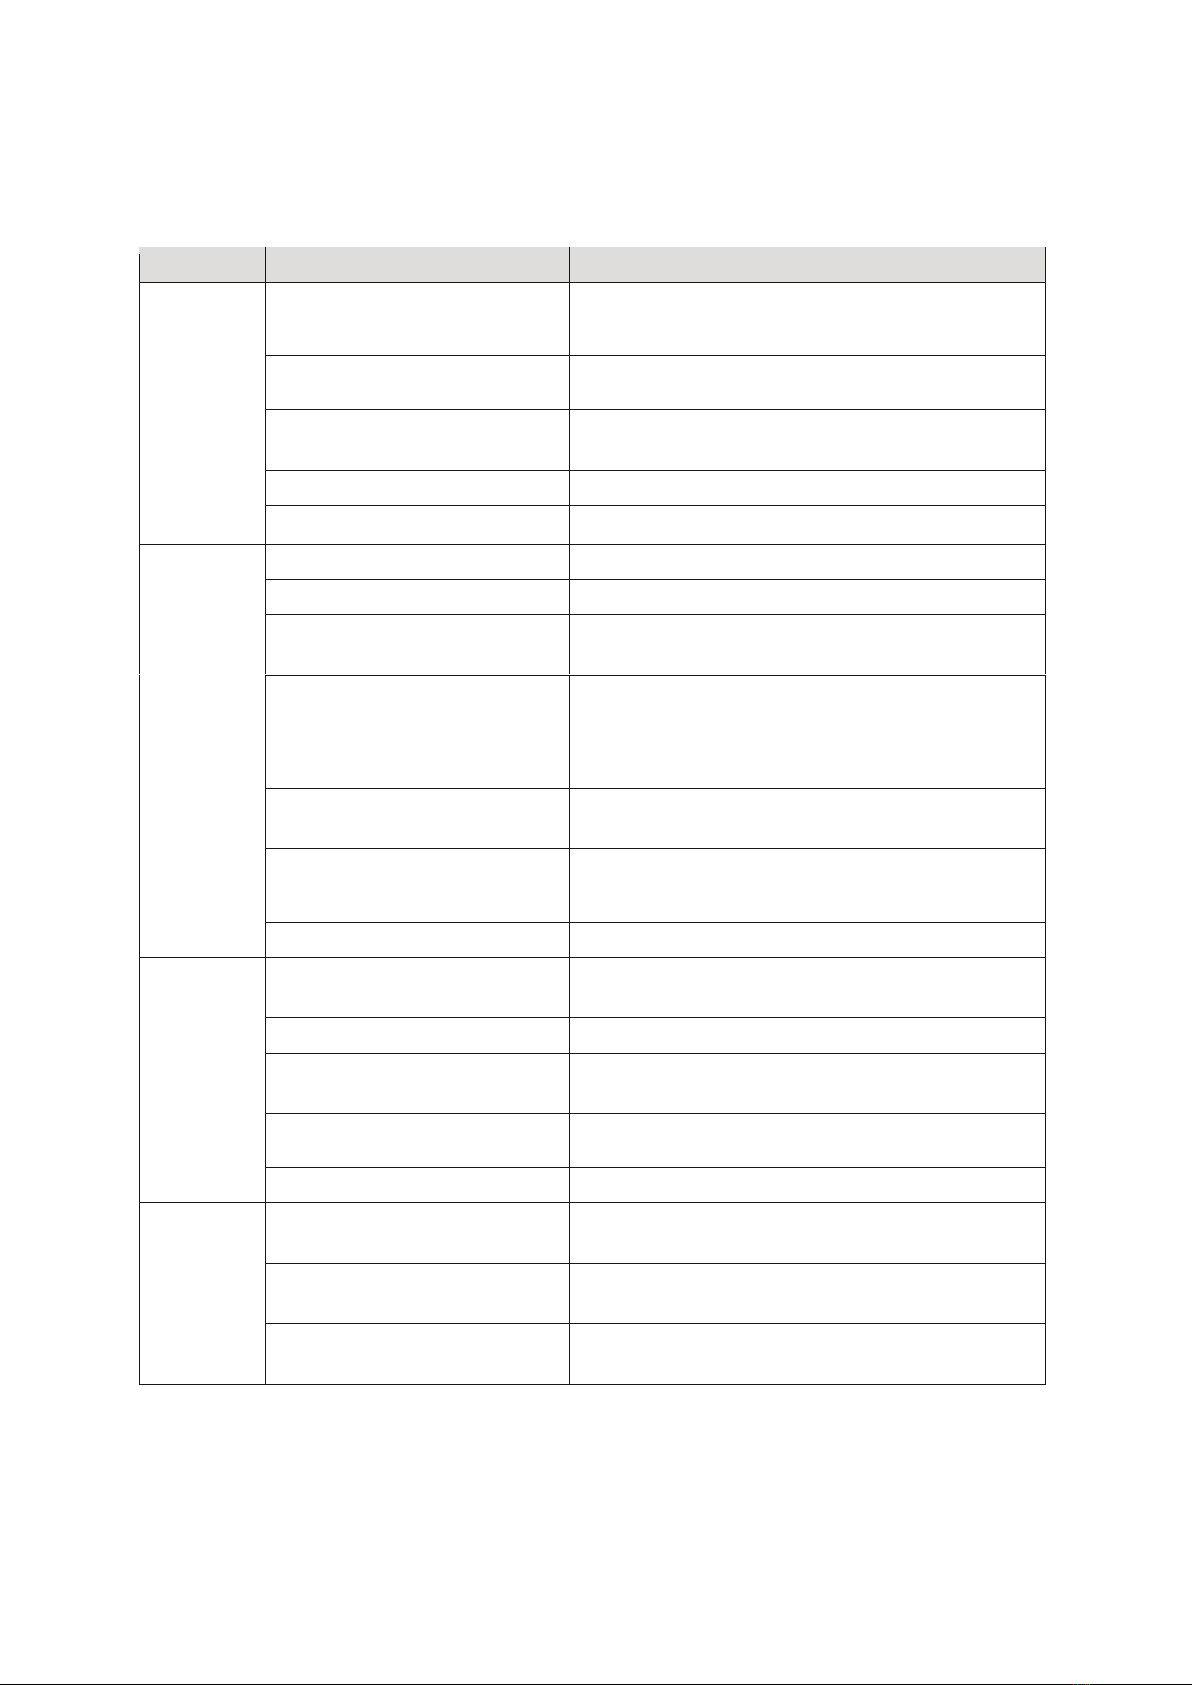
OPLOSSEN VAN PROBLEMEN
Indien er een storing van uw product optreedt, dient u de onderstaande tabel te raadplegen alvorens contact
op te nemen met uw dealer of de Hulplijn te bellen.
Probleem
Mogelijkeoorzaak
Handeling
Het apparat
werkt niet
Het apparat staat uit
Controleer of de stroomkabel van het apparaat is
aangesloten en of het apparaat is ingeschakeld
Steker en kabel zijn beschadigd
Laat een technicus of een vaktechnicus komen
De zekering in de steker is gesprongen
Vervang de zekering in de steker
Stroomvoorziening
Controleer de stroomvoorziening
Storing interne bedrading
Laat een technicus of een vaktechnicus komen
Het product
staat aan maar
de temperatuur
is te hoog/laag
Teveel ijs in de verdamper
Ontdooi het product
Condensor wordt geblokkeerd door
stof
Reinig de condensor
Deuren niet goed gesloten
Controleren of de deuren goed dicht en of
afdichtingen niet beschadigd zijn
Het product bevindt zich in de
nabijheid van een warmtebron of de
luchtstroom naar de condensor wordt
onderbroken
Verplaats de koelkast naar een geschiktere locatie
Omgevingstemperatuur is te hoog
Verbeter de ventilatie of verplaats het product naar
een koelere locatie
Ongeschikte levensmiddelen worden
in het product bewaard
Verwijder alle overbodige warme levensmiddelen of
deblokkeer de ventilator
Het product wordt overbelast
Verminder de hoeveelheid opgeslagen voedsel in het
product
Het product lekt
water
Het product staat niet recht
Pas de verstelbare poten aan om het product te
nivelleren (indien nodig)
De afvoeropening wordt geblokkeerd
Maak de afvoeropening vrij van obstakels
De waterstroom naar de afvoer wordt
geblokkeerd
Maak de vloer vrij van obstakels (indien nodig)
De waterbak is beschadigd
Laat een technicus of een vaktechnicus komen
De druppellade stroomt over
Leeg de druppellade (indien nodig)
Het product
maakt
ongebruikelijk
veel lawaai
U heeft de veiligheidsband niet
verwijderd
Verwijder de veiligheidsband
Moer/schroeflos
Alle moeren en schroeven controleren en aantrekken

14
TECHNISCHE SPECIFICATIES
Model
Voltage
Vermogen
(W)
Stroom
(A)
Temperatuur-
bereik
Capaciteit
Afmetingen
HxBxD(mm)
Gewicht
(kg)
7950.5115
220~240V/50Hz
110
0.8
2~10℃
5xGN1/4 Container
430x1200x335
25
7950.5117
220~240V/50Hz
110
0.8
2~10℃
6xGN1/4 Container
430x1400x335
27
7950.5118
220~240V/50Hz
110
0.8
2~10℃
7xGN1/4 Container
430x1500x335
29
7950.5119
220~240V/50Hz
110
0.8
2~10℃
7xGN1/4 Container
430x1600x335
30
7950.5121
220~240V/50Hz
110
0.8
2~10℃
8xGN1/4 Container
430x1800x335
32
7950.5123
220~240V/50Hz
110
0.8
2~10℃
10xGN1/4 Container
430x2000x335
34
7950.5125
220~240V/50Hz
110
0.8
2~10℃
4xGN1/3 Container
430x1200x395
28
7950.5127
220~240V/50Hz
110
0.8
2~10℃
6xGN1/3 Container
430x1400x395
30
7950.5128
220~240V/50Hz
110
0.8
2~10℃
6xGN1/3 Container
430x1500x395
31
7950.5129
220~240V/50Hz
110
0.8
2~10℃
7xGN1/3 Container
430x1600x395
32
7950.5131
220~240V/50Hz
110
0.8
2~10℃
8xGN1/3 Container
430x1800x395
34
7950.5133
220~240V/50Hz
110
0.8
2~10℃
9xGN1/3 Container
430x2000x395
36
ELECTRISCHE BEDRADING
Men dient de steker op een geschikt stopcontact aan te sluiten. De bedrading van dit apparaat is als volgt:
•Stroomkabel (bruin) naar de aansluitklem gemarkeerd met L
•Neutraalkabel (blauw) naar de aansluitklem gemarkeerd met N
•Aardekabel (groen/geel) naar de aansluitklem gemarkeerd met E
Dit apparaat moet worden geaard met behulp van een adequaat aardingscircuit. Bij twijfels raadpleeg een
vakkundige elektricien. De elektrische isolatiepunten mogen niet worden geblokkeerd. In geval van een
nooduitschakeling moeten de isolatiepunten direct toegankelijk zijn.
AFVALVERWERKING
De EU-richtlijnen vereisen dat koelproducten door gespecialiseerde bedrijven wordt verwerkt die gassen,
metalen en plastic componenten verwijderen of recyclen. Raadpleeg uw plaatselijke afvalverwerkingsbedrijf
voor informatie over de afvalverwerking van uw apparaat. De plaatselijke overheden zijn niet verplicht om
koelingsproducten van bedrijven als afval te verwerken maar kunnen uw informeren waar u het apparaat kunt
afgeven.
PRODUCTCONFORMITEIT
De onderdelen van producten hebben strenge producttesten ondergaan om te
voldoen aan wettelijke regels en specificaties die door internationale,
onafhankelijke en landelijke overheden worden voorgeschreven. Producten zijn
goedgekeurd en voorzien van het volgende symbool:

15
SICHERHEITSHINWEISE
•Auf eine flache, stabile Fläche stellen.
•Alle erforderlichen Montage- und Reparaturarbeiten sollten von Wartungspersonal oder einem
qualifizierten Techniker durchgeführt werden. Keine Bauteile oder Bedienflächen von diesem Produkt
entfernen.
•Für folgende Normen und Vorschriften sind die lokalen und nationalen Normen heranzuziehen:
- Arbeitsschutzvorschriften
- BS EN Verhaltenspraktiken
- Brandschutzvorschriften
- IEE-Anschlussvorschriften
- Bauvorschriften
•Das Gerät NICHT mit einem Strahl-/Hochdruckreiniger reinigen.
•Das Gerät NICHT zum Aufbewahren von medizinischen Produkten verwenden.
•KEINE Elektrogeräte im Gerät verwenden (wie Heizgeräte, Eiskremmaschinen usw.).
•NICHT auf den Schrank, die Schubladen oder Türen stellen.
•KEIN Öl oder Fett mit den Kunststoffteilen oder der Türdichtung in Kontakt kommen lassen. Bei
Kontakt sofort reinigen.
•Nur zum Gebrauch in Gebäuden.
•Flaschen mit Alkohol in hoher Konzentration müssen dicht verschlossen und aufrecht stehend im
Kühlschrank aufbewahrt werden.
•Das Gerät stets aufrecht tragen, lagern und transportieren. Zum Transport den Schrank an der
Unterseite anfassen.
•Vor Reinigungsarbeiten stets zunächst das Gerät abschalten und den Netzstecker ziehen.
•Verpackungsmaterial außerhalb der Reichweite von Kindern aufbewahren und gemäß den lokalen
Vorschriften entsorgen.
•Aus Sicherheitsgründen muss ein beschädigtes Stromkabel von einem Mitarbeiter oder empfohlenen
qualifizierten Elektriker erneuert werden.
EINFÜHRUNG
Bitte nehmen Sie sich einige Minuten Zeit und lesen Sie dieses Handbuch sorgfältig durch. Nur bei korrekter
Wartung und vorschriftsgemäßem Betrieb kann Ihr Produkt optimale Leistung erzielen.
LIEFERUMFANG
Folgende Teile befinden sich in der Verpackung:
Kühl oder tiefkühlgerät
Glasplatteoben
Glasplattehinten
2 seitlicheGlasplatten
Bedienungsanleitung
4 Regulierbare Fuße
6 Halterungen
4 Klammern
7 Gewindestifte
12 Schrauben
14 Stopfen
Gastronorm-Adapterstange
Ist stolz auf die hochwertige Qualität seiner Produkte und seinen erstklassigen Service. Wir stellen sicher, dass
alle gelieferten Produkte zum Zeitpunkt der Verpackung voll funktionsfähig sind und sich in einwandfreiem
Zustand befinden. Sollten Sie Transportschäden feststellen, wenden Sie sich bitte unverzüglich an Ihren Händler.

16
MONTAGE
Hinweis: Wenn das Gerät nicht aufrecht transportiert oder gelagert wurde, muss es vor Inbetriebnahme rund
12 Stunden aufrecht aufgestellt werden. Im Zweifelsfall lassen Sie es aufrecht stehen.
1. Gerät aus der Verpackung nehmen. Darauf achten, dass die gesamte Plastikfolie und alle
Beschichtungen von sämtlichen Flächen entfernt wurden.
2. Zur Belüftung einen Abstand von 20 cm zwischen Gerät und Wänden oder anderen Objekten
einhalten. Dieser Abstand muss größer sein, falls es sich bei dem Hindernis um eine Wärmequelle
handelt.
Hinweis: Vor dem ersten Einsatz des Geräts die Ablagen und das Geräteinnere mit einer Seifenlauge reinigen.
3. Das Gerät durch Einstellen der Schraubfüße ausgleichen.
GLASER EINSETZEN
1. Die Halterungen an den Rand des Geräts anschrauben.
Hinweis: darauf achten, dass die Bohrung in der Halterung für die Gewindestifte nach innen weist.
2. Die beiden seitlichen Glasplatten in die Halterungen schieben. Darauf achten, dass sich die Bohrungen im
Glas oben befinden.
Hinweis: darauf achten, dass die am weitesten von der Kante der Glasplatte entfernte Gewindebohrung zur
Rückseite des Geräts weist.
3. Fur Befestigung der Glasplatten einen Gewindestift in beide Halterung drehen.
Hinweis: darauf achten, dass das weiche Ende des Gewindestifts mit dem Glas in Kontakt kommt.
4.Schieben Sie die Glasplatte hinten zwischen die Seitliche Teilen. Darauf achten, dass sich die Bohrungen im
Glas oben befinden
5. Fur Befestigung der Glasplatten einen Gewindestift in beide Halterung drehen.
6. Die Kunststoffstopfen in die Bohrungen stecken.
7. Die Klammern mithilfe der Schrauben innen an den einzelnen Glasplatten sichern.
Hinweis: das kurze Ende der Schrauben muss sich an der Außenseite der Glasplatten befinden.
8. Die obere glasflache auf die Klammern setzen. Dabei müssen alle Bohrungen auf einer Linie liegen.
9. Die Stopfen einstechen und die obere Platte mit den Schrauben an den Klammern befestigen.

17
BETRIEB
Lagerung von Nahrungsmitteln
Sie erzielen die besten Ergebnisse mit Ihrem Gerät, wenn Sie folgende Anweisungen beachten:
Nahrungsmittel dürfen erst nach Erreichen der korrekten Betriebstemperatur im Gerät gelagert
werden.
Darauf achten, dass die Gastronorm-Einsatze stets gefüllt sind. Dies gilt auch dann, wenn die Geräte
nicht genutzt werden oder leer sind. Leere Einsatze verringern die Effizienz des Geräts erheblich.
Nicht die Lüfter im Gerät versperren.
Einschalten
1. Die Tür des Geräts schließen.
2. Darauf achten, dass der Ein-/Ausschalter auf [O] steht und der Netzstecker eingesteckt ist.
3. Das Gerät einschalten [l]. Die momentane Temperatur im Gerät wird angezeigt.
MANUELLES ABTAUEN
Das Gerät startet alle sechs Stunden automatisch einen Abtauzylus.
Hinweis: der Zyklus startet sechs Stunden nach dem ersten Anlaufen des Geräts.
Manuelles Abtauen des Geräts:
1. Die Taste ABTAUEN 5 Sekunden lang gedrückt halten.
2. Der Abtauzylus beginnt sofort und die Abtauenzeige leuchtet auf. Der Abtauzylus dauert maximal 30
Minuten.
Hinweis: durch das manuelle Abtauen wird der automatische Abtautimer zurückgesetzt.
3. Der nächste automatische Abtauvorgang beginnt sechs Stunden nach Ende des manuellen Abtauens.
REINIGUGN, PFLEGE UND WARTUNG
Vor Reinigungsarbeiten stets zunächst das Gerät abschalten und den Netzstecker ziehen.
Den Schrank möglichst häufig innen reinigen.
Keine Scheuermittel verwenden, da diese schädliche Rückstände hinterlassen können.
Die Türdichtung nur mit Wasser reinigen.
Nach dem Reinigen stets mit einem Tuch trocknen.
Zur Reinigung verwendetes Wasser darf nicht durch die Ablauföffnung in die Auffangschale gelangen.
Vorsicht beim Reinigen der Geräterückseite. Scharfe Kanten können zu Verletzungen führen.
Erforderliche Reparaturen sollten von einem Mitarbeiter oder einem qualifizierten Techniker
ausgeführt werden.
REINIGEN DES KONDENSATORS
Regelmäßiges Reinigen des Kondensators kann die Lebensdauer des Geräts verlängern. Wir empfehlen, den
Kondensator von einem Mitarbeiter oder qualifizierten Techniker reinigen zu lassen.
18
STÖRUNGSSUCHE
Bei einem Defekt Ihres Geräts konsultieren Sie bitte zunächst folgende Tabelle, bevor Sie die Helpline oder
Ihren Händler anrufen.
Störung
Vermutliche Ursache
Lösung
Das Gerät
funktioniert
nicht
Das Gerät ist nicht eingeschaltet
Prüfen, ob der Netzstecker in die
Steckdose gesteckt wurde und das Gerät eingeschaltet ist
Stecker und Kabel sind beschädigt
Mitarbeiter oder qualifizierten Techniker anrufen
Sicherung im Stecker ist
durchgebrannt
Neue Sicherung in den Stecker einsetzen
Stromzufuhr
Netzstromprüfen
Interner Vernetzungsfehler
Mitarbeiter oder qualifizierten Techniker anrufen
Das Gerät lässt
sich
einschalten,
aber die
Temperatur ist
zu
hoch/niedrig
Zu viel Eis auf dem Verdampfer
Das Gerätabtauen
Kondensator verstaubt
Reinigen Sie den Kondensator
Türen sind nicht richtig geschlossen
Prüfen, ob die Türen geschlossen und die Dichtungen
intakt sind
Gerät befindet sich in der Nähe
einer Wärmequelle, oder der
Luftstrom zum Kondensator ist
unterbrochen
Den Kühlschrank an einem geeigneteren Ort aufstellen
Umgebungstemperatur ist zu hoch
Belüftung intensivieren oder Gerät an einem kühleren Ort
aufstellen
Ungeeignete Nahrungs-mittel
werden im Gerät aufbewahrt
Einige heiße Nahrungsmittel herausnehmen oder
Produkte, die den Lüfter blockieren, entfernen
Gerät ist über lastet
Weniger Nahrungsmittel im Gerät lagern
Aus dem Gerät
läuft Wasser
aus
Das Gerät steht nicht gerade
Die Schraubfüße so regulieren, dass das Gerät eben steht
(sofern zutreffend)
Der Ablauf ist verstopft
Den Ablaufsäubern
Wasser kann nicht ablaufen
Den Boden des Geräts von Fremdstoffen reinigen (sofern
zutreffend)
Der Wasserbehälter ist beschädigt
Mitarbeiter oder qualifizierten Techniker anrufen
Die Tropfschalefließtüber
Die Tropfschale leeren (sofern zutreffend)
Das Gerät ist
ungewöhnlich
laut
Der Sicherheitsriemen wurde nicht
entfernt
Den Sicherheitsriemen entfernen
Alle Muttern und Schrauben
überprüfen und anziehen
Alle Muttern und Schrauben überprüfen und anziehen
Das Gerät steht nicht eben oder
stabil
Position überprüfen und bei Bedarf ändern

19
TECHNISCHE SPEZIFIKATIONEN
Modell
Spannung
Leistung
(W)
Strom-
stärke
(A)
Temperatur-
bereich(℃)
Capaciteit
Abmessungen
HxBxT(mm)
Gewicht
(kg)
7950.5115
220~240V/50Hz
110
0.8
2~10℃
5xGN1/4 Container
430x1200x335
25
7950.5117
220~240V/50Hz
110
0.8
2~10℃
6xGN1/4 Container
430x1400x335
27
7950.5118
220~240V/50Hz
110
0.8
2~10℃
7xGN1/4 Container
430x1500x335
29
7950.5119
220~240V/50Hz
110
0.8
2~10℃
7xGN1/4 Container
430x1600x335
30
7950.5121
220~240V/50Hz
110
0.8
2~10℃
8xGN1/4 Container
430x1800x335
32
7950.5123
220~240V/50Hz
110
0.8
2~10℃
10xGN1/4 Container
430x2000x335
34
7950.5125
220~240V/50Hz
110
0.8
2~10℃
4xGN1/3 Container
430x1200x395
28
7950.5127
220~240V/50Hz
110
0.8
2~10℃
6xGN1/3 Container
430x1400x395
30
7950.5128
220~240V/50Hz
110
0.8
2~10℃
6xGN1/3 Container
430x1500x395
31
7950.5129
220~240V/50Hz
110
0.8
2~10℃
7xGN1/3 Container
430x1600x395
32
7950.5131
220~240V/50Hz
110
0.8
2~10℃
8xGN1/3 Container
430x1800x395
34
7950.5133
220~240V/50Hz
110
0.8
2~10℃
9xGN1/3 Container
430x2000x395
36
ELEKTROANSCHLÜSSE
Der Stecker muss in eine geeignete Steckdose gesteckt werden.
Das Gerät ist wie folgt verdrahtet:
•Stromführender Leiter (braun) an Klemme L
•Neutralleiter (blau) an Klemme N
•Erdleiter (grün/gelb) an Klemme E
Das Gerät muss über eine spezielle Erdleitung geerdet werden. Bei Fragen wenden Sie sich bitte an einen
qualifizierten Elektriker. Elektroisolierpunkte dürfen nicht blockiert werden. Bei einem Notstopp müssen diese
Punkte jederzeit sofort zugänglich sein.
ENTSORGUNG
Gemäß EU-Vorschriften müssen Kühlprodukte von Fachunternehmen entsorgt werden, die alle
Gase, Metall- und Kunststoffbauteile entfernen oder recyceln. Ihre Kommunalverwaltung kann
Sie über die Entsorgung Ihres Geräts informieren. Kommunalbehörden sind nicht verpflichtet,
gewerbliche Kühlgeräte zu entsorgen. Sie können Sie jedoch über lokale Annahmestellen
informieren, die diese Geräte entsorgen.
KONFORMITÄT
Alle Produkte werden strengen Tests unterzogen, um die Einhaltung von Normen
und Spezifikationen internationaler und nationaler Behörden und unabhängiger
Organisationen zu gewährleisten. Produkte dürfen durch folgendes Symbol
gekennzeichnet werden:

20
CONSEILS DE SECURITE
•Placez l’appareil sur une surface plane, stable.
•L’installation et les éventuelles réparations doivent être confiées à un dépanneur / technicien qualifié.
Ne retirez aucun composant ou cache de ce produit.
•Consultez les normes locales et nationales pour vous conformer aux :
- lois sur l’hygiène et la sécurité au travail ;
- codes de bonnes pratiques BS EN ;
- précautions contre le risque d’incendie ;
- réglementations sur les branchements électriques IEE ; - règlements sur la construction
•NE PAS nettoyer cet appareil avec un nettoyeur à jet / à pression.
•NE PAS se servir de cet appareil pour stocker des médicaments.
•NE PAS utiliser d’appareils électriques à l’intérieur de l’appareil (ex. chauffages, sorbetières, etc.).
•NE PAS éclabousser les composants en plastique ou les joints de porte d’huile ou de matières grasses.
•En cas d’éclaboussure, nettoyez immédiatement la surface touchée.
•NE STOCKEZ aucun produit sur le dessus de l’appareil.
•Cet appareil est réservé exclusivement à une utilisation à l’intérieur.
•Les bouteilles qui contiennent un haut pourcentage d’alcool doivent être bouchonnées et rangées à la
verticale dans le réfrigérateur.
•Veillez à toujours transporter, stocker et manipuler l’appareil à la verticale et à le déplacer en tenant la
base du châssis.
•N’oubliez jamais d’éteindre et de débrancher l’appareil avant de procéder à son nettoyage.
•Gardez les emballages hors de portée des enfants. Débarrassez-vous des emballages conformément
aux règlements des autorités locales.
•Un cordon d’alimentation endommagé doit être remplacé par un agent ou un technicien qualifié
recommandé, pour éviter tout danger.
INTRODUCTION
Nous vous invitons à consacrer quelques instants à la lecture attentive de ce mode d’emploi. L’entretien et
l’utilisation appropriés de cette machine vous permettront de tirer le meilleur de votre produit
CONTENU DE L’EMBALLAGE
Les éléments suivants vous sont fournis de série :
Réfrigérateur ou congélateur
Paroisupérieure en verre
Paroi arrière en verre
Deux parois latérales en verre
Mode d’emploi
4 pieds réglables
Barre de séparation de Gastronormes
Ensemble de boulonnage
6 colliers
7 pattes de fixation
7 vis sans tête
12 vis
14 obturatuers
Attache une grande importance à la qualité et au service et veille à fournir des produits en parfait état
opérationnel, parfaitement intacts au moment de l’emballage. Nous vous prions de contacter votre revendeur
immédiatement si vous constatez un dommage quelconque survenu pendant le transport du produit.
This manual suits for next models
11
Table of contents
Languages:


