Econolux UBATPY60BK User manual

1
UBATPY60BK
UBATPY60SS
Single Pyrolytic Oven
Instruction Manual

2
Content
1…………………………………..…………………Important safety information
2…………………………………..…………………Installation
3…………………………………..…………………Prior to start up of the appliance
4…………………………………..…………………Your new oven
5…………………………………..…………………Program and function instruction
6…………………………………..…………………Grill guidance
7…………………………………..…………………Before using the oven for the first time
8…………………………………..…………………How to operate the oven
9…………………………………..…………………Troubleshooting
10…………………………………..………………Baking and grilling tips
11…………………………………..………………Maintenance and cleaning
12…………………………………..………………Environmental note
13…………………………………..………………Test dishes

3
Important safety information
This User Instruction Manual contains important information, including safety &
installation points, which will enable you to get the most out of your appliance. Please
keep it in a safe place so that it is easily available for future reference; for you or any
person not familiar with the operation of the appliance.
Warning:
●The appliance and its accessible
parts become hot during use. Care
should be taken to avoid touching
heating elements.
●Children less than 8 years of age shall
be kept away unless continuously
supervised.
●This appliance can be used by
children aged from 8 years and above
and persons with reduced physical,
sensory or mental capabilities or lack
of experience and knowledge or they
have been given supervision or
instruction concerning use of the
appliance in a safe way and
understand the hazards involved.
Children shall not play with the
appliance. Cleaning and user
maintenance shall not be made by
children without supervision.
●Asteam cleaner is not to be used.
●Accessible parts may become hot
during use. Young children should be
kept well away when in use.
●Do not use harsh abrasive cleaners or
metal scrapers to clean the oven door
glass as this can scratch the surface,
which may result in the oven glass
shattering.
●Do not use abrasive products to clean
the glass door panel to avoid
scratching it. Otherwise, severe failure
might happen to the appliance.
●The appliance must not be installed
behind a decorative door in order to
avoid overheating.
Operation:
Warning! Danger of fire!
●Do not allow paper or cloth to come
in contact with any heating element.
●Never store or use corrosive
chemicals, vapors, flammables or
nonfood products in or near oven. It is
specifically designed for use when
heating or cooking food. The use of
corrosive chemicals in heating or
cleaning will damage the appliance
and could result in injury
●If food inside an oven should ignite,
keep door closed. Switch off the oven
and disconnect from supply power.
●Exercise caution when opening the
door. Standing to the side, open the
door slowly and slightly to let hot air
and/or steam escape. Keep your face
clear of the opening and make sure
there are no children or pets near the
oven. After the release of hot air
and/or steam, proceed with your
cooking. Keep doors closed at all time

4
unless necessary for cooking or
cleaning purposes.
●Only use utensils that are suitable for
use with ovens.
Warning!
Danger of explosion!
●Liquids and other foods must not be
heated in sealed containers since they
are liable to explode.
●If smoke is observed, switch off the
oven and keep the door closed in order
to stifle any flames.
●Do not allow any accessories or electric
cables to contact the hot parts of the
appliance.
Warning!
Hot surfaces! Risk of burns!
●During use the appliance becomes hot.
Care should be taken to avoid touching
heating elements inside the oven.
●Warning! Accessible parts may become
hot during use. Young children should
be kept away.
●Never move racks or pans when they
are hot. Wait until they cool.
Safety advices:
IMPORTANT!
Always switch off the
electricity supply at the mains
during installation and maintenance.
General Information
●This appliance is designed for
domestic household use and can be
built into a standard kitchen cabinet or
housing unit.
●IMPORTANT: The adjacent furniture or
housing and all materials used in the
installation must be able to withstand a
minimum temperature of 85°C above
the ambient temperature of the room it
is located in, whilst in use.
●Certain types of vinyl or laminate
kitchen furniture are particularly prone
to heat damage or discolouration at
temperatures below the guidelines
given above.
●The appliance surfaces will become hot
during use and retain heat after
operation.
●Any damage caused by the non-
compliance of temperature tolerance of
oven during installation or by the too
close distance between the furniture
and the oven will be borne by the owner.
●This appliance is not intended for use
by persons (including children) with
reduced physical sensory, or mental
capabilities, or by those who lack
experience and knowledge, unless they
have been given supervision and
instruction concerning the use of the
appliance by a person responsible for
their safety .
Installation
●The oven must be installed in
accordance with the installation
instructions and all measurements must
be followed.
●All installation work must be carried out
by a competent person or qualified
electrician.
Children
●Please dispose of the packaging
material carefully. Packaging material
can be dangerous to children.
●Make sure to keep children away from
the appliance, children should be
supervised to ensure that they do not

5
play with the appliance. It might be
dangerous to allow the children to touch
the appliance.
General Safety
●Do not place heavy objects on the oven
door or lean on the oven door when it is
open, as it may cause damages to the
oven door hinges.
●Do not place those baked hot oil or fat
unattended on unattended areas, as it
will be a fire risk.
●Do not place pans, baking trays or
aluminium foil directly on the base of
the oven cavity as this can lead to
thermal accumulation and damage to
the enamel.
●Do not allow cable or plug to come into
contact with the heating areas of
appliance.
●Do not install the appliance next to
curtains or soft furnishings.
●Do not attempt to lift or move cooking
appliances by using the oven door or
handle, as this may cause damage to
the appliance or result in injury to the
person lifting the appliance.
Electrical safety
●If the supply cord is damaged, it must
be replaced by the manufacturer, its
service agent or similarly qualified
persons in order to avoid a hazard.
●The appliance must be installed in such
a way that the power supply is
accessible at all times.
●Before connecting the appliance to the
power supply, check that the power
supply voltage and current rating
corresponds with the power supply
details shown on the appliance rating
label.
●Never use a damaged appliance!
Disconnect the appliance from the
power source and contact your supplier
if it is damaged.
●Danger of electric shock! Do not
attempt to repair the appliance yourself.
In case of malfunction, repairs are to be
conducted by qualified personnel only.
●To avoid damaging the cord, do not
squeeze, bend or chafe it on sharp
edges. Keep it away from hot surfaces
and open flames as well.
●Lay out the cord in such a way that no
unintentional pulling or tripping over it is
possible.
●Do not open the appliance casing
under any circumstances. Do not insert
any foreign objects into the inside of the
casing.
●Never use accessories which are not
recommended by the manufacturer.
They could pose a safety risk to the
user and might damage the appliance.
Only use original parts and accessories.
●Keep the appliance away from any hot
surfaces and open flames. Always
operate the appliance on a level, stable,
clean and dry surface. Protect the
appliance against heat, dust, direct
sunlight, moisture, dripping and
splashing water.
●Do not place objects with open flames,
e.g. candles, on top of or beside the
appliance.
●WARNING: Ensure that the appliance
is switched off before replacing the
lamp to avoid the possibility of electric
shock.
●The fixed wiring for applicant shall have
an all-pole disconnection device.
Safety:

6
●Attention, always wear gloves when
handling products containing glass.
●For your safety, this product is made of
tempered glass. This type of glass is
highly resistant but has the feature to
retain the "memory" of shocks.
●Therefore, you should handle the
product with the greatest care to avoid
shocks and twists, especially during
installation.
●Avoid installing this type of product in
areas where it would be highly exposed
to shocks.
●Do not let children play with the product.
●Do not stick adhesive film on the glass
surface. In case of breakage, it would
generate large pieces that could be
dangerous
Electrical connection
Danger of electric shock!
●Any electrical installation must be
carried out by an authorised
professional.
●All fittings must be installed by a
competent person in accordance with
local regulations. If in doubt, consult a
qualified electrician.
●Important! Always switch off the
electricity supply at the mains during
installation and maintenance. We
recommend that the fuse is withdrawn
or circuit breaker switched off at the
distribution board whilst work is in
progress.
●This product must be earthed –if no
earth feed wire is available, consult an
electrician.
●Means for disconnection must be
incorporated in the fixed wiring in
accordance with the wiring rules. To
achieve this install appropriate switched
fused connection unit.
●Note! A switched fused connection unit
having a contact separation of at least
3mm in all poles should be connected
in fixed wiring.
●Connect the incoming positive, neutral
and earth cables to the terminals of the
switched fused connection unit. Ensure
connections are tight.
●The spur outlet must still be accessible
even when your oven is located in its
housing to enable the appliance to be
disconnected from the mains supply.
Cleaning
●Always disconnect the power supply
prior to cleaning the appliance. If the
switched fused connection unit is
difficult to reach, shut off the power
supply by using the corresponding
circuit breaker at the distribution board.
●Clean the appliance thoroughly before
first use. The oven should be cleaned
regularly and any food deposits
removed.
●Never clean the oven surfaces by
steam cleaning.
●The oven cavity should only be cleaned
with warm soapy water, using either a
sponge or soft cloth. No abrasive
cleaners should be used.
●Any stains that may appear on the
bottom of the oven will have originated
from food splashes or spilt food, these
splashes occur during the cooking
process. These could possibly be a
result of the food being cooked at an
excessively high temperature or being
placed in cookware that is too small.
●You should select a cooking
temperature and function that is
appropriate for the food that you are
cooking. You should also ensure that
the food is placed in an adequately
sized dish and that you use the drip tray
where appropriate.

7
Installation
Before installation
The appliance should be installed built in the cabinet . It should be keep safety distance with
appliance and the kitchen walls. Detail pls check below picture . (values in mm).
Surfaces, synthetic laminates and adhesives used must be heat resistant up to 85°C above
the ambient temperature of the room it is located in, whilst in use.
Kitchen cabinets must be set level and fixed. A gap of 5 mm is required between the
appliance and surrounding unit fronts.
If there is a drawer beneath the oven, a shelf must be installed between oven and drawer.
Installation method 1
Installation method 2
Installation and connection
▲Material damage!
The door and/or handle must not be used for lifting or moving the appliance.
For installation the appliance must be connected in accordance with all local gas and/or
electrical regulations.
Carry the appliance with at least two persons.
Use the slots or wire handles located at both sides to move the appliance.
Connection to the mains supply
This appliance must be earthed!
Our company shall not be held responsible for any damage caused by using
the appliance without an earthed socket. Risk of electric shock, short circuit or fire by
unprofessional installation! The appliance may be connected to the mains supply only
8
by an authorized qualified person and the appliance is only guaranteed after correct
installation.
Risk of electric shock, short circuit or fire by damage of the mains lead! The mains lead
must not be clamped, bent or trapped or come into contact with hot parts of the
appliance. If the mains lead is damaged, it must be replaced by a qualified electrician.
The mains supply must correspond to be data specified on the rating plate of the
appliance. The appliance mains cable must correspond to the specifications and the
power consumption.
Risk of electric shock!
Before starting any work on the electrical installation, please disconnect the
appliance from the mains supply.
Installation
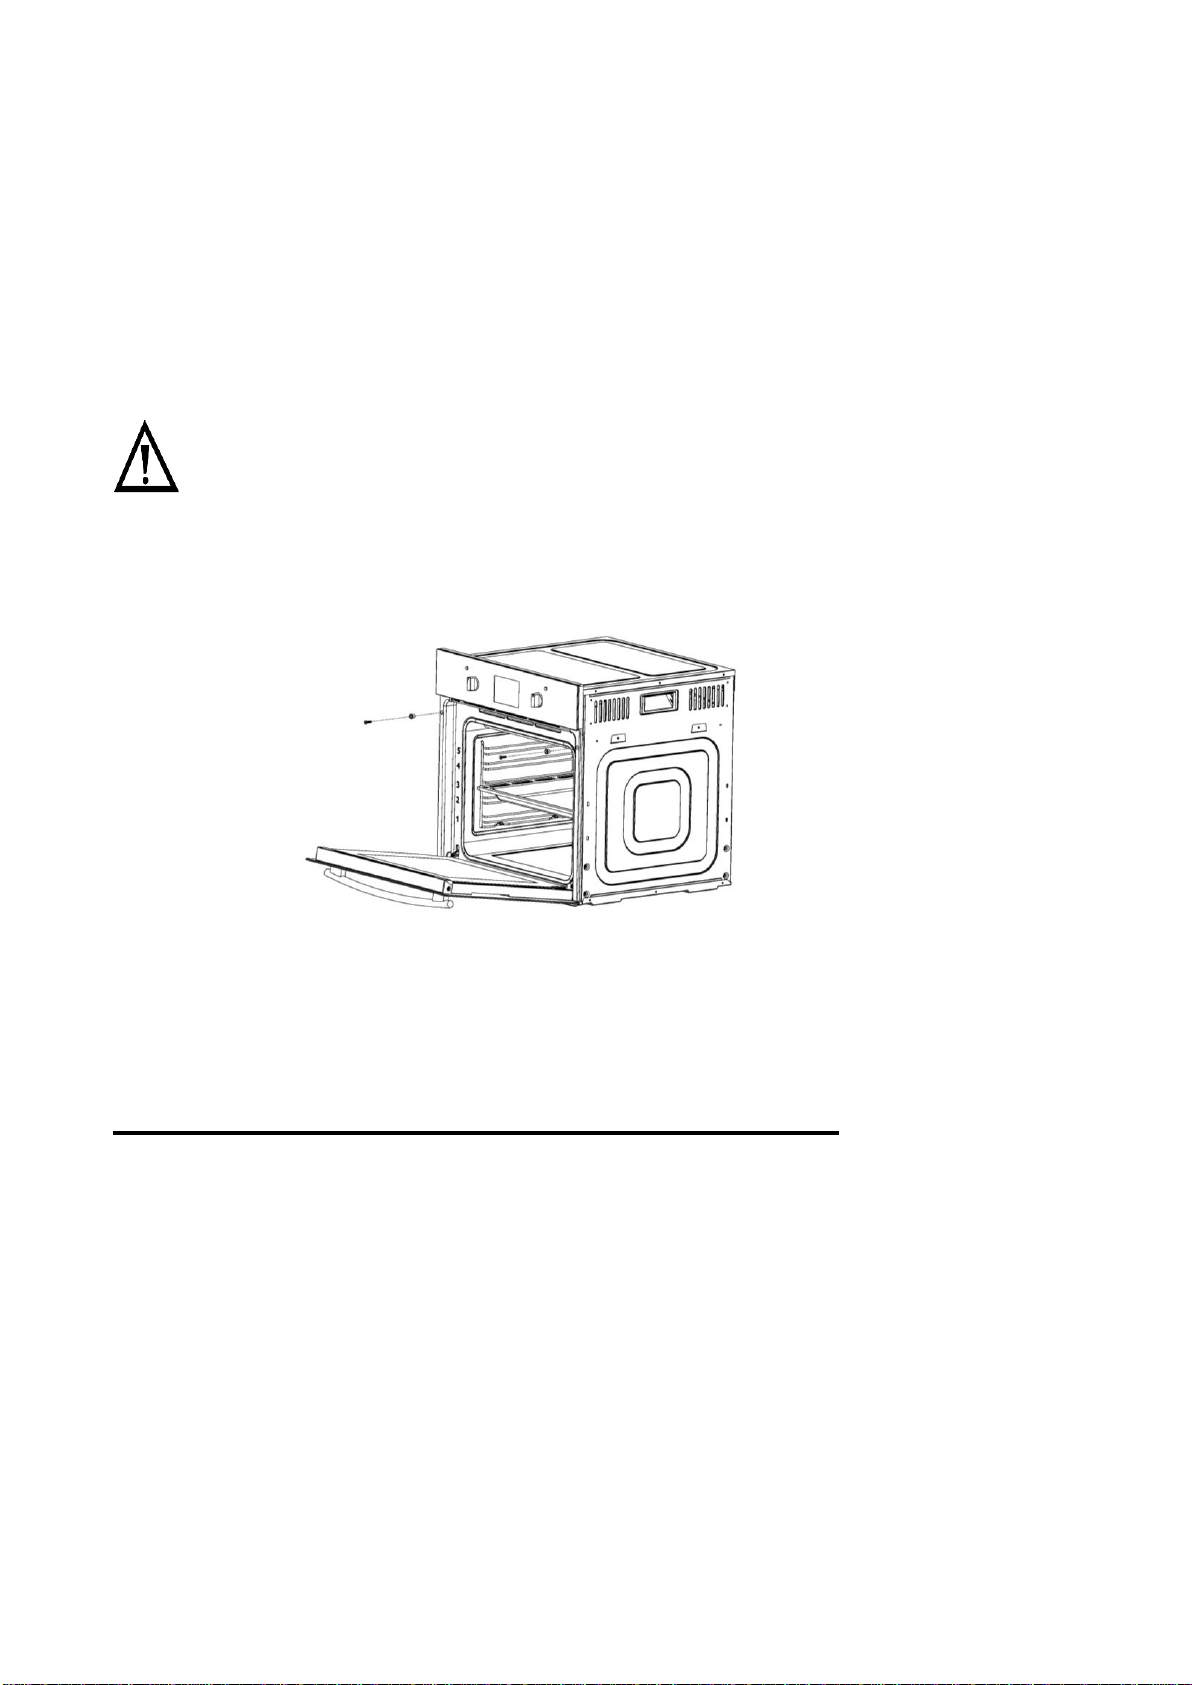
1、Slide the oven into the cabinet aperture, align and secure.
2、Fix your oven with the 2 screws and washers as indicated in the figure.
Final check
1. Connect the appliance to the mains supply and switch on the mains supply.
2. Check function.
Prior to start up of the appliance
➢Once this simple operation has been carried out the oven is ready to use for cooking.
➢This appliance is exclusively for domestic use.
➢Use the oven to cook food only.
➢Before cooking,make sure all oven accessories that are not required are removed from
the oven.
➢Pre-heat the oven to the cooking temperature before using it.
➢Place the cooking trays in the center of oven and leave space in between when using
more than one,so that the air can circulate.
➢Do not put oven trays on the base of the oven or cover it with aluminium foil. This will
cause thermal accumulation. The cooking and roasting times will not coincide and the
enamel may be damaged.
➢Try to open the oven door as little as possible to see the food (the oven light remains on
during cooking).
➢Take care when opening the door to avoid contact with hot parts and steam.

9
Your new oven
A. Oven overview
1、Control panel 5、Handle
2、Wire rack 6、Fan motor( behind steel plate)
3、Tray 7、Lamp
4、Door 8、Grill heating element
B.Technical specifications
Voltage/frequency
220-240V~50Hz
Total power consumption
2.800KW
Cable type/section
H05VV-F 3*1.5mm2
Cable length
1.2m
External dimensions(height/width/depth)
595/595/575(mm)
Installation dimensions(height/width/depth)
600/600/ min 555(mm)
Main oven
Multifunction oven
Energy efficiency class
A
Oven lamp
25W/300°C
Grill power consumption
2.650KW
C.Your accessories
•The accessories supplied with your appliance are suitable for making many meals.
Ensure that you always insert the accessories into the cooking compartment the right

10
way round.
Inserting accessories
You can insert the accessories into the cooking compartment at 5 different levels. Always
insert them as far as they will go so that the accessories do not touch the door panel.
The accessories can be pulled out approximately halfway until they lock in place. This
allows dishes to be removed easily.
Note: The accessories may deform when they become hot. Once they cool down again,
they regain their original shape. This does not affect their operation.
Oven pan
For moist cakes, pastries, frozen meals and large roasts. It can also be used to catch
dripping fat when you are grilling directly on the wire rack.
Oven deep pan(optional)
Used for pastries, large roasts, juicy dishes, and for collecting the fat while grilling.

11
Wire rack
Used for roasting and for placing the food to be baked, roasted or cooked in casserole
dishes to the desired rack.
D.Control panel
Here, you will see an overview of the control panel. Depending on the appliance model,
individual details may differ.
1.3.1 Button icon instruction
Button diagram
Display section icon diagram
Model/button
K1
K2
K3
K4
KB1
KB2
AK100-7A
Reminder/
parameter
switch
(temperature/
time)
clock/
booking
startup
Pause/
cancel
Plus/minus
(cooking
function)
Plus/minus
(temperature/
time)

12
Display screen icon
Display screen icon instruction
Icons
Function
Icons
Function
1
Corresponding heating
elements while working
8
Unit of degree Celsius ℃
2
Work time setting icon
9
System time icon
3
Reservation function,setup
start working time
10
Door lock icon
4
Display the day of time
value,including hour,minute
and second icon “:”
11
Clock icon
5
Hour icon
12
Oven working icon
6
Minute icon
13
Work state dynamic indicator bar(menu
working)
7
Display the temperature value
1.3.2 Function icon instruction
Icons
Function
Icons
Function
Top outer heat
element
Top inner heat element
Heating fan
(Defrost)
Bottom heat element
+
Self-cleaning mode
13
Program and function instruction
1、Power on
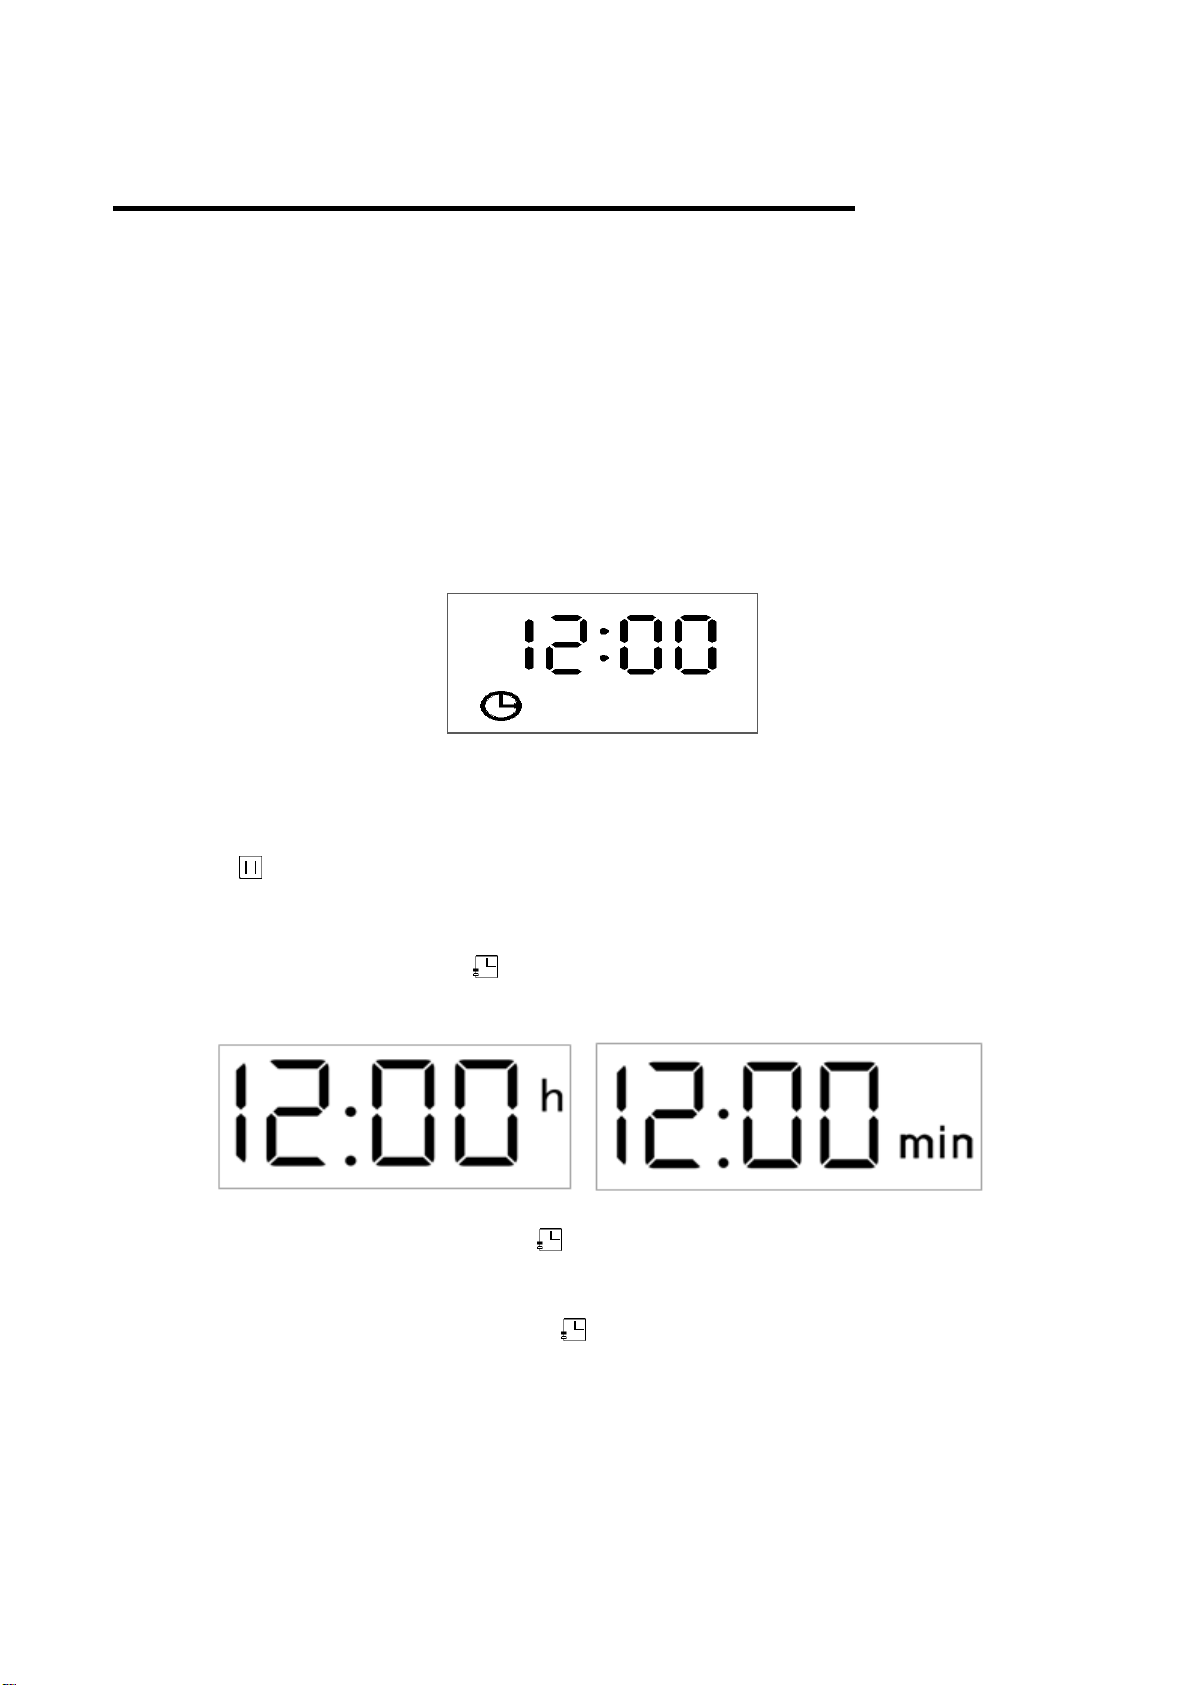
Connect your appliance to the mains supply, all indicator lights of the display board will light
up for 1s and then remind the user to input the time. Default time show 12:00, hour 12 will
flash, the time can be input at this stage, refer to clock setting requirement for details.
After 10s without any operation and the display will change to adjust minute.
Within 10s without any operation when adjusting minute,the oven will enter standby mode
automatically.
Under standby mode,if no any operation in 5 minutes, the oven will switch off automatically,
and the display screen is not displayed.
When the oven is switch off,you can change to standby mode by means of key or function
knob,and the standby mode displays the real time system clock and clock icon.(Refer to pic
below for the display effect.)
Initial standby mode
When oven is powered on,the oven door lock will start to self-checked. During the self-
examination, the door lock will walk back and forth automatically. If the correct position
signal is not detected within 20 seconds, the error code will show "E-3",and it will need to
long press “ ” for 3s to return to standby status.
2、Set clock
Under standby status, touching “”once into the clock adjustment state.This time hour
value of the clock will flash(1 time/second), by rotating programming switch KB2 to set the
hour time. (0~23~0 is recyclable).
Hour adjustment display effect Minute adjustment display effect
After adjusting the hour time, re-touch “”to switch to minute adjustment. Minute value
will flash at this time, by rotating programming switch KB2 to set minute time(0~59~0
recyclable).
After adjusting the minutes, re-touch the “”key to confirm, clock setting accomplished,
and at this time, the second icon ":" flashes (1S/1 time).
Adjust hour, hour icon "h" display, adjust minutes, minute icon "min" display. After
confirmation, hour icon and minute icon do not show. If the clock setting is not confirmed
within 10 seconds, the system defaults to complete the clock and automatically returns to
standby. If the clock is not adjusted within 10 seconds after power on, the system defaults to
12:00 and is on standby. If the power is off, the clock will be readjusted.
There will be only system clock displayed under standby status.

14
3、The choice of function
Under standby status, switch different functions by rotating the programming switch KB1 in
turn, refer to Pic below for the order( not recyclable,oven function will remember the last
operation).
Function mode diagram
When selecting the function, the clock position shows the default time of the corresponding
function, the temperature position shows the default temperature of the corresponding
function.The first switch, for temperature adjustable function level,default temperature value
and temperature icon “℃” will flash display;if temperature is not adjustable for that
function level,then default clock value and work time icon “ ” will flash display.
When selecting the function, you can switch into the temperature and working time
adjustment by touching “ ”.If adjusting temperature,temperature value and temperature
icon “ ” will flash display;if adjusting work time,clock value and work time icon “ ” will flash
display. Temperature value or time can be set by rotating the programming switch KB2.
If the working time and temperature are not set,or not touching “ ” within 10 seconds of
completion, the system automatically returns to standby status.The default cooking
time,temperature and adjustable temperature range are attached behind.
Note: The grill function adjustable time range:5mins to 2 hours 30mins.
4、Reservation function
After setting cooking time and temperature and before touching “ ” to start-up, touch “”
to enter to cooking end time setting (default end time=system time +setting cooking time),
cooking end time icon “ ” will flash(1S/ time) , the hour value of the clock position flashes
at this time,rotating programming switch KB2 to set the hour time. After setting the hour time,
touch “” again and enter the minute time setting. At this time, the minute value of the clock
position flashes, and the minute time can be set by rotating programming switch KB2, you
can use the “ ” to switch hour and minute settings circularly. After cooking end time(hour
and minute) setting completed, touch “ ” to start, system will automatically calculate the
grill start time (grill start time=cooking end time –grill working time).
The oven will display system clock under reservation status, all output does not
work.Display effect refer to pic below.
Reservation status display effect

15
Reservation status display: “ ” reservation icon will display, “ ” clock icon will
display,clock position will display system time, the selected menu will display,temperature
will display setting or default temperature.
For example,after setting up the function level,grill time and temperature,if you don’t use the
reservation function, you can touch “ ” key to start grill function.(refer to pic below for the
display effect)
If more than 10 seconds are not confirmed during setup, the oven will automatically return to
standby state.
Grill status display effect
When the oven works: “ ” working time icon will display, clock position will display work
countdown time, the selected menu will display,temperature will display setting or default
temperature, oven function start icon “ ” will display, the working status dynamic indicator
bar “ ” is displayed.
When switching to grill time or temperature, the display screen flashes corresponding
patterns (1 time/S),and stop flashing after confirm to start. The working time begin to
countdown after startup(countdowns by second).
When working touch “ ” key will pause the cooking, all output components stop working
(excluding cooling fan),touch “ ” key again to exit the current setting, and the oven returns
to standby status.
If the working time is 0, the oven stops (the exhaust motor continues to work), and the
system automatically returns to standby state.At this time, buzzer will beep continuously for
10 times, and the exhaust motor stops after the cavity temperature is less than 100 ℃.
Display temperature range:not lower than 30℃,and it will show Lo℃if lower than 30℃.
5、Pyrolytic self-cleaning mode
By rotating programming switch KB2 you can switch to Pyrolytic self-cleaning mode, the
default temperature of the mode is unadjustable, default working time is 1.5 hours,
adjustable working time range is min 1 hour and max 2 hours;
After selecting the Pyrolytic self-cleaning mode ,touch “ ” to start working. After self-
cleaning mode begin, “ ”icon will display, door lock will be activated, door lock icon “ ”
will always displayed, indicating that the oven door has been locked, at this moment, except
for touching “ ” key to pause or cancel the function, the other keys are invalid.
After the self-cleaning function is confirmed and started, clock position shows countdown
time, temperature position shows “ ”. Oven lamp cannot be used after Pyrolytic self-
cleaning mode begins.
After starting self-cleaning, door lock function will be activated automatically, the oven door
will be locked when detected the door is close to place. If the door lock fails to detect the

16
closing signal, the failure code "E-3" will be displayed and the self-cleaning function will be
stopped. At this time, the door should be closed again and the self-cleaning function should
be restarted by pressing “ ”. When the temperature of the cavity exceeds 300 ℃,you can
press “ ” to stop heating, but the oven door default can not be opened at this time. The
door can be opened only when cavity temperature drops below 300 ℃.
6、Attention for self-cleaning mode
➢Before use of the pyrolytic function, you must remove the side shelf, oven pan and other
relative accessories to avoid damage in the high temperatures reached in the cycle.
➢After using the pyrolytic function, do not use water or other washing agents.
➢After use the pyrolytic function, you may find matter which was not removed in the side
of the cavity, this is to be expected. Use a microfiber cloth to remove.
➢Before using the pyrolytic function, remove food residue and spillages from inside of the
oven cavity and prevent making a large amount of smoke and irritating smells during
the cycle.
➢When using the self-cleaning function, the oven can produce smoke and irritant
smell,please keep the room well ventilated.
➢When using the self-cleaning function, the outside temperature will be higher than
normal cooking temperature, do not touch the cavity casing and ensure children are
kept away from the oven to avoid getting hurt.
➢When the seal of oven is found to be faulty or damaged, it should be replaced by a
suitably qualified person and only a genuine replacement door seal should be fitted.Do
not use alternative door seals as they may not be suitable.
7、Door lock function
No.
Function instruction
Relieve way
1
Self-check after power on, if the
detection signal is normal then exit,
otherwise show the fault code "E-3".
Long press “ ” key to cancel the fault
code display, it will not affect normal
use.
2
Non-self-cleaning function mode,if
detected cavity temperature over
300℃then lock.
The lock will automatically relieve
when cavity temperature is below 300
℃.
3
a. The door lock will be activated
automatically after the self-
cleaning starts.
b. During the operation,except for
pressing “ ”, any operation
of other keys will be useless if
oven door is locked. When oven
is in standby or power off status,
the door lock will automatically
unlocked when the cavity’s
center temperature falls below
300℃.
Door lock relieve:
When the oven is in the process of
self-cleaning, if work completed and
the oven enters standby mode,oven
door will be locked for the cavity
temperature is above 300℃,display
screen will show door lock icon “ ”
(display effect refer to pic 1 below).
Door lock will relieve automatically
after the cavity temperature is below
300℃,at this time,door lock icon “ ”
will automatically extinguish from the
display screen(display effect refer to
pic 2 below).

17
4
Except for defrost mode, from the
beginning to the cumulative 15
minutes of work, if the cavity
temperature does not reach the set
temperature, door lock will be
activated automatically and with
memory function.
Only when press “ ” for 3S can
cancel the lock memory function.
Pic 1 Door locked in standby mode display effect
Pic 2 Door unlocked in standby mode display effect
8、Protection function
A、Display will show E-1 if sensor is short-circuited or disconnected,buzzer will
continuously sound for 10 times,1S/time(refer to display effect below).Touching
“ ” key can return to standby status at this time.
Sensor abnormality, alarm display effect
B、When the temperature <35℃after 5 minutes of heating, it means the heating
element have a problem, display will show E-2, buzzer will continuously sound
for 10 times,1S/time(refer to display effect below).Touching “ ” key can return to
standby status at this time.

18
Heat element abnormality, alarm display effect
C、Door lock will self-check after power on, if the correct signal is not detected for 20
consecutive seconds, indicating a failure of the door lock, or the door is not
closed or is not closed in place during self-cleaning, the screen displays E-3 if
the correct signal for the door is not detected. (refer to display effect
below).Touching “ ” key can return to standby status at this time.
Door lock abnormality, alarm display effect
D、When the oven is heated with a common function mode,and the cavity
temperature is above 300℃,the oven door will be locked automatically.At this
time,door lock icon “ ” will keep bright on the display screen.
Door lock will be automatically relieved when the cavity temperature is lower than
300℃,and door lock icon “ ” will automatically extinguish from the display
screen at this time.
9、Enquiry function
(1) Under cooking state, touch “ ” key one time can query system time, the clock position
shows the current time of the system,second icon will flash. Re-touch “ ” key or 10s later
automatically return to the cooking time display.
(2) At the end of the reminder time setting, reservation or cooking state,touch “ ” can
query the alarm remaining countdown. Re-touch “ ” key or 10s later automatically return to
its original state. You can query the remaining alarm time and reset the alarm time under
standby state, when the alarm countdown time is less than 1 minute, the clock position
shows 0: 00;
(3) In the reservation status, first touch of the “ ” can query the cooking start time, the
clock position shows the cooking start time, clock value and “ ” icon flashes. Re-touch
“ ” key or 10s later automatically return to the system time display.
10、Alarm function

19
Touch “ ” key under standby state to enter to alarm function setting, this time the clock
position hour value will flash,minute value will long lit and alarm icon “ ” keep bright.
(1) Rotate programming switch KB2 to set the hour time, at this time the hour value is
always bright, the value setting range is 0-23;
(2) Touch “ ” key again, minute value will flash,and hour value keeps bright;
(3) Rotate programming switch KB2 to set the minute time, at this time the value of the
minute is always bright, the setting range is 0-59;
(4) When the alarm time is set,you can touch “ ” for confirmation,second icon “:”starts to
flash, “ ” icon keeps bright, and it starts to countdown by second, when the time
countdown is 00:00, buzzer will sound for 1 minute (1S/time),and alarm clock icon “ ”
will keep flashing display(1S/time), at this time ,press any key can stop the flashing.
Note:1) During setup, second icon “:”will long lit,alarm clock icon “ ” will always bright.
2) During setup, touch “ ” key will cancel the current reminder time setting and return
to standby state.
3) If a reminder feature has been set,then alarm clock icon “ ” should always be
displayed when the menu is working, and the reminder time can be queried.
11、Start/pause/cancel function
1. After setting up the cooking function,touch “ ” key to start working; if touching “ ” key
when the cooking is suspended, you can restart the work.
2. During oven cooking, touch “ ” key one time can pause the cooking,temperature and
time will flash display, function icon will long lit;Touch “ ” key again will cancel current
cooking.
3. When setting system time,press “ ” key will exit the clock setting state directly and return
to standby state.
4. When oven function, working time and temperature are set, press “ ” key will exit
function setting state and return to standby state.
12、Oven function instruction
This appliance have 7 cooking functions and self-cleaning mode for choices.
Function instruction are as followings:

20
Function
mode
Icons
Default
temperature
Temperature
range
Default
time
Function description
Function 1
220
50-250
50:00
Rapid preheating mode:
This mode the inner and
outer part of the top heat
element and the bottom
heat element are both
activated to alternately
heat circulating, in this
mode, also the fan is in
operation to provide an
even distribution of the
heat and shorten the food
roasting time,suitable for
rapid preheating the
oven.
Function 2
50
Not adjustable
30:00
Defrost:Fan work
without heating at room
temperature. Defrost time
according to quantity and
series of food. The
defrost time,please
refer to the instruction of
food packaging label .
Function 3
200
50-250
50:00
Conventional oven (up
and base heating):
Suitable for grill meat or
baking food on one layer.
Function 4
210
50-230
50:00
Half grill: This method of
cooking uses the inner
part only of the top
element, which directs
heat downwards onto the
food. This function is
suitable for grilling small
portions of bacon, toast
and meat etc.
Function 5
210
50-250
60:00
Fan heating and grill
mode: This mode by
using top heat element
and fan together, to let
the inner heating circulate
quickly. It is suitable for
needing bake food
quickly and locking the
inner moisture of food,
such as beefsteak,
hamburger, and some
vegetables.
This manual suits for next models
1
Table of contents
Popular Oven manuals by other brands


Jenn-Air
Jenn-Air SVD48600P installation instructions

Bauknecht
Bauknecht BLPE 8200 User and maintenance manual

Morphy Richards
Morphy Richards MRMPO12T instruction manual

Hoover
Hoover HOZ7173 WIFI User instructions

Ariston
Ariston ML 99 IX A operating instructions

GOLDEN TANDOORS
GOLDEN TANDOORS GT-810AG Installation & operation manual


