Ecozy DW01 User manual

7
ecozy
COUNTERTOP
DISHWASHER
User
Manual
Please
carefully
read
this
user
manual
before
using
this
product
апа
keep
it
well
Юг
future
reference.
\2.01

Thank
you
for
choosing
our
product.
If
you
have
any
questions,
concerns,
or
need
any
help,
please
contact
us
at
ог
call
us
via
hotline
(443)
991-8777
(UTC
14:00-22:00,
Monday
to
Friday)

IMPORTANT
SAFETY
INSTRUCTIONS
WARNING
When
using
your
dishwasher,
please
follow
the
basic
precautions
including:
1.
Read
all
instructions
before
using
the
dishwasher.
2.
Use
the
dishwasher
only
for
its
intended
function.
3.0nly
use
е
detergent
designed
specifically
for
automatic
dishwashers
апа
keep
them
out
of
the
reach
of
children.
4.When
loading
items
to
be
washed
*таке
sure
that
the
sharp
items
do not
damage
the
door
seal;
апа
*load
sharp
knives
with
the
handles
facing
ир
ог
outside
to
reduce
the
risk
о
cut-type
injuries.
5.
Do not
wash
plastic
items
unless
they
are
marked
"dishwasher
safe”
or
the
equivalent.
6.
Do not
touch
the
heating
element
during
use
or
immediately
after
use
7.
Do not
tamper
with
the
controls
of
the
dishwasher.
8.
Do not
sit
оп
ог
stand
оп
е
door/basket
of
the
dishwasher.
9.
To
reduce
the
п5
of
injury,
0
not
allow
children
to
play
in
or
on the
dishwasher.
10.
Remove
the
door
to
е
washing
compartment
when
removing
ап
old
dishwasher
from
service
ог
discardingit.
11.DO
NOT
IMMERSE
ТНЕ
DISHWASHER
IN
WATER
to
protect
against
the
risk
of
electric
shock
12.
HOUSEHOLD
AND
INDOOR
USE
ONLY.
13.
Itis
forbidden
to
open
the
door
while
е
dishwasher
15
working
to
avoid
personal
danger
(e.g.
hot
water
flying
out
to
cause
hurt).
14.
If
the
supply
cord
is
damaged,
it
must
be
replaced
by
the
manufacturer,
its
service
agent,
ог
similarly
qualified
persons
10
avoid
а
hazard.
15.
This
appliance
is
not
intended
for
use
by
persons(including
children)
with
reduced
physical,
sensory
ог
mental
capabilities,
or
lack
of
experience
апа
knowledge
unless
they
have
been
given
supervision
or
instruction
concerning
the
use
of
the
appliance
by
а
person
responsible
for
their
safety.
SAVE
THESE
INSTRUCTIONS
SAFETY
WARNINGS
1.
Keep
е
dishwasher
and
its
cord
out
оё
the
reach
of
the
children,
2.
Unplug
the
dishwasher
from
е
outlet
when
it's
not
in
use,
before
you
remove
parts
from
it
ог
before
you
clean
it
З.
Allow
the
dishwasher
to
cool
down
before
you
install/remove
any
parts
ог
before
cleaning,
01

02
4.
Using
the
parts that
are
not
recommended
by
the
dishwasher's
manufacturer
may
cause
injuries.
5.Do
not
let
the
cord
of
the
dishwasher
hang
over
the
edge
of
a
table
ога
counter.
6.
Please
put
the
dishwasher
оп
а
dry
ап
flat
surface.
7.Do
not
use
ап
extension
cord
ог
modify
the
plug
provided
with
this
dishwasher.
8.
Do
not
place
апу
heavy
objects
оп
the
top
of
the
dishwasher.
9.
Do
not
put the
dishwasher
оп
ог
near
flammable
material,
vapor
ог
hot
gas,
such
as
gasoline.
10.
Be
sure
the
plug
of
the
dishwasher
is
fully
inserted
into
the
receptacle.
11.
Keep
all
the
packaging
material
of
the
dishwasher
away
from
children.
12.
Do
not
touch
or
cover
the
air
outlet
on
the
dishwasher.
13.
Do
not
place
the
dishwasher
in
ап
extremely
hot
ог
cold
environment.
14.
Do
not
operate
this
dishwasher
when
parts
are
missing
ог
broken.
15.
Check
е
dishwasher
for
the
presence
of
foreign
objects
before
use.
16.
Do
not
interrupt
the
power
of
the
dishwasher
by
pulling
the
power
supply
cord
out
of
its
socket
directly.
17.
Check
with
а
qualified
electrician
ог
service
representative
if
you
are
in
doubt
whether
the
dishwasher
is
being
used
correctly.
GROUNDING
INSTRUCTIONS
1.
This
dishwasher
must
be
grounded
in
the
event
of
a
malfunction
ог
breakdown.
Grounding
will
reduce
the
risk
of
electric
shock
by
providing
а
path
of
least
resistance
Юг
electric
current.
This
dishwasher
is
equipped
with
а
cord
having
ап
equipment-grounding
conductor
and
а
grounding
plug.
The
plug
must
be
plugged
into
ап
appropriate
outlet
that
is
installed
апа
grounded
following
alllocal
codes
апа
ordinances.
2.
WARNING
-
Improper
connection
оЁ
the
equipment-grounding
conductor
can
result
in
а
risk
оЁ
electric
shock.
Check
with
а
qualified
electrician
ог
service
representative
if
you
are
in
doubt
whether
the
appliance
is
properly
grounded.
Do
not
modify
the
plug
provided
with
the
dishwasher.
If
it
will
not
fit
the
outlet,
have
а
proper
outlet
installed
by
а
qualified
electrician.
We
will
accept
по
liability
ог
responsibilty
Юг
fires ог
electric
shocks caused
by
improper
operation,
dismantling
the
dishwasher
ог
by
not
adhering
to
the
above
safety
instructions.
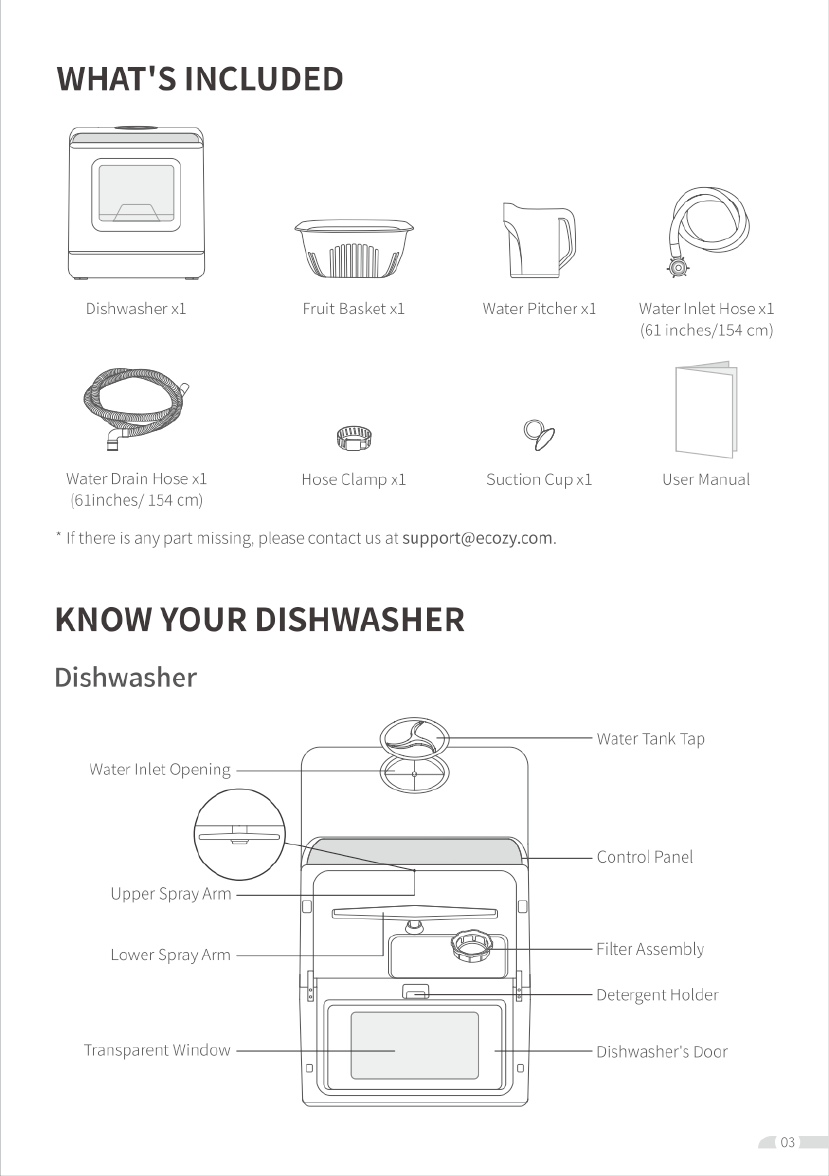
WHAT'S
INCLUDED
i/
Dishwasher
х1
Fruit
Basket
х1
Water
Pitcher
x1
Water
Inlet
Hose
x1
(61
inches/154
cm)
е
@
Water
Drain
Hose
х1
Hose
Clamp
х1
Suction
Сир
х1
User
Manual
(6linches/
154
cm)
*
If
there
15
any
part
missing,
please
contact
us
а!
KNOW
YOUR
DISHWASHER
Dishwasher
Ё\АШЫЮМ‹Т@
Upper
$ргау
Arm
5 |
Water
Inlet
Opening
Control
Panel
Lower
Spray
Arm
Filter
Assembly
‘£
(—E;
:L
Detergent
Holder
Transparent
Window
Dishwasher's
Door
] ]
03

EN
Cutlery
Basket
Upper
Basket
Lower
Basket
(For
North
America)
Upper
Basket
Lower
Basket
(For
Japan)
Water
Inlet
Connector
Water
Drain
Connector
04
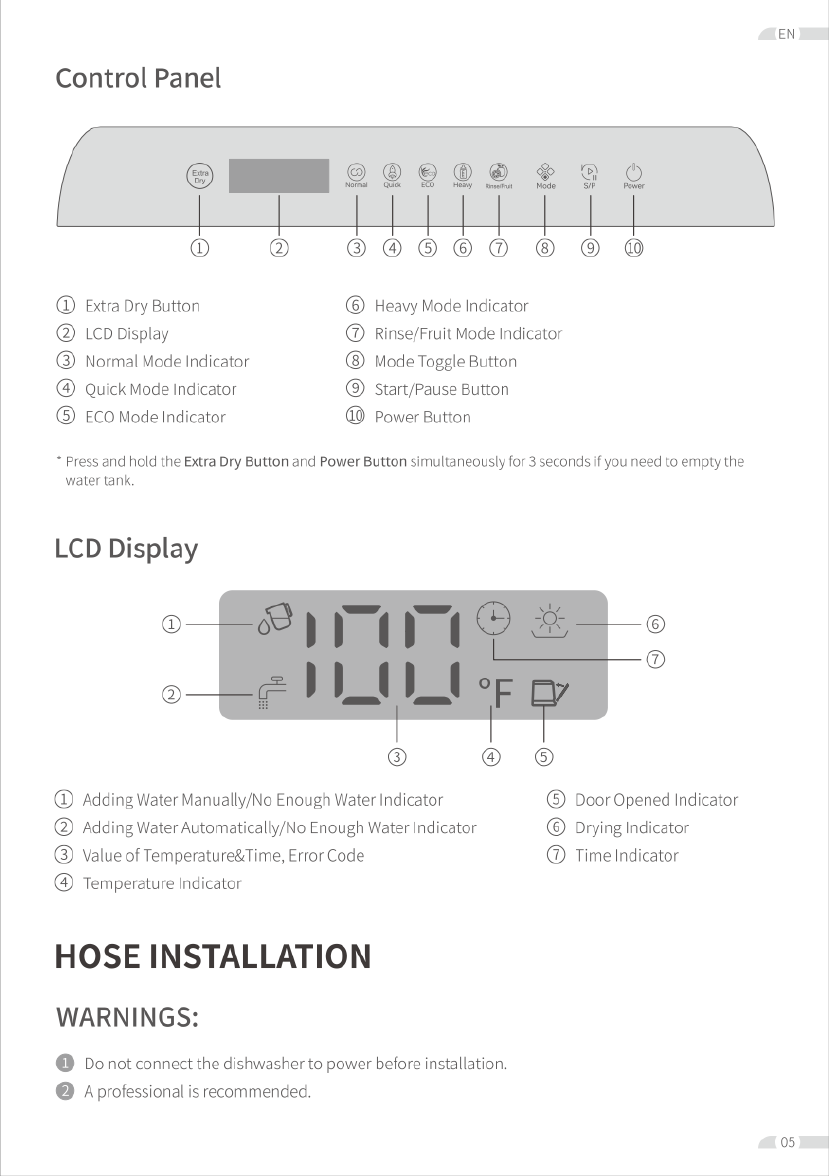
Control
Panel
©
ЩЩЩ
осс
ФЭ
&
2 O
W
64
B
e
e
мщ
B
К
.
O}
@ @
®06e
6 0 ©
©®
@
Extra
Огу
Button
©
Heavy
Mode
Indicator
@
1С
Display
@
Rinse/Fruit
Mode Indicator
©®
Normal
Mode Indicator
Mode
Toggle
Button
@
Quick Mode
Indicator
@
Start/Pause
Button
©
ЕСО
Mode
Indicator
@
Power
Button
*
Press
and
hold
the
Extra
Dry
Button
апа
Power
Button
simultaneously
for
3
зесопа
if
you
need
to
empty
the
water
tank.
LCD
Display
® ® ©
@
Adding
Water
Manually/No
Enough
Water
Indicator
©
Door
Opened
Indicator
@
Adding
Water
Automatically/No
Enough
Water
Indicator
©
Drying
Indicator
@®)
Value
of
Temperature&Time,
Error
Code
@
Time
Indicator
@
Temperature
Indicator
HOSE
INSTALLATION
WARNINGS:
@
Do
not
connect
the
dishwasher
to
power
before
installation.
@
A
professional
is
recommended.
05
В
ЕМ
©
Theinstallation
position
of
the
dishwasher
should
be
near
ап
existing
faucet
if
you
choose
to
add
water
automatically.
One
side
оЁ
the
sink
should
be
chosen
to
facilitate
the
connection
of
the
drain
hose.
If
you
choose
to
add
water
manually,
other
container
is
needed
for
draining
water.
1.
Drain
Hose
Installation
Step
1:
Connect
опе епа
(with
"L"
shape)
о!
the
Water
Drain
Hose
to
the
Water
Outlet
Connector,
then
screw
it
tightly
using
the
Hose
Clamp.
*
Screwdriver(not
included)
*
Make
sure
the
hose
s
tightly
fixed
to
avoid
water
leakage.
Step
2:
Fix
the
other
епа
of
the
Water
Drain
Hose
onto
а
sink
ога
bucket
using
the
Suction
Cup.
=]
=]
Tips:
@
Ifyou
don't
want
to
connect
the
Water
Drain
Hose
to
the
sink directly,
you
can
also
connect
it
to
a
drain
pipe
ога
drainage
pipe
а5
shown
below:
06
EN
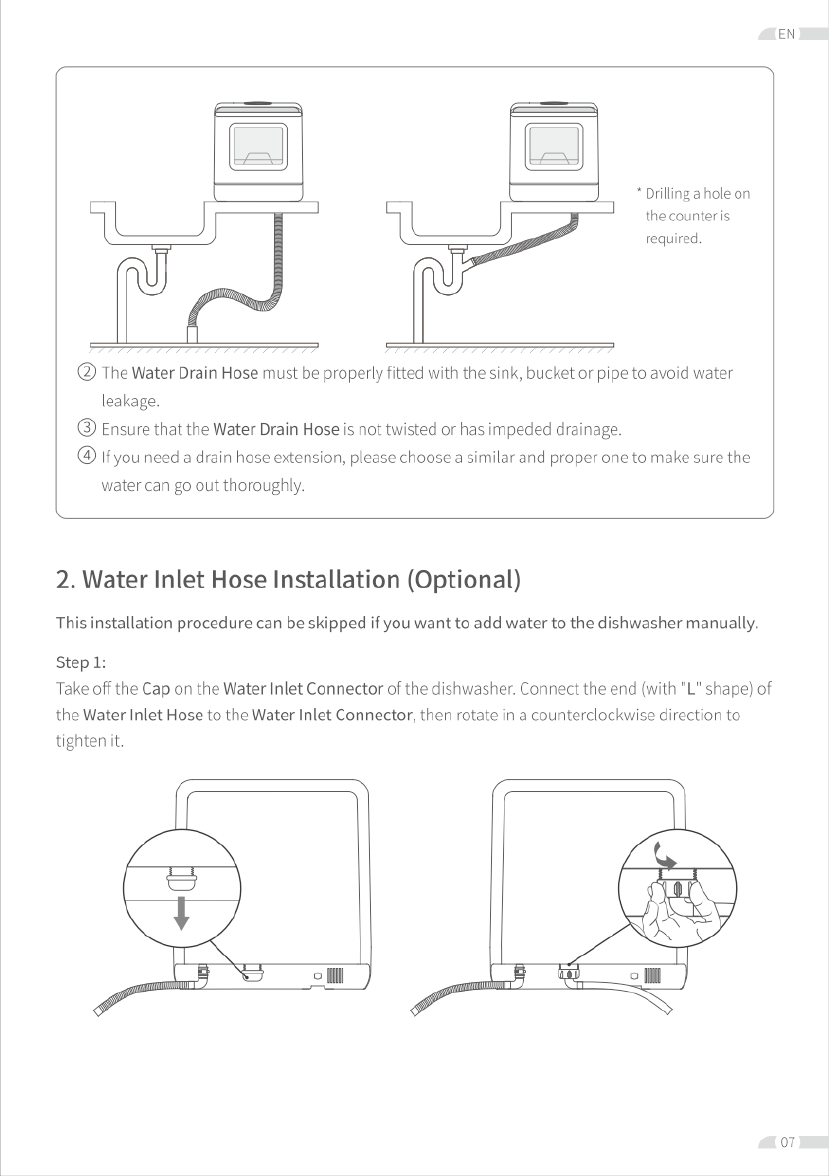
*
Drilling
а
hole
от
the
counteris
required
@
The
Water
Drain
Hose
must
be
properly
fitted
with
the
sink,
bucket
ог
pipe
о
avoid
water
leakage
©
Ensure
that
the
Water
Drain
Hose
15
not
twisted
ог
has
impeded
drainage.
@
Ifyou
need
а
drain
hose
extension,
please
choose
а
similar
and
proper
one
to
make
sure
е
water
can
go
out
thoroughly.
2.
Water
Inlet
Hose
Installation
(Optional)
This
installation
procedure
can
be
skipped
if
you
want
to
add
water
to
the
dishwasher
manually.
Step
1:
Take
оЁ
the
Сар
оп
the
Water
Inlet
Connector
of
the
dishwasher.
Connect
the
епа
(with
"L"
shape)
of
the
Water
Inlet
Hose
to
the
Water
Inlet
Connector,
then
rotate
in
а
counterclockwise
direction
to
tighten
it.
07
EN
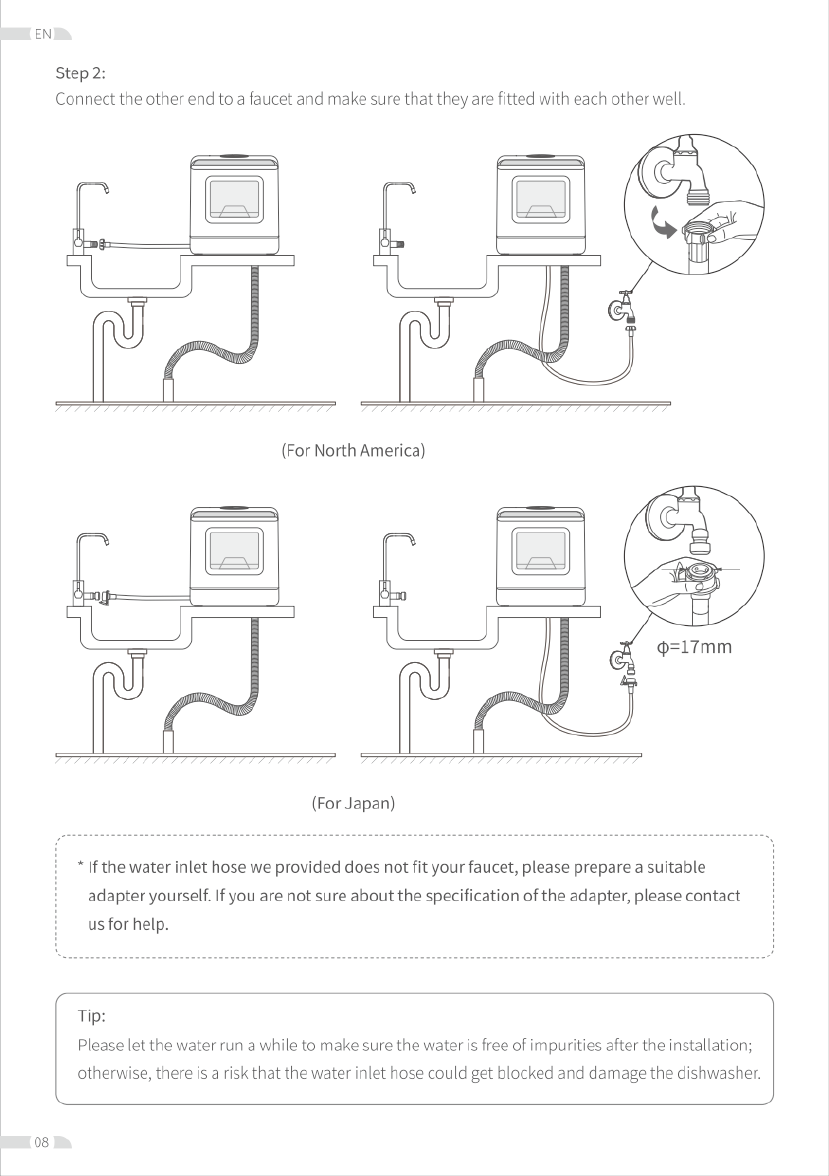
Step
2:
Connect
the
other
епа
to
а
faucet
and
make
sure
that
they
are
fitted
with
each
other
well.
(For
North
America)
(For
Japan)
*
If
the
water
inlet
hose
муе
provided
does
not
fit
your
faucet,
please
prepare
а
suitable
adapter
yourself.
If
you
are
not
sure
about
the
specification
of
the
adapter, please
contact
us
for
help.
Tip:
Please
let
the
water
run
а
while
to
make
sure
the
water
is
free
of
impurities
after
the
installation;
otherwise,
there
15
а
risk
that the
water
inlet
hose
could
get
blocked
апа
damage
the
dishwasher.
08
Table of contents


