EDER Maschinenbau Bark Stripper ESG-C User manual

Original
409001_01 | 12.2020
Operating instructions
EDER attachments with chain drive
Chainsaw attachment for working logs and wood
EN

1
Attachments with chain drive
409001_01 | 12.2020
Content
About this guide............................................................................2
Validity......................................................................................3
Warranty...................................................................................3
Presentation of the warning notes.............................................4
Symbols used in this manual.....................................................5
Safety instructions.........................................................................5
Intended use.............................................................................6
Improper use ............................................................................6
Qualification of the personnel....................................................6
Points to observe......................................................................7
Safety instructions for the workplace.........................................7
Behaviour in an emergency.......................................................7
Safety devices..........................................................................8
Personal protective equipment..................................................8
Design and function ......................................................................8
Function ...................................................................................8
EDER Bark Stripper Head ESG-C 400200............................8
EDER Flat Planer EPH-C 400600.........................................9
EDER Curved Planer ERH-C 400700 ...................................9
EDER Contour Planer EKH-C 401900 ................................10
EDER Groove Cutter ENF-C 400800..................................10
EDER Wire Brush ERB-C 401500.......................................10
EDER Bark Beetle Cutter EBF-C 400900............................11
Scope of delivery ........................................................................11
Check completeness of the delivery........................................11
Check transport damage.........................................................11
Transport................................................................................12
Assembly....................................................................................13
Mounting the attachment.........................................................13
Commissioning and operation.....................................................16

409001_01 | 12.2020
Attachments with chain drive
2
EN
Starting the engine..................................................................17
Operation....................................................................................17
Changing and adjusting the knives..........................................19
EDER Bark Stripper ESG-C................................................19
EDER Flat Planer EPH-C / EDER Curved Planer ERH-C....20
EDER Contour Planer EKH-C.............................................21
EDER Groove Cutter ENF-C...............................................22
EDER Wire Brush ERB-C...................................................23
EDER Bark Beetle Cutter EBF-C ........................................24
Cleaning .....................................................................................25
Maintenance...............................................................................26
Decommissioning and disposal ...................................................26
Faults..........................................................................................26
Technical data ............................................................................27
Accessories and spare parts...................................................27
Grooving knife for bark beetle control..................................28
EDER Bark Stripper ESG ...................................................29
EDER Flat Planer EPH.......................................................30
EDER Curved Planer ERH..................................................31
EDER Contour Planer EKH.................................................32
EDER Groove Cutter ENF ..................................................33
EDER Wire Brush ERB.......................................................34
Declaration of conformity.............................................................36

3
Attachments with chain drive
409001_01 | 12.2020
About this guide
Validity
These instructions apply to attachments (accessories) to be mounted on
chainsaws for debarking andmilling treetrunks andwood in thefollowing
variants:
EDER Bark Stripper ESG-C
EDER Flat Planer EPH-C
EDER Curved Planer ERH-C
EDER Contour Planer EKH-C
EDER Groove Cutter ENF-C
EDER Wire Brush ERB-C
EDER Bark Beetle Cutter EBF-C
They are aimed at forestry professionals and private individuals with
basic knowledge of wood processing.
The instructions contain important information on how to properly mount
the attachments on a chainsaw, start them up, operate them, use them,
maintain them and rectify simple faults yourself.
Warranty
Attachments are covered by the statutory warranty period. The seller
must be notified immediately of any defects that can be proven to be due
to material or assembly errors. Proof of purchase ofthe attachmentmust
be provided by presenting the invoice and receipt when making a claim
under the warranty. The warranty is excluded with regard to the parts if
the defects are caused by natural wear and tear, temperature, weather
conditions as well as defects resulting from faulty connection,
installation, operation, lubrication or force. Furthermore, no warranty is
given for damage caused by unsuitable improper use of the machine,
e.g. improper modifications or repair work carried out by the owner or
third parties under his or her own responsibility, or in the case of
deliberate machine overload. The manufacturer does not accept any
warranty for:
•Parts which are subject to natural wear and tear
•Non-compliance with the operating instructions and insufficient or
incorrect care
•The consequences of improper maintenance and servicing
•Damage from improper handling and incorrect operation
Guarantee
The warranty period shall be 24 months from the date of delivery for
exclusively private use, and 12 months for commercial or professional
use or application or for rental. The statutory warranty remains
unaffected. Warranty claims must always be proven by the buyer by
409001_01 | 12.2020
Attachments with chain drive
4
EN
means of the original purchase receipt. A copy of this is to be enclosed
with the warranty application. The buyer's address and machine type
must be clearly identifiable for professional or commercial use. Any
defects occurring within the warranty period due to material or
manufacturing faults must be remedied by repair if they have occurred
despite proper operation and care of the machine.
No guarantee or warranty
Using the chainsaw with the attachments will invalidate the chainsaw
warranty.
Eder Maschinenbau GmbH is not liable for any damage to the chainsaw
used. Use the chainsaw with the attachments at your own risk.
Wear items such as chains, sprockets, knives and guide bars are
excluded from the warranty.
Presentation of the warning notes
SIGNAL WORD
Type and source of the danger!
Consequences
➢Danger prevention
•The warning sign (warning triangle) draws attention to danger of
life or injury.
•The signal word indicates the severity of the danger.
•The paragraph "Type and source of danger" indicates the type or
source of danger.
•The paragraph "Consequences" describes the possible
consequences of not observing the warning.
•The paragraph "Danger prevention" indicates how to avoid the
danger. It is imperative that you comply with these measures for
averting danger!
!

5
Attachments with chain drive
409001_01 | 12.2020
The signal words have the following meaning:
Warning
word
Meaning
DANGER!
Indicates a hazard that will certainly lead to death
or serious injury if you do not avoid the danger.
WARNING!
Indicates a hazard that can lead to death or
serious injury if you do not avoid the danger.
CAUTION!
Indicates a hazard that can lead to minor or
moderate injury if you do not avoid the danger.
ATTENTION!
Indicates possible damage to property. The
environment, material assets or the plant itself can
be damaged if you do not avoid the danger.
Symbols used in this manual
Symbol
Meaning
If this information is not observed, this can lead to
deterioration in the operating process.
>
Instruction for action: Describes actions that must
be carried out.
Safety instructions
The attachments for chainsaws were manufactured in accordance with
the generally recognised rules of technology. Nevertheless, there is a
risk of personal injury and damage to property if you do not observe the
following basic safety instructions and the warnings preceding
instructions in this manual.
> Read these instructions thoroughly and completely before working
with the chainsaw attachment.
> Keep the manual in a legible condition.
> Make sure that the manual is always accessible to all users.
> Always pass on the chainsaw attachment to third parties together
with this manual.
i

409001_01 | 12.2020
Attachments with chain drive
6
EN
Intended use
The attachments are designed as interchangeable equipment for
mounting on chainsaws.
Only chainsaws that have been tested by Eder Maschinenbau GmbH for
compatibility with Eder attachments may be used as drive motors. An
overview can be found at www.eder-maschinenbau.de/
produkte/anbaugeraete-fuer-motorsaegen-produkte
The various attachments can be interchanged with each other. You may
only use the chainsaw attachments for the activities described in these
instructions. You must always respect the performance limits of the
device.
The attachments are approved for use in forestry as well as for private
use. It is designed exclusively for operation by one person. Never allow
two or more persons to work on one device.
Intended use also implies that you have read and understood this
manual in its entirety and in particular the chapters "Safety instructions"
and "Design and function".
Improper use
Any use not in accordance with the intended use is not permitted. The
following is considered improper use:
•removing or modifying safety devices,
•using the attachment in any other way than described in the chapter
"Intended use",
•mounting the attachment in any other way than described in the
chapter "Assembly",
•using the attachment under operating conditions that differ from those
described in this manual.
If the device is not used as intended, all warranty claims will become
void.
The manufacturer is not liable for damage to the device and for personal
injury resulting from improper use.
Qualification of the personnel
The attachments for chainsaws may only be mounted, operated,
maintained and repaired by persons who have familiarised themselves
with the device and the associated dangers by means of these
instructions.
Persons who assemble, operate, disassemble or maintain the
attachments must not be under the influence of alcohol, other drugs or
medicines that affect their ability to react, nor must they be tired, ill or
irritable.

7
Attachments with chain drive
409001_01 | 12.2020
Persons under the age of 18 may only use the device under the
supervision of a qualified person.
Points to observe
General safety instructions
> Always follow the instructions in this manual to avoid hazards and
prevent damage.
> Observe the relevant accident prevention regulations and other
generally recognised safety and occupational health rules.
> Only carry out repair, set-up, maintenance and cleaning work and
transport the device when the drive is switched off and the tool is
stationary.
> Operate the device exclusively with the protective equipment fitted
or provided by the manufacturer.
> Never leave the device unattended during operation.
> If you have long hair, wear a hairnet when working with the device.
> Do not smoke while refuelling or while working with the device.
> When using the device, observe the information on vibrations and
sound level given in the chapter Technical data.
Safety instructions for the workplace
> Ensure that the workplace and the traffic routes required for
transporting the wood to and from the site are safe.
> Keep the working area free of wood debris, obstacles and tripping
hazards. Eliminate slippery and smooth areas. Do not use sawdust
or wood ash for this purpose, otherwise there is a risk of slipping.
> Ensure adequate lighting at the workplace.
> Ensure that a level and step-resistant area with sufficient freedom of
movement is available for working.
> When using chainsaws with combustion engines, only work in well-
ventilated environments and not in enclosed spaces. Exhaust fumes
contain toxic carbon monoxide.
> Do not allow persons to approach the running device. Keep persons
and animals away from the workplace. Children, animals and adults
must keep at least 10 metres away from the running device.
> Never work in the rain as the stability in wet conditions is impaired.
> Do not leave the device standing in the rain.
Behaviour in an emergency
If, for example, malfunctions or dangerous situations pose an immediate
risk of injury to persons or damage to the device:
> Switch off the device to which the attachment is mounted.
409001_01 | 12.2020
Attachments with chain drive
8
EN
> Have the malfunctions eliminated by your specialist dealer.
Safety devices
Attachments may only be used with the protective and safety equipment
(e.g. protective plate) provided for the intended use. Protective and
safety equipment must never be disabled and must be cleaned if
necessary.
Personal protective equipment
> Always wear the following personal protective equipment when
operating the machine:
•Safety shoes with steel toecap
•Tight-fitting clothing, a hair net if necessary
•Suitable work gloves
•Safety helmet with face protection
•Hearing protection
•Cut-resistant trousers
The personal protective equipment must comply with
the applicable accident prevention regulations.
Design and function
Function
With the different versions of the attachment you can achieve different
contours when working the wood. The individual attachments can be
exchanged for another attachment in a few easy steps.
EDER Bark Stripper Head ESG-C 400200
Design: The ESG-C bark stripper head is mounted on a bar that
matches the chainsaw and is driven by a chain just like a normal
chainsaw. No modifications are required to the chainsaw.
Field of application: For peeling logs of any diameter.
The design of the cylinder results in high cutting performance with
minimum effort.
Tungsten carbide pins placed directly behind the knives are designed in
such a way that the distance between the knives and the log is
maintained automatically and independently of the bark thickness over
i
9
Attachments with chain drive
409001_01 | 12.2020
the entire length of the log. Knots and thin branches are easily and
cleanly milled off.
The cylinder is straight and mills a flat surface similar to that of the
peeling knife. This allows you to use the device at an angle or crosswise
when working on the side of the trunk and when peeling root knots.
For the processing of robinia wood we recommend the use of
the contour planer EKH.
EDER Flat Planer EPH-C 400600
Design: The EPH-C flat planer is mounted on a bar that matches the
chainsaw and is driven by a chain just like a normal chainsaw. No
modifications are required to the chainsaw.
Field of application: For planing flat or round wood surfaces from 30
cm diameter.
The design of the cylinder results in high cutting performance with
minimum effort.
The knives mounted on the rotating cylinder are continuously adjustable,
allowing you to set both the cutting radius and the cutting depth
according to the desired chip thickness.
On the cylinder there are four knives distributed on two levels, which
produce a smooth surface without vibrations.
EDER Curved Planer ERH-C 400700
Design: The ERH-C curved planer is mounted on a bar that matches
the chainsaw and is driven by a chain just like a normal chainsaw. No
modifications are required to the chainsaw.
Field of application: For planing round, flat or curved wood surfaces up
to 30 cm diameter.
The design of the cylinder results in high cutting performance with
minimum effort.
The knives mounted on the rotating cylinder are continuously adjustable,
allowing you to set both the cutting radius and the cutting depth
according to the desired chip thickness.
On the cylinder there are four knives distributed on two levels, which
produce a smooth surface without vibrations.
i
409001_01 | 12.2020
Attachments with chain drive
10
EN
EDER Contour Planer EKH-C 401900
Design: The EKH-C contour planer is mounted on a bar that matches
the chainsaw and is driven by a chain just like a normal chainsaw. No
modifications are required to the chainsaw.
Field of application: For planing straight and wavy wooden surfaces,
e.g. when building log houses, children's playgrounds, bonanza fences
and similar projects. Well suited for very hard woods such as robinia
wood.
The design of the cylinder results in high cutting performance with
minimum effort.
The adjustable minimum knife projection setting effectively prevents the
log from splitting. As one rotation of the cylinder means only one cut at
working width, the reaction forces are kept to a minimum. Knots and thin
branches are easily and cleanly planed off.
EDER Groove Cutter ENF-C 400800
Design: The ENF-C groove cutter is mounted on a bar that matches the
chainsaw and is driven by a chain just like a normal chainsaw. No
modifications are required to the chainsaw. Up to three knives of 10mm
width each can be used to achieve cutting widths up to 30mm.
Field of application: For milling channels and grooves in wood
surfaces, e.g. when building log houses, children's playgrounds, carving
sculptures and in similar projects.
The design of the milling head results in high cutting performance with
minimum effort.
Up to three knife discs can be mounted on the support, producing a
smooth surface without vibration.
EDER Wire Brush ERB-C 401500
Design: The ERB-C wire brush is mounted on a bar that matches the
chainsaw and is driven by a chain just like a normal chainsaw. No
modifications are required to the chainsaw.
Field of application: For processing and cleaning wood surfaces,
metallic surfaces such as steel or iron and for removing rust or old paint.
The EDER Wire Brush ERB is exceptionally suitable for working out the
natural structure of the wood grain on boards, beams and round timber,
e.g. during construction, restoration and maintenance work on log
houses, children's playgrounds, park benches, wooden fences, on
weathered and rotten wood and similar projects.

11
Attachments with chain drive
409001_01 | 12.2020
EDER Bark Beetle Cutter EBF-C 400900
Design: The EBF-C bark beetle cutter is mounted on a bar that matches
the chainsaw and is driven by a chain just like a normal chainsaw. No
modifications are required to the chainsaw.
Field of application: The device is suitable for carving the bark of trees
to destroy the habitat of bark beetles. Resin bleeds from the carved
areas and hardens on thesurface. This hinders thedevelopment of bark
beetle larvae. Furthermore, the decomposition of the scratched tree
trunk is promoted because it dries out less quickly than after debarking.
In addition, fungal spores and microbes find plenty of surface area to
attack in the scratches.
Scope of delivery
Check completeness of the delivery
The scope of delivery of the selected attachment includes:
•1x attachment
•1x Allen wrench 6 mm
•1x pin wrench
•1x setting gauge (ESG-C, EPH-C, ERH-C, EKH-C,)
•1x operating instructions
•1x groove nut wrench (EBF) / 2x groove nut wrenches (ERB)
The bar, chain and drive sprocket are not included in the scope of
delivery, as these must be selected depending on the chainsaw used.
Check transport damage
Visible transport damage can be recognized by packaging damage or
by scratched and deformed parts on the device.
> Be sure to make a note of the damage on the delivery note: both
on the copy you receive and on the one that you must sign.
> Make sure that the deliverer (driver) countersigns.
If the deliverer refuses to confirm the transport damage, you should
refuse to accept the delivery and inform us immediately. A claim in
retrospect, without a direct note on the delivery note, will not be
accepted either by the carrier or by the transport insurer.
If you suspect latent transport damage:

409001_01 | 12.2020
Attachments with chain drive
12
EN
> Report concealed transport damage within two days at the latest,
which means that you must have checked your delivered goods
within this period. Reporting damage after this time is usually not
accepted.
> Make a note on the shipping documents in any case: "Goods are
accepted subject to concealed transport damage".
Insurance companies of carriers often react very suspiciously and
refuse to provide compensation. Therefore, try to prove the damage
clearly (send a photo if possible).
Transport
CAUTION
Risk of injury by the attachment head!
The cutter head of the attachment has sharp-edged tools that can
cause injuries.
> Ensure that there is sufficient distance between thecutter head
of the attachment and persons.
> Carry the motorised handheld device with the cutter head of
the attachment facing backwards and the exhaust pipe turned
away from the body.
ATTENTION
Danger from leaking fuel!
If thefuel tank inlet isnot properlyclosed, fuelmay leak and pollute
the environment.
> Before transportation, check whether the fuel tank inlet is
correctly closed.
> When transporting the device on vehicles, secure it against
tipping over.
!

13
Attachments with chain drive
409001_01 | 12.2020
Assembly
WARNING
Danger during assembly with the drive motor running!
This may result in injury.
> Switch off the drive motor before assembling the unit and
secure the device against being switched on again.
Danger from changes to the device!
This may result in injury.
> Only carry out assembly work described in this manual.
> Do not adjust the support, the chain, the knives or the milling
head while the engine is running. The chain must be correctly
tensioned.
> Only use original spare parts. These can be ordered directly
from Eder Maschinenbau GmbH or from your dealer (see back
page for address)
Converting and using the chainsaw with the Eder
attachments voids the chainsaw's warranty. Eder
Maschinenbau GmbH accepts no liability for damage to the
chainsaw!
Mounting the attachment
ATTENTION
> Use a new sprocket on your chainsaw before using the
attachment. Retracted sprockets/chainrings can lead to
damage or higher wear on the drive chain.
> The sprocket/chainring used on the drive motor must have a
maximum of 7 teeth.
> When fitting, make sure you have the correct designation for
your sprocket/chainring. 3/8 LP, 3/8 Micro, 3/8 Hobby, 3/8
Picco etc. are not compatible with 3/8".

409001_01 | 12.2020
Attachments with chain drive
14
EN
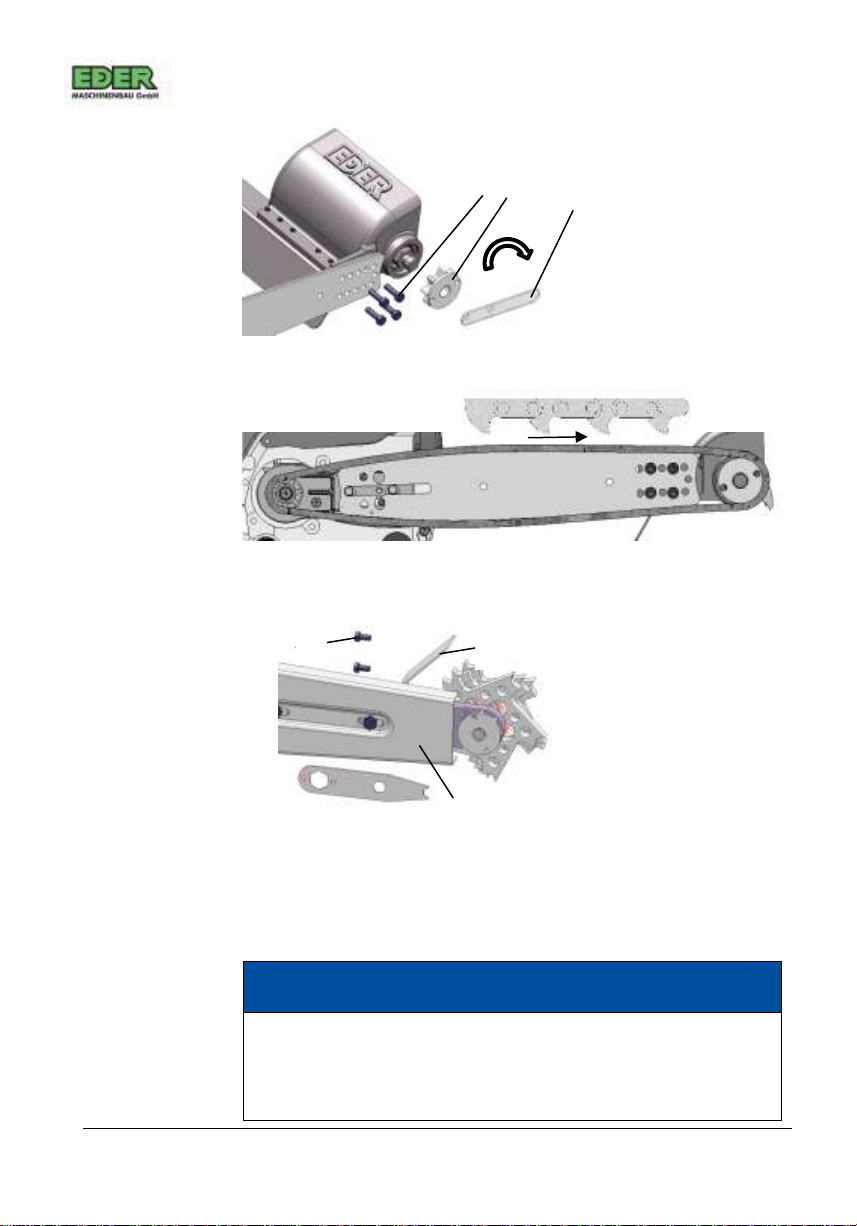
> Place the guide bar (1 - Fig.1) between the screws (2 - Fig.1) in the
same way as a normal chainsaw bar.
> Note that the bar is not symmetrical. The oil holes are in different
positions on the two sides of the bar. Choose the correct side of the
guide bar depending on the chainsaw used.
> Check that the oil hole of the guide bar is on the oil groove of the
chainsaw - if not, turn the guide bar over. (To check the position,
clean the saw around the oil groove and apply some oil in the oil
groove. Then place the guide baragainst the chainsaw in its intended
position and carefully remove it again. The oil in the groove then
leaves a mark on the bar).
> The hole (3 - Fig.1) in the support must be located at the chain
tensioner driver. Depending on the type of chainsaw, this is mounted
on the motor side or in the cover (4 - Fig.1).
> Screw the head you want to use with the 4 M6x20 screws (1 - Fig.
2). Check the screws regularly for tightness. The head can be
screwed on in different positions depending on the chainsaw model.
The correct position is the one that allows the drive chain to be
sufficiently tensioned and re-tensioned.
> Screw the drive sprocket onto the housing (2 - Fig.2) and tighten it
with the pin wrench (3 - Fig.2).
> Now place the chain around the chainsaw sprocket and around the
drive sprocket. Insert the drive links into the rail. Make sure that the
chain is running in the correct direction (Fig. 3
Fig. 1: Mounting the support
2
1
3
4
15
Attachments with chain drive
409001_01 | 12.2020
Fig. 2: Fastening the peeling head to the support
Fig. 3: Putting on the chain
> Fit the protective plate to the guide bar (1 –Fig. 4).
Fig. 4.: Mounting the protective plate
> The groove cutter has another protective plate (2 -Fig.4). This
is screwed to the housing with two hexagonal screws (3 - Fig.4).
ATTENTION
Chain and drive sprocket pitch
Only use chains and drive sprockets matching the chainsaw and
having the same pitch.
1
2
3
3
3
1
3
1

409001_01 | 12.2020
Attachments with chain drive
16
EN
ATTENTION
> Put the side plate back on the device, slightly fasten it and tension
the chain. A new chain needs to be retensioned more often. Check
the chain tension more often.
> Tighten the screws of the side plate firmly.
ATTENTION
Chain tension
> Check the chain regularly for correct chain tension. To do this,
always switch off the engine!
> The chain is correctly tensioned if you can pull it slightly out of
the guide bar by hand with the chain brake released. The
chain must not be lifted more than 4 mm from the guide bar.
Commissioning and operation
ATTENTION
Damage to knives and tools!
Nails, adhering sand and other foreign bodies can damage the
knives and tools of the attachment.
> Check the logs to be worked before each use. If necessary,
remove nails, sand and other foreign objects before milling.
Before starting the motorised handheld device, make sure you have safe
working conditions. Check that
> the attachment has been correctly mounted,
> the chain is sufficiently tensioned and not damaged,
> the chain brake is functional,
> all knives and tools are correctly mounted and firmly seated
(tightening torque 35 Nm)
> the handles are clean and dry,

17
Attachments with chain drive
409001_01 | 12.2020
> both the fuel tank and the device are located outside of flammable
environments. Note that closed, empty fuel tanks may contain
explosive vapours.
Starting the engine
CAUTION
Danger of injury due to rotating tools!
After you have released the throttle trigger, the device will continue
to rotate for a short time (freewheel).
> Before starting the engine, make sure that all protective
housings and protective plates are fitted to the attachment.
> Place the motorised handheld device on the ground so that the
device does not touch any foreign objects.
> Never start the device in a hanging position.
> Keep the device away from your body during work.
> Make sure that no one is in the working area of the device.
Operation
WARNING
Risk of injury due to unsafe standing position!
There is a risk of injury if your standing position is not stable or if
you work overhead.
> Always take a safe and stable position.
> Never work on icy or wet surfaces, as there is a risk of slipping.
> Never work on ladders or in unstable positions.
> While working, hold the device firmly with both hands so that
no parts of the body can approach the chain, the tool head or
the exhaust pipe. Grasp firmly the throttle handle with your
right hand and the front handle with your left hand. This also
applies to left-handed persons.
> Do not hold the device above your head when working and
always use both hands when working.
> Work calmly and carefully with good visibility and adequate
lighting.
Risk of injury!

409001_01 | 12.2020
Attachments with chain drive
18
EN
WARNING
If you do not observe the following points, injuries are possible due
to rebounding of the device.
> Only work on wood with the device (except for the Wire Brush
ERB-C).
> During work, make sure that the cutter head does not touch
any foreign objects (stones, glass, metal objects, etc.) that
could damage the cutter head or the chain
> When the engine is running, place the cutter head or wire
brush on the trunk surface only at operating speed.
> Make sure that the throttle trigger is not blocked by the throttle
lock when working with the device, as in this case it is not
possible to control the rotation.
> Check that the knives are firmly seated before each use.
> Switch off the device before putting it down.
ATTENTION
Chain brake
> On some models, frequent use of the chain brake at high
speeds can damage the drive motor.
> Only use the chain brake in emergency and dangerous
situations, with the engine running idle or when the engine is
switched off
ATTENTION
Lubrication
> After each replacement of the guide bar, check whether oil is
being pumped through the groove of the bar. To dothis, switch
the engine off again after a short running time.
> Note that the chain and the guide bar may be hot.

19
Attachments with chain drive
409001_01 | 12.2020
Changing and adjusting the knives
ATTENTION
Damage due to blunt knives
Regularly check the cutting edges of the knives
> Working with blunt knives can damage the knives and the
bearing.
> If necessary, sharpen the knives or replace them.
Suitable tool
> Use a suitable torque wrench to tighten the knives. Never
tighten them with an extension wrench or using a hammer.
EDER Bark Stripper ESG-C
Sharp knives are required for optimal work with the EDER Bark Stripper
ESG-C. Blunt knives can be sharpened manually using normal grinding
wheels. Cutting edge angle is 40°.
The required knife setting depends on the type of wood to be peeled.
Adjust the knives from case to case.
The smaller the knife protrusion, the less wood is removed and
the smoother the surface becomes.
Fig. 5: Knife adjustment
The tungsten carbide pins on the knife discs serve as depth limiters. All
four knives must therefore have the same setting and the same distance
to the carbide pins. The knives must not protrude beyond the tungsten
carbide pins.
All four knives are replaced and adjusted in the same way. Proceed as
follows for each knife:
> Loosen the Allen screw of the knife with a 6 mm Allen wrench.
i
i
3
2
1
This manual suits for next models
13
Table of contents
Popular Chainsaw manuals by other brands


Poulan Pro
Poulan Pro 1980-02 owner's manual

Husqvarna
Husqvarna 439 Operator's manual

Makita
Makita UC 4001A instruction manual

Husqvarna
Husqvarna 55 Rancher Operator's manual

Sievert Crane & Hoist
Sievert Crane & Hoist LITTLE MULE FEL Series Operating and maintenance manual

Ryobi
Ryobi OCS1830 Original instructions


