EENOUR Mate 2 User manual

Portable Air Conditioner
for Tent Camping
Model Name:Mate 2
Model No.: SQN750
User Manual
V1.0

WARNING:
⚫Before using this product, please read this manual carefully and keep it for future
reference.
⚫The specifications and design are subject to change without prior notice for
product improvement or upgrade.
⚫All illustrations in this manual are for illustration only.
⚫Consult with your dealer or manufacturer for more detail.

SAFETY PRECAUTIONS
Read this manual:
You’ll find many helpful tips inside about how to use and maintain your air conditioner properly.
You’ll find many answers to common problems in the troubleshooting tips. You should be
able to fix most of them quickly before calling service.
This manual may not cover every possible condition of use, so common sense and attention
to safety is required when installing, operating and maintaining this product.
CAUTION:
⚫Contact with the authorized service technician for repairing or maintaining this
product.
⚫The air conditioner is not intended for use by young children or anyone unable
to operate it independently.
⚫When using this product in the presence of children they should always be
supervised.
⚫If the power cord needs to be replaced, please contact our consumer service to
find an authorized technician.
⚫Electrical installation must be performed in accordance to national regulation
standards by qualified personnel only.
CAUTION: This symbol indicates possibility of injury or damage to property.
⚫This product is not intended for use by persons (including children) with reduced physical, sensory
or mental capabilities, unless they have been given supervision or instruction concerning use of the
product by a person responsible for their safety.
⚫This product should be installed in accordance with national wiring regulations.
⚫If the power cord is damaged, it must be replaced by the manufacturer its service agent or similarly
qualified persons in order to avoid a hazard.
⚫Do not run the power cord under carpeting. Do not cover cord. Do not route cord under furniture or
appliances. Put cord away from traffic area and where it might be tripped over.
⚫Contact with the authorized service technician for repairing or maintenance.
⚫Prior to maintenance or cleaning, the product must be disconnected from electricity.
⚫Do not install the product in a location that may be exposed to combustible gas. If combustible gas
accumulates around the unit, it may cause fire.

To prevent injury to the user or other people and property damage, the following
instructions must be followed.
WARNING: This symbol indicates the possibility of death or serious injury.
⚫Installation must be performed according to the installation instructions. Improper installation may
cause water leakage, electrical shock, or fire.
⚫Use only the included accessories and parts, and specified tools for the installation. Using non-
standard parts may cause water leakage, electrical shock, fire, and injury or property damage.
⚫Make sure that the power outlet you are using is grounded and has the appropriate voltage. The
power cord is equipped with a three-prong grounding plug to protect against shock. Voltage
information can be found on the side of the unit.
⚫DO NOT modify the length of the power cord or use an extension cord to power this product. Do
not share a single outlet with other electrical appliances. Improper power supply can cause fire or
electrical shock.
⚫Install the air conditioner on a flat, sturdy surface. Fail to do so could result in damage or excessive
noise and vibration.
⚫The air conditioner must be kept free from obstruction to ensure proper functioning and to mitigate
safety hazards.
⚫DO NOT install your air conditioner in a wet room such as a bathroom or laundry room. Exposure
to water can cause electrical components to short circuit.
⚫DO NOT install your air conditioner in a location where may be exposed to combustible gas, as this
could cause fire.
⚫DO NOT operate a unit that has been dropped or damaged.
⚫Only use the included accessories and specified parts for installation. Using nonstandard parts may
cause water leakage, electrical shock, fire and injury or property damage.
⚫DO NOT allow children to play with the air conditioner. Children must always be supervised around
the unit.
⚫In a thunderstorm, the unit should be turned off to avoid damage due to lighting.
⚫If the air conditioner is knocked over during use, turn off the unit and unplug it from the main power
supply immediately. Visually inspect the unit to ensure there is no damage. If you suspect the unit
has been damaged, contact a technician or customer service for assistance.
Notes on fluorinated gases
⚫This air conditioning unit is a sealed unit containing a fluorinated gas. For information
on the specific gas types and quantities, see the relevant label on the device or
specification. This product does not support user adding refrigerant themselves.
⚫Maintenance or repair of this device must be performed by a certified technician.
⚫Product recycling must be performed in accordance with local regulation.

Profile of Mate 2
Mate 2 is built with a 24V DC high-performance micro inverter compressor, and specified
design air duct system. It can drop down the outlet temperature 25 ℉ than ambient
temperature in 10 minutes. The product was designed to achieve compact size and
lightweight, with classic handle for easy carrying. Power consumption 200w~240w per hour,
2kwh battery is able to last working about 10 hours.
1.Control Panel
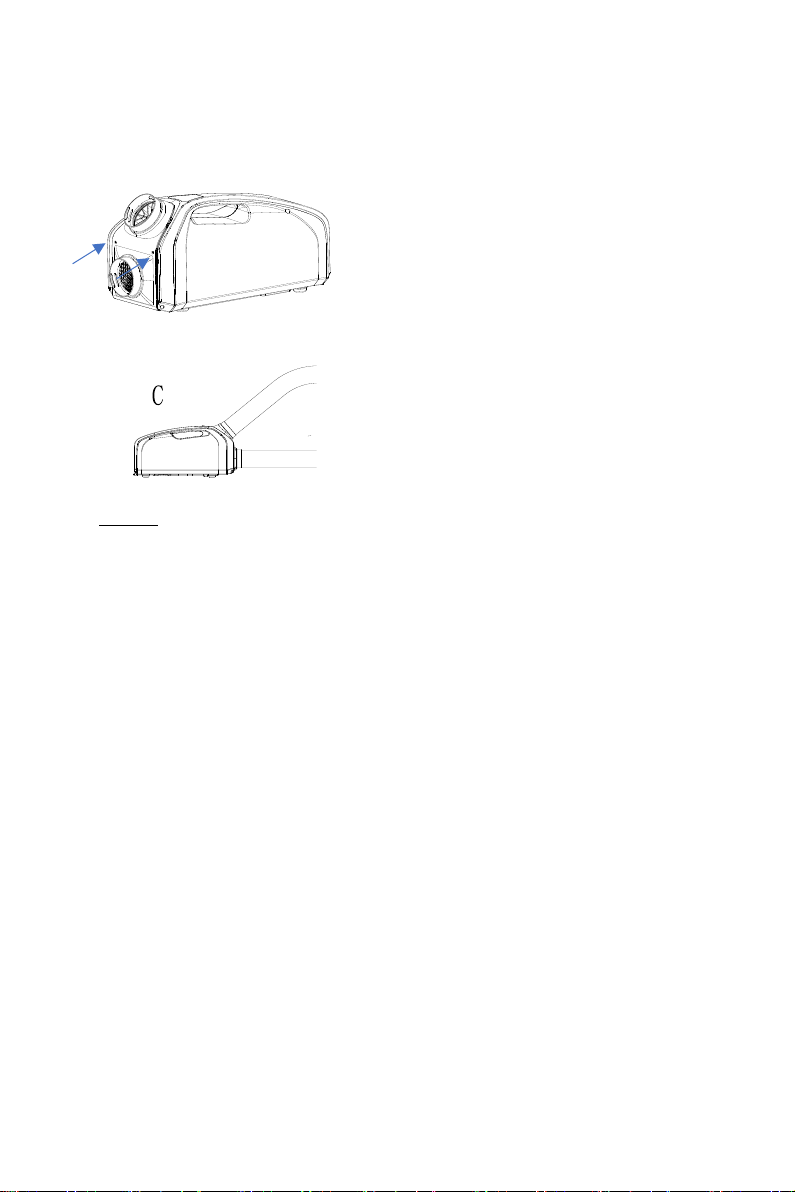
2.Outlet of cooled air
3.Inlet of air to evaporator
4.Inlet of air to condenser
5.Exhaust air outlet
6. Drain
7. Power input
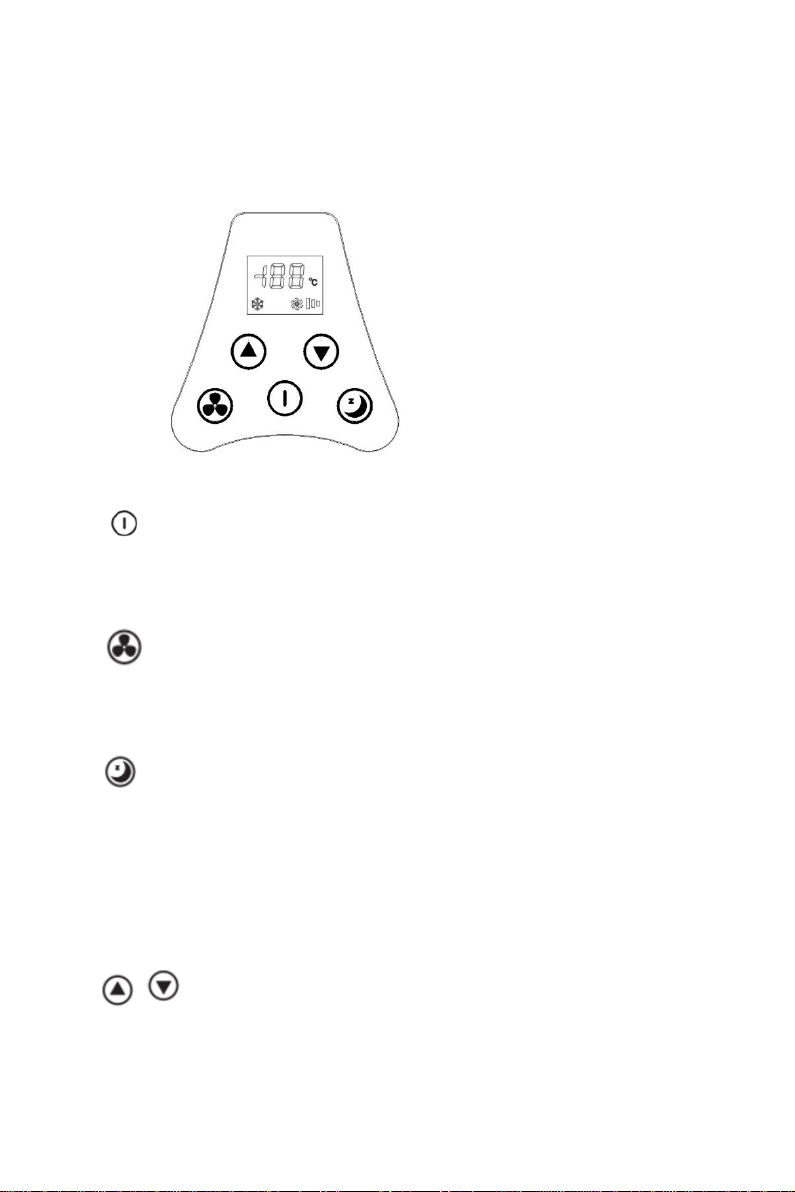
Control Panel and Display
On/Off
Long press to turn on/off the unit
Press the FAN button, choose the
1~3 Fan speed.
SLEEP mode
Long press the SLEEP mode button,
The COOLING mode is off, the SNOW icon will disappear,
the compressor and exhaust fan will be turned off.
In SLEEP mode, Long press the SLEEP mode button, will switch to COOLING mode.
Temp. + / Temp.- (Adjust range: 16 ℃~30℃)
USE YOUR Mate 2
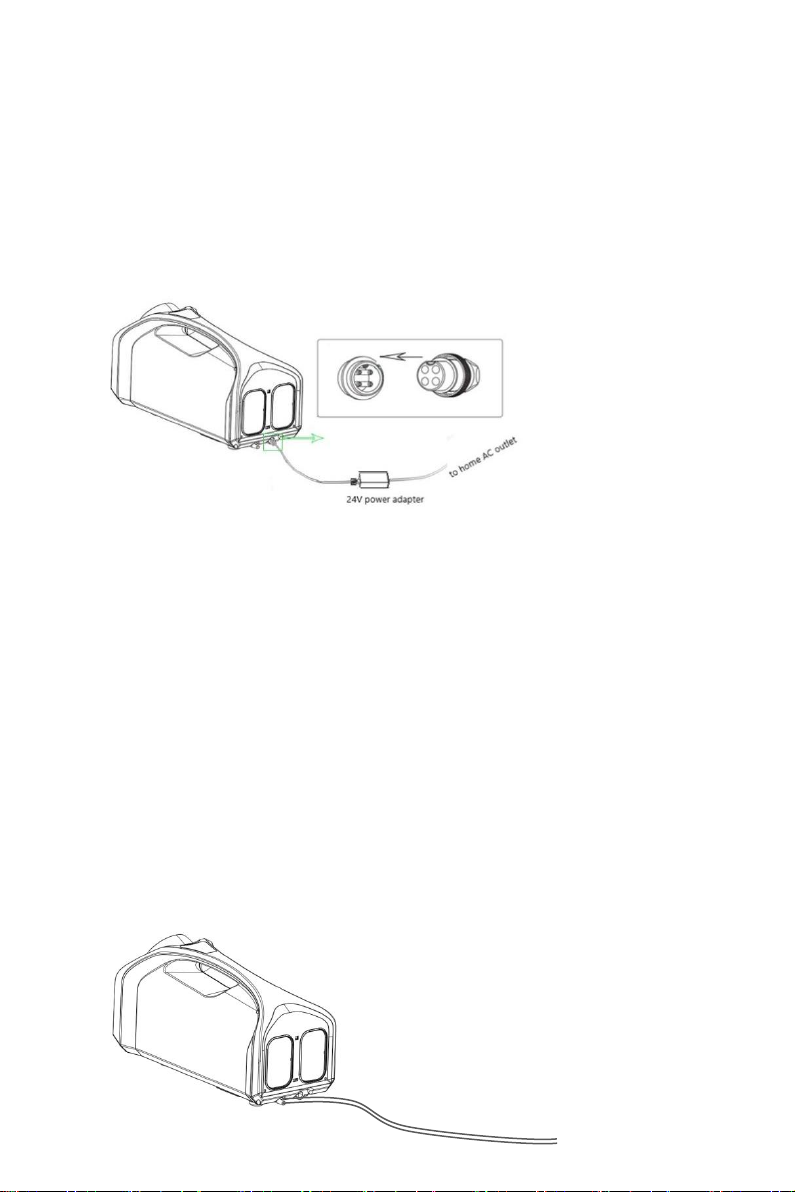
Operation with power supply
Option 1: Air conditioner power interface → power adapter → Home AC
100~240V(50Hz/60Hz)
Option 2: Air conditioner power interface → DC power station (24V, 10A)
Option 3: Air conditioner power interface → Solar panel (24V, 10A)
Note:
⚫The plug-in T on the power port corresponds to the adapter plug.
⚫An additional power cable is provided to allow for multiple applications of the product,
this device can be used with your outdoor batteries, RV power supply, etc. (Must meet
DC 24V standard, at least 10A current supply.)
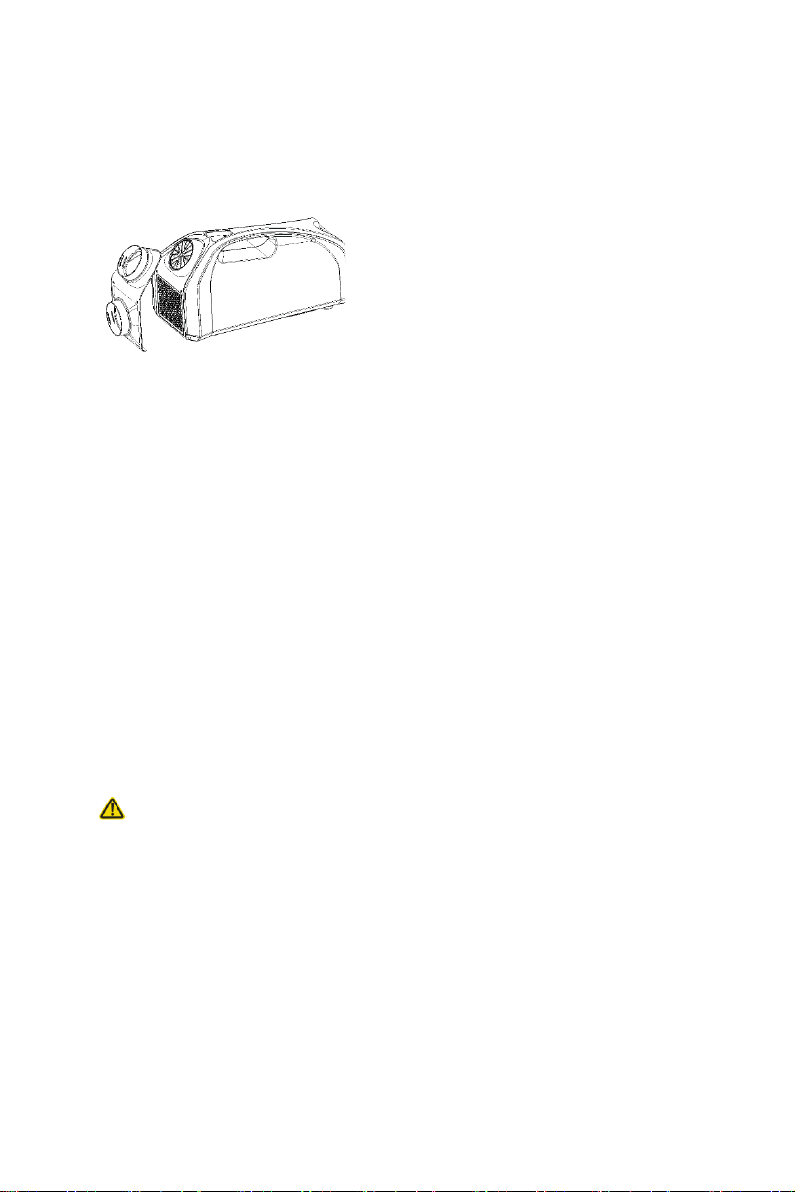
Accessory Connection Drain pipe connection
instructions

Connect the drain pipe to the drain and place the other end of the drain pipe into a container
or drain area.
⚫Take care not to place the drain hose close to the power supply.
⚫Make sure that the hose is fastened and that there are no leaks and no kinks that
impede the flow of water. Make sure that the end of the hose is facing down to allow
the water to flow smoothly.
Accessory Connection Exhaust hose connection
instructions
Process: Twist the air duct pipes into Venting hose connection adapter → Assemble
connection adapter to exhaust (stick the locating pins and hook at the bottom edge of adapter
to the corresponding holes, then push the release button to make sure adapter fixed
well→Adjust the length and direction of pipe.
When using the Mate 2 in a large space or outdoor open space, the Mate 2 is equivalent to
a cooler, without the need to connect the exhaust hose.
When using in a small confined space and want to cool down the space, please connect the
exhaust hose and place it properly.
WINDOW INSTALATION INSTRUCTION
1. Use a foam board as the window baffle.
2. DIY to cut out a circle holes with diameter of 10.2cm.
3. Use a utility knife to cut off the excess. If the size is not enough big, cut out some other
foam and stick them together.
4. Choose the right angle and place it on the window. Close the window and insert the
exhaust pipe into the round hole. Use duct tape to stick and seal up the gap between
pipe and the hole if necessary.
Cautions when placing exhaust hose
⚫To ensure proper functioning, do not extend or bend the hose excessively.
⚫Make sure there are no obstacles around the exhaust hose outlet for the exhaust
system to work properly.
Accessory Connection Clod Air Extension Pipe Connection
instructions
uct connection adapter to outlet of cooling air (Insert the bottom DAssemble Process:
edge of adapter into the hooks on the front side of inlet of evaporator, then screw
in the screws. → Twist the air duct pipes into duct connection adapter →Adjust the length
and direction of pipes.
This accessory can be used in some environments, such as the cab, RV, where it is not
convenient to place the Mate 2 for cold air reaching the position you want.
After installation, hold the adapter with one hand when pulling the air duct to the desired
position.
USE ENVIRONMENT
Your installation location should meet the following requirements:
⚫Make sure that you install your air conditioner on an even surface to minimize noise
and vibration.
⚫If using with a power adapter, the device must be put near a grounded plug.
⚫When the device is working and the air duct is not connected, make sure that there is
no obstruction in the exhaust air inlet and outlet at least 100cm, and there is no
obstruction in the front supply air and inlet at least 30cm.

Caution:
Please put Mate 2 flat for more than 30 minutes before the first time power on, or
after long distance bumpy transportation.
Please place Mate 2 smoothly, not tilted, not upside down when using it.
Placed in a tent
Suggestions:
⚫Pay attention to tent insulation. If the tent is poorly insulated, cover the tent with
an insulated mat.
⚫Pay attention to the tightness of the tent. For tents with vents, close or cover the
vents.
⚫Pay attention to shade the tent, it is recommended to use it in the shade.
⚫If it is a large tent, beyond the cooling range of Mate 2, please add one or more
air conditioners, or create a small cooling space with a cloth partition in the tent.

Care and Cleaning
⚫Always turn off and unplug power supply of the device before cleaning or servicing.
⚫DO NOT use flammable liquids or chemicals to clean the device.
⚫DO NOT wash the device under running water. Doing so may causes electrical danger
and damage.
⚫Always clean the device using a damp, lint-free cloth and mild detergent. Dry the
device with a dry, lint-free cloth.
Malfunction Diagnosis
Symptom
Possible Cause
Solution
Control Board no
Control board and control
Contact the consumer service.

displaying.
board connection fails.
Error code ‘E*’
Unit functional fails.
Contact the consumer service.
Temp. displays
abnormally.
Temp. sensor error.
Contact the consumer service.
Unit does not cool well.
The unit doesn’t work at cool
mode.
Stop working mode of SLEEP.
Exhaust hose is not
connected or is blocked.
Turn off the unit, check the hose
and reconnect it.
The room area is too large.
Confirm the cooling area.
The windows and doors are
open.
Make sure the room are closed.
There are heat source inside
the room.
Remove the heat source if
possible.
The unit is low on refrigerant.
Contact the consumer service.
The unit is noisy and
vibrates too much.
The floor is not level.
Place the unit on a flat, hard
surface.
The unit makes a
gurgling sound.
The sound is caused by the
flow of refrigerant.
This is normal.
Unit stops frequently.
The exhaust hose is blocked
or restricted.
Remove the exhaust hose to
check if the unit runs again. If
yes, shorten the hose and
reduce the bends or eliminate
the restriction.
Specification
Model No.
SQN750
Refrigerant
R134a
Cooling Capacity
2550BTU
Rated Voltage
DC 24V
Rated Current
10A
Net Weight
10kg
Pack Weight
14kg
Unit Dimension(mm)
582(L)*260(W)*314(H)
Water Proof
IPX 4
Noise
~50 dba
Working temp.
3-42℃ (37-1070℉)
Accessories

Hot dissipation duct adapter
1pc
Cold wind duct adapter
1pc
Screw for Cold wind duct
adapter(M4*12)
2pcs
Duct pipe
2pcs
AC/DC power adapter
(*Optional)
1pc
Drain pipe
1pc
DIY cord with M16-4 conn
ector
1pc
Statement
Please note that below situation or inappropriate operation will cause no warranty of this
product:

⚫Did not follow the instruction to operate it.
⚫If the product is found damaged, was not stopped operation and disconnected with
power.
⚫If the product was damaged mechanically or due to overvoltage.
⚫If the product was being modified, repaired or transformed without a written permission
from our company.
This manual suits for next models
1
Table of contents
Popular Air Conditioner manuals by other brands


Friedrich
Friedrich Chill CP18 Installation and operation manual

OMAS
OMAS Air-Fi AFT7 Installer and User Instruction Manual

GE
GE AGE07 Owner's manual and installation instructions

GE
GE AHE18 Series Owner's manual and installation instructions

Technibel
Technibel MCAV77C5VAB Technical data & service manual

Carrier
Carrier 42TOVG010 owner's manual


