EF BO-AE 5640 SS-TN Assembly Instructions

BO-AE 5640 SS-TN


2
USER INSTRUCTIONS
GENERAL WARNINGS
Read carefully all the instructions contained in this booklet. It provides you with important information regarding
the safe installation, use and maintenance of the appliance as well as useful advice for getting the best out of your
oven. Keep this booklet in a safe place for future reference. After removing the packing, check that the appliance is
not damaged in any way.
Be careful not to leave the packing materials (plastic sheeting, expanded polystyrene etc.) where children can get at
them, as they can be dangerous.
IMPORTANT: do not use the oven door handle to move the appliance, such as to remove it from the
packaging
The first time you switch the oven on, acrid smelling smoke may appear. This is caused by the heating of the
adhesive used on the insulation panels surrounding the oven. There is nothing unusual about this. If it happens,
simply wait until the smoke disappears before putting any food in the oven. Never roast or bake on the oven base.
Safety is a good habit to get into
Ƽ This appliance is designed for non-professional, household use and its functions must not be changed.
Ƽ The electrical system of this appliance may be used safely only when it is correctly connected to an efficient
earthling system in compliance with the safety standards currently in effect.
Ƽ The manufacturer will not be held liable for any damages that might arise out of incorrect installation or
improper, incorrect or unreasonable use of the appliance.
ATTENTION
The oven is an appliance which, for its nature, becomes hot, especially in correspondence of the glass door.
It is therefore a good rule that children do not approach the oven when it is functioning, particularly when
the grill in used.

3
The following items are potentially dangerous, and therefore, appropriate measures must be taken to prevent
children and the disabled from coming into contact with them:
-Controls and the appliance in general;
-Packaging (bags, polystyrene, nails, etc.);
-The appliance immediately after use of the oven or grill due to the heat generated;
-The appliance when no longer in use (potentially dangerous parts must be made safe).
Avoid the following:
-Touching the appliance with wet parts of the body;
-Using the appliance when barefoot;
-Pulling on the appliance or the supply cord to unplug it from the electrical outlet;
-Obstructing the ventilation or heat dissipation slots;
-Allowing power supply cords for small appliances to come into contact with the hot parts of the appliance;
-Exposing the appliance to atmospheric agents (rain, sun);
-Using the oven for storage purposes;
-Using flammable liquids near the appliance;
-Using adaptors, multiple sockets and/or extension cords;
-
Attempting to install or repair the appliance without the assistance of qualified personnel.
Accessible parts will become hot when in use. To avoid burns and scalds children should be kept away
During usage, the appliance becomes hot, care should betaken to avoid touching heating elements inside
the oven.
Qualified personnel must be contacted in the following cases:
-Installation (following the manufacture’s instructions);
-When in doubt about operating the appliance;
-Replacing the electrical outlet when it is not compatible with the plug for the appliance.
WARNING

4
Service Canters authorized by the manufacturer must be contacted in the following cases:
-If in doubt about the soundness of the appliance after removing it from the packaging;
-If the power supply cord has been damaged or needs to be replaced;
-If the appliance breaks down or functions poorly; ask for original spare parts.
It is a good idea to do as the following:
-Only use the appliance to cook food, nothing else;
-Check the soundness of the appliance after it has been unpacked;
-Unplugged the appliance from the electrical mains if it is not functioning properly and before cleaning or
performing maintenance;
-When the appliance is not used for an extended period of time, unplugged the appliance and close the gas
cock (it present);
-Use cooking gloves to place cookware in the oven or when removing it;
-Always grasp the oven door in the centre because the ends may be hot due to the escape of hot air;
-Make sure that the control knobs are on the “o”setting when the appliance is not in use;
-Unplug the appliance when you decide not to use the appliance any longer.
Ƽ The manufacturer may not be held responsible for any damage due to: incorrect installation, improper,
incorrect and irrational use.
The ovens are designed to operate with a monophase alternating current of 220-240V 50Hz. anyway, before the
installation of the appliance, we suggest you to check always these specifications on the rating label applied on
the outside rear part.
Powers absorbed in accordance with models Accessories according to models
Oven lower heating el. 1200Watt Oven inside hearting el. 1900 Watt Synchromotor 4 Watt
Oven upper heating el. 1000Watt Total grill heating el. 1000+1900 Watt Shaded motor (back) 25 Watt
Oven light 15Watt Circle heating el. 2100Watt Shaded motor (top) 15Watt
Overall dimensions for oven volume: width 436mm-height 315mm-depth 410mm=56liters
SPECIFICATION

5
INDICATOR LIGHTS
The indicator lights situated above the control panel go on and off when the heating elements are inserted or
removed. During the thermostatic functioning of the oven, the neon light remains on until the pre-chosen
temperature is reached and when it goes out, this is a sign that the temperature has been reached. When the oven
cools, the thermostat determines the re-insertion of the heating elements with consequent re-lighting of the
indicator lights. In models the internal oven light, which is always on when any function is in operation, is
considered as an operation, is considered as an operating warning light.
performing installation or maintenance!
Installation should be carried out according to the
instructions by a professionally qualified person.
The manufacturer declines all responsibility for
any damage to persons, animals or things due to a
wrong installation.
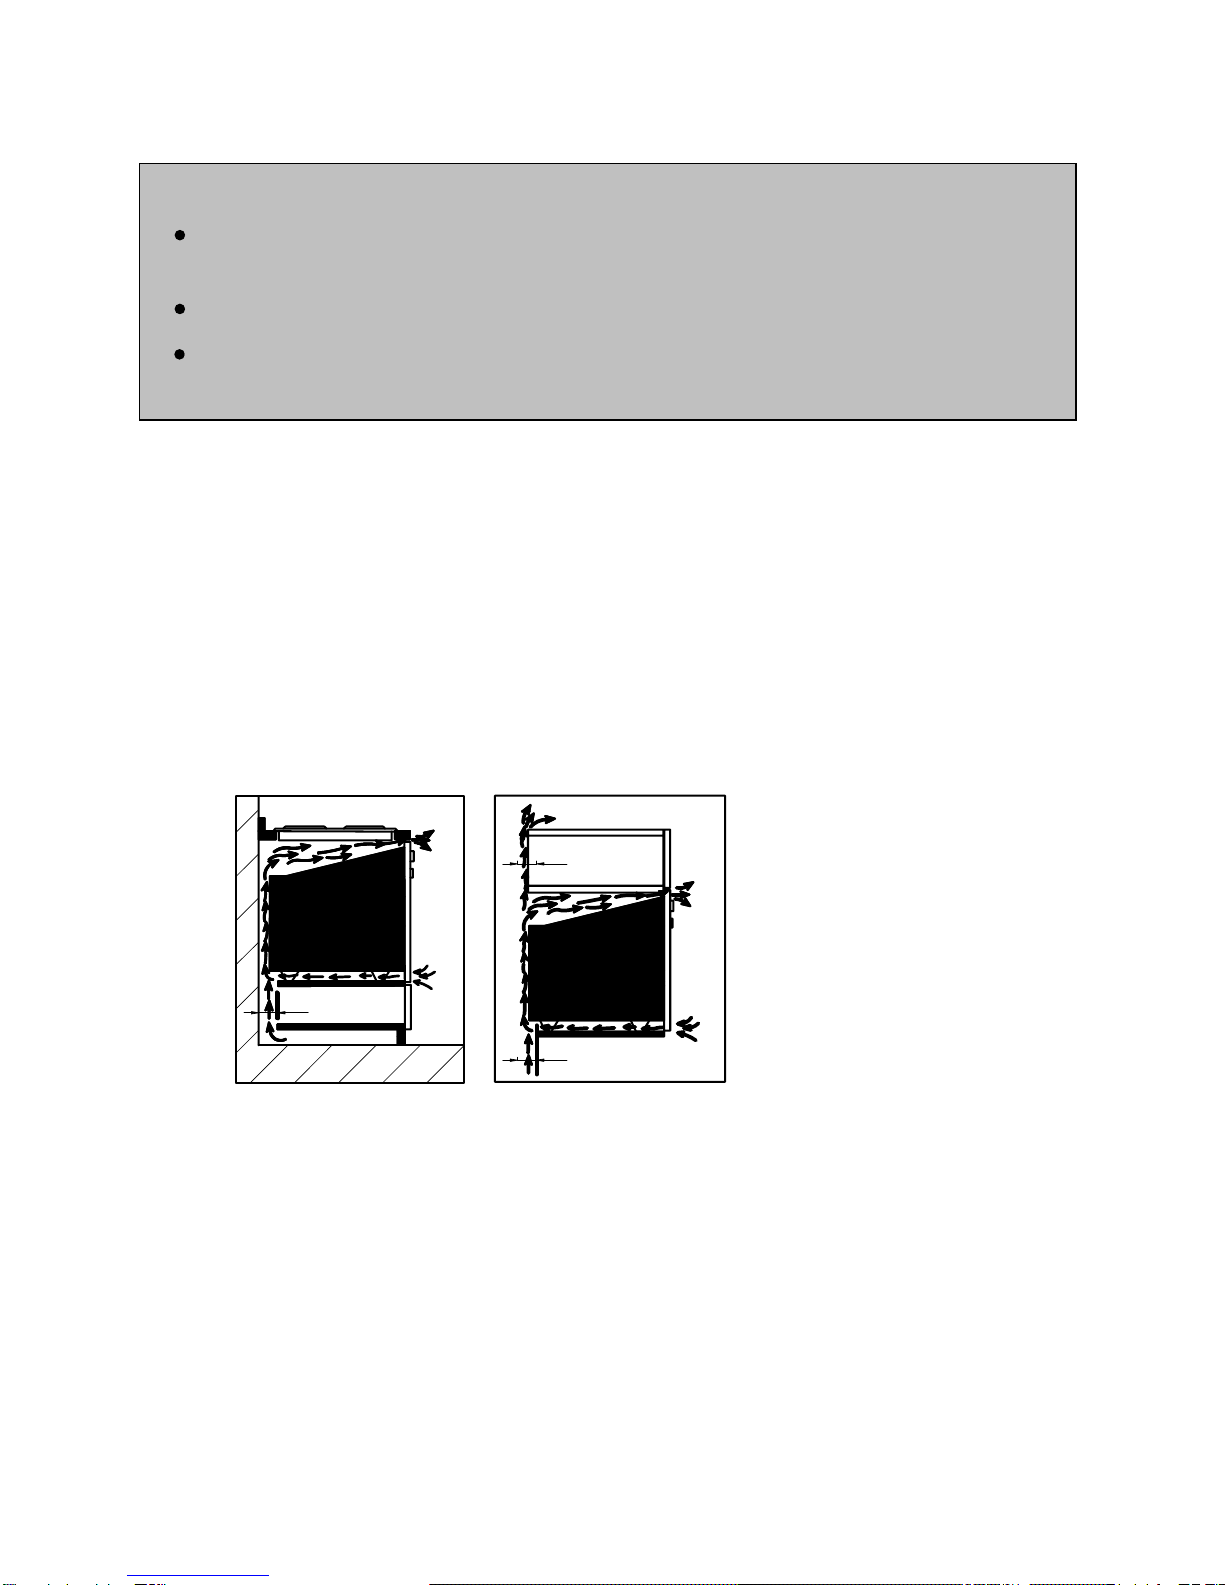
- Fit the appliance into its surround (beneath a work-top or above another appliance) by inserting screws into the 4
holes that can be seen in the frame of the oven when the door is open.
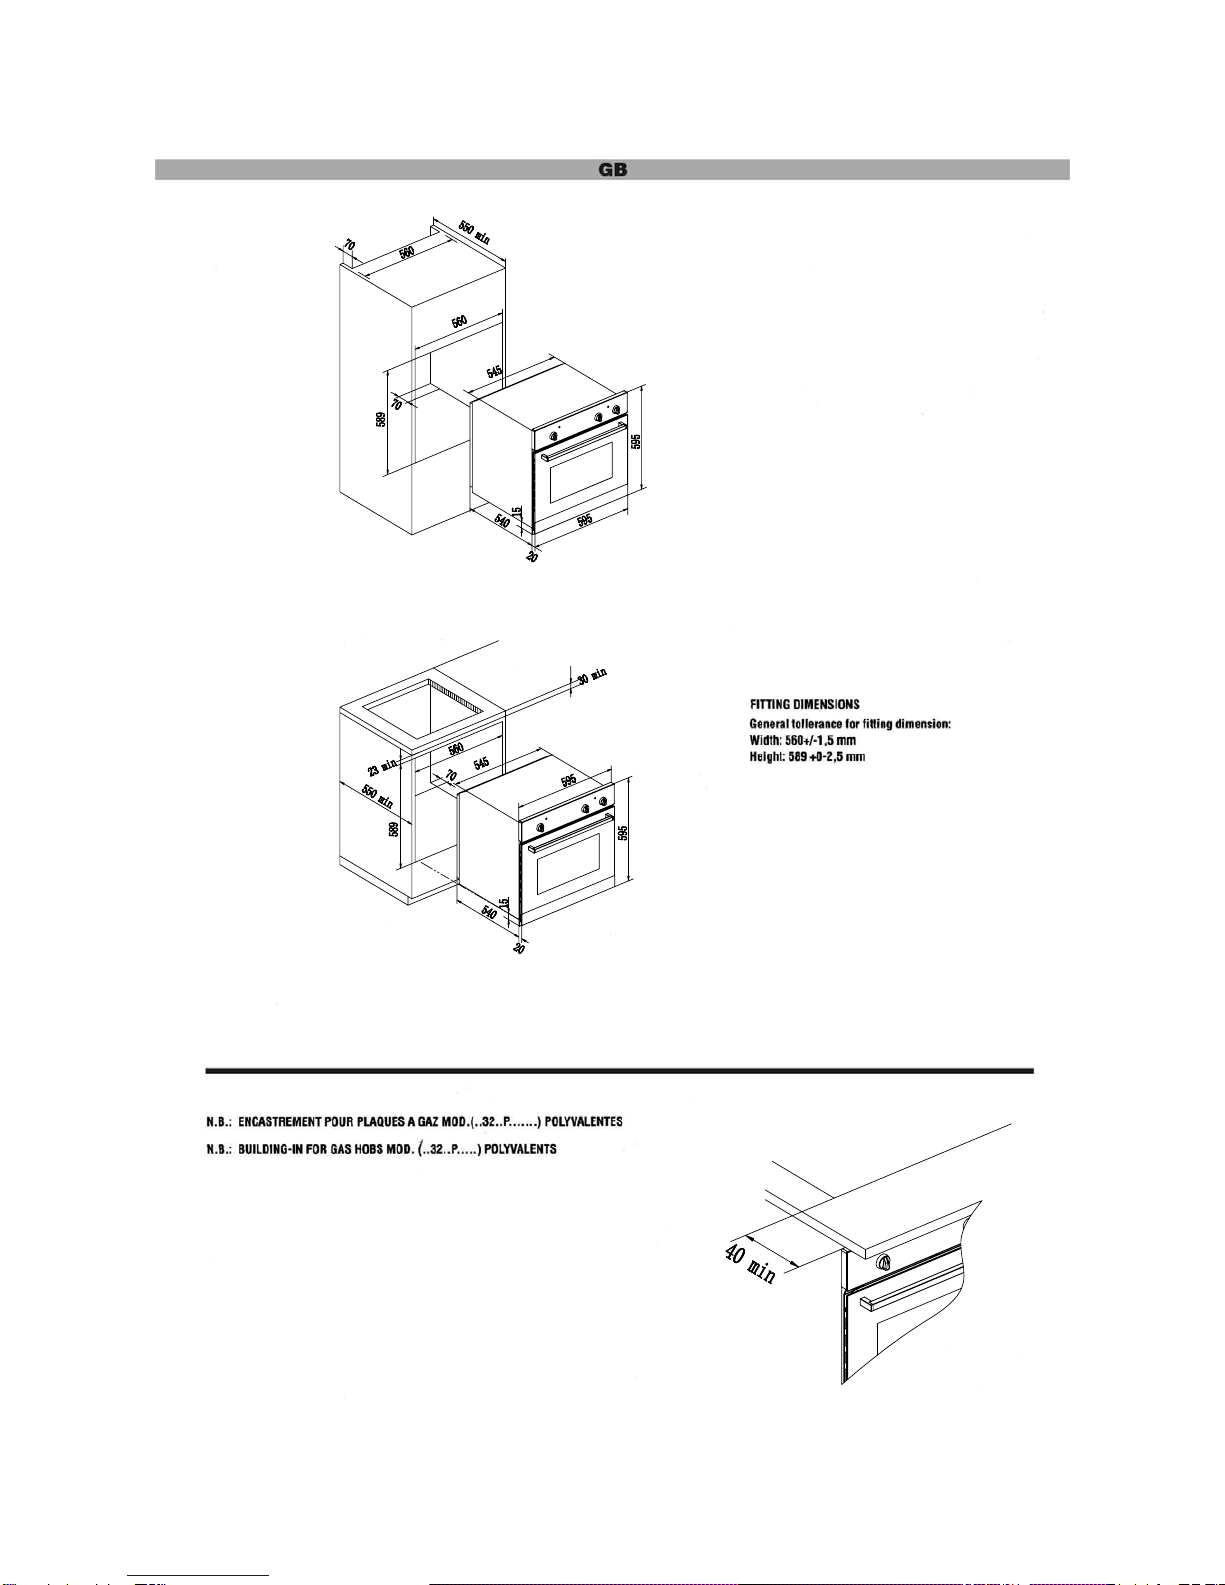
- For the most efficient air circulation, the oven should be fitted according to the dimensions shown in fig. 1-2 of
page 2.
- The rear panel of the cabinet must be removed so that aircan circulate freely. The panel to which the oven is fitted
should have a gap of at least 70 mm at the rear.
NB: where ovens are to be matched with hobs, it is essential to follow the instructions contained in the
booklet supplied with the other appliance.
INSTALLING THE APPLIANCE
IMPORTANT:Unplug your oven before
Fitting the appliance
Fig.3
A
A
A
6
Accessible parts may become hot during use. Yong children should be kept away.
Do not use harsh abrasive cleaners or sharp metal scrapers to clean the oven door glass
since they can scratch the surface, which may result in shattering of the glass.
For a built-in oven to work well the cabinet must be of the right type.
The panels of the adjoining furniture should be heat resistant. Particularly when the adjoining furniture is made of
veneered wood, the adhesives should be able to withstand a temperature of 120 . Plastic materials or adhesiveć
which cannot withstand this temperature will become deformed or unstuck.
To comply with safety regulations, once the appliance has been fitted it should not be possible to make contact with
the electrical parts.
All parts which offer protection should be fixed in such a way that they cannot be removed without the use of a
tool.
Ensure that the appliance is switched off before replacing the lamp to avoid the possibility of electric shock.
CONNECTION TO THE MAINS SUPPLY
THE APPLIANCE MUST BE CONNECTED ACCORDANCE WITH THE RULES CURRENTLY. IT CAN
ONLY BE HANDLED BY AN AUTHORIZED ELECTRICAL INSTALLER IF IN FORCE.
IMPROTANT
During use the appliance becomes hot, Care should be taken to avoid touching heating elements
inside the oven.
Fig.4 Fig.5
70
70
70

7
- If the appliance just fitted with supply leads but does not come already fitted with a plug, then permanently connect
to fixed wiring as follow:
- The “yellow/green” earth wire, which must be connected to terminal, has to be about 10mm longer than the other
wires; the “blue” neutral wire has to be connected to the terminal marked with letter N.
“Black, brown, red” live wires have to be connected to terminal L. Mains connection can also be made by fitting a
double pole switch with a minimum gap between the contacts of 3mm, proportionate to the load and complying
with the regulations in force.
The yellow/green earth wire should not be controlled by the switch.
The plug or a double pole switch used for mains supply connection should be easy to get at, once the appliance is in
position.
IMPORTANT :
position the mains supply cable so that it is never subjected to a temperature which is
ć
more than 50 above ambient temperature.
- The electrical safety of the appliancecan only be guaranteed when it has been correctly connected to an efficient
earthed power supply, as laid down in the regulations for electrical safety.
- The manufacturer cannot be held responsible for any damage to persons or objects due to lack of an earth
connection.
WARNING: THIS APPLIANCE MUST BE EARTHED
- Check that the power rating of the mains supply and of the sockets are suitable for the maximum power of the
appliance as indicated on the specification plate.
- plug should be accessible after installation. Fit the plug into a socket fitted with a third contact which corresponds
with the earth connection. This should be properly connected.
8
Fig.1
Fig.2

9
INSTRUCTIONS FOR USE: to switch off the oven, turn the knobs on position ( ) and ( )
CONVECTIONAL OVENS 4 FUNCTIONS
:KHQ\RXWXUQWKHFRQWURONQREWRSRVLWLRQWKHOLJKWZLOOE HRQIRUDOOWKHIROORZLQJ
RSHUDWLRQV
1DWXUDOFRQYHQWLRQ
%RWKWKHORZHUDQGXSSHUKHDWLQJHOHPHQWVRSHUDWHWRJHWKHU
SS J S J
7KLVLVWKHWUDGLWLRQDOFRRNLQJYHU\JRRGIRUURDVWLQJMRLQWVLGHDOIRUELVFXLWVEDNHG
DSSOHVDQGFULVSLQJIRRG<RXREWDLQYHU\JRRGUHVXOWVZKHQFRRNLQJRQDVKHOI
/RZHUKHDWLQJHOHPHQW
7KLVIXQFWLRQLVSDUWLFXODUO\LQGLFDWHGIRUFRRNLQJIURPWKHERWWRPZDUPLQJXSIRRGRU
VWHULOL]LQJJODVVMDUV,WLVDOVRLQGLFDWHGIRUIRRGUHTXLULQJORQJDQGVORZFRRNLQJLH
FDVVHUROH7KLVIXQFWLRQFDQEHXVHGEHWZHHQDQG0$;ć
8SSHUKHDWLQJHOHPHQW
,WLVLQGLFDWHGIRUZDUPLQJXSSUHFRRNHGIRRGZKHQSODFLQJWKHJULGRQWKHVHFRQGVKHOIIURP
WKHWRSRUIRUGHIURVWLQJSDVWU\SODFLQJWKHJULGRQWKHILUVWVKHOIIURPWKHERWWRP7KLV
IXQFWLRQFDQEHXVHGEHWZHHQDQG0$;ć
7RWDOJULOO
,WLVLQGLFDWHGIRUJULOOLQJDQGJUDWLQDWLQJWUDGLWLRQDOIRRG7KLVIXQFWLRQPXVWDOZD\VEH
XVHGZLWKKDOIRSHQGRRUDQGFRQWUROSURWHFWLRQLQSRVLWLRQVHHILJE
7RWDOJULOOKHDWLQJHOHPHQWRUWXUQVSLWPRWRUDFFRUGLQJWRWKHPRGHOVVHH)LJ
,WLVLQGLFDWHGIRUFRRNLQJRQWKHVSLWJULOOLQJDQGJUDWLQDWLQJ
7KLVIXQFWLRQPXVWDOZD\VEHXVHGZLWKKDOIRSHQGRRUDQGFRQWUROSURWHFWLRQLQSRVLWLRQVHH
ILJE
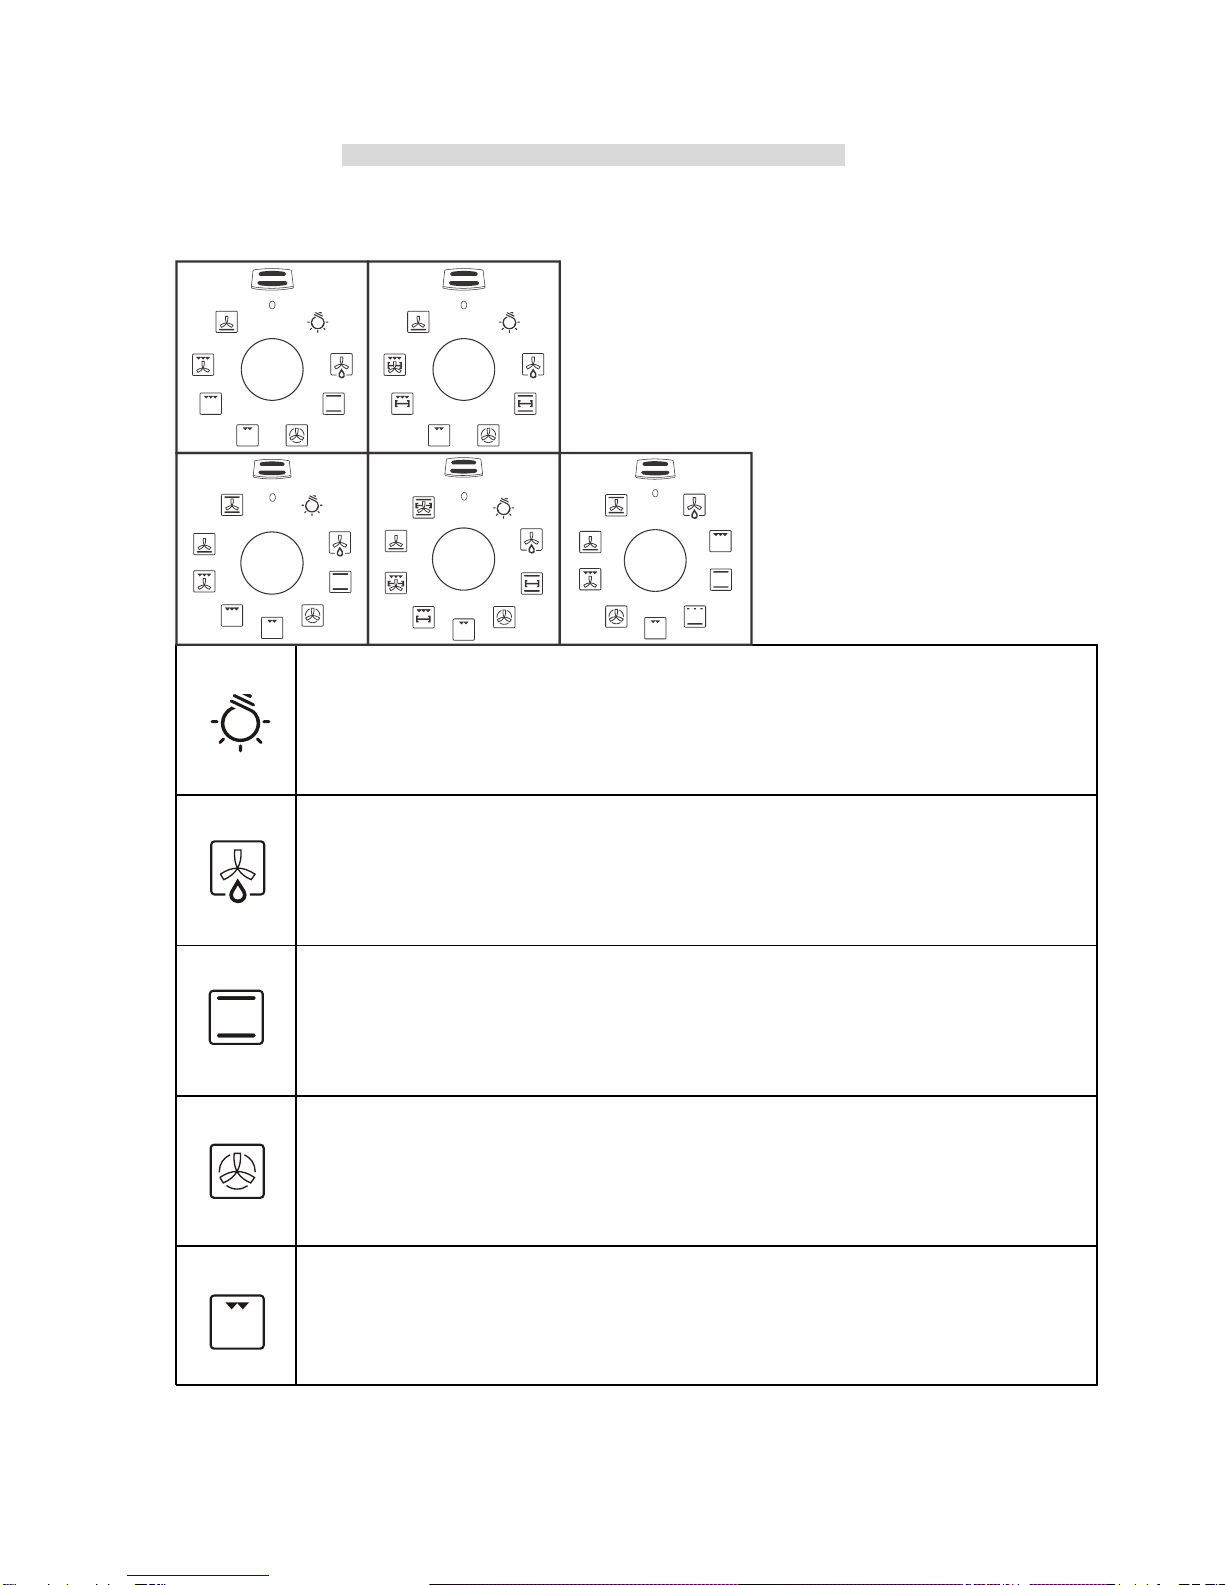
MULTIFUNCTIONAL OVENS 8 AND 9 FUNCTIONS
N.B.: All functions will start after selecting the temperature with the thermostat knob.
/LJWK
$OLJKWLQWKH2YHQ
'HIURVWLQJ ZLWK IDQ
'HIURVWLQJ
ZLWK
IDQ
7KHDLUDWDPELHQWWHPSHUDWXUHLVGLVWULEXWHGLQVLGHWKHRYHQIRUGHIURVWLQJIRRGPRUHTXLFNO\
DQGZLWKRXWSURWHLQVDGXOWHUDWLRQ
1DWXUDOFRQYHQWLRQ
%RWKWKHORZHUDQGXSSHUKHDWLQJHOHPHQWVRSHUDWHWRJHWKHU7KLVLVWKHWUDGLWLRQDOFRRNLQJ
GI WL MLW LG OI EL LW ENG O G L L I G < EWL
)DQRYHQ
%RWKWKHIDQDQGWKHFLUFXODUKHDWLQJHOHPHQWRSHUDWHWRJHWKHU7KHKRWDLUDGMXVWDEOHEHWZHHQ
DQG0$;ćLVHYHQO\GLVWULEXWHGLQVLGHWKHRYHQ7KLVLVLGHDOIRUFRRNLQJVHYHUDOW\SHVRI
IRRGPHDWILVKDWWKHVDPHWLPHZLWKRXWDIIHFWLQJWDVWHDQGVPHOO,WLVLQGLFDWHGIRU
YHU\JRR
G
I
RUURDV
WL
QJ
M
R
L
Q
W
V
LG
HD
O
I
RU
EL
VFX
LW
V
E
D
N
H
G
DSS
O
HVDQ
G
FU
L
VS
L
QJ
I
RR
G
<
RXR
EW
D
L
Q
YHU\JRRGUHVXOWVZKHQFRRNLQJRQDVKHOIDGMXVWLQJWKHWHPSHUDWXUHEHWZHHQDQG0$;ć
0HGLXPJULOO
,WLVLQGLFDWHGIRUJULOOLQJDQGJUDWLQDWLQJVPDOOTXDQWLWLHVRIWUDGLWLRQDOIRRG7KLV
IXQFWLRQFDQEHXVHGZLWKFORVHGGRRUIRUYHU\VKRUWWLPHVPLQXWHV)RUORQJHUWLPHV
WKLVIXQFWLRQPXVWDOZD\VEHXVHGZLWKKDOIRSHQGRRUDQGFRQWUROSURWHFWLRQLQ
SRVLWLRQVHHILJE
GHOLFDWHSDVWULHV
10.

11
7RWDOJULOO
,W LV LQGLFDWHG IRU JULOOLQJ DQG JUDWLQDWLQJ WUDGLWLRQDO IRRG 7KLV IXQFWLRQ PXVW DOZD\V EH
,W
LV
LQGLFDWHG
IRU
JULOOLQJ
DQG
JUDWLQDWLQJ
WUDGLWLRQDO
IRRG
7KLV
IXQFWLRQ
PXVW
DOZD\V
EH
XVHGZLWKKDOIRSHQGRRUDQGFRQWUROSURWHFWLRQLQSRVLWLRQVHHILJE
7RWDOJULOOKHDWLQJHOHPHQWRUWXUQVSLWPRWRUDFFRUGLQJWRWKHPRGHOVVHH)LJ
,WLVLQGLFDWHGIRUFRRNLQJRQWKHVSLWJULOOLQJDQGJUDWLQDWLQJ
7KLVIXQFWLRQPXVWDOZD\VEHXVHGZLWKKDOIRSHQGRRUDQGFRQWUROSURWHFWLRQLQSRVLWLRQVHH
IL E
IL
J
E
&RQYHQFWLRQDORYHQZLWKURWLVVHULH
$FRQYHQFWLRQDORYHQZRUNVRQWKHSULQFLSOHWKDWKHDWULVHV,WLVKRWWHUDWWKHWRSWKDQDW
WKHERWWRPLGHDOIRUFRRNLQJPHDWLQGLIIHUHQWVLGHVLPXOWDQHRXVO\
9HQWLODWHG*ULOO
,PSRUWDQWGRQRWVHWWKHUPRVWDWNQRE&WRRYHUć'XULQJJULOOLQJNHHSWKHRYHQGRRU
FORVHG$OOJULOOFRPSRQHQWVDQGIDQZRUN,QWKLVVHWWLQJWKHFHQWUDOKHDWLQJHOHPHQWVRI
WKHWRSZRUN7KLVFRPELQDWLRQRIIHDWXUHVFRPSXOVRU\LQWKHDLULQWKHRYHQIRUWKHHQWLUH
F\FOHRILQFUHDVHGQRQGLUHFWKHDWLQJHOHPHQWVKHDWUDGLDWLRQHIIHFW7KLVZLOODOORZWKHKHDW
WRSHQHWUDWHWKHLQWHUQDOIRRGDQGDYRLGIRRGVXUIDFH&KDUUHG
)DQDVVLVWHGWRWDOJULOO
7KHDLUZKLFKLVKHDWHGE\WKHJULOOKHDWLQJHOHPHQWLVFLUFXODWHGE\WKHIDQDQGVRKHOSVWR
GLVWULEXWHWKHKHDWEHWZHHQDQGć7KLVIXQFWLRQFDQEHXVHGIRUVWHULOL]LQJJODVV
MDUV
&RQYHQFWLRQDORYHQZLWKURWLVVHULH)DQ
7KHKHDWLQJHOHPHQWVXUURXQGVDIDQZKLFKGLVWULEXWHVKRWDLUDURXQGWKHRYHQ7KHUHVXOWLVD
PRUHHYHQWHPSHUDWXUHWKURXJKRXWWKHRYHQDQGPXFKIDVWHUFRRNLQJ
/RZHUKHDWLQJHOHPHQW)DQ
7KH DLU ZKLFK LV KHDWHG E\ WKH ORZHU KHDWLQJ HOHPHQW LV FLUFXODWHG E\ WKH IDQ DQG VR KHOSV WR
7KH
DLU
ZKLFK
LV
KHDWHG
E\
WKH
ORZHU
KHDWLQJ
HOHPHQW
LV
FLUFXODWHG
E\
WKH
IDQ
DQG
VR
KHOSV
WR
GLVWULEXWHWKHKHDWEHWZHHQDQGć7KLVIXQFWLRQFDQEHXVHGIRUVWHULOL]LQJJODVV
MDUV
,QWHQVLYH%DNH
7KHRYHQLVKHDWHGE\WRSDQGERWWRPHOHPHQWVDQGWKHIDQPRXQWHGLQWKHEDFNSDQHOKHOSVWR
GLVWULEXWH KHDW WKURXJKRXW WKH RYHQ 6XLWDEOH IRU SHUIHFW SDVWU\ QR QHHG WR EOLQG EDNH
GLVWULEXWH
KHDW
WKURXJKRXW
WKH
RYHQ
6XLWDEOH
IRU
SHUIHFW
SDVWU\
QR
QHHG
WR
EOLQG
EDNH
8SSHUKHDWLQJDQGLQVLGHKHDUWLQJ6HULHV/RZHUKHDWLQJHOHPHQW
7KLVIXQFWLRQLVXVHGPXOWLEDUUHOHGKDVDOVRZRUNHGLQWKHJDOOEODGGHUJDYHRIIKHDWHYHQO\
WKHHQUJ\FRQVXPSWLRQZDVORZ

12
Using the turnspit
In the “CONVECTIONAL OVEN” models, the turnspit can be used in combination with the grill. After fitting the
food on to the spit S, block it with the two forks F. then proceed as follows:
-Fit the knobs protection as shown in (fig. 6)
-Position the spit support as shown in (fig.7)
-Fit the end of the spit into the motor M at the back of the oven (fig. 7).
-Fit the support into the circular groove in the spit.
-Unscrew and remove handle A.
-Place the oven tray with a little water on the lowest shelf of the oven.
-Turn the knob to position to start up the motor.
-Partially close the oven door (fig. 6b).
-When the cooking time is up, screw the handle on the spit and remove everything from the oven. If necessary,
use an oven glove to avoid any burn.
Fig.6 Fig.7

13
Timers
Our ovens can be fitted with different types of timers:
MINUTES COUNTERS
Turn the knob clockwise to set the desired cooking time.
The minutes minder can be adjusted from 1 to 60 minutes (Fig. 8) or 1 to 120 minutes (Fig. 9)
A sound signal will inform you that the chosen time is up.
Fig.8 Fig.9
Operating instructions for Electronic Timer (6 keys)
<<LED>>PROGRAMMER (fig.10)
5
10
15
20
25
30
35
40
45
50
55
STOPTIMER
Minutes counter
Add time
Subtract time
Manual
End time
Cooking time
STOP
Fig.10
14
Features
24 hours clockwith automatic programmeand minutes counter
Functions
Cooking time, cookingend time, manualposition, clock, minutes
counter, timesto be setup to 23hours 59 minutes.
Display
4-figures, 7segments displayfor cooking timesand time ofday.
Cooking time andmanual function =saucepansymbol
Automatic function =AUTO
Minutes counter =bellsymbol
The symbols lightup when thecorresponding function isselected
Setting
To set. Press and release the desired function ,and set the time
with +and buttonswithin 5 seconds.
Key + and-
The +and buttonsincrease or decreasethe time ata speed
depending on howlong button ispressed
Setting the time
Press any twobuttons (cooking time,end time, minutescounter)
at the sametime, and +or button toset the desiredtime. This
deletes any previouslyset programme.
The contacts areswitched off andthe AUTO symbol flashes.
Manual use
By pressing themanual button therelay contacts switchon, the
AUTO symbol switches off and saucepan symbollights up.
Manual operation canonly be enabledafter the automatic
programme is overor it hasbeen cancelled.
Automatic use
Press the cookingtime or endtime button toautomatically form
the manual tothe automatic function.
Semi-automatic use withcooking time setting
Press the cookingtime button andset the desiredtime with +or-,
the AUTO and cookingtime symbols lightup continuously.The
relay switches onimmediately. When the cooking end time
corresponds to thetime of day, the relayand the cookingtime
symbol switch off. The sound signal rings and theAUTO symbol
flashes.
Semi-automatic use withend time setting
Press the endtime button. The time ofday appears onthe display.
Set the cookingend time with+button. The AUTO and cooking
time symbols lightup continuously.The relay contacts switch on.
When the cookingend time correspondsto the timeof day,the
relay and thecooking time symbolswitch off. When the cooking
time is up.The AUTO symbol flashes, the sound signal rings and
both the relayand the cookingtime button switchoff.
Automatic use withcooking time andend time setting
Press the cookingtime button andselect the lengthof the cooking
time with +orbutton. The AUTO and cooking time symbols light
up continuously.The relay switches on. By pressing the cooking
end time buttonthe next cookingend time appearson the display.
Set the cookingend time with+button. The relay and thecooking
time symbol switchoff .The symbol lights upagain when the
time of daycorresponds to thecooking start time.When the
cooking time isup, theAUTO symbol flashes,the sound signal
rings, the cookingtime symbol andthe relay switchoff
Minutes counter
Press the minutescounter button andset the cookingtime with
+or button.
The bell symbollights up whenthe minutes counteris operating,
when the settime is up,the sound ringsand the bellsymbol
switches off.
Sound signal
The sound signalstarts at theend of aprogramme or ofthe
minutes counter functionand it lastsfor 15minutes.
To stop it, push any functions button.
Start programme andcheck
The programme willstart in 4seconds after ithas been set.The
programme can bechecked at anytime by pressingthe
corresponding button.
Setting error
A settingerror is madeif the timeof day onthe clock fallswithin
the cooking startand end times.Tocorrect the settingerror,
change the cookingtime or cookingend time therelays switch off
when a settingerror is made.
Cancelling a setting
To cancel a setting, press the cooking time button and then press
the button until00:00 appears onthe display.Aset programme
will be automaticallycancelled on completion.
15
Operating instructions for Electronic Timer (3 keys)
Before using for the first time
Setting and changing the current time
The oven only operates when the time has been set.
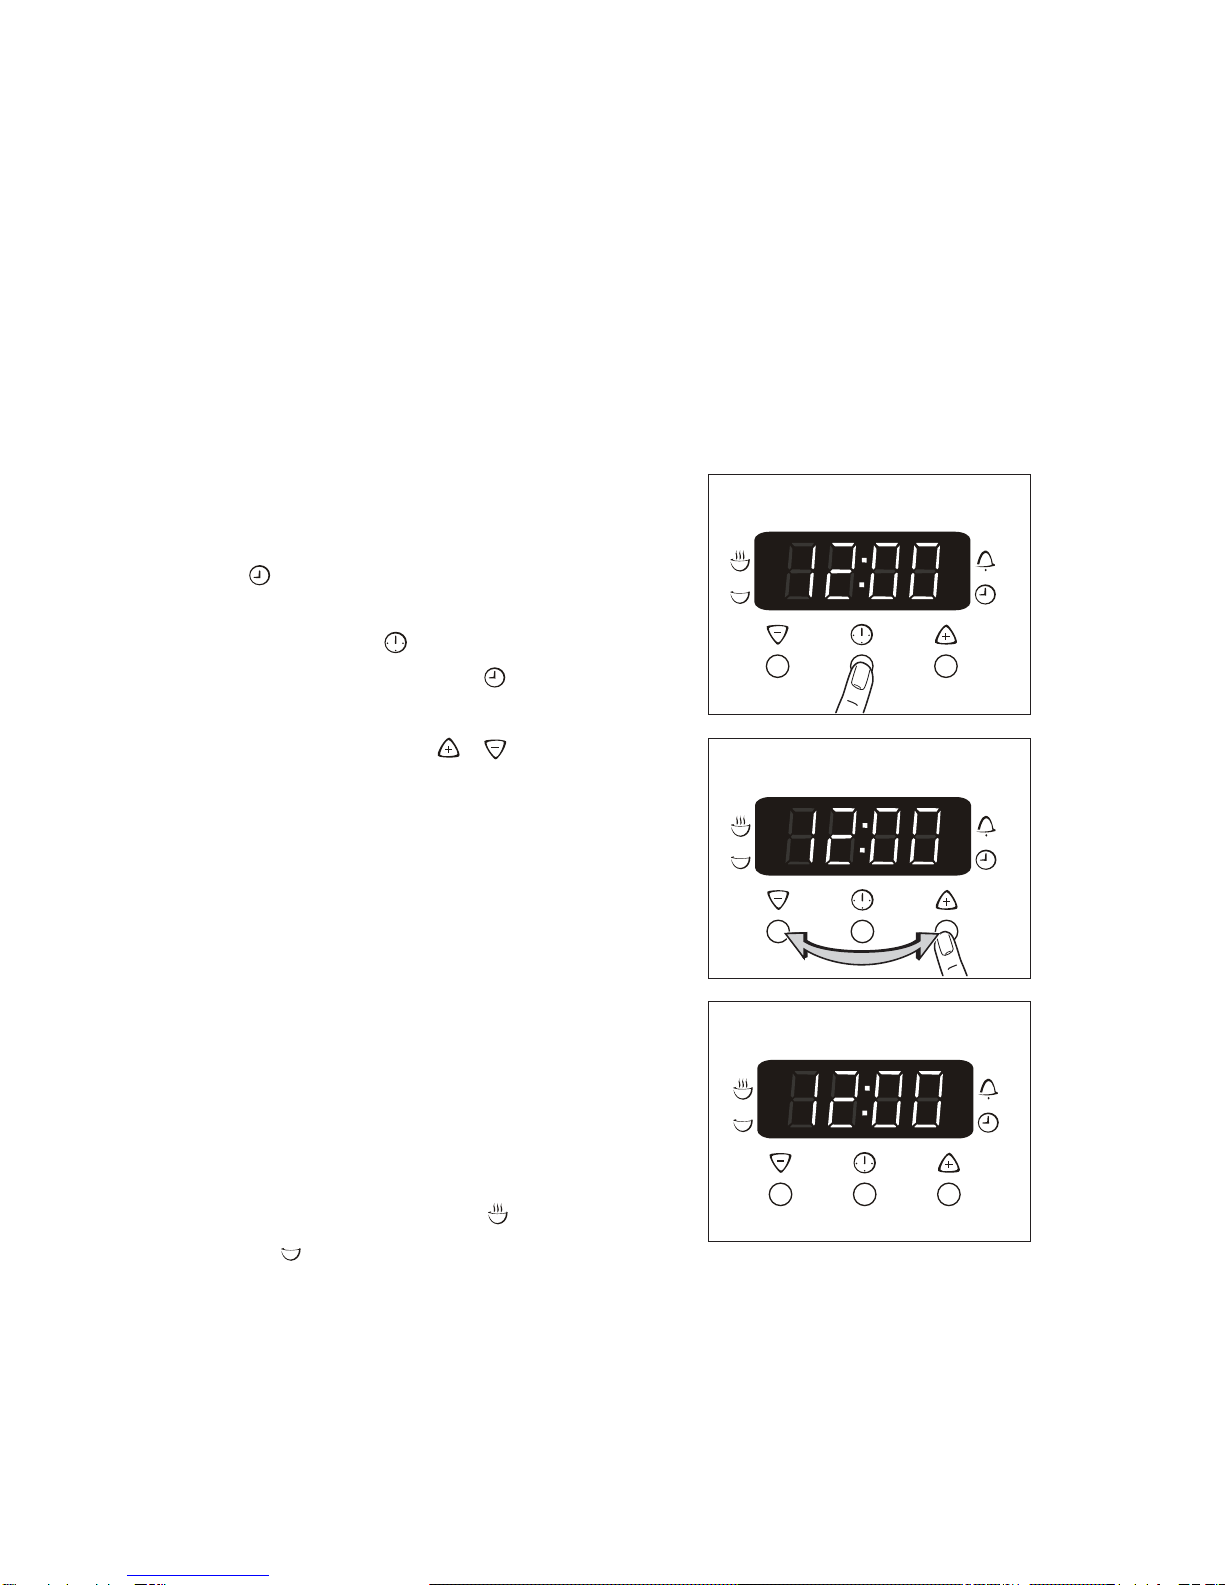
When the appliance has been connected to
the electrical supply or when there has
been a power cut, the function indicator
Time flashes automatically.
1. To change the time that has already been
set, press the Selection button repeatedly,
until the function indicator Time flashes.
2. Set the current time using the or button
After approx. 5 seconds, the flashing stops
and the clock displays the time of day set.
The appliance is now ready to use.
The time can only be changed if neither of
the automatic functions (Cook time or
End time ) have been set.
3
STOP
STOP
STOP
STOP
3
Electronic Timer Setting (3 keys)
16
Countdown
To set a countdown, a signal sounds after the time has elapsed.
This function does not affect the operation of the oven.
Cook time
To set how long the oven is to be in use.
End time
To set when the oven is to switch off again.
Time
To set, change or check the time
(See also section “Before Using for the First Time”).
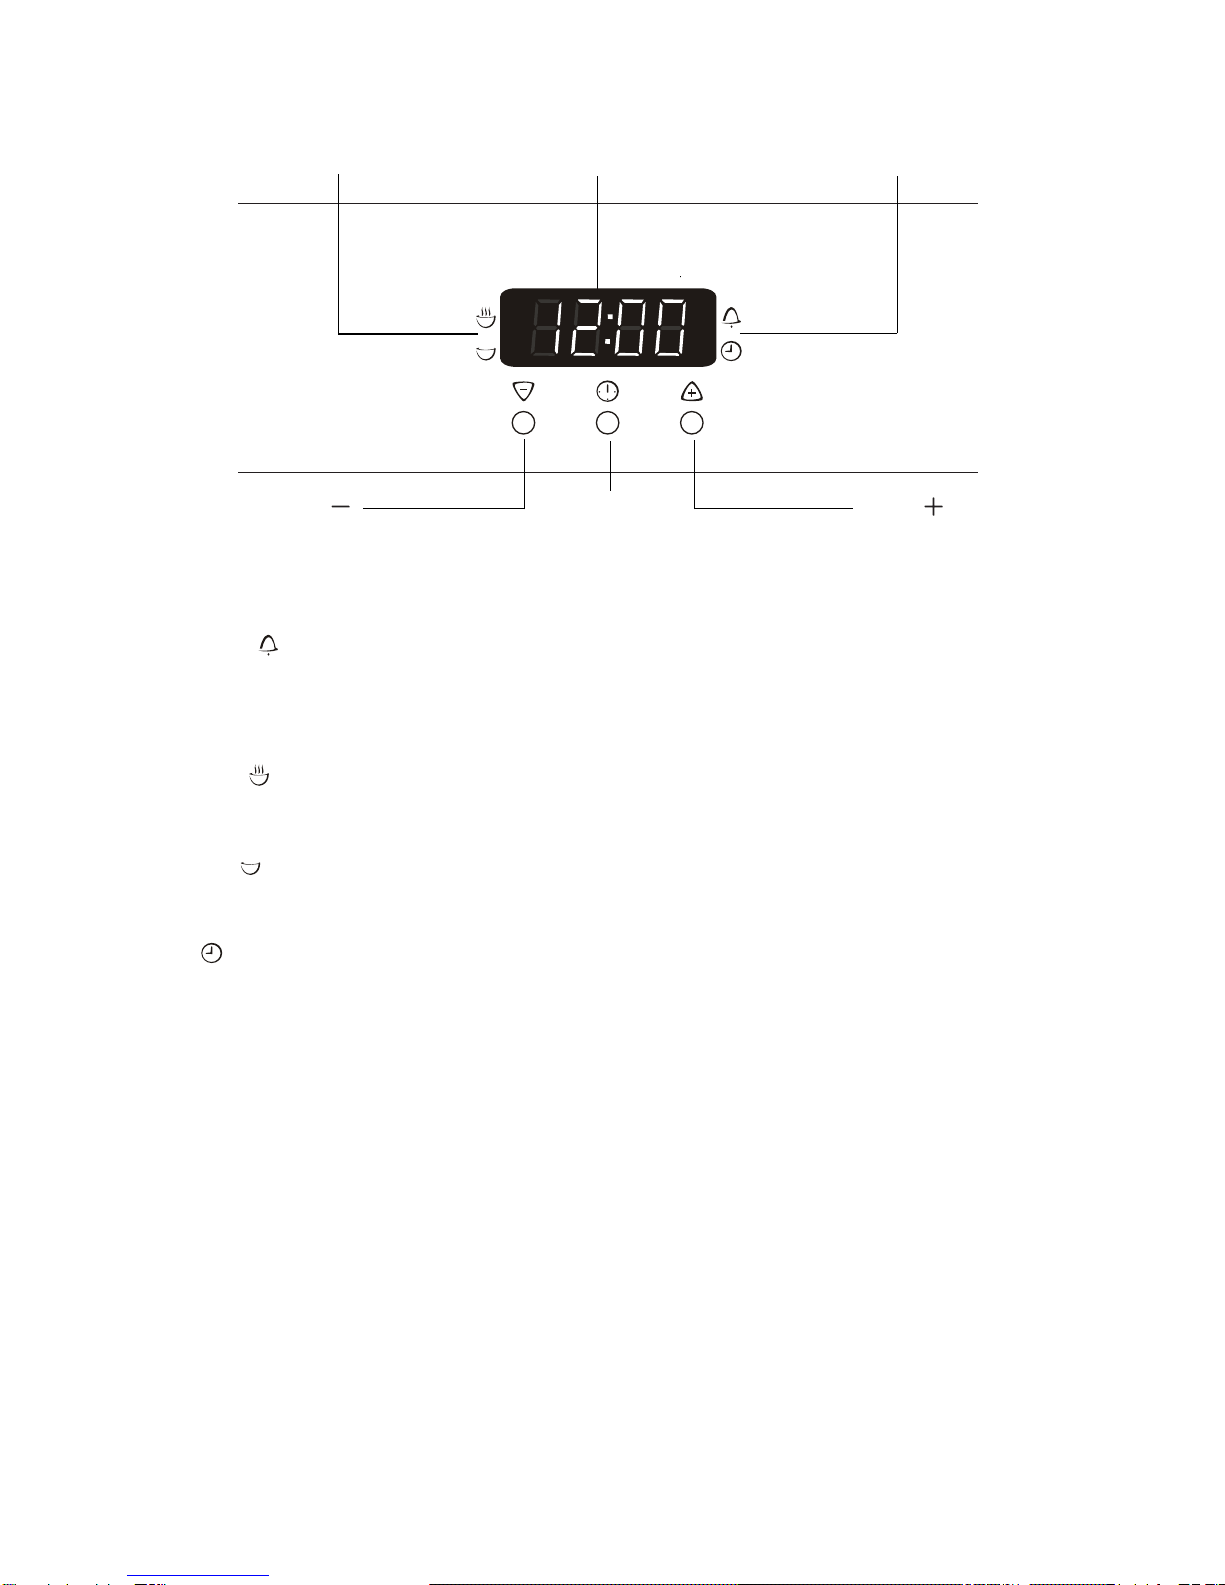
Clock Functions
Selector Button Button
Button
Time display Function IndicatorsFunction Indicators
STOP
STOP

17
How to use the clock functions
zWhen a function has been selected, the corresponding function indicator flashes for approx. 5 seconds. During
this time the desired times can be set using the or button.
zWhen the desired time has been set, the function indicator flashes for approx. another 5 seconds. After that the
function indicator is then lit. The set time begins to run.
zPress any of the buttons to stop the acoustic signal.
zThe desired oven function and temperature can be selected before or after the clock functions of Cook time
and End time are set.
zWhen the cooking time has ended, turn the oven function and temperature dial back to the OFF position.
STOP
3
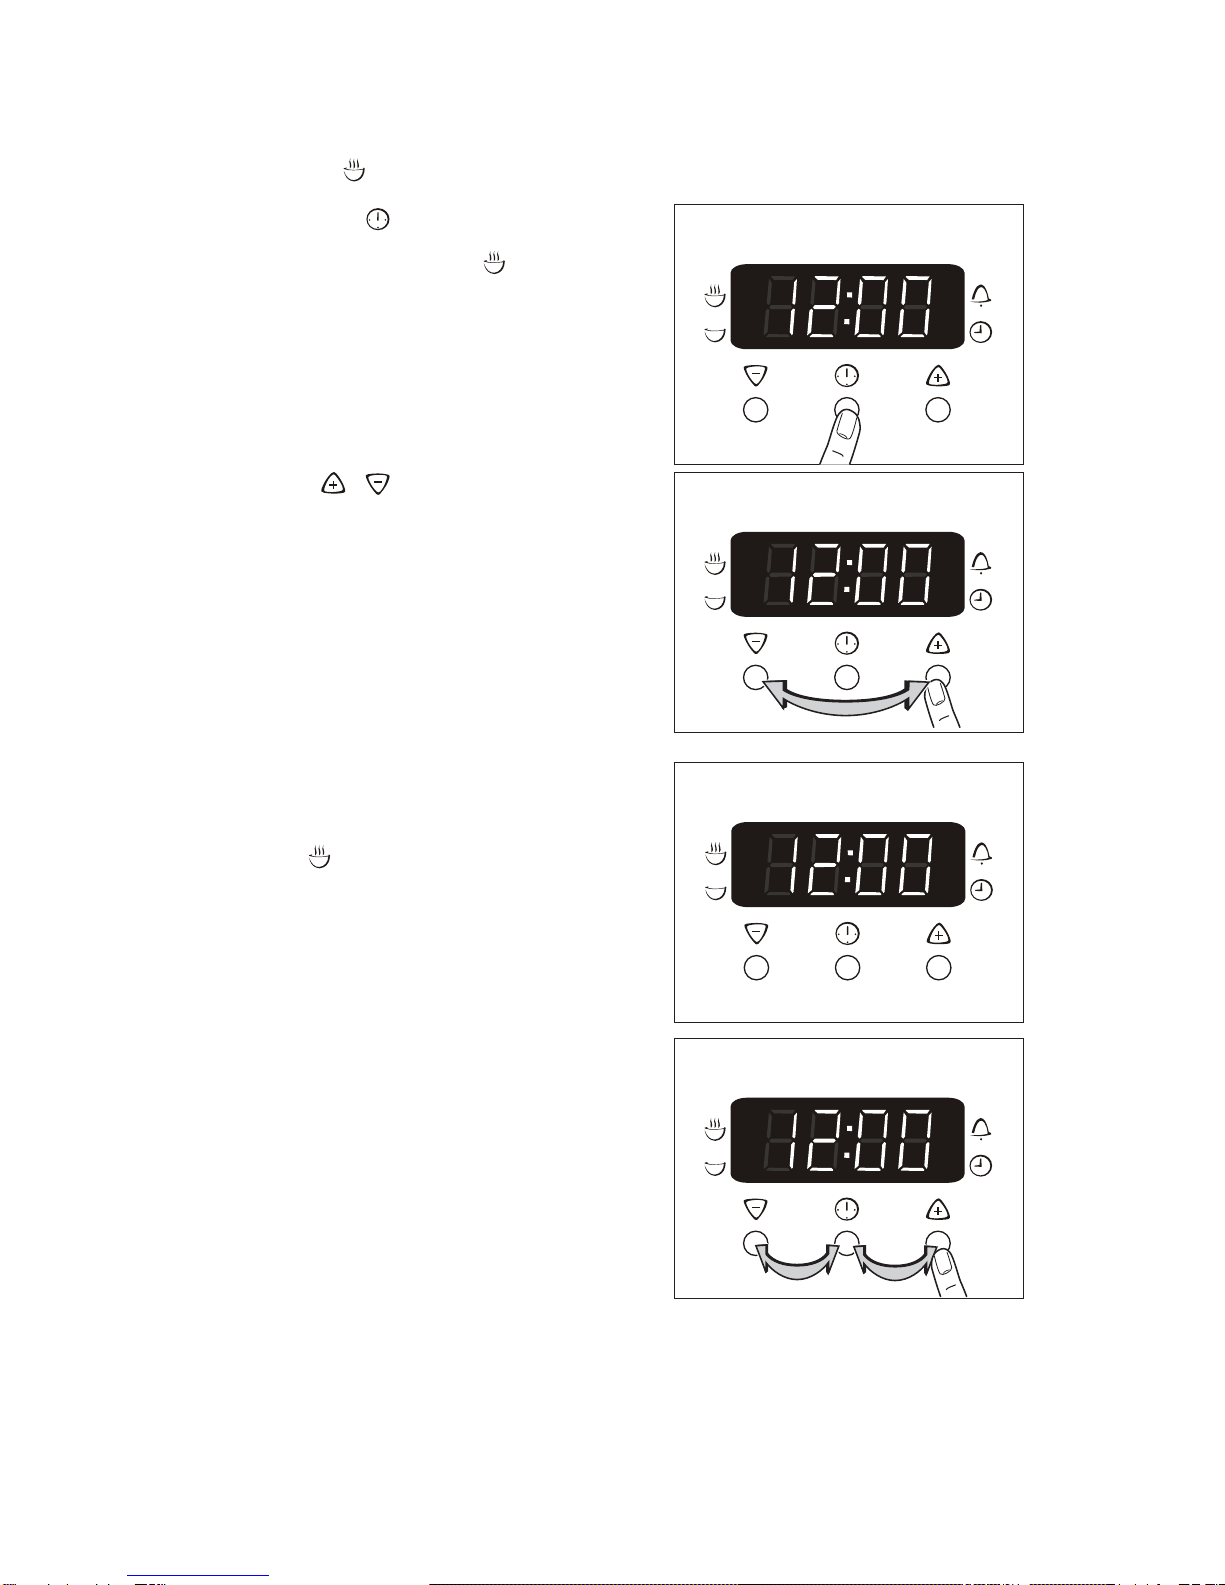
Switching off the Time Display
By switching off the time display you can save energy.
Switching off the time display
Hold down any two buttons until the display becomes dark.
Switching on the time display
Hold down any button until the time reappears in the display.
The display can only be switched off if none of the clock functions Cook time End time
or Countdown are in use.
STOP

18
Countdown
1. Press Selection button repeatedly, until
the function indicator Countdown flashes.
2. Using the or button, set the required
Countdown (m ax. 2 hours 30 minutes).
After approx. 5 seconds, the display shows
the remaining time.
The function indicator Countdown will
light up.
When the time has elapsed, the function
indicator flashes and an acoustic signal
sounds for 2 minutes.
Press any button to switch off the signal.
STOP
STOP
STOP
STOP
STOP
19
Cook time
1. Press Selection button repeatedly, until
the function indicator Cook time flashes.
2. Using the or button, set the required
cooking time.
After approx. 5 seconds, the display returns
to the current time. The function indicator
Cook time will light up.
When the time has elapsed, the function
indicator will flash, an acoustic signal will
sound for 2 minutes and the oven will
switch itself off.
3. Press any button to switch off the signal
and the program me.
STOP
STOP
STOP
STOP
Table of contents
Other EF Oven manuals


Popular Oven manuals by other brands


Middleby Marshall
Middleby Marshall PS770 Series Owner's operating and installation manual

Tricity Bendix
Tricity Bendix TBS 603 Instruction booklet

Miele
Miele h 6800 bp Operating and installation instructions

Electrolux
Electrolux E8931-7 user manual

Whirlpool
Whirlpool RM765PXB Use and care guide

Fisher & Paykel
Fisher & Paykel WOSV230N user guide


