EF BO AE 63 A User manual
THE BEAUTY OF SIMPLICITY
BUILT-IN OVEN
60CM
Models:
BO AE 63 A
BO AE 86 A
BO AE 1370 A
USER MANUAL

2
Please read this user manual before usage!
Dear Customer,
Thank you for purchasing this EF product. We hope that you obtain the greatest performance from our
products which has been manufactured with excellent quality, state-of-the-art technology that will be able to
contribute to making your everyday life even easier.
Hence, please take your time to read this entire user manual and other documents supplied with the product
to retain the appliance atits best performance andextend the lifespan ofthis appliance. This manualprovides
all detail instructions you may require to ensure a safe installation, usage, and maintenance.
Do note that this user manual may be applicable to other models. Differences between models will be
identified in the manual.
Explanation of symbols
Throughout this user manuals the following symbols are used:
Important Information or Useful hints about usage
General warning warns for hazardous situation
with regard to life and equipment
Electrical warning warns of hazards from electricity
which can result in physical injury and/or damage
to the equipment
Warning for risk of fire
Warning for hot surfaces
Please keep this user manual within easy reach for future references. Doing so will allow you
to understand and take advantage of the appliance unique features at any time.

3
CONTENTS
General Safety............................................................................................................4
Electrical Safety..........................................................................................................4
Disposal Instructions...................................................................................................5
Safety During / After Operation...................................................................................5
Child Safety................................................................................................................6
Cleaning And Maintenance.........................................................................................6
Maintaining Efficiency.................................................................................................8
Contacting Qualified Person / Customer Service........................................................8
Before Installation.......................................................................................................8
Installation Of Built-In Ovens ......................................................................................9
Electrical Connection................................................................................................10
Parts And Features...................................................................................................11
Oven Controls...........................................................................................................12
Oven Displays ..........................................................................................................13
Accessories..............................................................................................................14
BO AE 63 A, BO AE 86 A & BO AE 1370 A..............................................................16
Initial Use..................................................................................................................17
Initial Oven Clock Setting..........................................................................................17
First Cleaning Of The Appliances .............................................................................17
Initial Heating............................................................................................................17
BO AE 63 A..............................................................................................................18
BO AE 86 A..............................................................................................................18
BO AE 1370 A..........................................................................................................20
Features By Models..................................................................................................22
How To Use Oven Modes.........................................................................................23
Cleaning The Oven...................................................................................................25
How To Remove The Oven Door..............................................................................26
How To Dismantle The Oven Glass..........................................................................26
Tips For Saving Energy............................................................................................27
Practical Cooking Advices ........................................................................................27
Practical Cooking Advices Table...............................................................................30
4
SAFETY GUIDELINES
This section contains safety instructions that will help reduce the risk of injury, electric shock and property
damage.
GENERAL SAFETY
Always place oven racks in desired location while oven is cool. If a rack must be moved while oven is
hot, do not let potholder contact the heating elements.
Always use dry potholders. Moist or damp potholders on hot surfaces may result in burns from steam.
Secure all loose garments before begin operating. Tie long hair so that it does not hang loose, and do
not wear loose fitting clothing or hanging garments, such as ties, scarves, jewellery, or dangling sleeves.
Care shall be taken to avoid touching heating elements.
Disconnect the appliance from the electrical mains if it is not functioning properly and before cleaning or
maintenance
Unplug the appliance if not using for a long time
Use oven gloves to place cookware in the oven or remover the cookware
Grip the middle of the handle as the two ends will get hot due to the hot air from the cavity
Make sure of below settings when the appliance is not in use;
BO AE 63 A & BO AE 86 A –All knobs are in the “ “ or “ “ position
BO AE 1370 A –The display is only showing the clock
Cut the power supply cable when you decide not to use the appliance any longer
Frozen foods such as pizzas should be cooked on the wire grill. If the baking tray is used, it may become
deformed due to the great variation in temperatures.
Actions that should be avoided:
-Using the appliance when barefoot
-Touching the heating element after usage, even after a short operation
-Improper or dangerous operations
-Obstructing the ventilation or heat dissipation slots
-Exposing the appliance to atmospheric agents such as rain and sunlight
-Using the oven for storage purposes
-Touching the appliance with wet parts of the body
-Cutting the electricity by moving the appliance or by pulling the power cord
-Attempting to install or repair the appliance without reading the manual thoroughly or without the
assistance of qualified person
ELECTRICAL SAFETY
If the oven has been damaged in transport, do not connect it.
Appliance must be connected to the mains power supply only by a specially licensed electrician.
Avoid using adapters, multiple sockets and/or extension leads.
In the event of a fault or damage to the appliance, do not attempt to operate it.
Repairs should be performed by a licensed technician only.
Improper repair may result in considerable danger to you and others.
If your oven needs repair, contact a Service Centre or your dealer.
If the supply cord is defective, it must be replaced by a special cord or assembly available from the
manufacturer or an authorized service agent.
Electrical leads and cables should not be allowed to touch the oven.
Install an omnipolar circuit-breaker with a minimum contact opening of 3mm between the appliance and
the mains. The omnipolar circuit breaker should be sized according to the load and should comply with
current regulations (the earth wire should not be interrupted by the circuit breaker).
The rating plate is located on the right side of the door
The power supply of the appliance should be turned off when it is being repaired or cleaned.
Take care when connecting electrical appliances to sockets near the oven.
Use the electricity system safety when connecting the appliance earth cord.
If the product has a failure, it should not be operated unless
repaired by the Authorised Service Agent. Risk of electrical shock.

5
DISPOSAL INSTRUCTIONS
The material used to package this appliance is recyclable.
Dispose of the packaging materials in the appropriate container at your local waste disposal facility
Disposing of Old Appliances
-When replacing old appliances with new ones, the retailer is legally obligated to take back your old
appliance for disposals at least free of charge.
-You can obtain information about collection dates and public refuse disposal sites from your local refuse
department or council.
Crossed-Out Wheeled Dustbin Symbol
Do not dispose of electrical appliances as unsorted municipal waste, use separate
collection facilities. Contact your local government for information regarding the collection
systems available. If electrical appliances are disposed of in landfills or dumb, hazardous
substances can leak into the groundwater and get into the food chain, damaging your
health and well-being.
SAFETY DURING /AFTER OPERATION
This oven is designed only for the cooking of household food.
During use, the oven interior surfaces will become hot enough to cause burns.
Do not touch heating elements or interior surfaces of the oven until they have had time to cool down.
When cooking, care must be taken when opening the oven door as hot air and steam can escape rapidly.
When cooking dishes that contains alcohol, the alcohol may evaporate due to the high temperatures and
the vapour can catch fire if it comes into contact with a hot part of the oven.
For your safety, do not use high-pressure water cleaners or steam jet cleaners.
Do not pour water into the oven bottom when it is hot. This could cause damage to the enamel surface.
The oven door must be closed during cooking.
Do not line the oven bottom with aluminium foil and do not place any baking trays or tins on it. The
aluminium foil blocks the heat, which may result in damage to the enamel surfaces and causepoorcooking
results.
Fruit juices will leave stains, which can become indelible on the enamel surfaces of the oven.
When cooking very moist cakes, use the deep pan/baking tray.
Do no rest bakeware on the open oven door.
This appliance is not intendedfor use by young children or infirm persons without the adequate supervision
of a responsible person.
The appliance should be powered down before replacing the
lamp to avoid the possibility of electric shock.
Never store flammable materials in the oven and avoid using
flammable liquids near the appliance.
Before disposing of old appliances, make them inoperable so
that they cannot be a source of danger. To do this, disconnect
the appliance from the mains supply and remove the mains lead.
To protect the environment, it is important that old appliances
are disposed of in the correct manner. The appliance must not be
disposed of with household rubbish.
6
The oven’s electrical circuitry features a thermal shutoff system. If a cooking time is not entered, the oven
will shut itself off after two hours.
If the oven heats to abnormally high temperatures, the system will shut off the power supply to the heating
elements for a period of time or oven for all along.
During use, the oven glass door will become hot.
Avoid touching the oven glass door.
CHILD SAFETY
CLEANING AND MAINTENANCE
-Do not clean the appliance while it is still hot. Some cleaners produce noxious fumes when applied to a
hot surface. Wet clothes or sponges can cause burns from steam.
Oven Exterior
For cleaning both the interior and exterior of the oven, use a cloth and a mild cleaning agent or warm
soapy water.
Dry with kitchen paper or a dry towel.
Do not use metal scourers, caustic cleaners or abrasive products, especially stainless steel parts
This product can be used by the children who are at the age of 8 and over and the
people whose physical, sensory or mental skills are not fully developed or who do
not have necessary required experience and knowledge as long as they are
supervised or trained about the safe use of the product and its risks.
Children should not play with the device. Cleaning and maintenance works should
not be performed by children unless they are supervised by someone.
Children of lessthan 3years should be kept away unless continuouslysupervised.
Packaging materials may be dangerous for the children. Keep packaging materials
in a safe place away from reach of the children.
Electrical products are dangerous for the children. Keep the children away from
the product when it is in use. Do not allow them to play with the product. Use child
lock to prevent children from intervening with the product.
Accessible parts may become hot when the grill is in use. Children should be kept
away. Some parts of this product can become very hot and cause burns.
Particular attention has to be given where children and vulnerable people are
present.
Accessories that comes with the appliance should be kept out of sight and reach
of children as it may be potentially dangerous to them.
Items of interest to children should not be stored in an appliance, in cabinets
above an appliance or on the backsplash. Children climbing on an appliance to
reach items could be seriously injured.
Do not allow anyone to climb, stand, lean, sit, or hang on any part of an appliance,
especially the door, warming drawer or storage drawer. This can damage the
appliance, and the unit may tip over, potentially causing severe injury.
Make sure the oven is cool before cleaning!
7
For aluminium parts, wipe the plate gently with a soft cloth or microfiber cloth and a mild window
cleaning detergent.
Oven Interior
Do not hand-clean the door seal.
Do not use coarse scouring pads or cleaning sponges.
To avoid damaging the enamelled oven surfaces, use commercially available oven cleaners.
To remove stubborn soil, use a special oven clean.
Oven Door Glass
The oven door is equipped with three sheets of glass placed against each other. The inner & middle
sheets can be removed for cleaning (To remove the glass sheets, refer to “How to Dismantle The
Oven Glass Door” section in this manual)
Whenever the door is separated from the oven, the clips should be flipped open.
Do not use harsh abrasive cleaners or sharp metal scrapers to clean the oven door glass since they
can scratch the surface, which may resulting in shattering of the glass.
When the door is mounted, removing some of the parts (the door glass or some other part) from the
door may result in injury.
Accessories
Wash all bake ware and accessories after each use and dry with a kitchen towel.
To clean easily, soak in warm soapy water for about 30 minutes.
The oven and accessories should be cleaned after each use. Otherwise, further baking and roasting
will cause the deposits to bake on even harder and cleaning may become difficult and in extreme
cases impossible.
Cleaning with High Temperatures
Before cleaning with high temperatures,
-Make sure that all interior oven surfaces have been cleaned as described above. Otherwise, the
high temperatures can bake deposits onto the interior oven surfaces and make them impossible
to remove.
If, after manual cleaning, the oven is still heavily soiled, heating it to a high temperature will help
remove soiling caused by oil and grease splashes.
Note that if deposits of spices, syrups and similar substance are not removed by this process. These
should be further removed by hand with mild solution of hot water and washing –up liquid applied
with a soft brush.
Method :
1. Remove all accessories from the oven.
2. Set the oven to conventional function.
3. Set the heat to 250 °C.
4. Run the oven for approximately 1 hour.
The glass may break if you use excessive force
especially at the edges of the front sheet.
The length of time cleaning with this temperature will depend on the degree of
soiling. It is a good idea to set the finish time for the process using the end time
setting, in case you forget to switch the oven off at the end. Any remaining soil will
gradually disappear with each subsequent use of the oven at high temperatures.

8
GENERAL INFORMATION
MAINTAINING EFFICIENCY
Only call the service centres authorized by manufacturer
Always use original spare parts by the manufacturer
If the supply cord is defective, it must be replaced by a special cord or assembly available from the
manufacturer or an authorized service agent.
CONTACTING QUALIFIED PERSON /CUSTOMER SERVICE
In the following cases:
Installation (following the manufacturer’s instructions)
When in doubt about operating the appliance
The power supply cable damaged or needs to be replaced
Appliance breaks down or functions poorly
Replacing the electrical socket when it is not compatible with the appliance plug
Refer to the back cover page for the Customer Care Service contact details
INSTALLATION
The manufacturermay not be responsiblefor any damage due to incorrect installation and improper, incorrect
and irrational use.
BEFORE INSTALLATION
A safety distance must be left between the appliance and the kitchen walls and furniture.
Surfaces, synthetic laminates and adhesives used must be heat resistant (100°C minimum)
Kitchen cabinets must be set level and fixed.
If there is a drawer beneath the oven, a shelf must be installed between oven and drawers.
Carry the appliance with at least two persons
Take note of the following:
Prior to installation, visually check if the product has any defects on it. If so, do not have it installed.
Damaged products cause risks for your safety.
Electrical installation of this appliance must be performed only by a licensed electrician.
The oven must be installed according to the instructions supplied.
Remove the protective vinyl from the door after installation.
The power supply to the appliance must be cut off before any adjustments or maintenance work is done
on it.
Self-preparation of location and electrical installation
for the appliance is under customer’s responsibility

9
INSTALLATION OF BUILT-IN OVENS
In order to ensure that the built-in appliance functions properly, the cabinet containing it must be appropriate.
The figure below gives the dimensions of the cut-out for installation under the counter or in a wall cabinet unit.
N.B: Installation in compliance with the consumption declaration.
In order to ensure adequate ventilation, the back panel of the cabinet unit must be removed. Installing the
oven so that it rests on two strips of wood is preferable. If the oven rests on a continuous, flat surface,
there must be an aperture of at least 45×560mm
The panels of the adjacent cabinets must be made of heat-resistant material. In particular, cabinets with
a veneer exterior must be assembled with glues which can withstand temperatures of up to 100°C.
In compliance with the current safety standards, contact with the electrical parts of the oven must not be
possible once it has been installed.
All parts, which ensure the safe operation of the appliance, must be removable only with the aid of a tool.
To fasten the oven to the cabinet, open the door of the oven and attach it by inserting the 4 wooden
screws into the 4 holes located on the perimeter of the frame.
Do not install the appliance next to refrigerators or
freezers. The heat emitted by the appliance will lead to
an increase energy consumption of cooling appliances.
BO AE 1370 A
BO AE 86 A
BO AE 63 A
10
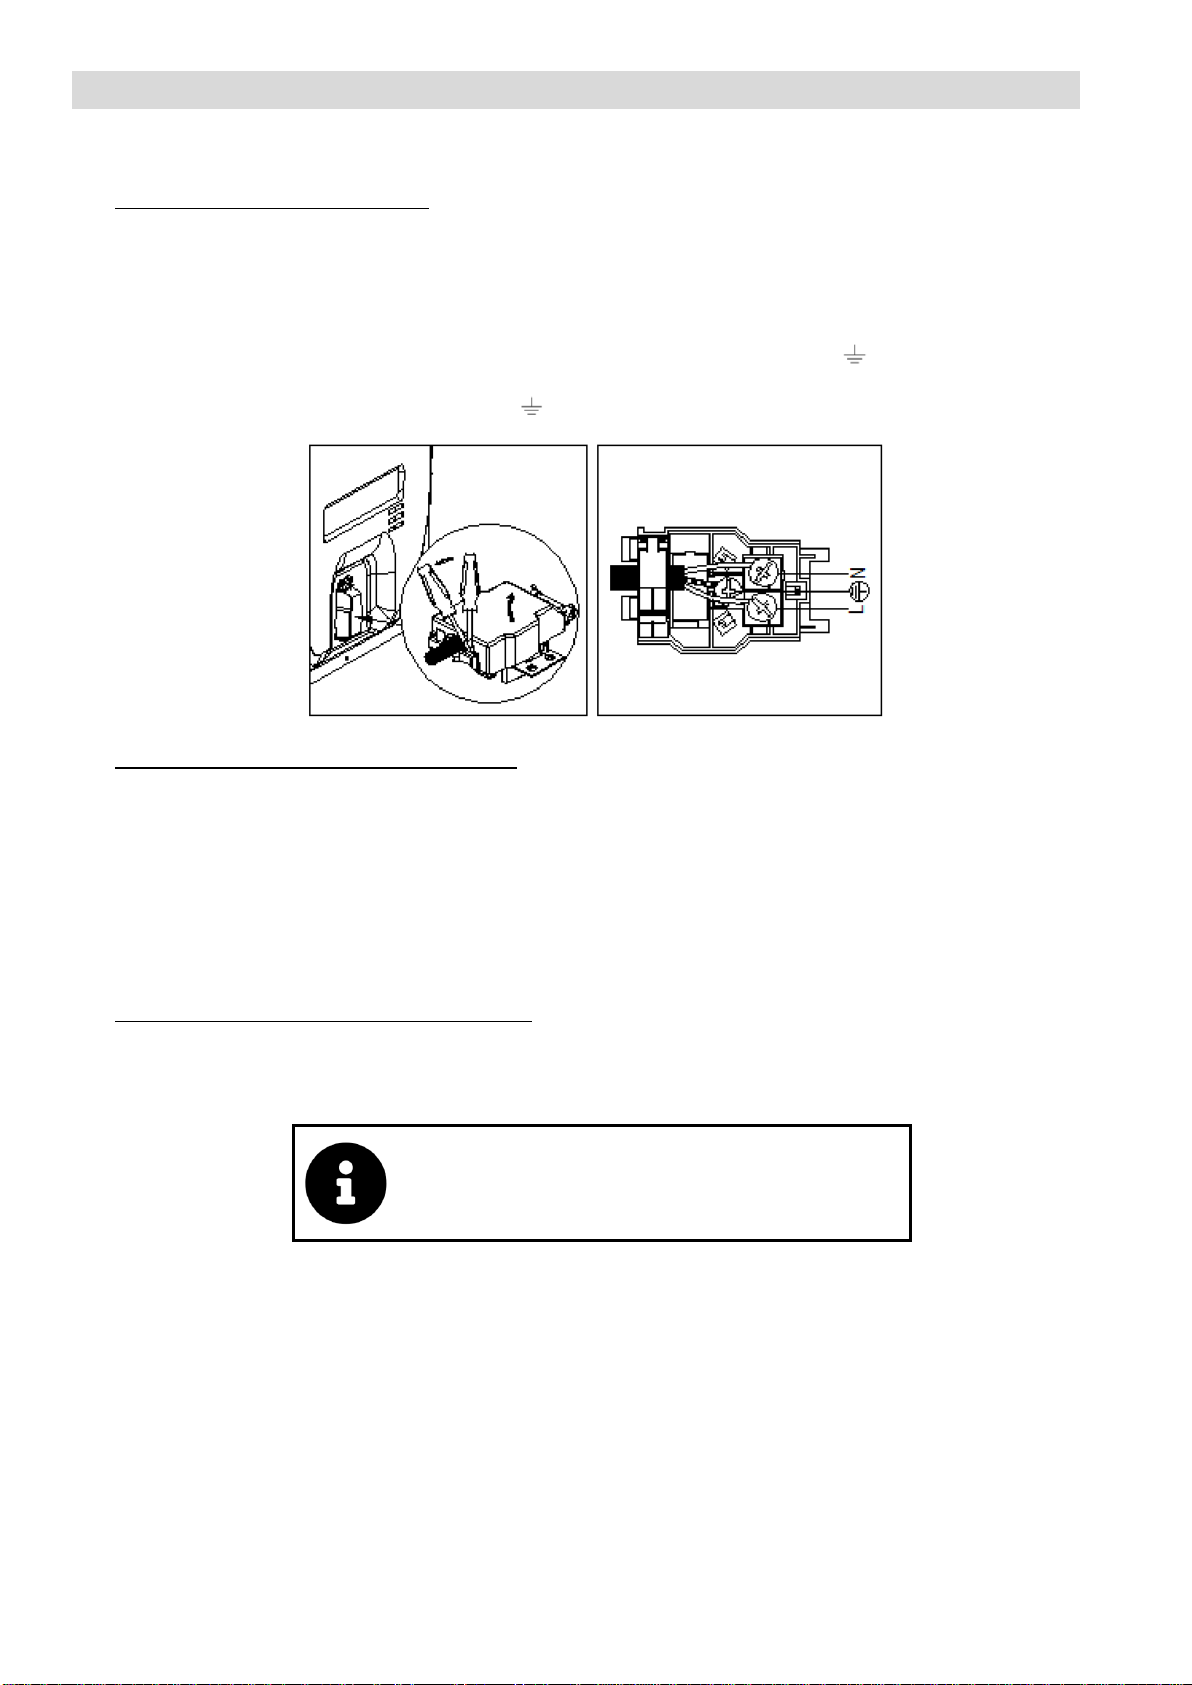
ELECTRICAL CONNECTION
Those ovens equipped with a three-pole power supply cable are designed to operate with an alternating
current. The wire for earthing the appliance is yellow-green in colour.
1. Fitting on a Power Supply Cable
Opening the terminal board
-Using a screw driver unscrew the bolt on the side tabs of the terminal board cover
-Using a screwdriver unhooking the 2 fixing hooks, pull open the cover of the terminal board.
To install the cable
-Remove the wire clamp screw and the three contact screws L- N -
-Fasten the wires beneath the screw heads using the following colour scheme:
Blue (N) Brown (L) Yellow-Green
-Fasten the supply cable in place with the clamp and close the cover of the terminal board
2. Connecting the supply cable to the mains
Install a standardized plug corresponding to the load indicated on the data plate.
When connecting the cable directly to the mains, install an omnipolar circuit breaker with a minimum
contact opening of 3mm between the appliance and the mains. The omnipolar circuit breaker should
be sized according to the load and should comply with current regulations (the earth wire should not
be interrupted by the circuit breaker)
The supply cable should be positioned so that it does not reach a temperature of more than 50℃
with respect to the room temperature, anywhere along its length, or protected by insulation sleeping
having an appropriate rating.
3. Before making the connection, check that -
The electrical safety of this appliance can only be guaranteed if the cooker is correctly and efficiently
earthed in compliance with regulations on electrical safety. Always ensure that the earthing is
efficient. If you have any doubts, do call qualified technician to check the system.
The manufacturer declines all responsibility
for damage resulting from a system which has
not been earthed.
Before plugging the appliance into the main, check that the specifications indicated on the date plate
(on the appliance or packaging) correspond to those of the electrical mains system of your home.
Check that the electrical capacity of the system and sockets will support the maximum power of the
appliance as indicated on the data plate. If you have any doubts, do call qualified technician.
If the socket and appliance plug are not compatible have the socket replaced with a suitable model
by a qualified technician. The latter, in particular, will also have to ensure that the cross section of
the socket cables are suitable for the power absorbed by the appliance.
The use of adapters, multiple sockets and /or extensions, is not recommended. If their use cannot
be avoided, remember to use only single or multiple adapters and extensions which comply with
current safety regulations .In these cases, never exceed the maximum current capacity indicated on
the single adapter or extension and the maximum power indicated on the multiple adapter. The plug
and socket must be easily accessible.
11
PRODUCT OVERVIEW
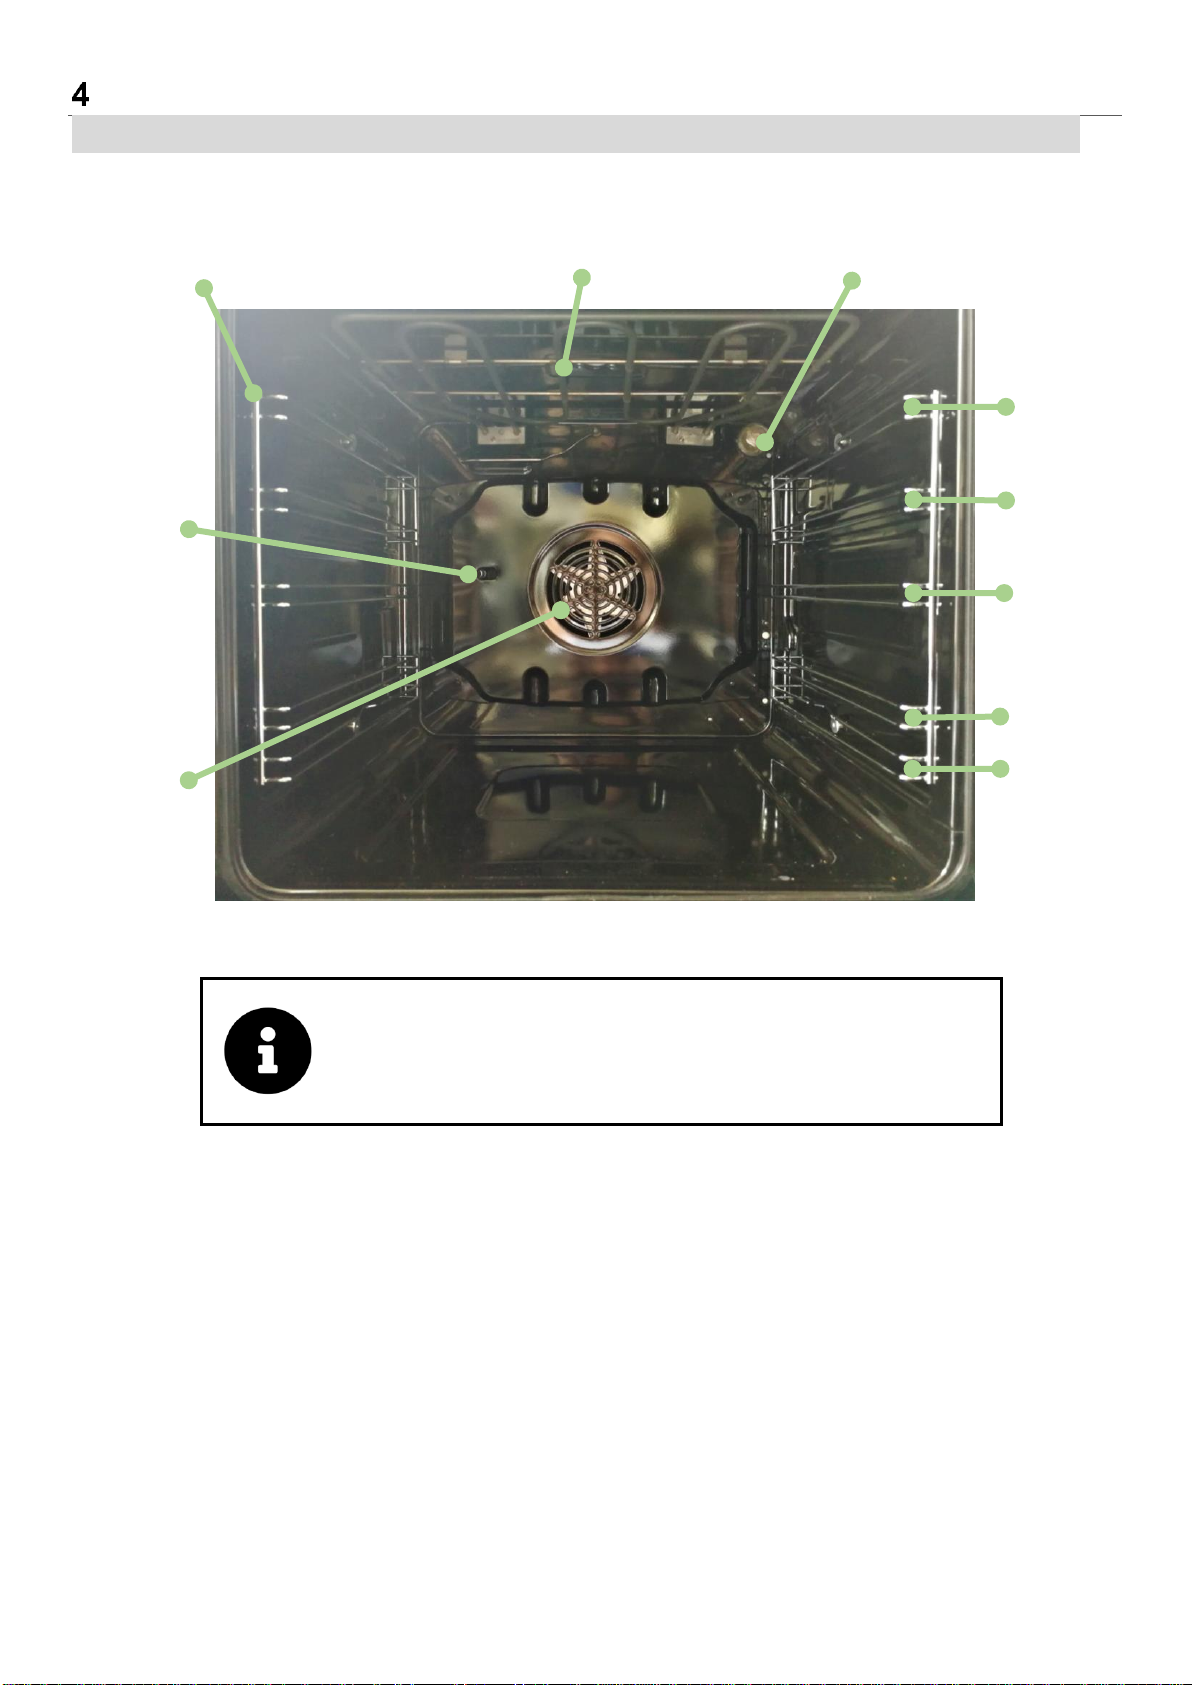
PARTS AND FEATURES
Levels 4 and 5 are used mainly for the grill functions.
Refer to the cooking guides provided throughout this manual
to determine appropriate shelf levels for your dishes.
Top Heating Element
Light Bulb
Level 5
Level 4
Level 3
Level 2
Level 1
Sliding Racks /
Side Runners
Rotisserie
Hole
Oven Fan

12
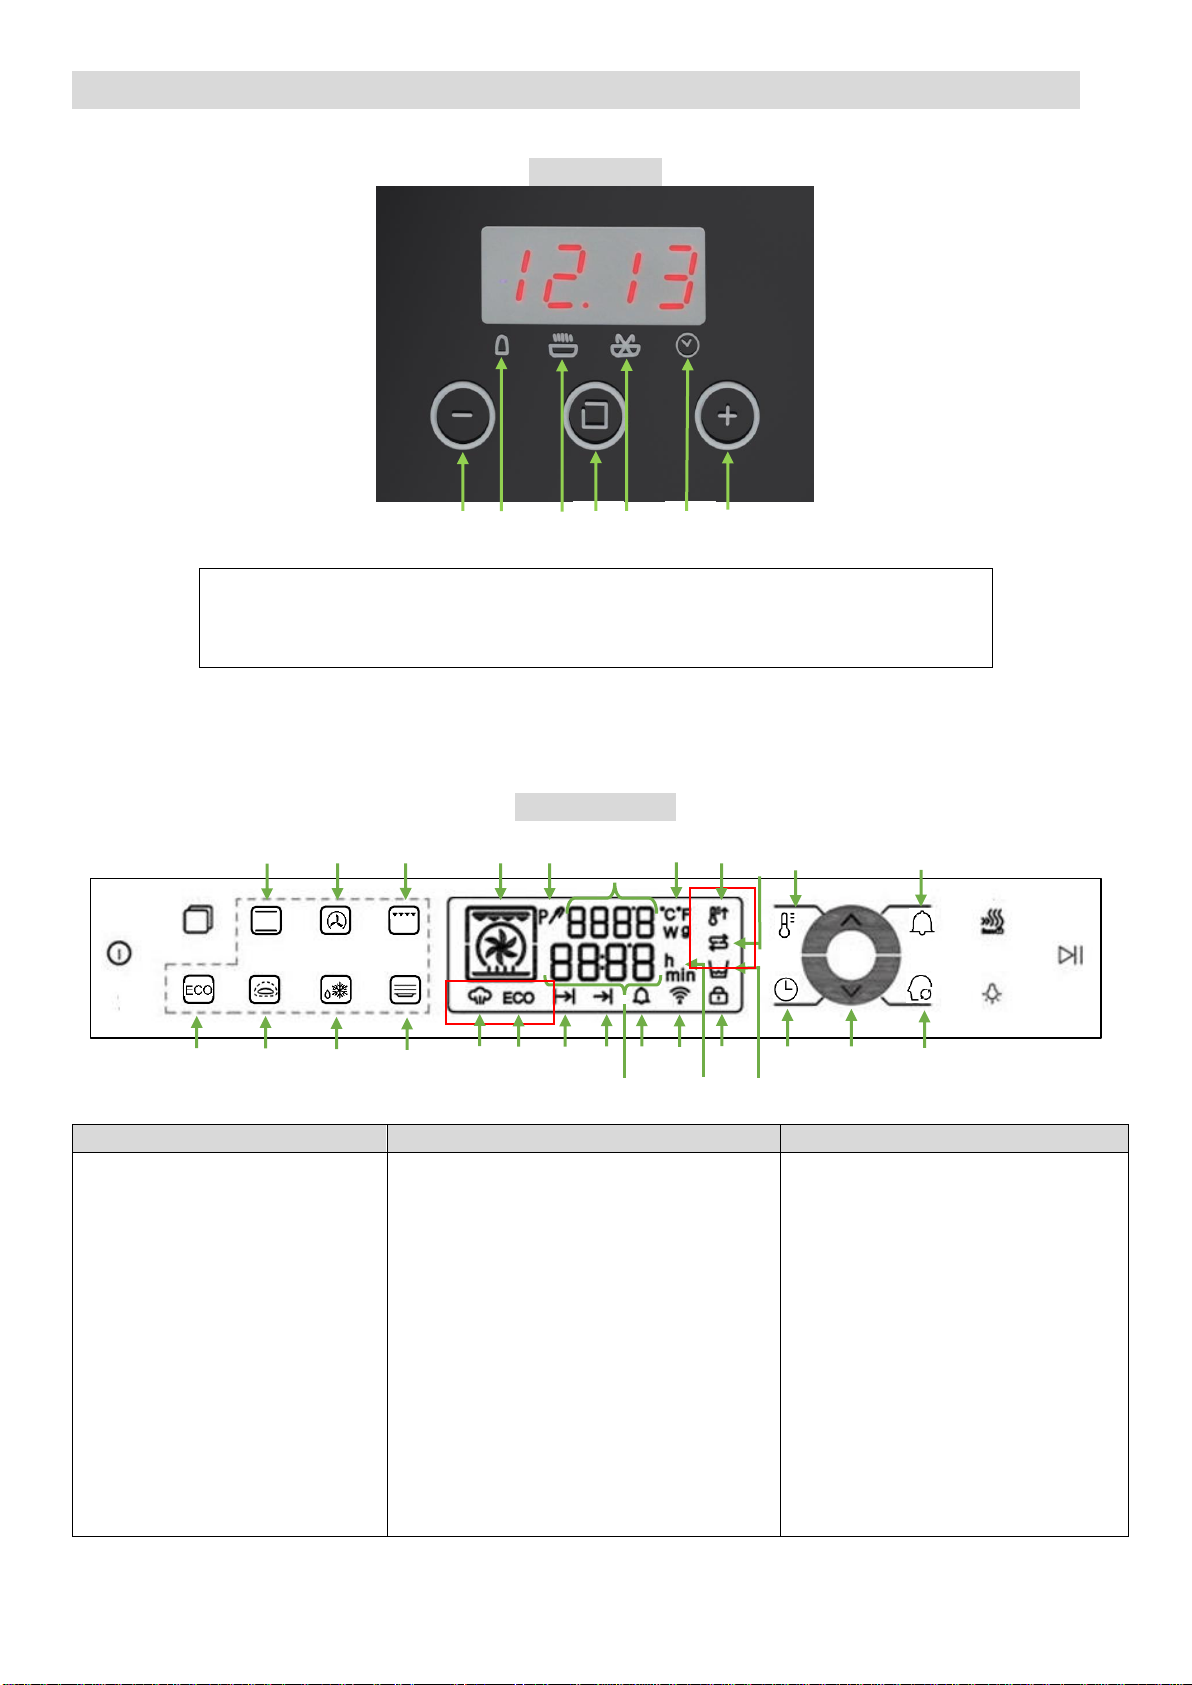
OVEN CONTROLS
BO AE 63 A
BO AE 86 A
BO AE 1370 A
1 –Cooking Mode Selection Knob
2–Manual Operation Setting
3–Cooking Time Selection Knob
4 –Oven Indication Light
5 –Cooking Temperature Selection Knob
1 –Cooking Mode Selection Knob
2 –Electronic Programmer
3 –Oven Indication Light
4–Cooking Temperature Selection Knob
1 –On/Off Button
2 –Function Button
3 –Function Shortcut Button
4–Window Display
5 –Temp/Function Adjust Button
6–Oven Light Button
7 –Start/Stop Button
8–Rapid Heating Button/Child Lock
4
1
5
3
1
3
4
2
2
1
2
4
3
6
7
8
5
13
OVEN DISPLAYS
BO AE 86 A
BO AE 1370 A
Function Shortcut Buttons
Window Display
Auxiliary Function
1 –Conventional Heat Mode
2 –Bake Mode
3 –Grill Mode
4 –Energy Saving Baking Mode
5 –Fermentation Mode
6 –Defrost Mode
7 –Warm Dish Mode
8–Current Oven Function Icon
9–Rotisserie Icon
10 –Temperature Display
11 –Temperature Scale
12 –Rapid Heating Button Icon
13 –
14 –
15 –Energy Saving Baking Mode Icon
16 –Cook Time Icon
17 –End Time Icon
18 –Time Display (Cook Time/End Time)
19 –Kitchen Timer Icon
20 –
21 –
22 –Child Lock Icon
23 –
24 –Temperature Button
25 –Time Button
26 –Kitchen Timer Button
27 –Memory Button
28 –Temp/Function Adjust Button
1/7 –Backward / Forward Adjustment
2 –Timer
3 –Cooking Time Setting
4 –Function Setting
5–End Cooking Time Setting
6 –Clock
1
7
2
3
6
4
1
2
3
4
5
6
7
8
9
10
11
12
13
14
15
5
16
5
17
5
18
5
19
5
20
22
23
24
25
26
27
28
21
5
14
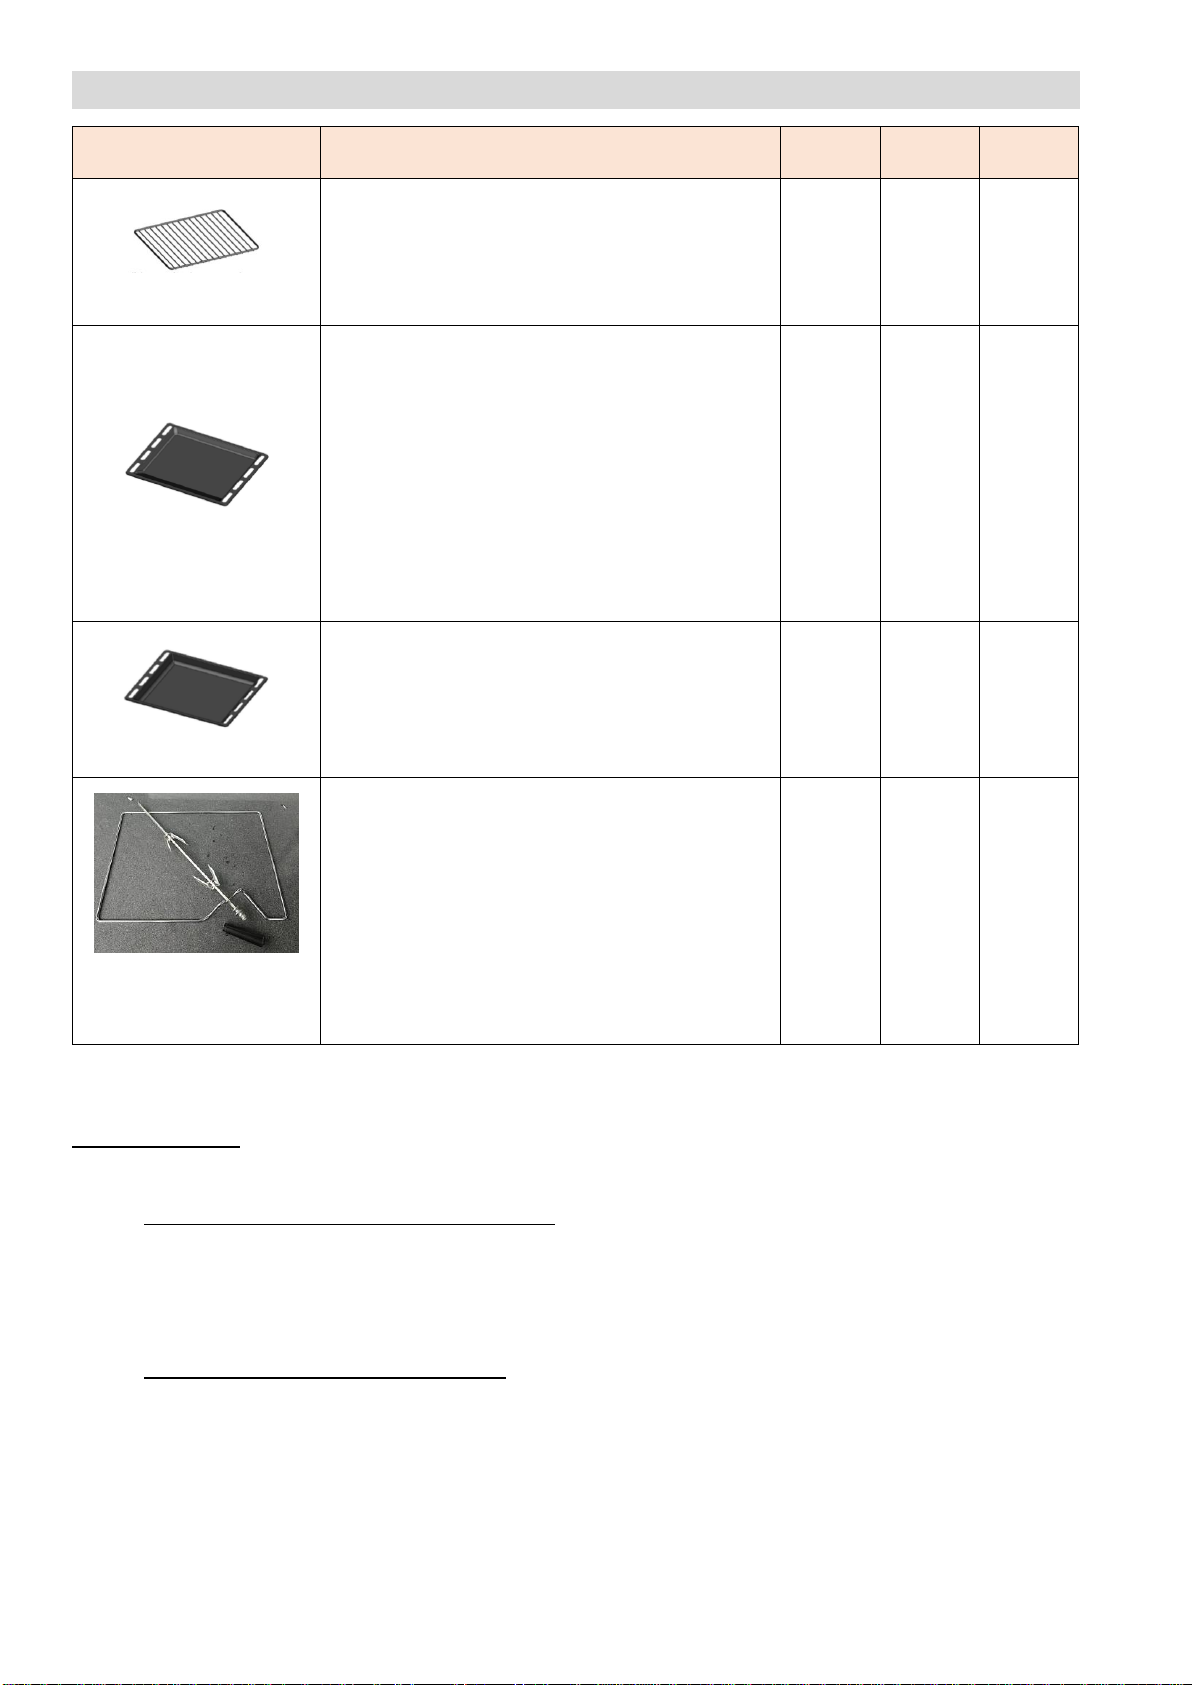
ACCESSORIES
*Product images shown are for illustration purposes only and may not be an exact representation of the
product.
Rotisserie Spit
*Refer to “Practical Cooking Advices” section to learn more about cooking rotisserie
To skewer the meat into the metal prongs.
1. Release the outer prongs from the bar and insert the meat through the bar all the way in until
the sharp ends of the inner prongs is completely inserted into the meat.
2. Insert the outer prongs back into the bar until sharp end of the outer prongs is completely
inserted into the meat.
Connecting rotisserie spit to the oven
1. Insert rotisserie spit support at “Level 3”
2. Attached the spit to the hole located inside of the back oven (Fig.A)
3. Align the neck of the bar to the support so that it will rotate evenly (Fig.B)
4. Place baking tray into “Level 1” to collect meat juices (Fig.C)
5. Make sure the handle is not attached to the body when oven is operating (Fig.D)
Items
Usage
BO AE
63 A
BO AE
86 A
BO AE
1370 A
Wire Grill
For dishes, cake tins, roasting and grilling
tray
Positioning the wire grill, insert the wire
grill at any desired level.
✔
✔
✔
Baking Tray
For cakes and biscuits
For baking or roasting purpose, insert the
baking tray into “Level 4”
Ensure that the pan or tray is properly
placed in the side runners.
If the oven does not include a deep tray
accessory, you can use the baking tray by
inserting into “Level 1”. However, it will not
collect as much juices as a deep tray
would collect.
✔
✔
✔
Deep Pan
For roasting or collecting meat juices or
fat drippings
For collecting meat juices/fat drippings,
insert the deep tray into “Level 1”
✔
Rotisserie Spit,
Support and
Detachable Handle
For rotisserie usage.
Refer below on learn how to use
Only works on certain modes (Refer to “How
to use Oven Modes” section in this manual)
✔
✔
✔

15
Fig.A
Fig.B
Fig.C
Fig.D
Refer to the “Practical Cooking Advices Table” if
you are unsure of which position best suited for
your dish.
Do not allow these accessories to contact the
bottom surface of the oven as it can damage the
enamel of the surface. Trays and pans placed on
“Level 1” should clear the bottom surface of the
oven by at least 2 cm.
Hole
Neck
Support
Tray
Handle

16
PRODUCT SPECIFICATIONS
BO AE 63 A, BO AE 86 A&BO AE 1370 A
Image
Model
BO AE 63 A
BO AE 86 A
BO AE 1370 A
Types
Conventional Oven
Multi-Function Oven
Multi-Function Oven
Size
60cm
60cm
60cm
Capacity
73L
73L
73L
Features
Mechanical control
Automatic cut off timer
5 shelf positions
Triple glazed glass door
Auto safety switch off
Electronic control with digital
clock
Automatic cut off timer
Pop out knob with LED light
5 shelf positions with easy
detachable side racks
Triple glazed glass door
Auto safety switch off
Black stainless steel strip
with mirror glass
Full sensor touch control
Automatic cut off timer
5 shelf positions with easy
detachable side racks
Triple glazed glass door
Auto safety switch off
Functions
Light
Top Heating
Convection
Fan Bake
Fan Assist Grill
Full Grill
Light
Top Heating
Convection
Delicate Cooking
Bake Cooking
Fan Assist Grill
Full Grill
Defrost
Top Heating
Convection
Full Grill
Fan Grill Assist
Fast Cooking
Defrost
Delicate Cooking
Bake Cooking
Pizza Cooking
Multi-Cooking
Fermentation Mode
Warm Dish Mode
Energy Saving Baking
Accessories
Grill Tray, Baking Tray and
Rotisserie
Grill Tray, Baking Tray and
Rotisserie
Rotisserie, Grill Tray, Deep
Tray, Baking Tray
Product
Dimension
W594 x D569 x H594 mm
W594 x D569 x H594 mm
W594 x D569 x H594 mm
Built-In
Dimension
W565 x D550 x H585 mm
W565 x D550 x H585 mm
W565 x D550 x H585mm
Technical
Information
A-10% class in Energy
Efficiency
Max. Temperature: 250°C
Total Power Load:
2.64kW
Voltage and Frequency of
Power Supply : 220-240V
~ 50/60Hz
A-10% class in Energy
Efficiency
Max. Temperature: 250°C
Total Power Load: 2.64kW
Voltage and Frequency of
Power Supply : 220-240V ~
50/60Hz
A-10% class in Energy
Efficiency
Max. Temperature: 260°C
Total Power Load: 3.2kW
Voltage and Frequency of
Power Supply : 220-240V ~
50/60Hz
Refer to
“How to Use
Oven Modes”
section for
the function
details.
17
PREPARATION
INITIAL USE
When grilling food or using the rotisserie (only available on certain models), place the dripping/baking
pan provided on the bottom shelf of the oven to prevent any sauce and/or grease from dripping into the
bottom of the oven
For all other types of cooking, never use the bottom shelf and never place anything on the bottom of the
oven when it is in operation, because this could damage the enamel. Place your cookware (dishes,
aluminium foil, etc.) on the grid provided with the appliance inserted, especially along the oven guides.
INITIAL OVEN CLOCK SETTING
If the clock is not set, the oven will not operate (Applicable to model BO AE 86 A and BO AE 1370 A)
BO AE 86 A
1. When power is first supplied to the oven, the display will show “12:00”.
2. Pressing the “ + ” or “ - “ button will increase or decrease the number.
3. Once it is adjusted to the right timing, after 5 seconds and there are no further adjustments, the display
shows the time of day. The appliance is now ready to use.
BO AE 1370 A
1. When power is first supplied to the oven, the display on the control panel will light briefly and 12:00 will
appear in the display.
2. Touch the “Time Button” “12:00” will start flashing in the display.
3. Press the “Temp/Function Adjust Button” to set the time.
4. Touch the “Time Button” again to end the settings or wait 5 seconds.
FIRST CLEANING OF THE APPLIANCES
Do not use sharp or abrasive cleaning materials. These could damage
the oven surface. For ovens with enamel fronts, use commercially
available cleaning agents.
Clean the oven thoroughly before using for the first time:
1. Open the door, the oven lights comes on automatically. If it is not turned on:
BO AE 1370 A –Touch the “Light Button”icon
BO AE 63 A / BO AE 86 A –Adjust the “Cooking Mode Selection Knob” to the symbol.
2. Clean all oven trays, accessories and side runners with warm water or washing up liquid and polish
dry with a soft clean cloth.
3. Clean the oven interior with a soft clean cloth. Wipe the front of the appliance with a damp cloth.
INITIAL HEATING
The first time you use your appliance, we recommend you to remove accessories and set the thermostat
to the highest setting and leave the oven on for about an hour with nothing in the cavity, with the oven
door closed.
There will be a distinctive odour and smoke comes out from the oven when first use and it is normal.
Ensure your kitchen is well ventilated during this conditioning period. After an hour, open the oven door
and let the air in. The odour that is often detected during this initial use is due to the evaporation of
substances used to protect the oven during storage.
18
OPERATING OF APPLIANCES
BO AE 63 A
Cooking Mode Selection Knob (1)
1. Adjust the knob to the desired cooking mode.
2. Remember to readjust the knob to symbol after completing the session.
Cooking Time Selection Knob (3)
1. This model is equipped with a timer.
2. Position of the cooking time knob between 10 minutes and 120 minutes.
3. At the end of the programmed length of time, the timer will sound and automatically turn off the oven.
Manual Operating Setting (2)
1. Position the “End Cooking Time Mode (3)” anti-clockwise to the symbol.
2. During this mode, the oven will continue baking endlessly until the knob is readjusted back to the
symbol or after 2 hours of cooking.
Oven Light
-The oven light will stay on automatically during cooking process.
-To switch on the oven light (for cleaning purposes) manually, make sure that the oven is in the
mode,adjust the “Cooking Mode Selection Knob (1)” to the symbol to turn it on.
Exterior Cooling Ventilation
-This model is equipped with a cooling fan, which comes on automatically when the oven is hot,
whether or not the appliance is currently in use. This is to cool down the exterior of the appliance or
the surrounding temperature within the cabinet.
-When the cooling ventilation has started, a flow of air can be heard exiting the oven between the
oven door and the control panel. The fan will turn off automatically when the exterior of the oven is
being cool down sufficiently.
-
Do not turn off the main switch during the cooling stage. Turn off only
when there is no air flow heard exiting from the oven. Turning off
during this stage may damage the oven.
BO AE 86 A
Pop-up Control Knob
Push the control knobs lightly to release it or lock it.
Timer (The longest time frame can be set is 23 hours 59 minutes)
Press the “Function Settings” until red light above the symbol flashes.
Press “ + “ or “ – “ button to adjust to the desired cooking time.
After setting, the proper time (hour, minute) and the red light above the symbol begins to light.
The timer countdown will begin to work. When it reaches the set timer, the red light above flashes,
and the alarm will ring. To stop the ringing, press any button.
Automatic Setting (To set the time of full automatic both starting and ending)
1. Press the “Function Settings” repeatedly until a red light above the flashes, and press “ +
“ or “ – “ button to set the time frame baking.
Example: The food is required to bake for 45 minutes and supposed to stop at 14:00. Set the
time of baking to “0:45”
2. Press the “Function Settings” repeatedly until a red light above the flashes, and press “ +
“ or “ – “ button to set the time to switch off.
Example: Set the end time of baking to 14:00.
3. Adjusting the “Cooking Mode Selection Knob (1)” and “Cooking Temperature Selection Knob (4)” to
set the desired temperature and baking method.
19
4. After these settings, the red lights above the and symbols and will light up, it indicates
the baking procedure of oven has been set and remembered automatically.
Example: The oven will only start to operate at 13:15, runs for 45 minutes, ends at 14:00.
5. When the baking is done, the red light will flash, and an audible signal sounds. Press any button to
remove the audible sound.
6. After the alarm is switched off, the oven will still continue to bake. To stop operation, adjust the
“Cooking Mode Selection Knob (1)” back to the symbol.
Semi-Automatic Setting (To set the time of automatic starting or ending)
Setting the time frame of baking (10 hours longest)
1. Press the “Function Settings” repeatedly until a red light above the flashes, and
press “ + “ or “ – “ button to set the time frame baking.
2. Adjusting the “Cooking Mode Selection Knob (1)” and “Cooking Temperature Selection Knob
(4)” to set the desired temperature and baking method. A red light above the symbol
will light up, it indicates the baking procedure of oven has been set and remembered
automatically.
3. When the baking is done, the red light will flash, and an audible signal sounds. Press any button
to remove the audible sound.
4. After the alarm is switched off, the oven will still continue to bake. To stop operation, adjust the
“Cooking Mode Selection Knob (1)” back to the symbol.
Setting the end time of baking (23 hours 59 minutes longest)
1. Press the “Function Settings” repeatedly until a red light above the flashes, and
press “ + “ or “ – “ button to set the end time of baking
2. Adjusting the “Cooking Mode Selection Knob (1)” and “Cooking Temperature Selection Knob
(4)” to set the desired temperature and baking method. A red light above the symbol
will light up, it indicates the baking procedure of oven has been set and remembered
automatically.
3. When the baking is done, the red light will flash, and an audible signal sounds. Press any button
to remove the audible sound.
a. After the alarm is switched off, the oven will still continue to bake. To stop operation, adjust the
“Cooking Mode Selection Knob (1)” back to the symbol.
Oven Light
Adjust the “Cooking Mode Selection Knob (1)” to the symbol to turn it on and stays on when
any of the electrical heating elements in the oven comes on.
To turn off, adjust back to the symbol.
Exterior Cooling Ventilation
This model is equipped with a cooling fan, which comes on automatically when the oven is hot,
whether or not the appliance is in use. This is to cool down the exterior of the appliance.
When the cooling ventilation has started, a flow of air can be heard exiting the oven between the
oven door and the control panel.
The fan will turn off automatically when the exterior of the oven is being cool down sufficiently.
Do not turn off the main switch during the cooling stage. Turn
off only when there is no air flow heard exiting from the oven.
Turning off during this stage may damage the oven.

20
BO AE 1370 A
Setting Oven Function
i. After the clock is set, select function bytouching the icon repeatedly or any function from the
“Oven Shortcut” section to choose your desired oven function on the control panel.
ii. Pressthe “Start/Stop Button” and the oven will operate accordingly.
Setting Oven Temperature
1. After the function is selected, press the icon to enter oven temperature setting. The
temperature display will start flashing.
2. Press the “Temp/Function Adjust Button” to adjust oven temperature.
( - to increase temperature; - to decrease temperature)
Switching Oven On/Off
1. To switch the oven on/off, touch the “On/Off Button”
Switching Oven Lights On/Off
1. To switch the lights on/off, touch the “Oven Light Button”
End Time (Setting end time during cooking)
1. Touch the “Time Button” several times until the “End Time” icon begins to flash.
2. Touch the “Temp/Function Adjust Button / ” to set the desired time.
3. After the timing is set, press “Start/Stop Button” icon to start the oven operations accordingly
with the selected end time.
Cook Time (Setting cook time during cooking)
1. Touch the “Time Button” several times until the “Cook Time” icon begins to flash.
2. Touch the “Temp/Function Adjust Button / ” to set the desired time.
3. After thetiming is set, press “Start/Stop Button” icon to start the oven operations accordingly
with the selected cook time.
Both Cook Time and End Time
need to set within 5 seconds and
press Otherwise, it will
revert to its original settings.
Delayed Start
If the “Cook Time” has already been entered and set, the cook time and the end time will be calculated
automatically. However, you can set a delayed start to the function if you want the dish to cook later to
your desired end time.
Example: Current oven time is 15:00 and the desired cook time 4 hours for this dish. However, you want
the oven to finish at 20:30 instead.
1. Touch the “Time Button” and the “Cook Time” icon on the display will begin to flash.
Example: Current time is 15:00 and the desired cook time is 4 hours.
2. Touch the “Temp/Function Adjust Button / “ to set the desired end time.
Example: Adjust the time to 4:00
3. Touch the “Time Button” again until the “End Time”icon and the current time appears.
4. Touch the “Time/Temp/Function Adjust Button / “ to set the delayed end time.
Example: Adjust the delay end time to 20:30
5. Touch the “Time Button” again to set the delayed end point or wait for 5 seconds. Both and
will flash in intervals, indicating that the settings have been set.
Example: The oven will stop operating immediately. When the current clock hits 16:30, the
oven will begin its operation and starts the countdown of the set cooking time of 4 hours to
end at the desired end time of 20:30.
If you want to set both “Cook
Time” and “End Time”, you
must set “Cook Time” first.
This manual suits for next models
2
Table of contents
Other EF Oven manuals


Popular Oven manuals by other brands


Breville
Breville BOV845 Smart Oven Pro Instruction book

eka
eka KF 630 D UD Use and instruction manual

Blodgett Combi
Blodgett Combi BC14G Service and repair manual

BORETTI
BORETTI Maggiore Cucine Installation - use - maintenance

Elba
Elba EEO-A4218 owner's manual

Bella
Bella Ultimate Elite Collection instruction manual


