EF BO GE 1770SA M User manual

1
EMBRACINGFINESTMOMENTS
BUILT‐INOVEN
60CM
Model:
BOGE1770SAM
USER MANUAL

2
Please read this user manual before usage!
Dear Customer,
Thank you for purchasing this EF product. We hope that you obtain the greatest performance from our
products which has been manufactured with excellent quality, state-of-the-art technology that will be able to
contribute to making your everyday life even easier.
Hence, please take your time to read this entire user manual and other documents supplied with the product
to retain the appliance at its best performance and extend the lifespan of this appliance. This manual provides
all detail instructions you may require to ensure a safe installation, usage, and maintenance.
Do note that this user manual may be applicable to other models. Differences between models will be
identified in the manual.
Explanation of symbols
Throughout this user manuals the following symbols are used:
Important Information or Useful hints about usage
General warning warns for hazardous situation
with regard to life and equipment
Electrical warning warns of hazards from electricity
which can result in physical injury and/or damage
to the equipment
Warning for risk of fire
Warning for hot surfaces
Please keep this user manual within easy reach for future references. Doing so will allow you
to understand and take advantage of the appliance unique features at any time.

3
CONTENTS
1 SAFETY GUIDELINES.............................................................................................4
GENERAL SAFETY.....................................................................................................4
ELECTRICAL SAFETY................................................................................................4
DISPOSAL INSTRUCTIONS.......................................................................................5
SAFETY DURING / AFTER OPERATION...................................................................5
CHILD SAFETY...........................................................................................................6
CLEANING AND MAINTENANCE...............................................................................7
2 GENERAL INFORMATION......................................................................................8
MAINTAINING EFFICIENCY.......................................................................................8
CONTACTING QUALIFIED PERSON / CUSTOMER SERVICE.................................8
3 INSTALLATION........................................................................................................9
BEFORE INSTALLATION............................................................................................9
INSTALLATION OF BUILT-IN OVENS........................................................................9
ELECTRICAL CONNECTION...................................................................................10
4 PRODUCT OVERVIEW..........................................................................................12
OVEN CONTROLS...................................................................................................12
ACCESSORIES.........................................................................................................13
5 PREPARATION......................................................................................................15
6 OVEN FUNCTION..................................................................................................16
BAKE FUNCTION.....................................................................................................16
PURE STEAM FUNCTION........................................................................................17
STEAM ROAST FUNCTION.....................................................................................17
AUTOMATIC MENU..................................................................................................18
7 OPERATING OF APPLIANCE...............................................................................19
8 CLEANING AND CARE.........................................................................................25
CLEANING THE OVEN.............................................................................................25
HOW TO REMOVE THE OVEN DOOR....................................................................27
HOW TO DISMANTLE THE OVEN GLASS..............................................................28
9 TIPS FOR ENERGY SAVINGS..............................................................................29
10 FAQS AND TROUBLESHOOTING......................................................................30
11 WARRANTY & SERVICE.....................................................................................34

4
1 SAFETY GUIDELINES
This section contains safety instructions that will help reduce the risk of injury, electric shock and property
damage.
GENERAL SAFETY
Before unpacking the appliance, please read the instructions carefully.
Always place oven racks in desired location while oven is cool. If a rack must be moved while oven is
hot, do not let potholder contact the heating elements.
Always use dry potholders. Moist or damp potholders on hot surfaces may result in burns from steam.
Secure all loose garments before begin operating. Tie long hair so that it does not hang loose, and do
not wear loose fitting clothing or hanging garments, such as ties, scarves, jewellery, or dangling sleeves.
Care shall be taken to avoid touching heating elements.
Disconnect the appliance from the electrical mains if it is not functioning properly and before cleaning or
maintenance
Unplug the appliance if not using for a long time
Use oven gloves to place cookware in the oven or remover the cookware
Grip the middle of the handle as the two ends will get hot due to the hot air from the cavity
Cut the power supply cable when you decide not to use the appliance any longer
Frozen foods such as pizzas should be cooked on the wire grill. If the baking tray is used, it may become
deformed due to the great variation in temperatures.
Actions that should be avoided:
‐ Touching the heating element after usage, even after a short operation
‐ Improper or dangerous operations
‐ Obstructing the ventilation or heat dissipation slots
‐ Exposing the appliance to atmospheric agents such as rain and sunlight
‐ Using the oven for storage purposes
‐ Touching the appliance with wet parts of the body
‐ Cutting the electricity by moving the appliance or by pulling the power cord
‐ Attempting to install or repair the appliance without reading the manual thoroughly or without the
assistance of qualified person
ELECTRICAL SAFETY
If the oven has been damaged in transport, do not connect it.
Appliance must be connected to the mains power supply only by a specially licensed electrician.
Avoid using adapters, multiple sockets and/or extension leads.
In the event of a fault or damage to the appliance, do not attempt to operate it.
Repairs should be performed by a licensed technician only.
Improper repair may result in considerable danger to you and others.
If your oven needs repair, contact a Service Centre or your dealer.
If the supply cord is defective, it must be replaced by a special cord or assembly available from the
manufacturer or an authorized service agent.
Electrical leads and cables should not be allowed to touch the oven.
Install an omnipolar circuit-breaker with a minimum contact opening of 3mm between the appliance and
the mains. The omnipolar circuit breaker should be sized according to the load and should comply with
current regulations (the earth wire should not be interrupted by the circuit breaker).
The rating plate is located on the right side of the door
The power supply of the appliance should be turned off when it is being repaired or cleaned.
Take care when connecting electrical appliances to sockets near the oven.
Use the electricity system safety when connecting the appliance earth cord.
If the product has a failure, it should not be operated unless
repaired by the Authorised Service Agent. Risk of electrical shock.

5
DISPOSAL INSTRUCTIONS
The material used to package this appliance is recyclable.
Dispose of the packaging materials in the appropriate container at your local waste disposal facility
Disposing of Old Appliances
‐ When replacing old appliances with new ones, the retailer is legally obligated to take back your old
appliance for disposals at least free of charge.
‐ You can obtain information about collection dates and public refuse disposal sites from your local refuse
department or council.
Crossed-Out Wheeled Dustbin Symbol
Do not dispose of electrical appliances as unsorted municipal waste, use separate
collection facilities. Contact your local government for information regarding the collection
systems available. If electrical appliances are disposed of in landfills or dumb, hazardous
substances can leak into the groundwater and get into the food chain, damaging your
health and well-being.
SAFETY DURING
/
AFTER OPERATION
This oven is designed only for the cooking of household food.
During use, the oven interior surfaces will become hot enough to cause burns.
Do not touch heating elements or interior surfaces of the oven until they have had time to cool down.
When cooking, care must be taken when opening the oven door as hot air and steam can escape rapidly.
When cooking dishes that contains alcohol, the alcohol may evaporate due to the high temperatures and
the vapour can catch fire if it comes into contact with a hot part of the oven.
For your safety, do not use high-pressure water cleaners or steam jet cleaners.
Do not pour water into the oven bottom when it is hot. This could cause damage to the enamel surface.
The oven door must be closed during cooking.
Do not place accessories or ovenware on the bottom of the oven cavity. This will cause heat to accumulate
and evenly damage the enamel.
Do not line the oven bottom with aluminium foil and do not place any baking trays or tins on it. The
aluminium foil blocks the heat, which may result in damage to the enamel surfaces and cause poor cooking
results.
Aluminium foil must not come into contact with the oven door glass. This could cause permanent
discoloration of the door glass.
Switch off the Main power supply before replacing the lamp to
avoid the possibility of electric shock.
Never store flammable materials in the oven and avoid using
flammable liquids near the appliance.
Before disposing of old appliances, make them inoperable so
that they cannot be a source of danger. To do this, disconnect
the appliance from the mains supply and remove the mains lead.
To protect the environment, it is important that old appliances
are disposed of in the correct manner. The appliance must not be
disposed of with household rubbish.

6
Fruit juices will leave stains, which can become indelible on the enamel surfaces of the oven.
When cooking very moist cakes, use the deep pan/baking tray.
Do no rest bakeware on the open oven door.
Over an extended period of time, moisture in the cavity may lead to corrosion. Allow the appliance to dry
after each use.
Always heat up the appliance for at least 20minutes if the appliance is not in used for 1 month to prevent
the moisture accumulated on the heating element which may lead to power short circuit.
If the residual heat in the cavity is used to keep the food warm, a high moisture content can occur and
may lead to condensation that can cause corrosion. Avoid condensation by opening the door or use
“Defrost” mode.
This appliance is not intended for use by young children or infirm persons without the adequate supervision
of a responsible person.
The oven’s electrical circuitry features a thermal shutoff system. If a cooking time is not entered, the oven
will shut itself off after two hours.
If the oven heats to abnormally high temperatures, the system will shut off the power supply to the heating
elements for a period of time or oven for all along.
During use, the oven glass door will become hot.
Avoid touching the oven glass door.
CHILD SAFETY
This product can be used by the children who are at the age of 8 and over and the
people whose physical, sensory or mental skills are not fully developed or who do
not have necessary required experience and knowledge as long as they are
supervised or trained about the safe use of the product and its risks.
Children should not play with the device. Cleaning and maintenance works should
not be performed by children unless they are supervised by someone.
Children of less than 3 years should be kept away unless continuously supervised.
Packaging materials may be dangerous for the children. Keep packaging materials
in a safe place away from reach of the children.
Electrical products are dangerous for the children. Keep the children away from
the product when it is in use. Do not allow them to play with the product. Use child
lock to prevent children from intervening with the product.
Accessible parts may become hot when the grill is in use. Children should be kept
away. Some parts of this product can become very hot and cause burns.
Particular attention has to be given where children and vulnerable people are
present.
Accessories that comes with the appliance should be kept out of sight and reach
of children as it may be potentially dangerous to them.
Items of interest to children should not be stored in an appliance, in cabinets
above an appliance or on the backsplash. Children climbing on an appliance to
reach items could be seriously injured.
Do not allow anyone to climb, stand, lean, sit, or hang on any part of an appliance,
especially the door, warming drawer or storage drawer. This can damage the
appliance, and the unit may tip over, potentially causing severe injury.

7
CLEANING AND MAINTENANCE
- Do not clean the appliance while it is still hot. Some cleaners produce noxious fumes when applied to a
hot surface. Wet clothes or sponges can cause burns from steam.
1. Oven Exterior
For cleaning both the interior and exterior of the oven, use a cloth and a mild cleaning agent or warm
soapy water.
Dry with kitchen paper or a dry towel.
Do not use metal scourers, caustic cleaners or abrasive products, especially stainless steel parts
For aluminium parts, wipe the plate gently with a soft cloth or microfiber cloth and a mild window
cleaning detergent.
2. Oven Interior
Do not hand-clean the door seal.
Do not use coarse scouring pads or cleaning sponges.
To avoid damaging the enamelled oven surfaces, use commercially available oven cleaners.
To remove stubborn soil, use a special oven clean.
3. Oven Door Glass
The oven door is equipped with three sheets of glass placed against each other. The inner & middle
sheets can be removed for cleaning (To remove the glass sheets, refer to “How to Dismantle The
Oven Glass Door” section in this manual)
Whenever the door is separated from the oven, the clips should be flipped open.
Do not use harsh abrasive cleaners or sharp metal scrapers to clean the oven door glass since they
can scratch the surface, which may resulting in shattering of the glass.
When the door is mounted, removing some of the parts (the door glass or some other part) from the
door may result in injury.
4. Accessories
Wash all bake ware and accessories after each use and dry with a kitchen towel.
To clean easily, soak in warm soapy water for about 30 minutes.
The oven and accessories should be cleaned after each use. Otherwise, further baking and roasting
will cause the deposits to bake on even harder and cleaning may become difficult and in extreme
cases impossible.
5. Cleaning with High Temperatures
Before cleaning with high temperatures,
‐ Make sure that all interior oven surfaces have been cleaned as described above. Otherwise, the
high temperatures can bake deposits onto the interior oven surfaces and make them impossible
to remove.
If, after manual cleaning, the oven is still heavily soiled, heating it to a high temperature will help
remove soiling caused by oil and grease splashes.
Note that if deposits of spices, syrups and similar substance are not removed by this process. These
should be further removed by hand with mild solution of hot water and washing – up liquid applied
with a soft brush.
The glass may break if you use excessive force
especially at the edges of the front sheet.

8
Method :
1. Remove all accessories from the oven.
2. Set the oven to conventional function.
3. Set the heat to 250 °C.
4. Run the oven for approximately 1 hour.
2 GENERAL INFORMATION
MAINTAINING EFFICIENCY
Only call the service centres authorized by manufacturer
Always use original spare parts by the manufacturer
If the supply cord is defective, it must be replaced by a special cord or assembly available from the
manufacturer or an authorized service agent.
CONTACTING QUALIFIED PERSON
/
CUSTOMER SERVICE
In the following cases:
Installation (following the manufacturer’s instructions)
When in doubt about operating the appliance
The power supply cable damaged or needs to be replaced
Appliance breaks down or functions poorly
Replacing the electrical socket when it is not compatible with the appliance plug
Refer to the back cover page for the Customer Care Service contact details
The length of time cleaning with this temperature will depend on the degree of
soiling. It is a good idea to set the finish time for the process using the end time
setting, in case you forget to switch the oven off at the end. Any remaining soil will
gradually disappear with each subsequent use of the oven at high temperatures.

9
3 INSTALLATION
The manufacturer may not be responsible for any damage due to incorrect installation and improper, incorrect
and irrational use.
BEFORE INSTALLATION
A safety distance must be left between the appliance and the kitchen walls and furniture.
Surfaces, synthetic laminates and adhesives used must be heat resistant (100°C minimum)
Kitchen cabinets must be set level and fixed.
If there is a drawer beneath the oven, a shelf must be installed between oven and drawers.
Carry the appliance with at least two persons
Take note of the following:
Prior to installation, visually check if the product has any defects on it. If so, do not have it installed.
Damaged products cause risks for your safety.
Electrical installation of this appliance must be performed only by a licensed electrician.
The oven must be installed according to the instructions supplied.
Remove the all the packaging materials and adhesive film from the appliance before turning on the power
The power supply to the appliance must be cut off before any adjustments or maintenance work is done
on it.
INSTALLATION OF BUILT
-
IN OVENS
In order to ensure that the built-in appliance functions properly, the cabinet containing it must be appropriate.
The figure below gives the dimensions of the cut-out for installation under the counter or in a wall cabinet unit.
Self-preparation of location and electrical installation
for the appliance is under customer’s responsibility
Ventilation opening
Ventilation opening
min
50 600
560+8
570
590
Map of ground cabinet
20
≥2.5 35
590 Machine 600 Machine
The minimum area of the
base vent is 250c㎡
≥5≥5
min
550 min
≥
≥2.5
600
560
+8
min
50
600
min570
min 550
*
*
Tall cabinet diagram Side view of high cabinet Side view of floor cabinet
The dimensions attached are in mm.

10
The panels of the adjacent cabinets must be made of heat-resistant material. In particular, cabinets with
a veneer exterior must be assembled with glues which can withstand temperatures of up to 100°C.
In compliance with the current safety standards, contact with the electrical parts of the oven must not be
possible once it has been installed.
All parts, which ensure the safe operation of the appliance, must be removable only with the aid of a tool.
To fasten the oven to the cabinet, open the door of the oven and attach it by inserting the 4 wooden
screws into the 4 holes located on the perimeter of the frame.
ELECTRICAL CONNECTION
The appliance is equipped with three-core power supply cable.
1. Connecting the supply cable to the mains
When connecting the cable directly to the mains, install an omnipolar circuit breaker with a minimum
contact opening of 3mm between the appliance and the mains. The omnipolar circuit breaker should
be sized according to the load and should comply with current regulations (the earth wire should not
be interrupted by the circuit breaker)
The supply cable should be positioned so that it does not reach a temperature of more than 50℃
with respect to the room temperature, anywhere along its length, or protected by insulation sleeping
having an appropriate rating.
2. Before making the connection, check that -
The electrical safety of this appliance can only be guaranteed if the appliance is correctly and
efficiently earthed in compliance with regulations on electrical safety. Always ensure that the earthing
is efficient. If you have any doubts, do call qualified technician to check the system.
The manufacturer declines all responsibility
for damage resulting from a system which has
not been earthed.
Before plugging the appliance into the main, check that the specifications indicated on the data plate
(on the appliance or packaging) correspond to those of the electrical mains system of your home.
Check that the electrical capacity of the system and sockets will support the maximum power of the
appliance as indicated on the data plate. If you have any doubts, do call qualified technician.
If the socket and appliance plug are not compatible, have the socket replaced with a suitable model
by a qualified technician. The latter, in particular, will also have to ensure that the cross section of
the socket cable is suitable for the power absorbed by the appliance.
The use of adapters, multiple sockets and /or extensions, is strongly not recommended. The plug
and socket must be easily accessible.
Do not install the appliance next to refrigerators or
freezers. The heat emitted by the appliance will lead to
an increase energy consumption of cooling appliances.

11
3. Changing the Power Supply Cable
Opening the terminal board (A)
‐ Using a screw driver unscrew the bolt on the side tabs of the terminal box
‐ Using a screwdriver unhooking the 2 fixing hooks (1,2), pull open the cover of the terminal board.
To install the cable
‐ Remove the wire clamp screw and the three contact screws L- N -
‐ Fasten the wires beneath the screw heads using the following colour scheme:
Blue (N) (5) Brown (L) (4) Yellow-Green (3)
‐ Fasten the supply cable in place with the clamp and close the cover of the terminal board
‐
12 3 4
brown {L}
yellow/green
blue {N}
6 5
A

OVEN CONTROLS
No. Symbol Description
1
Power /Off / CancelButton
2 BakeFunction
3 PureSteamFunction
4 SteamAssistedBakeFunction
5 AutoMenuFunction
6 CookingTimeSettingFunction
7 Light(press6&8simultaneously)
8 QuickPre‐heatFunction
9 Slider
10 Temperature/Time/SteamAdjustmentFunction
11
Start/Stop/ChildLock(3secs)Function
12
WaterTank
13 CookingTemperatureProgressIndicator
1 2 3 4 5 6 7 8 9 10 11 1213
4 PRODUCT OVERVIEW
12
On
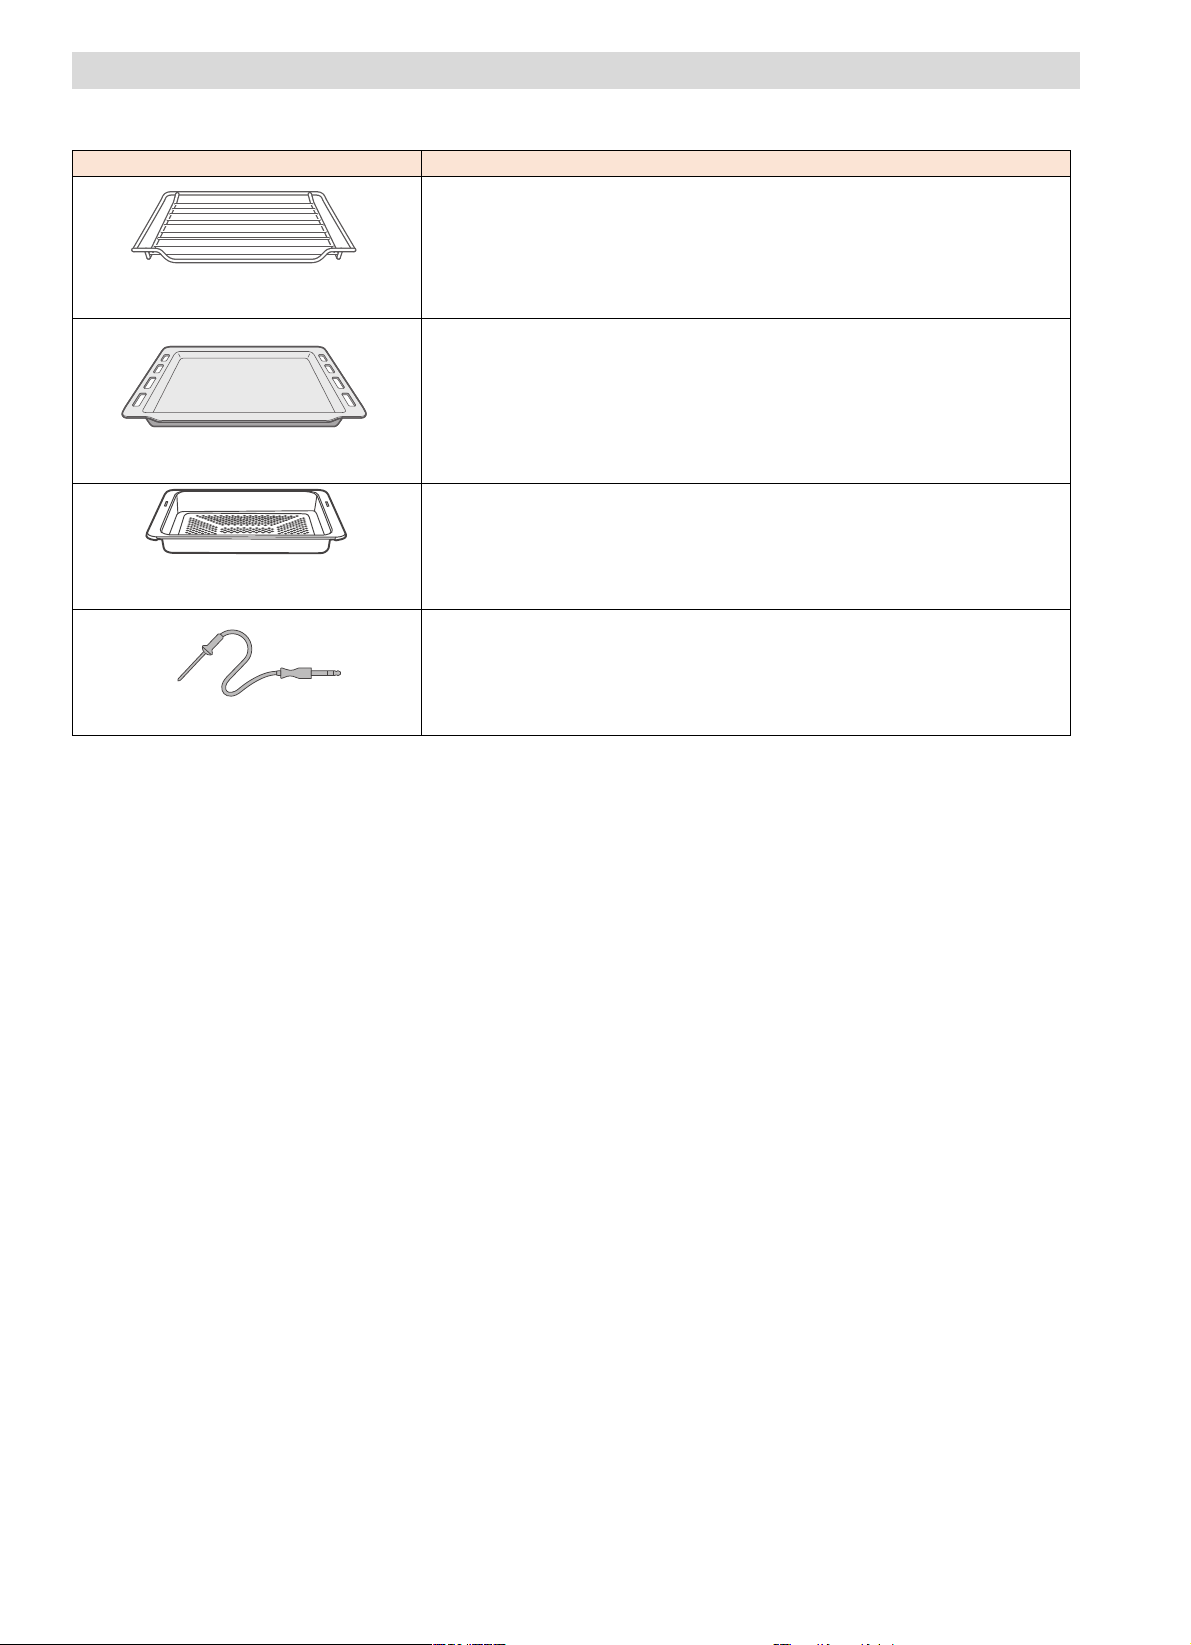
ACCESSORIES
The appliance is accompanied by a range of accessories as below
Product images shown are for illustration purposes only and may not be an exact representation of the
product.
The accessories may become deformed when they become hot. This does not affect the functionality of the
appliance. Once they have cooled down, they regain their original shape.
The steam tray can be used with all heating modes involving steam. However, for other heating mode at high
temperature, kindly take out the steam tray from the appliance. High temperature can cause permanent
discoloration and deformation of the steam tray.
Inserting Accessories
The appliance comes with five shelf positions. The shelf positions are counted from the bottom up.
The accessories can be pulled out approximately halfway without tipping.
Notes
1. Ensure that the accessories are inserted into the cavity the right way round.
2. Always insert the accessories fully into the cavity so that they do not touch the appliance door.
3. Slight discoloration on accessories may occur and this is normal
Items Usage
Wire Rack
For ovenware, dishes, cake tins
For roasting and grilling
Baking Tray
For moist cakes, biscuits, bread and other baked items
Can be used to catch dripping oil when grilling directly on wire
rack
Steam Tray
For steaming purpose
13
Meat Probe
For precise roasting

Locking Function
Wire tray can be pulled halfway out until they lock in place. The locking function prevents accessories from
tilting while they get pulled out. Accessories should be inserted into cavity correctly for the tilt protection.
When inserting the wire rack, ensure the wire rack is onto the right facing direction like the picture 1 and 3 as
above.
When inserting the baking tray, ensure the baking tray is onto the right facing direction like the picture 1 and
4
14
3
1
2
5
4
3
2
1
4
1

Before using the appliance to prepare food for the first time, you must clean the cavity and
accessories.
5 PREPARATION
INTIAL USE
1. Remove all stickers, surface protection foils and transport protection parts.
2. Remove all accessories and the side-racks from the cavity.
3. Clean the accessories and the side-racks thoroughly using soapy water and a dish cloth or soft
brush.
4. Ensure that the cavity does not contain any leftover packaging, such as polystyrene pellets or
wooden piece which may cause risk of fire.
5. Wipe the smooth surfaces in the cavity and the door with a soft, wet cloth.
6. Keep the kitchen highly ventilated while the appliance is heating up first time. Keep children and
pets out of the kitchen during this time. Close the door to the adjacent rooms.
7. The first time you use your appliance, we recommend you to remove accessories and set the thermostat
to the highest setting and leave the oven on for about an hour with nothing in the cavity, with the oven
door closed
Adjust the settings indicated. You can find out how to set the heating type and the temperature in
the next section.
There will be a distinctive odour and smoke comes out from the oven when first use and it is
normal. Ensure your kitchen is well ventilated during this conditioning period. After an hour, open
the oven door and let the air in. The odour that is often detected during this initial use is due to the
evaporation of substances used to protect the oven during storage
8. After the appliance has cooled down:
Clean the smooth surfaces and the door with soapy water and a dish cloth.
Dry all surfaces.
Install the cavity side frame.
OVEN CLOCK SETTING
Before the oven can be used, the time/clock should be set.
1. When power is first supplied to the oven, the clock display “00:00” on the display panel will be
shown and the hour “00”:00 will flash. Adjust the hour by touching " " or +/- key.
2. Press " " to confirm hour setting. Next, the minute position "00" will flash, adjust the clock
minute position by or +/-, then press " " to complete the setting.
NOTE:
1. If you need to modify the clock again, please hold the key for 3 seconds and refer to steps 1 and 2 to
complete the modification.
2. The clock is 24 hour display.
Heating Mode
Temperature
Time
250°C
1h
Settings
15

6 OVEN FUNCTION
BAKE FUNCTION
General operation: select grill function, adjust time or temperature, start cooking.
If you need to heat the tableware, please select the "Convection" function and set the temperature to 50°C.
1. After the cooking cycle is completed, the ventilation fan continues to run for a period of time to disperse
the heat
2. For fan assisted cooking function, the fan will continue to blow after the cooking is completed and this is
normal.
3. Defrosting and "ECO" functions cannot be preheated quickly.
Types of Heating Temperature
Conventional30~250℃
For baking and roasting on one or more
levels. Heat comes from the ring heater
surrounding the fan evenly.
Convection 50~250℃
For grilling f at items and for browning
food. The fan distributes the heat evenly
around the cavity.
Double Grill + Fan 50~250℃
For baking and roasting on one or more
levels. The fan distributes the heat from the
heating elements evenly around the cavity.
Conventional + Fan 50~250℃
For grilling small amounts of food and for
browning food. Please put the food in the
center part under the grill heating element.
150~250℃
For add extra browning to the bases of
pizzas, pies, and pastries. Heating come
from the bottom heater.
Bottom Heat30~200℃
For making yeast dough and sourdough to
pr and culturing yogurt.
Dough P30~45℃
_
Drying function It is used to dry the furnace chamber and
prevent bacteria from growing
ECO 140~240℃For energy-saved cooking.
Use
For traditional baking and roasting on one
level. Especially suitable for cakes with
moist toppings.
Full Grill
roofing oof
16

PURE STEAM FUNCTION
General operation: adjust the cooking time for steaming and start cooking.
STEAM ROAST FUNCTION
General operation: select the steam roasting function, adjust the cooking time/temperature/ steam amount,
and start cooking.
The steam grill function can make the food softer and yet the skin is crisper
Note
Before using the steam baking function, please add pure water to the water tank.
Depending on the intensity level, there are 3 level of steam option:L1~L3. L1 is low intensity while L3 is
high intensity of steam
When the steam grill function is activated, both baking and steam icon will be displayed
Caution!
If you open the appliance door while the appliance is in operation, the oven operation will be paused. Please
be especially careful with the risk of burns.
Conventional+steam 160-230°C
For baking and roasting on one or more
levels. Heat comes from the ring heater
surrounding the fan evenly.
Convection+steam 160 -250°C
For baking and roasting on one or more
levels. The fan distributes the heat from the
heating elements evenly around the cavity.
Conventional + Fan
+steam 160-230°C
For add extra browning to the bases of
pizzas, pies, and pastries. Heating come
from the bottom heater.
Bottom Heat+steam 160-200°C
For grilling small amounts of food and for
browning food. Please put the food in the
center part under the grill heating element.
Radiant Heat+steam 160-235°C
Use
For traditional baking and roasting on one
level. Especially suitable for cakes with
moist toppings.
Types of Heating Temperature
17
Steam function cannot choose the intensity for steam (only 100%).

AUTOMATIC MENU
General operation: Select automatic menu function, select menu, start cooking.
Bake menu
Menu
01
02 Aubergine gratin 180°C 30 min Yes
03 Ratatouille 160°C 40 min Yes
04 Crab in a salt crust 200°C 23 min Yes
05 Escabeche 160°C 30 min Yes
06 Fillet of sole fish with fresh herbs 220°C 10 min Yes
07 Oven-roasted chicken with root
vegetables and potatoes 200°C 55 min Yes
08 Crispy pork belly 180~230°C 67 min Yes
09 steak 230°C 25 min Yes
10 Shepherd's pie
30 min Yes
11 Pasta gratin 200°C 45 min Yes
12 Harissa chicken with olives and
chickpeas 160°C 40 min Yes
13 Banana bread 160°C 60 min Yes
14 Chocolate fondant 180°C 10 min Yes
15 Apple strudel with vanilla sauce 180°C 30 min Yes
Display Function or
Temperature Cooking time Preheating
230°C 10 min Yes
Roasted pumpkin with goat's
cheese and rocket
200°C 20 min Yes
100°C
Menu
Antipasti vegetables16
17 Australian pumpkin soup
100°C
40 min
NO
18 Stuffed courgettes
100°C
30 min
NO
19 Letil salad
100°C
30 min
NO
20 Fish curry with peaches
100°C
25 min
NO
21 Sea bass with vegetables
100°C
30 min
NO
22 Mussels in sauce
100°C
40 min
NO
23 Chicken breast with sundried
tomatoes
100°C
40 min
NO
24 Crema catalana
100°C
30 min
NO
25 Sticky toffee pudding
100°C
45 min
NO
Pure steam menu
Display Function or
Temperature Cooking time Preheating
100°C 20 min NO
26Descaling - 15 min -
dE5
18

7 OPERATING OF APPLIANCE
Power on the appliance. Set the clock if required (refer to the oven clock setting).
STARTING THE APPLIANCE
Press the oven function symbol ( ) to choose the desired cooking function.
Use the slider " " or +/- key to set the cooking time
Press the symbol “ ” to confirm the cooking time
Use the slider " " or +/- key to set the cooking temperature
Press the symbol “ ” to confirm the cooking temperature
Press the symbol “ ” to start the cooking operation
Press “ ” to cancel the cooking process
The cooking time can be set in one minute increment for up to one hour, then in five minutes increment for
up to two hours, then in thirty minutes for up to five hours.
The maximum cooking time is 5 hours.
Pausing the Appliance
Press the symbol “ ” to interupt and pause the cooking process. Press the symbol again to resume
cooking.
QUICK PREHEAT
Quick Preheat can be used to shorten cooking time.
By default, the baking function will come with quick preheat “ ”
To disable the quick preheat function, press the symbol “ ” and the icon “ ” will disappear from the
display screen.
The preheat function can be disabled only before the cooking is in operation.
Once the temperature achieves the pre-set temperature, the quick preheat will stop and the icon will
not be shown on the display screen. The cooking time will start to count down.
To achieve an even cooking result, do not place the food into the cooking compartment until the quick preheat
is completed (cooking temperature progress indicator will stop blinking)
Note
The cooking time setting start only after the quick preheat is done. It is recommended to set the actual cooking
time when the quick preheat is completed.
CHANGING THE COOKING TEMPERATURE AND TIME
After starting the cooking process, you may change the cooking temperature and time.
Press the symbol “ ” and the cooking temperature will flash. Use the slider " " or +/- key to change the
temperature.
Press the symbol “ ” again and the cooking timer will flash. use the slider " " or +/- key to change the
cooking time.
If no setting is applied for 10minutes, the appliance will be switched off automatically.
19

If no setting is applied after pressing the symbol “ ”, it will go back to the preset temperature and cooking
time.
Press “ ” to cancel the cooking process
Caution!
During cooking operation, the appliance becomes very hot especially inside the cavity. Never touch the
interior surfaces of the appliance or the heating elements. Use oven gloves to remove accessories or
ovenware from the cavity, and allow the appliance to cool down. Keep children at a safe distance at the same
time to avoid the injury of burns.
STEAM
Food can be cooked gently using pure steam or steam assist function.
Caution!
When using steam function, hot steam can escape when oven door is opened. Depending on the intensity of
the steam, it may not be visible. Do not stand too close to the appliance when opening the oven door to
prevent risk of burning.
Keep children away.
Humming noise can be heard while the water pump is in operation. This is normal and does not mean that
the appliance is malfunction.
Starting the steam function
Press the water tank symbol to take out the water tank
Fill the water tank with pure water and push it back to the compartment
Touch the oven function menu to choose the desired cooking function
For pure steaming function
For steam assist function
For pure steaming function, set the cooking time before the operation can be activated
For steam assist function, set the cooking time, the intensity of the steam (L1, L2, L3) and the cooking
temperature
Press the symbol “ ” to choose to set cooking time, the intensity of steam and cooking temperature
Press the symbol “ ” to start the cooking operation
When cooking with steam assist function, steam is introduced into the cooking compartment with various
interval and with various of steam intensity. This gives a better cooking result as the food will become crispy
outside while tender/juicy inside.
Changing the cooking time and temperature
You can change the setting as usual. Refer to the above “Changing the cooking time and temperature”
Notes
If the water tank is empty during steaming process, operation will be interuppted and the symbol “ ” will
flash on the display. Fill the water tank and restart the cooking by pressing .
Only switch on the steaming once the cooking compartment is cooled down to room temperature.
20
Table of contents
Other EF Oven manuals


