EGAmaster MASTEREX 79788 User manual
MANUAL DE INSTRUCCIONES
OPERATING INSTRUCTIONS
ESPAÑOL.................................2
ENGLISH..................................8
GARANTIA / GUARANTEE...13
RADIO TRANSMISOR
TWO-WAY RADIO
MASTEREX 79788
2
INTRODUCCIÓN
Diseñado y fabricado para cumplir con las especicaciones IP68 para la protección total
contra el agua e intrusiones de polvo.
Esta guía rápida proporciona una guía básica para el funcionamiento de su radio.
ACCESORIOS OPCIONALES
Montaje y desmontaje de los accesorios
Para conectar un accesorio, retire la cubierta de
accesorios desenroscando el tornillo de bloqueo en sentido
antihorario (deje la cubierta unida o guárdela en un lugar
seguro).
Enchufe el accesorio en el zócalo, a continuación, apriete
con cuidado el tornillo de bloqueo en sentido horario hasta
que quede apretado (No use cualquier utensilio o apriete
demasiado).
Para retirar un accesorio, aoje el tornillo de jación del
accesorio en sentido antihorario.
Asegúrese de volver a colocar la cubierta con el n de
proteger el zócalo (la radio no es sumergible sin el zócalo
cubierto).
INFORMACIÓN SOBRE LA BATERÍA
Cargar la batería
1. Conecte el adaptador AC a la base de carga y enchufe.
2. Desconecte el transceptor.
3. Inserte la batería en el soporte del cargador, ya sea con o sin el transceptor conectado. El
LED de estado del cargador cambia a rojo y comienza la carga.
4. Cuando se complete la carga el LED de estado del cargador cambia de rojo a verde (una
batería completamente descargada tardará aproximadamente 3 horas para recargar).
Un LED rojo parpadeante en el cargador indica que hay un problema con la batería.
Retire la batería del cargador y consulte al fabricante.
ESPAÑOL
3
PRECAUCIÓN
PRECAUCIONES CON LA BATERÍA
• No recargue la batería si ya está completamente cargada. Si lo hace, puede acortar la vida
de la batería o dañarla.
• Después de completarse la carga, retire la batería del cargador. Si la alimentación
del cargador se apaga y se enciende de nuevo, se reiniciará la carga y la batería se
sobrecargará.
• Por favor asegúrese de que la radio se apaga antes de colocarla en el cargador y nunca
conecte la radio mientras esté en el cargador.
• Utilice sólo baterías y cargadores del fabricante.
• No cortocircuite los terminales de la batería o tire la batería al fuego.
• No cargue el transceptor y/o la batería si está mojada.
PELIGRO
¡NO DESMONTE NI MODIFIQUE LA BATERÍA!
Su batería incorpora circuitos de seguridad para evitar peligros. Si el circuito
de seguridad está dañado o anulado, o las celdas de la batería están directamente
dañadas, pueden generar calor extremo, humo, rotura y emitir llamas.
7
1
5
5
53
6
2
4
1. Botón On/O. Manténgalo pulsado para encen-
der / apagar el transceptor.
2. Control volumen.
3. Control canales.
4. Botón PTT (Push To Talk). Pulsar para hablar y
soltar para escuchar.
5. Botón programable por su distribuidor (consulte
a su distribuidor para obtener más información).
6. LED indicador:
Rojo jo - Transmitiendo.
Rojo, parpadeo lento – La batería necesita re-
cargarse.
Verde jo - Recibiendo.
Ámbar jo – Recibiendo señal no válida.
Ámbar, parpadeo rápido - Escaneando.
Ámbar, parpadeo – En modo standby.
7. Micrófono.
SIN DISPLAY
HABLAR
AQUÍ

4
PREPARACIÓN DE LA RADIO
Fijar / quitar la antena
1. Para jarla, alinee con cuidado la antena
con el zócalo. Rosque en sentido horario
(teniendo cuidado de no estropear la rosca)
hasta que se asiente rmemente con el anillo
de goma de la cubierta de accesorios entre la
antena y la parte superior de la radio (A).
2. Para quitarla, desenrosque la antena en
sentido antihorario (B).
Colocar / retirar la batería
1. Para colocarla, localice las clavijas
en la parte inferior de la batería en
las ranuras de la radio y presione la
parte superior de la batería contra la
radio. Asegure la batería apretando
el tornillo hacia la derecha con la
mano. (No utilice cualquier utensilio
o apriete demasiado) (C).
2. Para quitar, desenroscar el tornillo
de bloqueo en sentido antihorario
y tire de la batería fuera de la parte
superior de la radio (D).
ENCENDIDO, RECEPCIÓN Y APAGADO
1. Para encender, mantenga pulsado el botón On/O en la parte frontal de la radio.
2. Cuando la radio ha pasado sus tests diagnósticos emitirá un tono.
3. La radio entrará en modo standby. Esto lo indica el LED ámbar parpadeando cada 5
segundos, indicando que la radio está a punto.
4. Ajuste el control de volumen (2) al nivel de volumen deseado.
5. Con el botón de canales (3) asegúrese de tener seleccionado el canal correcto.
6. Cuando reciba una señal válida, el LED se iluminará jo en verde y escuchará el audio
desde el altavoz de la radio o del accesorio de audio (si tiene uno conectado).
7. Cuando acabe de usar la radio, apáguela manteniendo pulsado el botón On/O hasta
que escuche un beep y el LED/LCD se apaguen.

5
TRANSMITIR
1. Realice los pasos 1al 5 de ‘Encendido, recepción y apagado’.
2. Antes de transmitir, monitorice el canal y asegúrese de que está libre.
3. Cuando reciba una señal, antes de transmitir, espere a que ésta acabe. El transceptor no
puede transmitir y recibir simultáneamente.
4. Pulse el botón PTT (Push To Talk) (4) para empezar la transmisión. El LED se ilumina en
color rojo.
5. Para la mejor calidad de transmisión de voz debe hablar directamente al micrófono de la
radio (7) a unos 4cm entre la boca y la radio.
6. Tenga en cuenta: si se habla en la parte superior de la radio o con la boca más lejos,
transmitirá con voz de baja calidad.
7. Para nalizar la transmisión, suelte el botón PTT.
NOTAS
¡IMPORTANTE!
El fabricante no se responsabiliza de los daños o mal funcionamiento del aparato en caso de
que no se use correctamente o se haya utilizado para trabajos para los que no esté diseñado.
De acuerdo con la Directiva de Residuos de Aparatos Eléctricos y Electrónicos
(RAEE), estos deben ser recogidos y dispuestos por separado. Si usted tiene que tirar, por
favor, no use la basura habitual. Por favor, póngase en contacto con su distribuidor para el reci-
claje de forma gratuita.
GARANTIA
Esta garantía no cubre aquellas piezas que por su uso normal tienen un desgaste.
Nota: para obtener la validez de la garantía, es absolutamente imprescindible que complete
y remita al fabricante el documento de “CERTIFICADO DE GARANTIA”, dentro de los siete
dias a partir de la fecha de compra.

6
CARACTERISTICAS
• El cargador se puede usar para recargar paquetes de baterías de iones de litio.
• La fuente de alimentación de rango libre facilita los voltajes de CA en un rango de 100V a
240V.
• El tiempo requerido para recargar una batería completamente descargada es de aproxima-
damente 6 horas.
• Este cargador ha sido diseñado para ser colocado sobre una supercie plana o montada
sobre un soporte de pared.
INSTRUCCIONES DE USO
1. Conecte el adaptador al módulo de carga.
2. Enchufe el cable principal de alimentación de CA del adaptador a la toma de corriente.
3. Si está conectado a la batería, asegúrese de que la radio esté apagada.
4. Inserte la batería en la plataforma de carga, con o sin la radio conectada. El LED de la esta-
ción de carga se ilumina en rojo para indicar que la batería se está cargando.
5. Cuando se complete la carga, el LED se iluminará en verde.
ADAPTADOR DE RED
Voltaje de entrada 100-240VAC 50Hz/60Hz
Voltaje de salida 12VDC 500mA
Peso 80g
Tipo de adaptador 2 Pin (Europe, US, Australia)
3 Pin (UK)
ESTACIÓN DE CARGA
Voltaje de entrada 11.5~14.4VDC 500mA
Voltaje de salida 8.7VDC 400mA
Dimensiones (H)75mm x (W)84mm x (D)80mm
Peso 120g
Rango de temperatura funcional - 20°C a +55°C
CARGADOR DE BATERÍA DE IONES DE LITIO

7
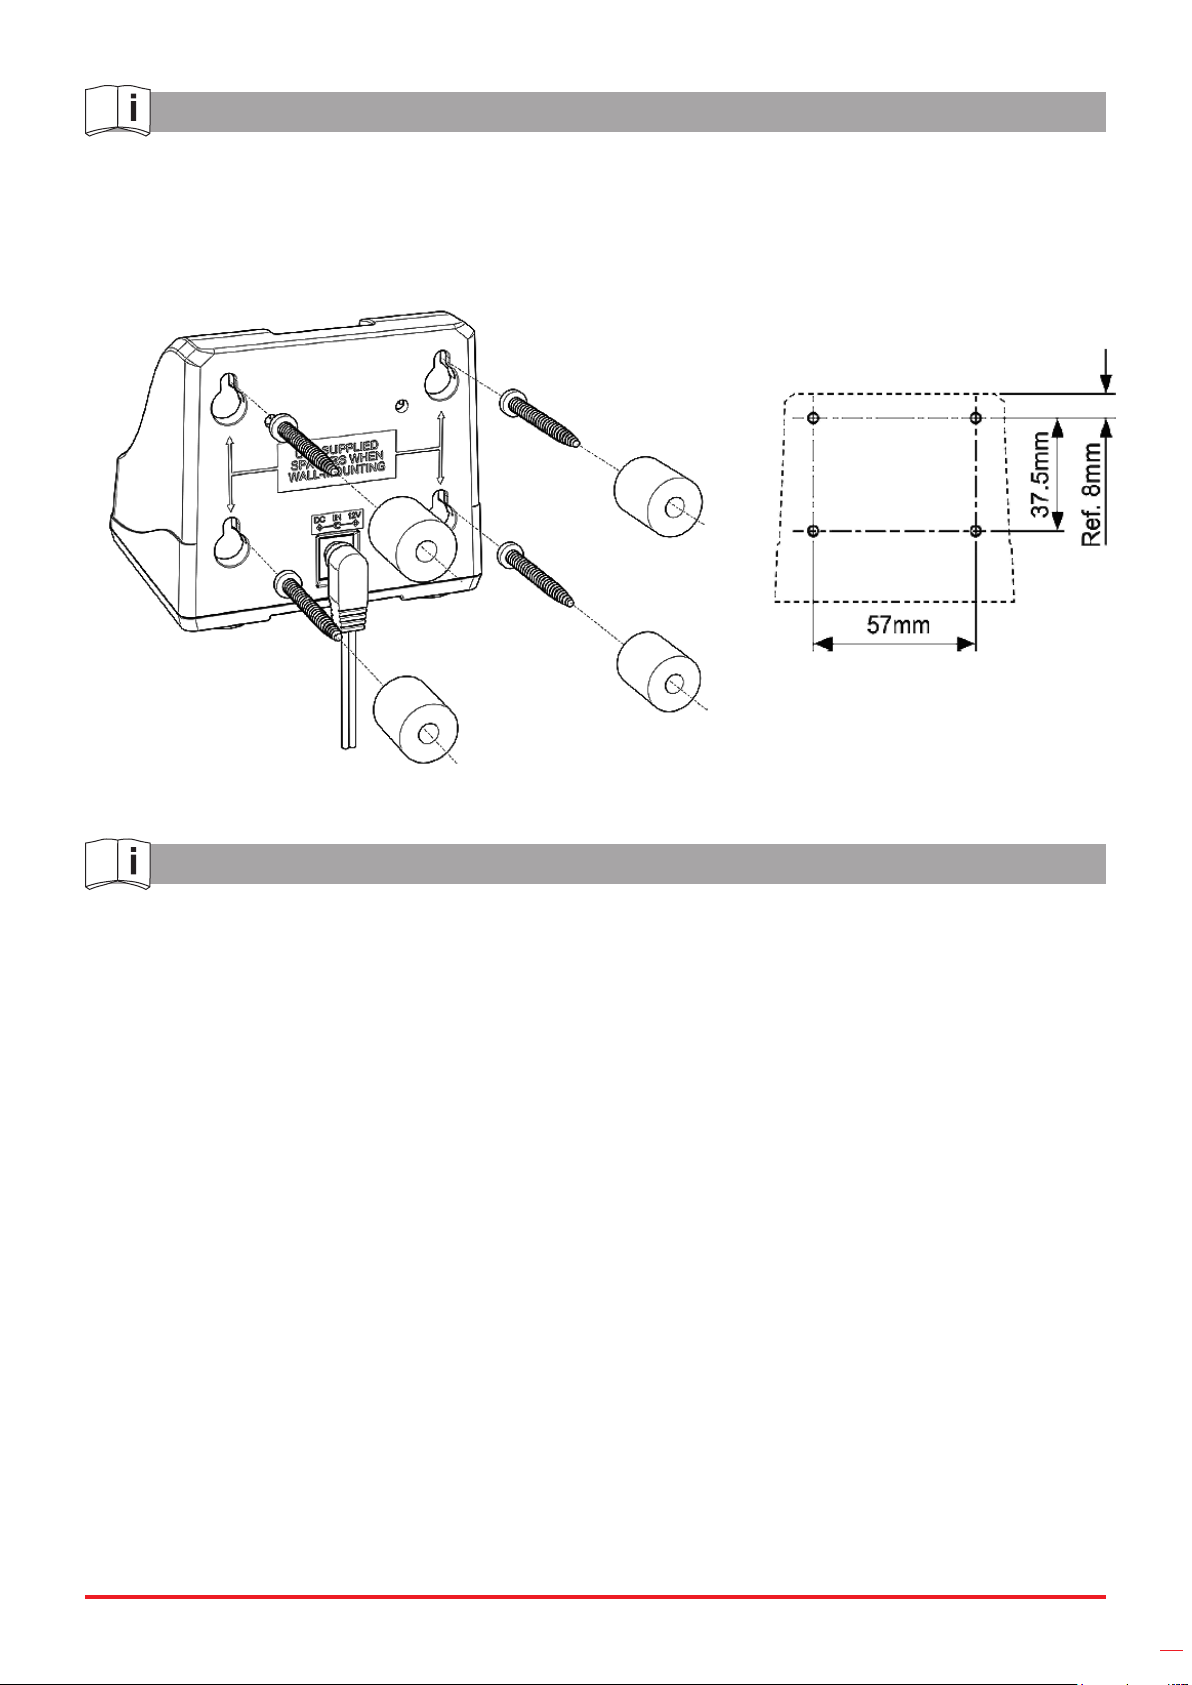
MONTAJE DEL SOPORTE
Para su conveniencia, el cargador puede apoyarse en su base o montarse en un soporte.
Están disponibles por separado un tornillo de soporte y un kit separador.
Patrón de oricios de
montaje del soporte
PRECAUCIONES
• El cargador está diseñado exclusivamente para su uso con paquetes de baterías de iones de
litio. No lo use para cargar ningún otro tipo de paquete de baterías.
• No lo use con ningún otro adaptador.
• El adaptador está diseñado para usarse con una tensión de alimentación CA de entre 100V y
240V. No lo conecte a una fuente de alimentación fuera de este rango.
• Nunca cargue el transceptor mientras está encendido.
• Desenchufe el adaptador de la corriente cuando no esté en uso.
• No lo desmonte, tampoco el adaptador.
• Nunca inserte ningún metal u otro objeto conductor en el cargador.
• No toque los terminales del cargador.
• Nunca cortocircuite los contactos de carga con metal u otro objeto conductor.
• Solo debe almacenarse en un área seca y bien ventilada.
NOTA
En caso de que su adaptador se moje, no lo conecte a la red eléctrica ni lo encienda.
Consulte a su distribuidor inmediatamente.

8
INTRODUCTION
designed and manufactured to meet IP68 specication for total protectionagainst water and
dust intrusion.
This quick guide provides a basic guide for the operation of your radio.
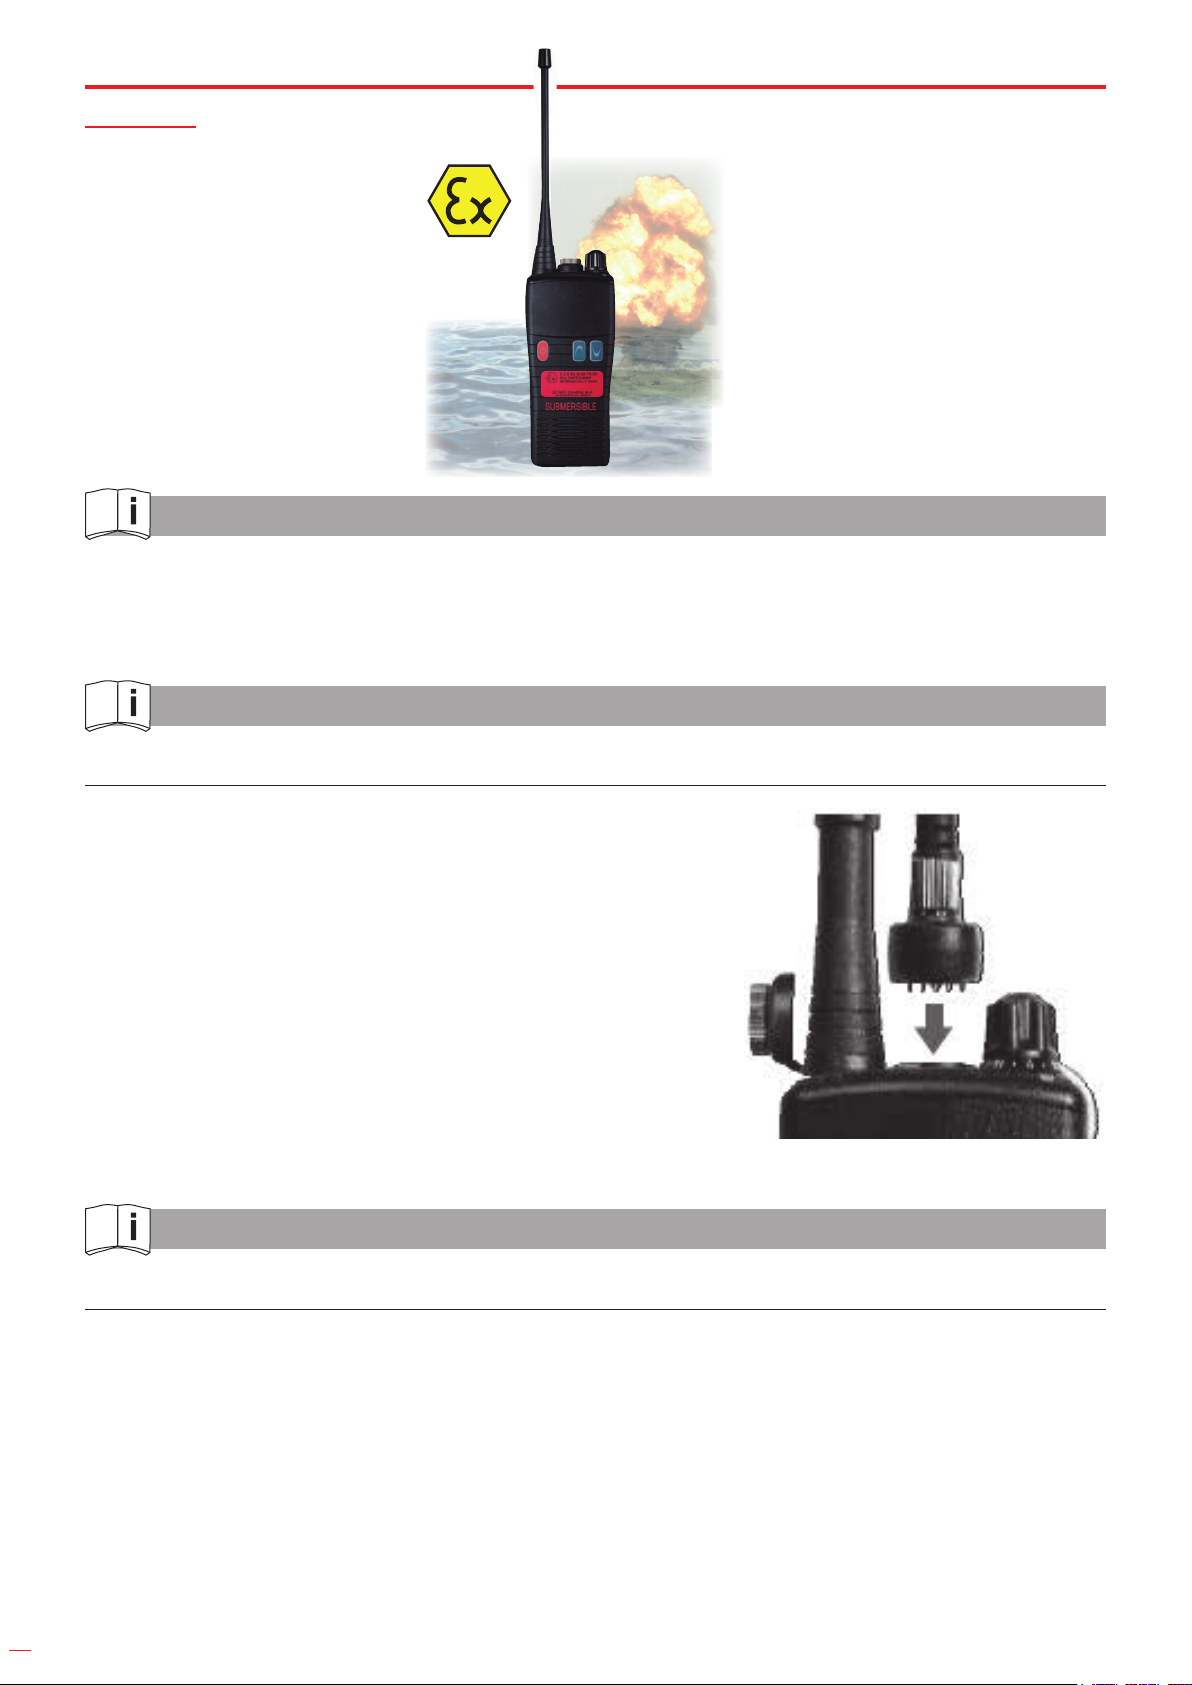
OPTIONAL ACCESSORIES
Attaching and removing accessories
To attach an accessory, remove the accessory cover by unscrewing the locking screw anti-
clockwise (leave cover attached or store in a safe place).
Plug the accessory into the socket, then carefully tighten the locking screw clockwise until
nger tight (do not over tighten or use any implement).
To remove an accessory, unscrew the locking screw of the accessory by hand in an anti-cloc-
kwise direction.
Ensure you re-t the accessory socket cover (the radio is not submersible without the socket
covered).
BATTERY INFORMATION
Battery charging
1. Connect the AC adapter to the charger pod and plug in.
2. Turn the radio o.
3. Insert the battery pack into the charger pod, either with or without the radio attached. The
charger LED status light changes to red and charging begins.
4. When charging is complete the charger LED status changes from red to green. A fully dis-
charged battery pack will take approximately 3 hours to recharge.
A ashing red LED on the charger indicates there is a problem with the battery.
Remove the battery from the charger and consult your the manufacturer.
ENGLISH

9
CAUTION
BATTERY PACK PRECAUTIONS
• Do not recharge the battery pack if it is already fully charged. Doing so may reduce the life of
the battery pack.
• After charging is complete, remove the battery from the charger. If the power to the charger is
turned o and on again, charging will restart and the battery will become overcharged.
• Please ensure that the radio is turned o before placing it in the charger and never switch a
radio on whilst in the charger.
• Only use manufacturer branded battery packs and chargers.
• Do not short the battery terminals or dispose of the battery in a re.
• Do not charge the radio and/or battery pack if they are wet.
DANGER
DO NOT DISASSEMBLE OR MODIFY THE BATTERY IN ANY WAY!
Your battery pack incorporates a safety circuit to avoid danger, if the safety circuit is damaged
or bypassed, or the battery cells are damaged directly, they may generate extreme heat, smoke,
rupture and emit ames.
7
1
5
5
53
6
2
4
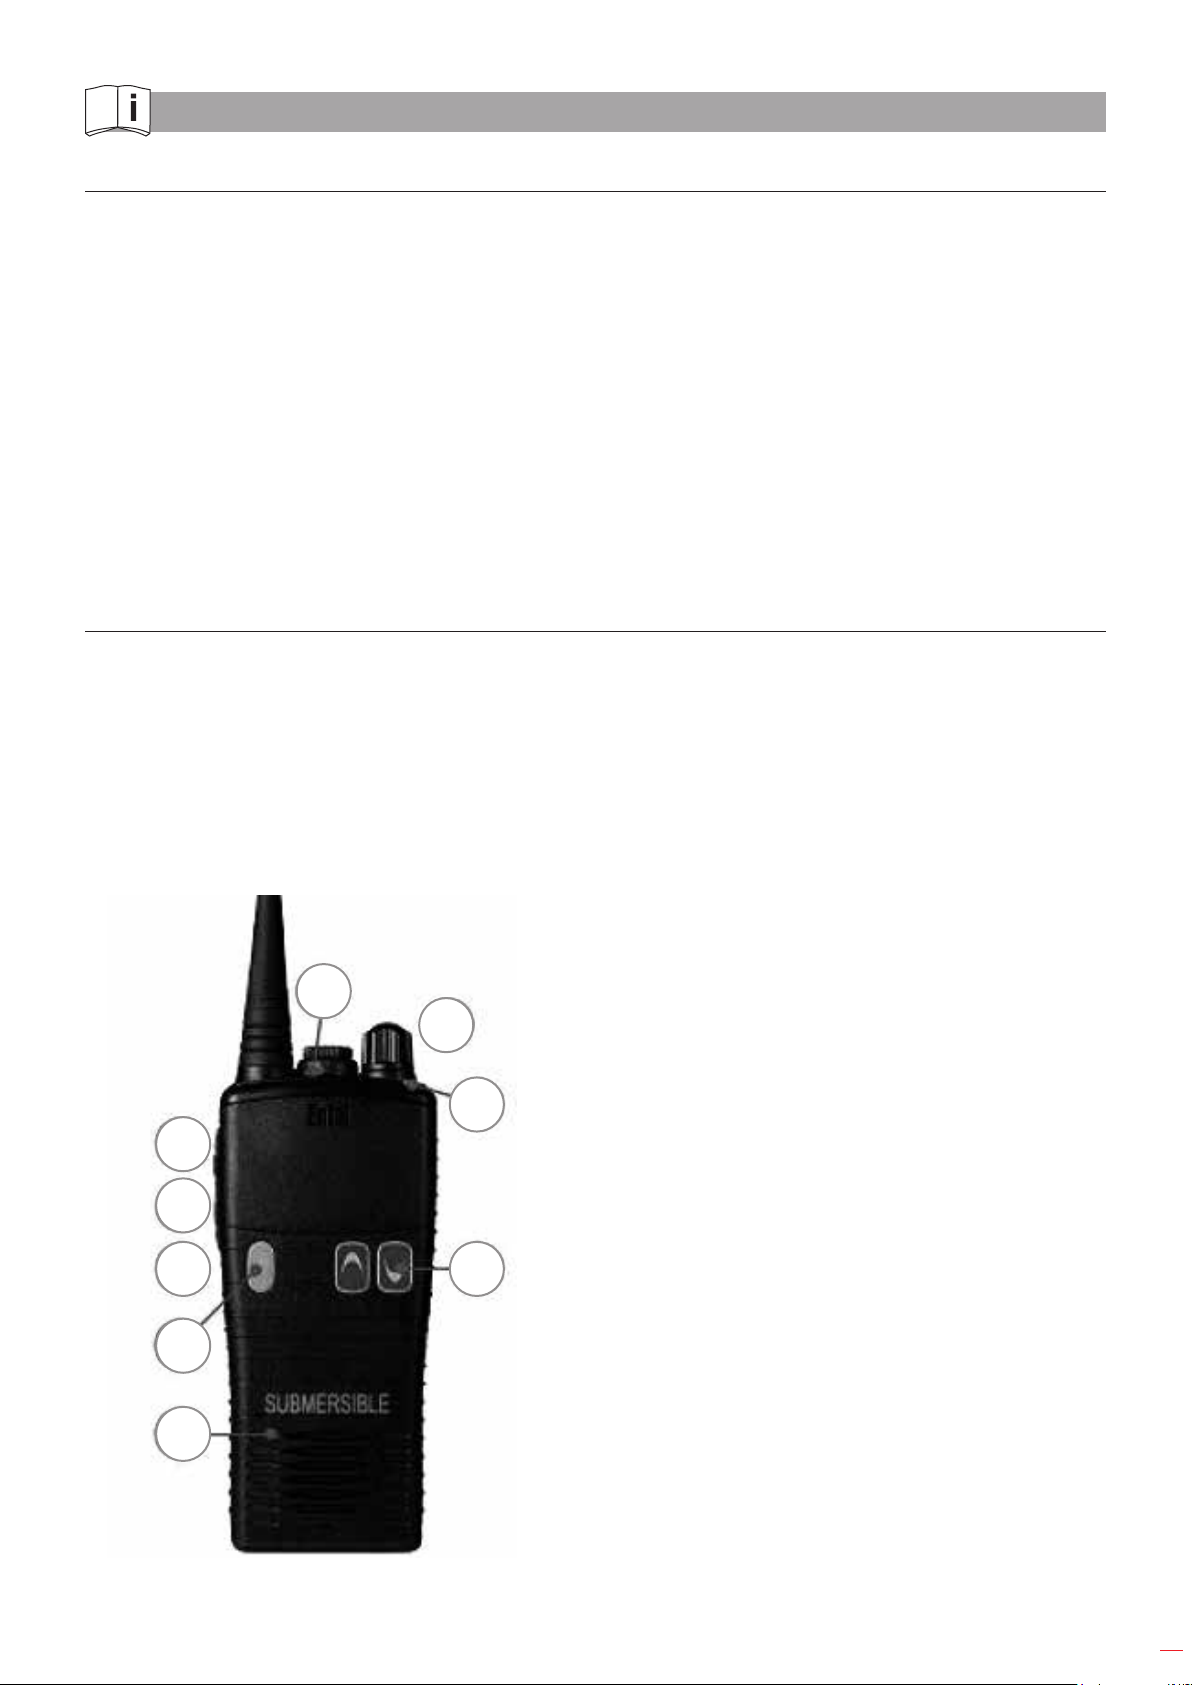
1. On/O button: press and hold to turn the radio
on or o.
2. Volume control.
3. Channel control.
4. Push To Talk (PTT) button: press to speak and
release to listen.
5. Dealer programmable button (ask your dealer
for more information).
6. LED indicator:
Red steady - Transmitting.
Red ashing slowly - Battery needs recharging.
Green steady - Receiving.
Amber steady - Invalid signal being received.
Amber ashing rapidly - Scanning.
Amber pulsing - In standby mode.
7. Microphone.
NON DISPLAY
TALK
HER

10
PREPARING YOUR RADIO FOR USE
Attaching/removing the antenna
1. To attach, carefully align the antenna with
the socket. Screw in the antenna clockwise
(taking care not to cross the thread) until it
is seated rmly with the accessory cover’s
rubber ring between the antenna and the top
of the radio (A).
2. To remove, unscrew the antenna anti-clockwi-
se (B).
Attaching/removing the battery pack
1. To attach, locate the pegs on the
bottom of the battery into the slots
on the radio and press the top of
the battery against the radio. Secu-
re battery by tightening the screw
clockwise by hand. (Do not use any
implement or over tighten) (C).
2. To remove, unscrew the locking
screw anti-clockwise and pull the
battery away from the top of the
radio (D).
SWITCHING ON, RECEPTION AND SWITCHING OFF
1. To switch on, press and hold the on/o button (1) on the front of the radio.
2. When the radio has passed its diagnostic tests, it will emit a fanfare tone.
3. The radio will enter standby mode. This is indicated by the LED Amber ashing once every 5
seconds, signaling that the radio is ready for use.
4. Adjust the volume control to select the desired volume level.
5. Using the channel buttons, ensure you have the correct channel selected.
6. When receiving a valid signal, the LED will illuminate steady green and audio will be emitted
from the radio’s speaker or audio accessory (if attached).
7. When nished using the radio, switch o by pressing and holding the on/o button (1) until
the radio beeps and the LED/LCD is extinguished.
11
TRANSMITTING
1. Perform steps 1 through to 5 above.
2. Before transmitting, monitor the channel and make sure it is clear.
3. When receiving a signal, wait until the signal stops before transmitting. The radio cannot
transmit and receive simultaneously.
4. Press the Push To Talk (PT T) but ton (4) to begin your transmission. To conrm transmission
the LED will illuminate red.
5. For best transmitted speech quality, you must talk directly into the radio’s microphone (7) at
around 4cm bet ween your mouth and the radio.
6. Please note: if you talk into the top of the radio or with your mouth further away, you will
transmit poor quality speech.
7. When the transmission is nished release the PTT button.
NOTES
IMPORTANT!
The maker will not take responsibility for damage or malfunction as a result of the device
being incorrectly used or, applied for a purpose for whith it was not intended.
According to Waste Electrical and Electronic Equipment directive (WEEE), these ones
must be collected and arranged separately. If you have to throw them out, please, do not use
the usual rubbish. Please, contact your distributor for free recycling.
GUARANTEE
The maker guarantees to the device owner 12 months against any manufacture defect.
This guarantee do not cover the parts wich are consumables.
Note: to apply the guarantee its necesary to send the “GUARANTEE CERTIFICATE” duly
lled within one week after purchased the machine to the maker.

12
LITHIUMION BATTERY CHARGER
FEATURES
• The charger can be used to recharge lithium-Ion battery packs.
• Free range power supply facilitates AC voltages in the range 100V to 240V.
• The time required to recharge a fully discharged battery pack is approximately 6 hours.
• This charger has been designed to sit on a at surface or be wall/bulkhead mounted for your
convenience.
OPERATING INSTRUCTIONS
1. Connect the adapter to the charger pod.
2. Plug power main plug of the adapter into the wall outlet.
3. If attached to the battery, ensure the radio is switched o.
4. Insert the battery pack into the charging pod, either with or without the radio attached. The
charger pod’s LED illuminates red to indicate that the battery is charging.
5. When charging is complete the LED will illuminate green.
MAINS ADAPTER
Input Voltage 100-240VAC 50Hz/60Hz
Output Voltage 12VDC 500mA
Weight 80g
Adapter Type 2 Pin (Europe, US, Australia)
3 Pin (UK)
CHARGING POD
Input Voltage 11.5~14.4VDC 500mA
Output Voltage 8.7VDC 400mA
Dimensions (H)75mm x (W)84mm x (D)80mm
Weight 120g
Operational Temperature Range - 20°C to +55°C
13
BULKHEAD MOUNTING
For your convenience the charger can be seated on its base, or bulkhead mounted.
A bulkhead screw and spacer kit is available separately.
Bulkhead mounting
hole pattern
PRECAUTIONS
• The charger is designed exclusively for use with lithium- ion battery packs. Do not use it to
charge any other type of battery pack.
• Do not use with any other adapter.
• The adapter is designed for use with an AC power supply voltage between 100V and 240V.
Do not connect it to a power source outside this range.
• Never charge the transceiver whilst it is switched on.
• Unplug the adapter from the mains when it is not in use.
• Do not dismantle.
• Never insert any metal or other conductive objects into the charger.
• Do not touch the charger terminals.
• Never short the charge contacts with metal or any other conductive object.
• Must only be stored/used in a well ventilated, dry area.
NOTE
In the event that your adapter gets wet, do not connect to the mains or switch on.
Consult your dealer immediately.

14


Table of contents
Languages:
Other EGAmaster Two-way Radio manuals


