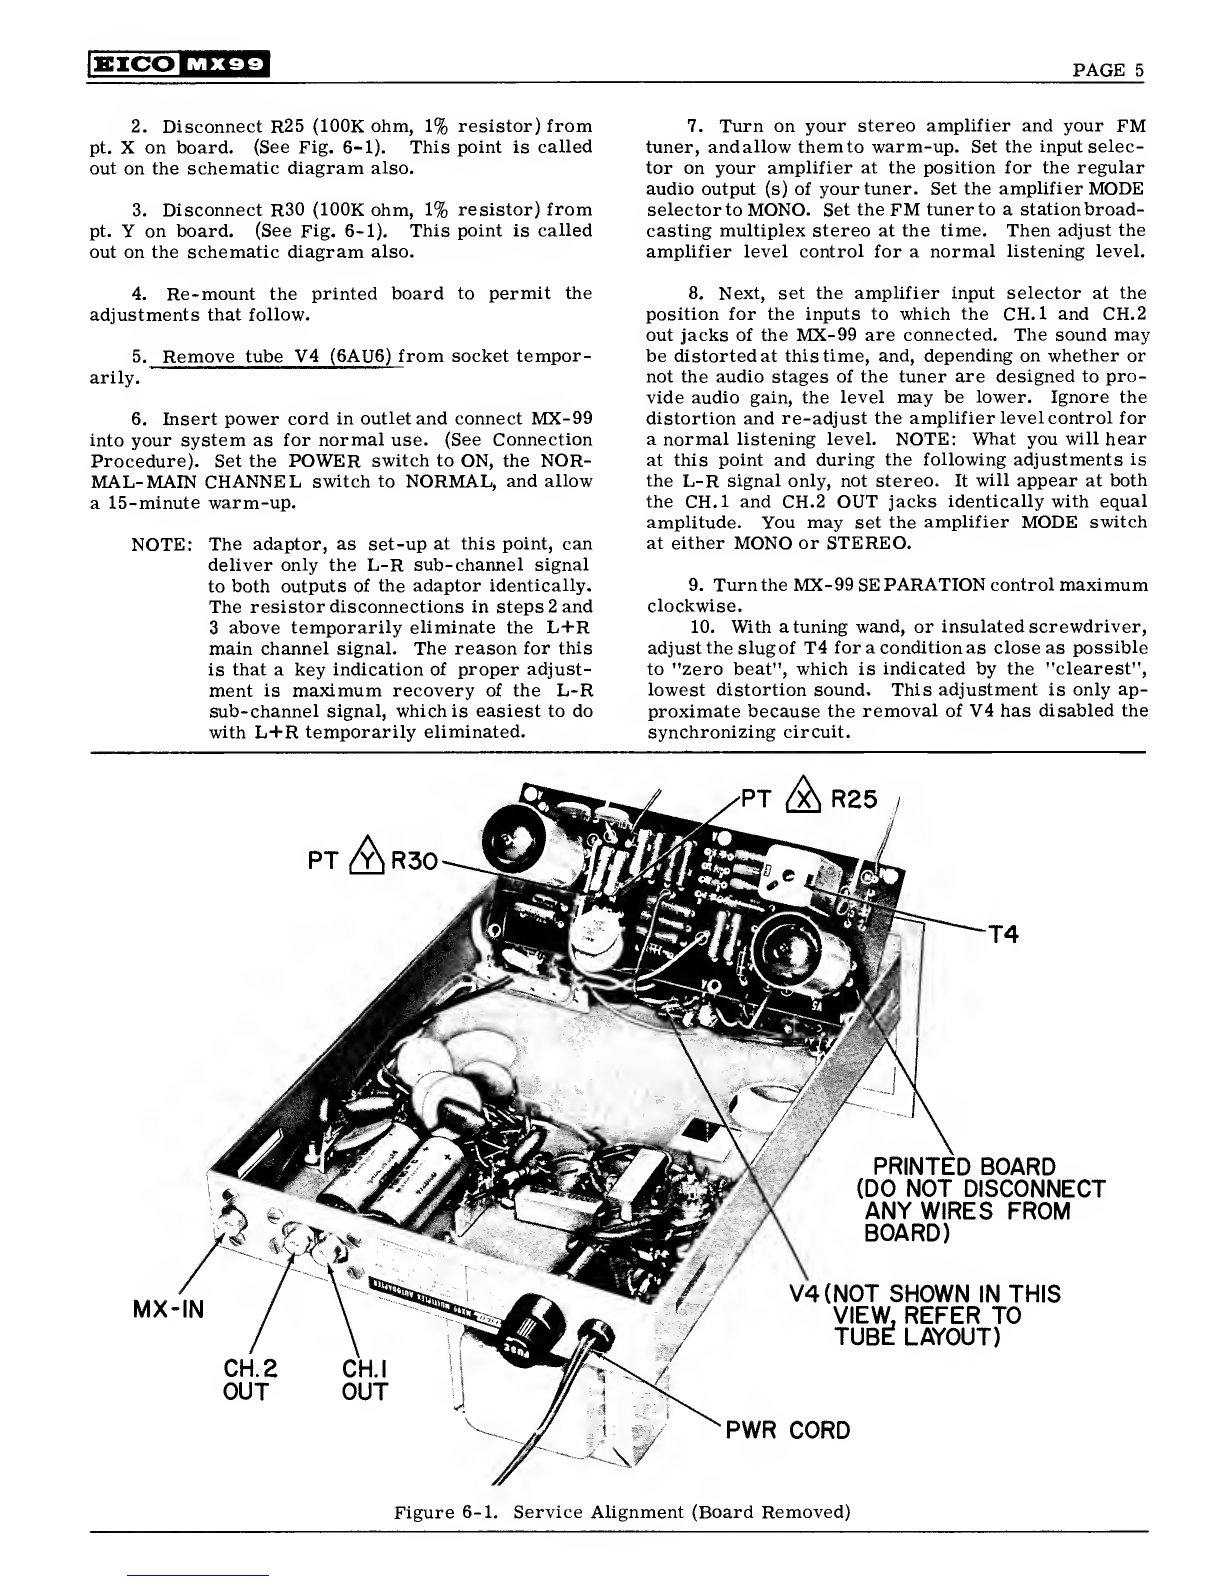
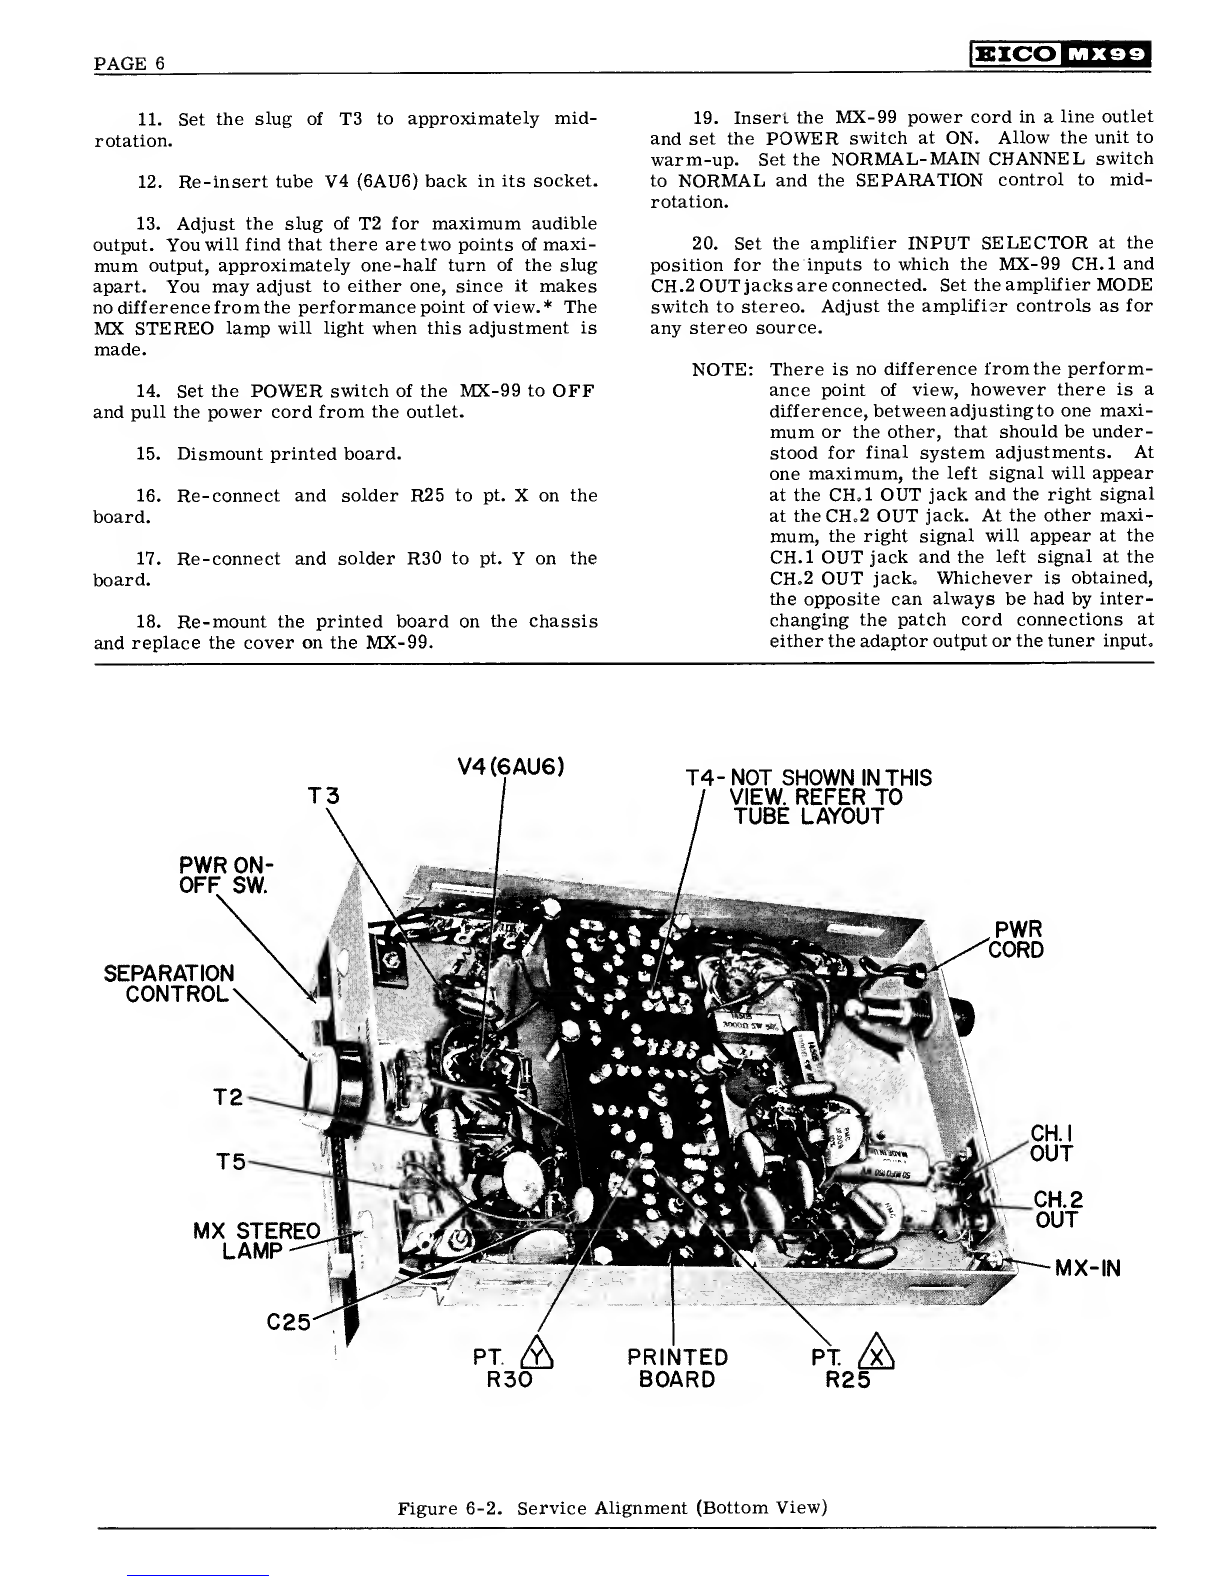
Eico MX-99 User manual

MULTIPLEX AUTODAPTOR
TABLE OF CONTENTS
SECTION I. GENERAL DESCRIPTION
SECTION II. CABINET INSTALLATION
2-1. General
2-2. Preparation of Unit
2-3. Preparation of Cabinet
2-4. Mounting the Unit
SECTION HI. ELECTRICAL CONNECTIONS
SECTION IV. OPERATION
SECTION V. CIRCUIT DESCRIPTION
SECTION VI. MAINTENANCE
6-1. General
6-2. Service Alignment
6-3. Voltage and Resistance Charts
6-4. Trouble-Shooting Chart.
6-5. Special Operating Notes
6-6. EICO's Service Policy
SECTION VII. REPLACEMENT PARTS LIST
FIGURES
SECTION I. GENERAL
MX-99 Photo
SECTION III. Electrical Connections
Fig. 3-1. Input Connections
SECTION VI. MAINTENANCE
Fig. 6-1. Service Alignment (Board Removed)
Fig. 6-2. Service Alignment (Bottom View)
Fig. 6-3. Tube and Transformer Layout
Fig. 6-4. MX-99 Schematic Diagram
Page
..2
2
2
2
3
3
3
4
.4
.4
.7
.8
.8
.9
11
1
3
.5
.6
.7
12
EICOmm
ELECTRONIC INSTRUMENT CO., INC. 33-00 NORTHERN BLVD., LONG ISLAND CITY 1, N.Y.
COPYRIGHT© 1961 ELECTRONIC INSTRUMENT COMPANY, I.

PAGE 2EICO MX99
IN ST RUCTION BOOK
SECTION I. GENERAL DESCRIPTION
*
The new EICO MX-99 Multiplex Autodaptor employs
an original method of zero phase shift, filterless detec-
tion of multiplexed signals. The unit automatically
delivers stereo on a stereo broadcast signal, and mono
from amono signal without spurious signals in either
case. The stereo signal is automatically gain-balanced
and the mono signal is automatically equal from both
outputs without adjustment. An indicator lamp turns
on when the station selected is broadcasting multiplex
stereo.
The design features freedom from phase distorting
filters in either the main or sub channel paths which
cause loss of separation. Nevertheless this design
provides the required, or better-than-required, sup-
pression of all spurious signals including SCA (67kc)
background music carrier, reinserted 38kc sub-car-
rier, 19kc pilot carrier, and all harmonics thereof.
This is achieved partly through an original technique
for deriving the left and right signals, and partly by
sharp ultrasonic filters after the signals are derived.
All of the foregoing is very important for high quality
tape recording, where spurious signals can beat against
the tape recorder bias oscillator and result in audible
spurious tones in arecording. This adaptor will syn-
chronize with any usable output from the FM tuner
and will demodulate without significant distortion tuner
(composite signal) as high as 5volts peak-to-peak.
The MX-99 is self powered, and includes low
impedance cathode follower outputs. External controls
include an oscillator turn-off switch to permit inter-
ference-free listening to mono stations having low
sub-carrier frequency SCA store-casting and asepar-
ation control. Aseparation of 30db between channels
is typical and an overall gain of unity is provided from
input to output on both stereo and mono. The MX-99
is designed for all EICO FM equipment (HFT90, HFT92,
ST96), and any other component quality, wide band FM
tuner provided with amultiplex output.
Tubes: 2-12AU7, 1-12AT7, 1-6AU6, 1-6D10, 1-6X4
and 6diodes
Size (HWD): 3-7/8" x9-1/8" x6-3/8"
Weight: 7lbs.
Cover: OPTIONAL
*Patent Pending
SECTION II. CABINET INSTALLATION
2-1. GENERAL
1.
Mount horizontally on awell-braced shelf. The
stock thickness of the wood panel may not exceed 3/4".
2. Do not remove feet for mounting. Air must be
allowed to enter through the perforations in the bottom
plate to avoid overheating.
3. To avoid over heating when stacking components
mount the tuner below the amplifier with the MX-99
alongside the tuner. Any shelf above the MX-99 must
be spaced at least 2inches away. Allow at least a1-
inch tolerance on either side of the unit.
4. Leave the back of the cabinet entirely open.
2-2. PREPARATION OF UNIT
1. Loosen the left and right side pairs of screws
(4 in all) that fasten the bottom plate and cover to the
chassis, just enough to permit the cover and bottom
plate to slide backward or forward in the 3/4" chassis
slots.
2. Push both cover and bottom plate back as far
as they will go (3/4"). The screws that have been
loosened will move from the front to the rear ends of
the slots in the chassis.
3. Detach the knob from the separation control
shaft. Then remove the 2screws, that fasten the panel
to the chassis, one at the left of the NORMAL-MAIN
CH switch and the other at the right of the ON-OFF
switch. Take panel off and set it aside. The unit is
now prepared for cabinet installation.
2-3. PREPARATION OF CABINET
1. Two templates are provided, one for the cabinet
shelf and the other for the cabinet panel. The shelf
template is used to locate exactly two holes that are
to be drilled in the shelf. The panel template is used
to locate exactly the required rectangular cut-out. The
two templates must be used together as indicated, as
there is an exact relationship between the locations of
the shelf holes and panel cut-out.
2. To use the shelf template, cut it or fold it back
exactly along the dashed line. Remove the shelf from
the cabinet and line up this dashed line on the template
with the front edge of the shelf, positioning it also along
the edge to leave at least 1clearance on each side.
Tape the template in position and use acenter punch
to mark the centers of the two holes to be drilled. If
the shelf can not be removed, place the template in a
similar manner on the top side of the shelf if there is
room to drill from the top side, or on the under side
of shelf if there is room only to drill from the under
side. If the template is used on the underside of the
shelf, mark the rear edge of the shelf at the points
where the extended heavy lines on the template hit the
rear shelf edge. After the holes are center-punched,
remove the template and drill carefully through the
punched centers to adiameter of 1/4”. If the shelf
has been removed for the drilling operation, now re-
mount it. Finally, replace the shelf-template in exactly
its former position on the top-side of the shelf and

EICO PAGE 3
IMX99
tape it down. If the shelf template had been used on the
underside of astationary shelf, now place it on the top-
side of the shelf using the marks on the rear edge of
the shelf previously made. (In the latter case, accuracy
may be improved by cutting the two holes out of the
shelf-template with arazor blade and then lining up the
holes in the shelf template with the holes in the shelf).
3.
To use the panel template, cut it or fold it back
exactly along the dashed line. This dashed line cor-
responds to the junction of the top side of the cabinet
shelf and the interior side of the wood panel. Position
the panel template against the interior side of the wood
panel so that the dashed line rests against the shelf
and the two heavy vertical lines in the panel template
meet with the two heavy horizontal lines in the shelf
template. Tape the panel template down and use a
center -punch to mark the centers of thefour 3/8" holes
in the four corners of the rectangular cut-out shown
on the template. Now remove both templates and drill
carefully through each of the four punched centers to
ahole diameter of 3/8". On the frontside of the wood
panel scribe arectangle externally tangential to the
four drilled holes. Check the height and width of the
rectangle against the panel template dimensions. These
dimensions should not be exceeded. Now carefully cut
out the rectangle with asabre saw, using asmall blade
to start accurately in the 3/8" holes. After the cutting
operation, any rough spots or excess material along
the edges of the cut-out may be removed with afile.
Finally, brush or blow out all chips and sawdust.
2-4. MOUNTING THE UNIT
2. The outputs of the MX-99 are the CH. 1OUT
and CH.2 OUT jacks. Connect these to an auxiliary
(high level) pair of stereo inputs of your amplifier.
Connect the regular tuner outputs to the amplifier's
regular tuner inputs. If you have the EICO ST-96 FM-
AM tuner, you may connect the MX-99 outputs to the
MX ADAPTOR jacks MX1 and MX2 and select the ad-
aptor outputs with the tuner SELECTOR switch; the
ST-96 then is connected to the amplifier as normally.
3. Plug the line cord of the MX-99 into aswitched
convenience outlet on the tuner. When the system is
in operation, this plug may be oriented for least audible
hum.
NOTES:
The MX-99 is designed for use with component-
type FM (or FM-AM) high fidelity tuners of wide-band
design equipped with amultiplex output jack. Not in-
cluded are non-component type ac-dc equipment (severe
shock hazard), tuners without one or more limiting
stages ahead of the detector (excessive output may
overload adaptor).
14H-L MX 99 MULTIPLEX AUTODAPTOR
117V
60CY FUSE
(2)
35A 1A
CONNECT MX IN TO MX (multi)
OUTPUT OF
CONNECT
CHI CH2 OUT
TO MX/AUX
INPUTS OF STEREO AMPLIFIER
CHI CH2 MX
@@ @
OUT IN
EICO 33-00 NORTHERN BLVD., L.I.C. 1, N.Y.
*patont pending STK.N0.n2tl
1.
Insert the unit from the rear of the cabinet,
carefully guiding the chassis control plate through the
panel cut-out. Center the unit in the cut-out and re-
mount the panel with the two screws previously removed.
Figure 3-1. Input Connections
SECTION IV. OPERATION
1.
Turn on your FM tuner and stereo amplifier.
2.
Hold the front panel against the wood (from the
outside) and push the cover and bottom plate forward
(from the inside) until they contact the inside surface
of the wood panel.
3. Obtain from ahardware dealer two No. 8-32
binding head machine screws that are 1/2" longer than
the thickness of the mounting shelf.
4. Now place 5/8" flatwashers against the heads of
the two No. 8-32 screws referred to in step 3, and in-
sert them from the bottom side of the shelf into the two
holes drilled previously. It may be necessary to shift
the unit slightly to the left or right in order to afford
clear access for the screws. When both screws have
caught, tighten them to secure the unit to the shelf.
2. Set your amplifier input selector at the auxiliary
input to which the MX-99 is connected if you are going
to listen to astereo broadcast. For amono broadcast,
you may by-pass the adaptor altogether by setting the
amplifier input selector to the input to which the tuner's
regular output is connected. In the case of the ST-96,
this selection may be made with the tuner's SELECTOR
switch.
NOTE: The following applies to stereo and mono
tuner listening with the adaptor outputs
selected by the stereo amplifier.
3. Set the ON-OFF switch at ON, indicated by the
lighting of the POWER pilot lamp. If this switch is left
at ON, the MX-99 will turn off and on with your tuner,
as is usually desired. Allow afew minutes warm-up.
5.
Replace the knob previously removed on the
separation control shaft.
SECTION III. ELECTRICAL CONNECTIONS
1. The input of the MX-99 is the MX IN jack.
Connect this to the multiplex output jack of the FM or
FM-AM tuner (variously called MULTI, MX, or MPX
OUTPUT).
4.
The NORMAL-MAIN CH. switch must be set at
NORMAL (oscillator on) for stereo broadcasts. It may
be left at NORMAL for most mono broadcasts when you
are listening casually. However, the MAIN CH. position
(oscillator off) must beused for mono broadcasts when
the station is broadcasting SCA store-cast) at alow
sub-carrier frequency (other than that authorized by
the FCC for stations broadcasting stereo.) This will
usually show up as squeals interfering with the mono
broadcast when the switch is set at NORMAL. All mono

PAGE 4>:+<•*•! MX99
broadcasts will come through with slightly less noise
at the MAIN CH. position. For critical mono listening
or recording, selection of the tuner's regular output by
the stereo amplifier is desirable.
5. Operate your tuner as you normally would in
either tuning to astation known to be broadcasting
stereo at the time, or in searching for astation that
is broadcasting stereo. (Note: If your FM tuner has
an AFC circuit and also an "AFC defeat" switch, it is
recommended that you tune with AFC defeated for
greater tuning accuracy and then switch in the AFC
afterwards.) When you are tuned to astation broad-
casting stereo, the MX stereo neon lamp indicator of
the MX-99 will glow steadily. (NOTE: The neon lamp
will go out if the station switches to mono broadcasting
at any time.) Adjust your stereo amplifier controls
for the desired listening level and best balance between
channels.
6. Adjust the SEPARATION control of the MX-99
for best audible separation between the stereo channels.
This setting will usually be the same for all stations
broadcasting stereo, although there may be one or more
stations in your area for which different settings are
necessary because of non-standard practice on the
part of these particular stations.
NOTE: The MX STEREO lamp may glow at some
off-station points on the dial. These are
spurious indications and should be ignored.
SECTION V. CIRCUIT DESCRIPTION
The composite stereo signal as received from the
ratio detector is amplified by VIA. In order not to
alter the performance of the ratio detector, the input
impedance of this stage is made exceptionally high.
The 19kc pilot signal is isolated and amplified by
V4. Frequency doubling is accomplished by afull-wave
rectifier (CR1, CR2) at the plate ov V4, and the 38kc
signal thus obtained is used to synchronize a38kc push-
pull oscillator (V5) which drives aring modulator
(CR3-CR6, R12-17). In addition to a strong 38kc com-
ponent, the full-wave rectifier delivers anegative DC
voltage when the 19kc pilot carrier is received. This
DC voltage is used to cut off switching tube VlB, and
thus ignite the MX STEREO neon pilot lamp II, indi-
cating that astereo broadcast is in progress.
VIA also delivers the amplified composite stereo
signal to the grid of asplit load phase inverter (V2A).
V2A provides two outputs which differ in phase by 180°
and which are alternately sampled by the ring modu-
lator at a38kc rate. The two sampled outputs are
added and amplified byV2B. Adding the two alternately
sampled out of phase signals effectively produces an
output which is the input signal multiplied by a38kc
switching function of zero average value and odd sym-
metry. The audible portion of this signal is (L-R).
The output of V2B (L-R) is mixed with the two
outputs of V2A (L+R,-L-R), available at the plate and
cathode of V2A, respectively, to derive Land -R. De-
emphasis is accomplished in the mixing networks.
Evidently the phase of one signal must be reversed to
duplicate the original phase relationship, and this is
accomplished by V3A. The signal inverted by V3A is
fed to the grid of cathode follower V3B and the other
signal (not inverted) is fed to the grid of V3C.
Channel separation is controlled by varying the
amount of (L-R) signal which is injected into the mix-
ing network. This is effected by again control in the
grid of V2B. The output signal level under the condition
of optimum separation is thus determined by the direct
(L+R) component and is virtually independent of the
phase of the reinjected carrier. An error in the phase
of the injected carrier will simply require ahigher
setting of the separation control to achieve the same
output amplitude and channel separation that would be
obtained under the optimum carrier phase condition.
Note that the demodulator is of the balanced type
so that the potentially troublesome 38kc carrier does
not appear in the adaptor output. The presence of this
signal might conceivably introduce beat notes with tape
recorder bias oscillators.
Cathode follower outputs (V3B and V3C) are pro-
vided in each channel and filtering of the output wave-
forms are effected in these stages. Filtering atten-
uates the high frequency components which are intro-
duced in the demodulation process, and which, while
substantially attenuated by the de-emphasis networks,
may become objectionable in tape recording. In addi-
tion, the filters are designed to remove the 19kc pilot
signal which is usually present to anoticeable degree
in the output signals.
SECTION VI. MAINTENANCE
6-1. GENERAL
Your instrument will normally require little ser-
vice outside of tube replacement. The performance of
the instrument is not dependent on tube selection, and
all of the types employed are available nationally.
Completed kits do not require alignment because
of factory pre-alignment of all tuned circuits. However,
aservice alignment procedure is given which does not
require the use of instruments. Use this procedure on
completed kits only if there is definite indication of
misalignment, and after checking that wiring is entirely
correct and that there are no damaged or defective
parts.
Trouble-shooting information is provided also.
Included in this section are atrouble-shooting chart
and atable of operating voltages and resistances.
6-2. SERVICE ALIGNMENT
NOTE: This adjustment procedure can be per-
formed only when an FM station is known
to be broadcasting multiplexed stereo.
1. Pull power cord from outlet. Remove the MX-99
cover and temporarily dismount (but do not disconnect)
the printed board.

MX99 PAGE 5
2. Disconnect R25 (100K ohm, 1%resistor) from
pt. Xon board. (See Fig. 6-1). This point is called
out on the schematic diagram also.
3. Disconnect R30 (100K ohm, 1%resistor) from
pt. Yon board. (See Fig. 6-1). This point is called
out on the schematic diagram also.
4. Re-mount the printed board to permit the
adjustments that follow.
5. Remove tube V4 (6AU6) from socket tempor-
arily.
6. Insert power cord in outlet and connect MX-99
into your system as for normal use. (See Connection
Procedure). Set the POWER switch to ON, the NOR-
MAL-MAIN CHANNEL switch to NORMAL, and allow
a15-minute warm-up.
NOTE: The adaptor, as set-up at this point, can
deliver only the L-R sub-channel signal
to both outputs of the adaptor identically.
The resistor disconnections in steps 2and
3above temporarily eliminate the L+R
main channel signal. The reason for this
is that akey indication of proper adjust-
ment is maximum recovery of the L-R
sub-channel signal, which is easiest to do
with L+R temporarily eliminated.
7. Turn on your stereo amplifier and your FM
tuner, andallow themto warm-up. Set the input selec-
tor on your amplifier at the position for the regular
audio output (s) of your tuner. Set the amplifier MODE
selector to MONO. Set the FM tuner to astation broad-
casting multiplex stereo at the time. Then adjust the
amplifier level control for anormal listening level.
8. Next, set the amplifier input selector at the
position for the inputs to which the CH. 1and CH.2
out jacks of the MX-99 are connected. The sound may
be distorted at this time, and, depending on whether or
not the audio stages of the tuner are designed to pro-
vide audio gain, the level may be lower. Ignore the
distortion and re-adjust the amplifier level control for
anormal listening level. NOTE: What you will hear
at this point and during the following adjustments is
the L-R signal only, not stereo. It will appear at both
the CH.l and CH.2 OUT jacks identically with equal
amplitude. You may set the amplifier MODE switch
at either MONO or STEREO.
9. Turn the MX-99 SEPARATION control maximum
clockwise.
10. With atuning wand, or insulated screwdriver,
adjust the slug of T4 for acondition as close as possible
to "zero beat", which is indicated by the "clearest",
lowest distortion sound. This adjustment is only ap-
proximate because the removal of V4 has disabled the
synchronizing circuit.
CH.2
OUT OUT
BOARD
(DO NOT DISCONNECT
ANY WIRES FROM
BOARD)
V4(N0T SHOWN IN THIS
VIEW. REFER TO
TUB^ LAYOUT)
PWR CORD
Figure 6-1. Service Alignment (Board Removed)

PAGE 6
V4 (6AU6)
.PWR
CORD
j'ftooci “sm •&,
IMajwos J
MX STEREO
LAMP
11. Set the slug of T3 to approximately mid-
rotation.
12. Re-insert tube V4 (6AU6) back in its socket.
13. Adjust the slug of T2 for maximum audible
output. You will find that there are two points of maxi-
mum output, approximately one-half turn of the slug
apart. You may adjust to either one, since it makes
no difference from the performance point of view.* The
MX STEREO lamp will light when this adjustment is
made.
14. Set the POWER switch of the MX-99 to OFF
and pull the power cord from the outlet.
15. Dismount printed board.
16. Re-connect and solder R25 to pt. Xon the
board.
17. Re-connect and solder R30 to pt. Yon the
board.
18. Re-mount the printed board on the chassis
and replace the cover on the MX-99.
19. Insert the MX-99 power cord in aline outlet
and set the POWER switch at ON. Allow the unit to
warm-up. Set the NORMAL- MAIN CHANNEL switch
to NORMAL and the SEPARATION control to mid-
rotation.
20. Set the amplifier INPUT SELECTOR at the
position for the inputs to which the MX-99 CH.l and
CH.2 OUT jacks are connected. Set the amplifier MODE
switch to stereo. Adjust the amplifier controls as for
any stereo source.
NOTE: There is no difference lromthe perform-
ance point of view, however there is a
difference, between adjusting to one maxi-
mum or the other, that should be under-
stood for final system adjustments. At
one maximum, the left signal will appear
at the CH.l OUT jack and the right signal
at the CH.2 OUT jack. At the other maxi-
mum, the right signal will appear at the
CH.l OUT jack and the left signal at the
CH.2 OUT jack. Whichever is obtained,
the opposite can always be had by inter-
changing the patch cord connections at
either the adaptor output or the tuner input.
T4- NOT SHOWN IN THIS
/VIEW. REFER TO
/TUBE LAYOUT
PWR ON
OFF SW
SEPARATION
rnMTDAi
PT. A
R25
PRINTED
BOARD
Figure 6-2. Service Alignment (Bottom View)

•1 MX99 PAGE 7
6-3. VOLTAGE &RESISTANCE CHART
Pin# Column 1
DC Volts Column 2
38KC Column 3
Resistance Pin# Column 1
DC Volts Column 2
38KC Column3
Resi stance
VI 1100 DC 25K V3 10 140 DC 6K
25.5 DC 2.2M 11 10 DC 2.2M
311.3 DC 4,100 12 0DC 0
50DC 0V4 10DC 60
632 to 50 DC 125K 21.5 DC 150
7-1.3 DC 50-250 30DC 0
80DC 04Filament -6.3 VAC, 60 cps to ground
9Filament -6.3 VAC, 60 cps to ground 5140 DC 6,000
140 6,000
V2 180 DC 28K 71.5 DC 150
20DC 90K
32.8 DC 1,500 V5 1140 16 6,000
40DC 0001M
0DC 09.8 51.5K
120 DC 15K 000
13.5 DC 2.2M 5000
27 DC 10K 6140 17 6,000
Filament -6.3 VAC, 60 cps to ground 7-3.2 9100K
.89.8 1,500
V3 1Filament -6.3VAC, 60cps to ground 9Filament -6.3 VAC, 60 cps to ground
110 DC 18K
28 DC 10K V6 1AC 280V, 60 cps 370
12 DC 3K 2——
140 DC 6K 3000
6 12 DC 3K 4Filament -6.3VAC, 60 cps to ground
7 8 DC 1M 5———
8———6AC 280V, 60 cps 370
98DC 1M 7350 2.5 200K*
All readings are +20%.
Column 1, 2and 3: POWER switch to ON, MX STEREO switch to NORMAL, SEPARATION control to NORMAL.
Feed no signal to inputs.
Column 2: All measurements are made with a high impedance VTVM and are at 38kc, unless otherwise indicated.
Column 3: Line Cord removed from power outlet. Pin 7of V6 is connected to ground.
*Connection to ground removed when making this measurement.

6-4. TROUBLE-SHOOTING CHART
SYMPTOM CAUSE REMEDY
Fuse blows with V6 out of
socket.
Short in T1 Replace
Fuse blows only with V6 in
socket.
Defective V6, short C7 Replace
Filament not lit. Open heater in tube
Open green lead for T1 or leads
to filaments.
8.3V winding of T1 open
Replace tube
Replace T1
POWER bulb doesn't light Defective R18, 12 Replace
MX stereo bulb doesn't light
when stereo program is in
progress
Defective R10,T2,T3,I1,C6,
CR1, CR2 Replace
MX stereo bulb lights only
with VI out of socket Misaligned T2 and T3 Realign
DC voltage at V6 cathode
(pin 7) is incorrect as speci-
fied below:
a) No voltage Defective V6
C7 shorted internally or
externally
Connection to center top of h.v.
secondary winding of T1 open
Replace
Repair or replace
Repair or replace
b) High voltage Lead from C7C, R19, or R20 open Repair or Replace
c) Low voltage T4 shorted to ground
C7A open or shorted
V6 defective
Replace
Replace
Replace
Excess hum C7 open Replace
Sustained microphonics Vl defective Replace
Distorted Stereo T2,T3,T4 out of alignment Realign
Lack of separation V2,R31,R33,R34,R35,CR1,CR2,
CR3,CR4, CR5,CR6 Replace
High-pitched whistle on certain
FM stereo stations
67kc (SCA sub-carrier) trap T5
misaligned or defective Realign by adjusting
coil slug for inaudi-
bility of whistle. If
defective, replace.
6-5. SPECIAL OPERATING NOTES
The MX-99, as supplied, incorporates acapacitor,
C25, having avalue of .001 mfd and associated with
input stage VIA, which is designed to provide optimum
compensation for the high frequency roll-off (at 53kc)
of all EICO tuners (HFT-90, 92 and ST-96). When
using the MX-99 with one of these EICO tuners that is
properly aligned and operating normally, the optimum
setting of the MX-99 SEPARATION control will usually
fall somewhere between4and 8on the dial,* andat this
setting separation will be maximum across the audio
band. There are two other cases involving the use of
the MX-99 with other brands of FM tuners.
Provided that the station is employing the modulation
percentage practices recommended by the FCC, i.e.,
45% main carrier, 45% sub-carrier, 10% pilot carrier.
Check with the station involved.
CASE 1
If you are using the MX-99 with another brand of
FM tuner, and you find that maximum separation is
obtained with the SEPARATION control set somewhere
between 0and 4, you can usually maximize high-
frequency separation and reduce distortion by removing
capacitor C25 from the circuit.

KICO PAGE 9
MX99
CASE 2
If you are using the MX-99 with another brand of
FM tuner, and you find that maximum separation is
obtained with the SEPARATION control set somewhere
between 8and 10, you can usually maximize high-
frequency separation by increasing the value of C25 to
as much as twice its present value of .OOlmfd. (You
may do this by soldering an additional 10% disc capaci-
tor in parallel with C25. Try 470mmf first and stick
with this value if separation is noticeably improved;
if not, try .OOlmfd).
NOTE: In Case 1, the results of removing C25
are favorable in all respects. In Case 2,
the increase in the value of C25 over its
present value of .001 mfd will result in
asomewhat higher background noise level.
The latter effect is not related to the per-
formance of the MX-99 Adaptor, but merely
reflects the actual signal-to-noise ratio
in the tuner over the frequency band con-
taining the multiplexed signal.
6-6. EICO’s SERVICE POLICY
SERVICE CONSULTATION
If you are experiencing trouble that you cannot
diagnose yourself, you are invited to avail yourself of
the EICO Service Consultation Department. The con-
sultant handling your inquiry will make every effort to
diagnose the cause of your particular difficulty based
on the information that you provide. Please be as
thorough as possible. Include the following information
about your unit:
a) Have you made athorough check of the wiring,
checking also for cold solder joints, or acci-
dental shorting between parts, or to chassis?
(Check to see whether abare wire or lead ex-
tends far enough to be shorted when the bottom
plate is put on).
b) Have you checked that the proper tube or trans-
istor is in each socket, and also making proper
contact in the socket? Are all shields firmly
in place?
c) Does the trouble occur at one time or one
operating situation, but not at another time or
operating situation? Be as specific as possible
in this respect.
d) If the unit is of the type that involves alignment
or calibration, be as specific as possible as
to what you have done or not done with regard
to these requirements. If the unit incorporates
tuned circuits stated to be factory pre-aligned,
did you change any settings? If so, whatalign-
ment procedure did you use?
e) Have you observed any pecularity about apart?
If apart appears charred or otherwise damaged
by excessive heat, please say so. If you think
you have damaged aparticular part in the
assembly or wiring, please say so. In con-
junction with the symptoms, the consultant may
be able to determine whether such apart is
likely to be defective.
f) Have you gone through any trouble-shooting
procedure that may be provided? If your manual
includes atable of contacts made at each switch
position, have you checked out the switches
accordingly (if the trouble is such that doing
this would be appropriate)? Have you been able
to make checks of the operating voltages and/or
resistances, if this is appropriate, and your
manual provides atable of voltages and resist-
ances? What are the results of these checks?
Also, have you taken any other trouble-shooting
approaches? What have been the results?
g) If this is high fidelity equipment, please state
the type (magnetic, ceramic, crystal) of phono
cartridge you are using and/or the make and
model number. State the make and model of
your record changer, or turntable and tone arm.
Are the speakers in the same cabinet with
your electronic equipment? If so, describe the
cabinet and the placement of the components.
Please state the make and model of your speak-
ers.
In addition, list any code numbers in red under the
words INSTRUCTION MANUAL on the cover of the
book provided with your unit. If there are no red code
numbers, state this specifically. If the unit bears a
serial number, it is essential that you include this also.
PARTS REPLACEMENT
If it appears that acomponent is defective, and
you desireareplacementfromEICO, address your cor-
respondence to our Customer Service Department.
If you are claiming the right to ano-charge re-
placement under the terms and conditions of the war-
ranty, it is required that you shall have sent in the
registration card within 10 days of the date of purchase,
and that you send back the defective part transportation
prepaid. EICO will make the necessary replacement
at no charge for parts eligible under the terms and
conditions of the warranty. In returning tubes, pack
them very carefully to avoid breakage in shipment.
Broken tubes will not be replaced. Please read the
warranty on the subject of parts eligible for replace-
ment.
Further information required on apart returned
to the factory for ano-charge replacement under the
terms and conditions of the warranty is as follows:
a) Model number and serial number, if any, of
unit. Also any code numbers in red under the
words INSTRUCTION MANUALon the cover of
the book supplied with the unit.
b) Stock number and description of part as given
on the parts list. If the part is not listed (of
itself) in the parts list, it means that the part
is integral with asub-assembly. If the sub-
assembly is not sealed, and the defective part
is definitely identified and easily replaceable
(not more than two connections), you may re-
quest replacement for the particular part. If
the sub-assembly is sealed, or if the defective
part is not definitely identified or is not easily
replaceable (more than two connections), then
remove the sub-assembly and return it to EICO
(less any tubes) for repair or replacement, if
your unit is in warrantee. If your unit is out
of warrantee, you are generally advised to
order areplacement sub-assembly.
c) Describe as completely as possible the nature
of the defect, or your reason for requiring
replacement.
FACTORY REPAIR SERVICE
EICO maintains aFactory Repair Service Depart-
ment for in-warranty or out-of-warranty repair of
E ICO equipment. If is intended to serve those customers
who are not adequately familiar with electronics to
make use of the EICO Service Consultationfacilities, or
whose difficulties cannot be solved by correspondence.
For allout-of-warranty units, there is aminimum
labor and handling fee. For the Model MX-99, this fee
is $7.50. Charges for components replaced are addi-
tional to the minimum fee.
For in-warranty completed kit units, there is a
minimum labor and handling fee. For the Model MX-99,


SECTION VII. REPLACEMENT PARTS LIST Replacement Parts List (Cont'd.
)
SYM.# STOCK# AM'T. DESCRIPTION SYM.# STOCK# AM’ T. DESCRIPTION
Cl 22560 capacitor, disc, .05mid, GMV (50K or 50,000mmf) SI,
2
62015 2switch, slide, SPST
C2 23039 capacitor, elec., lmfd, 15V T1 30056 1transformer, power
C3 20063 capacitor, mylar, .03mfd, 5% T2 34631 1coil, filter, 19kc
C4,5 22552 capacitor, disc, 220mmf, 10% T3 34632 1coil, doubler, 19kc
C6 23048 capacitor, elec., lmfd, 150V T4 34633 1coil, oscillator, 38kc
C7 24005 capacitor, elec., 20 x40 x40mfd T5 33001 1coil, trap, 67kc
C8,9, 10 22560 capacitor, disc, .05mfd, GMV (50K or 50,000mmf) TB1 54018 1terminal strip, 4post, with ground
Cll 22532 capacitor, disc, .0015mfd, 10% (1.5K or 1500mmf) TB2 54015 1terminal strip, 3post 2left, with ground
C12, 14,16 22560 3capacitor, disc, ,05mfd, GMV (50K or 50,000mmf)TB3 54006 1terminal strip, 3post, 2right
C13 22532 capacitor, disc, .0015mfd, 10% (1.5K or 1500mmf) TB4 54018 1terminal strip, 4post, with ground
C15 23500 capacitor, elec., lOmfd, 12V TB5 54024 1terminal strip, 2post, left
C17 22548 capacitor, disc, ,009mfd, 10% (9K or 9000mmf) TB6 54044 1terminal strip, 3post left, with ground
C18, 19 20062 2capacitor, mylar, ,025mfd, 10% (25K or 25,000mmf) VI 90012 1tube, 12AT7
C20 22548 1capacitor, disc, ,009mfd, 10% (9K or 9000mmf) V2 90033 1tube, 12AU7
C2 1,22 20062 2capacitor, mylar, .025mfd, 10% (25K or 25, OOOmmf) V3 90081 1tube, 6D10
C23,24 23015 2capacitor, elec., 50mfd, 150V V4 90020 1tube, 6AU6
C25 22521 1capacitor, disc, .00 lmfd, 10% (IK or lOOOmmf) V5 90033 1tube, 12AU7
CR1,2,3, 4,5,6 95006 6diode, 40V, PIV V6 90036 1tube, 6X4
FI 91002 1fuse, 1Amp XF1 97800 1fuseholder
11,2 92012 2bulb, NE-2E XVI 97025 1tube, socket, 9pin miniature, bottom mount
J1 50014 1jack, single XV297065 1tube, socket, 9pin with shield
J2-3 50011 1jack, dual XV3 97064 1tube, socket, 12 pin, compactron
LI,
2
35068 2coil, 8mh XV4 97022 1tube, socket, 7pin miniature, bottom mount
R1 10453 1resistor, 18K ohm, 10%, 1/2W (brown, grey, orange, silver) XV 597065 1tube, socket, 9pin with shield
R2 10434 1resistor, 2.2M ohm, 10%, 1/2W (red, red, green, silver) XV6 97022 1tube, socket, 7pin miniature, bottom mount
R3 10446 1resistor, 270 ohm, 10%, 1/2 W(red, violet, brown, silver) 40000 10 nut, hex, No. 6-32
R4 10450 1resistor, 3900 ohm, 10%, 1/2W (orange, white, red, silver) 40001 1nut, hex, 3/8’’- 32
R5 10435 1resistor, 150K ohm, 10%, 1/2W (brown, green, yellow, silver) 40007 18 nut, hex, No. 4-40
R6 10441 1resistor, 150 ohm, 10%, 1/2W (brown, green, brown, silver) 40016 1nut, 1/2", fuseholder
R7 10431 1resistor, 47 OK ohm, 10%, i/2W (yellow, violet, yellow, silver) 40017 6nut, Tinnerman, No. 8-32
R8 10407 1resistor, 1M ohm, 10%, 1/2W (brown, black, green, silver) 40034 4nut, Tinnerman, No. 4-40
R9, 10 10410 2resistor, 100K ohm, 10%, 1/2W (brown, black, yellow, silver) 41046 4screw, No. 8-32 x3/8, brown
Rll 10442 1resistor, 1500 ohm, 10%, 1/2W (brown, green, red, silver) 41086 screw, No. 6-32 x5/16
R12, 13, 14, 15, 11068 resistor, 1500 ohm, 1%, 1/2W 41090 12 screw, No. 4-40 x5/16
16,17 41091 4screw, No. 4-40 x1/4, flat head
R18 10426 resistor, 33K ohm, 10%, 1/2W (orange, orange, orange, silver) 41097 2screw, No. 6-32 x5/16, brown
R19,20 14505 resistor, 3000 ohm, 10%, 5W 41110 6screw, No. 4-40 x1-1/8
R21 10434 resistor, 2.2M ohm, 10%, 1/2W (red,red,green,silver) 42000 1washer, lock, 3/8"
R22 11038 resistor, 9000 ohm, 1%, 1/2W 42001 1washer, flat, 3/8"
R23 10442 resistor, 1500 ohm, 10%, 1/2W (brown, green, red, silver) 42002 10 washer, lock, No. 6
R24 11018 1resistor, 9500 ohm, 1%, 1/2W 42007 24 washer, lock. No. 4
R25 11079 resistor, 100K ohm, 1%, 1/2W 42029 1washer, rubber, 1/2”
R26,27,28,29 11020 resistor, 40K ohm, 1%, 1/2W 42039 6washer, flat. No. 4
R30 11079 resistor, 100K ohm, 1%, 1/2W 44020 6spacer, 3/4"
R31 18091 potentiometer, 250K ohm, linear, taper 46015 4foot, plastic
R32 11079 1resistor, 100K ohm, 1%, 1/2W 51503 2clip, can
R33 10426 1resistor, 33K ohm, 10%, 1/2W (orange, orange, orange,silver) 53049 1knob
R34 10442 1resistor, 1500 ohm, 10%, 1/2W (brown, green, red, silver) 57000 1line cord, brown
R35 10435 1resistor, 150Kohm, 10%, 1/2W (brown, green, yellow, silver) 80122 1panel
R36 11049 1resistor, 70K ohm, 1%, 1/2W 81333 1chassis
R37 10434 1resistor, 2.2M ohm, 10%, 1/2W (red, red, green, silver) 81334 1bottom plate
R38 10407 1resistor, 1M ohm, 10%, 1/2W (brown,black, green, silver) 81335 1cover (OPTIONAL)
R39 11559 1resistor, 12K ohm, 5%, 1/2W (brown, red, orange, gold) 81955 1bracket, coil
R40 10528 1resistor, 270 ohm, 5%, 1/2W (red, violet, brown, gold) 82101 1strain relief
R41 11051 1resistor, 10K ohm, 1%, 1/2W 82509* 1printed board
R42 10407 1resistor, 1M ohm, 10%, 1/2W (brown, black, green, silver) 89261 1label, nomenclature, back
R43 10446 1resistor, 270 ohm, 10%, 1/2W (red, violet, brown, silver) 89262 1label, tube layout
R44,45 10413 2resistor, 2700 ohm, 10%, 1/2W (red, violet, red, silver) 89627 1capsule, glue
R46 10446 1resistor, 270 ohm, 10%, 1/2W (red, violet, brown, silver) 89684 2bulb, housing, fishpaper
R47,48 10453 2resistor, 18K ohm, 10%, 1/2W (brown, grey, orange, silver) 97304 2shield for slide switch
197720 2jewel
66106 imanual of instruction (wired)
66359 imanual of instruction (kit)
*82512 and 82509 are interchangeable

PAGE 12 EICO
+50V
R39 CI6
I/2-I2AU7 I/2-I2AU7
I.5K CIO
V3A
I/3-6DI0
I/3-6DI0
•0
0
f
o
11
KV3C
/I/3-6DI0
9. '
©Ht VIA
C1/2-
[3 I2AT7
L±!
!67KC
/220MMF f
C4 if ^Xr9 I
1
"
220MMF <100 1
3V5A,B
RIO, IOOK
=* c
i
6
-150V
-CR4
MAIN CH.
S2
NORMAL
RI7-I.5K-|%
VA—
.
RI4 4=
7l.5K,l%
+150V
I/2-I2AT7
notes:
I-ALL RESISTORS ARE IN OHMS aARE I/2W, 10% UNLESS OTHERWISE
INDICATED.
2-
ALL CAPACITOR VALUES ARE IN MFD, S500V, 10% UNLESS OTHER-
WISE INDICATED.
3- M=MEGOHMS (1,000,000)
4- K= KILOHMS (1,000)
5- Z\ INDICATES TEST POINTS.
II7VAC +-LC7A
-T 20
400V
L+C7B J-+C7C
-40 -40
350V 350V
wht
—
y_
Figure 6-4. MX-99 Schematic Diagram
Other manuals for MX-99
1
Popular Car Stereo System manuals by other brands

Sony
Sony XM-ZR704 Marketing Specifications

Discount Car Stereo
Discount Car Stereo VOL-AUX Quick start installation guide

Dual
Dual XD5110 Installation & owner's manual

Kenwood
Kenwood 08AO6-4E2-200 operating instructions

Pioneer
Pioneer KEH-P7015 X1M/ES Service manual

Sony
Sony CDX-M750 - Fm/am Compact Disc Player Service manual