logo
Brands
  1. Home
  2. •
  3. Brands
  4. •
  5. EKOVENT
  6. •
  7. Ventilation Hood
  8. •
  9. EKOVENT EKO E-line User manual

EKOVENT EKO E-line User manual

This manual suits for next models

12

Popular Ventilation Hood manuals by other brands

Haier CXW-219-D67 null

Haier

Haier CXW-219-D67 null

emmeti RECUPA MED A-140 Installation and use manual

emmeti

emmeti RECUPA MED A-140 Installation and use manual

Nibe F135 user manual

Nibe

Nibe F135 user manual

Zephyr Spruce AK9834BS Use, care and installation guide

Zephyr

Zephyr Spruce AK9834BS Use, care and installation guide

Kuppersberg INTRO 60 Technical Passport

Kuppersberg

Kuppersberg INTRO 60 Technical Passport

Hisense MH6INBG manual

Hisense

Hisense MH6INBG manual

Miele DA 1255 Operating and installation instructions

Miele

Miele DA 1255 Operating and installation instructions

Broan 46000 Specification sheet

Broan

Broan 46000 Specification sheet

GE Profile PV977 Owner's Manual & Installation Instructions

GE

GE Profile PV977 Owner's Manual & Installation Instructions

FALMEC FFRIA24W5FS Instruction booklet

FALMEC

FALMEC FFRIA24W5FS Instruction booklet

Whirlpool RH2600XL-1 SERIES installation instructions

Whirlpool

Whirlpool RH2600XL-1 SERIES installation instructions

ETNA AV360RVS Instructions for use

ETNA

ETNA AV360RVS Instructions for use

JUNO JDF603E6 installation manual

JUNO

JUNO JDF603E6 installation manual

Miele DA 6708 D Operating and installation instructions

Miele

Miele DA 6708 D Operating and installation instructions

Tricity Bendix LE 150 Installation & operating instructions

Tricity Bendix

Tricity Bendix LE 150 Installation & operating instructions

AEG X68163BV1 user manual

AEG

AEG X68163BV1 user manual

AEG 125 D operating instructions

AEG

AEG 125 D operating instructions

Smeg KSEV97X instruction manual

Smeg

Smeg KSEV97X instruction manual

https://manuals.online logo
https://manuals.online logoBrands
  • About & Mission
  • Contact us
  • Privacy Policy
  • Terms and Conditions

Copyright 2025 Manuals.Online. All Rights Reserved.

Installation- and maintenance instructions 2022-03
Roof hoods E-line & S-line
Roof inlets EKO-T & EKO-TD
EKOVENT AB We reserve the right to make changes 2022-03
2
Table of contents
General about the product
Transport
The product is transported to the assembly
site with a crane or forklift.
Important!
To avoid damage the product must be
lifted, the product must not be pulled or
lowered hard against the surface.
Checking delivered goods
Check the delivery for transport damage
and to ensure that it is copmplete as
soon as it arrives. The approved delivery
is acknowledged the consignment note.
Products with defects may not be installed.
Contact the supplier immediately.
Storage
If you have to store the packages tempo-
rarely store it in a dry dust free place. Do
not expose to anny aggressive gases or
liquids. The product must be handled
so that no mechanical damage occurs to
it.
Commissioning
The product must not be used until the
whole the installation is in operational con-
dition.
Personnel requirements
Assembly/ installation and sommissioning
must only be carried out by instructed per-
sonnel or by the manifacturer. Instructions
in this manual must be followed, if you
have any questions contact the supplier.
– Damage due to incorrect transport,
handling or storage.
– That the user has failed to inspect,
maintain and to a reasonable extent
take care of the equipment.
EKOVENT AB hereby disclaims all responsibility for:
– Personal injury or property damage as a
result of the product has been used in viola-
tion of instructions and specications in this
manual.
EKOVENT’s liability shall be limited to repair
or replacement of faulty equipment part.
Installation- and maintenance instructions
General about the product .........................2
Lifting instructions......................................3
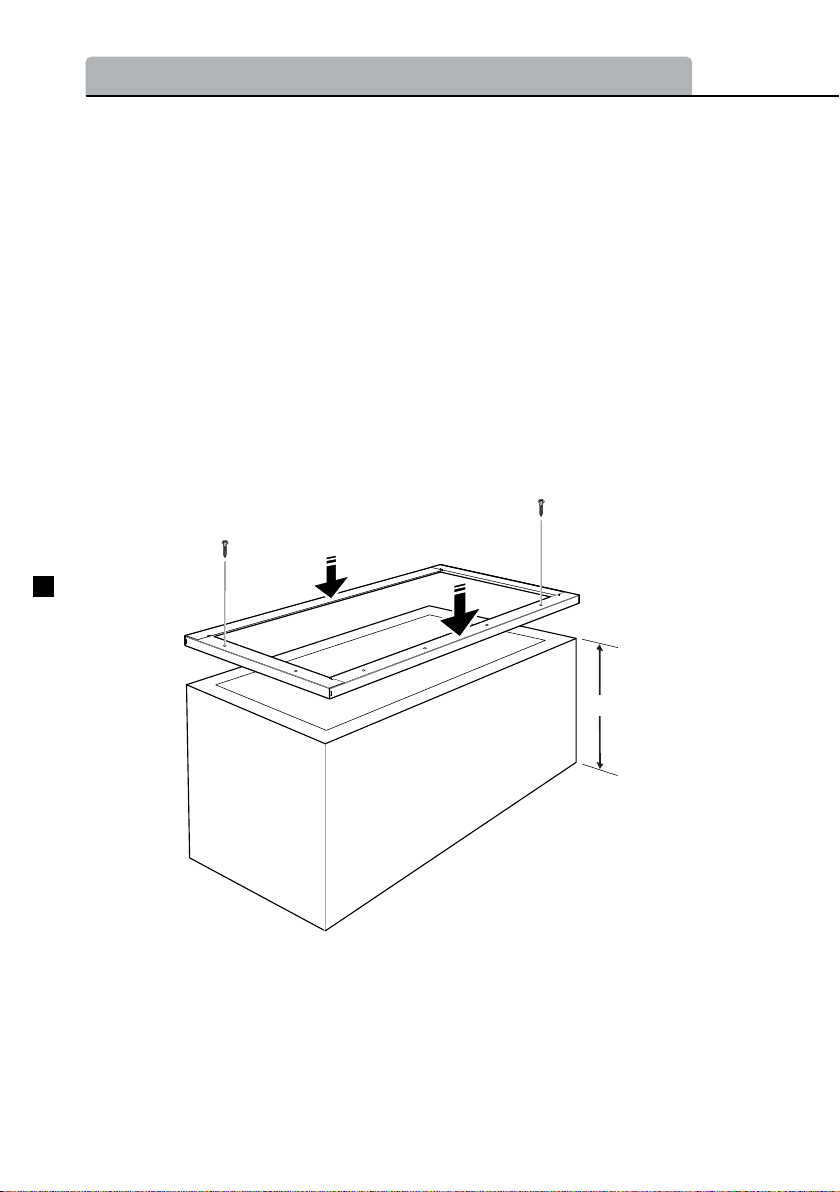
Anchoring of Roof hood .............................3
Installation .............................................. 5-8
Maintenance...............................................9
EKOVENT AB We reserve the right to make changes 2022-03
3
Lifting instructions
Important!
Carefully read our instructions that apply to each product and size.
Use the designated lifting method and the designated lifting accessories.
• Lifting may be only performed by app-
ropriately trained personnel.
• Only the product may be lifted. The
lifting of person or other types of lifting
must not be performed when lifting the
roof hood.
• Do not stand under suspended loads.
• Lifting of products may only be carried
out using lifting equipment approved
for the intended purpose. Approved
shackles, lifting or sling hooks must
be used in combination with chains,
slings or straps.
• Use all (four) lifting points.
• Carefully check that the assigned
lifting points are not damaged before
lifting
• Check that the specied angle (20º)
is on connecting lifting gear is not ex-
ceeded. For compensation of angles
or lengths must approved screws be
used .
• When lifting our roof hoods, the met-
hods described for the particular hood
model must be applied. We recom-
mend that the H-yoke or frame-yoke
is used when lifting products with four
lifting points or more to ensure a so
evenly distributed load as possible
• The Roof inlets are lifted separately
Anchoring
All roof hoods are prepared for anchoring.
E-Line have lifting eyes than can be used.
S-Line has pre-punched holes that can be used if needed.
S-LineE-Line
EKOVENT AB We reserve the right to make changes 2022-03
4
Installation- and maintenance instructions
Weight (kg)
Model
Size
EKO-
HAE
EKO-
HUE
EKO-
HKE
EKO-
HAAS
EKO-
HUAS
EKO-
HKAS
20 9 9 14 14 12 35
30 13 13 21 18 15 43
40 17 18 29 38 30 85
50 23 24 38 50 40 110
60 29 30 49 63 48 130
80 56 57 94 95 75 190
100 79 79 132 125 95 230
120 106 106 162 160 125 270
140 138 137 210 205 155 305
160 174 179 267 250 175 345
180 223 226 340
200 273 278 420
Model
Size
EKO-
TD
(El30)
10 30
12 36
13 41
16 52
18 62
20 63
22 74
24 84
28 96
30 106
34 118
40 140
42 150
44 162
46 184
48 215
50 255
Model
Size
EKO-
T
(EI30)
3 19
4 26
5 32
6 39
6,5 43
7 46
8 52
9 59
9,5 63
10 66
11 72
12 79
13 85
14 92
15 98
16 105
17 111
18 118
19 125
20 131
21 138
EKOVENT AB We reserve the right to make changes 2022-03
5
Installation
300mm
<
A + 20mm
A + 20mm
A
B
3
1
2
Installation EKO-T and EKO-TD
Cut out size for sloping roof=
Example roof slope 30 degrees = 900 + 20 = 1067 mm
0,86
Width Roof inlet (A) + 20 mm
Constant Y according to
diagram
0
0,6
0,7
0,8
0,9
1
510 15 20 25 3030 35 40 45 50
X
Y
Important!
Follow the lifting instructions to perform safe lifting.
1. Calculate the cut out size in the roof according to the charts and examples below.
2. Use the lifting points and place the Roof inlet in the hole.
3. Secure the Roof inlet to the ceiling with the mounting brackets (3) by screwing in the attach-
ment points. Use self-drilling sheet metal screw 4.8x25 mm or equivalent.
4. Cover the Roof inlet with plywood (2), roong felt (1), sheet metal or other approved sealing
method.
• The Roof inlet must be at least 300 mm above the roof.
• For horizontal roofs, the cut out size installation of Roof inlet is AxB + 20 mm.
• In the case of sloping roofs, the roof slope must be taken into account, see below.
• Roof inlet is mounted horizontally.
i
X = roof
slope
in degrees
Model
Size
EKO-
T
(EI30)
3 19
4 26
5 32
6 39
6,5 43
7 46
8 52
9 59
9,5 63
10 66
11 72
12 79
13 85
14 92
15 98
16 105
17 111
18 118
19 125
20 131
21 138
EKOVENT AB We reserve the right to make changes 2022-03
6
Installation- and maintenance instructions
Installation of EKO-SUH (Adjustable outlet speed)
(Applies to EKO E-Line size 20-200 and EKO S-Line size 20-100)
EKO-SUH is placed in the roof hood outlet and adapted to its attachment points in the hood.
1. Adjust the EKO-SUH to the desired position and lock with a sheet metal screw in the up-
per edge of the hood.
2. Lock EKO-SUH with blind rivet nut M10 and sheet metal screws.
Calculate the desired area:
A = q/v
v = Desired outlet speed, m/s
q = Available air ow, m3/s
A = Outlet area, m2 (AxB)
EKO-SUH
EKOVENT AB We reserve the right to make changes 2022-03
7
1
2
3
Installation of the mount frame
The mounting frame consists of four loose angle plates with foldable sheets in the corners.
1. Fold the plate 90º.
2. Bring the corners of the angle plates together.
3. Fold the plates another 90º so that they lock the angle plates together.
EKOVENT AB We reserve the right to make changes 2022-03
8
1
2
Min 300 mm
ovan tak
Installation- and maintenance instructions
Installation of the mount frame
1. Place the mounting frame on the Roof inlet.
2. Screw the mounting frame to the Roof inlet.
Use self-drilling sheet metal screw 4.8 x 25 mm or equivalent.
above the ceiling
EKOVENT AB We reserve the right to make changes 2022-03
9
Installation of the Roof Hood
• Be sure to place the Hood upright with exhaust air and outdoor air over each
duct in the Roof inlet. Roof hood and Roof inlet are mounted horizontally.
i
Important! Follow the lifting instructions to perform safe lifting.
1. Use the lifting points and place the roof hood on the mounting frame.
2. Attach the hood to the mounting frame by screwing in the attachment
points. Use self-drilling sheet metal screw 4.8 x 25 mm or equivalent.
above the ceiling
2
1
20°
• For Combined Hoods, the supplied gasket must be mounted on the roof hood
between exhaust air and intake air.
NOTE!
EKOVENT AB We reserve the right to make changes 2022-03
10
Installation- and maintenance instructions
Maintenance
• Check and correct any visible damage.
• Check that the hood is properly at-
tached in the Roof inlet and that any
stay lines are whole and taut.
• Check that the hood’s wire mesh is
secure mounted and have no visible
damages.
• Remove any accumulation of leaves,
dirt or snow.
• Make sure that no object obstructs the
air ow.
• Inspect the drainage holes in the Roof
hood that no dirt or leaves obstruct
the water from running out of the
hood.
Cleaning
• The requirement for cleaning cor-
responds to the requirements which
is placed on the facility in general and
the applicable product warranty.
• Do not clean the hood with a high-
pressure cleaner.