Ekselans CAM B3 User manual


ITS Partner O.B.S S.L · Av. Cerdanyola 79-81 Local C
08172 Sant Cugat del Vallés · Barcelona (Spain)
Phone: +34935839543 · info@ek.plus · www.ek.plus
CAM B3 USER MANUAL
TABLE OF CONTENTS
Features. ........................................................................................................................................................................................................................................ 3
Contents of the box. ....................................................................................................................................................................................................... 3
Parameters. ................................................................................................................................................................................................................................. 3
Installation Guide.................................................................................................................................................................................................................... 4
Camera configuration......................................................................................................................................................................................................... 5
Access to live video feed................................................................................................................................................................................................8
Camera settings. .....................................................................................................................................................................................................................9
Accessory settings. .........................................................................................................................................................................................................9
Network configuration. ................................................................................................................................................................................................9
IP Camera settings.........................................................................................................................................................................................................10
Motion detection..............................................................................................................................................................................................................11
Playback of images recorded on the SD memory.................................................................................................................................. 12
FAQS...............................................................................................................................................................................................................................................13

ITS Partner O.B.S S.L · Av. Cerdanyola 79-81 Local C
08172 Sant Cugat del Vallés · Barcelona (Spain)
Phone: +34935839543 · info@ek.plus · www.ek.plus
3
CAM B3 USER MANUAL
Features.
Designed for use with alarm systems, the Smart Camera is a wireless, Internet-enabled camera with
excellent performance. Its lightweight and attractive design is perfect for use in an office or home
environment. This IP camera is easy to set up and operates via an app for mobile devices. Using
international servers worldwide, users can easily view recorded or live video anywhere, anytime from a
phone. 1920 x 1080 video resolution at 30 fps. Automatic IR-LED lighting with IR-cut filter switch. IR night
vision with 8 IR LEDs (up to 30 meters). Wi-Fi compatible with IEEE802.11 b/g/n, 2.4 GHz band. WEP,
WPA-PSK and WPA2-PSK encryption. Recording and playback via micro-SD card, up to 128 GB. ONVIF
protocol compatible. High quality H.265 video compression format.
Contents of the box.
•B3 outdoor camera.
•12V 1 A power supply.
•Screws for wall mounting and cable glands.
Parameters.
Camera
Image sensor
CMOS 1/2,9” 2 MP
Effective pixels
1920 (H) x 1080 (V)
WDR
Digital WDR
Noise Reducction
3D DNR
Day/Night Control (IR-cut filter)
Automatic (ICR) / Color / White and Black
Motion Detection
Supported
SD card
Up to 128 GB
IR Distance
30 m
Lens
Focal Length
4 mm
Maximum opening
F 2,4
Focus Control
Fixed
Viewing Angle
114°
Video
Encode
H.265 mani profile
Resolution
1080 P (1920 x 1080) VGA(640x352)
Video transmission rate
64 Kbps ~ 8 Mbps
Video frame rate
25 fps to 1080 P
Image snapshot
Supported
General
Power
DC 5 V/1 A
Hard reset
Yes
Power consumption
< 5 W
Operating conditions
-10 °C- 55 °C, 10 ~ 90 HR
Environmental resistance
IP 65
Dimensions
Ø70.5x173.5mm
Weight
380g
Network
Smartphone
iOS (9.0 or higher), Android (5.0 or higher
)
Wi-Fi
Wi-Fi (802.11 b/g/n), solo 2,4 G
Encryption WEP/WPA-PSK/WPA2-PSK
P2P
Yes

ITS Partner O.B.S S.L · Av. Cerdanyola 79-81 Local C
08172 Sant Cugat del Vallés · Barcelona (Spain)
Phone: +34935839543 · info@ek.plus · www.ek.plus
4
CAM B3 USER MANUAL
Installation Guide.
Install the micro SD card into the camera
(Optional).
Remove the cover by removing the screws.
Insert the micro SD card that is to be installed,
which can be up to 128GB. Be careful to position
the front and back of the micro SD card before its
installation so that the camera can recognize the
card.
WARNING: IF INSTALLING AN SD CARD
ALWAYS DO SO WITH THE CAMERA SWITCHED
OFF AS IT IS LIKELY TO MALFUNCTION IF THE
CAMERA IS SWITCHED ON.
Replace the top cover.
Installing the camera on the wall.
Note: Prior to installation, ensure that the surface
where the camera is to be mounted can
withstand at least three times the weight of the
camera.
1) Drill holes where the camera is to be mounted
using a 3/16" drill bit.
2) Affix the included wall brackets to these holes.
3) Screw the base to the wall brackets with the
included screws. Once the base is mounted,
tighten the screws tightly.
•Reset: Factory reset button.
•LAN: Connect the LAN cable, only if
necessary. Do not connect the cable first
until it is configured via Wi-Fi.
•Power: Connect to the power supply.

ITS Partner O.B.S S.L · Av. Cerdanyola 79-81 Local C
08172 Sant Cugat del Vallés · Barcelona (Spain)
Phone: +34935839543 · info@ek.plus · www.ek.plus
5
CAM B3 USER MANUAL
Camera configuration.
To configure the camera, it must be disconnected from the LAN cable. Only the first configuration can
be made using the Wi-Fi.
Open the SEKUR IP application and go to “Device
settings”(in the image it is the wheel).
Click on add device.
Scan QR code
ITS Partner O.B.S S.L · Av. Cerdanyola 79-81 Local C
08172 Sant Cugat del Vallés · Barcelona (Spain)
Phone: +34935839543 · info@ek.plus · www.ek.plus
6
CAM B3 USER MANUAL
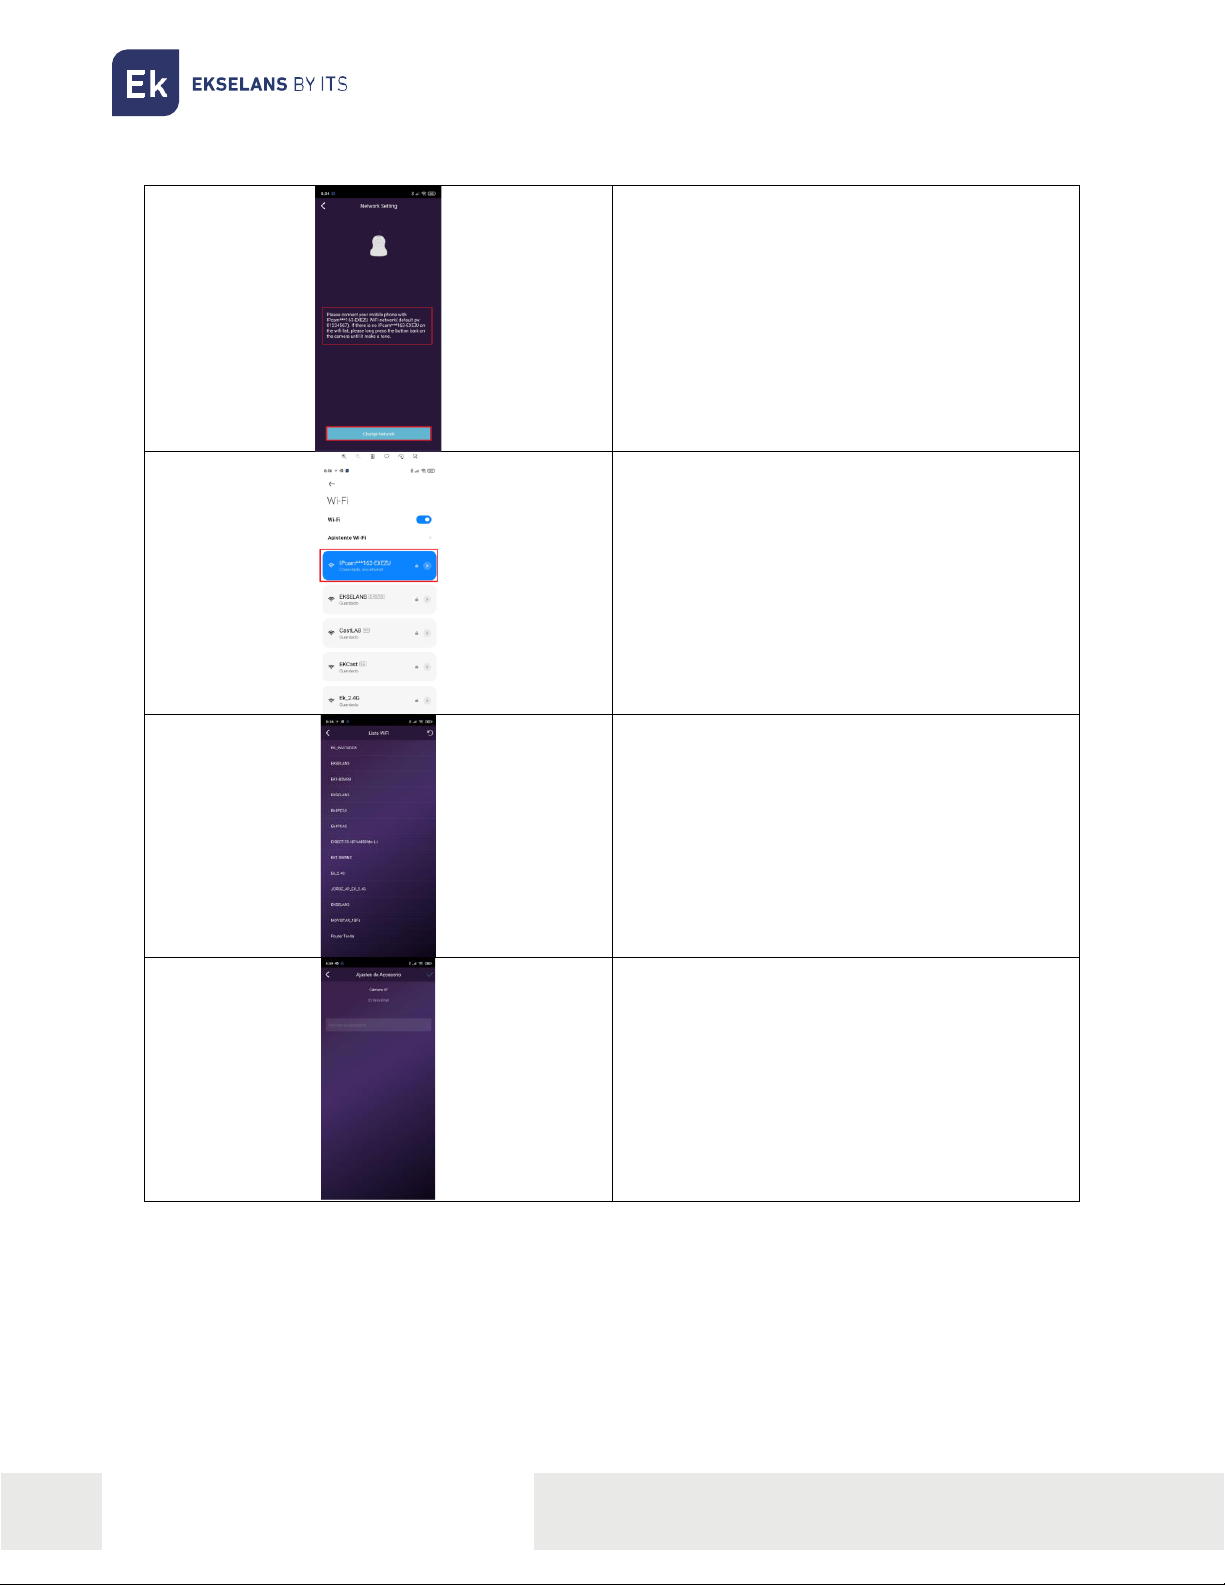
The following screen will appear. It indicates the
password (01234567) and the SSID of the camera
which must be connected.
Connect to the SSID of the camera to be installed.
Once connected click on the back arrow and
select “Maintain configuration” where the phone
specifies to stay on the network without internet
access.”
Select the SSID 2.4GHZ to which the camera is to
be connected and configure the password of that
SSID. This SSID must have an internet connection.
During the process a sound will be heard from
the camera as if it has been carried out correctly.
Important, remember to wait until the screen for
the camera name appears, it may take a few
minutes.
Name the camera to be identified. Once finished
go to the settings wheel of our application and in
devices the added camera should appear, then,
access “IP Camera”

ITS Partner O.B.S S.L · Av. Cerdanyola 79-81 Local C
08172 Sant Cugat del Vallés · Barcelona (Spain)
Phone: +34935839543 · info@ek.plus · www.ek.plus
7
CAM B3 USER MANUAL
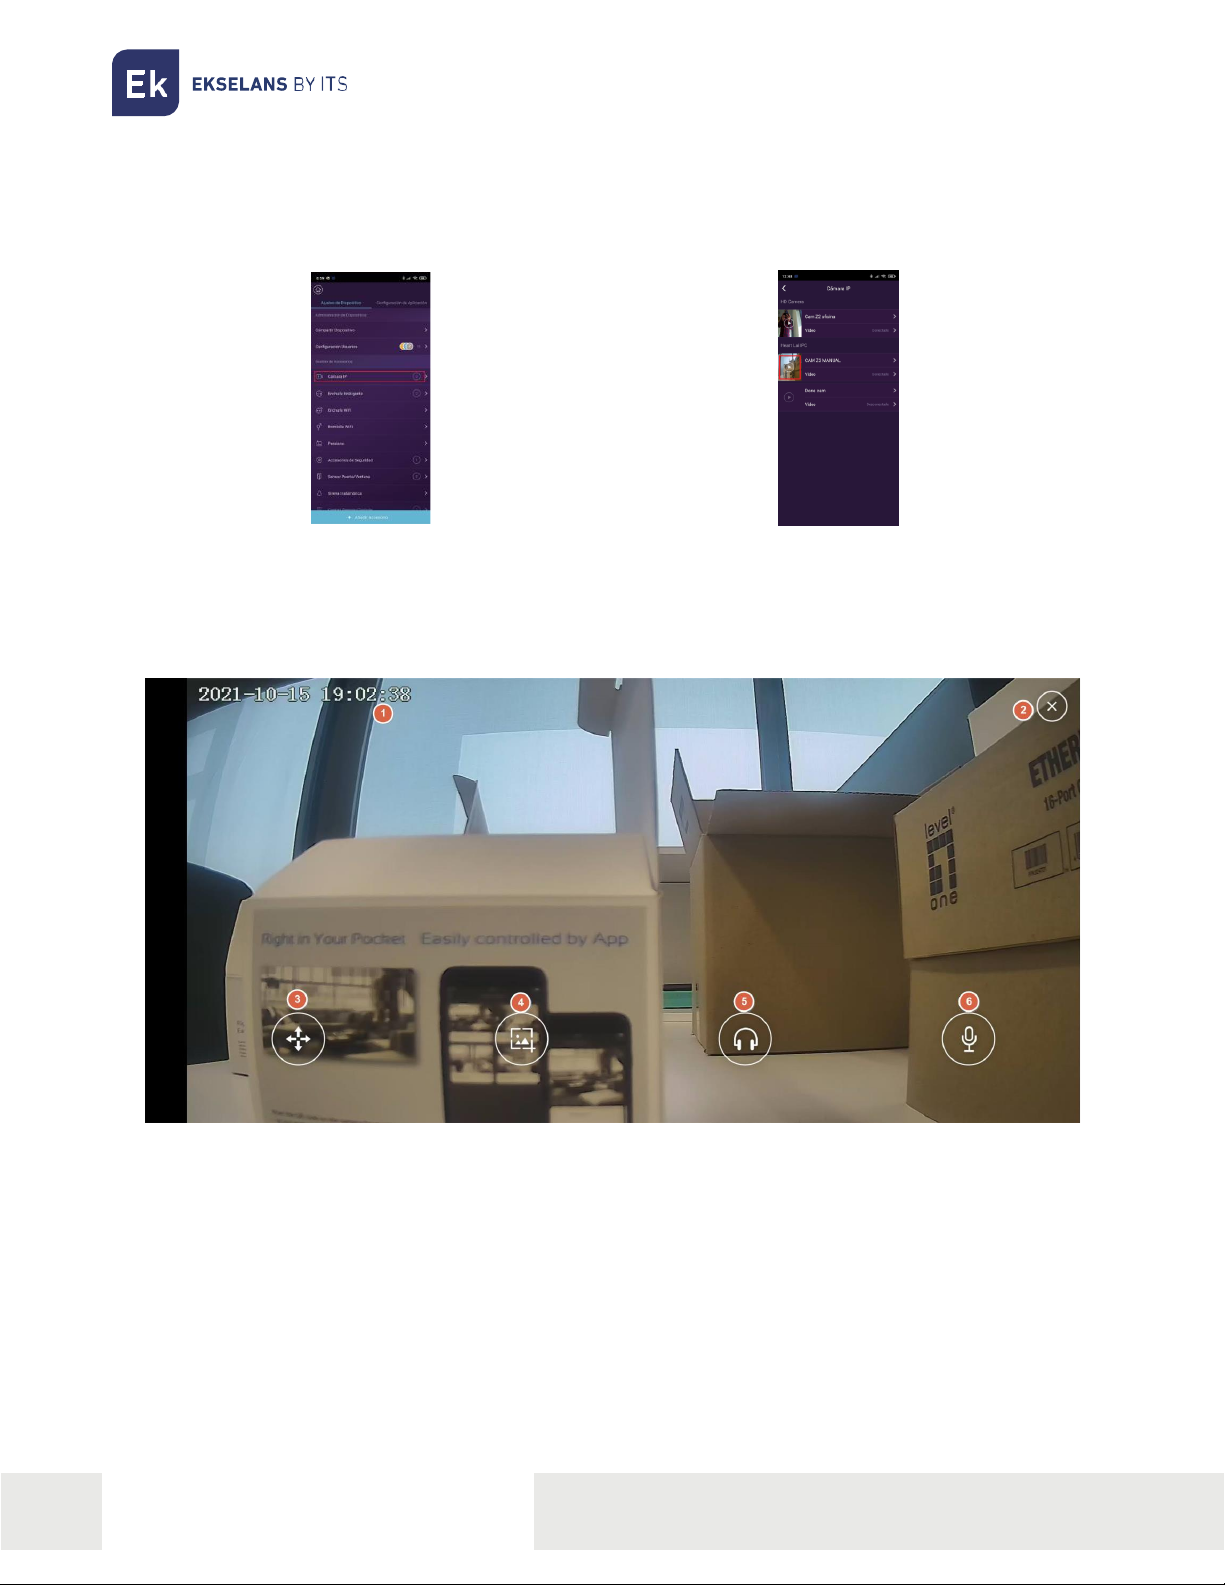
Once finished go to the settings wheel of our
application and in devices the added camera
should appear, then access “IP Camera”.
When accessed, the cameras which have been
added will appear. Click on the exclamation mark
to configure a password for the camera. Just like
that the password will be configured.
Once finished, it will appear in connected status
and the camera can be accessed without any
problems. It can only be accessed when its status
is “Connected”.
WARNING: The camera will be configured with the Wi-Fi, if connected via cable it will work using the
cable instead of via Wi-Fi, it does not require configuration for the LAN cable part.
ITS Partner O.B.S S.L · Av. Cerdanyola 79-81 Local C
08172 Sant Cugat del Vallés · Barcelona (Spain)
Phone: +34935839543 · info@ek.plus · www.ek.plus
8
CAM B3 USER MANUAL
Access to live video feed.
1. Go to the “Device settings”menu of the
installed cameras.
2. Click on play in the camera that is to be viewed.
WARNING IT MUST BE IN CONNECTED
STATE
In the playback there are different options available:
1. Current date and time of the camera.
2. Button to close the application.
3. Button to move the camera: The camera can be moved in the permitted directions.
4. Image capture: An image capture can be made at the same time as clicking the button.
5. Audio button: When clicked, one can listen through the camera's microphone.
6. Talk button: One can talk through the camera's loudspeaker.

ITS Partner O.B.S S.L · Av. Cerdanyola 79-81 Local C
08172 Sant Cugat del Vallés · Barcelona (Spain)
Phone: +34935839543 · info@ek.plus · www.ek.plus
9
CAM B3 USER MANUAL
Camera settings.
Accessory settings.
1. Go to the “Device settings”where the
cameras are installed.
2. Click on the name of the camera that is to be
configured.
1. Accept button: Whenever a change is made in
the configuration it must be accepted so that it
is applied completely.
2. Camera ID: Identifier number of the camera
itself. It should not be identical to that of any
other camera.
3. Camera name: The name of the camera can be
changed.
4. Network configuration: The Wi-Fi to which the
camera is connected can be changed.
5. IP camera settings: The camera configuration
can be accessed.
6. Delete button: The camera can be deleted if so
wished.
Network configuration.
This enables changing the Wi-Fi configuration to which it is connected. Follow the same steps as in
Camera configuration. From the second table.

ITS Partner O.B.S S.L · Av. Cerdanyola 79-81 Local C
08172 Sant Cugat del Vallés · Barcelona (Spain)
Phone: +34935839543 · info@ek.plus · www.ek.plus
10
CAM B3 USER MANUAL
IP Camera settings.
1. Details: The status of the camera, as well as the password
that was configured upon first installation can be seen.
This password can be changed from this same menu by
clicking on it.
2. Advanced settings:
oMotion detection: Enables activating the motion
detection. It has its own menu that will be
explained in the Motion detection section.
oSINC, with phone time zone: Synchronize the
camera with the time on one’s phone. By default,
it is not supplied with the same time/hour, it is
recommended to synchronize so that the
time/video relationship is correct.
oHD: Enables setting the maximum resolution of
the camera with which it captures the image, in
this case HD.
oHorizontal flip: Enables rotating the image
horizontally in the application. This is necessary
depending on the physical position in which the
camera is installed.
oVertical flip: Enables rotating the image in the
application vertically. It is necessary depending
on the physical position in which the camera is
installed.
oWI-FI configuration: Enables changing the WI-FI
configuration.
oFormat SD Card: It is advisable once the SD card
is installed for the first time, to format the card
thanks to this option.

ITS Partner O.B.S S.L · Av. Cerdanyola 79-81 Local C
08172 Sant Cugat del Vallés · Barcelona (Spain)
Phone: +34935839543 · info@ek.plus · www.ek.plus
11
CAM B3 USER MANUAL
Motion detection.
1. Motion Detection: Enables activating motion detection.
For the images to be recorded, the recording must be
activated.
2. Camera Alarm Scheduling: Enables activating a time in
which the recording will be triggered when motion is
detected.
oAlarm Sound: The camera will emit a sound when
motion is detected.
oMotion Sensitivity: The sensitivity with which the
recording starts when motion is detected can be
adjusted.
oAlarm Start Time: Start time at which the camera
will be triggered due to motion.
oAlarm End Time: End time at which the alarm will
be triggered by motion detection
3. Camera record scheduling: Enables to activate a
schedule in which the camera will record. If the “Motion
Detection”is not activated and this option is activated, it
will record continuously.
oRecord Start Time: Start time at which the camera
will start recording images.
oRecord End Time: End time at which it will record
images.

ITS Partner O.B.S S.L · Av. Cerdanyola 79-81 Local C
08172 Sant Cugat del Vallés · Barcelona (Spain)
Phone: +34935839543 · info@ek.plus · www.ek.plus
12
CAM B3 USER MANUAL
Playback of images recorded on the SD memory.
1. Go to the “Device settings” menu where the
cameras are installed.
2. Click on “Video” for the camera that is
to be viewed.
The recording screen where the timeline can be browsed to view the recordings made will be
displayed. These recordings will have a color depending on whether they are motion or continuous
recordings.
1. Time: Time of the moment selected in the timeline.
2. Exit button.
3. Calendar: The day that is to be visualized can be selected.
4. Timeline: Displays the different times of the selected day.
5. Red line: Time of day selected for display.
6. Recording by motion detection: The recordings made due to motion will be displayed in red.
7. Continuous recording: Continuous recordings will be displayed in green.

ITS Partner O.B.S S.L · Av. Cerdanyola 79-81 Local C
08172 Sant Cugat del Vallés · Barcelona (Spain)
Phone: +34935839543 · info@ek.plus · www.ek.plus
13
CAM B3 USER MANUAL
FAQS
I have already connected the camera to the Internet, but I cannot connect it to the application.
Check that you have used the QR code during synchronization. Check that you are using 2.4 GHz Wi-Fi,
the camera cannot support 5 GHz.
The camera only supports IPV4. The Services and DHCP server must be enabled in the Router settings.
If you are using a firewall, all ports 10000 to 65535 must be enabled for the IP address of the camera in
its configuration. It is recommended that you enable all permissions requested by the camera.
I cannot save the snapshots.
The application needs access to the phone's album to save snapshots. Certain phones ask for your
permission when using the feature for the first time.
If you press "No" by mistake during authorization, you must activate same in the system settings menu.
How do I factory default to the camera?
PLEASE NOTE THE RESULTS OF FACTORY DEFAULT: ALL DATA, INCLUDING INTERNET SETTINGS,
WILL BE DELETED.
After switching the camera on, press and hold the RESET button for approximately 5 seconds until you
hear a noise made by the camera using a hairpin or similar object. The reset will take approximately 1
minute.
This manual suits for next models
1
Table of contents


