Electro Depot Valberg MFO 66 M K205T User manual

Integrated oven
Four encastrable
Inbouwoven
Horno empotrado
06/2022 - V3
971913 - MFO 66 M K205T (V2)
INSTRUCTION MANUAL ................................02
GUIDE D’UTILISATION....................................42
HANDLEIDING ................................................80
MANUAL DEL USUARIO ...............................116
EN
WARRANTY CONDITION
This product is guaranteed for a period of 2 years from the date of purchase* against
any failure resulting from a manufacturing or material defect. This warranty does
not cover defects or damage resulting from incorrect installation, improper use or
abnormal wear of the product.
*on presentation of the receipt.
FR
CONDITION DE GARANTIE
Ce produit est garanti pour une période de 2 ans à partir de la date d’achat*, contre
toute défaillance résultant d’un vice de fabrication ou de matériau. Cette garantie ne
couvre pas les vices ou les dommages résultant d’une mauvaise installation, d’une
utilisation incorrecte ou de l’usure anormale du produit.
*sur présentation du ticket de caisse.
NL
GARANTIEVOORWAARDEN
Dit product wordt gegarandeerd voor een periode van 2 jaar vanaf de aankoopdatum*,
voor elke storing die het gevolg is van een fabricagefout of het materiaal. Gebreken of
schade door slechte installatie, onjuist gebruik of abnormale slijtage van het product
worden niet gedekt door deze garantie.
*op vertoon van kassabon.
ES
CONDICIONES DE LA GARANTÍA
Este producto tiene una garantía por un período de 2 años a partir de la fecha de
compra*, ante cualquier fallo resultante de un defecto de fabricación o de material.
Esta garantía no cubre los defectos o los daños provocados por una mala instalación,
un uso inadecuado o por un desgaste anormal del producto.
*mediante la presentación del comprobante de compra.
ELECTRO DEPOT
1 route de Vendeville
59155 FACHES-THUMESNIL
FRANCE
10 11 12 13
1
2
3
4
9
8
7 6
5
010
20
30
40
50
60
70
100
90
80 180
75
100
150
200
250
max
010
20
30
40
50
60
70
100
90
80 180
75
100
150
200
250
max

Thanks !
Thank you for choosing this VALBERG product.
Chosen, tested and recommended by ELECTRO DEPOT,
the products of the VALBERG brand are easy to use,
reliable and of an impeccable standard.
Thanks to this appliance, you can be sure that each
use will bring you satisfaction.
Welcome to ELECTRO DEPOT.
Visit our website: www.electrodepot.fr
www.electrodepot.be
9EN

11 FR
Avant d’utiliser l’appareil
A
11 EN
Before using the appliance
A
Before starting, please read this user manual!
Dear Customer,
Thank you for choosing a Valberg product. We hope you get the most out of your product,
which has been manufactured in state-of-the-art factories with high-quality materials.
Therefore, we urge you to carefully read this manual as well as all the other related
documents in full before using the product, and keep them for future reference. If you pass
the appliance on to someone else, don't forget to pass the user manual on to them as well.
Observe all warnings and information contained in the user manual.
Please note that this user manual also applies to several other models. The differences
between the models will be identified in the manual.
ABefore using the
appliance
CUsing the appliance
DUseful information
BOverview of
the appliance
The instructions are also available on the site
http://www.electrodepot.fr/sav/notices/
Important safety and environmental instructions
and warnings
Description of the appliance
Technical features
Contents of the packaging
Installation
Preparation
Using the oven
Maintenance and servicing
Troubleshooting
Packaging and the environment
Disposing of your old appliance
10 EN
Table of contents

12 13
FR FR
Avant d’utiliser l’appareil Avant d’utiliser l’appareil
A A
13 EN
Before using the appliance
A
12 EN
Before using the appliance
A
• If the power cable is damaged, it must be replaced by the manufacturer, one of its
technicians or another similarly qualified person to avoid any hazards.
• Install the appliance in such a way that it can be completely disconnected from the
network. The separation must be performed by a mains plug or a switch that is built into the
fixed electrical installation, in accordance with building regulations.
• The rear surface of the oven gets hot during use. Check that the electrical connection is
not in contact with the rear surface of the appliance as this could damage the connections.
• Be careful not to trap the power cable between the oven door and the frame, or leave it
lying on top of hot surfaces. Otherwise, the insulation of the cable may melt and cause a fire
due to a short circuit.
• The servicing of the equipment and electrical systems may only be carried out by
authorised and qualified people.
• In the event of damage, switch off the appliance and unplug it from the mains power. To
do this, switch off the circuit breaker.
• Check that the voltage of the fuse is compatible with the appliance.
Product safety
Theaccessiblepartsof the appliancebecomehot during
use. Take all necessary measures to avoid touching the
heating elements. Children under the age of 8 years
should be kept away from the appliance unless they are
under continuous supervision.
• Never use the appliance when under the influence of alcohol or any other drug.
• Be careful when adding alcohol to your dishes. Alcohol evaporates at high temperatures
and can cause a fire if it ignites when it comes in contact with hot surfaces.
• Make sure that no flammable substance is placed near the appliance given that its sides
may become hot during use.
• The appliance heats up during use. Measures should be taken to avoid touching the
heating elements inside the oven.
General safety
• This appliance may be used by children aged 8 years or more, and by people with
reduced physical, sensory or mental capacities, or no previous experience or knowledge of
the appliance, unless they are being supervised and have received instructions on how to
use the appliance safely, and that they understand the risks involved. Children must not be
allowed to play with the appliance. Cleaning and maintenance should not be performed by
children without supervision.
• This appliance is not intended for use by people (including children) with reduced
physical, sensory and mental abilities, or no previous experience and knowledge of the
appliance, unless they are being supervised and have received instructions on how to use it.
Children who are being supervised must not be allowed to play with the appliance.
• If the appliance is given to another person for personal use or sold on the second-hand
market, make sure that the accompanying user manual, labels, other relevant documents
and parts are provided with the appliance.
• The appliance must be installed and repaired by a qualified technician. The manufacturer
cannot be held responsible for damage caused as a result of use by unqualified people, and
for any circumstances liable to void the warranty. Before installing the appliance, carefully
read the instructions.
• Do not operate the appliance if it is defective or shows visible signs of damage.
• Make sure the appliance's buttons are in the off position after each use.
Electrical safety
• If the product is not working, do not use it unless it has been repaired by an authorised
technician. You could get an electric shock!
• Only plug the appliance into an earthed outlet/cable whose voltage and protection match
those specified in the "Technical data" chapter. The earth connection should be installed
by a qualified electrician when the appliance is used with or without a transformer. Our
company disclaims all liability in the event of a problem resulting from the appliance not
being earthed according to the local regulations in force.
• Do not clean the appliance by pouring water into it. You could get an electric shock!
• Never touch the plug with wet hands! Similarly, never unplug the appliance by pulling on
the cable. Always hold the plug itself when unplugging the appliance.
• Unplug the appliance when conducting any installation, maintenance, cleaning and
repair work.
Important safety and environmental instructions and
warnings

14 15
FR FR
Avant d’utiliser l’appareil Avant d’utiliser l’appareil
A A
15 EN
Before using the appliance
A
14 EN
Before using the appliance
A
Never use baking paper when the cooking temperature is higher than that recommended for
the baking paper. Do not place baking paper directly on the base of the oven.
WARNING
Make sure that the power cable of the appliance is
unplugged or that the circuit breaker is switched off
before replacing the lamp, to avoid any risk of an
electric shock.
• To avoid overheating, the appliance must not be installed behind an outer door panel.
To ensure the reliability of your appliance:
- Make sure that the plug is properly inserted into the outlet to prevent sparking.
-Use only the original extension cables, and be careful not to cut or otherwise damage them.
• Also make sure that the outlet is free from liquid or mould before plugging in the
appliance.
Intended use
• This appliance is designed for household use. Commercial use is prohibited.
CAUTION
This appliance is for cooking purposes only. It must not
be used for other purposes, e.g. heating a room.
• Do not use this appliance to heat plates under the grill, hang up napkins and tea towels,
etc. on the handles, or dry and reheat anything.
• The manufacturer shall not be held liable for damage caused by improper use or
handling.
• The oven can be used for defrosting, baking, roasting and grilling food.
• Original spare parts are available for 10 years from the date of product purchase.
• Do not obstruct any of the ventilation outlets.
• Do not heat tins or closed glass jars in the oven. The pressure that would build up in the
tin/jar could cause it to burst.
• Do not place baking trays, dishes or aluminium foil directly on the bottom of the oven. The
resulting heat that builds up could damage the bottom of the oven.
• Do not use highly abrasive cleaners or a sharp metal scraper to clean the glass door of
the oven: they could scratch the surface and crack the glass.
• Do not use steam cleaners to clean the appliance; these can cause an electric shock.
(Accessories vary depending on the model of oven.)
Place the grill and the drip pan correctly in the guide rails. Slide the grill or drip pan between
two guides rails and check that it is properly balanced before placing food on it (see the
illustration below).
• Do not use the appliance if the glass door is missing or cracked.
• Always use oven mitts when putting dishes in the oven or removing them.
• Place the baking paper containing the food in the pot or on the oven accessory (tray,
wire rack, etc.) and put it all in the preheated oven. Remove any excess baking paper that is
sticking out of the accessory or pot to avoid contact with the heating elements of the oven.

17 FR
Aperçu de l’appareil
B
16 FR
Avant d’utiliser l’appareil
A
17 FR
Overview of the appliance
B
16 EN
Before using the appliance
A
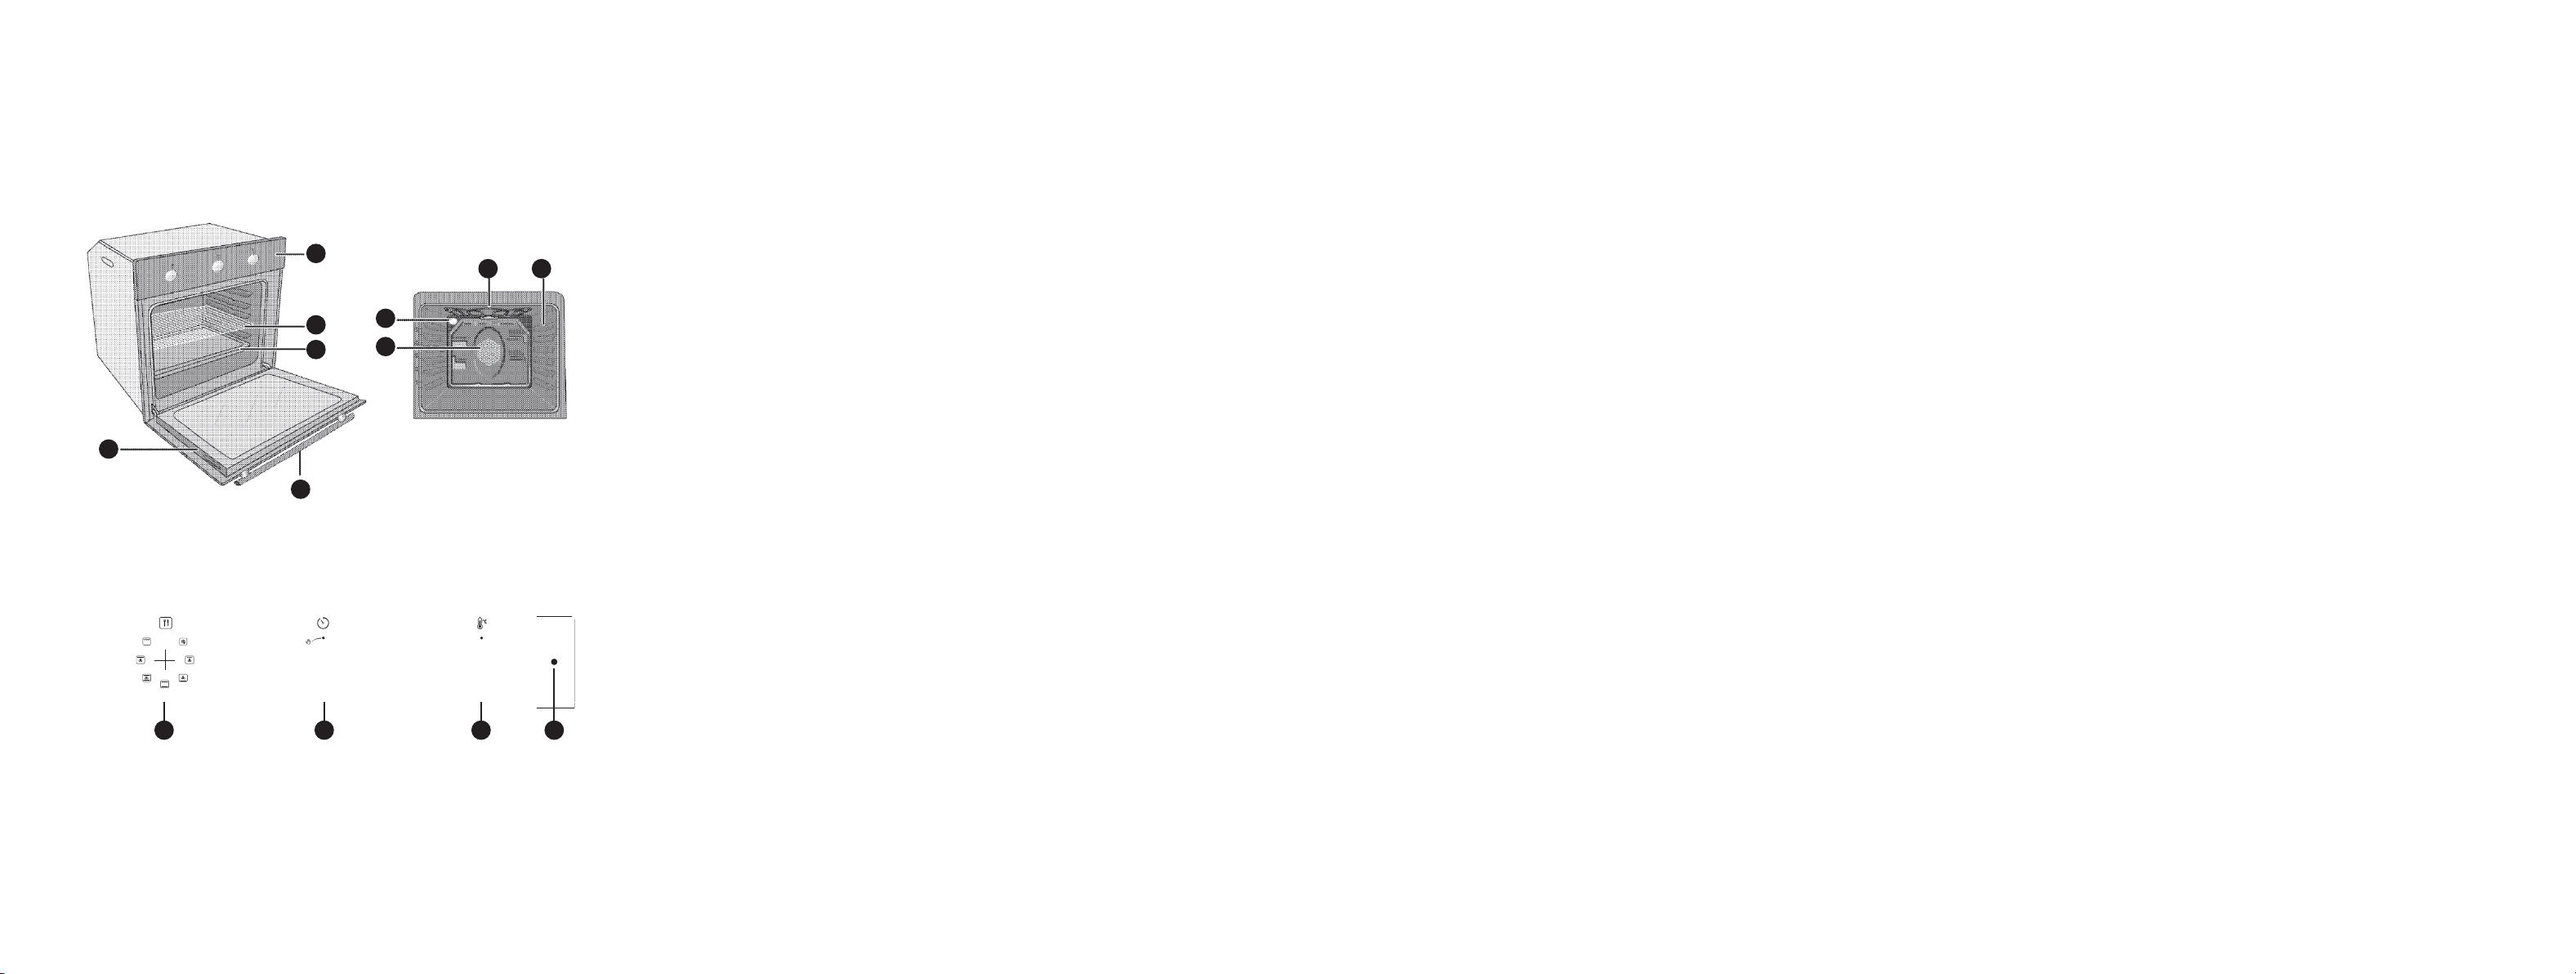
Description of the appliance
1Control panel 8Bulb
2Grill 9Fan motor (behind the steel plate)
3Drip pan 10 Oven mode selector
4Handle 11 Mechanical timer
5Door 12 Oven temperature selector
6Guide rails 13 Oven on indicator light
7Upper heating element
Child safety
CAUTION
The accessible parts may become hot during use. Keep
children away from the appliance.
• Packaging materials can be hazardous for children. Keep the packing materials out of
the reach of children. The packaging must be disposed of in accordance with environmental
standards.
• Electrical appliances are hazardous for children. Keep children away from the appliance
when it is on and do not allow them to play with it.
• Do not place objects on top of the appliance that children could reach.
• When the front door is open, do not place heavy objects on it or allow children to sit on it.
The appliance could tip over or the door hinges could be damaged.

18 19
FR FR
Aperçu de l’appareil Aperçu de l’appareil
B B
19 FR
Overview of the appliance
B
18 EN
Overview of the appliance
B
Contents of the packaging
The supplied accessories may vary depending on the model of the appliance. All the
accessories described in the user manual may not be part of the appliance.
1. User manual
2. Standard pan
Used for pastry, frozen food and large roasts.
3. Metal grill
Used for roasting, baking or for stews, it is placed in the oven at the required height.
4. Correctly place the metal shelf and the pan on the telescopic runners.
(This feature is optional. This may not be available on your product.)
The telescopic runners make it easy to fit and remove the pans and the metal shelf.
When using the pan and metal shelf with the telescopic runners, make sure that the pins
on the rear of the telescopic runner are resting against the edges of the metal shelf and the
tray.
Additional information according to regulation EU 66/2014 and the standards in force.
The technical specifications may be modified without
prior notice in order to improve the quality of the
appliance.
The pictures in this manual are given for the purposes
of illustration and may not correspond exactly to the
appliance.
The values mentioned on the labels of the appliance
or in the accompanying documentation are obtained
under laboratory conditions in accordance with the
corresponding standards. Depending on the operating
conditions and the environment of the appliance, these
values may vary.
Technical specifications
20 21
FR FR
Utilisation de l’appareil Utilisation de l’appareil
C C
21 EN
Using the appliance
C
20 FR
Using the appliance
C
Do not install the appliance near refrigerators or
freezers. The heat emitted by the appliance will
increase the energy consumption of refrigeration
appliances.
Do not use the door and/or handle to lift or move the
appliance.
Installation
The product must be installed by a qualified person in accordance with the regulations in
force. Otherwise, the warranty is not valid. Under no circumstances shall the manufacturer
be held liable for damage resulting from any procedure carried out by unauthorised people.
What's more, such a procedure may void the warranty.
The customer is responsible for preparing the site and
installing the electricity for the appliance.
Install the appliance in accordance with the gas and
electrical regulations that apply in your location.
Before installing it, check the appliance for faults. In
the event of a defect, do not have it installed.
A damaged appliance can pose a safety hazard.
Before installation
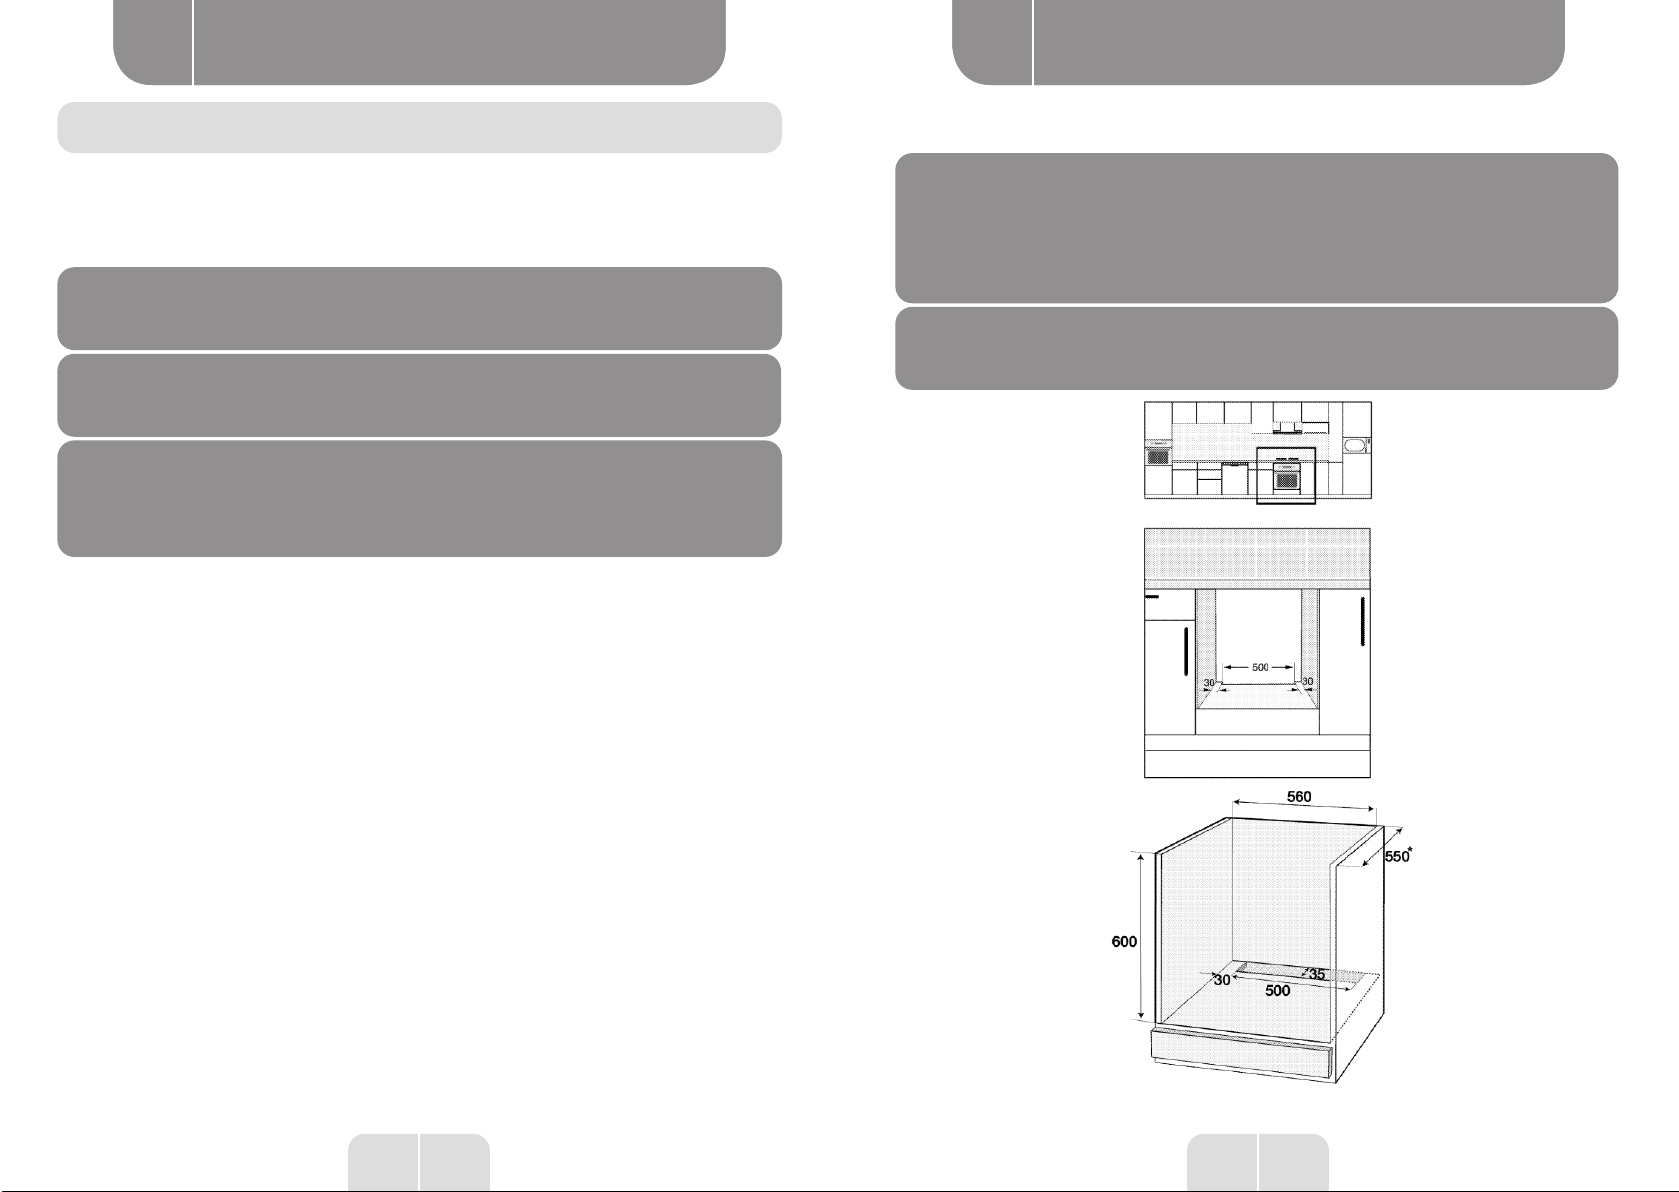
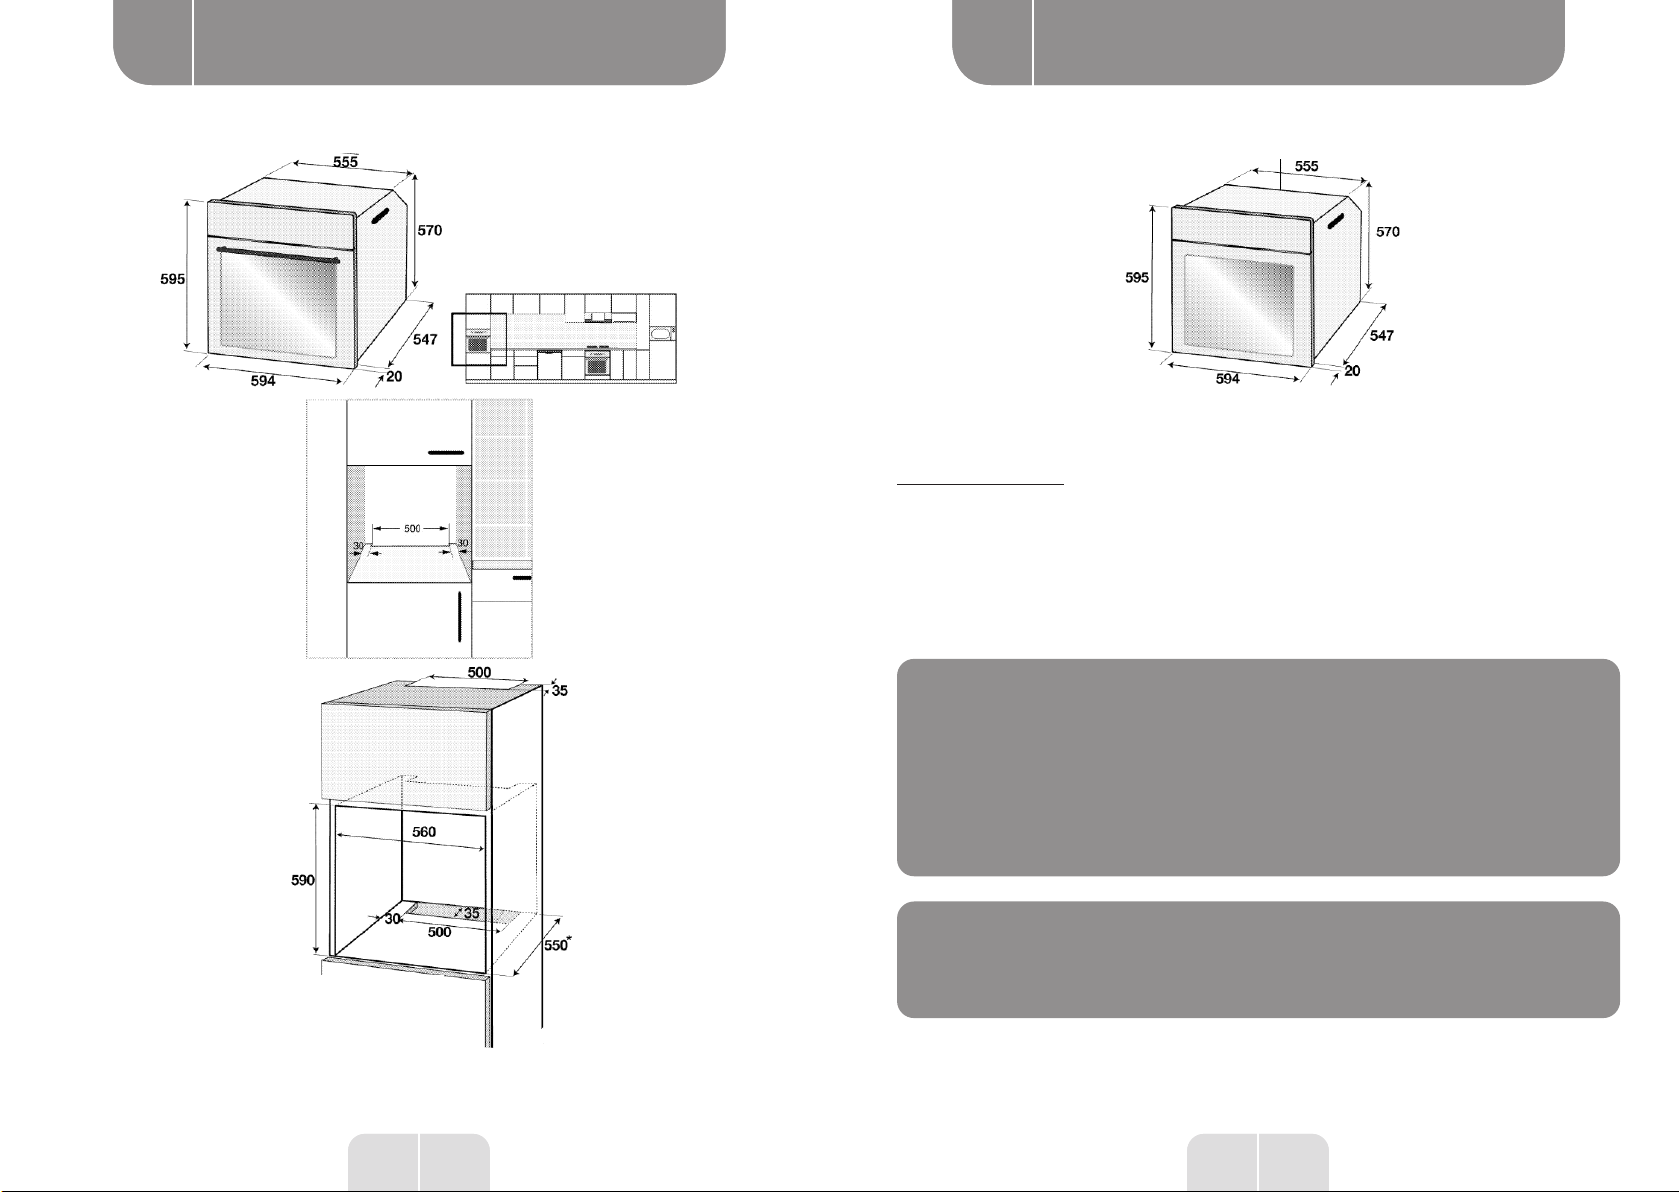
The appliance is intended to be installed in commercially available kitchen furniture. A safe
distance must be left between the appliance and the walls of the kitchen and the furniture
elements. Refer to the diagram (values in mm).
• The surfaces, synthetic laminates and adhesives must be heat resistant (up to 100°C or
more).
• The kitchen furniture must be stable and securely fastened in place.
• If there is a drawer under the oven, a shelf must be installed between that oven and the
drawer.
• The appliance must be transported by at least two people.
• To move the oven, hold it by the notches located on both sides.
• Before installing the product, remove all the materials and documents inside.
• The kitchen furniture must conform to the dimensions shown in the figure below. At the
back of the kitchen cabinet, cut an opening to the dimensions shown in the figure below to
provide adequate ventilation.
22 23
FR FR
Utilisation de l’appareil Utilisation de l’appareil
C C
23 EN
Using the appliance
C
22 FR
Using the appliance
C
Installation and connection
Install the appliance in accordance with all applicable gas and electrical regulations.
Electrical connection
Plug the appliance into an earthed socket protected by a miniature circuit breaker with
sufficient capacity, as specified in the "Technical specifications" table.
The earth connection should be installed by a qualified electrician when the appliance
is used with or without a transformer. Our company shall not be held liable for damage
resulting from the use of an appliance that is not earthed in accordance with the local
regulations in force.
The appliance must only be connected to the power
supply by an authorised and qualified technician. The
warranty period of the appliance starts only after it has
been correctly installed. The manufacturer cannot be
held responsible for any damage that may result from
procedures carried out by unauthorised persons.
A damaged power cable must be replaced by a qualified
electrician. Otherwise, there is a risk of electric shocks,
short circuits or a fire!

24 25
FR FR
Utilisation de l’appareil Utilisation de l’appareil
C C
25 EN
Using the appliance
C
24 FR
Using the appliance
C
• Secure the oven with the 2 screws, as shown in the illustration.
• After installation, make sure that the screws are tight enough and that the oven does not
move. The oven may tip over during use if it is not installed according to the instructions and
if the screws are not tightened enough.
For products equipped with a fan: (this may not be available on your product.)
1
2
3
1Fan
2Control panel
3Door
The integrated fan cools both the cabinet surrounding the appliance and the front of the
latter.
• The connection must comply with the national regulations in force.
• The specifications of the power supply must correspond to those shown on the rating plate
of the appliance. Open the door to see the nameplate.
• The power cable of the appliance must comply with the values in the "Technical
specifications" table.
Before carrying out any work on the electrical
installation, the appliance must be unplugged from the
power supply network. Not doing so can pose a risk of
electric shocks!
The power cable plug must be easily accessible after
the appliance is installed (it must not be lying on top of
the hob).
The wiring must comply with national/local
electrical regulations. In addition, you should use
the recommended sockets and plugs for ovens. If the
power limit of the appliance is greater than the current
carrying capacity of the plug and socket, connect the
appliance directly to a fixed electrical installation
without using a plug or socket.
Plug the power cable into the outlet.
Installing the product
• Slide the oven into the cabinet. Align it and secure it making sure that the power cable is
not broken and/or trapped.

26 27
FR FR
Utilisation de l’appareil Utilisation de l’appareil
C C
27 EN
Using the appliance
C
26 FR
Using the appliance
C
Tips for saving energy
The following tips will help you use your appliance in an eco-friendly way and save energy
as a result:
• Use cooking utensils coated with enamel; this will improve heat transmission.
• When cooking, preheat the oven if this is what the user manual or recipe recommends.
• Do not open the oven door too often during cooking.
• Whenever possible, try to cook several dishes in the oven at the same time. You can place
two baking dishes on the metal frame.
• Cook several dishes, one after the other. The oven will already be hot.
• You can save energy by switching off the oven a few minutes before the end of the cooking
time. Do not open the oven door.
• Defrost frozen meals before cooking them.
Getting started
Cleaning the appliance for the first time
Certain detergents or cleaning products can damage
the surface of the appliance.
Do not use abrasive detergents, cleaning powders/
creams, or sharp objects for cleaning.
1. Remove all the packaging materials.
2. Wipe the surfaces of the appliance with a damp cloth or sponge and finish with a dry
cloth.
Cooking for the first time
Switch on the appliance for 30 minutes and then turn it off. This will burn off and remove any
residues from the production process or the protective layers.
Preparation
The fan continues to run for 20 to 30 minutes, even
after the oven has been switched off. If you are cooking
with the oven timer, the fan will also switch off at the
end of the cooking time, like all the other oven modes.
Final check
1. Switching on the appliance.
2. Check the functions.
Future moves
• Keep the original box of the appliance and use it for future moves. Follow the instructions
on the box. If you no longer have the original box, wrap the appliance in bubble wrap or
heavy-duty cardboard, with some tape to hold everything together.
• To prevent the grill and drip pan inside the oven from damaging the door, place a strip of
cardboard on the back of the door, level with the pans. Secure the oven door to the side walls
using duct tape.
• Do not use the door or handle to lift or move the appliance.
• Do not place any object on the appliance and keep it
level when moving it.
• Carry out a visual inspection of the appliance to check
for any damage caused during transportation.

28 29
FR FR
Utilisation de l’appareil Utilisation de l’appareil
C C
29 EN
Using the appliance
C
28 FR
Using the appliance
C
Using the oven
General information on pastry, rotisserie and grilling.
Hot surfaces can cause burns! The appliance can be
very hot during use. Never touch the burners, internal
parts of the oven, heating elements, etc., when they
are hot. Keep children away from them. Always use
oven mitts when putting dishes in the oven or removing
them.
Take care when opening the oven as some steam may
come out. The steam can cause burns to your hands,
face and/or eyes.
Pastry cooking advice
• Use all the available space of the pan.
• Place the baking dish in the middle.
• Select the appropriate location before switching on the oven or grill. Do not change the
position of the dish when the oven is hot.
• Keep the oven door closed.
Tips for roasting
• Season whole chickens, turkeys and large pieces of meat with lemon juice and black
pepper before cooking to improve cooking performance.
• Meat roasted with bones takes 15 to 30 minutes longer to cook than an equivalent roast
without bones.
• Each centimetre of thickness of meat requires approximately 4 to 5 minutes of cooking
time.
• Let the meat rest in the oven for about 10 minutes after the end of the cooking time. The
juice will spread throughout the meat and will not flow out when it is cut.
• Fish should be placed in the middle of the oven or lower, in a fireproof dish.
Hot surfaces can cause burns! The appliance can be
very hot during use. Never touch the burners, internal
parts of the oven, heating elements, etc., when they
are hot. Keep children away from them. Always use
oven mitts when putting dishes in the oven or removing
them.
Electric oven
1. Take all the baking pans and wire grills out of the oven.
2. Close the oven door.
3. Select the "Conventional" mode.
4. Select the hottest setting for the oven; refer to the chapter on Using the electric oven.
5. Switch on the oven for about 30 minutes.
6. Switch off the oven; refer to the chapter on Using the electric oven.
Grill oven
1. Remove all the baking pans
and the metal grill from the oven.
2. Close the oven door.
3. Select the hottest setting
for the grill; refer to the chapter on Using the grill.
4. Switch on the oven for about 15 minutes.
5. Switch off the grill; refer to the chapter on Using the grill.
During the first few hours of use, the appliance may
give off some odours and smoke. This is quite normal.
Make sure the room is well-ventilated so that any
odours and smoke can escape. Do not inhale the smoke
and odours given off.

30 31
FR FR
Utilisation de l’appareil Utilisation de l’appareil
C C
31 EN
Using the appliance
C
30 FR
Using the appliance
C
When the timer is set for a defined period, it stops
automatically; refer to the chapter on Using the oven
timer.
Turn the mode selector and the temperature selector to the Off (upper) position.
Guide rail positions (for the model with a grill)
It is important to place the grill correctly on the guide rails. The grill must be inserted
between the metal guide rails as shown in the illustration.
Make sure that the grill pan is not touching the back wall of the oven. Slide the grill towards
the front of the guide rail so that it is properly positioned in relation to the inner door to get
the best performance from the grill.
(The guide rail positions vary depending on the model of oven.)
Oven modes
The order of the oven modes shown may vary according to your appliance.
Tips for grilling
When meat, fish and poultry are grilled, they turn brown quickly, become crispy and do not
dry out. Thin pieces of meat, meat skewers and sausages, as well as juicy vegetables (e.g.
tomatoes and onions), are particularly suitable for this type of cooking.
• Spread the pieces to be grilled on the metal grill, or the baking pan with the metal grill, so
that the space covered does not protrude beyond the area covered by the resistance.
• Slide the metal shelf or baking pan with the grill into the oven at the required level. If you
are grilling food on the shelf, slide the baking pan onto the frame to collect the fat. The slide-
in baking pan must cover the entire surface of the grill. This pan may not be supplied with
the product. Add a little water to the baking pan to make it easier to clean.
Do not place food too far back in the grill area. This is
the hottest part and fatty foods can catch fire.
Using the electric oven
Selecting the temperature and oven mode.
1 2
1Oven mode selector
2Oven temperature selector
1. Set the oven timer to the required cooking time; refer to the chapter on Using the oven
timer.
2. Set the mode selector to the required mode.
3. Set the temperature selector to the required temperature.
The oven heats up to the set temperature and maintains that temperature. During heating,
the temperature indicator light stays on.
Switching off the electric oven
Place the oven timer in the Off position.
010
20
30
40
50
60
70
100
90
80 180
75
100
150
200
250
max

32 33
FR FR
Utilisation de l’appareil Utilisation de l’appareil
C C
33 EN
Using the appliance
C
32 FR
Using the appliance
C
Pulsed grill
The grilling effect is not as strong as that of the large grill mode.
• Place small and medium-sized portions evenly under the grill element to
prepare grilled food.
• Turn the food over halfway through cooking.
Using the oven timer
10
20
30
40
50
60
70
90
80
Starting cooking
To switch on the oven, you must select the required
cooking mode and temperature, and set the cooking
time. Otherwise, the oven will not start.
1. Turn the timer clockwise to set the cooking time.
2. Place your dish in the oven.
3. Select a temperature and an oven mode. Refer to the chapter on Using the electric oven.
The oven will heat up to the set temperature and maintain that temperature until the end of
the set cooking time.
4. Once the cooking time has elapsed, the timer automatically turns anticlockwise. There
will be a warning sound to indicate that the set time has elapsed and the power supply has
been switched off.
Natural convection
The upper and lower heating elements operate simultaneously. Food is cooked
from above and below simultaneously. This mode is suitable for cakes, pastries
or cakes and stews cooked in moulds, for example. Cooking with a single pan.
Upper/lower heating element with fan
The upper and lower elements, and the fan (in the rear wall) are on. Hot air is
also quickly blown into the oven by the fan. Cooking with a single pan.
Upper heating element with fan
The upper element and the fan (in the rear wall) are on. The fan spreads hot
air more evenly than the oven mode in which only the lower heating element
is on.
Lower heating element with fan
The lower element and the fan (in the rear wall) are on. The fan spreads hot
air more evenly than the oven mode in which only the lower heating element
is on.
This mode should also be used to facilitate steam cleaning.
Fan mode
The oven is not heated. Only the fan (in the rear wall) is on. This oven mode
is suitable for slowly defrosting frozen solid food and warming it up to room
temperature, as well as cooling cooked food.
Large grill
The large grill on the upper surface of the oven is on. It is suitable for grilling
large quantities of meat.
• Place large and medium-sized portions evenly under the grill element to
prepare grilled food.
• Turn the food over halfway through cooking.

34 35
FR FR
Utilisation de l’appareil Utilisation de l’appareil
C C
35 EN
Using the appliance
C
34 FR
Using the appliance
C
Dish Number of
pans
Accessories
needed Oven mode
Guide
rail
height
Temperature
(°C)
Cooking
time
(approx.
in min.)
Cakes in pan One pan Standard pan* 3 180 25 ... 30
Cakes in a
mould One pan Baking tin on a
wire grill** 2 180 40 ... 50
Cupcakes One pan Standard pan* 3 160 25 ... 35
Sponge cake One pan
Springform
baking tin with a
diameter of 26 cm
on a wire grill**
3 160 25 ... 35
Cookies One pan Baking tray* 3 180 25 ... 30
Choux pastry One pan Standard pan* 2 200 30 ... 40
All-butter
pastry dough One pan Standard pan* 2 200 25 ... 35
Sourdough One pan Standard pan* 2 200 35 ... 45
Lasagna One pan
Rectangular
metal/glass pan
on a metal grill**
2 - 3 200 30 ... 40
Pizza (thick) One pan Standard pan* 2 200 ... 220 15 ... 20
Pizza (thin) One pan Standard pan* 2 200 10 ... 15
Steak
(whole)/Roast One pan Standard pan* 3
25 min.
250/max, then
180 ... 190
100 ... 120
Leg of lamb
(cooking pot) One pan Standard pan* 3
25 min. 220
then
180 ... 190
70 ... 90
Roast chicken
(1.8-2 kg) One pan Standard pan* 2
15 min.
250/max, then
180 ... 190
60 ... 80
Turkey (5.5
kg) One pan Standard pan* 1
25 min.
250/max, then
180 ... 190
150 ... 210
Fish One pan Standard pan* 3 200 20 ... 30
We recommend preheating the oven for any food preparation.
* These accessories are not necessarily supplied with the product.
** These accessories are not supplied with the product. These are commercially available accessories.
If you do not want to use the timer function, turn the
timer anticlockwise to the hand symbol.
5. Switch off the oven using the timer, the oven mode selector or the temperature selector.
Switching off the oven before the set time
1. Turn the timer anticlockwise to the Off position.
2. Switch off the oven using the temperature selector and the oven mode selector.
Table of cooking times
The times indicated in this table are only given as a
rough guide.
Theymayvarydependingonthe temperature, thickness
and type of food, as well as your cooking preferences.
Oven cooking and rotisserie
The 1st level of the oven corresponds to the location of
the lowest guide rail.

36 37
FR FR
Utilisation de l’appareil Utilisation de l’appareil
C C
37 EN
Using the appliance
C
36 FR
Using the appliance
C
Bake the dough by following the mode and temperature
indicated in the cooking chart.
If the lower part is still not golden enough, put the
pastry on a lower level, the next time.
Tips for cooking vegetables
• If all the juice in the vegetable dish has gone and it is too dry, cook the vegetables in a pot
with a lid rather than a pan. Closed containers preserve the juices of the food.
• If a vegetable dish is not cooking properly, boil the vegetables beforehand or prepare them
as you would for making canned food, and place them in the oven.
Using the grill
Close the oven door while grilling.
The hot surfaces can cause burns!
• Turn the timer anticlockwise to the hand symbol, when using the grill.
Switching on the grill
1. Turn the oven mode selector clockwise to the grill symbol.
2. Then set the required grill temperature.
3. If necessary, preheat the oven for about 5 minutes.
The temperature control light (temperature) comes on.
Stopping the grill
1. Turn the oven mode selector to the Off (up) position.
Food that is not suitable for grilling can pose a fire
hazard. Only use grilling food that is suitable for the
intense heat of the grill. Do not place food too far back
in the grill area. This is the hottest part and fatty foods
can catch fire.
Table of cooking times for the grill
Grilling using the electric grill
Cooking table for test dishes
The dishes mentioned in this cooking table are prepared in accordance with the EN 60350-1
standard in order to make it easier for inspection bodies to test the product.
Dish Number of
pans
Accessories
needed Oven mode
Guide
rail
height
Temperature
(°C)
Cooking
time
(approx.
in min.)
Shortbread One pan Standard pan* 3 180 40 ... 50
Cupcakes One pan Standard pan* 3 160 25 ... 35
Sponge cake One pan
Springform
baking tin with a
diameter of 26 cm
on a wire grill**
3 160 25 ... 35
Apple pie
Round baking tin
with a diameter of
20 cm on a metal
grill**
2 180 50 ... 60
We recommend preheating the oven for any food preparation.
* These accessories are not necessarily supplied with the product.
** These accessories are not supplied with the product. These are commercially available accessories.
Pastry cooking advice
• If the cake is too dry, increase the temperature by 10°C and reduce the baking time.
• If the cake is too moist, use less liquid or lower the temperature by 10°C.
• If the cake is too dark on the top, put it on the lower level, lower the temperature and
increase the baking time.
• If it is well-cooked on the inside but sticky on the outside, use less liquid, lower the
temperature and increase the cooking time.
Pastry cooking advice
• If the pastry is too dry, increase the temperature by 10°C and reduce the baking time.
• Moisten the layers of dough with a sauce made from milk, oil, egg and yoghurt.
• If the pastry takes too long to cook, make sure that the thickness of the pastry you have
prepared does not exceed the depth of the baking pan.
• If the top of the pastry is golden but the bottom is not cooked, check that you have not used
too much sauce for the bottom of the pastry. Try to spread the sauce evenly over the pastry
layers and the top of the pastry to brown them evenly.

39 FR
Informations pratiques
D
38 FR
Utilisation de l’appareil
C
39 EN
Useful information
D
38 FR
Using the appliance
C
Maintenance and servicing
• Clean the appliance after each use. This will make it easier for you to remove any residues
of food and prevent them from burning when the oven is next used.
• No special cleaning product is needed to clean the appliance. Use warm water with
detergent, a soft cloth or a sponge to clean the appliance, and wipe it with a dry cloth.
• Always be sure to wipe off any excess liquid after cleaning and immediately wipe up any
spillages.
• Do not use detergents containing acid or chlorine to clean stainless steel surfaces and the
handle. Use a soft cloth with a non-abrasive liquid detergent to clean these parts, taking
care to always rub in the same direction.
Do not use steam cleaners to clean the appliance, as
they can pose a risk of electric shocks.
Cleaning the control panel
Clean the control panel and the control knobs with a damp cloth and wipe them dry.
If your product has buttons, do not remove the control
buttons to clean the control panel.
The control panel could be damaged!
Cleaning the oven
Cleaning the side rail (varies according to the model of oven.)
(This feature is optional. This may not be available on your product.)
1. Remove the front part of the side rail by pulling it towards the opposite side of the side
wall.
2. Remove the side rail completely by pulling it towards you.
The surface can be damaged by certain detergents or
cleaning products.
Do not use abrasive detergents, cleaning powders/
creams, or sharp objects for cleaning.
Food Accessories needed Guide rail
height
Recommended
temperature (°C) **
Grilling time
(approximately)
Fish Metal grill 4 ... 5 250 20...25 min. #
Chicken wings
or thighs Metal grill 4 ... 5 250 25...35 min.
Lamb chops Metal grill 4 ... 5 250 20...25 min.
Roast beef Metal grill 4 ... 5 250 25...30 min. #
Veal cutlet Metal grill 4 ... 5 250 25...30 min. #
Toasted
bread* Metal grill 4 250 1...3 min.
# depending on the thickness.
*Preheat for 5 minutes.
**If your oven grill temperature cannot be adjusted, the grill will operate at the recommended
temperature.
The dishes mentioned in this cooking table are prepared in accordance with the EN 60350-1
standard in order to make it easier for inspection bodies to test the product.
Food Accessories needed Guide rail height Recommended
temperature (°C) **
Grilling time
(approximately)
Toast Metal grill 4 250 1...3 min.
Meatballs (beef)
-12 pieces Metal grill 4 250 25...35 min.
Turn the food over after 2/3 of the total cooking time has elapsed.
We recommend preheating the oven for 5 minutes for any food that is to be roasted.
General points
Regular cleaning of the appliance will extend its lifetime and avoid problems in the future.
Unplug the appliance from the power outlet before
starting cleaning and maintenance. Otherwise, there is
a risk of electric shocks!
Allow the appliance to cool down before cleaning it.
The hot surfaces can cause burns!

40 41FR FR
Informations pratiques Informations pratiques
D D
41 EN
Useful information
D
40 EN
Useful information
D
Easy steam cleaning
This makes cleaning easy because the dirt (if treated immediately) is softened by the steam
that forms inside the oven and the drops of water that condensate on the interior surfaces
of the oven.
1. Remove all the accessories from the oven.
2. Pour 500 ml of water on the baking pan and place it on the second level.
3. Set the oven temperature to 100°C and run it on the easy steam clean mode for 25
minutes.
4. Open the door and wipe the interior surfaces of the oven with a damp sponge or cloth.
5. Use warm water with detergent, a sponge or a soft cloth to clean stubborn dirt, and
remove it with a dry cloth.
During the easy steam clean mode, the water placed in
the tray to soften the residue and dirt, that has built up
in the oven cavity, will evaporate and condense in the
oven cavity and on the interior glass of the oven door,
so that the water can drain out when you open the oven
door. Wipe off any condensation as soon as you open
the oven door.
Cleaning the oven door
Use warm water with detergent, a soft cloth or a sponge to clean the door of the oven, and
wipe the appliance with a dry cloth.
Do not use abrasive detergents or hard metal scrapers
to clean the oven door. You could scratch the surface
and damage the glass.
Catalytic walls
(This feature is optional. This may not be available on your product.)
The internal side walls (A) and/or the rear wall (B) of your product may be coated with a
catalytic enamel. The catalytic walls have a light matte colour and a porous surface. Do
not clean the catalytic walls of the oven. Thanks to their perforated structure, the catalytic
surfaces absorb grease. When they start to shine, it means they are covered in fat. When this
happens, they should be replaced.
42 43FR FR
Informations pratiques Informations pratiques
D D
43 EN
Useful information
D
42 EN
Useful information
D
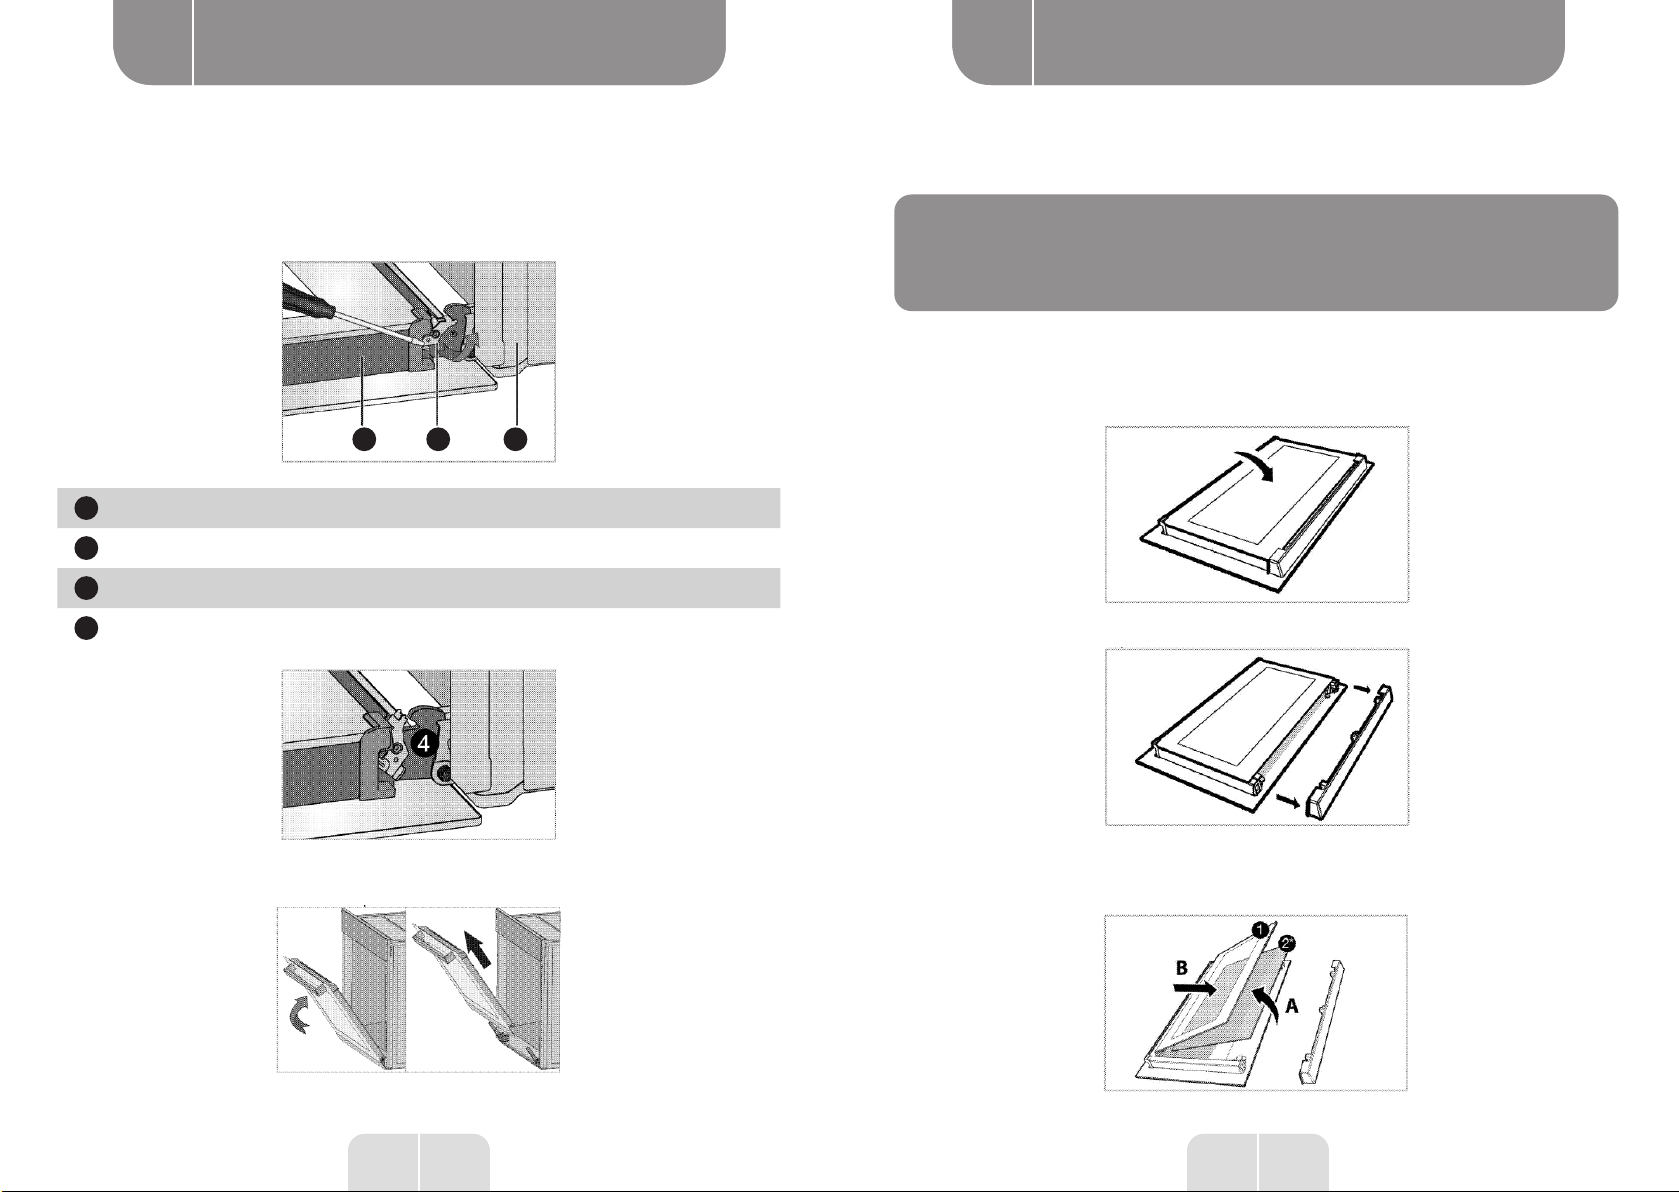
4. Remove the front door by pulling it up to release it from the right and left hinges.
To fit the door, follow the same steps performed during
the removal process, but in reverse order. Remember
to close the hinge housing clips when refitting the door.
Removing the glass from the door
(This feature is optional. This may not be available on your product.)
The interior glass panel of the oven door can be removed for cleaning.
1. Open the oven door.
2. Remove the plastic part located on the top of the door by pulling it towards you.
3. As shown in the figure, slightly lift the rear glass panel (1) in the direction A, then pull it in the
direction B.
Removing the oven door
1. Open the front door (1).
2. Open the clips located on the hinge housing (2), on the right and left sides of the front door,
by pressing down on the clips, as shown in the diagram.
1 2 3
1Door
2Hinge (closed position)
3Oven
4Hinge (opened position)
3. Open the front door halfway.
This manual suits for next models
1
Table of contents
Languages:
Other Electro Depot Oven manuals

Popular Oven manuals by other brands


Bakers Pride
Bakers Pride P-18S Specifications

GE
GE Profile PT960SMSS Dimensions and installation information

Whirlpool
Whirlpool WOD51EC0A Product dimensions

Thermador
Thermador SMW272 Service manual

Pacific
Pacific PL8430SSBG070 owner's manual

Defy
Defy GEMINI PETIT CHEF MULTIFUNCTION THERMOFAN owner's manual


