Electrovision ALTAI Treasure Seeker 2 T330BB User manual

Page 1
T330BB
Metal Detector

Page 2
IMPORTANT
Installer and Users please note:
These instructions should be read carefully and left with the user of the
product for future reference.
BEFORE USE
You must inspect the product including its cable for any signs of damage. If the
product is damaged, DO NOT use it, and contact your supplier immediately.
Make sure that you are familiar with the relevant law (which is not the same in
Scotland as it is in England and Wales) even if you are metal detecting on your
own land. We would advise you to follow the National Council for Metal Detecting
Code of Conduct
1
1. Do not trespass. Obtain permission before venturing on to any land.
2. Respect the Country Code, leave gates and property as you find them and do
not damage crops, frighten animals or disturb nesting birds.
3. Wherever the site, do not leave a mess or an unsafe surface for those who
may follow. It is perfectly simple to extract a coin or other small object buried
a few inches below the ground without digging a great hole. Use a suitable
digging implement to cut a neat flap (do not remove the plug of earth entirely
from the ground), extract the object, reinstate the grass, sand or soil carefully,
and even you will have difficulty in locating the find spot again.
4. If you discover any live ammunition or any lethal object such as an
unexploded bomb or mine, do not disturb it. Mark the site carefully and report
the find to the local police and landowner.
5. Help keep Britain tidy. Safely dispose of refuse you come across.
6. Report all unusual historical finds to the landowner, and acquaint yourself
with current NCMD policy relating to the Voluntary Reporting of Portable
Antiquities in England and Wales and the mandatory reporting requirements
in Scotland. See: http://www.treasuretrovescotland.co.uk/index.asp
7. Remember it is illegal for anyone to use a metal detector on a designated
area (e.g. Scheduled Monuments (SM), Sites of Special Scientific Interest
(SSSI), or Ministry of Defence property) without permission from the
appropriate authority. It is also a condition of most agri-environment
agreements that metal detecting access is subject to certain rules and
regulations including mandatory finds recording. Details of these agreements
and the access conditions they impose are shown on the NCMD website.
1
Reproduced with kind permission of the National Council for Metal Detecting
Appendix A to the NCMD Constitution Revised February 2000 Amended AGM
June 2012
Page 3
8. Acquaint yourself with the terms and definitions used in the following
documents:
(1) "Treasure" contained in the Treasure Act 1996 and its associated Code of
Practice, making sure you understand your responsibilities.
(2) Advice for Finders of Archaeological Objects including Treasure 2006.
(3) The voluntary Code of Practice for Responsible Metal Detecting to which
the NCMD is an endorsee.
(4) Advice for finders in Scotland:
see http://www.treasuretrovescotland.co.uk/html/finders.asp
9. Remember that when you are out with your metal detector you are an
ambassador for your hobby. Do nothing that might give it a bad name.
10. Never miss an opportunity to explain your hobby to anyone who asks about
it.
If you take your hobby seriously, then we recommend that you should join the
National Council for Metal Detecting: visit its website at www.ncmd.co.uk for more
details and how to join.
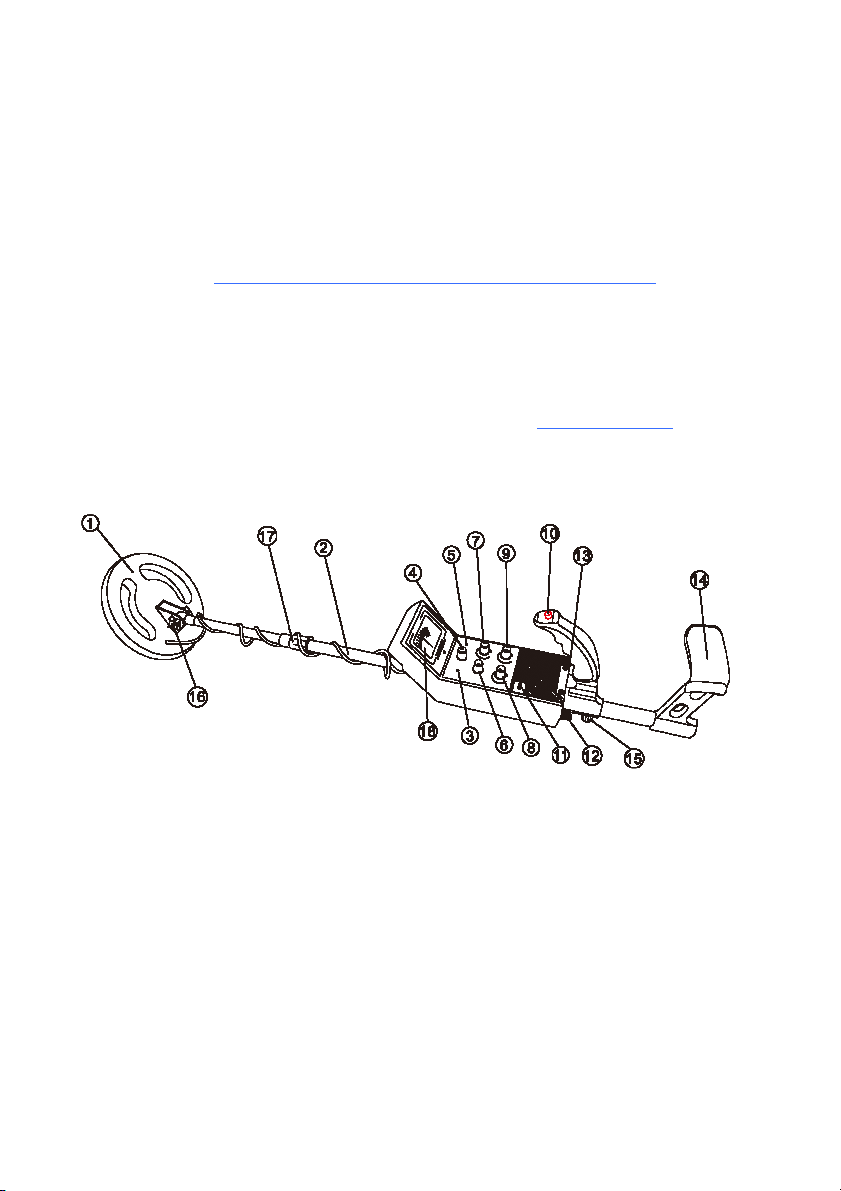
IDENTIFYING THE PARTS
1. SEARCH COIL
2. ADJUSTABLE SHAFT
3. RED FERROUS METAL
DETECTOR
4. TUNE ADJUSTER
5. GREEN NON-FERROUS
METAL DETECTOR
6. MODE SELECTOR
7. GROUND CONTROL
8. DISCRIMINATION
9. SENSITIVITY ADJUSTER
10. HANDLE WITH AUTO-TUNE
BUTTON
11. BATTERY TEST
12. VOLUME CONTROL
13. HEADPHONE JACK
14. ARM REST
15. ARM TEST KNOB
16. SEARCH COIL KNOB
17. STEM LOCK NUT
18. METER
Page 4
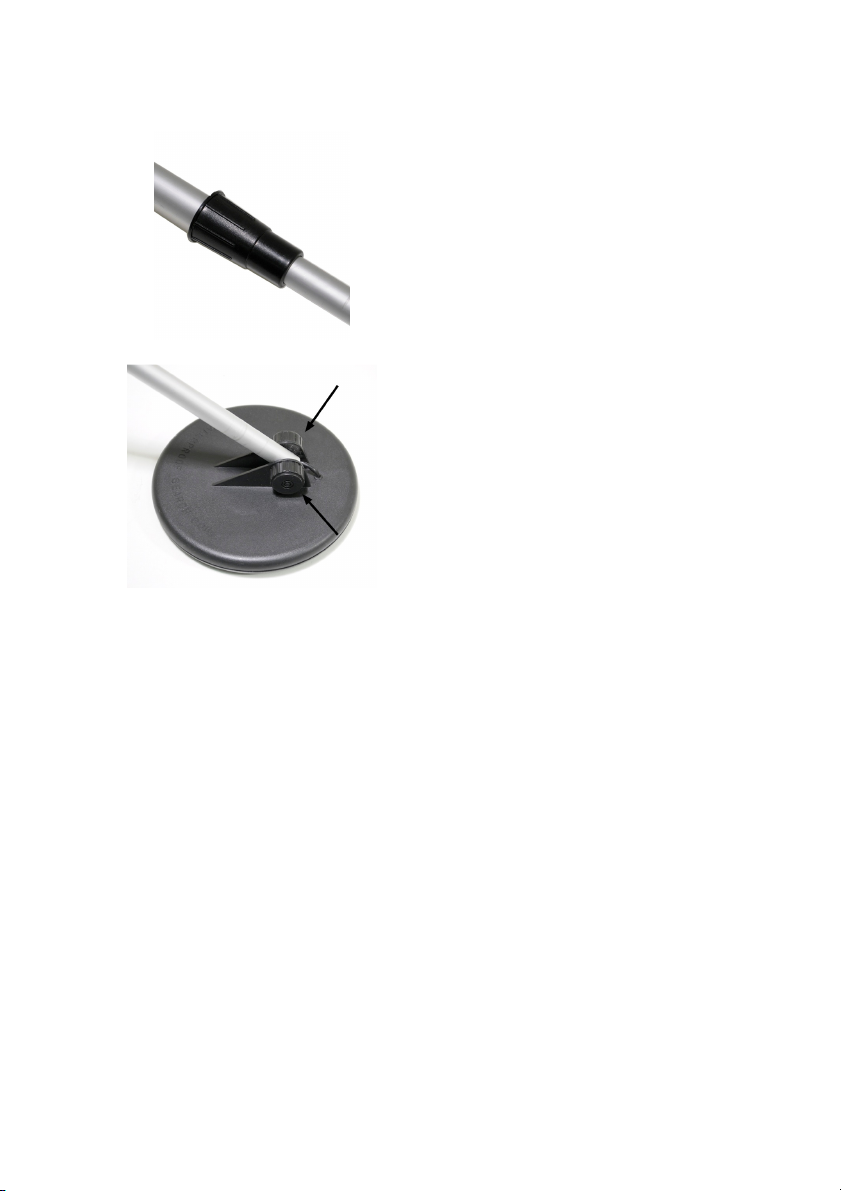
SETTING UP
ADJUSTING THE SHAFT
1. Loosen the locknut
2. Lengthen or shorten the stem so that
when you stand upright with the
detector in your hand, the search coil is
level and about 12 mm to 50 mm (½” to
2”) above the ground with your arm
relaxed at your side.
3. Tighten the locknut
ADJUSTING THE SEARCH COIL
Loosen the knobs that attach the
search coil to the shaft, then adjust the
search coil to the desired angle. (The
search coil should be parallel with the
ground). Tighten the knobs just enough
to keep the search coil from rotating or
wobbling.
INSTALLING BATTERIES
The T330BB requires three PP3-size 9 Volt batteries
Do not mix old and new batteries, different types of batteries (standard, alkaline,
or rechargeable), or rechargeable batteries of different capacities.
1. If the detector is on, turn VOLUME (on the control housing) to OFF. (The
control clicks).
2. Press on the battery compartment cover and slide the cover off in the direction
of the arrow.
3. Insert the batteries into the compartment and connect the clip.
4. Replace the cover.
Always remove old or discharged batteries; batteries can leak chemicals that
can destroy electronic parts.
If you do not plan to use the detector for a week or more, remove the
batteries.
Dispose of old batteries promptly and properly.
You can extend battery life by using headphones, which require less power than
the built-in speakers. See “Using headphones” on Page 6.
TESTING THE BATTERIES
If the detector does not turn on, has weak volume, will not tune properly, or has
erratic operation, or drifts, test the battery power.

Page 5
Rotate the MODE selector to the VLF position. Set the Battery test switch (11) to
B1. The meter pointer should be in the green section (labelled “batt”). If not,
replace the left hand side batteries (both batteries from the compartment
containing two batteries). Then set the Battery Test switch to B2. Again the meter
pointer should be in the green section (labelled “batt”). If not, replace the single
battery from the right-hand-side compartment.
Return the switch to the OPERATE position when you have finished testing the
batteries.
SETTING THE METER
With the MODE selector switch in the
OFF position, the meter should read
zero. If it does not, adjust the position
of the pointer until it reads zero by
rotating the screw with a small
screwdriver.
USING HEADPHONES
You can connect a pair of stereo headphones (not supplied) to the detector so
you can listen to it privately. Using headphones also saves battery power and
makes it easier to identify subtle changes in the sounds you hear, for better
detection results.
To connect headphones to the detector, insert the 3.5 mm jack from the
headphones into the socket labelled EAR on the side of the control housing.
The internal speaker is disconnected when you connect earphones.
LISTENING SAFELY
To protect our hearing, follow these guidelines when you use earphones.
Set the volume to the lowest setting before you begin listening. After you
begin listening, adjust the volume to a comfortable level.
Do not listen at extremely high volume levels. Extended high-volume listening
can lead to permanent hearing loss.
Once you set the volume, do not increase it. Over time, your ears adapt to
the volume level, so a volume level that does not cause discomfort might still
damage your hearing.
TRAFFIC SAFETY
Do not wear earphones while operating your detector near high-traffic areas.
Even though some earphones are designed to let your hear some outside
sounds when listening at normal volume levels, they still can present a traffic
hazard.
Page 6
OPERATION
PRINCIPLE OF OPERATION
The detector is operated at the frequency of 15 kHz, which is called the Very Low
Frequency (VLF). In the VLF, the detector is allowed to response only to metal
objects and ignored effects of iron ground mineralization. With the TR
(Transmitter-Receiver i.e. TR1 & TR2 in the MODE SELECTOR) discriminating
circuitry, differentiation of metal can be achieved. Differentiation of a metal
detector is its ability to distinguish between metals objects as well as ferrous and
non-ferrous metals. Ferrous metals contain iron, while non-ferrous metal such as
gold, silver, copper, platinum, aluminium, lead, and zinc do not.
When the detector senses a metallic object, the meter reading changes, the
GREEN NON-FERROUS INDICATOR (5) or the RED FERROUS INDICATOR (3)
turns on or off, and the detector sounds one of three tones. The actual reaction
depends on what metal is detected: the higher the tone pitch, the stronger the
detection.
PREPARING THE DETECTOR
Hold the detector in a comfortable position; then rotate VOLUME clockwise away
from OFF to the desired sound level. Set OPERATE/BATT TEST to OPERATE to
detect.
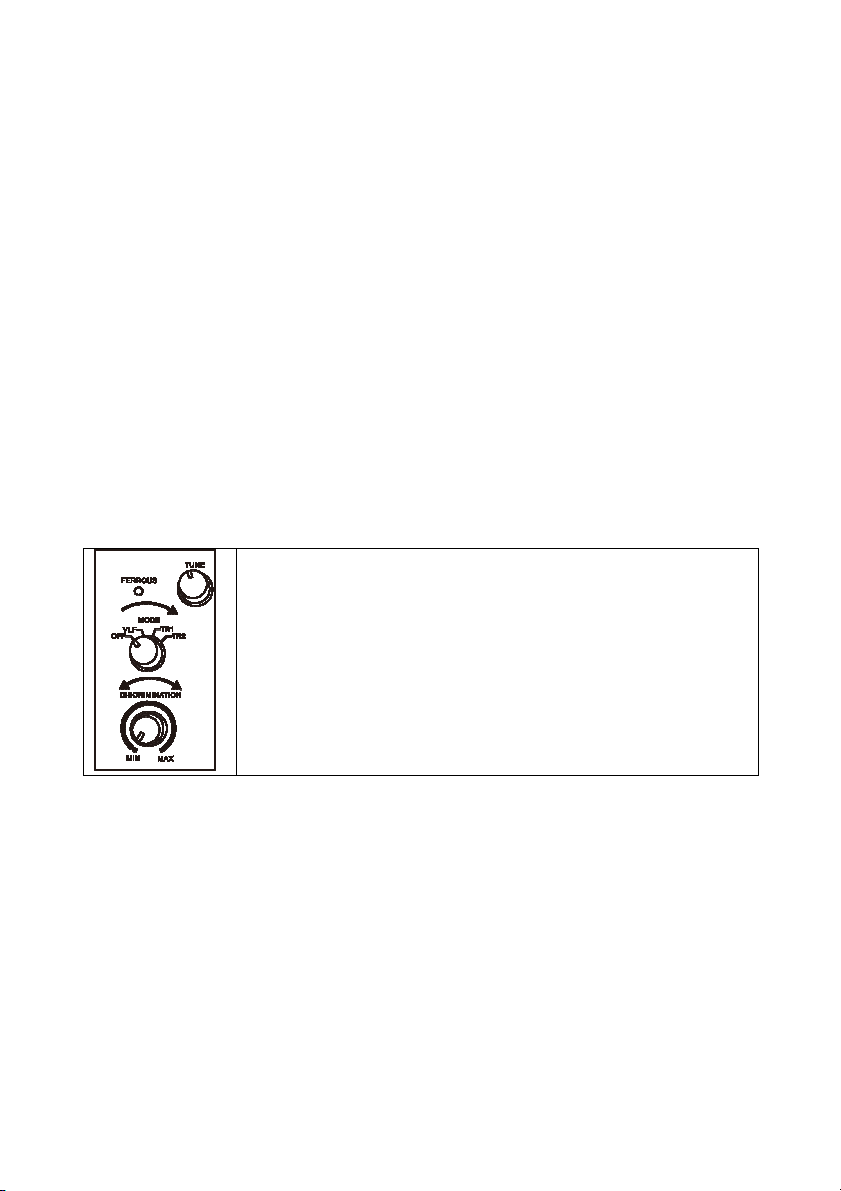
MODE SELECTION
The detector provides you the following mode of operation:
1. OFF – power off. Cut all power supply to the detector.
2. VLF – for testing the batteries and tuning of the detector.
(See “TUNE ADJUSTMENT” and “GROUND ADJUSTMENT”)
3. TR1 – to detect extreme differences in metals such as
between iron and gold. Iron shows in the ferrous section while
gold in the non-ferrous section.
4. TR2 – to detect finer distinction between metals such as
aluminium and gold.
TUNE ADJUSTMENT
Your detector needs to be tuned between the detector’s receiver and transmitter
circuits to provide consistent pointer and tone indications. This TUNE operation is
essential every time when you turn on the detector. To tune your detector:
1. Make sure that the BATT TEST (11) switch is in the OPERATE position.
2. Turn the VOLUME CONTROL (12) to the 10 o’clock position.
3. Rotate the MODE SELECTOR (6) to VLF position.
4. Set GROUND CONTROL (7), DISCRIMINATION (8) and SENSITIVITY (9)
ADJUSTER to mid-range.
5. Lift the search coil at about the height of a desktop and away from any metal
objects. Hold down the RED BUTTON (10) on the handle and slowly rotate
TUNE ADJUSTER (4) until the VIEWMETER (18) pointer rests at or near 0.

Page 7
Note: Pressing the RED BUTTON (10) on the handle at any time during operation
will automatically return the pointer to the centre of the meter.
GROUND ADJUSTMENT
To eliminate the effect due to iron minerals or dissolved salt of the soil, you have
to adjust the GROUND CONTROL (7) to tune out false signals. To adjust the
GROUND:
1. Set MODE SELECTOR (6) to VLF position and lower the search coil to 15 to
50 mm (½” to 2”) above the ground.
2. If the pointer swings to the right, turn GROUND CONTROL (7) to the left, if
the pointer swings to the left, turn GROUND CONTROL to the right.
3. Raise the search coil to the height of your knee and press the RED BUTTON
on the handle. The pointer returns to the centre (10).
4. Repeat Steps 1-3 until the pointer stays close to the centre each time you
lower the search coil to the ground.
5. After you set GROUND CONTROL, the detector is set for the soil type at that
particular site. Do not reset it until you use the detector at a different site.
DISCRIMINATION ADJUSTMENT
The discrimination of a metal detector is its ability to differentiate between types of
metals. With the T330BB, you may differentiate ferrous from the non-ferrous
metals. Also you may distinguish between types of non-ferrous metals. The
T330BB provides you two modes of discrimination. Their functions are as follows:
1. TR1 MODE, which detects all metals and should be used for initial searching.
The DISCRIMINSTION CONTROL (8) should be set to mid-range.
2. TR2 MODE, the DISCRIMINATION of the detector can detect finer
distinctions between metals, such as aluminium and gold.
After an object located in the TR1 mode, switch to TR2 mode to determine the
quality of the metal by increasing the DISCRIMINATION, the detector becomes
more sensitive to the differences between large aluminium and gold pieces, for
example, but some small valuable pieces, such as coins and small rings, might be
overlooked.
In the high level of DISCRIMINATION, the detector first does not detect small
pieces of aluminium foil, then thick foil, and finally metal objects like pull tabs from
aluminium cans.
Note: Each time you use the detector in a different area, you must readjust the
DISCRIMINATION.
SENSITIVITY ADJUSTMENT
The sensitivity of a detector is the ability to detect objects at different depths in the
soil. MIN is the minimum while MAX is the maximum. Always leave the
SENSITIVITY ADJUSTER (9) set as high as possible. However in high level of
SENSITIVITY you will also pick up more false signals in highly mineralized or
trashy soil. It is recommended that when the detector makes a “chattering” noise,
decrease SENSITIVITY until the “chatter” stops.

Page 8
SEARCHING
After you have adjusted your detector, you may proceed to normal searching.
1. Turn the MODE SELECTOR (6) to TR1 position.
2. Adjust the SENSITIVITY ADJUSTER (9). Only experience will tell you how
much sensitivity you should use. As a general rule, turn your sensitivity down to
reduce excessive false signals caused by highly mineralized ground or
interference caused by power lines, radio stations, etc. Turn it up if you want
those deepest, smallest targets and you are willing to put up with a few more
false signals.
3. Keep the search coil moving at a comfortable rate. Remember that the metal
detector is a motion detector and responds only when the search soil (or the
target) is moving.
4. Keep the coil parallel to, and as close to the ground as practical. This is
important for maximum coverage and depth. If you’re hunting on a lawn you
can rub the coil right on the grass.
5. Overlap your sweeps approximately 50%.
6. Search in a methodical manner sweeping in a side-to-side motion.
7. Take your time. If you walk too fast, you can’t overlap your sweeps and you’ll
miss a lot of ground.
SEARCH COIL SWEEPING HINTS:
While holding the search coil level and
about 25 to 50 mm (1—2") above the
ground, slowly move the search coil
over the area where you placed the
sample, sweeping the search coil in a
side-to-side motion.
Sweep slowly – hurrying makes you
miss targets.
Never sweep the search coil as if it
were a pendulum. Raising the search
coil while sweeping or at the end of a
sweep causes false readings.

Page 9
FALSE SIGNALS
Because your detector is extremely sensitive, signals caused by buried rubbish,
and other sources of interference might cause signals that seem confusing. The
key to handling these types of signals is to dig for only those targets that generate
a strong, repeatable signal. As you sweep the search coil back and forth over the
ground, learn to recognise the difference between signals that occur at random
and signals that are stable and repeatable.
To reduce false signals when searching where there is a lot of buried rubbish,
scan only a small area at a time using slow, short overlapping sweeps.
The key to handling these types of signals is to dig for only those targets that
generate a strong, repeatable signal. As you sweep the search coil back and forth
over the ground, learn to recognize the difference between signals that occur at
random and signals that area stable and repeatable. To reduce false signals
when searching over ground with buried refuse, scan only a small area at a time
using slow, short overlapping sweeps.
PINPOINTING A TARGET
1. Turn the MODE SELECTOR (6) to TR2 position to determine the quality of
the metal.
2. Continue sweeping the search coil over the target in a narrowing side-to-side
motion.
3. Memorise the exact spot on the ground where the detector beeps.
4. Stop the search coil directly over this spot on the ground. Now move the coil
slowly forward and back a couple of times, again stopping over the strongest
response.
5. Move the coil side-to-side over more time and stop over the strongest signal
once again. Your target should be directly below the “Hot Spot” of the search
coil.
OPERATION TIPS
When you are working in an unfamiliar territory, always bury a coin and check it at
different discrimination and sensitivity levels. There may be some sensitivity loss
at higher levels of discrimination. Here are some suggested tips of operation.
1. If the detector display or sounds false signals, it may be due to one of the
following reasons:
a. The sensitivity may be set too high.
b. Your sweeping speed may be too fast, or at a wrong angle.
c. The target is a heavily oxidized metal.
2. The display does not show the correct type when the detector finds a target.
The reasons may be due to
a. More than one target.
b. An alloy that the detector does not recognize.
c. The target is heavily oxidized.
d. The sensitivity may be too high.

Page 10
CARE & MAINTENANCE
Keep the metal detector dry. If it gets wet dry it immediately. The search coil is
protected against the ingress of water. If used in salt water, rinse with tap water
before drying. Do not let water get into the control box.
Handle the metal detector carefully – dropping it can damage the internal parts.
Do not use the metal detector in extremes of temperature. Batteries do not work
well at very low temperatures, and will discharge if the metal detector is stored
where it is too warm.
Do not store the T330BB in extreme temperatures such the inside of a car parked
in the sun, especially in the car boot
Clean the metal detector occasionally using a damp cloth. Do not use strong
detergents.
If the T330BB is not going to be using it for a while, take the batteries out. Acid
damage caused by leaking batteries can be severe.
If you “scrub” the search coil on the ground, the cover will eventually wear away.
Replacement coils are expensive. Instead, invest in an inexpensive coil cover.
Put a plastic bag over the control housing when operating the T330BB in rain, fog
or dust.
DISPOSAL AND RECYCLING
You must not dispose of this product with domestic household waste.
Most local authorities have specific collection system for appliances and
disposal is free of charge to the end-user.
When replacing an existing product with a similar new product your retailer
may take the old product for disposal.
TECHNICAL SPECIFICATION
Dimension: 920—1210×185×200 mm
Weight: 1.26 kg
Batteries: 3 × PP3 (not supplied)
Operating frequency: 15 kHz ± 2 kHz
Detection depth:
Buried coin 24 mm diameter 150 mm
Buried aluminium plate 600 mm square 1.4 m
Headphone connector: 3.5mm jack
Discriminator: Ferrous/Non-ferrous

Page 11
SERVICE WARRANTY
•Electrovision guarantees the product free from defects in materials and
workmanship for a period of twelve months.
•Should this appliance be operated under conditions other than those
recommended, at voltages other than the voltage indicated on the
appliance, or any attempts made to service or modify the appliance, then
the warranty will be rendered void.
•The product you buy may sometimes differ slightly from illustrations. This
warranty is in addition to, and does not affect, your statutory rights.
•Our guarantee is administered by our retailers.
•If your product arrives damaged, you must contact the retailer from
whom you bought it. The retailer's contact details will be on the invoice
that arrived with the product, or on the e-mail you received when you
placed the order. Do not contact Electrovision, only your retailer can
arrange a replacement.
•If your product fails within the guarantee period, and needs to be
repaired or replaced, you must contact the retailer from whom you
bought it.
•The retailer's contact details will be on the invoice that arrived with the
product, or on the e-mail you received when you placed the order.
•If you have just received your product and require techical help in using
it, please call our Help Desk on (0845) 459 4816
•If you have any other technical queires about the product, please call our
Help Desk on (0845) 459 4816.
Electrovision Ltd.,
Lancots Lane, Sutton,
St. Helens, Merseyside.
WA9 3EX
website: www.electrovision.co.uk
Table of contents


