manuals.online logo
Brands
  1. Home
  2. •
  3. Brands
  4. •
  5. Elektra Beckum
  6. •
  7. Power Tools
  8. •
  9. Elektra Beckum KG 90/15 Manual

Elektra Beckum KG 90/15 Manual

®
115 366 5377/ D/ENG/F/NL/IT/ES/DA/SV / 5000 - 1.1
Betriebs- und Wartungsanleitung für Klammergerät
Operating and Maintenance Instructions Air Stapler
Notice d’utilisation et d’entretien de l’agrafeuse
Gebruikers- en onderhoudshandleiding voor tacker
Istruzioni per l’uso e la manutenzione per
Dispositivo di chiodatura per punti metallici
Manual de servicio y mantenimiento para
Betjenings- og vedligeholdelsesvejledning for klammermaskine
Anvisningar för drift och skötsel av
KG 90/25
KG 90/40
D
ENG
IT
NL
F
DA
ES
SV
Item Description
1 Trigger lock
2 Air inlet
3 Trigger
4 Catch lever
5 Exhaust deflector
6 Magazine slide
7 Magazine lock
8 Service shutter
9 Depth adjustment
1. Getting to Know Your Air Stapler KG 90/25 and KG 90/40
ENG
1
2
34
5
6
5
3
2
7
1
9
8
6
Contents ●tackers shall only be con-
nectedtoairlinesthatare
controlled by a pressure
regulating device, ensu-
ring that the max. permis-
sibleoperatingpressureis
not exceeded by more
than 10%.
●oxygen or fuel gas is not
used as power source for
air-powered tackers.
●connection to an air sup-
ply line is only made by
means of a quick coupler,
and that the tool is de-
pressurised after discon-
nection.
●for maintenance and re-
pairs only the genuine
spare parts listed in the
parts list shall be used.
●repair and maintenance
workisonlycarriedoutby
individuals authorised by
the equipment manufac-
turer or other competent
individuals, under obser-
vation of the information
given in the instructions
As competent person is
regarded who possesses
sufficient knowledge in the
field of air-powered tackers,
obtained by vocational
training, schooling and work
experience, and who is
familiar with the applicable
legal regulations pertaining
to work safety and accident
prevention and the general
accepted technical rules to
such extent, that he/she is
capable of judging the state
of operating safety of
tackers.
1. Getting to Know Your
Air Stapler KG 90/25
and
KG 90/40
2. Please Read First!
2.1 Specified conditions of
use
3. Safety Instructions
3.1 Regulations
3.2 Tool safety
3.3 Work safety
4. Initial Operation
5. Care and Maintenance
5.1 Care
5.2 Trouble shooting
6. Specifications
7. Standard Delivery
8. Accessories
2.1 Specified conditions of
use
This Air Stapler is an air po-
wered tacker. Due to its ver-
satility it can be used it can
beused ininteriorcompletion
for fastening grooved and
tongued boards, panels,
ledges, strips, etc. The stap-
les can be located at easily
concealed location. The
stapler features a contract
trip, which requires the gun
tip to be pressed down be-
fore a shot can be triggered
It is suitable for driving type
90 staples of 5.8 mm crown
width and a length of 15 - 25
mm (KG 90/25) and 15 - 40
mm (KG 90/40), wire size
1.05 x 1.27 mm.
●Read instructions before
commissioning, especi-
allythe safetyinstructions.
●If you notice transport
damagewhileunpacking,
notifyyoursupplierimme-
diately. Do notoperatethe
air tool!
●Dispose of the packing in
anenvironmentally friend-
ly manner. Take to a pro-
per collecting point.
●Keep instructions for fu-
ture use.
●If you lend or sell this air
tool be sure to have the
instructions to go with it.
2. Please Read First
3. Safety Instructions
3.1 Regulations
Forportable tackersthestan-
dard DIN 7259 (UVV34) is
applicable. This standard
requires, that:
●for tackers only the
fasteners specified in the
instructions shall be used
(see chapter „Specifica-
tions).
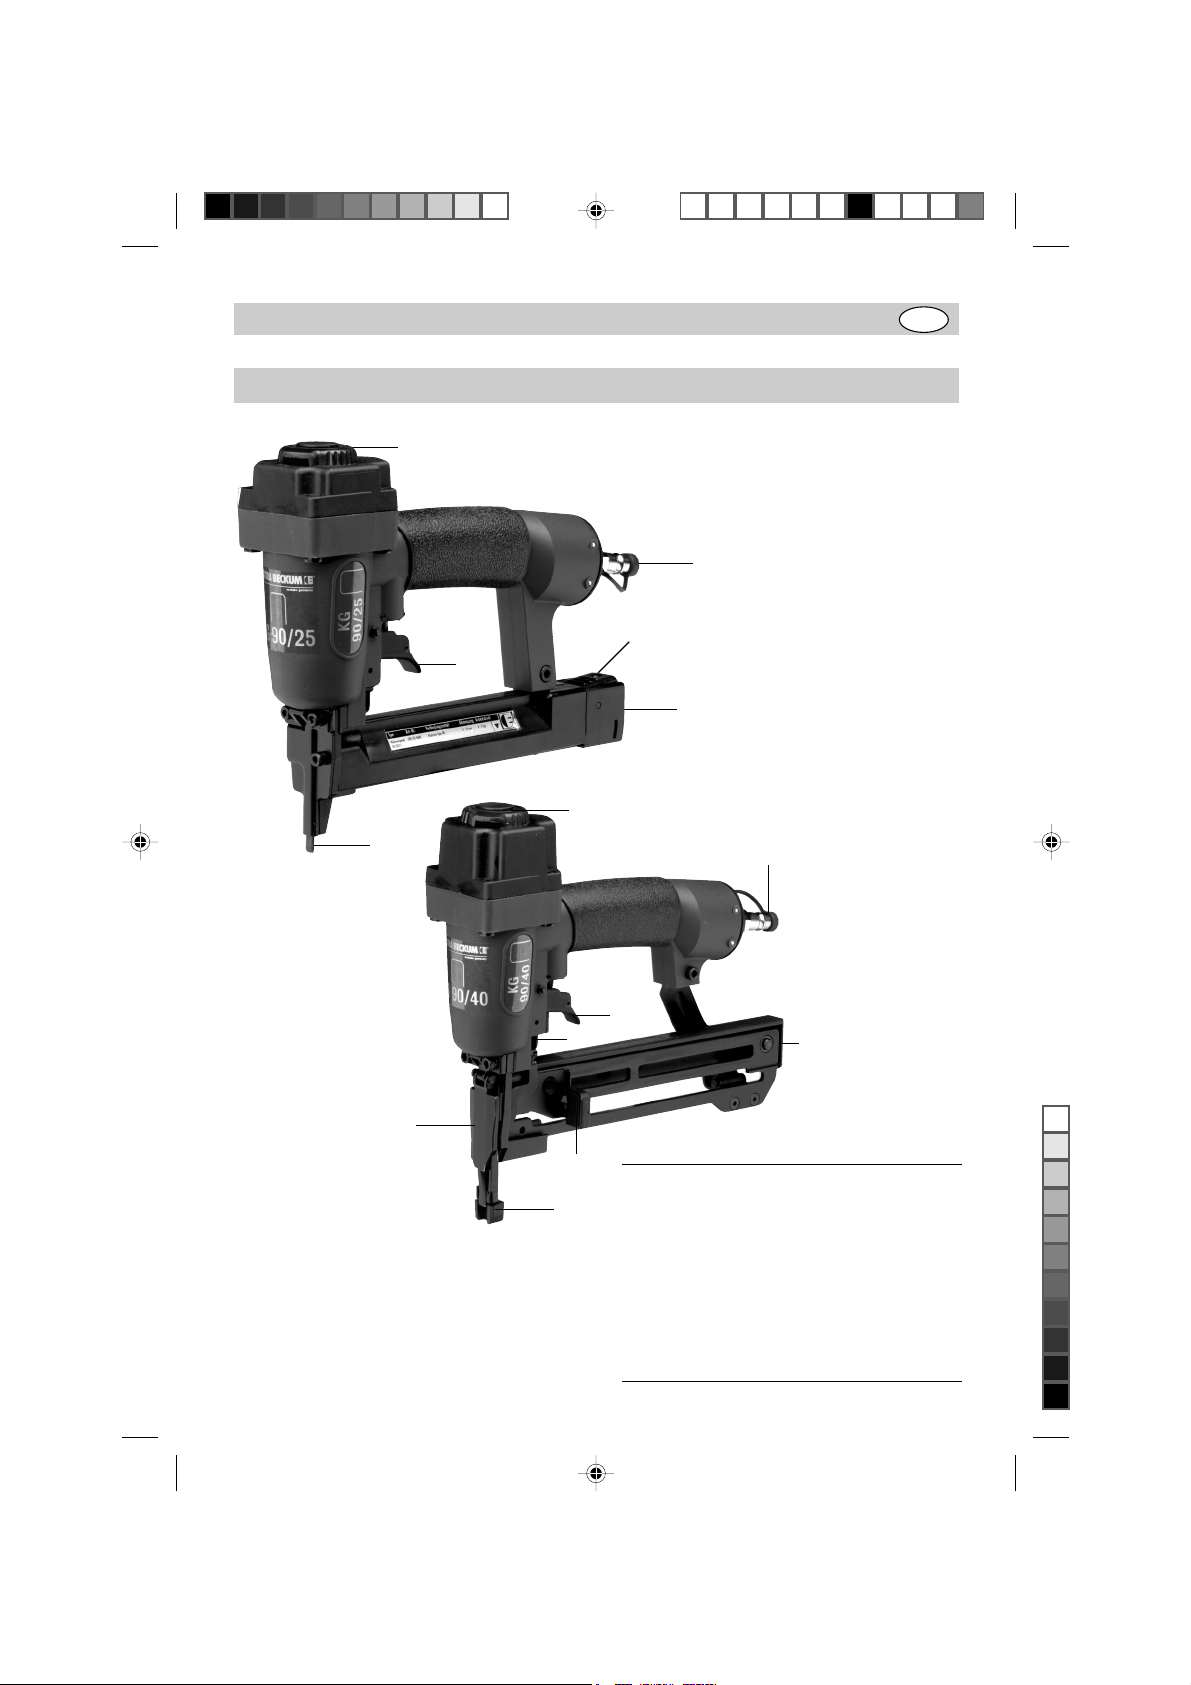
To access a staple jammed
in the tip, actuate the lever
on the side of the service
shutter (item 8) to open it,
thenremovejammedstaple.
Turn exhaust deflector (item
5)to desired position.Setthe
working pressure to the
lowest recommended pres-
sure(4.0bar).Connectionto
the pressurised air source is
made by 6 mm flexible air
hose fitted with a quick
coupler.
Set the tacker, checked for
proper functioning, to the
point the fastener is to be
driven and pull the trigger
(item 3). Increase or de-
crease the working pressure
in 0.5 bar increments, until
the desired result is achie-
ved. The tacker should be
operated at the lowest
possiblepressure.Take care
to avoid working pressures
over 7 bar and shots without
fasteners in the magazine.
A faulty or not properly wor-
king tool must be discon-
nected from the pressurised
air source immediately and
presented to a competent
person for inspection.
Disconnect tool from air
supply and empty the
magazine during extended
work breaks or when work is
completed.
3.2 Tool Safety
Air-powered tackers shall
only be operated and ser-
viced by persons having
been instructed in the oper-
ation of such tools.
Keep out of the reach of
children.
Before every use check to
see that all safety and trig-
gering devices are func-
tioning properly. Also check
the tightness of all screws
and nuts. The tool must not
be modified, nor shall any
emergency repairs or con-
version be made. Avoid
damage or weakening of the
tool. Never dismount or
disable parts such as the
tool’s trigger.
Always wear safety glasses
andhearingprotectionwhen
working with a tacker.
4. Initial Operation
The tool must be discon-
nectedfromthe air supplyfor
loading its magazine!
KG 90/25: by pressing the
catch lever (item 4) the
magazine is unlocked and
the magazine slide (item 6)
can be pulled back. Put
fastenersinto magazine from
below and push magazine
slide (item 6) forward until it
engages at the catch lever.
KG 90/40: pull magazine
slide back against the
magazine lock. The staples
can then be loaded from the
top. When loaded, press
magazine lock and push
magazine slide forward. The
KG 90/40 features a depth
adjustment (item 9), which
allowsfor adjusting thedepth
thestaplesaredriven in.The
KG 90/40 is also fitted with a
protectingcapon the contact
trip,to prevent damagewhen
working planed or otherwise
finished surfaces. When
fastening grooved and ton-
gued boards the protecting
cap should be removed.
3.3 Work Safety
Never aim an operable
tacker against yourself or
other persons. When wor-
king, hold the tacker in such
waythatyourhead and body
willnot beinjuredinthe event
of possible recoil. Never pull
the trigger with the nozzle in
the air.
Whenthetackerisoperable,
carryit at thehandleonly and
never with the trigger pulled.
Whenworking, take carethat
fasteners are not shot
through thin material and do
not slide off at corners or
edges.
O-rings damages or soiled Clean or replace O-rings, tighten
screws fully
A. Air escapes between lid and housing:
Faults and possible causes Remedy
B. Fasteners are not driven all the way in:
Working pressure too low.
Cross section of air hose too small.
Tool without lubrication
Increase air pressure in 0.5 bar
increments, until fasteners are
properly driven.
Min. 6 mm inner diameter required..
Clean parts and lubricate.
C. Fasteners are driven too far into the material:
Working pressure too high. Reduce working pressure in steps
of 0.5 bar.
D. Fasteners project or are bend:
Tool not held down firmly enough. Hold down tool more firmly or
increase working pressure, if necessary.
5.2 Trouble shooting
c) manual lubrication
If neither a service unit nor a
line oiler exists in the
pressurised air system, 3 -5
drops of pneumatic oil must
be given into the air inlet
before each use.
●Store air tools in dry
rooms only.
5. Care and Maintenance
5.1 Care
Observing the maintenance
instructions given here
ensures a long service life
andtrouble-freeoperationof
this quality product. Always
disconnect from the
pressurised air supply when
servicing.
For a lasting, trouble-free
operation daily cleaning and
periodic lubrication is
indispensable.
Use only special pneumatic
oil (see chapter 8
„Accessories“).Yourchoices
for lubrication:
a) by mist oiler
A complete service unit
includes a mist oiler and is
fitted at the compressor.
b) by line oiler
A line oiler is installed on the
tool’sairinlet,which provides
the necessary oil for
lubrication.
KG 90/25 KG 90/40
Air consumption (per shot) 0.52 l 0.66 l
Working pressure 5.0 - 7.0 bar
Magazine capacity (staples/brads) 110 pcs. 145 pcs.
Dimensions (LxWxH) 256x59x202 mm 295x60x235 mm
Weight (w/o fasteners) 0.72 kg 0.93 kg
A-weighted single-shot emission
sound power level (LWA 1s) 91 dB 90 dB
A-weighted single-shot emission
sound power level (LPA 1s) 86 dB 85 dB
Vibration 2.5 m/sec22.7 m/sec2
Recommend inner air hose diameter 6 mm
Suitable fasteners staples type 90
for model KG 90/25 also staples type ES 13 - 25 mm long 13 - 40 mm long
Crown width of staples 5.8 mm
Wire size 1.25 x 1.00 mm
Pressurised air required: clean and free of condensate,
with fine mist of oil
Compressor capacity: min. 50 l/min filling capacity
Recommended working pressure Max. working pressure
set at regulator or filter/pressure
regulator 7 bar.
6. Specifications
7. Standard Delivery
Air Stapler KG 90/25
1000 staples 25 mm
2 Allen keys
1 Safety glasses
1 Can pneumatic oil
1 Blow moulded case
1 Instruction manual
Air Stapler KG 90/40
2 Allen keys
1 Safety glasses
1 Can pneumatic oil
1 Blow moulded case
1 Instruction manual
8. Accessories
Staples
Type 90/15 CNK resin-bonded, crown 5.8 mm, 15 mm long (2000 pcs.) Stock-no.090 105 3790
Type 90/20 CNK resin-bonded, crown 5.8 mm, 20 mm long (2000 pcs.) Stock-no.090 105 3804
Type 90/25 CNK resin-bonded, crown 5.8 mm, 25 mm long (2000 pcs.) Stock-no.090 105 3812
Type 90/30 CNK resin-bonded, crown 5.8 mm, 30 mm long (2000 pcs.) Stock-no.090 105 3820
Type 90/35 CNK resin-bonded, crown 5.8 mm, 35 mm long (2000 pcs.) Stock-no.090 105 3839
Type 90/40 CNK resin-bonded, crown 5.8 mm, 40 mm long (2000 pcs.) Stock-no.090 105 3847
Pneumatic oil for air tools, 0.5 l can
Stock-no.090 100 8540
Line oiler 1/4"
Stock-no.090 105 4584

This manual suits for next models

11

Other Elektra Beckum Power Tools manuals

Elektra Beckum SR 1500 set User manual

Elektra Beckum

Elektra Beckum SR 1500 set User manual

Elektra Beckum RS 4000 User manual

Elektra Beckum

Elektra Beckum RS 4000 User manual

Popular Power Tools manuals by other brands

Hilti TE 50 operating instructions

Hilti

Hilti TE 50 operating instructions

Marland Clutch CEUS M Series Service & installation instructions

Marland Clutch

Marland Clutch CEUS M Series Service & installation instructions

RTR MAX RTM393 operating manual

RTR

RTR MAX RTM393 operating manual

Costway ET1381DE user manual

Costway

Costway ET1381DE user manual

OAV P305 Instruction manuals

OAV

OAV P305 Instruction manuals

RODCRAFT RC6300 Operation manual

RODCRAFT

RODCRAFT RC6300 Operation manual

Mannesmann 18141 instruction manual

Mannesmann

Mannesmann 18141 instruction manual

Stiga SCS 100 Li 20 S Operator's manual

Stiga

Stiga SCS 100 Li 20 S Operator's manual

SATA 98101 user manual

SATA

SATA 98101 user manual

Jefferson JEFHTGVAR-230 user manual

Jefferson

Jefferson JEFHTGVAR-230 user manual

Drill Master JOURNEYMAN 400 user guide

Drill Master

Drill Master JOURNEYMAN 400 user guide

HOSCH HD-PU-L Installation and operation manual

HOSCH

HOSCH HD-PU-L Installation and operation manual

Stanley Genesis 07537 Instruction and service manual

Stanley

Stanley Genesis 07537 Instruction and service manual

Makita 5630DWA parts list

Makita

Makita 5630DWA parts list

Bort BPS-700X-Q manual

Bort

Bort BPS-700X-Q manual

Prokit's Industries SS-611 user manual

Prokit's Industries

Prokit's Industries SS-611 user manual

Master Quality Power ZJQ5116 instruction manual

Master Quality Power

Master Quality Power ZJQ5116 instruction manual

Laguna Tools DAKE Y instruction manual

Laguna Tools

Laguna Tools DAKE Y instruction manual

manuals.online logo
manuals.online logoBrands
  • About & Mission
  • Contact us
  • Privacy Policy
  • Terms and Conditions

Copyright 2025 Manuals.Online. All Rights Reserved.