Elite 55 User manual

1
INSTALLATION AND OPERATION MANUAL
SWIMMING POOL HEAT PUMP
MODELS: ELITE 55, 65, 85, 100, 115, & 130
IMPORTANT
It is important to register your product with us on our web
site. This will help us find your warranty when you place a
service call. If we cannot find your warranty registration, a
proof of purchase will be necessary.
www.ttifab.com/warranty.php

2
FAILURE TO FOLLOW THESE INSTRUCTIONS
WILL VOID YOUR WARRANTY
MANDATORY SAFETY MEASURES
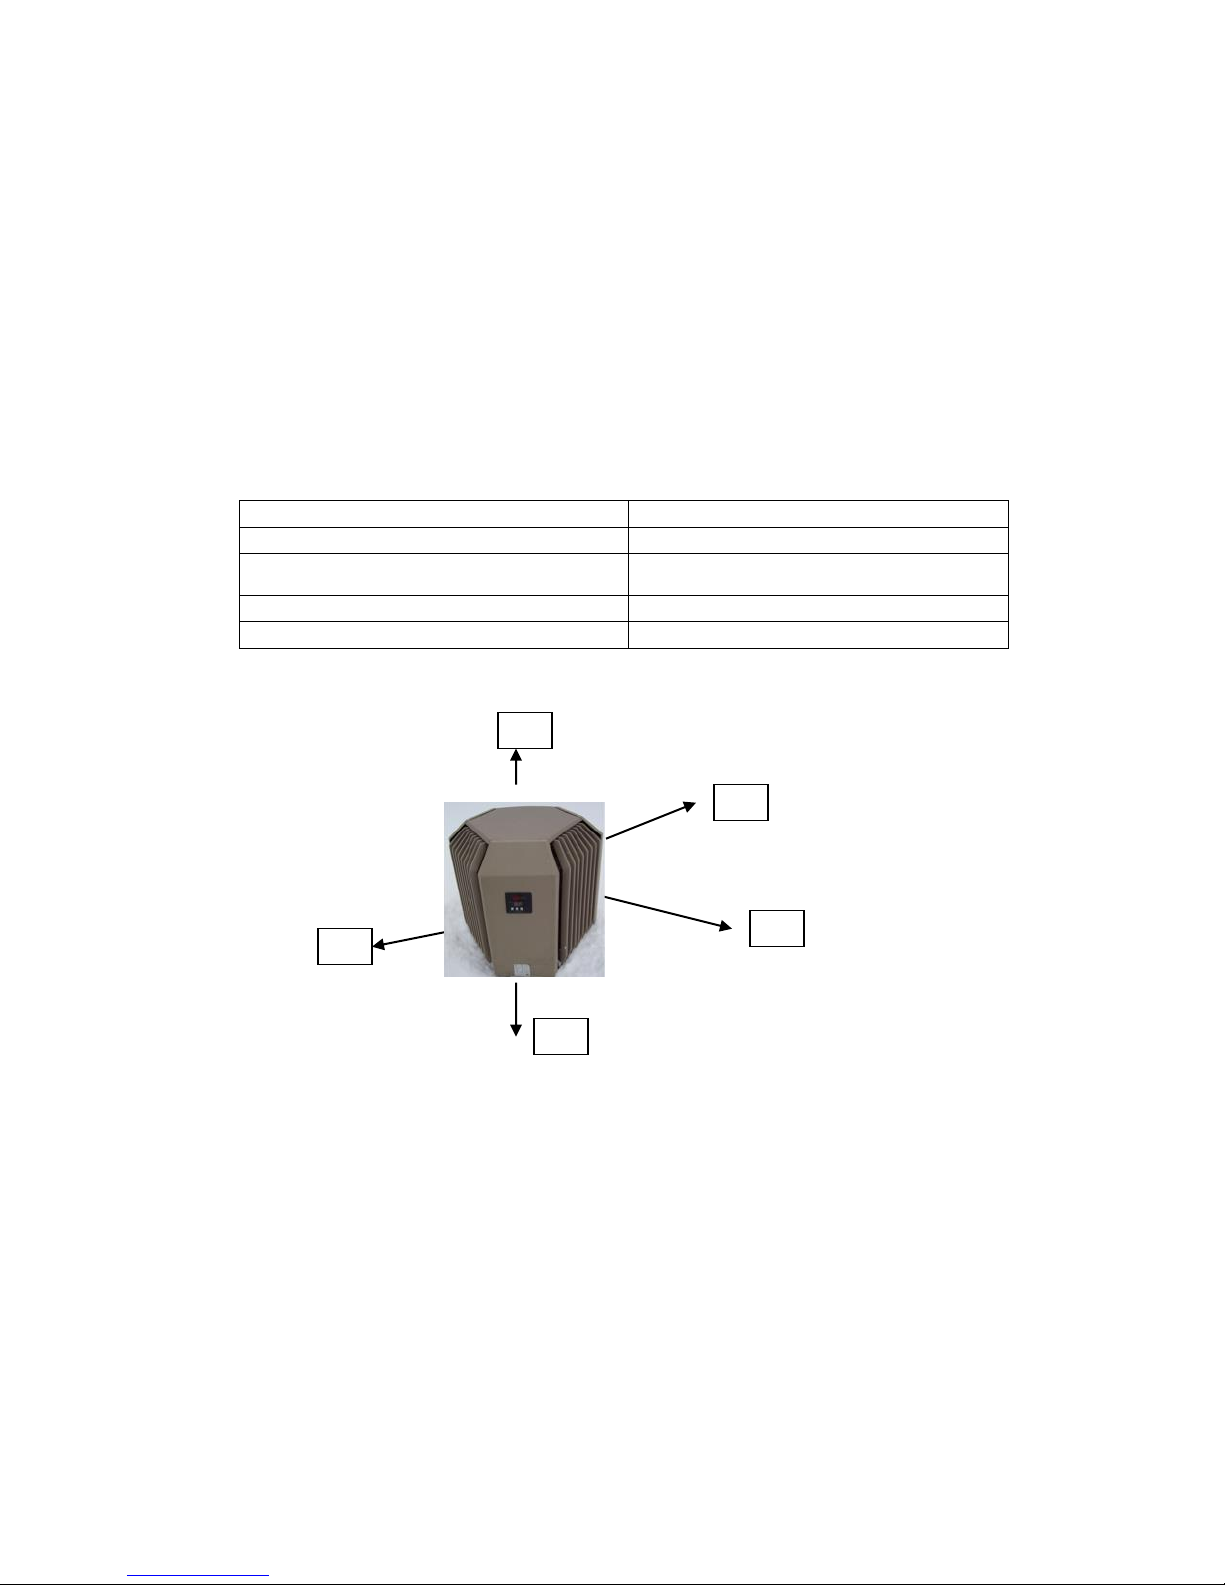
Congratulations for your purchase of an Elite heat pump. Your new Elite heat pump will extend your
pool season and bring you years of comfort and enjoyment.
This document will help to answer any questions you may have, will provide technical support and
will allow you to take full advantage of your new Elite heat pump safely.
Please take the time to read this document in its entirety.
IMPORTANT: YOUR HEAT PUMP MUST BE INSTALLED
BY A CERTIFIED ELECTRICIAN.
READ AND FOLLOW ALL INSTRUCTIONS.
ELECTRICAL HAZARDS
To reduce the risk of electrical shock:
-All electrical connections should be made by a licensed electrician in accordance with national,
provincial and local codes and standards.
-Before installing or removing any Elite equipment, make sure that all breakers covering the pool
area have been turned off.
-A clearly identified breaker must be installed in order to be able to interrupt power to the heat
pump in case of an emergency.
-Never open the electrical box without having shut off all power sources to the heat pump
beforehand.
-If your heat pump is equipped with a water pump control option, don’t forget to turn off the breaker
for this pump prior to intervening.
CHEMICAL HAZARDS
Poorly balanced water may produce bacteria that can affect your health as well as damage your
pool and its equipment. Have your water analyzed weekly by an expert.
To avoid injury when using chemical products, wear rubber gloves and safety goggles, and work in
a well-ventilated area. Choose wisely the area where you will be handling these chemicals, as they
may damage any surface they come in contact with.
WARNING
Failure to heed the following warnings may result in
permanent injury, electrocution or drowning.

3
WATER PRESSURE EQUIPMENT HAZARDS
Your water filtration system works under pressure, and water pressure may go off prior to work
beginning. Please refer to the water filtration system instruction manual for more information.
PREVENTING INJURIES AND DROWNING
To reduce the risk of injury, do not authorize children to operate this device.
Do not allow anyone, and particularly children, to sit, climb or lean on any installed equipment
that is part of your pool operation system. Unless otherwise specified, ALL components of your
pool operation system should be at least 1 meter away from the pool so that children may not use
them access the pool, which could result in injury or drowning.
The thermodynamic and electrical specifications are outlined on the rating plate.
Elite heat pumps have a 240V –1 phase voltage. Make sure you have the appropriate electrical
connections.
Make sure that there is no watering or sprinkler system near or aimed at the water heater. Most
water sprinkling systems are connected to wells whose water contains minerals, Sulphur and
other aggressive contaminants. These contaminants may promote corrosion and affect the
efficiency of your heat pump.
ELECTRICAL WARNINGS
Installations should be performed by qualified professionals only. Any installation performed by
another unqualified individual may entail risks for that individual and/or other people.
Electrical installation should conform to the National Electrical Code as well as any provincial
or municipal standards.
KEEP THESE INSTRUCTIONS FOR FUTURE
REFERENCE
WARNING
Failure to heed the following warnings may result in damages
to your pool equipment.
WARNING
Avoid injuries cause by electrical current.

4
TABLE OF CONTENTS
I) INTRODUCTION…….…………………………………..P.5
A source of savings
How does it work?
Minimal maintenance
II) POSITIONING…………………………………………….P.6
Ventilation and accessibility
Other recommendations
III) WATER SUPPLY AND BACKFLOW………….……….P.7
Plumbing connections
Minimum and maximum water flows
IV) CHLORINATORS, BROMINATORS AND
OTHERS………………………………………….…...….P.8-9
Basic connections, inline chlorinator or brominator
Salt chlorinator
Pressurized chlorinator or brominator
Parallel connection
V) CONNECTION TO ELECTRICAL POWER……..…….P.9
VI) MAINTENANCE………………………………………….P.10
Cleaning
Winterizing
Seasonal restart
Water bypass
VII) REGULATOR..............……………………….……….P.11-12
VIII) ALARM CODES.................................................................P.13
IX) TROUBLE SHOOTING....................................................P.14
X) QUESTIONS AND ANSWERS……….…………………P.15

5
INTRODUCTION
A SOURCE OF SAVINGS
Your heat pump will allow you to realize substantial savings compared to other means of heating your pool. Even if
it has a lower heating capacity (BTU / h), which forces it to operate up to 24 hours a day in some cases, the heat
pump remains the most inexpensive way to heat your pool, thanks to the use of advanced techniques in
thermodynamics.
HOW DOES IT WORK?
Your heat pump works the same way as a water pump. While the water pump transfers water from one place to
another, your heat pump transfers heat between the air and the water in your pool. Your heat pump does not produce
heat, just like a water pump does not produce water with the energy it consumes. Thus it is possible to achieve
yields of up to 600% or 700% under optimum conditions, or a COP of between 6 and 7. In other words, for every
kilowatt that your heat pump uses, it transfers up to 6 or 7 kilowatts between the air and the water in your pool. This
compares favorably with the 80% to 95% yield of a traditional gas, oil or electric pool water heater. However, it is
true that the performance of traditional pool water heaters remains constant regardless of weather conditions, while
that of heat pump varies. But even when temperatures are cooler, the heat pump continues to transfer energy and it
remains advantageous in night time temperatures as low as 5°C (41°F).
MINIMAL MAINTENANCE
Your new heat pump has been designed to necessitate minimal maintenance. However, if you want your
pool to be heated as efficiently as possible, you should abide by the installation and maintenance advice
contained in this document.

6
POSITIONING
Choosing the area where your heat pump will be installed is extremely important. You must respect the
following guidelines.
VENTILATION AND ACCESSIBILITY
Your heat pump works, in large part, in symbiosis with the surrounding air: it is important that there be
adequate ventilation all around the heat pump. Therefore, the device should not be installed in a closed
space such as a garden shed or a basement.
IMPORTANT: Your heat pump must have sufficient free space around it to function properly.
You should also clear any obstructions surrounding the heat pump, as indicated in the table below:
ALL MODELS
(1) in front of the evaporation coil
60 cm = 2 feet
(2) in front of all other surfaces
35 cm = 14 inches
(3) in front of the fan*
120 cm = 4 feet
(4) in front of the service panel
60 cm = 2 feet
*Objects should be placed as far away as possible from the area where air is evacuated.
OTHER RECOMMENDATIONS
You should not install the device below a roof, so that your heat pump becomes buried under snow or
receives too much water if the roof is not fitted with gutters. Do not install your heat so that the sun
directly hits the regulator. This will not cause damages, but the display will be harder to read.
Similarly, you should not install automatic sprinkler near your pool heat pump. The device must be
installed on a flat, firm and level surface. A concrete slab or equivalent is preferred. Consider that your
device will produce condensation, so there will be water leaking around the unit.
1
3
2
4
1

7
WATER SUPPLY AND BACKFLOW
PLUMBING CONNECTIONS
All Elite model connections have a 1 ½’ diameter.
MINIMUM AND MAXIMUM WATER FLOWS
For maximum efficiency, your heat pump must operate with water flows between 57 liters per minute (15
U.S. gallons per minute) and 170 liters per minute (45 U.S. gallons per minute). With a water flow of less
than 57 lpm (15 U.S. GPM) and greater than 170 lpm (45 U.S. GPM), the heat pump will not work
properly and will suffer damage. (See table below).
A set of valves (Fig. A) to insulate the heat pump and adjust the water flow must be installed.
We recommend installing this set of valves (Fig. A) in order to be able to adjust the optimal water flow
circulating in the heat exchanger (condenser). An adjustable automatic bypass valve must be installed
when a water pump of 2 HP or more is used to circulate the pool water.
Your water pump must be able to supply each heat pump with a water flow within the limits listed below.
MODEL
MINIMUM
IDEAL
MAXIMUM
Elite 50 & 65
57 l/m (15 GPM US)
170 l/m (45 GPM US)
170 l/m (45 GPM US)
Elite 85, 100, 115, & 130
77 l/m (20 GPM US)
170 l/m (45 GPM US)
170 l/m (45 GPM US)
1 U.S. gallon per minute (1GPM US) = 3.78 liters per minute (3.78 l/m)
WARNING
If the above-prescribed water flows are not respected,
damage will ensue and your warranty will be void.
WARNING
Elite pool heat pumps normally operate with a 1.4 bar (20 PSI) water
pressure. The maximum operating water pressure is 2.0 bars (30 PSI).
Failure to respect the prescribed water pressures will void the warranty of
your heat pump.
WATER IN
WATER OUT
SORTIE D’EAU
By-pass valve closed during operation
Figure. A (By-Pass)

8
CHLORINATORS, BROMINATORS
AND OTHER AUTOMATIC SYSTEMS
BASIC CONNECTIONS, INLINE CHLORINATOR OR BROMINATOR
This connection is mandatory to ensure the long working life of your pool heat pump.
Any automatic distribution system for chemicals, chlorine, bromine or other, must be installed so that the
distribution system’s water output is located after the pool’s heat pump. The heat pump’s warranty will be
void if the installation is not compliant to this rule.
SALT CHLORINATORS
Salt chlorinators are made to be installed as inline chlorinators. Therefore, they must be installed as
prescribed in the section above (“inline chlorinator or brominator”).
PRESSURIZED CHLORINATOR OR BROMINATOR
Pressurized chlorinators or brominators start by using a small quantity of water as it exits the filter, then
add chemicals and forward this highly concentrated solution into the pool. Check valves must therefore
be extremely resistant to corrosion. Only use the valves that have been supplied or recommended by the
manufacturer of your chlorinator or brominator.

9
PARALLEL CONNECTION
For larger pools, it may be necessary to connect
two heat pumps in parallel. Make sure you install
them at least 2 feet apart.
1, 2 and 3: optional valves
4: filter
5: water pump
CONNECTION TO ELECTRICAL POWER
To ensure your safety and the proper functioning of the device, the electrical connections must be
performed by a qualified electrician according to national codes, provincial and local regulations.
A circuit breaker must be installed close to the heat pump, in an accessible location.
Never open the electrical box without shutting off the power to all sources used for the operation of the
heat pump. If your heat pump has a pool pump control option, remember to close the circuit breaker to
this pump.
The spec sheet for the heat pump contains all the requirements for voltage and amps.
If the power cord is damaged, it must be replaced by a qualified electrician.
WARNING
When you shut off the water to one of the heat pumps, the water flow that previously
went through the heat pump is redistributed to the other heat pumps. Valves must be
adjusted to obtain the prescribed water pressures (see page 7).

10
MAINTENANCE
CLEANING
To prolong the working life of the device, you must:
1) Clean the pool filter regularly to ensure adequate water flow inside the heat pump.
2) Keep the surface of the coil (evaporator) clean and free from obstructions: paper, leave or other.
3) Clean your unit with mild household cleaner and rinse with a garden hose at low pressure.
WINTERIZING (TITANIUM HEAT EXCHANGER)
When the device is exposed to temperatures below freezing, it becomes essential to prevent ice formation
within the section containing water by draining the heat pump’s heat exchanger. To store your heat pump,
you must:
1) Turn the device off.
2) Turn off the circuit breaker and close the valves.
3) Unscrew the water inlet and outlet connections (Figure A).
4) Rinse the condenser with tap water and drain the system with air pressure or vacuum.
5) Cover the unit with a waterproof drop cloth if left outside all winter.
SEASONAL RESTART
Before restarting your pool heat pump, you must:
1) Check and adjust the quality of the pool water.
2) Make sure the breaker for the heat pump is turned off.
3) Install the heat pump on a level surface and connect all plumbing.
4) Clean the pool filter and ensure that the water return system is working properly.
5) Turn on the circuit breaker for the pool’s heat pump.
WATER BYPASS
Some maintenance operations may require that the pool heat pump be disconnected from the filtration
system. To divert the water, you must:
1. Stop the device.
2. Open the bypass valve and close the water inlet and outlet valves.
For longer stops (1 week or more):
3. Unscrew the water inlet and outlet connections
WARNING
Before any storage or cleaning operation, turn off all electrical circuit
breakers.

11
Regulator
1.Operation Display
a. The display shows Time when the machine is off
b. The display shows Temperature of the swimming pool water when the machine is on.
2.Water temperature setting
a. Press MODE key can switch HEAT circulating mode.
b. Available no matter the machine is on or off. Press HEAT light up.
c. Press the key or to set water temperature. The controller indicates flashing
temp.
Press or to adjust to your desired water temp.
d. 5 seconds later, the controller display will back to the normal mode.

12
3. Time setting
A. Available no matter the machine is on or off.
B. Press key to set time,when the clock on the screen is flashing, press again to set
hour. Use or to adjust hour. Before the flashing stops, press to set minute.
Use or to adjust. After adjusting,press and water temperature will be
displayed. 30 seconds later,the controller display will be back to the normal mode.
4. Timer on and off
A. Press set timer on. When the indicator light is on and the time is flashing, press again to set
hour. Use or to adjust. Before the flashing stops, press to set minute.
B. Use or to adjust. After adjusting, press and water temperature will been seen.
30 seconds later, the controller display will be back to the normal mode.
C. Press to set timer off. When the indicator light is on and the time is flashing, press
again to set hour. Use or to adjust before flashing stop, press to set minute.
Use or to adjust. After adjusting, press and water temperature will been seen.
30 seconds later, the controller display will be back to the normal mode.
5. Cancel timer on and off
Press or to cancel timer on and off. When the number is flashing, press when
timer indicator light is off and LED shows water temperature, the timer on and off is canceled.
30 seconds later, the controller display will be back to the normal mode.

13
ALARM CODES
E 1
High pressure protection
E 2
Low pressure protection
E 3
Low water pressure protection
E 4
Over current (3 phase machine)
E 6
Compressor exhaust overload protection
PP 1
Pool ( SPA )heater sensor failure
PP 2
Exhaust sensor failure
PP 3
Coil pipe sensor failure
PP 4
Intake pipe sensor failure
PP 5
Air temp sensor failure
PP 7
When the temperature<+32℉, auto stop protection(not
Failure)

14
TROUBLESHOOTING
PROBLEMS
POSSIBLE CAUSES
SOLUTIONS
The device won’t start.
No power
No need for heat
Compressor protection delay
activated (Power light is
flashing)
Make sure circuit breaker is on
Check desired temperature and
adjust if necessary
When the device stops, the
regulator imposes a 3-minute delay
before restarting compressor to
allow for pressure balancing.
The displayed water temperature
rises quickly after the compressor
starts.
Water intake and outlet have
been reversed
Check to see if water is circulating
in the right direction in the pool
water heater.
The device works but the water does
not reach the desired temperature.
Water connections are reversed
Heat loss is greater than the
devices heating capacity
Pool is too large for the heat
pump model
Check to see if water is circulating
in the right direction toward
condenser.
Choose a more powerful model or
use more than one heat pump.
Choose a more powerful model or
use more than one heat pump.
There is a lot of water under the
device.
Normal runoff due to
condensation
Abnormal water leak.
No action required (install a drain
if necessary)
To determine whether this is a leak,
turn off the device until all
condensation runoff has gone. See
if there is still water after 24 to 48
hours.
There is frost on the evaporator.
Outdoor temperature is cold
Compressor works but fan does
not work
The defrost sensor is defective –
alarm
Cooling fluid level is too low
Check to see if defrost is working
(the compressor does not operate
during defrost –only the fan
operates)
Request service online at
www.poolheatpump.ca/serviceCall.
php
Regulator display is hard to read.
The regulator display is exposed
to direct sunlight
Create some shade above the
display to make easier to read.
The fan works, but the compressor
does not.
Defrost in operation (Defrost
indicator lights up)
No action required
The fan works, but the compressor
does not work for more than 3 hours.
Compressor is broken, in
thermal protection mode or
connections are loose (Power
light is on)
Request service online at
www.poolheatpump.ca/serviceCall.
php

15
QUESTIONS AND ANSWERS
1) Is it possible that my pool has been losing water since my heat pump was installed?
Your pool is not leaking water, but because of the higher temperature of the pool water, water evaporates more
than before. Indeed, the greater the temperature difference between pool water and air, the more evaporation
occurs.
2) There is water runoff around my heat pump. Could it be leaking?
Your heat pump probably does not have a leak. The water around the heat pump usually results from the
condensation of moisture in the air over the cold evaporator of the heat pump, just like condensation on a glass
of ice water for example. But if you really want to know if a leak is present in your heat pump, you can turn off
the heat pump, but without diverting the water. Wait until the water evaporates around the heat pump. If the
water has not dried within 24 to 48 hours or so, or if there is still more water, then it is very likely that it comes
from a leak. Contact an authorized service center.
3) The temperature displayed on the heat pump is different from that displayed on my pool thermometer. Is
there a problem with my heat pump?
Probably not. Your heat pump includes a controller and calibrated sensors. Most often, the problem lies in the
pool thermometer. Although mercury thermometers are often very precise, their casing is not, and the mercury
thermometer is often offset with respect to the graduations marked on the casing. The thermometer displays
temperatures higher or lower than the actual temperature of the water. To measure the water temperature, you
can use an oral thermometer on which the graduations are more precise.
When pools have a bottom drain, it is also possible that the pool heat pump displays a temperature of 1 to 2
degrees lower than that measured at the surface. This is normal because the water is always colder at the bottom
of the pool than on the surface.
4) Since installing my pool heat pump, the water pressure in the filter pump has increased. Is this normal?
Yes. The new heat pump, as well as new pipes, are creating added resistance to the flow of water in the system.
It is normal to have an increase in pressure of 5 to 7 PSI after installing a pool heat pump.
5) Why doesn’t the pool temperature increase when my pool heat pump is operating?
There are three possibilities, when the heat pump is operating:
-The heat pump provides more energy than the pool loses: the temperature increases.
-The heat pump delivers as much energy as the pool loses: the temperature remains stable.
-The heat pump provides less energy than the pool loses: the temperature drops.
Don’t forget that heat pump performance varies depending on operating conditions. Heat loss from the pool is
dependent on outside temperature, wind and the size of the pool, as well as several other factors.
It is recommended to use an insulating pool cover to reduce heat loss and water evaporation, especially
during cold nights.

16
TTI FABRICATION Inc.
684 Place Trans-Canada
Longueuil, QC, J4G 1P1
Canada
www.ttifab.com
www.ttifab.com
This manual suits for next models
5
Table of contents
Popular Heat Pump manuals by other brands

SUNSCAN
SUNSCAN SunSmart SSD-0360410A Installation & operation manual

Nortek
Nortek Y1SA installation instructions

Ariston
Ariston NIMBUS COMPACT M NET 40 M EXT Technical Instructions for Installation and Maintenance

Olympus
Olympus IX2-DICD instructions

Toshiba
Toshiba HWS-804XWHM3-E owner's manual

Carrier
Carrier 38MURA installation instructions

Star Pool
Star Pool THP05 Installation and user manual

Bosch
Bosch 200 R Installation

Carrier
Carrier 50JZ024 Installation, Start-Up and Service Instructions

Friedrich
Friedrich VERT-I-PAK VHA09K25RTQ Service manual

Daikin
Daikin FVY71LAVE Service manual

Daikin
Daikin EKHH2E200AAV3 Installation and user manual