Elkron DS80HA12-002A User manual

ITALIANO
TELECAMERA IP TEL600EXT
TEL600EXT è compatibile con le Micro SD fino a 32GB di memoria (la Micro SD non è inclusa nella telecamera).
NOTA BENE: Prevedere max 4 telecamere per impianto.
LED Comportamento Condizione
VERDE
Acceso La telecamera è alimentata
Spento La telecamera non è alimentata
ROSSO
Acceso La telecamera è in modalità Privacy
3 lampeggi veloci Telecamera associata al router tramite WiFi
2 lampeggi veloci Ingresso/Uscita dalla modalità Privacy
Lampeggio continuo La telecamera non è connessa al server EGON
GIALLO
Acceso Connessa a Internet (via cavo o wireless)
Spento Disconnessa da Internet
Lampeggio veloce per 5 minuti La telecamera è in apprendimento
Lampeggio continuo La telecamera è in visualizzazione o registrazione
GUIDA RAPIDA
DS80HA12-002A
Vista frontale
Vista posteriore
1) Led VERDE
2) Led ROSSO
3) Led GIALLO
4) Lente
5) Sensore di luminosità
6) Microfono
7) Porta USB (Type A)
8) Slot per Micro SD
9) Porta Ethernet
10) Tasto Apprendimento / Privacy
11) Jack per alimentazione

ALIMENTAZIONE E CONNESSIONE AL ROUTER
TEL600EXT è alimentata da un adattatore 12Vcc – 1A, fornito a corredo. Prima di procedere al suo apprendimento nel sistema,
bisogna connetterla allo stesso router a cui è collegata l’unità centrale.
Sono disponibili due modalità alternative di connessione della telecamera al router:
1) CONNESSIONE FILARE:
Collegare il cavo Ethernet, presente nella confezione, tra la telecamera e il proprio router. Alimentare la telecamera. Alla fine della
fase di inizializzazione (circa 1 minuto) attendere che il led giallo della telecamera diventi acceso fisso, che segnala la connessione
internet avvenuta.
La telecamera ha l’impostazione di rete in DHCP.
2) CONNESSIONE WIRELESS:
Collegare in un primo tempo il cavo Ethernet tra la telecamera e il router; utilizzare il software Finder per entrare nella
programmazione locale della telecamera (per scaricare e lanciare il software Finder, collegarsi al sito internet www.elkron.it).
Selezionare l’indirizzo IP della telecamera e premere il tasto “Open Web Page”
Al primo accesso inserire quanto specificato sotto e premere “Accedi”:
NOME UTENTE: admin
PASSWORD: cX+HsA*7F1
Verrà visualizzata la pagina di cambio password. Inserire una nuova password e ripetere l’inserimento (la modifica del nome
utente è facoltativa).
Fare clic su OK per confermare. Verrà visualizzata la pagina di benvenuto. Effettuare nuovamente l’accesso con il nuovo nome
utente e password per poter proseguire.

Accedere quindi al menu “Configurazione di rete”, selezionare quella Wireless e procedere con la funzione “Scan WiFi” per
identificare ed associare la Telecamera al router desiderato.
APPRENDIMENTO SULLA CENTRALE
1) Abilitare la modalità di apprendimento sull’unità centrale (per i dettagli, fare riferimento al manuale completo di
installazione della stessa);
2) Tenere premuto il tasto Apprendimento per circa 10 secondi, fino a quando il led GIALLO inizierà a lampeggiare
velocemente. Per completare la procedura di apprendimento fare riferimento al manuale completo dell’unità centrale.
Per uscire dallo stato di apprendimento prima del time out di 5 minuti, mantenere premuto il tasto Apprendi- mento per
6 secondi, il led GIALLO smetterà di lampeggiare velocemente
NOTA
Per la programmazione dei parametri della telecamera tramite la sua interfaccia di programmazione, fare riferimento al manuale
completo di installazione della telecamera disponibile sul sito Elkron. Il software Finder, necessario per identificare e localizzare
la telecamera nella rete locale (LAN), deve essere scaricato dal sito www.elkron.it nell’area riservata dedicata al Download dei
Software per PC.
MODALITÀ PRIVACY
La modalità Privacy permette di abilitare o disabilitare la ripresa delle immagini della telecamera.
Ingresso/Uscita dalla modalità Privacy: mantenere premuto il tasto Privacy per 2 secondi fino a quando il led rosso lampeggerà
due volte.
PROCEDURA DI RIPRISTINO LOCALE DELLA TELECAMERA
Eseguire questa procedura per riavviare la telecamera e cancellare le programmazioni effettuate e gli eventi registrati, riportando
le impostazioni ai valori di fabbrica (compresa la password):
Per ripristinare la telecamera alle impostazioni originali di fabbrica:
Step 1. Disconnettere l’alimentazione scollegando l’alimentatore.
Step 2. Tenere premuto il pulsante apprendimento e collegare l’alimentatore.
Step 3. Continuare a tenere premuto il pulsante per almeno 30 secondi.
Step 4. Quando tutti e 3 i LED lampeggiano 3 volte contemporaneamente, seguiti dallo spegnimento di tutti i LED, rilasciare
il pulsante.
Step 5. La telecamera IP è stata ripristinata, attendere il riavvio.
ATTENZIONE!
Dopo aver effettuato il reset di fabbrica, la telecamera dovrà essere riappresa e riconnessa alla rete.
INSTALLAZIONE
Per la sua installazione prevedere un ambiente esterno con protezione dagli agenti atmosferici diretti. Gli accessori per il
montaggio a corredo della telecamera sono i seguenti:
BASE 2 RACCORDI DRITTI RACCORDO A “L” TESTA
Dopo aver scelto la superficie di installazione della telecamera, usare la base per segnare i fori di fissaggio da praticare sul muro.
Vedere nella pagina successiva come assemblare gli accessori.
Per collegare la telecamera alla testa ed effettuarne la regolazione, seguire la descrizione sottostante:
Il tappo (3) contiene lo snodo per regolare e fissare l’orientamento della telecamera. Per rendere mobile lo snodo al fine di trovare
l’orientamento voluto, girare la manopola di fissaggio (4) senza svitarla del tutto e successivamente tirare leggermente indietro,
rispetto allo snodo, il blocco di fissaggio (5), sbloccando così lo snodo.
N.B. il blocco di fissaggio si muove solo di qualche millimetro.
A questo punto, muovere lo snodo nella posizione voluta e fissarlo spingendo avanti il blocco di fissaggio, in modo che quest’ultimo
fermi lo snodo e sia allineato al tappo. Serrare la manopola per bloccare il tutto.
Fori di fissaggio
Tappo (3)
Blocco di fissaggio
dello snodo (5)
Vite di montaggio (1)
Ghiera di bloccaggio (2)
Manopola di fissaggio dello
snodo (4)
Vite inferiore (6)
1 X
1 X

DICHIARAZIONE DI CONFORMITÀ UE SEMPLIFICATA
Il fabbricante, URMET S.p.A., dichiara che il tipo di apparecchiatura radio: TELECAMERA IP TEL600EXT è conforme alla direttiva
2014/53/UE. Il testo completo della dichiarazione di conformità UE è disponibile al seguente indirizzo Internet: www.elkron.com.
CLICCARE SUL SEGUENTE LINK DEL SITO ELKRON PER ACCEDERE ALLA SCHEDA TECNICA DEL PRODOTTO E SCARICARE IL MANUALE
COMPLETO:
DIRETTIVA 2012/19/UE DEL PARLAMENTO EUROPEO E DEL CONSIGLIO del 4 luglio 2012 sui rifiuti di apparecchiature
elettriche ed elettroniche (RAEE). Il simbolo del cassonetto barrato riportato sull’apparecchiatura o sulla sua
confezione indica che il prodotto alla fine della propria vita utile deve essere raccolto separatamente dagli altri rifiuti.
L’utente dovrà, pertanto, conferire l’apparecchiatura giunta a fine vita agli idonei centri comunali di raccolta differenziata
dei rifiuti elettrotecnici ed elettronici. In alternativa alla gestione autonoma è possibile consegnare l’apparecchiatura che
si desidera smaltire al rivenditore, al momento dell’acquisto di una nuova apparecchiatura di tipo equivalente. Presso i
rivenditori di prodotti elettronici con superficie di vendita di almeno 400 m2 è inoltre possibile consegnare gratuitamente, senza
obbligo di acquisto, i prodotti elettronici da smaltire con dimensione massima inferiore a 25 cm. L’adeguata raccolta differenziata
per l’avvio successivo dell’apparecchiatura dismessa al riciclaggio, al trattamento e allo smaltimento ambientalmente compatibile
contribuisce ad evitare possibili effetti negativi sull’ambiente e sulla salute e favorisce il reimpiego e/o riciclo dei materiali di cui è
composta l’apparecchiatura.
ELKRON
Tel. +39 011.3986711 - Fax +39 011.3986703
www.elkron.com – mail to: info@elkron.it
ELKRON è un marchio commerciale di URMET S.p.A.
Via Bologna, 188/C - 10154 Torino (TO) – Italy
www.urmet.com
MADE IN TAIWAN
INSTALLAZIONE A MURO INSTALLAZIONE A SOFFITTO
1 2 1 2
3
3

FRANÇAIS
CAMÉRA IP TEL600EXT
TEL600EXT est compatible avec les cartes Micro SD jusqu'à 32GB de mémoire (la carte Micro SD n'est pas incluse dans la
caméra).
N.B. : Prévoir jusqu'à 4 caméras par installation.
LED Action Condition
VERTE
Allumée La caméra est alimentée
Éteinte La caméra n'est pas alimentée
ROUGE
Allumée La caméra est configurée en mode de
Confidentialité
3 clignotements rapides Caméra associée au routeur via WiFi
2 clignotements rapides Entrée/sortie du mode Confidentialité
Clignotement continu La caméra n'est pas connectée au serveur EGON
JAUNE
Allumée Connectée à Internet (par câble ou sans fil)
Éteinte Déconnectée d'Internet
Clignotement rapide pendant 5 minutes La caméra est en cours d'apprentissage
Clignotement continu La caméra est en cours de visualisation ou
d'enregistrement
GUIDE RAPIDE
DS80HA12-002A
Vue avant Vue arrière
1) LED VERTE
2) LED ROUGE
3) LED JAUNE
4) Lentille
5) Capteur de luminosité
6) Microphone
7) Port USB (Type A)
8) Emplacement pour microphone SD
9) Port Ethernet
10) Touche Apprentissage/Confidentialité
11) Jack d'alimentation

ALIMENTATION ET CONNEXION AU ROUTEUR
TEL600EXT est alimentée par un adaptateur 12Vcc - 1A, fourni avec le produit. Avant de procéder à son apprentissage au sein
du système, il est nécessaire de la brancher sur le même routeur auquel l'unité centrale est connectée :
Il existe deux modes alternatifs de connexion de la caméra au routeur :
1) CONNEXION FILAIRE :
Raccorder le câble Ethernet (livré de série) entre la caméra et son routeur. Alimenter la caméra. Au terme de la phase
d'initialisation (env. 1 minute), attendre que la LED jaune de la caméra s'allume de manière fixe, laquelle signale que la connexion
Internet a bien été établie.
La configuration réseau de la caméra est réglée sur DHCP.
2) CONNEXION SANS FIL :
Dans un premier temps, raccorder le câble Ethernet entre la caméra et le routeur ; utiliser le logiciel Finder pour accéder à la
programmation locale de la caméra (pour télécharger et lancer le logiciel Finder, connectez-vous au site www.elkron.it).
Sélectionner l'adresse IP de la caméra et appuyer sur la touche « Open Web Page » (Ouvrir page Web).
Lors du premier accès, saisir les identifiants ci-dessous et appuyer sur « Connexion »:
NOM UTILISATEUR : admin
MOT DE PASSE : cX+HsA*7F1
La page de modification du mot de passe s'affichera. Saisir un nouveau mot de passe et répéter la saisie (la modification du nom
utilisateur est facultative).Cliquer sur OK pour valider. La page d'accueil s'affichera. Répéter la procédure d'accès avec le nouveau
nom utilisateur/mot de passe pour poursuivre.

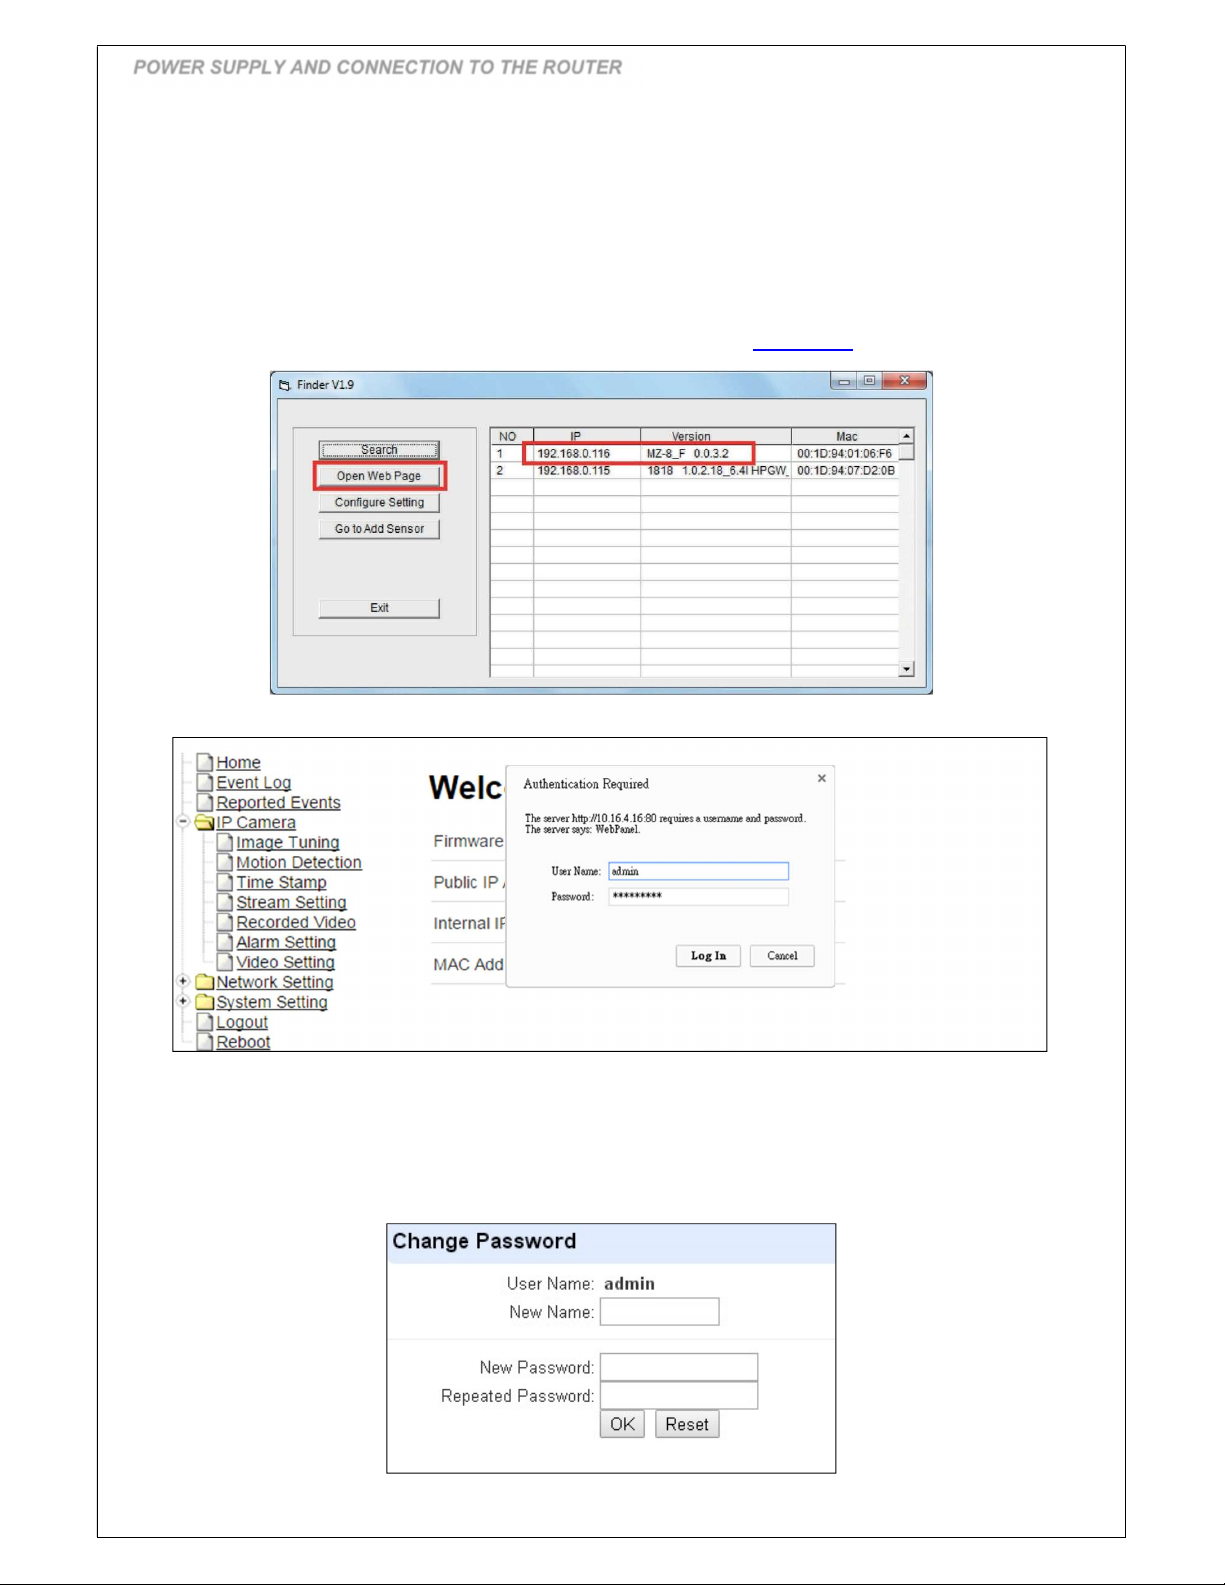
Accéder ensuite au menu « Paramétrage Réseau », sélectionner « Sans fil » et lancer la fonction « Scan WiFi AP…» pour
identifier et apparier la caméra au routeur désiré.
APPRENTISSAGE SUR LA CENTRALE
1) Habiliter le mode d'apprentissage sur l'unité centrale (pour les détails, se reporter au manuel d'installation complet de
celle-ci) ;
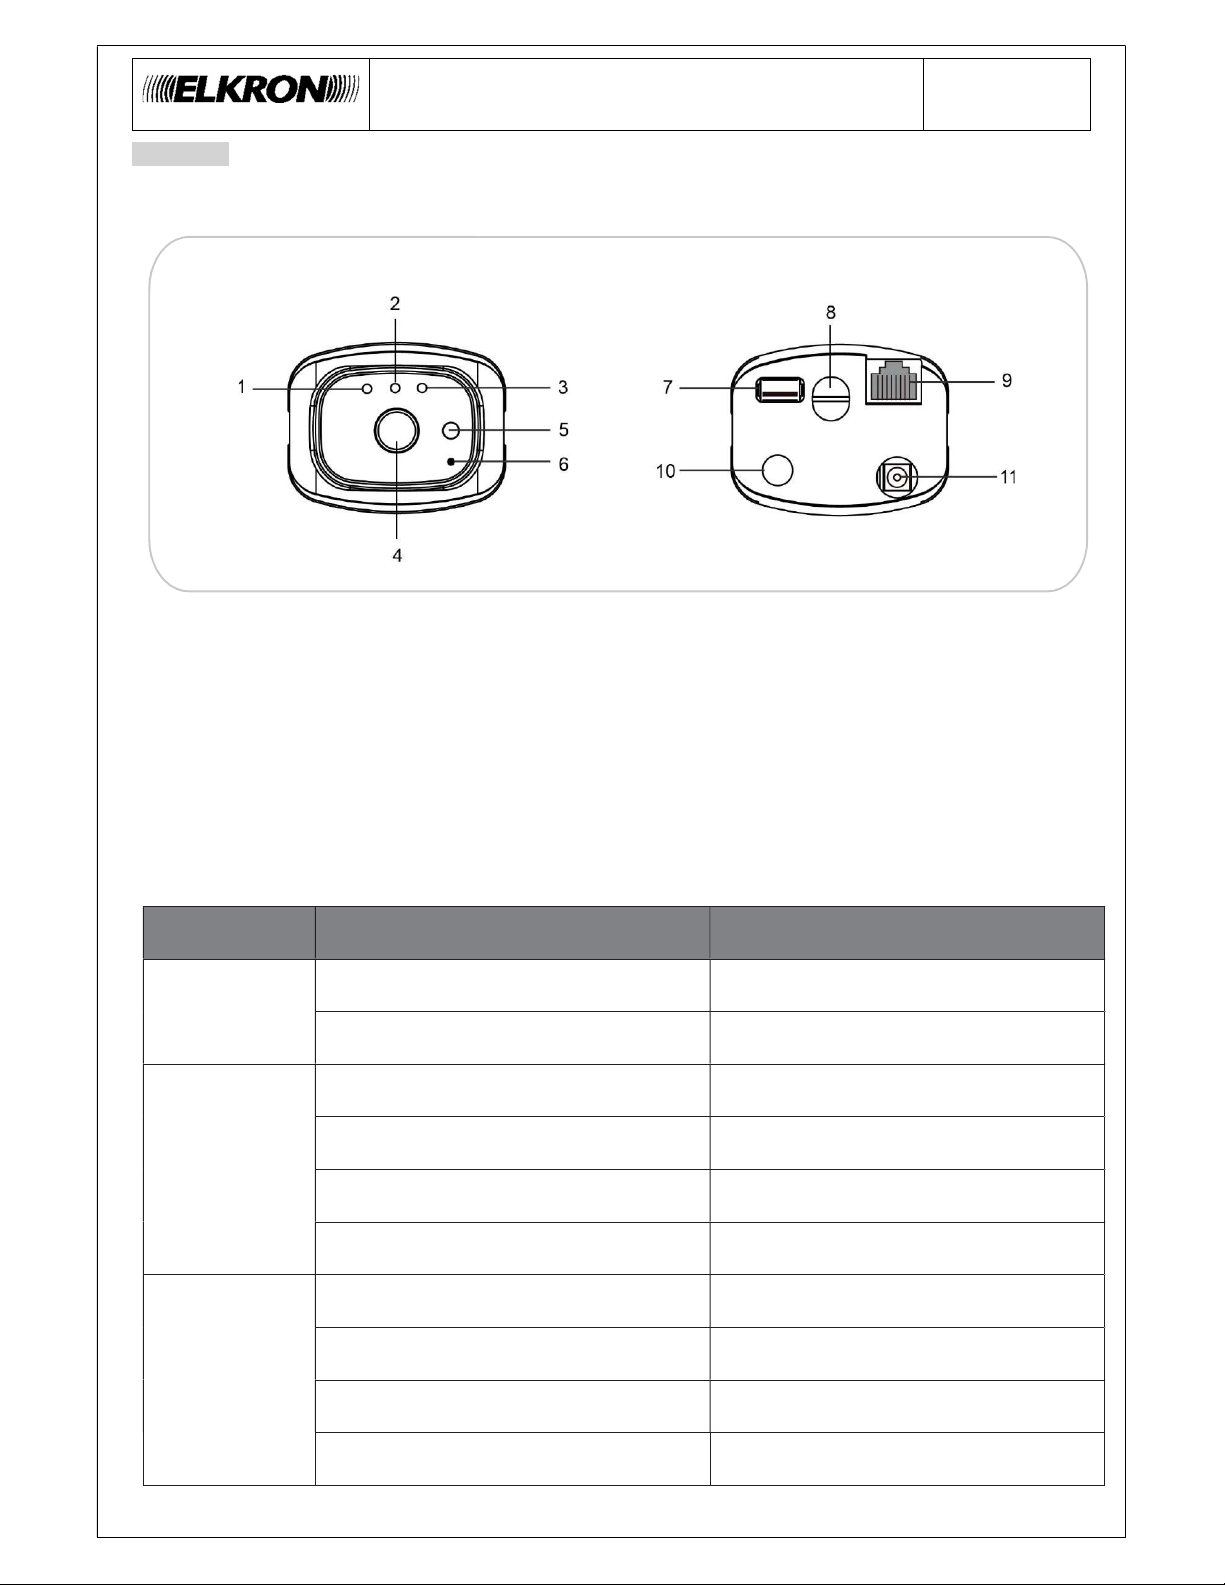
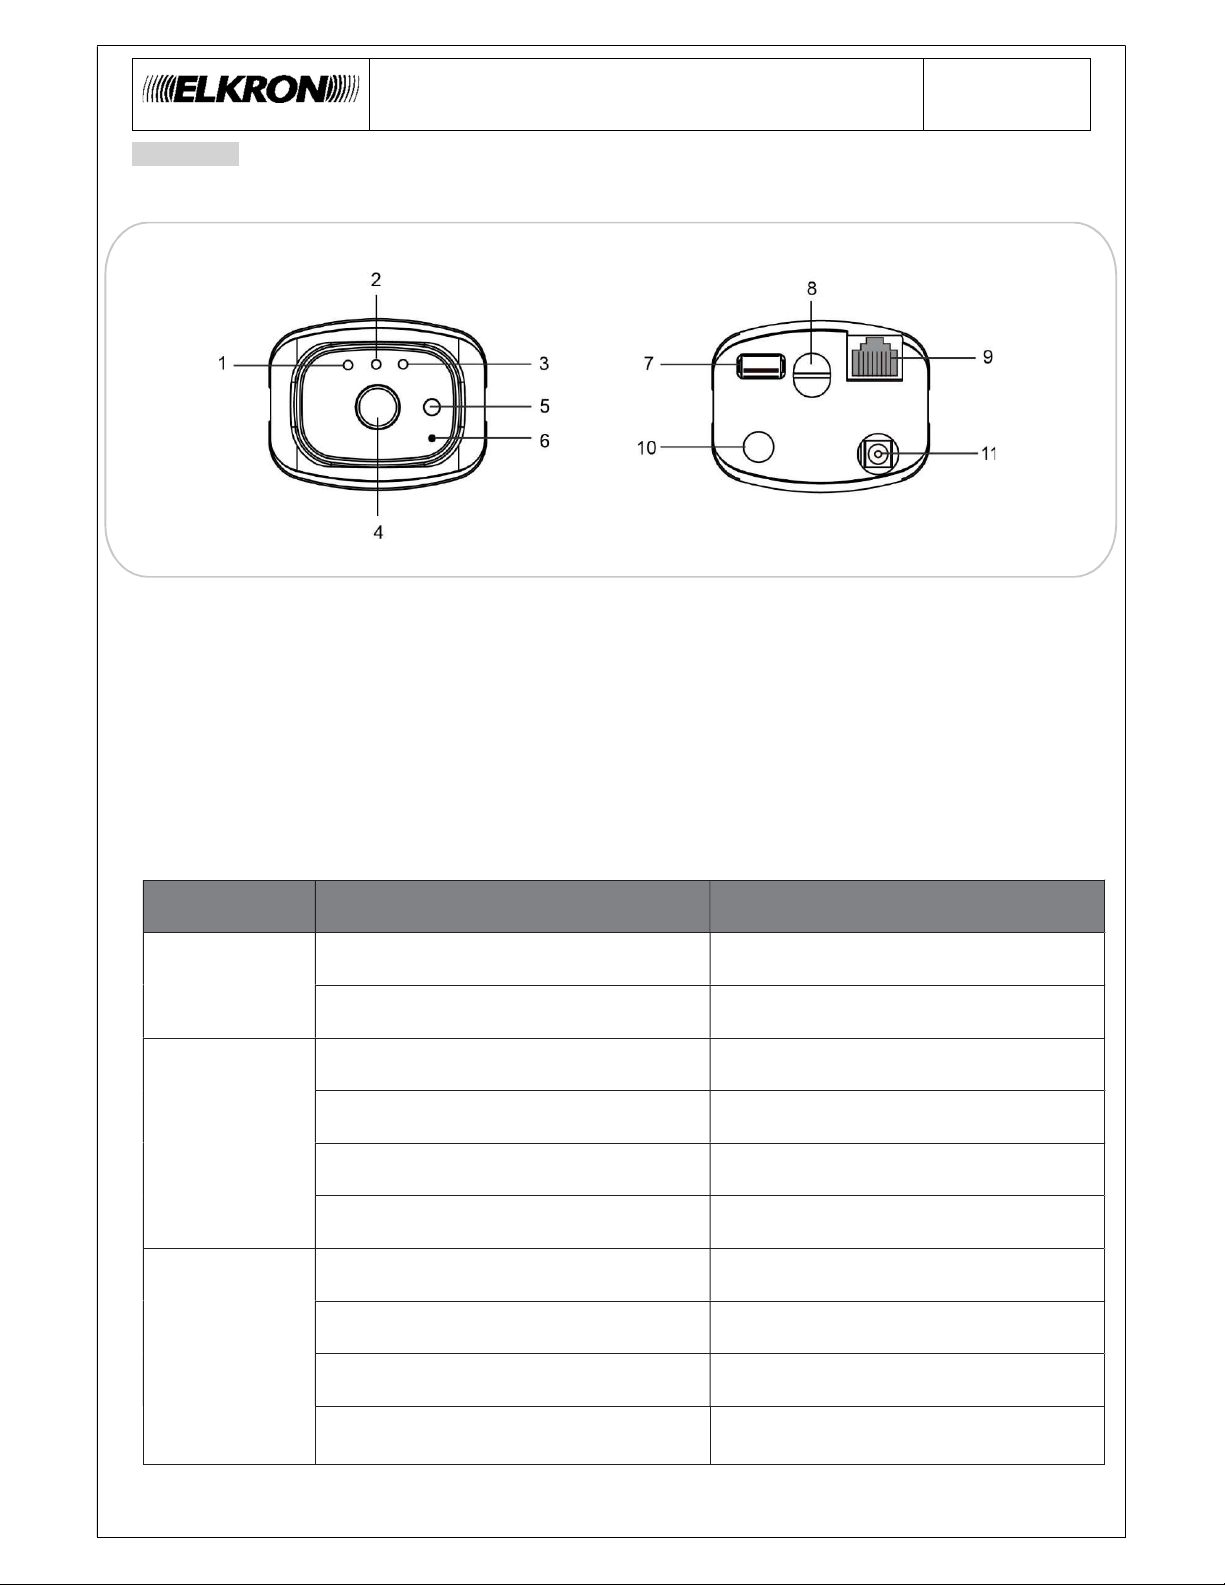
2) Maintenir la touche « Apprentissage » enfoncée pendant environ 10 secondes, jusqu'à ce que la LED JAUNE commence
à clignoter rapidement. Pour compléter la procédure d'apprentissage, se reporter au manuel complet de l'unité centrale.
Pour quitter l'état d'apprentissage avant le délai de 5 minutes, maintenir la touche « Apprentissage » enfoncée pendant
6 secondes. La LED JAUNE cessera de clignoter rapidement
REMARQUE :
Pour la programmation des paramètres de la caméra par son interface de programmation, se reporter au notice d'installation de
la caméra disponible sur le site web d'Elkron. Le logiciel Finder, nécessaire pour identifier et localiser la caméra dans le réseau
local (LAN), doit être téléchargé sur le site www.elkron.it, dans l'espace réservée au téléchargement des logiciels pour PC.
MODE CONFIDENTIALITÉ
Le mode Confidentialité permet d'activer ou de désactiver le filmage des images par la caméra.
Entrée/Sortie du mode Confidentialité : maintenir la touche Confidentialité enfoncée pendant 2 secondes, jusqu'à ce que la
LED rouge clignote deux fois.
PROCÉDURE DE RÉTABLISSEMENT LOCAL DE LA CAMÉRA
Exécuter cette caméra pour redémarrer la caméra et effacer les programmations effectuées et les événements enregistrés, en
rétablissant les paramètres d'usine (y compris le mot de passe) :
Pour rétablir les paramètres d'usine de la caméra, procéder comme suit :
• Étape 1 Débrancher l'alimentation, en déconnectant son boîtier.
• Étape 2 Maintenir la touche Apprentissage enfoncée et brancher l'alimentation.
• Étape 3 Continuer d'enfoncer la touche pendant au moins 30 secondes.
• Étape 4 Dès que les trois LED clignotent simultanément à trois reprises avant de s'éteindre, relâcher la touche.
• Étape 5 La caméra IP a été rétablie ; attendre sont redémarrage.
ATTENTION !
Après avoir rétabli les paramètres d'usine, la caméra devra être apprise une nouvelle fois et reconnectée au réseau.
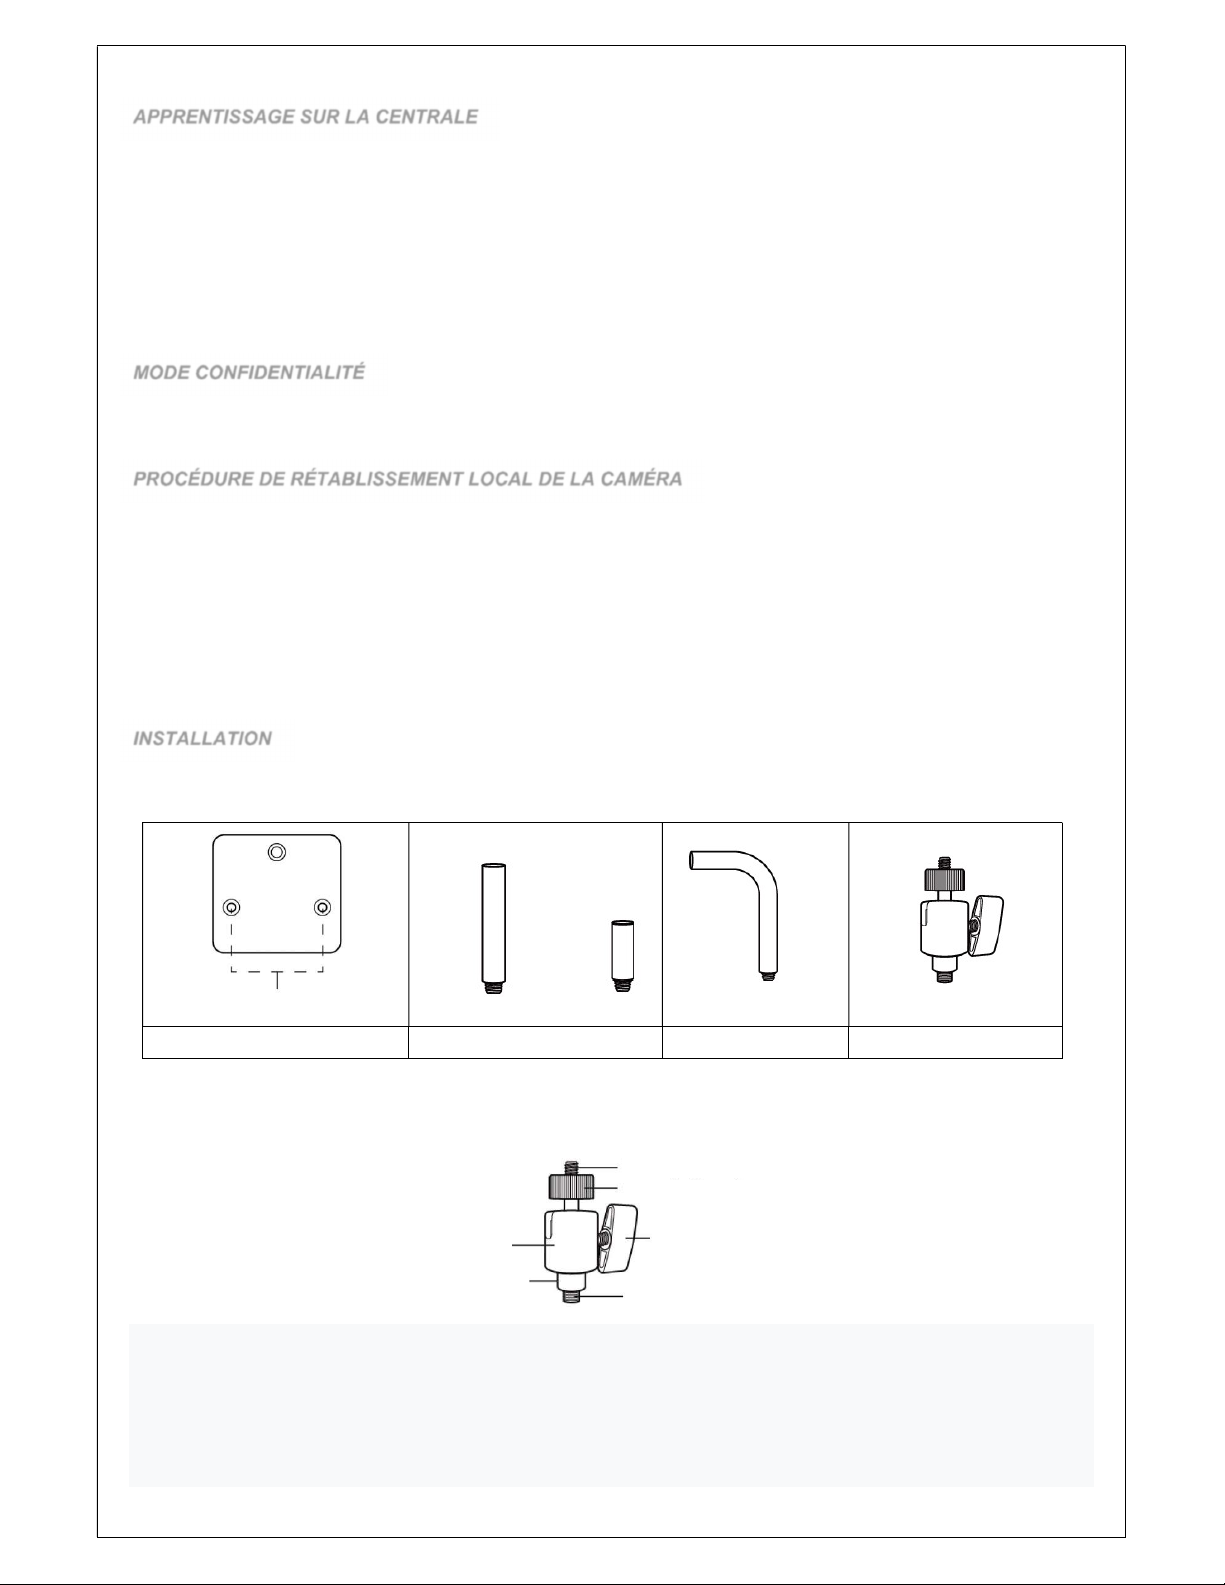
INSTALLATION
Pour son installation, prévoir un environnement extérieur avec une protection contre les agents atmosphériques directs. Les
accessoires de montage fournis avec la caméra sont les suivants:
BASE 2 RACCORDS DROITS RACCORD EN « L » TÊTE
Après avoir choisi la surface d'installation de la caméra, utiliser la base pour marquer les orifices de fixation à percer sur le mur.
Voir à la page suivante comment assembler les accessoires.
Pour connecter la caméra à la tête et l'ajuster, suivez la description ci-dessous:
Le bouchon (3) contient le joint permettant de régler et de fixer l'orientation de la caméra. Pour rendre le joint mobile afin de
trouver l'orientation souhaitée, tournez le bouton de fixation (4) sans le dévisser complètement, puis tirez légèrement le bloc de
fixation (5) vers l'arrière par rapport au joint, débloquant ainsi le joint.
N.B. le bloc de fixation ne bouge que de quelques millimètres.
A ce stade, déplacez le joint dans la position souhaitée et fixez-le en poussant le bloc de fixation vers l'avant, de sorte que ce
dernier arrête le joint et soit aligné avec le bouchon. Serrez le bouton pour tout verrouiller.
Bloc de fixation du joint (5)
Vis de montage (1).
Bague de réglage (2)
Bouton de fixation de joint (4)
Vis inférieure (6)
1 X
1 X
Trous de fixation
Bouchon (3)

DÉCLARATION DE CONFORMITÉ UE SIMPLIFIÉE
Le fabricant, URMET S.p.A., déclare que le type d'équipement radio : CAMÉRA IP TEL600EXT est conforme à la Directive
2014/53/UE. Le texte complet de la déclaration de conformité UE est disponible à l'adresse Internet suivante : www.elkron.com.
CLIQUER SUR LE LIEN DU SITE WEB ELKRON SUIVANT POUR ACCÉDER À LA FICHE TECHNIQUE DU PRODUIT ET POUR TÉLÉCHARGER LE
MANUEL COMPLET :
LES BONS GESTES DE MISE AU REBUT DE CE PRODUIT (Déchets d’équipements électriques et électroniques)
Ce symbole apposé sur le produit, ses accessoires ou sa documentation indique que ni le produit, ni ses accessoires
électroniques usagés (chargeur, casque audio, câble USB, etc.), ne peuvent être jetés avec les autres déchets
ménagers.
La mise au rebut incontrôlée des déchets présentant des risques environnementaux et de santé publique, veuillez séparer vos
produits et accessoires usagés des autres déchets. Vous favoriserez ainsi le recyclage de la matière qui les compose dans le
cadre d’un développement durable.
ELKRON
Tel. +39 011.3986711 - Fax +39 011.3986703
www.elkron.com – mail to: info@elkron.it
ELKRON est une marque commerciale de URMET S.p.A.
Via Bologna 188/C – 10154 Turin (TO) Italie
www.urmet.com
INSTALLATION MURALE INSTALLATION AU PLAFOND
1 2
3
1 2
3
MA
DE IN TAIWAN

ENGLISH
TEL600EXT IP CAMERA
TEL600EXT is compatible with Micro SD with up to 32GB of memory (the Micro SD is not included in the camera).
IMPORTANT NOTE: Up to 4 cameras may be installed in each system.
LED Behaviour Condition
GREEN
On The camera is powered.
Off The camera is not powered
RED
On The camera is set to Privacy mode
3 fast blinks Camera associated with the router via WiFi
2 fast blinks Privacy Mode on/off
Continuous blinking The camera is not connected to the EGON server
YELLOW
On Connected to the Internet (wired or wireless)
Off Disconnected from the Internet
Fast blinking for 5 minutes The camera is in learning mode.
Continuous blinking The camera is in viewing or recording
QUICK GUIDE
DS80HA12-002A
Frontal view
Rear view
1) GREEN led
2) RED led
3) YELLOW led
4) Lens
5) Brightness sensor
6) Microphone
7) USB port (Type A)
8) Micro SD slot
9) Ethernet port
10) Learning / Privacy button
11) Power jack

POWER SUPPLY AND CONNECTION TO THE ROUTER
TEL600EXT is powered by a 12Vdc - 1A adapter, supplied as standard. Before running the learn procedure in the system, connect
it to the same router that the control unit is connected to:
The camera can be connected to the router in two alternative ways:
1) WIRED CONNECTION:
Connect the Ethernet cable, included in the package, between the camera and your router. Power up the camera. At the end of
the initialisation phase (about 1 minute), wait for the yellow LED on the camera to turn on fixed. This indicates that the internet
connection has been established.
The camera has the network setting in DHCP.
2) WIRELESS CONNECTIONS:
First connect the Ethernet cable between the camera and the router. Use the Finder software to enter the local camera
programming (to download and launch the Finder software, connect to the website www.elkron.it).
Select the IP address of the camera and press the "Open Web Page" button.
When you log in for the first time, enter the following and press "Login":
USER NAME: admin
PASSWORD: cX+HsA*7F1
The password change page will be displayed. Enter a new password and repeat the entry (changing the user name is optional).

Click on OK to confirm. The welcome page will be displayed. Log in again with your new username and password to continue.
Then access the "Network Setting" menu, select the Wireless and proceed with the "Scan WiFi" function to identify the Camera
and pair it with the desired router.
LEARNING PROCEDURE ON THE CONTROL UNITS
1) Enable learning mode on the control unit (see the complete installation manual of the control unit for details).
2) Press and hold the Learn button for about 10 seconds until the YELLOW LED starts blinking rapidly. Refer to the
complete manual of the control unit to complete the learning process. To exit learning state before the 5-minute timeout,
hold the Learn button pressed for 6 seconds. The YELLOW LED will stop blinking rapidly.
NOTE
For programming the camera parameters using its programming interface, refer to the complete camera installation manual
available on the Elkron website. The Finder software needed to identify and locate the camera in the local area network (LAN)
must be downloaded from www.elkron.it in the reserved area dedicated to PC Software Downloads.
PRIVACY MODE
Privacy mode can be used to enable or disable the camera images.
Privacy mode on/off: Hold the Privacy button pressed for 2 seconds until the red LED blinks twice.
LOCAL CAMERA RESTORE PROCEDURE
Run this procedure to reboot the camera and delete the recorded programs and events, returning the settings to the default
settings (including the password):
To restore the camera to its default settings:
Step 1. Disconnect the power by disconnecting the power supply unit.
Step 2. Hold the learn button pressed and connect the power supply unit.
Step 3. Hold the button pressed for at least 30 seconds.
Step 4. Release the button when all 3 LEDs blink 3 times simultaneously and then all switch off.
Step 5. The IP camera has been restored. Wait for it to reboot.
IMPORTANT
After restoring default settings, the camera must be learnt again and reconnected to the network.
INSTALLATION
For its installation, provide an external environment with protection from direct atmospheric agents. The mounting accessories
supplied with the camera are as follows:
BASE 2 STRAIGHT FITTINGS “L”-FITTING HEAD
After choosing the camera installation surface, use the base to mark the fixing holes to be drilled in the wall. See on the next page
how to assemble the accessories.
To connect the camera to the head and adjust it, follow the description below:
The cap (3) contains the joint for adjusting and fixing the orientation of the camera. To make the joint movable in order to find the
desired orientation, turn the joint fixing knob (4) without unscrewing it completely and then pull the fixing block (5) slightly
backwards with respect to the joint, thus unlocking the joint.
N.B. the fixing block only moves a few millimeters.
At this point, move the joint to the desired position and fix it by pushing the fastening block forward, so that the latter stops the
joint and is aligned with the cap. Tighten the knob to lock everything.
Cap (3)
Joint fixing
block (5)
Installation screws (1)
Lock ring (2)
Joint fixing knob (4)
Lower screw (6)
1 X
1 X
Fastening holes

SIMPLIFIED EU DECLARATION OF CONFORMITY
The manufacturer, URMET S.p.A., hereby declares that the wireless device: TEL600EXT IP CAMERA complies with Directive
2014/53/EU. The complete EU Declaration of Conformity can be downloaded from the following Internet address:
www.elkron.com.
CLICK ON THE FOLLOWING LINK ON THE ELKRON WEBSITE TO ACCESS THE PRODUCT DATA SHEET AND DOWNLOAD THE COMPLETE
MANUAL:
Directive 2012/19/EC OF THE EUROPEAN PARLIAMENT AND OF THE COUNCIL of 4 July 2012 on waste electrical and
electronic equipment (WEEE). The crossed-out wheelie bin symbol on the equipment or its packaging indicates that
the product at the end of its useful life must be collected separately from other waste. Therefore, any products that have
reached the end of their useful life must be given to waste disposal centres specialising in separate collection of waste
electrical and electronic equipment. As an alternative to autonomous disposal, the device you want to dispose of can
be given back to the retailer at the time of purchasing new similar equipment. At electronic product retailers with a sales
area of at least 400 m2, it is possible to return, without any obligation to buy, electronic products to dispose of with dimensions
below 25 cm free of charge. The separate collection for delivery the equipment to recycling, to treatment and environmentally
compatible disposal helps avoid possible negative effects on the environment and health and promotes the reuse and/or recycling
of materials that make up the equipment.
ELKRON
Tel. +39 011.3986711 - Fax +39 011.3986703
www.elkron.com – mail to: info@elkron.it
ELKRON is a trademark of URMET S.p.A.
Via Bologna, 188/C - 10154 Torino (TO) - Italy
www.urmet.com
MADE IN TAIWAN
WALL-MOUNTED INSTALLATION CEILING INSTALLATION
1 2
3
1 2
3
This manual suits for next models
1
Table of contents
Languages:
Other Elkron IP Camera manuals