Elliott Studio Arts 66-100 User manual


2
Elliott Studio Arts Series Sixty-Six
Model 66-100
100 watt / channel Stereo power amplifier
Table of contents:
Introduction…………………………………………………………………………3
Primer on tubes……………………………………………………………………..3
Placement and hookup……………………………………………………….…….4
Initial setup and power-up…………………………………………………….…..4
Maintenance…………………………………………………………………………5
More things to consider……………………………………………………….…...6
Pictorial diagram…………………………………………………………….……..8
Specifications.…………………………………………………………………..…...8
Warranty……………………………………………………………………….…….9
Contact Information & Registration form…………………………………….. 10

3
Welcome to the wonderful world of vacuum tube audio!
Vacuum tube audio components can add a life to music that only the most
expensive solid-state gear can match. The Elliott Studio Arts 66-100 stereo
power amp was designed to give many years of musical satisfaction and add fun
to your listening experience. Although not inexpensive the 66-100 was designed
for the ‘real-world’ music lover and is a high value in performance and no-
nonsense design.
The 66-100 is custom designed and hand-built. It features point-to-point circuitry,
hand matched high-temperature components and wiring, and custom wound
output and power transformers. For longevity there’s an internal cooling fan,
current surge suppression, line and B+ fusing and a filament pre-heat mode. The
casework is heavy gauge steel with internal dampening sheets. The AC input has
RFI filtering and surge limiting. Low overall loop feedback plus local feedback
around the output stage stabilizes the gain and lowers distortion. The output
stage runs in ‘ultralinear’ mode. The power supply is overbuilt and utilizes large
computer-grade filter capacitors and a big choke for an ultra-clean and ‘stiff’
reservoir. A bias meter and switch is built-in for convenience; you provide the
screwdriver.
Please be aware that this is a tube amp, it gets hot and has high voltage
potentials inside that can be hazardous to your health. Please refer all service to
a qualified technician; we will gladly supply full schematic documentation and
replacement parts upon request.
You are qualified to replace the tubes and fuses and set the bias. Please
carefully follow the procedures outlined below so you don’t waste an expensive
set of output tubes.
Now a little primer on tube amps….
Tube amps typically sound louder, more dynamic, dimensional and transparent
than a solid-state amp of the same rated output power. Tube amps have higher
levels of distortion and don’t measure as well as solid-state, but they generally
overload more gracefully with lower-order harmonics that can give a warmer,
more forgiving sound. That’s not to say they’re soft! Tubes are lightning fast and
(depending on circuit design) aren’t slew-limited like their solid-state brethren.
You will be pleased with the amount of detail and resolution you will hear from
your recordings through the 66-100. You may find that you can listen longer and
at subjectively louder levels with tubes, as there’s less listener fatigue.
Tube amps have a higher output impedance than solid state amplifiers; though
this amp has excellent low frequency extension and control it doesn’t have the
high damping factor needed to control dual 18” bass bins. That said the 66-100
should drive your ‘real-world’ (4 to 8 ohm) speakers nicely.

4
Placement and hookup of your shiny new amp
Place the amplifier on a level non-resonant surface with plenty of ventilation
above and behind. Tube amps won’t survive in cramped equipment racks or
enclosed spaces; they need to breath. Also, why would you want to hide it away?
You can bask in the warm orange glow of the tube filaments.
The speaker wires hook to the binding posts on the rear panel. The right channel
is on the right side as you’re facing the front, the left on the left side. The positive
goes to the red post and the negative to the black. The binding posts will accept
most terminated speaker cable, banana plugs or bare wire. Tighten snugly but
not too tight –a ½” nut driver is nice here.
The input cables go to the RCA input jacks directly above the speaker binding
posts.
The power cable is a shielded IEC type. Make sure the power switch is in the ‘off’
position. Plug into the IEC socket on the back panel of the amplifier.
Setup and initial power-up of your amplifier
Once you have your new amp installed it’s time to plug in the tubes, set initial
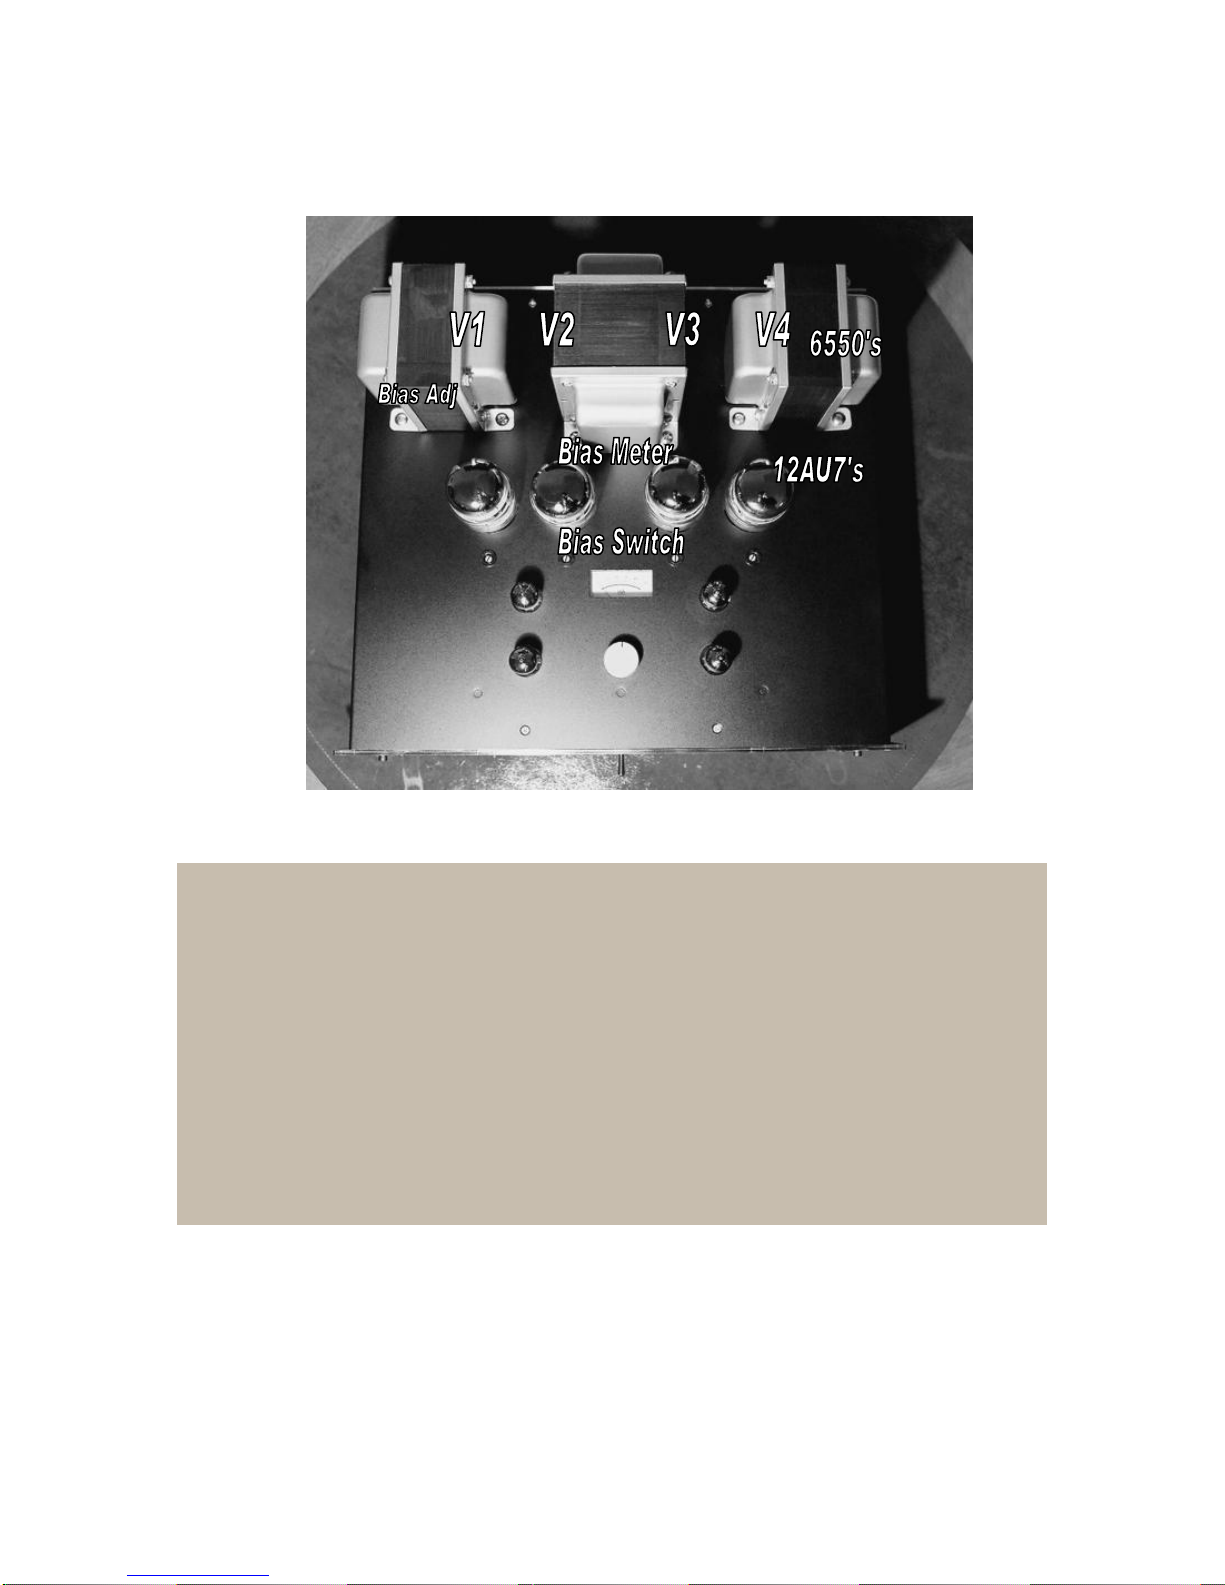
bias* and fire it up! I’ll take you through it step by step: (refer to figure 1 on pg. 8
for tube locations and switch positions)
1) With power off - Install the 4- 6550 output tubes in their respective
sockets. These are the big tubes and go into the big sockets in front of
the output transformers. The tubes delivered are matched sets so don’t
worry where they go. Note that the bases are ‘keyed’ and only go in one
way.
2) Install the 4- 12au7a’s in their respective sockets. These are the small 9-
pin tubes and go in the 4 sockets at the front of the amplifier.
3) Set all 4 bias controls to fully counter clockwise. These are located
directly in front of each output tube. You’ll need a small standard
screwdriver for this adjustment.
4) Place the amp in ‘Standby’ by switching the power switch ‘ON’. This
powers up the filament and bias supplies to pre-heat the tubes. The amp
should automatically power up after approximately one minute. Your
room lights may dim briefly, this is normal. In low light conditions you will
see a blue fog glowing inside the output tubes. This is also normal, and
pretty too!
5) Locate the bias switch, directly in front of the meter in the middle of the
top panel of the amp. The center position is ‘off’ and the pointer should
be at 12:00. Switch two positions to the left, the pointer points to the left
most output tube, V1. Set the bias for V1 to 40 ma. by turning it’s bias

5
control clockwise. Switch to the next position clockwise, this is for V2.
Again, the pointer on the switch points to the tube you’re adjusting. Set to
40 ma. Set each output tube in this manner. Go back and re-set each
tube again because each adjustment slightly affects the others.
6) Play some music at moderate volume. Go back and check the bias
setting of each tube after about 10 minutes with the music stopped.
7) Re-check the bias setting occasionally during the first several hours of
operation as the tubes and circuitry ‘break-in’, and on a monthly basis
thereafter. If the output tubes plates (gray metal structure inside the tube)
ever begin to glow orange or red, turn off immediately! This is an over-
bias condition and may damage the tubes. Should this happen, go back
to step 3 and start over. The power supply fuse should blow before any
damage to the amp occurs. If you get no meter deflection the fuse may
be blown. Check and replace fuse(s) with specified types.
8) Enjoy the music!
*Bias level is the point at which the tube operates in a non-signal condition. Input
and driver tubes are biased in ‘class A’ which is in the middle of it’s operating
range, output tubes are biased ‘class AB’ which puts them near the bottom of
their operating range. One output tube takes the positive half of the signal and
the other takes the negative half. For more information on amplifier theory please
refer to one of the many books published on the subject.
Maintenance of your amplifier
Tube amplifiers require periodic maintenance to ensure optimum performance.
Bias –As described above, occasionally check and correct bias levels. The amp
is designed so that when you can no longer increase bias to maintain 40ma. per
tube it’s time to replace the set.
Cleaning –Keep the tubes clean and free of dust and oily deposits. Clean with a
soft towel and rubbing alcohol if necessary. Be careful not to spill the alcohol on
the painted surface of the casework! The casework can be cleaned with a mild
detergent and soft towel. In both instances, apply the liquid to the towel, not
directly to the amplifier! Always clean when the amp is off and has cooled down.
Fan –Periodically clean the fan filter. Remove the finger guard by gently pulling it
out of the rubber sockets that secure it. Dust off the filter by briskly whisking with
a paintbrush. Replace the filter in the finger guard and gently push back into the
rubber sockets.
Heat –Your amplifier will run hot, that’s the nature of tube amps. The harder you
run it the hotter it will get. Keep it well ventilated and away from other heat

6
sources. You can leave the filter out of the fan for slightly better airflow and
cooling at the expense of a little more dust accumulation and fan noise
Now some more things to consider as you’re enjoying the
music:
Feel free to try different brands of tubes, they all have a different sound and you
may like some better than others. The amp will take 6550’s, KT-88’s and KT-
90’s. The KT-88’s are more expensive and some think more refined then the
6550’s. The KT-90’s will provide more power and last longer since they’re
designed to dissipate more power than the KT-88’s or 6550’s. The tubes supplied
are a good starting point, they’re solid performers, but you can get real tweaky
and spend a fortune on high-end tubes if you’re so inclined. Or you may just want
to turn it on and listen, like I do..
Always buy matched pairs and keep them together per channel, or matched
quartets. Order them from a reputable supplier. Some tubes may be matched but
have a lower transconductance than normal and will therefore output less power
for a given bias voltage. That’s the way tubes are!
Go back and check the bias setting occasionally and re-set as necessary. Keep
them all matched; an imbalance will cause current to flow through the output
transformer causing saturation of the core and higher levels of distortion. The
tubes should stay pretty constant but a little drift is normal. With matched sets
they should age at the same rate and track nicely. It is okay to bias the tubes
slightly hotter but never above 50ma.
The input and driver tubes should last a very long time. If you should feel the
need to try different tubes here be careful to order them with matched sections or
have them tested (they’re dual triodes, two tubes in one bottle). Use only 12au7a
types.
Don’t handle the output tubes too much- keep them clean and free from
fingerprints; they’ll stay cooler and last longer. And don’t touch them when the
amp is on unless you like blisters - they get hot. It is good to periodically wiggle
the little input tubes in their sockets (with power off) to remove oxidation from the
pins and sockets.
The rate at which your output tubes wear out depends on how hard you drive
your amplifier. If you typically listen to highly compressed pop music at concert
levels count on replacing the output tubes more often than if you listen to more
dynamic music at moderate to loud levels. If you’re into chamber music played at
background levels they’ll last a long time! Also, if you use highly sensitive
loudspeakers your amp is working much less for the same SPL output.

7
I believe that the quality of speaker, input and power cables affects the sound;
use good quality wire. I also believe there is a law of diminishing returns; one
could easily spend more on a set of interconnects than the cost of the entire
amplifier. Use your own judgment here. It’s subjective and a matter of personal
taste. If you’re into DIY there’s plenty of websites featuring homemade speaker
and interconnect cables you can try. That’s what I’ve done.
You can try different ‘feet’ under the amp; some like the solid cones, some like
the squishy pods. The rubber feet provided will support the weight and isolate the
vibrations adequately. Cones will drain away vibrations into whatever the amp
rests upon, and squishy pods will keep vibrations from getting out but may help
damp them in the process. I haven’t tried them. The power transformer and the
casework are internally damped and the cooling fan is attached with a soft rubber
isolation mount so there shouldn’t be much problem.
The amplifier is an unbalanced design and therefore a little more prone to
induced noise than the professional balanced units. A little hum from your
speakers is normal (you should hear almost no noise with the amp ‘on’ and input
cables unhooked). If you experience hum try dressing the input cables differently.
You will find that as you move them around behind the amp the hum level will go
up and down. It is an induced EMI (electromagnetic) field from the power
transformer that causes the hum. This is usually not a problem; a little
experimentation should reduce or eliminate the hum. If there is a nasty buzz
there may be a ground loop or an open ground between your preamp and the 66-
100. Check your input cables for continuity. The use of a high quality isolation
transformer is recommended to remove ground loops.
Do not float the AC ground on the 66-100 or any other
grounded component in your system in an attempt to isolate
the hum! This is a safety ground and is there to protect you if
there is a fault that could energize the chassis of the
component and cause electrocution.
Never run the amplifier without speakers connected! This
can destroy expensive output tubes and transformers!!
8
Figure 1
Specifications:
*Output Power: 100 watts per channel into 4 ohms Ultralinear; 65 watts per channel (optional)
Triode
*Distortion @ 1 KHz, 100 Watts/ 4 ohms: THD .889%, THD+N .895%
*Frequency Response: 20 hz to 20 Khz +/- 3dB
*Class AB operation, 40ma initial bias (adjustable)
*Input sensitivity: 1.5 v p-p for full output
*Non-inverting
*Output impedance: 2 ohms
*Input impedance: 90K ohms
*Power consumption: 240 watts idle, 340 watts full power 2 channels driven 1Khz into 4 ohms
*Power line input filter -50dB @ 30Mhz
*Over 295 Joules of power supply storage
*Power supply fused on primary and secondary, with current inrush limiters on AC and B+
*60 second B+ delay to extend tube life
*65 lbs shipping weight

9
5 Year Limited Warranty on Parts and Labor
Owner must register product within 30 days of purchase by sending in the
registration form below. You will be contacted if any upgrades or modifications
become available. We will not sell your information.
Elliott Studio Arts will cover under warranty any repair of our products due to
defective parts or workmanship, this includes shipping damage from factory to
customer. If a defect is discovered Elliott Studio Arts will, at its discretion, repair
or replace the product at no charge to you provided it is returned within the
warranty period. The customer must pay shipping fees to Elliott Studio Arts for
warranty service.
Elliott Studio Arts will not cover under warranty any repairs of our products due to
neglect, abuse, accident or misapplication. Elliott Studio Arts reserves the right to
determine what constitutes neglect, abuse, accident or misapplication. This
includes damage caused by improper connection to other equipment and
modifications carried out by any entity other than Elliott Studio Arts. Elliott Studio
Arts is not liable for any damage to associated equipment or property due to
neglect, abuse or accidental damage to Elliott Studio Arts products.
Any applicable implied warranties, including warranty of merchantability, are
limited in duration to a period of the express warranty as provided herein
beginning with the original date of purchase and no warranties, whether express
or implied shall apply to the product thereafter. Under no circumstances shall
Elliott Studio Arts be liable for any loss, direct, indirect, incidental, special, or
consequential damage arising out of or in connection with the use of this product.
Elliott Studio Arts warranty will cover for the first 5 years of ownership the
following:
*All parts replaced under the warranty agreement except tubes and transformers,
*All labor for said repairs,
*Return shipping to registered owner.
All products must be shipped to factory for warranty repairs. Customer must
contact Elliott Studio Arts for Return Authorization Number before shipping
product to factory.
Please save original shipping carton for this purpose.
**Tubes are not covered under this warranty**

10
Contact Information:
Elliott Studio Arts
206-351-7248
Feel free to contact us for questions regarding repairs, service information, set up
instructions or praise..
-Specifications, parts and design subject to change without notice-
………………………………………………………………………
Elliott Studio Arts Product Registration Form
Model #
Serial #
Purchase Date
Dealer / Direct
Name
Address
email
Please fill out and mail to:
Elliott Studio Arts
Product Registration
412 NE 80th St
Seattle, Wa 98115
Table of contents
Other Elliott Studio Arts Amplifier manuals


Popular Amplifier manuals by other brands

S.M.S.L
S.M.S.L AD18 manual

Bosch
Bosch Plena Easy Line PLE-1P120-EU Installation and user instructions

Analog Technologies
Analog Technologies AHVA250V2X10MA quick start guide

Custom Audio Electronics
Custom Audio Electronics Traynor YCV40 owner's manual

Fracarro
Fracarro MAP Series manual

Ocean Matrix
Ocean Matrix OMX-MDA6 instruction manual


