elmeg CS290 User manual

elmeg CS290 / CS290-U / IP-S290
English - Deutsch - Français - Italiano - Español - Svenska
Norsk - ÅëëçíéêÜ - Dansk - Polski - Nederlands - Português
Operating instructions
Bedienungsanleitung
Notice d'utilisation
Istruzioni per l'uso
Instrucciones de servicio
Bruksanvisning
Brukerveiledning
åã÷åéñßäéï ÷ñÞóçò
Betjeningsvejledning
Instrukcji obslugi
Handleiding
Manual de instruções


English . . . . . . . . . . . . . . . . . . . . . . . . . . . . . . . . . . . . . . 1
User interface of the telephone. . . . . . . . . . . . . . . . . . . . . . . . . . . . . . . . . . . . . . . . . . 2
Description and installation . . . . . . . . . . . . . . . . . . . . . . . . . . . . . . . . . . . . . . . . . . . 3
Safety notes. . . . . . . . . . . . . . . . . . . . . . . . . . . . . . . . . . . . . . . . . . . . . . . . . . . . . 3
Telephone installation . . . . . . . . . . . . . . . . . . . . . . . . . . . . . . . . . . . . . . . . . . . . . . 4
Advanced system telephone configuration . . . . . . . . . . . . . . . . . . . . . . . . . . . . . . . . . . 8
Operation . . . . . . . . . . . . . . . . . . . . . . . . . . . . . . . . . . . . . . . . . . . . . . . . . . . . . 12
Declaration of conformity and CE mark . . . . . . . . . . . . . . . . . . . . . . . . . . . . . . . . . . . 19
Deutsch . . . . . . . . . . . . . . . . . . . . . . . . . . . . . . . . . . . . . . 1
Bedienoberfläche des Telefons. . . . . . . . . . . . . . . . . . . . . . . . . . . . . . . . . . . . . . . . . . 2
Beschreibung und Installation . . . . . . . . . . . . . . . . . . . . . . . . . . . . . . . . . . . . . . . . . . 3
Sicherheitshinweise . . . . . . . . . . . . . . . . . . . . . . . . . . . . . . . . . . . . . . . . . . . . . . . . 3
Installation des Telefons . . . . . . . . . . . . . . . . . . . . . . . . . . . . . . . . . . . . . . . . . . . . . 4
Erweiterte Konfigurierung des Systemtelefons . . . . . . . . . . . . . . . . . . . . . . . . . . . . . . . . 8
Bedienung. . . . . . . . . . . . . . . . . . . . . . . . . . . . . . . . . . . . . . . . . . . . . . . . . . . . . 12
Konformitätserklärung und CE-Zeichen . . . . . . . . . . . . . . . . . . . . . . . . . . . . . . . . . . . 19
Français . . . . . . . . . . . . . . . . . . . . . . . . . . . . . . . . . . . . . . 1
Présentation du téléphone . . . . . . . . . . . . . . . . . . . . . . . . . . . . . . . . . . . . . . . . . . . . 2
Description et installation . . . . . . . . . . . . . . . . . . . . . . . . . . . . . . . . . . . . . . . . . . . . 3
Remarques de sécurité . . . . . . . . . . . . . . . . . . . . . . . . . . . . . . . . . . . . . . . . . . . . . . 3
Installation du téléhone. . . . . . . . . . . . . . . . . . . . . . . . . . . . . . . . . . . . . . . . . . . . . . 5
Configuration étendue du téléphone de système . . . . . . . . . . . . . . . . . . . . . . . . . . . . . . . 9
Utilisation. . . . . . . . . . . . . . . . . . . . . . . . . . . . . . . . . . . . . . . . . . . . . . . . . . . . . 13
Déclaration de conformité et marque CE . . . . . . . . . . . . . . . . . . . . . . . . . . . . . . . . . . . 20
Italiano . . . . . . . . . . . . . . . . . . . . . . . . . . . . . . . . . . . . . . 1
Interfaccia utente del telefono . . . . . . . . . . . . . . . . . . . . . . . . . . . . . . . . . . . . . . . . . . 2
Descrizione e installazione . . . . . . . . . . . . . . . . . . . . . . . . . . . . . . . . . . . . . . . . . . . . 3
Informazioni per la sicurezza . . . . . . . . . . . . . . . . . . . . . . . . . . . . . . . . . . . . . . . . . . 3
Installazione del telefono . . . . . . . . . . . . . . . . . . . . . . . . . . . . . . . . . . . . . . . . . . . . . 4
Configurazione estesa del telefono di sistema . . . . . . . . . . . . . . . . . . . . . . . . . . . . . . . . . 9
Uso. . . . . . . . . . . . . . . . . . . . . . . . . . . . . . . . . . . . . . . . . . . . . . . . . . . . . . . . . 12
Dichiarazione di conformità e marcatura CE. . . . . . . . . . . . . . . . . . . . . . . . . . . . . . . . . 19
Español . . . . . . . . . . . . . . . . . . . . . . . . . . . . . . . . . . . . . . 1
Teclas y pantalla del teléfono. . . . . . . . . . . . . . . . . . . . . . . . . . . . . . . . . . . . . . . . . . . 2
Descripción e instalación . . . . . . . . . . . . . . . . . . . . . . . . . . . . . . . . . . . . . . . . . . . . . 3
Indicaciones de seguridad . . . . . . . . . . . . . . . . . . . . . . . . . . . . . . . . . . . . . . . . . . . . 3
Instalación del teléfono . . . . . . . . . . . . . . . . . . . . . . . . . . . . . . . . . . . . . . . . . . . . . . 4
Configuración ampliada del teléfono de sistema . . . . . . . . . . . . . . . . . . . . . . . . . . . . . . . 9
Manejo . . . . . . . . . . . . . . . . . . . . . . . . . . . . . . . . . . . . . . . . . . . . . . . . . . . . . . 13
Declaración de conformidad y símbolo CE . . . . . . . . . . . . . . . . . . . . . . . . . . . . . . . . . . 20
Svenska . . . . . . . . . . . . . . . . . . . . . . . . . . . . . . . . . . . . . . 1
Telefonens manöveryta. . . . . . . . . . . . . . . . . . . . . . . . . . . . . . . . . . . . . . . . . . . . . . 2
Beskrivning och installation . . . . . . . . . . . . . . . . . . . . . . . . . . . . . . . . . . . . . . . . . . . 3
Säkerhetsanvisningar . . . . . . . . . . . . . . . . . . . . . . . . . . . . . . . . . . . . . . . . . . . . . . . 3
Installation av telefon . . . . . . . . . . . . . . . . . . . . . . . . . . . . . . . . . . . . . . . . . . . . . . . 4
Utvidgad konfigurering av systemtelefonen . . . . . . . . . . . . . . . . . . . . . . . . . . . . . . . . . . 9
Användning. . . . . . . . . . . . . . . . . . . . . . . . . . . . . . . . . . . . . . . . . . . . . . . . . . . . 12
Konformitetsförklaring och CE-märken . . . . . . . . . . . . . . . . . . . . . . . . . . . . . . . . . . . 19

Norsk . . . . . . . . . . . . . . . . . . . . . . . . . . . . . . . . . . . . . . . 1
Betjeningsgrensesnitt for telefonen . . . . . . . . . . . . . . . . . . . . . . . . . . . . . . . . . . . . . . . 2
Beskrivelse og Installation . . . . . . . . . . . . . . . . . . . . . . . . . . . . . . . . . . . . . . . . . . . . 3
Sikkerhetshenvisninger. . . . . . . . . . . . . . . . . . . . . . . . . . . . . . . . . . . . . . . . . . . . . . 3
Installere telefonen . . . . . . . . . . . . . . . . . . . . . . . . . . . . . . . . . . . . . . . . . . . . . . . . 4
Utvidet konfigurering av systemtelefonen . . . . . . . . . . . . . . . . . . . . . . . . . . . . . . . . . . . 9
Håndtering . . . . . . . . . . . . . . . . . . . . . . . . . . . . . . . . . . . . . . . . . . . . . . . . . . . . 13
Konformitetserklæring og CE-merker. . . . . . . . . . . . . . . . . . . . . . . . . . . . . . . . . . . . . 20
ÅëëçíéêÜ .....................................1
ÅðéöÜíåéá ÷åéñéóìïý ôïõ ôçëåöþíïõ ......................................2
ÐåñéãñáöÞ êáé åãêáôÜóôáóç...........................................3
ÅãêáôÜóôáóç ôïõ ôçëåöþíïõ ..........................................5
ÅêôåôáìÝíç äéáìüñöùóç ôçò óõóêåõÞò óõóôÞìáôïò .............................9
Ïäçãßåò ÷ñÞóçò..................................................13
ÄÞëùóç óõìöùíßáò êáé óÞìá CE........................................21
Dansk . . . . . . . . . . . . . . . . . . . . . . . . . . . . . . . . . . . . . . . 1
Telefonens betjeningsflade . . . . . . . . . . . . . . . . . . . . . . . . . . . . . . . . . . . . . . . . . . . . 2
Beskrivelse og installation . . . . . . . . . . . . . . . . . . . . . . . . . . . . . . . . . . . . . . . . . . . . 3
Sikkerhedsanvisninger . . . . . . . . . . . . . . . . . . . . . . . . . . . . . . . . . . . . . . . . . . . . . . 3
Installation af telefonen. . . . . . . . . . . . . . . . . . . . . . . . . . . . . . . . . . . . . . . . . . . . . . 4
Udvidet konfiguration af systemtelefonen . . . . . . . . . . . . . . . . . . . . . . . . . . . . . . . . . . . 9
Betjening . . . . . . . . . . . . . . . . . . . . . . . . . . . . . . . . . . . . . . . . . . . . . . . . . . . . . 13
Konformitetserklæring og CE-mærke . . . . . . . . . . . . . . . . . . . . . . . . . . . . . . . . . . . . . 19
Polski .......................................1
Interfejs obs³ugi telefonu .............................................2
Opis i instalacja ..................................................3
Wskazówki bezpieczeñstwa ...........................................3
Instalacja telefonu .................................................5
Zaawansowana konfiguracja telefonu systemowego .............................9
Obs³uga ......................................................13
Deklaracja zgodnoœci i symbol CE .......................................20
Nederlands . . . . . . . . . . . . . . . . . . . . . . . . . . . . . . . . . . . . 1
Gebruikersinterface van de telefoon. . . . . . . . . . . . . . . . . . . . . . . . . . . . . . . . . . . . . . . 2
Beschrijving en installatie . . . . . . . . . . . . . . . . . . . . . . . . . . . . . . . . . . . . . . . . . . . . 3
Veiligheidsaanwijzingen . . . . . . . . . . . . . . . . . . . . . . . . . . . . . . . . . . . . . . . . . . . . . 3
Telefoon installeren . . . . . . . . . . . . . . . . . . . . . . . . . . . . . . . . . . . . . . . . . . . . . . . . 4
Uitgebreide configuratie van de systeemtelefoon . . . . . . . . . . . . . . . . . . . . . . . . . . . . . . . 9
Bediening . . . . . . . . . . . . . . . . . . . . . . . . . . . . . . . . . . . . . . . . . . . . . . . . . . . . . 13
Conformiteitsverklaring en CE-teken . . . . . . . . . . . . . . . . . . . . . . . . . . . . . . . . . . . . . 19
Português . . . . . . . . . . . . . . . . . . . . . . . . . . . . . . . . . . . . . 1
Interface do utilizador do telefone. . . . . . . . . . . . . . . . . . . . . . . . . . . . . . . . . . . . . . . . 2
Descrição e instalação. . . . . . . . . . . . . . . . . . . . . . . . . . . . . . . . . . . . . . . . . . . . . . . 3
Instruções de segurança . . . . . . . . . . . . . . . . . . . . . . . . . . . . . . . . . . . . . . . . . . . . . 3
Instalação do telefone . . . . . . . . . . . . . . . . . . . . . . . . . . . . . . . . . . . . . . . . . . . . . . . 5
Configuração alargada do telefone de sistema . . . . . . . . . . . . . . . . . . . . . . . . . . . . . . . . . 9
Manuseamento. . . . . . . . . . . . . . . . . . . . . . . . . . . . . . . . . . . . . . . . . . . . . . . . . . 13
Declaração de conformidade e o símbolo CE . . . . . . . . . . . . . . . . . . . . . . . . . . . . . . . . . 20

Operating instructions
elmeg CS290 / CS290-U / IP-S290
English
1

User interface of the telephone
1 Functionbutton:Thiskeyopenstheprogrammingmenu.Ifyouarealreadylocatedinamenu
and then press the key, either menu-specific functions are shown, or you are moved back one
programmingstep.
2 Escape button: Pressing the Esc button during programming returns the telephone to its idle
status.
3 3softkeys
The functions of the softkeys are displayed in capital or small letters (depending on your set-
tings).
4 Display:Thedateandtimeappearonthetoplineofthedisplaywhenyouconnecttheunittothe
power supply system (IPS 290), or to the internal ISDN or UP0 (CS 290, CS290-U) port of the
PABXsystem.Thedateandtimeareimportedautomaticallyfromthepabxsystem.Thetextdis-
played for a function on line 2 is always located above the corresponding softkey. When you
pressthesoftkey,thenextlevelisdisplayed.
Ifnotallinformationfitintothescreen,thiswillbeindicatedby»««or»««.
5 OKbutton:Pressingthisbuttonstoresasettinginthetelephone.Youthenheartheacknowled-
gementsignal.
6 Ckey:Pressthisbuttontomovebackonemenustepinthemenu.Ifyouarecurrentlyintheinput
mode,thisbuttoncanbeusedtodeleteindividualcharacters.
7 Call-LED:IncomingcallsaresignaledbyarapidlyflashingLED.
8 Speaker
9 Openlistening (hands-freebuttonIP-S290)
10 Endingacall
English
2

11 Inquiriybutton
12 Lastnumberredialbutton
13 Arrowbuttons:Thearrows»{«and»}«intherightcorneronthetoplineofthedisplayindicate
thatyoucancallupfurtherfunctionsonthelowerlinesusingthearrowbuttons.
14 asteriskkey,rhombuskey
15 Dialkeys/VIPkeys
16 5programmablefunctionkeyswithinsetLED
EachbuttonhasanLEDassignedtoit.TheseLEDscanbeusedtoindicatecertainfunctions.
TheLEDsofthetwokeysatthebottomhavetwodifferentcolors(onlyCS290andCS290-U).
17 Labelpanelforprogrammablefunctionkeys
Description and installation
elmeg CS290
ThissystemtelephoneisdesignedforconnectiontoaninternalS0-port(4wires)ofanelmegpabxsystem.
elmeg CS290-U
This system telephone is designed for connection to an internal Up0-port (2 wires) of an elmeg pabx sys-
tem.ThesystemtelephonecomeswithanISDNporttowhichfurtherISDNterminaldevicescanbeconnec-
ted.
elmeg IP-S290
ConnectthissystemtelephonetothecorrespondingLANport(ornetwork)ofthePABXsystemusingaCat.
5cable.ThesystemtelephoneisequippedwithaPCoutputthatcanbeusedtoconnectotherIPterminalde-
vices.
Setting up/ Configuring the system-telephone
On the system telephone itself you can only carry out a limited configuration of the supported features.
Complete configuration of the system telephone is possible only via the appropriate ports of the elmeg
PABX system.
Safety notes
•Mindthestorageandoperationtemperaturesforthedevice listedinthetechnicalspecifications.
Onlyconnectthedevicewhenthe permissibleambientoperatingtemperaturehasbeenreached.
•Please note that condensation on or in the unit must be prevented when moving from cold to warm
surroundings.Onlyremovetheunitfromthepackagewhenthepermissibleambientoperatingtem-
peraturehas beenreached.
•Youshould notmakecallsorconnectordisconnect anylinesduringthunderstorms.
•Onlyattach theconnectingcords attheconnectionsprovided.
•Makesurephonecablesareinstalledinasafemannertopreventtripping.
•Avoidthefollowing:
Directsunlight
Sourcesof heat(forexampleradiators)
English
3

Electronicdevices (forexamplestereo components,officeequipmentormicrowave devices
Ingressofmoistureorliquids
Aggressivefluidsorvapors
Dustyenvironment
•Donotusetheunit inexcessivelyhumidroomsorhazardouslocations.
•Onlyopenthosesectionsof thedevicespecified intheassembly/operatinginstructions.
•Donottouchplugconnectors withpointed,metal,ormoistobjects.
•Ifyoudonotpermanentlymountthedeviceoranyaccessories,besuretoplaceit/themonanon-slip
surface.
•Whenrequired,cleantheunitwithaslightlymoistenedcloth.
•Onlyuseapprovedaccessories.
•OnlyterminalswithSELVand/orwhichcomplywithETS300047maybeconnectedtotheunit.This
regulationisfulfilledwhenapproved terminaldevicesareusedas intended.
Plug-in power supply
•Useonly approved powerplug-inunits (DSA-0101F-05 UPorL15 D52 ABDDLAWO).
•Donotusepowerplug-inunitswithvisibledefects ordamage (fissures,cracks, etc.)
Scope of supply
System telephone, Handset with connection cord, Connection cable, 2 feet, Operating instructions, Label
panelfor programmablefunctionkeys.Adaptercord (CS290-U) forheadsetsequippedwith4-pin connec-
ting cord (8-pin plug / 4-pin cord).
Care and maintenance
The ISDN system telephone has been manufactured for normal, everyday use. When required, clean the
ISDN system telephone with a slightly moistened cloth, or with an anti-static cloth. Never use a solvent to
cleanthephone!Neveruseadrycloth;electrostaticchargescoulddamagetheelectronicsinthesystem.Itis
essential that no liquids penetrate into the inside of the ISDN system telephone, as this could destroy the
phone.
Installing the telephone
Beforeinstallingthetelephoneyoumustmounttherear feetfor thetelephoneatthe positions(6) shownin
figure 4. Depending on the height of these two feet you can adjust the display angle of your phone to your
personal angle of vision. Ensure that the two feet have the same height.
Toadjust theheight,pullthefeet offof thebottomofthetelephone,rotatethemaround60°andplacethem
backintheenclosure.Byturningthefeetbyaround60°(aroundthelongitudinalaxis)eachtimeyoucanset
three different heights for the phone.
Please note that the plastic feet of your telephone may leave marks on sensitive surfaces, such as furniture.
Themanufacturerofthe telephoneisnotliablefor anysuchdamage. Therefore,useappropriate non-skid-
ding pads under the phone.
Telephone installation
Connecting the handset cord
Connectthehandsetcord(1)asshowninfigure2.Laythehandsetcordinthecordgroove(2)andlockitbe-
low the two cord retainers (3).
English
4

elmeg CS290 at the ISDN port
Connect the ISDN-cord (1) to the S0-jack as
shown in figure 2. Ensure that the longer ISDN
connector is plugged into the ISDN jack and the
shorter ISDN connector into the ISDN socket on
the telephone. Thenlay the ISDN cord in thecord
groove(2)andlockitbelowthetwocordretainers
(3).
elmeg CS 290-U at the UP0-port
Connect the ISDN-cord (1) to the UP0jack as
shown in figure 1. Ensure that the longer ISDN
connector is plugged into the ISDN jack and the
shorter ISDN connector into the ISDN socket on
the telephone. Thenlay the ISDN cord in thecord
groove(2)andlockitbelowthetwocordretainers
(3). Figure 1 shows a downstream ISDN-telepho-
neconnectedtotheS0--portoftheelmeg290-U.
CS290-U phones may not be connected through the S0 jack to the ISDN connection.
Important notes for the UP0-connection
•You can connect a further eight ISDN devices with an S0 port at the S0 jack of the telephone. Howe-
ver,iftheseterminaldevicesarepoweredbytheelmegCS290-Usystemtelephone,thentwodevices
onlymaybeconnected.
•TheISDNconnectionconstellationfordown-circuitterminaldevicesonthesystemtelephonemust
bestar-shaped (pleaseusetheISDNdistributor).
•Themaximumlinedistancebetweenthe elmegCS290-UandanydownstreamISDNterminaldevi-
cesmaynotexceed100 meters.
•Terminatingresistorsmaynotbeconnected.
English
5
Figure 1
Figure 2
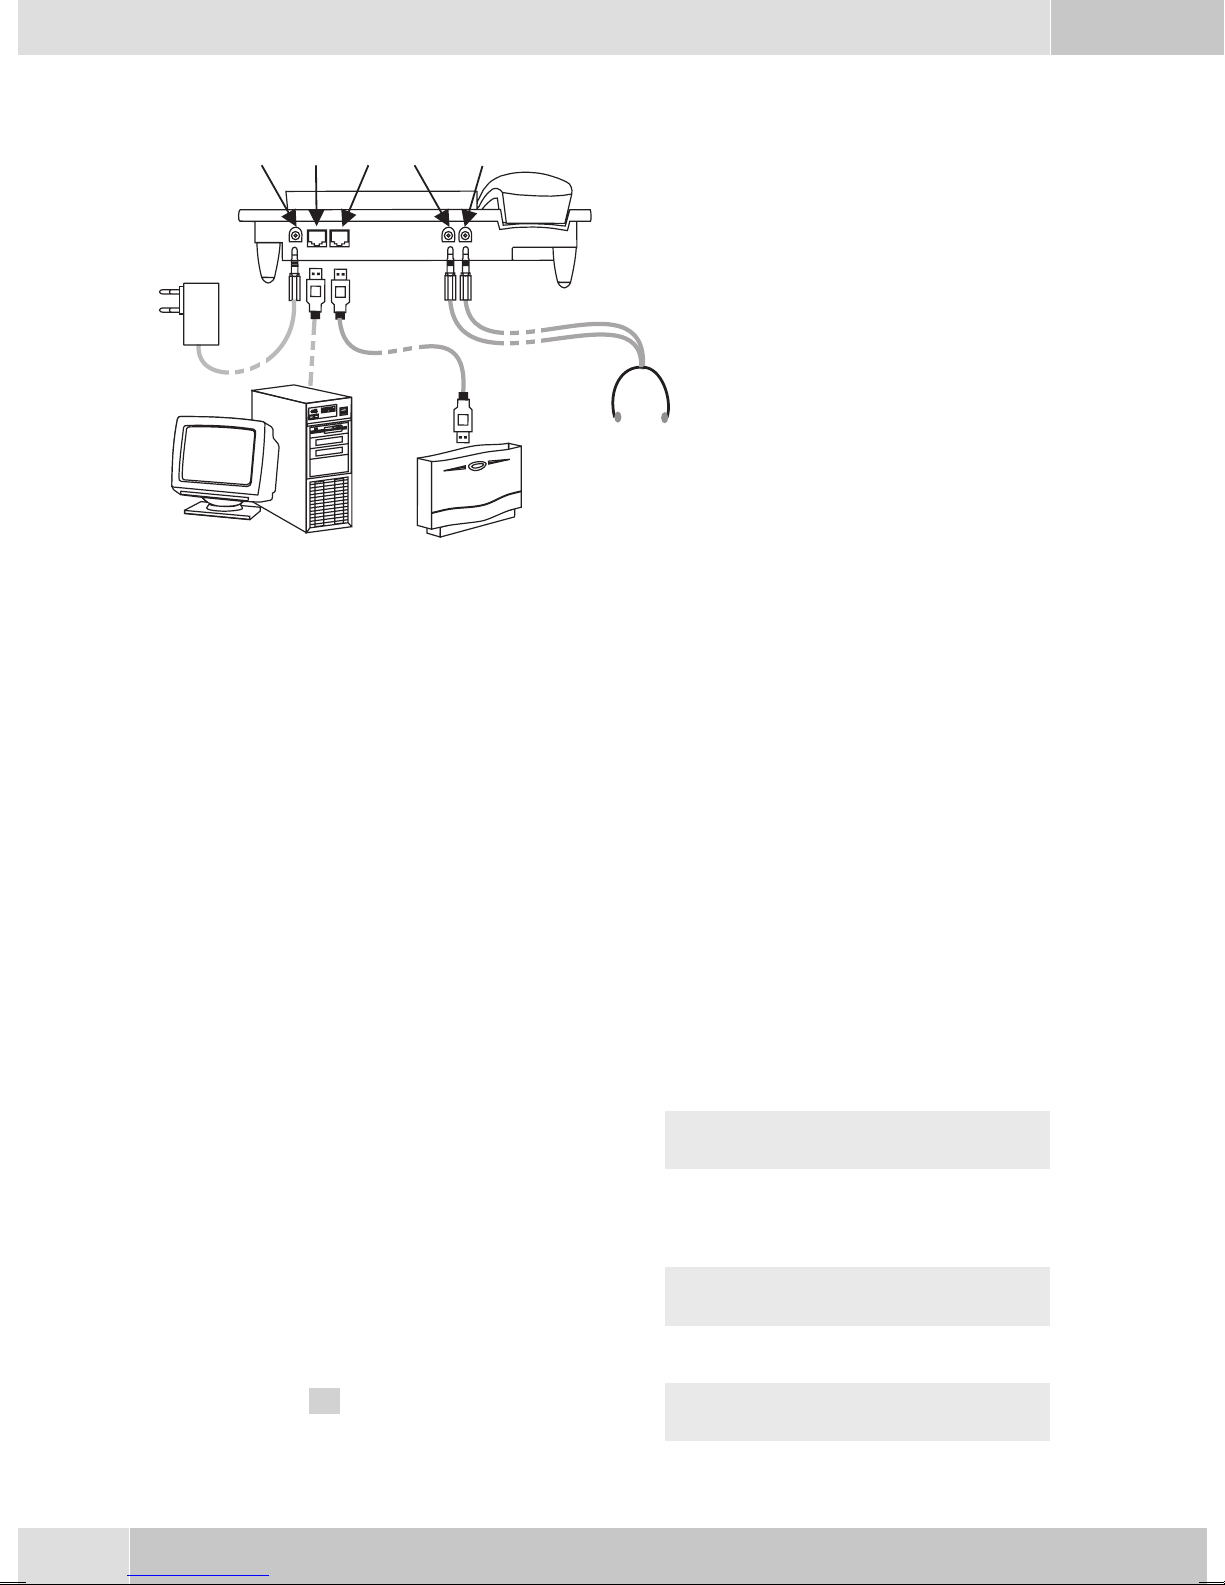
elmeg IP-S290 at the Ethernet-port
1-Connection for plug-in power
supply unit
2-Plug-in power supply unit
3-Ethernet PC-Connection
4-PC or other IP-telephone
5-Ethernet-port of the pabx
6-elmeg pbx
7-Audio-In connection (micropho-
ne)
8-Audio-Out connection (hand-
set)
9-Headset with two 5mm-ste-
reo-connectors.
Audio in / Audio out
The telephone is equipped with an input (7) and an output (8) for audio signals. These ports are provided
forheadsets. Thejacks arelinkedtothecorrespondingportsfortheheadsetjacks onthebottomofthetele-
phones.
Connecting to and operating the system telephone at the pabx system (basic function including
DHCP)
Consulttheinstallation instructionsforthe PABXsystemto determinewhichport canbeusedforconnec-
ting the IP-S290. Connect this port with the Ethernet PABX port on the system telephone.
•ConfigureyourPABXsystemforusewithIPsystemtelephones.
•DefinetheMSNsfortheIPsystemtelephoneswithinthePABX system.
•Switch on the power (plug-in power supply unit) to the IP system telephone and wait until the tele-
phonehasbeeninitialized.
OncetheIPsystemtelephonehasbeeninitializedyouwillberequestedtoselectthelanguageinthedisplay.
•Selectthedisplaylanguage.
Press the arrow buttons to view the available
languages and confirm your selection by pres-
sing O.
Welche Sprache
deutsch english polski
•EnteroneoftheMSNs thathasbeeninputto thePABXsystem(intheexampleshownhere,12).
Confirm your entry by pressing O.Program dial number
MSN-1>12
Swtich to Use DHCP.
Select »on«. use DHCP
off on
•Thetelephoneand PABXsystemaresynchronized.
English
6
Figure 3

IfthereisnoconnectiontothePABXsystem(noLANlink,orthetelephonehasnotbeenlogged
in),thesymboll» -----/ /----‰ «willbeshowninthedisplayinsteadofthetime.
You can now use the IP system telephone at the ISDN or UP0 port.
Connecting a headsets (not included in the scope of supply)
Recommended: Headsets from Plantronics including a U10PS connection cable or GN Netcom.
Connecttheheadsetasshowninfigure4.Thenlaytheheadsetcord(3)inthecordgroove(4)andlockitbe-
low the cord retainers (5).
You can use the handset or the headset for making calls.
Headset »Firefly F142 N« from Plantronics (not for IP-S290)
The LED in the mike arm of this headset is activated using the headset button on the telephone.
Pin assignments of the headsets
Headset-connection CS 290, IP-S290
1 - Microphone +
2 - Handset (ground)
3 - Handset
4 - Microphone (ground)
Headset-connection CS 290-U
1 - DSHG receiver
2 - Ground
3 - Microphone +
4 - Handset (ground)
5 - Handset (3.3 V switchable via resistor)
6 - Microphone (ground)
7 - V+ (3.3V)
8 - DSHG transmitter
English
7
Figure 4

Changing the label
Thelabelsforthefunctionkeysareprovidedonthelastpageofthisoperatingmanual.Cutoutthelabelyou
wish to use.
To change the label panel, press the flexible cover together between your index finger and thumb and lift it
out. The label panel can now be changed.
YoucanfillinthelabelpanelviayourPCyourself.TheCDROMsuppliedwiththesystemcontainsanAdo-
be Acrobat file with templates.
Pictographs
Thepictographs(symbols)describedbelowhavebeenusedintheseoperatinginstructionstoil-
lustratesomeproceduresforsettingandusingthetelephone.
bLiftupthehandsetorstartprepareddialing.
aReplacehandset.
Thetelephoneisidle.
lAcallissignaled.
Theringermelodysounds.
gYouareconductingacall.
dAthree-partyconferencecallisinitiated.
qYouhearthepositiveornegativeacknowledgementsignal.
tSelectthecallnumber,code,characterortext.
0...9
*,#
Presstheappropriatebuttononthepush-buttonset.
Advanced system telephone configuration
Ingeneral,yourtelephoneallows fora limitedconfigurationonlyofthe supportedfeatures. Completecon-
figuration is possible only using an elmeg PABX system.
Activating the extended configuration mode
Enter the code number »**46782551##« (Vanity-format »**INSTALL1##«).
Advanced Settings
Entering or modifying MSN extension numbers
UnderF-»config«-»msn«-»msn-1...3«-»tnumb«- youcanenterandeditthephonenum-
bers.
English
8

Connected to a pabx
Begin as follows:F»config«-
•Numberlength(softkey »number«)
Themaximumlengthforinternal numbersthatare assigned todifferentinternal extensionswithin
yourPABX system;
•Automaticexchangelineaccess(softkey »ln. access«)
Withdirectexchangelineaccess,youdonothavetodialthelineaccessdigitforconductingoutgoing
calls.
•Lineaccessdigit(softkey»extern«)
Line access digit for the pabx; the line access digit is placed automatically in front of the number of
thecallerfortheexternalcalls.
Setting the User Interface
Begin as follows:F-»adjust«--»use«
Connecting / using a headsets (softkey »headset«)
Configuring a headset; For headset operation, use the function key »headset«. You may also want to
use the function key »auto-answer«.
•Defaultsettingduringaconnection
Selectwhetherintheinitialsettings»DTMF«or»keypad«ispossibleduringanongoingcall;
Programming function keys
Begin as follows:F-»adjust«-
•Directdial buttons(softkey»list«oder »new«)
Programingatelephonenumberfora specificfunctionbutton.
•Functionbuttons(softkey»function«) prog new function {}
1_:-
•Selectthefunctionkeythatyouwishtoassignanewfunctionto .Confirmyourselectionbypressing
O(anextensionkeyinthisexample). 1_ / Extension key
Number>
•Enterthedesiredinternalextensionnumber»Number«and confirmbypressingO.
Possible settings and allocation options are described in the detailed operating instructions
provided on the CD.
Deactivating the extended configuration mode
Enter the code number »**46782550##« (Vanity-format »**INSTALL0##«).
If the ISDN telephone is disconnected from the ISDN network, (for example by unplugging the ISDN con-
nectorofthephoneorbyswitchingofforresettingthepabx),theextendedconfigurationmodewillbeauto-
matically switched off.
English
9

Setting the display language
You can select the language of your display.
Begin as follows:
aFSSS
config Display language
Deutsch Press the arrow buttons to view the available
languages.
Welche Sprache? }
deutsch english polski
Example:
English Press the arrow buttons to view the available
languages.
Which language?}
deutsch english polski
SPress the softkey below the desired language.
The display switches to the changed language
immediately.
Entering letters and numbers
Youcanadvance throughthecharacters(lettersornumbers)bypressingtheappropriate button repeated-
ly.
The following buttons are configured for the entry of figures and numbers:
Button 1st press 2nd
press 3rd press 4th press 5th press 6th press 7th press
11
2ABc 2 ÄÅÆ
3DEF 3 €
4GHI 4
5JKL5
6MNO6 ÖØ
7PQRS7ß$
8TUV8Ü
9WX Y Z 9 ¥
**
##
English
10

Every letter that you enter is shown as capitals.
Example: »FUNKWERK«.
Several special characters are assigned to the button »0«.
For ex.: »!«, »&«, »?«, »+«, »-«, »=«, »(«, »)«, »@«, »$«, …
Whenyoupressthe0keythefirsttimeaspaceisinserted.Whenyoupressthiskeyasecondtimeseve-
ralspecialcharacters areshowninthedisplay.Presstheappropriatekeytoselectthecorrespondingspecial
characters 1…9. If you wish to view further special characters, press the 0key.
Additional Information in the Display
Whenthetelephoneisintheidlestate, additionalinformati-
on about functions that have been configured are shown on
the top line of the display.
01.11.05 08:30 S U }
tbook vip
»S« Thedial filterfor thetelephonehasbeenconfiguredviathe PCconfigurationprogram.Phone
numbersorpartialnumbersarenowenabledorinhibitedforcalling.
»U« Callrerouting(AWS)configured.
>
S
If you wish to get more information about the
configuredfunctionspresstherightarrowbut-
ton and then »info«.
01.11.05 08:30 S U {
mail charges info
MSN extension numbers
Youcanenterupto3phonenumbers(MSNs)via PCconfiguration thatcanbeused bythe telephoneat the
internal ISDN connection for the pabx system. Please observe the instructions in the PABX manual.
When you enter an MSN or extension numberin your ISDN system telephone you are essentially defining
that your ISDN system telephone is called using this MSN or extension number when a call is made. If you
entermorethanoneMSNextensionnumberinyourtelephone,yourphonewillringeachtimeoneofthese
MSN extension numbers is called.
Entering or editing MSN extension numbers
Entering or editing a phone number can only be performed via the PC configuration program for the tele-
phone or via the » Advanced Configuration« of the telephone.
Viewing MSN extension numbers
Begin as follows: F-»config«-»msn«-»msn-1« (or »msn-2«,»msn-3«)
»tnumb«.
Setting the melody and the volume
Youcan defineandsetaspecificmelodyanditsvolumeforeachextensionnumberthatyouenter. Youcan
set a different ringing melody or volume for internal calls.
In the initial setting of the telephone, 10 different melodies are stored for call signaling. These
10 melodies can not be changed.
English
11

Setting the melody
In the menu »msn-1«, »Program msn-1« press »Sound« and then »internal«or»ex-
ternal«.
OUse the arrow buttons to set the desired melo-
dy.
Confirm your entry by pressing OK.
Select melody {}
- --------- 2
Setting the ringer melody volume
In the menu »MSN-1«, »Program MSN-1« press »volume« and then »internal«or»ex-
ternal«.
OUse the arrow buttons to set the volume.
Confirm your entry by pressing OK.
Select volume {}
MSN-1 - ------ +
Assigning a name to the MSN extension number
You can assign your own names (max. 5 characters) to the MSN extension numbers.
The assignments for the keypad for entering letters and digits are described on page 10.
In the menu »MSN-1«, »Program MSN-1«-
>-press »msn-name«.
t
O
Enter the name desired name.
In this example: »STORE«.
Confirm your entry with OK.
Own MSN designation
MSN-1>STORE
Onceanamehasbeenenteredforanumber,thesoftkeydesignations»msn-1«,»msn-2«or»msn-3«
arereplacedbythecorrespondingnamesinthemenu.Inthisexamplehere»STORE«isdisplayed instead
of »msn-1«.
Operation
Important notes
Notall ofthefeatures describedheremaybeimplementedinthestandardISDNconnectionofyourservice
provider.Contact yourservice providertodeterminewhichfeaturescomestandardwithyourISDNaccess
and which ones you must apply for separately.
If the ISDN telephone is disconnected from the ISDN network, (for exampleby unplugging the ISDN con-
nector of the phone or by switching off or resetting the pabx), several settings and lists will be lost.
For ex.: Temporarily stored text messages (SMS, UUS1), a requested Completion of call to busy subscriber
or data downloaded from the pabx.
Starting a call
Dial number - no correction possible
btg
Lift up handset Dial call number Conversation
English
12

Dial call number - correction possible
atbg
Handset on hook Dial call number Lift up handset Conversation
Tochangethenumberor tocorrectawrongentry,selectthewrongfigurewiththearrowbuttonsandpress
Cto delete it.
If you wish to conduct the call using the handset, just lift it up after dialing the number. Any time during a
call you can switch back and forth between hands-free calling, speaker function and use of the handset.
After you have dialed the number you can also press the speaker button to have the number dialed and to
use hands-free calling.
Ifanumberthatistobedialedisinhibitedthroughthedialfilterforthesystemtelephoneandtheinhibitfil-
ter is activated, the brief message »Inhibited number« will appear in the display.
Other options for dialing without lifting the handset
Theoption ofdialingwithoutliftingthehandset andofcorrecting oradding toanumberalsoexists during
dialing:
•fromtheredialingmemory.
•fromthecallerlist.
•fromthe VIP-memory.
•fromthedirectdialingmemory.
If you are using one of these options, you can make further entries prior to initiating the call.
You can define which number (MSN), if any, is to be transmitted to the party being called.
Dialing from the VIP memory
aSor tb
Handset on hook vip Select VIP destination Select VIP destination Lift up handset
Dialing from the direct dialing memory
aZbg
Handset on hook Press the direct dialing key Lift up handset Conversation
Dialing from the pabx telephone directory
aStOO
bg
Handset on hook tbook Enter first letter Select entry Lift up handset Conversation
Starting a call with a fixed MSN extension number
Youcan conductaninternalorexternal callsuchthatadefinednumber(MSN)is transferredfrom yourte-
lephone to the party you are calling. This number must have been entered previously in your telephone.
English
13

When you call, either number that is transmitted is shown in the second line of the display (»msn1...
msn3«) or the name that you have assigned to this number (MSN).
at
OFS S bg
Handset on
hook Dial call
number msn msn-1 ... msn-3 Lift up
handset Conversation
Restricting calling line identification for the next call
During an external or internal call, you can prevent the number from being transmitted (displayed) to the
partyyouhavecalled.Youcanalsopermanentlysetthisspecificfunction(detailedinstructionsontheCD).
at
OF S bg
Handset on hook Dial call number secret Lift up handset Conversation
Accepting a call
albg
Handset on hook Lift up handset Conversation
Restricting calling line identification
Whenacallissignaled,youcandecidebeforeacceptingthecallwhetheryournumberistobetransmittedto
the caller. If your phone is the final destination of call rerouting you can use this procedure to prevent the
caller from seeing the final destination phone number (i. e. yours).
al
>S bg
Handset on hook secret Lift up handset Conversation
Rejecting / forwarding a call
Rejecting a call
al
S
Handset on hook reject
Call Deflection
al
StO
Handset on hook x-fer Dial call number
English
14

Redialing
Simple last number redial
aWbg
Handset on hook Lift up handset Conversation
Extended redialing
Intheextendedredialingfunctionthe10previouscalls,connectionsanddialedtelephonenumbersaresto-
red.Youcan viewthese bypressing theWbutton orthearrowbuttonsand subsequentlyhavethemre-
dialed automatically.
aWW or Obg
Handset on hook Select entry Select entry Lift up handset Conversation
The last dialed number is displayed. At the end of the second line the status of this entry is indicated by the
letters displayed there.
»v« Connection
»A« Call
»|« Callsconfiguredforautomaticredialing.
no entry Youplacedacalltosomebodybutdidnotreachhim/her,orhis/herlinewasbusy.
Deleting a call number from extended redialing
aWW or FS
Handset on hook Select entry Select entry delete?
Automatic redialing
Ifyouplaced acallto asubscriberwhose numberis busyor whodoesnot answer,youcan thenactivateau-
tomatic redialing which will call that same subscriber again after about 10 seconds.
bt g WS a
Lift up handset Dial call number Subscriber busy or does not ans-
wer autodial Replace handset.
Whenthetelephoneisidle,autodialingisindicatedinthedisplaybypressingthesoftkey"AUTODIAL".
Afteraround10secondsthehands-freecallingfunctionofyourphoneisactivatedandthenumberisdialed
automatically.
This is repeated for up to around 2 minutes.
Up to 20 call attempts are made if the subscriber can still not be reached.
You can cancel automatic redialing by pressing the redial button.
English
15

Deactivate automatic redialing
You can deactivate automatic redialing at any time. There are no further call attempts.
To deactivate automatic redialing during automatic dialing press E.
If you like to deactivate automatic redialing in the idle state of the phone, proceed as follows:
aSS
Handset on hook autodial yes
Dialing from the caller list
aSbor Lg
Handset on hook list Select entry Lift up handset Conversation
Deleting an entry from the caller list
aSFS
Handset on hook list Select entry delete?
Muting
mute Room inquiriy speak
Conversation SS
Open listening (Hands Free Calling IP-S290)
gLL g
Conversation Begin open listening End open listening Conversation
When you hang up the handset while open listening is active, both open listening and the call itself are ter-
minated.
Using a headset
Activating and deactivating the headset
The handset remains in its cradle when "headsets" are being used.
aztgz
Handset on hook activate headset Dial call number Call via headset Deactivate headset
English
16
Other manuals for CS290
2
This manual suits for next models
2
Table of contents
Languages:


