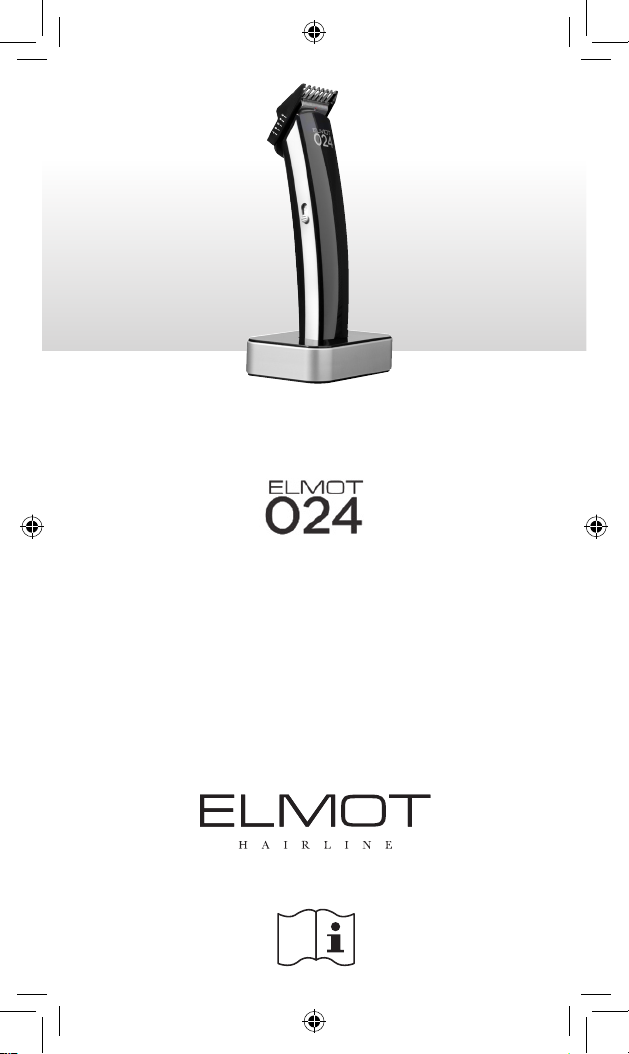
ELMOT 024 User manual
MANUALE D’USO
TRIMMER
GARANZIA
User manual
Mode d’emploi
Manual de uso
Manual do usuário
Warranty
Garantie
Garantía
Garantia

2
34567
A
CLICK!
CLICK!
CLICK!
A1
A2
B1 C1
C2
C4
C3
B2
B3
1
2
10
3 4
8
5
7
7
7
7
3 - 4
3 - 4
3 - 4
8
7
9
6
3
AVVERTENZE GENERALI SULLA SICUREZZA
Per evitare danni e pericoli dovuti ad un impiego non conforme, osser-
vare scrupolosamente e conservare le istruzioni per l’uso. Se il prodotto
verrà successivamente ceduto a terzi, consegnare anche il libretto di
istruzioni.
DISIMBALLO E VERIFICA DEL PRODOTTO
Estrarre il prodotto dalla sua confezione ed assicurarsi che sia integro e che non pre-
senti segni visibili di danneggiamento dovuti al trasporto.
In caso dubbi, non utilizzare l’apparecchio e contattare il Centro di Assistenza tecnica
più vicino (consultare ˝Centri assistenza tecnica (IT)˝ indicati nel presente manuale).
ATTENZIONE! PERICOLO PER I BAMBINI.
Gli elementi dell‘imballaggio (sacchetti in plastica, polistirolo espanso,
ecc.) non devono essere lasciati alla portata dei bambini in quanto po-
tenziali fonti di pericolo.
ATTENZIONE! Attrezzature con prestazioni professionali.
IT
Istruzioni originali
SPIEGAZIONE DEI SIMBOLI
I nostri prodotti sono conformi alla Direttiva di Compatibilità Elettromagneti-
ca 2004/108/CE e alla Direttiva di bassa Tensione 2006/95/CE.
Un apparecchio viene definito di classe III quando la protezione contro la
folgorazione si affida al fatto che non sono presenti tensioni superiori alla
bassissima tensione di sicurezza SELV (Safety Extra-Low Voltage). Tale appa-
recchio viene alimentato o da una batteria o da un trasformatore SELV.
Gli apparecchi di Classe III non devono essere provvisti di messa a terra
di protezione.
Questo simbolo indica che il prodotto risponde ai requisiti richiesti dalle nuo-
ve direttive introdotte a tutela dell’ambiente e che deve essere smaltito in
modo appropriato al termine del suo ciclo di vita. Chiedere informazioni alle
autorità locali in merito alle zone dedicate allo smaltimento dei rifiuti.
Questo simbolo, generalmente accompagnato con la descrizione, indica
all’utilizzatore che ci sono da leggere importanti operazioni e istruzioni.
NON IMMERGERE IL PRODOTTO IN ACQUA O IN ALTRI LIQUIDI.
Tutte le figure ed i particolari di esse sono riportate a pag. 2 del presente manuale; nelle
successive istruzioni vengono indicati il riferimento del particolare ed il numero della figu-
ra, ad esempio: 1(fig. A).
4
AVVERTENZE SULLA SICUREZZA ELETTRICA
L’uso di apparecchi elettrici comporta l’osservanza di alcune regole fondamentali.
AVVERTENZA: non utilizzare il presente apparecchio nelle vicinanze di
vasche da bagno, lavandini o altri recipienti contenenti acqua!
Non immergere mai l‘apparecchio in acqua o altro liquido!
Non toccare l‘apparecchio se questo è caduto in qualsiasi liquido.
In particolare:
• non toccare mai l’apparecchio con mani, piedi bagnati o umidi;
• non usare l’apparecchio a piedi nudi;
• non tirare il cavo di alimentazione o l’apparecchio per staccare la spina dalla presa;
• non esporre l’apparecchio ad elementi atmosferici (pioggia, sole, ecc.);
• non lasciare che bambini giochino con l’apparecchio.
• Quando l‘apparecchio è utilizzato in locali da bagno, scollegarlo dall‘alimentazio-
ne dopo l‘uso poiché la vicinanza dell‘acqua può rappresentare un pericolo anche
quando l‘apparecchio è spento.
• Estrarre sempre la spina dalla presa di corrente, senza tirare il cavo.
• Non utilizzare il prodotto se il cavo o altre parti appaiono danneggiati. Se il cavo di
alimentazione è danneggiato esso deve essere sostituito dal costruttore o dal suo
servizio di assistenza tecnica o comunque da una persona di qualifica similare, in
modo da prevenire ogni rischio.
• Ulteriore protezione è rappresentata dall’integrazione, nel circuito elettrico dome-
stico, di un dispositivo di sicurezza contro le correnti di guasto, con una corrente
nominale di intervento non superiore a 30mA.
• Si consiglia di contattare un elettricista di fiducia per ulteriori informazioni. La sicu-
rezza di questi apparecchi elettrici è conforme alle regole della tecnica riconosciu-
te e alla legge sulla sicurezza delle apparecchiature elettriche.
• Non lasciare la spina inutilmente inserita nella presa di corrente, ma scollegarla
quando l’apparecchio non è utilizzato.
• Posizionare il prodotto su superfici piane e stabili lontano da fonti di calore.
AVVERTENZE GENERALI SULL’USO
Per le caratteristiche tecniche fare riferimento alla confezione esterna e alle indica-
zioni riportate sulla targa dati apposta sul prodotto stesso.
Utilizzare l‘apparecchio solo per lo scopo preposto, non utilizzare su
parrucche o pelo di animali. Il costruttore declina ogni responsabilità
per quanto riguarda l‘uso improprio dell‘apparecchio.
Non avvolgere il cavo dell’adattatore attorno allo stesso per evitare
danni e prevenire ogni rischio derivato.

5
Durante la ricarica e l‘utilizzo, l‘apparecchio può surriscaldarsi; pertan-
to questo è da ritenersi normale.
• Verificare che la tensione di rete corrisponda a quella indicata sulla targa dati tec-
nici dell’apparecchio e sull‘adattatore di tensione.
• Tenere al di fuori della portata dei bambini. I bambini non devono usare né gio-
care con l’apparecchio.
• L‘apparecchio non è destinato ad essere utilizzato da persone (bambini compresi) le
cui capacità fisiche sensoriali o mentali siano ridotte, oppure con mancanza di espe-
rienza o di conoscenza, a meno che esse abbiano potuto beneficiare, attraverso l‘in-
termediazione di una persona responsabile dello loro sicurezza, di una sorveglianza
o di istruzioni riguardanti l‘uso dell‘apparecchio. I bambini devono essere sorvegliati
per sincerarsi che non giochino con l‘apparecchio.
La pulizia e la manutenzione
non devono essere fatte dai bambini senza una supervisione.
• AI fine di garantire un funzionamento ottimale e in piena sicurezza, in caso di
cadute o urti violenti, far eseguire un controllo presso un centro di assistenza au-
torizzato.
• Il cavo d’alimentazione non deve mai venire a contatto con l’apparecchiatura.
• Disinnestare sempre l‘apparecchio dopo averlo usato.
• Utilizzare, caricare e conservare l‘apparecchio ad una temperatura compresa tra
0 °C e 40 °C.
DESCRIZIONE DELL’APPARECCHIO E DEGLI
ACCESSORI
Verificare la dotazione del vostro apparecchio (fig. A).
1 Interruttore ON/OFF
2 Corpo-Impugnatura
3 Testina U-blade per taglio e finitura
4 Testina design di precisione per decorazioni
5 Olio lubrificazione lame
6 Base per ricarica
7 Pettine regolabile per testina U-blade
8 Spazzolina per pulizia
9 Adattatore AC/DC con cavo di alimentazione
10 Spia di carica (rossa) e di funzionamento (verde)
CARICA DELL’APPARECCHIO
Questo apparecchio può essere utilizzato a batteria o con collegamen-
to diretto alla rete di alimentazione.
Non ricaricare se la temperatura ambiente è inferiore a 0 °C o superiore
a 40 °C.
6
PRIMO UTILIZZO. La carica può avvenire tramite adattatore collegato diretta-
mente all‘apparecchio, oppure con collegamento per mezzo della base.
1) Collegamento diretto: collegare il connettore dell‘adattatore 9(fig. A) alla presa
posta nella parte
inferiore
dell‘apparecchio.
2) Collegamento tramite base: posizionate l‘apparecchio nell‘alloggiamento predi-
sposto sulla base 6(fig. A) e il connettore dell‘adattatore 9(fig. A) alla presa posta
nella parte inferiore della base.
3) In entrambi i casi, collegare l‘altra estremità dell‘adattatore alla prese di rete.
4) Caricare l’apparecchio per 8 ore prima di iniziare ad usarlo per la prima volta.
A carica completa dell‘apparecchio il led rosso di carica 10 (g. A) non
si spegne né cambia colore.
Non caricare l’apparecchio oltre il tempo raccomandato; l’eccessiva
carica ridurrà la durata delle batterie ricaricabili.
L’apparecchio completamente carico ha un’autonomia di 45 minuti.
Prima dell’utilizzo e della ricarica assicurarsi sempre che l’apparecchio sia completa-
mente asciutto.
CARICA IN SEGUITO AL PRIMO UTILIZZO.
Non eettuare la carica dell’apparecchio ogni giorno.
• Assicurarsi che l‘apparecchio sia completamente asciutto.
• Assicurarsi che l‘apparecchio sia spento, o spegnerlo posizionando su OFF l‘inter-
ruttore 1(fig. A).
• Procedere alla carica come indicato al par.“PRIMO UTILIZZO“.
FERMO PROLUNGATO DELL‘APPARECCHIO.
Se l‘apparecchio non sarà utilizzato per un periodo di tempo superiore ai sei mesi,
esso deve essere ricaricato per 8 ore, come indicato al par. “PRIMO UTILIZZO“, prima di
essere collocato nel luogo di conservazione.
Qualora la batteria dovesse esaurirsi, provvedere alla sostituzione con lo stesso mo-
dello in dotazione oppure richiedendola al servizio assistenza autorizzato.
Consigli per conservare la durata della batteria:
• Non effettuare la carica dell‘apparecchio ogni giorno.
• Scaricare completamente la batteria ogni sei mesi, quindi ricaricarla osservando le
indicazioni riportate in “PRIMO UTILIZZO“.
• Non caricare l’apparecchio oltre il tempo raccomandato; l’eccessiva carica ridurrà
la durata delle batterie ricaricabili.
Caricare completamente l‘apparecchio almeno una volta all‘anno.
7
IMPIEGO
ATTENZIONE! Non usare mai l’apparecchio se le lame delle testine 3
e 4 (g. A) sono danneggiate o se il blocco lame non funziona cor-
rettamente.
Non usare mai l‘apparecchio su capelli o peli bagnati.
Il Trimmer ricaricabile Elmot-024 è un prodotto multifunzione per la finitura ed il de-
sign, con due diverse testine ed un pettine regolabile.
ACCENSIONE E SPEGNIMENTO DELL’APPARECCHIO.
Accensione
• Posizionare l‘interruttore 1(fig. A2) in posizione ON; il LED 10 (fig. A) si accende
di colore verde.
Spegnimento
• Posizionare l‘interruttore 1(fig. A2) in posizione OFF; il LED 10 (fig. A) si spegne.
CONSIGLI UTILI PER ILTAGLIO
• Lavare i capelli come di abitudine, asciugarli e spazzolarli in direzione della crescita
districando eventuali nodi.
• Dopo l‘asciugatura non utilizzare lacca, schiuma per capelli o gel.
• Iniziare con l‘impostazione più alta del pettine regolabile 7(fig. A1) e ridurre gra-
dualmente l‘impostazione della lunghezza dei capelli.
• Per ottenere un risultato ottimale, utilizzare l‘apparecchio in senso opposto rispet-
to alla crescita dei capelli.
• Se nel pettine regolabile 7si accumulano molti capelli, rimuovere il pettine
dall‘apparecchio (v. par.„Rimozione del pettine regolabile“) e procedere alla pulizia
(soffiare e/o scuotere facendo uscire i capelli accumulati).
• Utilizzare la testina U-blade 3(fig. A1) per taglio e finitura.
• Utilizzare la testina design 4(fig. A1) di precisione per decorazioni.
USO DELL’APPARECCHIO.
Utilizzo del pettine regolabile per testina U-blade.
Per inserire il pettine regolabile U-blade 7(fig. A) seguire le indicazioni seguenti:
• Verificare che l‘apparecchio sia spento.
• Far scivolare il pettine regolabile 7sulla testina fino a quando non viene udito il
“click” di aggancio (Fig. B1).
• Assicurarsi che il pettine 7sia inserito correttamente nella scanalature ad incastro
su entrambi i lati.
• Con il pettine regolabile 7inserito, l’apparecchio dispone di 5 impostazioni diverse
per la lunghezza dei capelli:
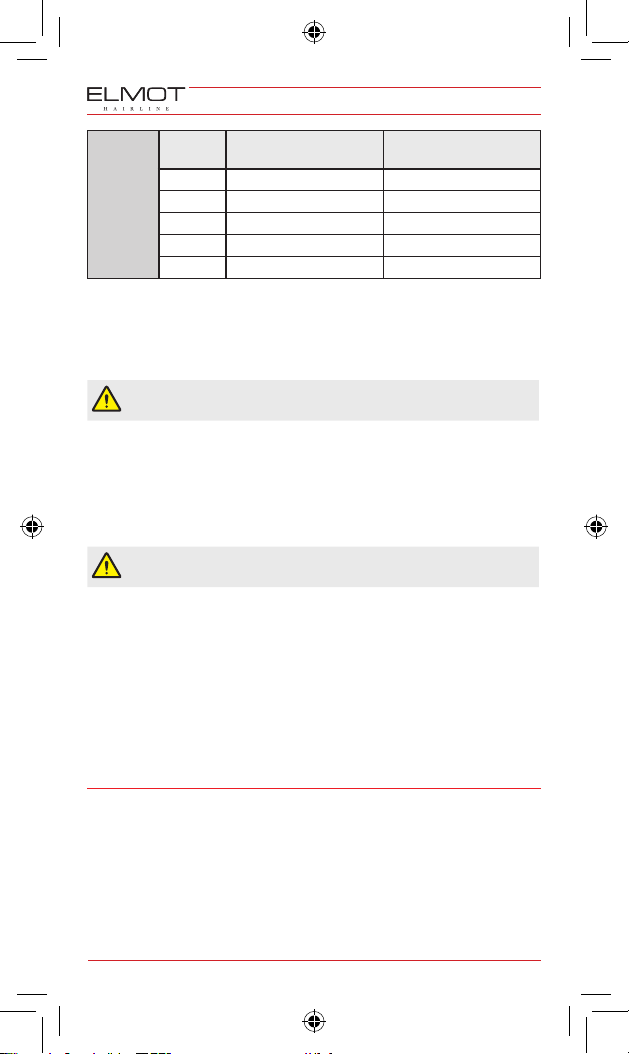
8
PETTINE REGOLABILE
PER TESTINA U-BLADE
(7)
Posizione Impostazione pettine
(n.)
Lunghezza taglio ottenuta
(mm)
13 3
24 4
35 5
46 6
57 7
• Spingere il pettine regolabile e farlo scorrere fino all’impostazione di lunghezza
desiderata (Fig. B2).
• Accendere l’apparecchio.
• Procedere con il taglio; per suggerimenti consultare il par. “CONSIGLI UTILI PER
IL TAGLIO“.
Spegnere l‘apparecchio prima di cambiare o montare qualsiasi acces-
sorio.
Rimozione del pettine regolabile
• Spegnere l’apparecchio.
• Spingere il pettine regolabile 7e sfilarlo dall’apparecchio (Fig. B3).
• Procedere come indicato al cap.“Rimozione e pulizia blocco lame“.
Utilizzo senza il pettine regolabile.
Quando si usa l‘apparecchio senza il pettine regolabile (7), la lama del-
la testina (3, 4) taglierà molto vicino al cuoio capelluto.
L’uso dell’apparecchio, senza il pettine regolabile 7, permette di tagliare i capelli mol-
to vicino alla pelle (0,8 mm) o per ridefinire i contorni della nuca e l’area attorno alle
orecchie.
Nel caso si sia utilizzato il pettine regolabile e si desidera procedere senza quest’ul-
timo effettuate le operazioni indicate al par. “Rimozione del pettine regolabile“, poi:
• accendere l’apparecchio e procedere come desiderato.
• A fine operazione spegnere l’apparecchio.
• Procedere come indicato al cap.“Rimozione e pulizia blocco lame“.
MANUTENZIONE
PULIZIA GENERALE
Disinserire sempre la spina del cavo di alimentazione dalla presa di rete prima di pro-
cedere con ogni intervento di pulizia.
• Per evitare ogni rischio di scossa elettrica, non pulite l‘apparecchio con ac-
qua e non immergetelo in acqua.
• Non usate soluzioni abrasive o detersivi concentrati.
• Pulire la parte esterna utilizzando un panno morbido o leggermente inumidito.
• A fine operazione assicurarsi che tutte le parti interessate alla pulizia siano com-
pletamente asciutte.
9
Rimozione e pulizia blocco lame
• Spegnere l‘apparecchio e staccare la spina dell‘adattatore 9(fig. A).
• Rimuovere il pettine regolabile 7(fig. A) osservando le indicazioni riportate in“Uti-
lizzo senza il pettine regolabile“.
• Premere la parte centrale della testina 3o 4(fig. A) verso il basso usando il pollice
fino a quando questa non si apre (fig. C1); quindi estrarla dall‘apparecchio.
• Fare attenzione a non far cadere a terra la testina 3o 4.
• Con la spazzolina 8(fig. A) in dotazione, pulire la testina e la parte interna dell‘ap-
parecchio (fig. C2, C3) .
• Posizionare la linguetta della testina nell‘apposita fessura e fare scattare l‘unità in
posizione (fig. C4).
Lubricazione
Per assicurare l‘affilatura delle lame di taglio è importante lubrificare il blocco lame
(lama fissa e lama mobile) almeno una volta al mese.
Si consiglia di applicare ad intervalli regolari (una volta alla settimana) due/tre gocce
di lubrificante 5(fig. A) direttamente sul blocco lame.
SMALTIMENTO
L‘imballo del prodotto è composto da materiali riciclabili. Dividete le parti in
base alla loro tipologia e smaltitele in accordo con le leggi vigenti in merito
alla tutela ambientale.
Ai sensi della norma europea 2002/96/CE (RAEE), l’apparecchio in disuso
deve essere smaltito in modo conforme al termine del suo ciclo di utilizzo.
Ciò riguarda il riciclaggio di sostanze utili contenute nell’apparecchio e per-
mette la riduzione dell’impatto ambientale. Per maggiori informazioni, rivol-
gersi all’ente di smaltimento locale o al rivenditore dell’apparecchio.
Smaltimento della batterie e dell’adattatore
• Spegnere l‘apparecchio.
• Rimuovere le batterie dal proprio alloggiamento.
Non gettare le batterie e/o l‘adattatore nei riuti domestici.
Questo apparecchio contiene batterie ricaricabili di tipo NI-MH. L‘utilizzatore
finale è tenuto a smaltire le pile in appositi centri di raccolta.
Le pile e gli adattatori usati vengono ritirati gratuitamente nei punti di raccolta del
proprio comune o in qualsiasi negozio di vendita di batterie, pile, ecc.
Oltre ad assolvere un obbligo di legge, si contribuirà così alla salvaguardia dell‘ambiente.
ATTENZIONE! Non ricollegare l’apparecchio alla presa di corrente
dopo aver estratto le batterie.
10
GARANZIA
ELMOT, by Gammapiù s.r.l., produce apparecchi di qualità con l’impiego di materiali
selezionati.
Ogni apparecchio inoltre, è sottoposto ad accurati controlli prima della distribuzione.
La Garanzia ELMOT è valida secondo i termini di legge vigenti, decorre dalla data di
acquisto e copre i costi di riparazione. Fa fede la data riportata sullo scontrino/fattura.
L’apparecchio deve essere consegnato a Gammapiù s.r.l. o presso i Centri Assistenza
Autorizzati. La Garanzia ELMOT decade nei tempi prevista dalla legge vigente, anche
se l’apparecchio non è stato utilizzato.
La Garanzia ELMOT copre i difetti qualitativi dell’apparecchio riconducibili ai materiali
o alla fabbricazione.
ATTENZIONE! La Garanzia ELMOT decade nel caso in cui sull’apparecchio si ri-
scontrino interventi diretti dell’acquirente o manipolazione da parte di perso-
nale non autorizzato da Gammapiù s.r.l.
LA GARANZIA NON COPRE:
• Danni causati da uso non conforme, trattamenti impropri o rotture da trasporto.
• Danni causati dalla mancata osservanza delle istruzioni d’uso.
• Danni causati dall’uso dell’apparecchio con tensione di rete non corretta.
• Apparecchi sui quali siano montati accessori di altri produttori.
• Difetti che influiscono in modo irrilevante sul valore o sulla possibilità d’uso del
prodotto.
• Parti soggette a normale usura.
ASSISTENZA TECNICA
Per eventuali riparazioni consultare ˝Centri assistenza tecnica (IT)˝ indicati nel pre-
sente manuale per contattare l‘assistenza più vicina e comunicare il modello del
prodotto.
Per la lista aggiornata dei centri assistenza consultare il sito internet:
www.elmothairline.it
Il produttore si riserva il diritto di apportare in ogni momento e senza alcun preavviso modifiche
e/o sostituzione delle parti, ove lo ritenesse più opportuno, per offrire sempre un prodotto affida-
bile, di lunga durata e con tecnologia avanzata.

11
GENERAL SAFETY WARNINGS
To avoid damage and dangers due to improper use, carefully follow the
instructions for use and keep them in a safe place. If the product is han-
ded over to a third party also provide the instruction booklet.
UNPACKING AND INSPECTING THE PRODUCT
Remove the product from its packaging and make sure it is intact and has no visible
signs of damage caused during transport.
In case of doubt, do not use the appliance and contact the nearest Technical Assis-
tance Centre.
ATTENTION! DANGER FOR CHILDREN.
The packaging materials (bags made of plastic, polystyrene foam, etc.)
must not be left within reach of children as they are potential sources
of danger.
ATTENTION! Appliance with professional performance.
EN
Translation of the original instructions
EXPLANATION OF SYMBOLS
Our products comply with the Electromagnetic Compatibility Directive
2004/108/EC and Low Voltage Directive 2006/95/EC.
An appliance is classified as class III when the protection against electrocu-
tion is guaranteed by the fact that the appliance does not contain voltages
greater than the Safety Extra-Low Voltage (SELV). This appliance is powered
either by a battery or an SELV transformer.
Class III appliances do not require earthing.
This symbol indicates that the product meets the requirements of the new
directives introduced so as to protect the environment and must be dispo-
sed of appropriately at the end of its life cycle. Request information from the
local Authorities about the areas dedicated to waste disposal.
This symbol, generally together with the description, informs the user that
there are important operations and instructions to be read.
DO NOT IMMERSE THE PRODUCT IN WATER OR OTHER LIQUIDS.
All the figures and parts detailed in them are shown on page 2 of this manual; the inst-
ructions that follow provide a part reference and the number of the figure, e.g.: 1(fig. A).
12
ELECTRICAL SAFETY PRECAUTIONS
Using electrical appliances requires compliance with some basic regulations.
WARNING: do not use this appliance while close to bathtubs, sinks or
other containers that hold water!
Never place the appliance in water or other liquid!
Do not touch the appliance if it has fallen into any liquid.
In particular:
• never touch the appliance with wet or damp hands or feet;
• do not use the appliance with bare feet;
• do not remove the plug from the socket by pulling the power cord or the ap-
pliance;
• do not expose the appliance to the elements (rain, sun, etc.);
• do not let children play with the appliance.
• When the appliance is used in a bathroom, unplug it after using it as it can still
pose a hazard when switched off and placed near water.
• Always remove the plug from the socket without pulling on the cord.
• Do not use the product if the cord or other parts are damaged. If the power cord
is damaged it must be replaced by the manufacturer or the relevant technical
assistance or in any case by a person with similar skills in order to prevent any risk.
• Further protection is provided with the integration, in the home electric circuit, of
a fault current protection device with a nominal trigger current no greater than
30mA.
• Contact your electrician for further information. The safety of these electrical appli-
ances conforms with known technical rules and with the laws regarding the safety
of electrical appliances.
• Do not leave the plug inserted unnecessarily in the socket; unplug the appliance
when not in use.
• Place the product on a flat, stable surface, away from sources of heat.
GENERAL USE WARNINGS
Refer to the outer packaging and the specications on the data plate axed to the
product itself for the relevant technical specications.
Use the appliance only for the intended purpose; do not use it on wigs
or on animal hair. The manufacturer declines all liability concerning
misuse of the appliance.
Do not wind the power adapter cable around the adapter to avoid da-
mage and to avoid any risks derived from the damage.
13
During charging and use, the appliance may become hot; this is nor-
mal.
• Make sure that the mains voltage matches the one shown on the technical data
plate on the appliance and on the power adaptor.
• Keep out of reach of children. Children must not use or play with the appliance.
• The appliance is not designed to be used by persons (including children) with
reduced physical, sensory or mental capacities, or with a lack of experience or
knowledge, unless they are supervised or provided with sufficient instruction on
the use of the appliance by a person responsible for their safety. Children must be
supervised to ensure that they do not play with the appliance.
Cleaning and main-
tenance must not be performed by children without supervision.
• To guarantee the proper and safe functioning, should the device fall or impact
violently, have it checked at an authorized customer service centre.
• The power cord must never come into contact with the appliance.
• Always disconnect the appliance after use.
• Use, charge and store the appliance at a temperature between 0 °C and 40 °C.
DESCRIPTION OF THE APPLIANCE AND ITS
ACCESSORIES
Make sure your appliance is provided with the correct accessories (fig. A).
1 ON/OFF Switch
2 Body-Handle
3 U-blade head for cutting and finishing
4 Precision design head for styling
5 Blade lubrication oil
6 Charger base
7 Adjustable guide comb for U-blade head
8 Brush for cleaning
9 AC/DC power adapter with power cable
10 Charging light (red) and operating light (green)
CHARGING THE APPLIANCE
This appliance can be used on battery power or connected directly to
the mains power supply.
Do not recharge the appliance if the ambient temperature is below 0
°C or above 40 °C.
14
USING FOR THE FIRST TIME. The appliance can be charged by connecting the
adaptor directly to the appliance or by connecting it via the base.
1) Direct connection: connect adaptor connector 9(fig. A) to the port at the
bottom
of the appliance.
2) Connection through base: insert the appliance into the base 6(fig. A) and the
power adaptor 9(fig. A) into the port at the bottom of the base.
3) In both cases, connect the other end of the power adapter to the mains power
supply.
4) Charge the appliance for 8 hours before using for the first time.
When charging is complete, the red charging LED 10 (g. A) does not
turn o or change colour.
Do not charge the appliance for longer than the recommended time;
overcharging reduces the life of the rechargeable batteries.
When the appliance is fully charged it can operate for 45 minutes without being con-
nected to the mains.
Before using the appliance, always ensure it is completely dry.
CHARGING AFTER THE FIRST USE.
Do not charge the appliance every day.
• Ensure that the appliance is completely dry.
• Ensure that the appliance is off, or turn it off at the switch 1(fig. A).
• Charge the appliance as described in the paragraph„USING FOR THE FIRST TIME.“
PROLONGED PERIOD OF DISUSE
If the appliance is not going to be used for a period greater than six months, it should
be charged for 8 hours, as described in paragraph„USING FOR THE FIRST TIME“, before
being put away into storage.
If the battery discharges and provides little charge, replace it with the same model or
request a replacement from the authorised assistance service.
Recommendations for preserving battery life:
• Do not charge the appliance every day.
• Completely drain the battery every six months, then recharge following the inst-
ructions described in the paragraph„USING FOR THE FIRST TIME“.
• Do not charge the appliance for longer than the recommended time; overchar-
ging reduced the life of rechargeable batteries.
Fully charge the appliance at least once a year.

15
USE
ATTENTION! Do not use the appliance if the blades of the heads 3 and
4 (g. A) are damaged or if the blade block is not working correctly.
Do not use the appliance on wet hair.
The Elmot-024 rechargeableTrimmer is a multifunctional product designed for finish-
ing and styling, with two different heads and an adjustable guide comb.
TURNING THE APPLIANCE ON AND OFF.
Turning on
• Move switch 1(fig. A2) to the ON position; the LED 10 (fig. A) will light up green.
Turning o
• Move switch 1(fig. A2) to the OFF position; the LED 10 (fig. A) will go out.
USEFUL TIPS FOR CUTTING
• Wash the hair as usual, dry and brush it in the direction of growth to untangle
any knots.
• After drying, do not use hairspray, mousse or gel.
• Start with the highest setting of the adjustable guide comb 7(fig. A1) and gradu-
ally reduce the hair length setting.
• For best results, use the appliance against the direction of hair growth.
• If hair starts to clog the adjustable guide comb 7, remove the guide comb from
the appliance (see par. „Removing the adjustable guide comb“) and clean away
the hair (blow and/or brush out).
• Use the U-blade head 3(fig. A1) to cut and finish.
• Use the precision design head 4(fig. A1) for styling.
USING THE APPLIANCE
Use of the adjustable guide comb for the U-blade head.
To insert the adjustable U-blade guide comb 7(fig. A) follow the instructions below:
• Check that the appliance is off.
• Slide the adjustable guide comb 7onto the head until you hear it click into place
(fig. B1).
• Ensure that the guide comb 7is correctly inserted in the slots on either side.
• With the adjustable guide comb 7inserted, the appliance has 5 different hair
length settings:

16
ADJUSTABLE GUIDE
COMB FOR U-BLADE
HEAD (7)
Position Comb setting
(n.) Hair length obtained (mm)
13 3
24 4
35 5
46 6
57 7
• Push the adjustable guide comb and slide it to the hair length setting you want
(fig. B2).
• Turn on the device.
• Cut the hair; for tips see par.„USEFUL TIPS FOR CUTTING“.
Turn o the appliance before changing or inserting any accessories.
Removing the adjustable guide comb
• Turn off the appliance.
• Push the adjustable guide comb 7so that it slides off the appliance (Fig. B3).
• Follow the instructions described in chap. “Removing and cleaning the blade
block”.
Using without the adjustable guide comb.
When using the appliance without the adjustable guide comb (7), the
blade of the head (3, 4) will cut the hair very close to the skin.
The appliance can be used without the adjustable guide comb 7to cut the hair very
close to the skin (0.8 mm) or to redefine the hairline of the neck and around the ears.
If the appliance has been used with the adjustable guide comb and is then to be used
without it, remove the comb as described in par. “Removing the adjustable guide
comb”, then:
• Turn on the appliance and cut as desired.
• When finished cutting, turn off the appliance.
• Proceed as described in chap. “Removing and cleaning the blade block”.
MAINTENANCE
GENERAL CLEANING
Always disconnect the power cord from the mains socket before cleaning.
• Avoid all risk of electric shock by not cleaning the appliance with water and
do not immerse it in water.
• Do not use abrasive solutions or concentrated detergents.
• Clean the exterior with a soft cloth or slightly damp cloth.
• After use, make sure that all parts are completely dry.

17
Removing and cleaning the blade block
• Turn off the appliance and remove the power adaptor from the mains socket 9)
fig. A).
• Remove the adjustable guide comb 7(fig. A) following the instructions provided
in the chapter “Using without the adjustable guide comb“.
• Press the central part of the head 3or 4(fig. A) downwards with your thumb until
it opens (fig. C1); then remove it from the appliance.
• Take care not to drop the head 3or 4.
• Use the brush provided 8(fig. A) to clean the head and inside the appliance (fig.
C2, C3) .
• Position the tab of the head in its slot and click the unit into position (fig. C4).
Lubrication
To ensure that the cutting blade remains sharp, the blade block must be lubricated
(fixed blade and mobile blade) at least once a month.
It is recommended to apply two to three drops of lubricant 5(fig. A) directly to the
blade block at regular intervals (once a week).
DISPOSAL
The product packaging is made of recyclable materials. Separate the parts
according to their type and dispose of them in accordance with applicable
laws on the environmental protection.
In accordance with the European Directive 2002/96/EC (WEEE), the unused
appliance must be disposed of appropriately at the end of its life cycle. This
concerns the recycling of useful parts of the appliance and allows a reduction
in the environmental impact. For more information, please contact your local
waste disposal facility or appliance retailer.
Disposing of the battery and power adapter.
• Turn off the appliance.
• Remove the battery from its compartment.
Do not dispose of the batteries and/or power adapter with normal
domestic waste.
This appliance contains Ni-MH type rechargeable batteries. The end user is
responsible for disposing of the batteries at a special waste collection centre.
The batteries and power adapters are collected free of charge at collection points set
up by your local council or by any battery retailer.
By doing this, you not only comply with the law, but also help protect our environment.
ATTENTION! Do not reconnect the appliance to the power supply once
the batteries have been removed.

18
WARRANTY
ELMOT, by Gammapiù s.r.l., produces quality appliances using carefully selected ma-
terials.
Furthermore, each appliance is subjected to careful quality control checks before
being distributed. The ELMOT Warranty is valid under the current terms of law, is valid
from the date of purchase, and covers repair costs. Proof is the date shown on the re-
ceipt/invoice. The appliance must be delivered to Gammapiù s.r.l. or their Authorised
Assistance Centres. The ELMOT Warranty expires after the period prescribed under
applicable legislation, even if the appliance has not been used.
The ELMOT Warranty covers any qualitative defects in the appliance due to materials
or its manufacturing.
ATTENTION! The ELMOT Warranty is void if, on the appliance, there are found
to be direct interventions by the user or manipulation by personnel not autho-
rised by Gammapiù s.r.l.
THE WARRANTY DOES NOT COVER:
• Damage caused by non-compliant use, improper treatment or breakage during
transport.
• Damage caused by non-compliance with the user instructions.
• Damage caused by use of the appliance with incorrect mains voltage.
• Appliances which mount accessories from other manufacturers.
• Defects that do not affect the value of the ability to use the product.
• Parts subject to normal wear.
TECHNICAL SUPPORT
For an updated list of assistance centres visit the website:
www.elmothairline.it
The manufacturer reserves the right to make changes and/or replace parts at any time and wi-
thout prior notice if it deems it appropriate in order to always offer a reliable and long-lasting
product with advanced technology.

19
MISES EN GARDE GÉNÉRALES SUR LA SÉCURITÉ
Pour éviter des dommages et des dangers dus à une utilisation non
conforme, observer scrupuleusement et conserver les instructions
pour l'utilisation. Si l'appareil est cédé par la suite à des tiers, leur four-
nir également le mode d'emploi.
DÉBALLAGE ET CONTRÔLE DU PRODUIT
Sortir le produit de son emballage et s‘assurer qu’il soit intact et qu‘il ne présente pas
de signes visibles d‘endommagement dus au transport.
En cas de doutes, ne pas utiliser l‘appareil et contacter le Centre d‘Assistance tech-
nique le plus proche (consulter « ASSISTANCE TECHNIQUE (FR) » indiqués dans le
présent manuel).
ATTENTION ! RISQUE POUR LES ENFANTS.
Les éléments de l’emballage (sachets en plastique, polystyrène expan-
sé, etc.) ne doivent pas être laissés à la portée des enfants puisque ce
sont des sources potentielles de danger.
ATTENTION ! Équipements professionnels performants.
FR
Traduction des instructions originales
EXPLICATION DES SYMBOLES
Nos produits sont conformes à la Directive de Compatibilité Électromagné-
tique 2004/108/CE et à la Directive de basse Tension 2006/95/ CE.
Un appareil est défini de classe III lorsque la protection contre l'électrocution
s'en remet au fait que des tensions supérieures à la très basse tension de
sécurité SELV (Safety Extra-Low Voltage) sont absentes. Cet appareil est ali-
menté par une batterie ou par un transformateur SELV.
Les appareils de Classe III ne doivent pas être dotés de mise à la terre
de protection.
Ce symbole indique que le produit répond aux exigences requises par les
nouvelles directives, introduites pour la protection de l'environnement, et
qu'il doit être éliminé de façon appropriée au terme fin de son cycle de vie.
Demander des informations aux autorités locales concernant les zones dédi-
ées à l'élimination des déchets.
Ce symbole, généralement accompagné de la description, indique à
l'utilisateur qu'il y a des opérations importantes et des instructions à lire.
NE PAS PLONGER LE PRODUIT DANS L'EAU OU DANS D'AUTRES LIQUIDES.
Toutes les figures et les détails de celles-ci sont reportés à la page 2 du manuel présent ; la
référence du détail et le numéro de la figure sont indiqués dans les instructions suivantes,
par exemple : 1(fig. A).
20
MISES EN GARDE SUR LA SÉCURITÉ ÉLECTRIQUE
L‘emploi d‘appareils électriques comporte le respect de certaines règles fondamen-
tales.
MISE EN GARDE : ne pas utiliser le présent appareil à proximité de baig-
noires, de lavabos ou d'autres récipients contenant de l'eau !
Ne jamais plonger l'appareil dans l'eau ni dans un autre liquide !
Ne pas toucher l'appareil s'il est tombé dans un liquide quelconque.
En particulier :
• ne jamais toucher l‘appareil avec les mains, les pieds mouillés ou humides ;
• ne pas utiliser l‘appareil avec les pied nus ;
• ne pas tirer sur le câble d‘alimentation ni l’appareil pour débrancher la prise ;
• ne pas exposer l‘appareil à des éléments atmosphériques (pluie, soleil, etc.) ;
• ne pas laisser les enfants jouer avec l‘appareil.
• Quand l‘appareil est utilisé dans des salles de bains, le débrancher de l‘alimentation
après l‘utilisation car la proximité de l‘eau peut représenter un danger également
quand l‘appareil est éteint.
• Toujours extraire la fiche de la prise de courant, sans tirer sur le câble.
• L‘appareil ne doit pas être utilisé si le câble est endommagé ou s‘il présente des
dommages apparents. Si le câble d‘alimentation est endommagé, il doit être rem-
placé par le constructeur ou par son service d‘assistance technique ou, dans tous
les cas, par une personne de qualification similaire, de façon à éviter tout risque.
• Une autre protection consiste à intégrer dans le circuit électrique domestique
un dispositif de sécurité contre les courants de défaut, avec un courant nominal
d‘intervention ne dépassant pas 30 mA.
• Nous recommandons de contacter un électricien de confiance pour plus
d‘informations. La sécurité de ces appareils électriques est conforme aux règles de
la technique reconnues et à la loi sur la sécurité des appareils électriques.
• Ne pas laisser la fiche inutilement insérée dans la prise de courant, mais la débran-
cher lorsque l‘appareil n‘est pas utilisé.
• Positionner le produit sur des surfaces planes et stables, loin de sources de chaleur.
MISES EN GARDE GÉNÉRALES SUR L’UTILISATION
Pour les caractéristiques techniques, se référer à l’emballage extérieur et aux indi-
cations reportées sur la plaque signalétique qui se trouve sur le produit.
Utiliser l'appareil uniquement dans le but préposé, ne pas utiliser sur
des perruques ou des poils d'animaux. Le constructeur décline toute
responsabilité en ce qui concerne l’usage impropre de l’appareil.
Ne pas enrouler le câble de l'adaptateur autour de celui-ci an d'éviter
de l'endommager et de prévenir tout risque associé.
Table of contents
Languages:


