EMFA PATNOS 4 User manual

www.emfa.com.tr
TR
EN
-
-
-
-
-
-
-
-
-
-
163032
PATNOS 4 RECESSED LED FIXTURE
PATNOS 4 YERE GÖMME LED ARMATÜR
IP 67
Dış Mekan
Kullanım Alanı
KULLANMA TALİMATI
Teknik Özellikler
V : 220-240 V AC
Hz : 50/60
Lens : 10°, 25°, 40°
Gövde : Alüminyum
Difüzör : Temperli Cam
Vidalar : Paslanmaz Çelik A4
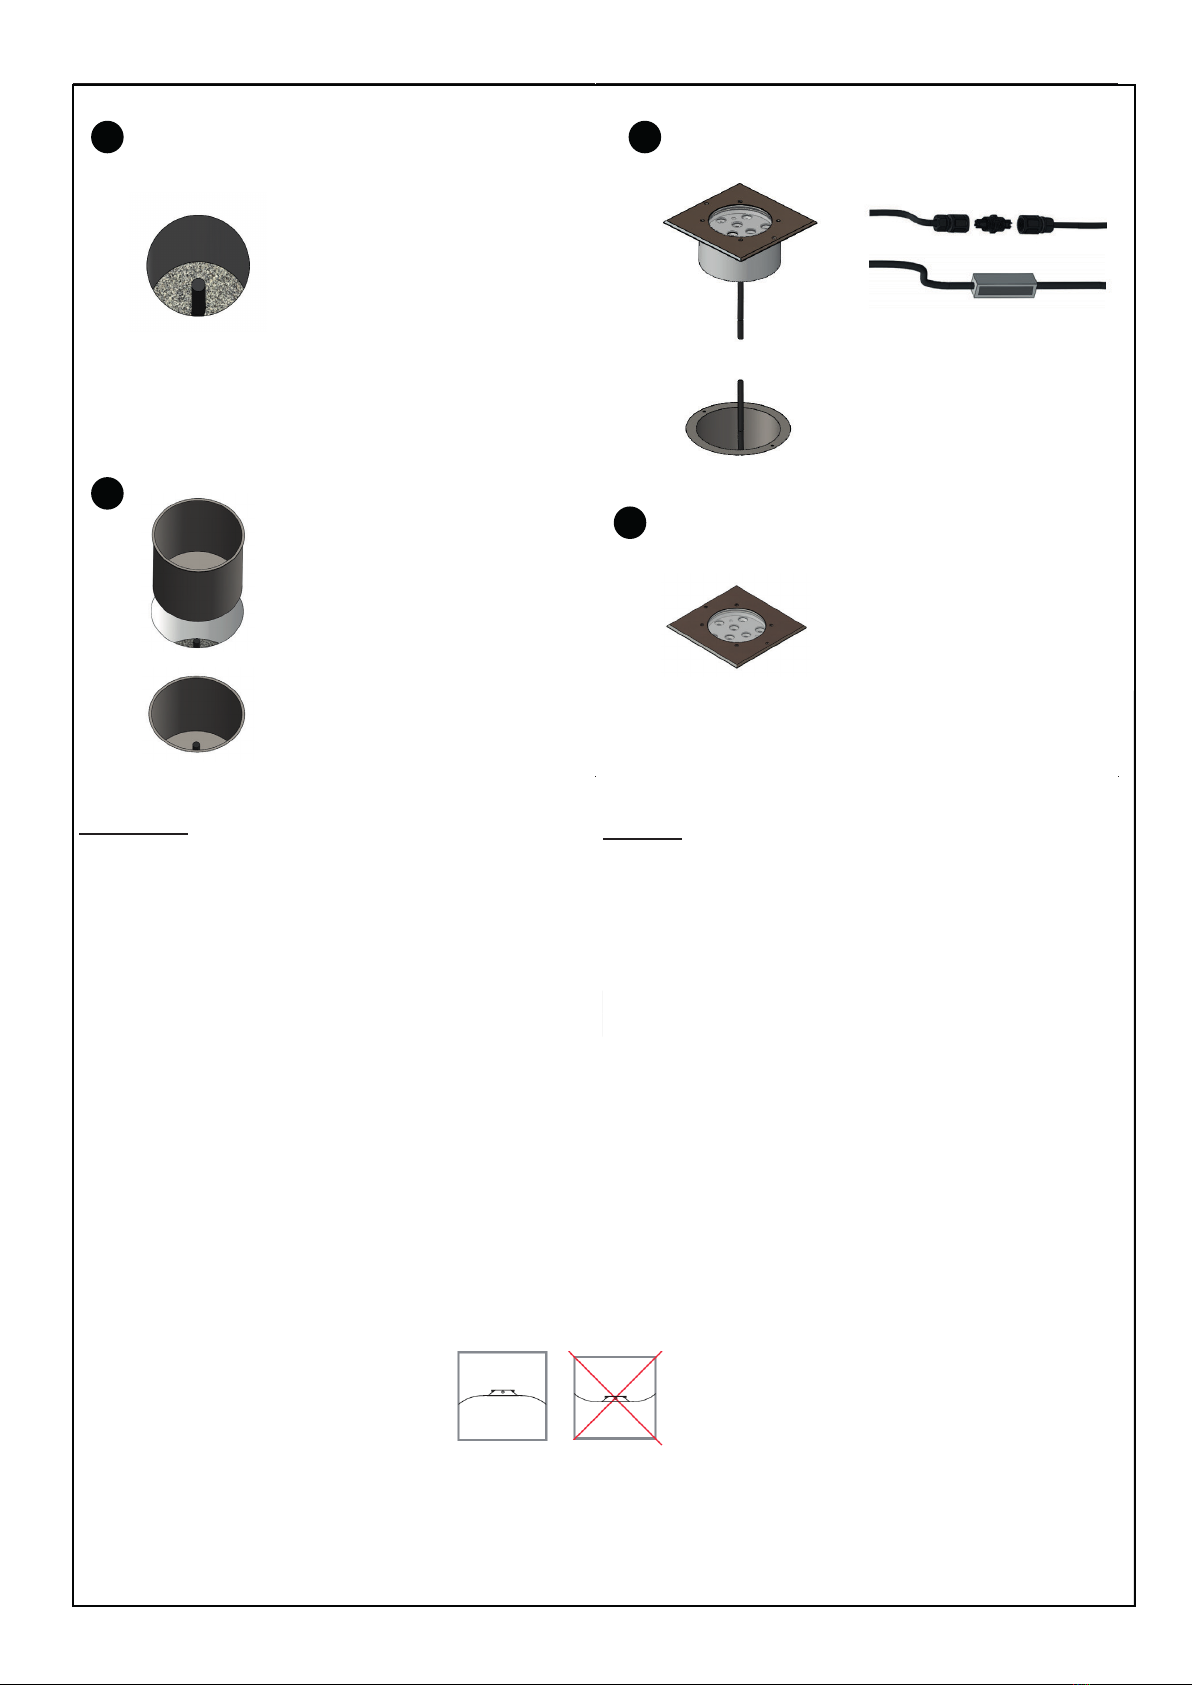
MONTE EDİLİŞİ
- Armatür monte mahalindeki besleme sigortasını kapatınız.
- Armatür ölçülerine göre gömme çukurunu hazırlayınız.
- Drenajı kontrol ediniz.
- Topraklı kablo kullanınız.
- Resimlerde gösterildiği gibi ürünün gerekli elektrik bağlantılarını yapınız.
- Ürünü kullanılacağı yere monte ediniz.
- Besleme sigortasını açarak armatürü çalıştırınız.
INSTRUCTION MANUAL
Exterior Place
Area of use
Technical Facilities
- Prepare the recessed pit according to the luminaire dimensions.
TO ASSEMBLE
- Check the drainage.
- Make the necessary electrical connections of the product as
shown in the pictures.
- Use ground cable.
- Install the product where it will be used.
- Turn on the supply fuse and turn on the armature.
- Turn o the supply fuse in the luminaire mounting area.
V : 220 - 240 V AC
Hz : 50/60
Lens : 10°, 25°, 40°
Body : Aluminium
Diuser : Tempered Glass
Screws : Stainless Steel A4
101
65
Ø 126
160
160
SAFETY
Armatürün monte edileceği deliği açınız.
Kablolama ve direnaj yapıldıktan
sonra 20 - 30 cm yüksekliğinde
çakıl ile doldurunuz.
Direnajı kontrol etmek için açılan çukura
bir kova su dökünüz ve 15-20 dk içerisinde
suyun boşaldığından emin olunuz.
Open the hole for the fixture to be
mounted. After preparing the drainage,
fill the hole with gravel up to 20-30 cm.
To check if the drainage is working
properly, you can pour a bucket of water
into the hole. The water should be drained
in 15-20 minutes.
After completing the connections
luminaire to the prepared area
place it.
Turn on power to operate the fixture.
Bağlantıları tamamladıktan sonra
armatürü, hazırlanan bölgeye
yerleştiriniz.
Montajı tamamlanan armatüre
enerji vererek çalıştırabilirsiniz.
www.emfa.com.tr
1
2
3
4
Hazırladığınız kabloyu armatürün kablosuna
IP 68 konnektör veya özel izolasyon
malzemesi kullanarak bağlayınız.
GÜVENLİK
- Bu armatürün montajı ve çalışması güvenlik yönetmeliklerine
tabidir. Kurulum ve devreye alma sadece kalifiye bir elektrikçi
tarafından yapılmalıdır.,
- Yanlış kurulum veya kullanımlardan dolayı oluşabilecek
zararlardan üreticinin herhangi bir sorumluluğu yoktur.
- Armatürde kullanıcı tarafından sonradan herhangi bir
değişiklik yapılırsa, değişiklikten kaynaklı oluşabilecek olan herhangi
bir sorundan kullanıcı sorumludur.
- Bu armatür seyyar elde kullanmaya uygun değildir. Sabit ve güvenli
bir yere montaj edilmelidir.
- Armatürün harici bükülgen kablo veya kordonunun hasar görmesi
durumunda, bir tehlike meydana gelmesini engellemek için
yalnızca imalatçı veya onun yetkili servisi ya da eşdeğer nitelikte
kalifiye personel tarafından değiştirilmesi gerekir.
- Olabilecek arızalar için arızalı ürünlere hiçbir müdahale yapılmadan
yerinden sökülerek üretici firmaya ulaştırılmalıdır. Ürünlerin yerinden
sökümü esnasında kablo izolasyonuna hasar verilmemelidir. Ayrıca
kablo ürüne çok yakın kesilmemelidir. Müdahale edilecek mesafe
bırakılmalıdır.
- Arıza ile ilgili yapılacak testler sonucunda oluşacak olan rapor
müşteri ile paylaşılacak, gereği halinde garanti kapsamında
olumsuzluklar giderilerek ürün müşteriye geri teslim edilecektir.
- Armatür içindeki ışık kaynağı sadece imalatçı tarafından ya da
imalatçının yetkili servisi ya da eşdeğer nitelikte bir kişi tarafından
değiştirilmelidir.
Connect the cable you prepared to the cable
of the luminaire with use an IP68 connector or
special insulation material.
Armatür su birikintisi oluşacabilecek zeminlere montaj edilmemelidir.
The luminaire should not be mounted on oors where water puddles may occur.
- Installation and operation of this luminaire comply with safety regulations.
Installation and activation should only be done by a qualified electrician.
- The manufacturer is not responsible for any damage caused by incorrect
installation or use.
- If any changes are made in the fixture by the user after the sale, the user is
responsible for any problem that may occur due to the change.
- This fixture is not suitable for handheld use. It should be mounted in a
fixed and safe place.
- In case the external exible cable or cord of the fixture is damaged;
to avoid a danger it should only be replaced by the manufacturer or its
authorized service or equivalent qualified personel.
- For possible malfunctions, the defective products must be disassembled
and delivered to the manufacturer company without any invervention.
During the dismantling of the product, the cable insulation should not be
damaged. Also, the cable should not be cut too close to the product.
Enough cable should be left to take out the fixture.
- The report, which will be formed as a result of the tests to be made regarding
the malfunction, will be shares with the customer, and if necessary, the product
will be delivered back to the customer by eliminating the problems according
to the warranty.
- The light source in the fixture should only be replaced by the manufacturer’s
authorized service or an equivalent person.
Kabloyu gömme kasasının deliğinden geçiriniz.
Gömme kasasını zemine yerleştiriniz.
Pass the cable through the hole of the recessed case.
Place the recessed case on the oor.
This manual suits for next models
1
Popular Outdoor Light manuals by other brands

Kichler Lighting
Kichler Lighting HELEN 37536 instructions

Thorn
Thorn OXANE L installation instructions

esotec
esotec Solar Globe Light multicolor 20 operating instructions

mitzi
mitzi HL200201 ELLIS Assembly and mounting instructions

HEPER
HEPER TILA S AFX 3 Module Installation & maintenance instructions

Designplan
Designplan TRON 180 installation instructions


BEGA
BEGA 84 253 Installation and technical information

HEPER
HEPER LW8034.003-US Installation & maintenance instructions

HEPER
HEPER MINIMO Installation & maintenance instructions

LIGMAN
LIGMAN BAMBOO 3 installation manual

Maretti
Maretti TUBE CUBE WALL 14.4998.04 quick start guide

Maxim Lighting
Maxim Lighting Carriage House VX 40428WGOB installation instructions