emissimo MAYOOR M5 User manual

Instruction manual
Bedienungsanleitung
Инструкция по эксплуатации
Electric Thermopot MAYOOR M5
Elektrischer Thermo-Wasserkocher / Thermopot MAYOOR M5
Термопот MAYOOR M5

CONTENT
INHALT
СОДЕРЖАНИЕ
EN......................................................................................................................................3
DE....................................................................................................................................14
RU ...................................................................................................................................26

3EN
THERMOPOT MAYOOR M5
Thermopot is intended for boiling water and
maintaining its temperature at a set level.
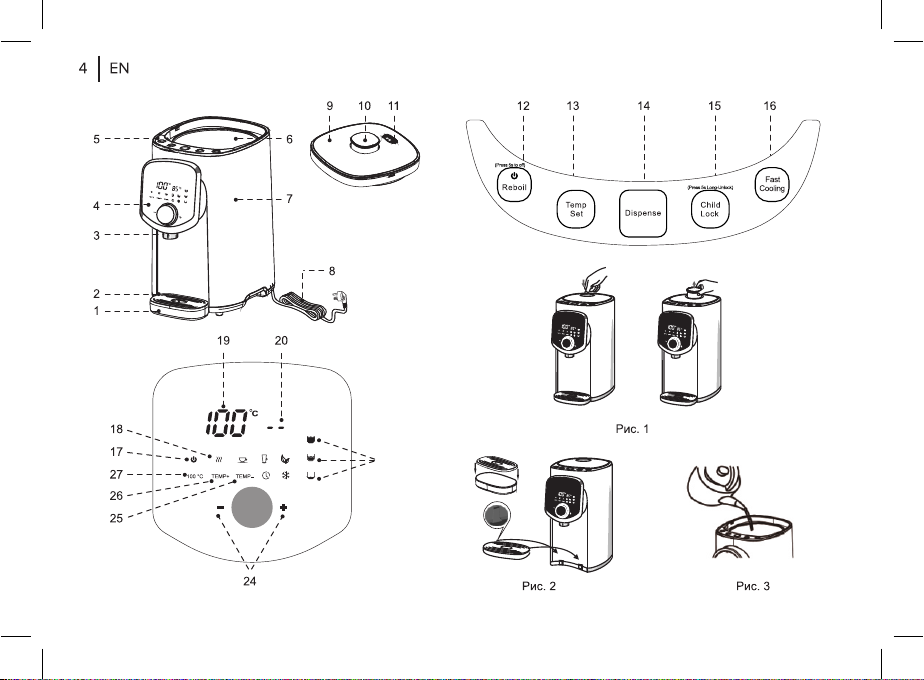
DESCRIPTION
1. Tray
2. Tray grid
3. Spout for pouring water
4. Indication/temperature selection panel
5. Control panel
6. Thermopot ask
7. Body
8. Power cord
9. Detachable lid
10. Lid lock handle
11. Steam release openings
Control panel
12. On/o/re-boil button «Start/re-boil»
13. Water temperature selection button «Temperature
selection»
14. Water dispense on button «Water dispense»
15. Lock on/o button «Lock»
16. Switching on the water cooling mode «Quick
cooling»
ATTENTION!
For additional protection it is reasonable to install a
residual current device (RCD) with nominal operation
current not exceeding 30 mA into the mains. To install
RCD, contact a specialist.
EN
Indication/temperature selection panel
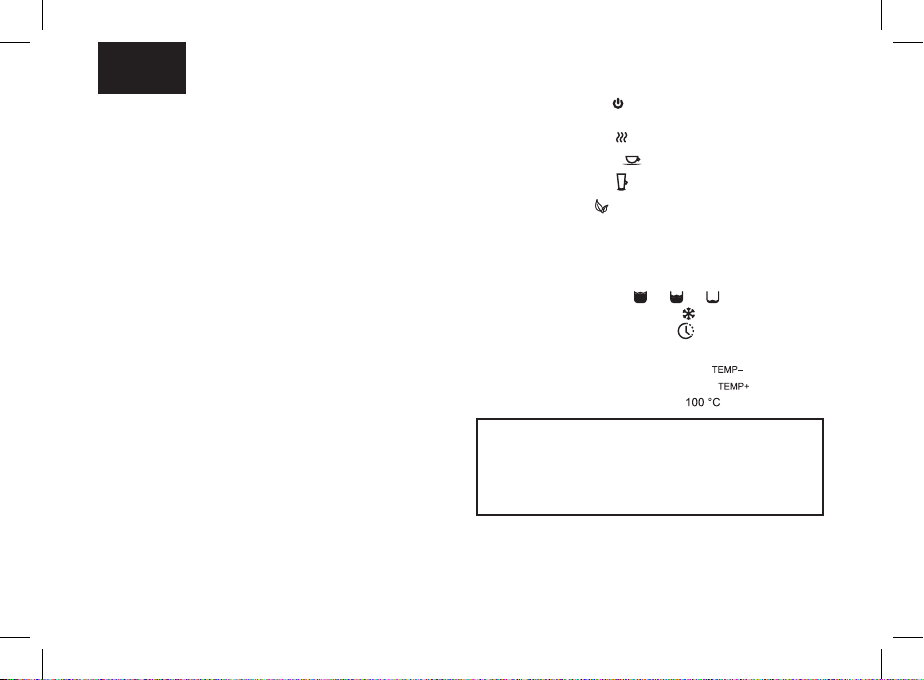
17. Stand-by mode symbol « »
18. Symbols of modes:
- water boiling « »
- water for black tea brewing « »
- water for coee brewing « »
- water for herbal tea brewing « »
19. Water heating temperature digital symbols
20. Hot water keep warm mode digital symbols
21. Symbols of volume of water in the thermopot ask
« », « », « »
22. Water cooling mode on symbol « »
23. Long boiling mode symbol « »
24. Temperature mode setting adjuster «-/+»
25. Water temperature setting symbol « »
26. Water temperature setting symbol « »
27. Water boiling mode symbol « »
水量
水量
21

5EN
SAFETY MEASURES AND OPERATION
RECOMMENDATIONS
Read the operation instructions carefully before
using the thermopot and keep it for future reference.
•Use the thermopot for its intended purpose only, as it
is stated in this manual.
•Mishandling the thermopot can lead to its breakage
and cause harm to the user or damage to his/her
property and it is not covered by warranty.
• The thermopot is intended for heating and boiling
drinking water only, do not heat or boil any other
liquids.
• Make sure that operating voltage of the thermopot
indicated on the label corresponds to your home mains
voltage.
• The power plug is equipped with a grounding contact,
plug it into the socket with
• reliable grounding contact. In case of short circuit the
grounding reduces the risk of electric shock.
• Contact an electrical technician, if you are not sure
that your sockets are installed properly and grounded.
• To prevent re do not use adapters designed for
connecting the plug to the mains socket without
grounding contact.
• In case of sparking in the mains socket and
occurrence of smell of burning, unplug the unit and
apply to the organization maintaining your home
mains.
• If smoke appears from the body of the thermopot,
unplug the unit and take measures to prevent re
spreading.
•Do not use the thermopot outdoors.
• It is not recommended to use the unit during lightning
storms.
• Protect the unit from impacts, falling, vibrations and
other mechanical stress.
•Do not switch the thermopot on if the water tank is
empty.
•Do not ll the thermopot with water directly from the
faucet; to ll the thermopot use a suitable bowl.
• Do not place the thermopot next to the walls or close
to the kitchen furniture.
•Place the thermopot keeping at least 20 cm gap
between the thermopot body and the wall and at
least 50 cm gap above the thermopot.
•Never leave the plugged-in thermopot unattended.
• Do not use the thermopot in proximity to kitchen
sink, in bathrooms, near swimming pools or other
containers lled with water.
•Do not use the thermopot near heating appliances,
heat sources or open ame.
• Do not use the thermopot in places where aerosols
are used or sprayed, and in proximity to inammable
liquids.
•Place the thermopot on a at stable surface; do not
place it on the edge of a table. Do not let the power
cord hang from the edge of the table and make sure

6EN
it does not touch hot surfaces or sharp edges of
furniture.
•Do not touch the power cord and the power plug with
wet hands.Do not switch the thermopot on without
water, after the thermopot is lled, close the lid tightly.
•Ensure that the water level is not above the maximal
mark. If the water level exceeds the maximal mark,
boiling water can splash out of the thermopot during
boiling.
• To avoid burns by hot steam, do not bend over the
steam release openings in the thermopot lid. Do not
block the steam release openings with any objects.
• Do not open the thermopot lid while water boiling.
• Be careful while carrying the thermopot lled with
boiling water.
• Be very careful when pouring hot water out of the
thermopot.
• Unplug the thermopot before cleaning or when you
are not using it. When unplugging the thermopot hold
only the power cord plug and carefully remove it from
the mains socket, do not pull the power cord — this
can lead to damage of the power cord or the socket
or cause short circuit.
• To avoid electric shock do not immerse the thermopot
into water or any other liquids.
• Do not wash the thermopot in a dishwashing
machine.
• For children safety reasons do not leave polyethylene
bags, used as a packaging, unattended.
ATTENTION!
Do not allow children to play with polyethylene bags
or packaging lm. Danger of suocation!
• The thermopot is not intended for usage by children.
• Do not leave children unattended to prevent using
the unit as a toy.
•Do not allow children to touch the unit and the power
cord during the thermopot operation.
• Place the unit out of reach of children during the
operation and cooling down.
• This unit is not intended for usage by physically or
mentally disabled persons (including children) or by
persons lacking experience or knowledge if they are
not under supervision of a person who is responsible
for their safety or if they are not instructed by this
person on the usage of the unit.
•Check the integrity of the power cord, the power plug
and the thermopot body periodically.
• If the power cord is damaged, it should be replaced
by the manufacturer, a maintenance service or
similar qualied personnel to avoid danger.
•If the power cord is damaged, it should be replaced
with a power cord received from the manufacture or
service.
•Transport the thermopot in the original package.
• Keep the unit out of reach of children and disabled
persons.

7EN
THERMOPOT IS INTENDED FOR HOUSEHOLD USE
ONLY, DO NOT USE THE COFFEE MAKER FOR
COMMERCIAL OR LABORATORY PURPOSES.
BEFORE USING THE THERMOPOT
After unit transportation or storage at low
temperature keep it for at least 3 hours at room
temperature before switching on.
•Unpack the thermopot and remove all the packaging
materials.
• Keep the original package.
• Read the safety measures and operating
recommendations.
• Check the delivery set.
• Examine the thermopot for damages, in case of
damage do not plug it into the mains.
• Make sure that the specications of power supply
voltage specied on the label correspond to the
specications of your mains.
• Wipe the outer surface of the unit body (7) with a
clean, slightly damp cloth to remove dust.
• Remove the lid (9), to do this, press the lid lock
handle (10), take it and remove the lid (9) (pic. 1).
• Wipe the inner surface of the thermopot ask (6) with
a clean, slightly damp cloth to remove dust. Install
the lid (9) back to its place and press the lock handle
(10).
•
SWITCHING ON FOR THE FIRST TIME
•Place the thermopot on a dry at surface so that
the distance between the thermopot and the wall or
furniture is at least 20 cm and the free space above
the thermopot is at least 50 cm.
•Place the grid (2) on the tray (1), place the tray (1) on
the installation place (pic. 2).
• Remove the lid (9), to do this, press the lid lock
handle (10), take it and remove the lid (9) (pic. 1).
• Fill the thermopot with water using a suitable
cookware, do not exceed the maximal water level
mark «FULL» which is located on the inner surface
of the ask (6). Do not ll the thermopot directly
from the faucet; to ll the thermopot use a suitable
cookware (pic. 3).
Note: to reduce the mineral deposit (scale) level, it is
recommended to use the water cleaned with domestic
water lters.
•Install the lid (9) back to its place and press the lock
handle (10) (pic. 1).
• Insert the plug of the power cord (8) into the mains
socket, you will hear a sound signal and all the
symbols will be shown on the display, after that
only the stand-by mode symbol (17) « » will be
glowing, illumination of the button (13) «Temperature
selection» will be glowing on the control panel (5).
• Symbols (21) will show the presence of water in the
thermopot ask (6):

8EN
- « » - the thermopot ask is lled with water by
3/3 of its capacity.
- « » - the thermopot ask is lled by 2/3 of its
capacity.
- « » - low water level, the thermopot ask is lled
by 1/3 of its capacity, it is necessary to ll the
thermopot ask with water, otherwise the heating
element will not switch on.
•Press the button (12) «Start/re-boil» on the control
panel (5), the indicator of the button (12) «Start/re-
boil» will light up, the symbol (27) « » and the
symbol (18) « » will light up, water will start heating
up, the water temperature is shown with digital
symbols (19).
Notes:
-every pressing of buttons on the control panel (5)
is accompanied by a sound signal;
- when switching on for the rst time, a foreign
smell from the heating element can appear, this is
acceptable and it is not covered by warranty.
•The hot water keeping temperature will be shown
with digital symbols (20), the hot water keeping
temperature «85°C» is set by default.
• To avoid suering hot steam burns, do not bend
over the steam release openings (11) located in the
thermopot lid (9). Do not block the steam release
openings (11) with any objects.
•After water boiling the symbol (27) « » will be
ashing for 60 seconds, then it will go out, you will
hear sound signals, the indicator of the button (12)
«Start/re-boil» will go out as well, the thermopot will
switch on in the keep warm mode, the hot water
keeping temperature «85°C» is set by default.
• Drain the water after the rst boiling. Hot water
resulting from the rst boiling is not recommended to
consume, you may use it for domestic needs.
ATTENTION!
Be careful during pouring out water to avoid
suering hot water burns.
•Unlock the activation of the water dispense pump
by pressing the button (15) «Lock», illuminations of
buttons (15) «Lock» and (14) «Water dispense» will
light up.
• Place the cup on the grid (2) and press and hold the
button (14) «Water dispense», once the cup is lled
with the necessary quantity of water, release the
button (14) «Water dispense».
Notes:
-the water is dispensed only when the indicators
of the buttons (14 and 15) are switched on; if
you pressed the button (15) «Lock» and did not
perform any actions, in this case the indicators of
the buttons (14 and 15) will go out in 10 seconds;
-all the water level indicators (21) will be glowing
during water pouring;

9EN
- control the tray (1) lling with water drops; when
the tray (1) is lled up, remove it, drain water and
install the tray (1) back to its place;
-if you have not used the thermopot for a long time,
the water dispense may malfunction. In this case it
is recommended to open and close the lid (9) and
to switch the water dispense on again.
• To switch the thermopot o press and hold the button
(12) «Start/re-boil» for 5 seconds, take the plug of the
power cord (8) out of the mains socket.
• Remove the lid (9) (pic. 1) and allow complete
cooling-down of the thermopot.
• Tilt the thermopot and drain the remaining water,
install the lid (9) back to its place and press the lock
button (10) (pic. 1).
USAGE OF THERMOPOT
•Prepare the thermopot for operation, as specied in
the previous section (ll with water, insert the power
plug into the mains socket).
• Water heating up and keep warm modes selection
•Press the button (12) «Start/re-boil» on the control
panel (5), the indicator of the button (12) «Start/re-
boil» will light up, the symbol (27) « » and the
symbol (18) « » will light up, water will start heating
up, the water temperature is shown with digital
symbols (19).
• After water boiling the symbol (27) « » will be
ashing for 60 seconds, then it will go out, you will
hear sound signals, the indicator of the button (12)
«Start/re-boil» will go out as well, the thermopot will
switch on in the keep warm mode, the hot water
keeping temperature «85°C» is set by default.
•In the hot water keeping warm mode you can set the
hot water keeping temperature for various
beverages by pressing the button (13) «Temperature
selection», the respective symbols (18) light up:
- « » - water boiling mode, water is heated up to
the boil and digital symbols (19) «100°C» are
shown.
- « » - hot water keeping mode up to «95°C» for
black tea brewing, the temperature «95°C» is set
by default. To change the water heating up
temperature use the adjuster (24) «- /+», the
range of temperature selection is from 87°C to
95°C.
- « » - hot water keeping mode up to «85°C»
for coffee brewing, the temperature «85°C» is set
by default. To change the water heating up
temperature use the adjuster (24) «-/+», the range
of temperature selection is from 80°C to 86°C.
- « » - hot water keeping mode up to «70°C» for
making herbal tea, the temperature «70°C» is set
by default. To change the water heating up
temperature use the adjuster (24) «-/+», the range
of temperature selection is from 65°C to 79°C.

10 EN
Water cooling mode
•Press the «Quick cooling» button (16), the symbol
(22) « » will light up and will be ashing, the
thermopot cooling fan will switch on. To switch the
cooling mode o, press the «Quick cooling» button
(16) again, the « » symbol (22) will go out.
Water level scale
•You can control the water level in the thermopot ask
(6) with symbols (21):
- « » - the thermopot ask is lled with water by
3/3 of its capacity.
- « » - the thermopot ask is lled by 2/3 of its
capacity.
- « » - low water level, the thermopot ask is lled
by 1/3 of its capacity, it is necessary to ll the
thermopot ask with water, otherwise the heating
element will not switch on.
•Remove the lid (9), to do this, press the lid lock
handle (10), take it and remove the lid (9) (pic. 1). Fill
the thermopot with water using a suitable cookware,
do not exceed the maximal water level mark «FULL»
on the inner surface of the ask (6). Do not ll
the thermopot directly from the faucet; to ll the
thermopot use a suitable cookware (pic. 3).
• The thermopot will switch on in the water boiling
mode, after water boiling you will hear sound signals
and the thermopot will be switched to the hot water
- (26) « »- hot water keeping mode up to
«55°C», the temperature «55°C» is set by default.
To change the water heating up temperature use
the adjuster (24) «-/+», the range of temperature
selection is from 50°C to 64°C.
- (25) « » - hot water keeping mode up to
«45°C», the temperature «45°C» is set by default.
To change the water heating up temperature use
the adjuster (24) «-/+», the range of temperature
selection is from 40°C to 49°C.
Note:
- when the hot water keeping warm is set below
40°C, the symbols «- -» will be shown instead of
digital symbols (20).
- (23) « » - switching on the long boiling mode,
this mode is used to reduce the level of chlorine
dissolved in water. In this mode water is heated up
to 100°C, the symbol (27) « » will be ashing,
water will be boiling for 3 minutes, after that the
symbol (27) « » will go out, you will hear
sound signals and the thermopot will be switched
to the hot water keeping mode for coee brewing
(18) « », the water temperature «85°C» will be
shown with symbols (20).
•Hot water keeping modes for black tea « », coee
«», herbal tea « », water temperature in a range
of 50-64 °C « » and water temperature 40-49 °C
«» can be selected with adjuster (24) «-/+».
11EN
keeping warm mode for coee brewing, the symbol
(18) « » and digital symbols (20) «85°C» will light
up.
•Where it is necessary to re-boil water, press the
button (12) «Start/re-boil» on the control panel (5),
the indicator of the button (12) «Start/re-boil» will light
up, the symbol (27) « » and the symbol (18) «
» will light up, water will start heating up, the water
temperature is shown with digital symbols (19). After
water boiling the symbol (27) « » will be ashing
for 60 seconds, then it will go out, you will hear sound
signals, the indicator of the button (12) «Start/re-boil»
will go out as well, the thermopot will switch on in the
keep warm mode, the hot water keeping temperature
«85°C» is set by default.
• To switch the thermopot o press and hold the button
(12) «Start/re-boil» for 5 seconds, take the plug of the
power cord (8) out of the mains socket.
Child lock
•Use this function to protect children from hot water
burns.
• To switch the child lock on, press and hold the
«Lock» button (15) for 5 seconds, the indicator of
the buttons (14) «Water dispense» and «Lock» will
light up.
•The button (14) «Water dispense» on the control
panel (5) is inactive in the child lock condition.
•To switch the child lock o press and hold the button
(15) «Lock» for 1 seconds, the indicators of the
buttons (14) «Water dispense» and (15) «Lock» will
light out.
•To switch the thermopot o press and hold the button
(12) «Start/re-boil» for 5 seconds, unplug the unit.
CLEANING AND MAINTENANCE
•Before cleaning the thermopot unplug (8) it, remove
the lid (9) and allow complete cooling-down of the
thermopot. (pic. 1)
•Always drain the remaining water from the thermopot
ask, to do this remove the lid (9).
•Carefully tilt the thermopot to drain the remaining
water.
• Remove the tray (1), remove the grid (2), pour the
water out of the tray (1), wash the tray (1) and the
grid (2). Place the grid (2) on the tray (1) and place
the tray (1) on its installation place.
•Clean the outer surface of the thermopot body (7)
with a slightly damp cloth and then wipe it dry.
• Use neutral detergents to remove dirt, do not use
metal brushes, abrasives and solvents.
• Do not immerse the thermopot and the power cord
(20) into water or other liquids.
• Do not put the thermopot in a dishwashing machine.
Stains on the inner surface of the thermopot ask
• Water contains various minerals that can cause
stains on the inner surface of the thermopot ask, the

12 EN
stains do not aect the operation of the thermopot,
stains are not covered by the warranty.
• You can remove the stains from the inner surface of
the thermopot ask with citric acid solution or table
vinegar.
• To remove the avour of citric acid or vinegar, boil
water and pour it out.
• Repeat this procedure until the smell and foreign
taste vanish completely.
Removing the mineral deposits (descaling)
•Scale, appearing inside the thermopot ask,
inuences the water taste and disturbs the heat
exchange between water and the heating element.
It also risks damaging the heating element. Burning
of the heating element caused by the large amount
of scale in the thermopot ask is not covered by
warranty.
• To remove the scale ll the thermopot with a mixture
of one part ordinary vinegar and two parts water up
to the maximal level mark «FULL».
•Insert the power cord (8) plug into the mains socket.
• Switch the thermopot on in the water boiling mode.
After water boiling switch the thermopot o, to do
this, press and hold the button (12) «Start/re-boil» for
5 seconds, take the plug of the power cord (20 8) out
of the mains socket and leave the thermopot with the
vinegar solution overnight.
• In the morning pour out the vinegar solution, ll the
thermopot with water up to the maximal level, boil it
and pour out the water.
• You can use special descaling agents for electric
kettles, strictly following the instruction.
• Clean the thermopot from scale regularly.
STORAGE
•Before taking the thermopot away for long storage,
disconnect it from the mains, let the unit cool down
and pour out the water.
• Clean the thermopot.
•Keep the thermopot out of reach of children and
disabled persons.
DELIVERY SET
1. Thermopot – 1 pc.
2. Manual – 1 pc.
ECHNICAL SPECIFICATIONS
•Power supply 220-240 V, ~ 50-60Hz
• Rated input power: 1200-1450 W
•Water tank capacity: 5 l
13EN
RECYCLING
To prevent possible damage to the
environment or harm to the health of
people by uncontrolled waste disposal,
after expiration of the service life of the unit
or the batteries (if included), do not discard
them with usual household waste, take the
unit and the batteries to specialized stations for further
recycling.
The waste generated during the disposal of products
is subject to mandatory collection and consequent
disposal in the prescribed manner.
For further information about recycling of this product
apply to a local municipal administration, a household
waste disposal service or to the shop where you
purchased this product.
The manufacturer reserves the right to change the
design, structure and specications not aecting
general operation principles of the unit, without prior
notice.
The unit operating life is 3 years
The manufacturing date is specied in the serial
number.
In case of any malfunctions, it is necessary to apply
promptly to the authorized service center.
14 DE
THERMOPOT MAYOOR M5
Mit dem Thermopot können Sie Wasser aufkochen
und die eingestellte Temperatur halten.
BESCHREIBUNG
1. Schale
2. Schalengitter
3. Wasserablauftülle
4. Anzeige-/Temperaturwahlplatte
5. Bedienungsplatte
6. Thermopotbehälter
7. Gehäuse
8. Netzkabel
9. Abnehmbarer Deckel
10. Deckelsperrgriff
11. Dampfablasslöcher
Bedienungsplatte
12. Ein-/Aus-/Kochtaste «Start/Kochen»
13. Wassertemperaturwahltaste «Temperatur»
14. Wasserausgabeschalttaste «Wasserausgabe»
15. Ein-/Ausschalttaste der Verriegelung
«Kindersicherung»
16. Ein-/Ausschalttaste des Wasserkühlbetriebs
«Schnellkühlung»
Anzeige-/Temperaturwahlplatte
ACHTUNG!
Als zusätzlicher Schutz ist es zweckmäßig, den
FI-Schalter mit Nennstrom maximal bis 30 mA im
Stromversorgungskreis aufzustellen; wenden Sie sich
dafür an einen Spezialisten.
DE
17. Betriebssymbol « »
18. Betriebssymbole:
- Wasser kocht « »
- Schwarzer Tee « »
- Kaffeewasser « »
- Kräutertee « »
19. Wasserheiztemperaturzahlensymbole
20. Zahlensymbole des Heißwassertemperaturhaltun
gsbetriebs
21. Symbole des Wasservolumens im
Thermopotbehälter « », « », « »
22. Wasserkühlbetriebssymbol « »
23. Dauerkochbetriebssymbol « »
24. Temperaturbetriebseinstelltasten «-/+»
25. Wassertemperatureinstelltasten « »
26. Wassertemperatureinstellsymbol « »
27. Wasserkochbetriebssymbol « »

水量
水量
Start/
Kochen
Temperatur
5 Sek. drücken
für AUS
Wasser-
ausgabe
5 Sek. drücken
zum Entriegeln
Kinder-
sicherung
Schnell-
kühlung
Abbildung 1
Abbildung 2 Abbildung 3
21

16 DE
SICHERHEITSHINWEISE UND
GEBRAUCHSANLEITUNG
Bevor Sie den Thermopot benutzen, lesen Sie
die Bedienungsanleitung aufmerksam durch und
bewahren Sie sie zum späteren Gebrauch auf.
•Verwenden Sie den Thermopot nur
bestimmungsgemäß, wie es in dieser
Gebrauchsanleitung beschrieben ist.
•Nicht ordnungsgemäße Nutzung des Thermopots
kann zu seiner Störung führen, einen
gesundheitlichen oder materiellen Schaden beim
Nutzer hervorrufen, und ist kein Garantiefall.
• Benutzen Sie den Thermopot nur fürs
Wasserkochen, es ist nicht gestattet, andere
Flüssigkeiten darin aufzuwärmen oder aufzukochen.
•Vergewissern Sie sich, dass die auf dem
Bezeichnungszettel angegebene Betriebsspannung
und die Netzspannung übereinstimmen.
•Der Netzstecker hat einen Erdungskontakt; stecken
Sie ihn nur in eine Steckdose mit dem zuverlässigen
Erdungskontakt.
•Bei einem Kurzschluss verringert die Erdung das
Stromschlagrisiko.
•Wenden Sie sich an einen Elektriker, wenn Sie sich
nicht sicher sind, ob Ihre Steckdosen richtig
installiert und geerdet sind.
•Verwenden Sie keine Adapterstecker, die zum
Anschließen des Netzsteckers an eine Steckdose
ohne Erdungskontakt bestimmt sind, um das
Brandrisiko zu vermeiden.
•Bei Brandgeruch und Funken in der Steckdose
ziehen Sie den Netzstecker aus der Steckdose
heraus und wenden Sie sich an Ihren
Hausstromnetz leistenden Dienst.
• Wenn Rauch aus dem Thermopot austritt, ziehen
Sie das Netzkabel aus der Steckdose heraus und
treffen Sie Feuerverhinderungsmaßnahmen.
•Es ist nicht gestattet, den Thermopot draußen zu
benutzen.
• Es ist nicht empfohlen, das Gerät bei Gewitter zu
benutzen.
•Schützen Sie das Gerät vor Stößen, Stürzen,
Vibrationen und anderen mechanischen
Einwirkungen.
• Schalten Sie den Thermopot ohne Wasser nicht ein.
•Es ist nicht gestattet, den Thermopot direkt aus dem
Wasserhahn aufzufüllen, benutzen Sie dafür ein
passendes Gefäß.
•Stellen Sie den Thermopot nicht in der Nähe von
Wänden oder Küchenmöbeln auf.
• Stellen Sie denThermopot so auf, dass ein Abstand
zwischen ihm und einer Wand oder Möbeln
mindestens 20 cm und der Freiraum darüber nicht
weniger als 50 cm beträgt.
• Lassen Sie den ans Stromnetz angeschlossenen
Thermopot nie unbeaufsichtigt.

17DE
• Benutzen Sie den Thermopot nicht in der Nähe von
Spülbecken, in Badezimmern, neben Wasserbecken
oder anderen mit Wasser gefüllten Behältern.
•Benutzen Sie den Thermopot nicht in direkter Nähe
von Heizgeräten, Wärmequellen oder offenem Feuer.
• Es ist verboten, den Thermopot an Orten, wo Sprays
verwendet werden, sowie in der Nähe von
leichtentzündbaren Flüssigkeiten, zu verwenden.
• Stellen Sie den Thermopot auf eine ebene standfeste
Oberfläche auf, stellen Sie ihn nicht an den
Tischrand. Achten Sie darauf, dass das Netzkabel
vom Tisch nicht herabhängt und heiße Oberflächen
und scharfe Möbelkanten nicht berührt.
•Berühren Sie das Netzkabel und den Netzstecker
nicht mit nassen Händen.
• Schalten Sie den Thermopot nicht ohne Wasser ein,
nachdem der Thermopot gefüllt ist, machen Sie den
Deckel dicht zu.
•Achten Sie darauf, dass der Wasserstand im
Thermopot nicht über der Wasserstandsmarke liegt.
Falls der Wasserstand über der maximalen Marke ist,
kann sich das kochende Wasser aus dem Thermopot
während des Kochens ausgießen.
•Um sich mit heißem Dampf nicht zu verbrühen,
beugen Sie sich nicht über die Dampfablasslöcher im
Thermopotdeckel. Decken Sie die
Dampfablasslöcher nicht mit Gegenständen ab.
•Öffnen Sie den Deckel des Thermopots während
des Wasserkochens nicht. Die Oberfläche des
Thermopots kann eine ziemlich hohe Temperatur
haben.
• Seien Sie beim Tragen des mit siedendem Wasser
gefüllten Thermopots vorsichtig.
•Seien Sie sehr vorsichtig, wenn Sie Heißwasser aus
dem Thermopot abgießen.
• Trennen Sie den Thermopot vor der Reinigung oder
wenn Sie ihn nicht benutzen vom Stromnetz ab.
Wenn Sie den Thermopot vom Stromnetz
abtrennen, halten Sie nur den Netzstecker fest und
ziehen Sie ihn aus der Steckdose vorsichtig heraus;
ziehen Sie nicht am Netzkabel, da es zu seiner
Beschädigung und Steckdosenstörung sowie einem
Kurzschluss führen kann.
•Tauchen Sie den Thermopot nicht ins Wasser oder
andere Flüssigkeiten, um das Stromschlagrisiko zu
vermeiden.
• Es ist nicht gestattet den Thermopot in der
Spülmaschine zu waschen.
• Aus Sicherheitsgründen lassen Sie Kinder in der
Nähe von Plastiktüten, die als Verpackung
verwendet werden, nie ohne Aufsicht.
ACHTUNG! Lassen Sie Kinder mit Plastiktüten oder
Verpackungsfolien nicht spielen. Erstickungsgefahr!

18 DE
Feststellung jeglicher Beschädigungen, sowie im
Sturzfall, trennen Sie das Gerät vom Stromnetz
ab und wenden Sie sich an einen Kundendienst.
• Transportieren Sie den Thermopot nur in der
Fabrikverpackung.
• Bewahren Sie das Gerät an einem für Kinder und
behinderte Personen unzugänglichen Ort auf.
DIE THERMOPOT IST NUR FÜR DEN GEBRAUCH IM
HAUSHALT GEEIGNET.ES IST VERBOTEN, IHN ZU
INDUSTRIE- ODER LABORZWECKEN ZU BENUT-
ZEN.
THERMOPOT VORBEREITUNG ZUM BETRIEB
Falls das Gerät bei niedrigen Temperaturen
transportiert oder aufbewahrt wurde, lassen Sie ihn
mindestens 3 Stunden bei Raumtemperatur stehen.
•Packen Sie den Thermopot aus und entfernen
Sie alle Verpackungsmaterialien.
•Bewahren Sie die Originalverpackung auf.
•Lesen Sie die Sicherheitsmaßnahmen und
Bedienungsempfehlungen.
• Prüfen Sie auf Komplettheit.
• Prüfen Sie den Thermopot auf Beschädigungen;
wenn er beschädigt ist, schließen Sie ihn nicht
an das Stromnetz an.
•Vergewissern Sie sich, dass die
Stromversorgungsparameter am Etikett mit den
Netzstromparameternübereinstimmen.
• Der Thermopot ist nicht für den Gebrauch durch
Kinder geeignet.
• Beaufsichtigen Sie Kinder, damit sie das Gerät
nicht als Spielzeug benutzen.
•Lassen Sie Kinder das Gerät und das Netzkabel
während des Betriebs vom Thermopot nicht
berühren.
•Während des Betriebs und des Abkühlens stellen
Sie das Gerät an einen für Kinder unzugänglichen
Ort auf.
•Dieses Gerät ist für Personen (darunter Kinder)
mit Körper-, Nerven- und Geistesstörungen oder
Personen ohne ausreichende Erfahrung und
Kenntnisse nicht geeignet, wenn sie sich nicht
unter der Aufsicht einer Person, die für ihre
Sicherheit verantwortlich ist, befinden oder
entsprechende Anweisungen über die Nutzung
des Geräts bekommen haben.
•Überprüfen Sie regelmäßig den Zustand
des Netzkabels, des Netzsteckers und des
Thermopotgehäuses.
•Wenn das Netzkabel beschädigt ist, soll es vom
Hersteller, vom Kundendienst oder von ähnlich
qualifiziertem Personal ersetzt werden, um
Gefahren zu vermeiden.
•Es ist nicht gestattet, das Gerät selbständig
zu reparieren. Es ist nicht gestattet, das Gerät
selbständig auseinanderzunehmen; bei der

19DE
• Wischen Sie die Außenoberäche des Gehäuses (7)
mit einem sauberen, leicht angefeuchteten Tuch zur
Entstaubung ab.
•Entfernen Sie den Deckel (9), drücken Sie dazu den
Deckelsperrgri (10), fassen Sie ihn an und nehmen
Sie den Deckel (9) ab (Abb. 1).
• Wischen Sie die Außenoberäche des
Thermopotbehälters mit einem sauberen, leicht
angefeuchteten Tuch zur Entstaubung ab. Setzen
Sie den Deckel (9) zurück auf und drücken Sie den
Deckelsperrgri (10).
ERSTE EINSCHALTUNG
•Stellen Sie den Thermopot auf einer trockenen und
ebenen Oberfläche so auf, dass ein Abstand
zwischen ihm und einer Wand oder den Möbeln
mindestens 20 cm und der Freiraum darüber nicht
weniger als 50 cm beträgt.
• Stellen Sie das Gitter (2) auf die Schale (1) auf.
Stellen Sie die Schale (1) auf den Aufstellplatz auf
(Abb. 2).
•Entfernen Sie den Deckel (9), drücken Sie dazu den
Deckelsperrgriff (10), fassen Sie ihn an und
nehmen Sie den Deckel (9) ab (Abb. 1).
•Gießen Sie Wasser in den Thermopot ein, indem
Sie ein passendes Gefäß benutzen, überschreiten
Sie die Maximalfüllstandsmarke «FULL» an der
Innenoberfläche des Behälters (6) nicht. Es ist
nicht gestattet, denThermopot direkt aus dem
Wasserhahn aufzufüllen, benutzen Sie dafür ein
passendes Gefäß (Abb. 3).
Anmerkung: zur Verringerung von
Mineralablagerungen (Kalkstein) ist es empfohlen,
mit Haushaltswasserfiltern gereinigtes Wasser zu
benutzen.
•Setzen Sie den Deckel (9) zurück auf und drücken
Sie den Deckelsperrgriff (10) (Abb. 1).
•Stecken Sie den Stecker des Netzkabels (8) in eine
Steckdose ein, dabei ertönt ein Tonsignal, und alle
Symbole erscheinen auf dem Bildschirm, danach
leuchtet nur das Wartebetriebssymbol (17) « », auf
der Bedienungsplatte (5) leuchtet die Beleuchtung
der «Temperaturwahl»-Taste (13).
• Die Symbole (21) zeigen das Wasservorhandensein
im Thermopotbehälter (6) an:
- « » - der Thermopotbehälter ist zu 3/3 mit
Wasser gefüllt;
- « » - der Thermopotbehälter ist zu 2/3 gefüllt;
- « » - niedriger Wasserstand, der
Thermopotbehälter ist zu 1/3 gefüllt, Wasser muss
hinzugegossen werden, da sich sonst das
Heizelement nicht einschaltet.
•Drücken Sie die «Start/Kochen»-Taste (12) auf der
Bedienungsplatte (5), dabei leuchten die Anzeige der
«Start/Kochen»-Taste (12), das Symbol
(27) « » und das Symbol (18) « », Wasser
beginnt sich zu erwärmen, die Wassertemperatur
wird mit den Zahlensymbolen (19) angezeigt.

20 DE
Anmerkungen:
- bei jedem Drücken der Tasten der
Bedienungsplatte (5) ertönt ein Tonsignal;
- bei erster Einschaltung kann ein Fremdgeruch
vom Heizelement ausgehen, es ist normal und
ist kein Garantiefall.
• Die Zahlensymbole (20) zeigen die
Heißwassertemperatur an, die
Heißwassertemperatur ist standardmäßig auf
«85°C» eingestellt.
•Um sich mit heißem Dampf nicht zu verbrühen,
beugen Sie sich nicht über das Dampfablassloch
(11) im Thermopotdeckel (9). Decken Sie die
Dampfablasslöcher (11) nicht mit Gegenständen
oder Tüchern ab.
•Nach dem Wasserkochen blinkt das Symbol (27)
« » 60 Sekunden lang, danach erlischt es,
die Tonsignale ertönen, die Anzeige der «Start/
Kochen»-Taste (12) erlischt, der Thermopot wird in
den Temperaturhaltungsbetrieb umgeschaltet, die
Heißwassertemperatur ist standardmäßig auf «85 °
C» eingestellt.
•Gießen Sie das Wasser nach dem ersten Kochen
ab. Das beim ersten Kochen erhaltene Heißwasser
ist nicht zum Trinken empfohlen, Sie können es für
den häuslichen Bedarf verwenden.
ACHTUNG!
Seien Sie beim Wasserabgießen vorsichtig,
um Verbrühungen zu vermeiden.
• Entriegeln Sie die Wasserzufuhrpumpe durchs Drücken
der Taste «Kindersicherung» (15), dabei leuchten die
Tasten (15) «Kindersicherung» und (14)
«Wasserausgabe».
• Stellen Sie eine Tasse aufs Gitter (2) und halten Sie die
«Wasserausgabe»-Taste (14) gedrückt. Nachdem die
erforderliche Wassermenge in die Tasse geflossen ist,
lassen Sie die «Wasserausgabe»-Taste (14) los.
Anmerkungen:
-Wasser wird nur dann ausgegeben, wenn die
Anzeigen der Tasten (14 und 15) leuchten; wenn
Sie die «Kindersicherung»-Taste (15) gedrückt
haben, ohne das Gerät zu betreiben, erlöschen die
Anzeigen (14 und 15) in diesem Fall nach 10
Sekunden;
- bei der Wasserausgabe leuchten alle
Wasserstandsanzeigen (21).
-achten Sie auf den Füllstand der Schale (1) mit
Rest-Wassertropfen. Leeren Sie die Schale (1)
entfernen Sie sie, gießen Sie Wasser ab und
setzen Sie die Schale (1) zurück.
-wenn Sie den Thermopot längere Zeit nicht benutzt
haben, kann die Wasserausgabe zeitweise
aussetzen. In diesem Fall wird empfohlen,
Table of contents
Languages:


