Emmi dent Platinum User manual

Unbedingt
lesen!
quickguide +
fehlerbehebung
quickguide +
Problem fixing
read
carefully!
Quickguide
emmi®-dent Platinum & emmi®-dent Platinum Care
3 M
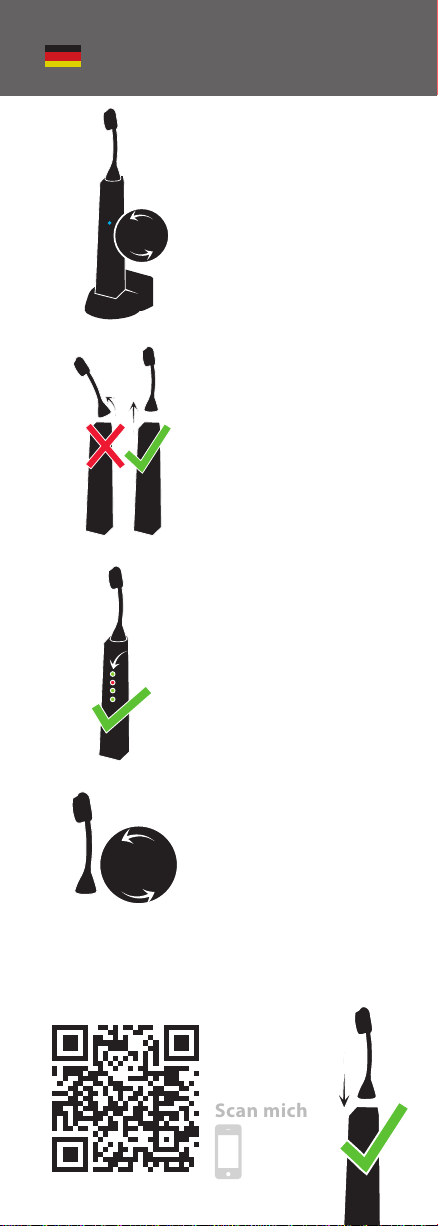
Vor Erstgebrauch
24 Stunden aufladen.
Bürstenaufsatz
senkrecht aufstecken.
Aufsätze alle 3 Monate
austauschen.
Grüne LEDs:
Gerät arbeitet korrekt
Rote LED:
Gerät muss aufgeladen
werden, oder Aufsatz
defekt.
Videoanleitung:
Richtiges Aufsetzen der Ultraschall Aufsätze
für eine optimale Ultraschall-übertragung!
Scan mich
24 h

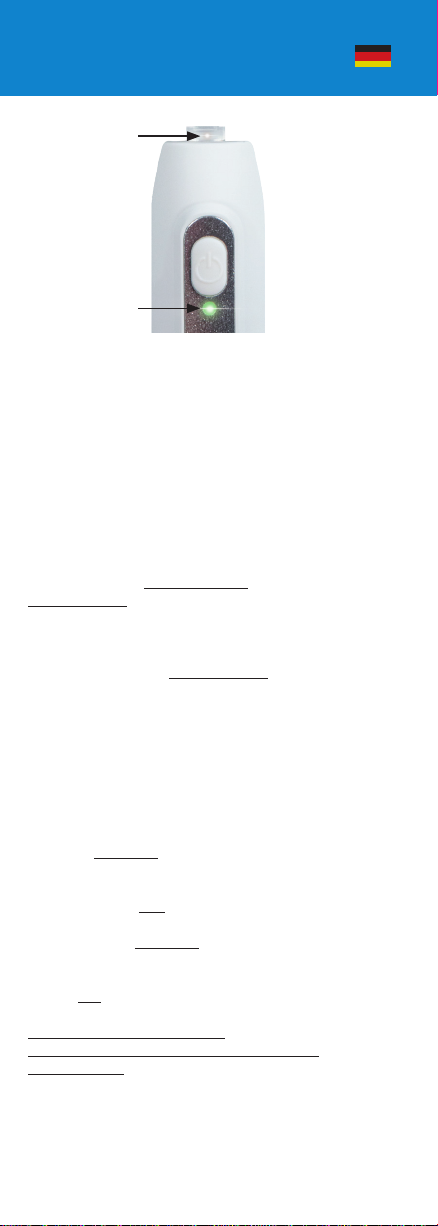
LED-Erklärung
emmi®-dent Platinum & emmi®-dent Platinum Care
LED 3b
LED 5
LED 4
LED 3a
LED 2
LED 1
Die Funktionen der LEDs:
a) Ladekontrollfunktion LED2
Blaue LED: emmi®-dent ist auf der Ladestation
Hellblaues Licht: emmi®-dent im Ladevorgang
Schwaches blaues Licht: emmi®-dent ist
vollständig geladen
b) Batterie-Zustand
(LED1, LED3a, LED5 & LED3b)
Die drei grünen LEDs (und die weiße LED am
Bürstenkopf) werden beim Putzvorgang in Art
eines Lauflichts verwendet.
Ist die Batterie vollständig geladen, leuchten
LEDs wie folgt:
• LED1, LED3a, LED5 + LED3b
Ist die Batterie ca. 1/3 entladen, leuchtet
der Reihe nach:
• LED1, LED3a + LED3b
Ist die Batterie ca. 2/3 entladen, leuchtet
nur noch:
• LED1
c)„Dringend aufladen“-Anzeige
Ist die Batterie stark entladen, blinkt nach
dem Putzvorgang die LED 4 ein paarmal rot.
Bitte emmi®-dent aufladen.
d) Umschaltung von Vibration und
akustischem Signal
(außer emmi®-dent Platinum Care)
Wird die An-Taste der emmi®-dent ca.
10 Sekunden lang gedrückt, blinkt die LED2
rot und die Vibration sowie das akustische
Signal werden ausgeschaltet.
Halten Sie die An-Taste für ca. 10 Sekunden
gedrückt und es blinkt die LED2 grün auf,
so werden dieVibration sowie das akustische
Signal eingeschaltet.

Quickguide
emmi®-dent Metallic & emmi®-pet
Vor Erstgebrauch
24 Stunden aufladen.
Bürstenaufsatz
senkrecht aufstecken.
Aufsätze alle 3 Monate
austauschen.
Grüne LEDs:
Gerät arbeitet korrekt
Rote LED:
Gerät muss aufgeladen
werden, oder Aufsatz
defekt.
Videoanleitung:
Richtiges Aufsetzen der Ultraschall Aufsätze
für eine optimale Ultraschall-übertragung!
Scan mich
24 h
3 M
LED-Erklärung
emmi®-dent Metallic & emmi®-pet
Die Funktionen der LEDs:
a) Ladekontrollfunktion LED1
Blaue LED: emmi®-dent ist auf der Ladestation
Hellblaues Licht: emmi®-dent im Ladevorgang
Schwaches blaues Licht: emmi®-dent ist
vollständig geladen
b) Batterie-Zustand
(LED1 & LED2)
Die beiden LEDs werden beim Putzvorgang als
Batterie-Zustands-Anzeige verwendet.
Ist die Batterie zwischen voll und ca.
1/3 entladen:
• LED1 leuchtetdauerhaft grün und die LED2
einmal ca. alle 3 Sekunden
Ist die Batterie ca. 2/3 entladen:
• LED2 leuchtet dauerhaft grün
c)„Dringend aufladen“-Anzeige
Ist die Batterie stark entladen, blinkt nach
dem Putzvorgang die LED1 ein paarmal rot.
Bitte emmi®-dent aufladen.
d) Umschaltung von Vibration und
akustischem Signal (außer
emmi®-pet)
Wird die An-Taste der emmi®-dent ca.
10 Sekunden
lang gedrückt gehalten, blinkt die
LED1 rot und die Vibration sowie das akustische
Signal werden ausgeschaltet.
Halten Sie die An-Taste für ca. 10 Sekunden
gedrückt und es blinkt die LED1 grün auf,
so werden dieVibration sowie das akustische
Signal eingeschaltet.
Bitte berücksichtigen Sie:
emmi®-pet ist komplett geräusch- und
vibrationslos
LED 2
LED 1

Hier finden Sie technische Fehler, die bei Ihrem
emmi®-Gerät auftreten könnten, die Sie aber
selbst beheben können:
1) Aufblinken der roten LED bedeutet:
a) Akku entladen:
Stellen Sie hierzu das Handstück auf die Lade-
station, sodass das emmi®-Ultraschallgerät den
Ladevorgang starten kann.
b) Hinweis auf einen defekten Aufsatz:
Setzen Sie hierzu einen neuen Aufsatz auf das
Handstück auf und schalten Sie das Gerät
erneut an. Nun sollte die grüne LED durchge-
hend leuchten.
2) Grüne LED leuchtet auf und erlischt
umgehend:
a) Kein Aufsatz aufgesteckt: Setzen Sie hierzu
bitte einen Aufsatz auf das Handstück auf und
schalten Sie dieses erneut wieder ein.
Die grüne LED sollte nun durchgehend leuch-
ten.
b) Aufsatz defekt:
Setzen Sie auch hier bitte einen neuen Aufsatz
auf das emmi®-Ultraschallgerät auf und schalten
Sie dieses im Nachgang ein. Die grüne LED
sollte nun dauerhaft leuchten.
3) Die grüne LED leuchtet durchgehend,
jedoch ohne Vibration:
Vibration wurde manuell ausgeschaltet:
Setzen Sie hierzu bitte einen Aufsatz auf Ihr
emmi®- Gerät auf. Halten Sie zum Einschalten
die EIN/AUS Taste für ca. 10 Sekunden ge-
drückt. Die LED leuchtet drei Mal grün auf. Der
Finger kann nun von der EIN/AUS Taste genom-
men werden. Nach erneutem Einschalten sollte
dieVibration wieder vorhanden sein.
Zum Ausschalten derVibration gehen Sie bitte
identisch vor. Die LED leuchtet dabei drei Mal
rot auf.
(Bitte beachten Sie, dass unseren Modelle emmi®-dent
Platinum Care und emmi®-pet keinenVibrationsmotor
besitzen und diese Funktion somit bei diesen Modelle
nicht anwendbar ist.)
Fehlerbehebung

Quickguide
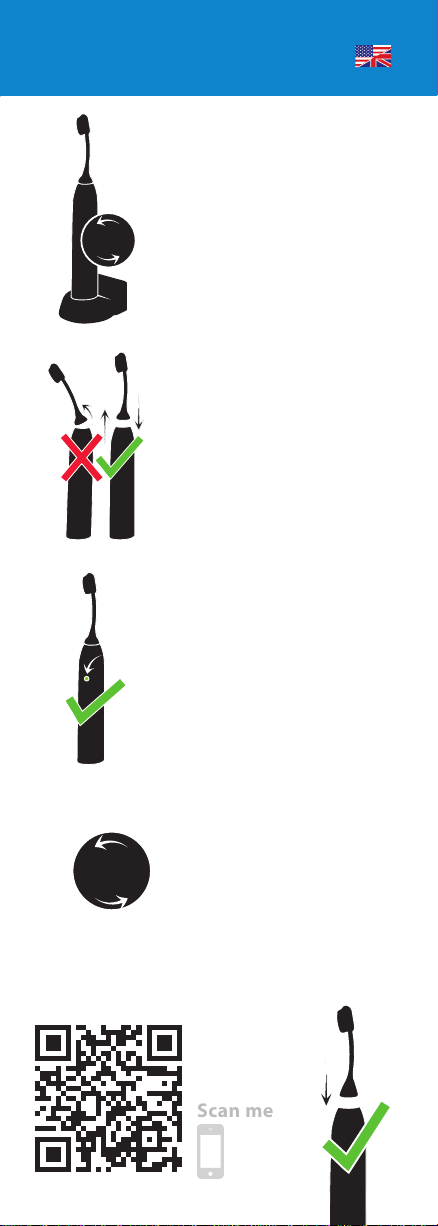
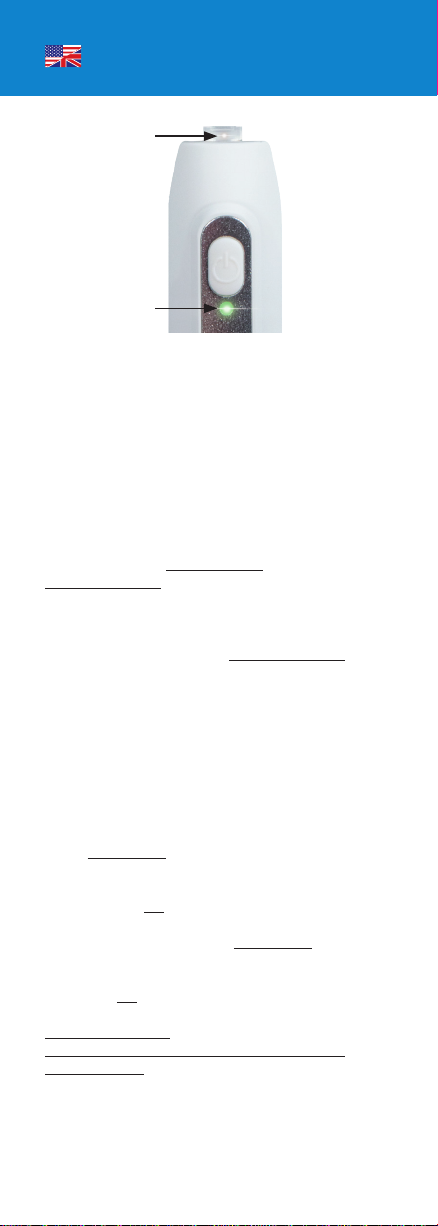
emmi®-dent Platinum & emmi®-dent Platinum Care
3 M
Before first use charge
for 24 hours.
Insert the attachment
vertically.
Replace attachments
every 3 months.
Green LEDs:
The device is working
correctly.
Red LED:
The device needs to
be charged or the
attachment is dfective.
Video tutorial:
Correct placement of the ultrasound attach-
ments for optimal ultrasound transmission!
Scan me
24 h
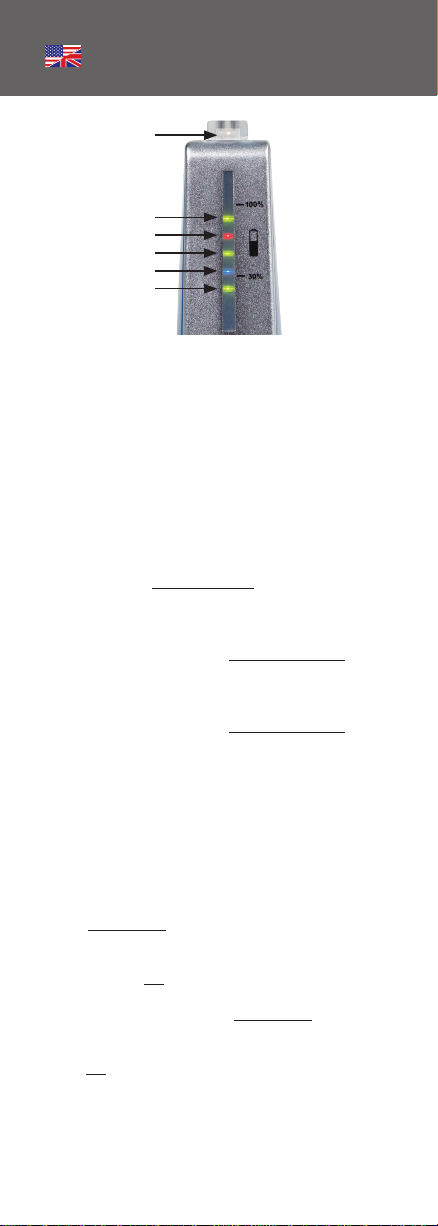
LED declaration
emmi®-dent Platinum & emmi®-dent Platinum Care
LED 3b
LED 5
LED 4
LED 3a
LED 2
LED 1
Functions of the LEDs:
a) Charging control function LED2
Blue LED: emmi®-dent is on the charging station
Light blue light: emmi®-dent in charging process
Weak blue light: emmi®-dent is fully charged
b) Battery status
(LED1, LED3a, LED5 & LED3b)
The three green LEDs (and the white LED on
the brush head) are used in the manner of a
sequential light during the cleaning process.
Is the battery fully charged, the LEDs light up
as follows:
• LED1, LED3a, LED5 + LED3b
If the battery is approx. 1/3 discharged, the
following LEDs light up in sequence:
• LED1, LED3a + LED3b
If the battery is approx. 2/3 discharged, only
the following LED lights up:
• LED1
c)„Urgent recharge“ indicator
If the battery is heavily discharged, the LED4
flashes red a few times after the cleaning
process. Please charge the emmi®-dent.
d) Switching between vibration and acoustic
signal (except emmi®-dent Platinum Care)
If the On button of the emmi®-dent is pressed
for approx. 10 seconds, the LED2 flashes red
and the vibration as well as the acoustic signal
are switched off.
Press and hold down the On button for approx.
10 seconds, and the LED2 flashes green.The
vibration as well as the acoustic signal are swit-
ched on now.
Quickguide
emmi®-dent Metallic & emmi®-pet
Before first use charge
for 24 hours.
Insert the attachment
vertically.
Replace attachments
every 3 months.
Green LEDs:
The device is working
correctly.
Red LED:
Thedevice needsto
be chargedor the
attachment isdefective.
Video tutorial:
Correct placement of the ultrasound attach-
ments for optimal ultrasound transmission!
Scan me
24 h
3 M
LED explanation
emmi®-dent Metallic & emmi®-pet
LED 2
LED 1
Functions of the LEDs:
a) Charging control function LED2
Blue LED: emmi®-dent is on the charging station
Light blue light: emmi®-dent in charging process
Weak blue light: emmi®-dent is fully charged
b) Battery status
(LED1 & LED2)
The two LEDs are used as battery status indicators
during the cleaning process.
If the battery is between full and approx.
1/3 discharged:
• LED1 lights up permanently green and LED2
once approx. every 3 seconds
If the battery is approx. 2/3 discharged, only
the following LED lights up:
• LED2 lights permanently green
c)„Urgent recharge“ indicator
If the battery is heavily discharged, the LED1
flashes red a few times after the cleaning
process. Please charge the emmi®-dent.
d) Switching between vibration and acoustic
signal (except emmi®-pet)
If the On button of the emmi®-dent is pressed
for approx. 10 seconds, the LED2 flashes red
and the vibration as well as the acoustic signal
are switched off.
Press and hold down the On button for approx.
10 seconds, and the LED2 flashes green.
The vibration as well as the acoustic signal are
switched on now.
Please consider:
emmi®-pet is completely soundless and
vibrationless.

Problem fixing
Hereyouwillfindindependentlycorrectable
errorsthatcouldoccurwithyouremmi®-device:
1) Flashing of the red LED means:
a) Battery discharged:
Place thehandpieceon thecharging station
so the emmi®-ultrasounddevicecan start the
chargingprocess.
b) Indication of a defective attachment:
Place anew attachment on the handpiece and
switchthedeviceonagain.The green LED
shouldnowlightupcontinuously.
2) Green LED lights up and turns off
immediately:
a) No attachment attached: Please attach an
attachment tothehandpieceand switch it on
again.Thegreen LED shouldnowlightup
continuously.
b) Attachment defective: Please attach anew
attachment totheemmi®-ultrasonicdeviceand
try toswitchitonafterwards.Thegreen LED
shouldnowlightupcontinuously.
3) The green LED lights up continuously, but
without vibration:
Vibration was manually switched off:
Pleaseplaceanattachmentonyouremmi®-device.
Pressand holdtheON/OFF key forapprox.
10 seconds toswitchon.TheLEDlightsupgreen
three times.Youcannowremoveyourfinger
fromtheON/OFFkey.Afterswitchingthedevice
on,thevibrationshouldworkagain.
To switch off the vibration,please proceed in the
sameway.TheLEDwilllightupred three times.
(Please note that our models emmi®-dent Platinum
Careand emmi®-petdo not haveavibrationmotor
and therefore this function cannot beused with these
models).

Emmi Ultrasonic GmbH
Gerauer Str. 34 | 64546 Moerfelden-Walldorf
Sie brauchen persönliche Hilfe?
Wenden Sie sich gerne an unseren
Kundenservice:
Tel.: +49 (0) 6105 / 40 67 94
WhatsApp: +49 (0) 160 / 50 91 446
E-Mail: info@emmi-ultrasonic.de
You need personal assistance?
Please feel free to contact our
customer service:
Phone: +49 (0) 6105 / 40 67 94
WhatsApp: +49 (0) 160 / 50 91 446
E-Mail: info@emmi-ultrasonic.de
This manual suits for next models
3
Table of contents
Languages:


