EMPORIA GD61ABB-UK User manual

1 | P a g e
1
GD61ABB-UK instruction manual
COMFORT TELEPHONE combo - corded telephone and DECT cordless with digital answering machine
#DRAFT VERSION 24.04.2020

2 | P a g e
2
WELCOME and GETTING STARTED
Thank you for purchasing the emporia COMFORT DECT combo phone with telephone answering machine
function.
Before you start to use your new phone, please follow these steps to ensure set-up and correct performance.
Place the phone
Keep a distance of at least 1 m from the cordless telephone or electrical appliances to avoid background noise.
Phone line cable
Insert the transparent plug into the ‘LINE’ cord socket (see OVERVIEW page 6) on the underside of the
handset-storage. Insert the other end of the line cord into the telephone wall socket
Plug in the power supply
Insert the plug into the socket (see OVERVIEW page 6) on the back of the desk telephone and your DECT
cordless phone charging base. For UK and Ireland products, push the 2 pin power supply firmly into the base
of the supplied adaptor until fully inserted and secure the adaptor by tightening the screw in between to 3 pins.
Now you are ready to connect to a 240V power socket.
Set display-language
Your new phone has a number of different languages included as standard. If your device is initially set to a
different language you will need to change both the handset language and the answer machine message
language. Please see page 10 (and 17 for TAM message).
Set date & time
If your service provider have activated caller ID, the time and date of the phone will be automatically updated
by the network as soon as you receive a call. The network operator sends only month and day, not the year,
you must set the year as it is needed to calculate the day for the timestamp.
Set dial mode
Set the dialling mode correctly according to your network operator (this is set to tone automatically for the UK).
Screen backlight
The backlight is on when you receive an incoming call, dial or press any key. To save energy it goes off when
the phone is not in use.
Important Notice:
1. Please charge the battery in the DECT cordless handset for at least 12 hours before using. When placing the handset in the
charging base correctly, you will hear a beep to confirm.
2. To keep the batteries charged, whenever you don’t need to use the handset (such as overnight, or when you go out), leave
the handset on the charge cradle.
3. The cordless handset provided is already registered at the base by factory-default. If you have also purchased an additional
handset (GD61AH) then you will need to register it to the base (corded) unit before use. To register an additional handset to
the base please follow the description on page ([insert correct reference]).

3 | P a g e
3
SAFETY INSTRUCTION
When using your telephone equipment, the following basic safety precautions should always be followed to
reduce the risk of fire, electric shock and injury to persons:
Read, understand and follow these instructions
Unplug the product from the wall outlet before cleaning. Do not use liquid cleaners or aerosol cleaners.
Use a soft damp cloth for cleaning.
Do not place this product on unstable surfaces. The product may fall and cause serious damage to the
product.
Do not overload wall outlets and extension cords as this can result in fire or electric shock.
Never push foreign objects of any kind into this product through cabinet slots as they may affect
dangerous voltage points or short circuit parts that could result in fire or electric shock. Never spill liquid of
any kind on the product.
Avoid moving or disconnecting this unit during a heavy storm, as there may be a remote risk of electric
shock from lightning and thunder.
IMPORTANT –The base unit must be used with the mains adapter supplied with the unit.
Using any other adapter will may invalidate any approval given to this apparatus.
We do not recommend that any non-technical professional person to open the telephone, please send to
a service centre if required.
FEATURES
Your new phone has many features as listed below. Some features are network or PABX (switchboard)
features.
LCD with clear 3 line display
GAP Compatible (to add additional cordless handsets)
Hearing aid friendly - Your telephone is fitted with an inductive coupler so it is compatible with hearing aids.
Up-to 5 handsets can be registered to the same base unit, and maximum 4 bases per handset
8 supported languages: German, Italian, Portuguese, Russian, Dutch, Turkish, French, Spanish, and
English.
Caller ID (network service dependent)
Redial and pause function
3 one-touch memories for corded BASE unit
30 incoming numbers memory of the DECT cordless handset
29 incoming numbers memory of the corded BASE unit
10 outgoing number memories
50 Phone book memories with 12 characters & 20 digits maximum
TAM (TelephoneAnswering Machine) function with up to 60 minute record time
Page to all Handset function
Call transfer to other handsets and Internal call between base and handset

4 | P a g e
4
Conference call among external call, base and handset(s)
10 ringer melodies
Adjustable volume for ring tone / speaker / earpiece
Different melody option for phonebook entries
Alarm clock function with SNOOZE
Auto/manual answer machine function
Call bar function
LCD backlight function
Keypad lock function
Mute function
New call LED indicator on the base
TAM Specification:
Digital Answering machine with max. 60 minutes messages
ICM (in coming message) and conversation recording
Caller ID display when playing message
2 groups OGM can be recorded by user
Memo recording with up to 120 seconds
Time and date stamp for messages
Voice prompt in DEUTSCH (German), ENGLISH (English), FRANÇAIS (French) and ITALIAN (to change
please see page (page 17)
Remote answer machine message access
5 | P a g e
5
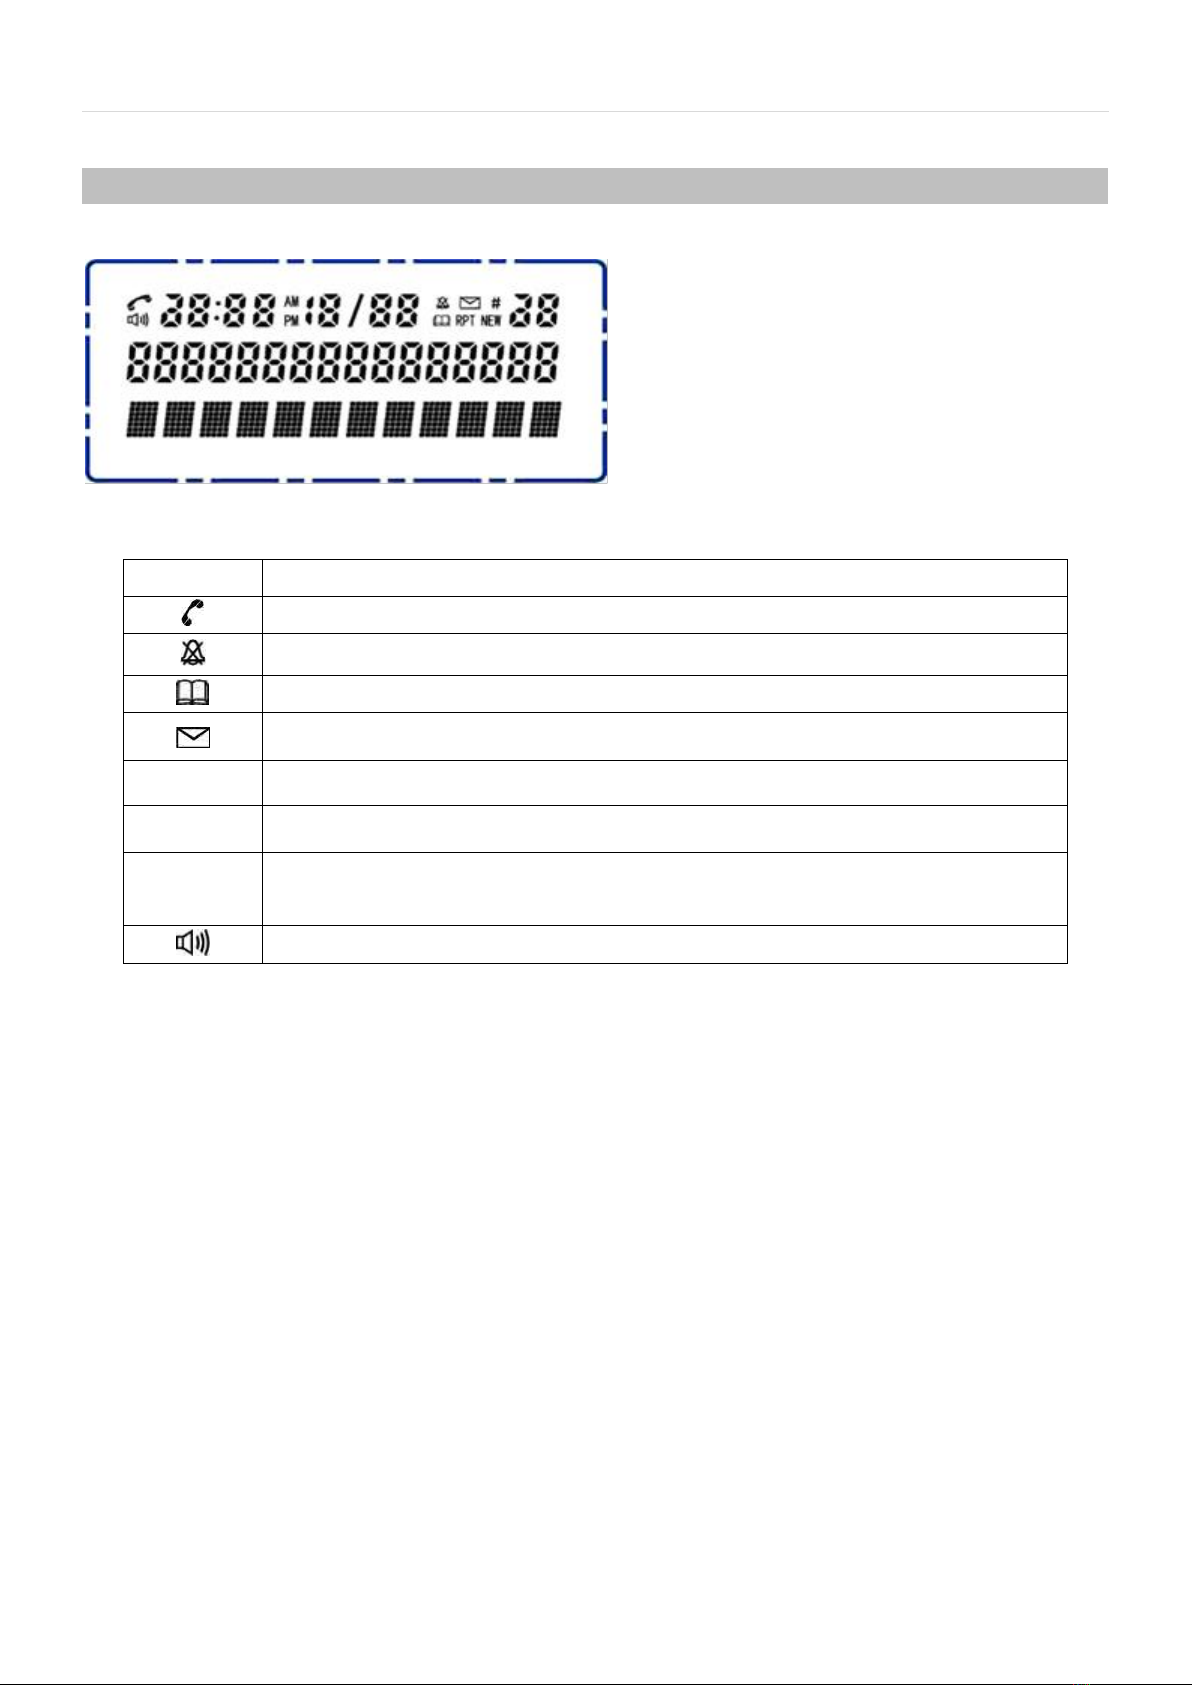
LCD display symbols
Icon
Function
The icon will be displayed when you pick up the handset
The icon will be displayed when ring is set to off( the ring volume is set to OFF)
The icon will be displayed when you are in the phonebook menu
Displayed when a new voice message is received from the network
RPT
Displayed when the same missed call received more than one time.
NEW
The icon will be displayed when a new call comes and hasn’t been viewed yet
#
When you scroll and review the incoming or outgoing numbers ,it appears along with
the digit to indicate the sequence of the call
The icon will be displayed when the speakerphone is in use

6 | P a g e
6
OVERVIEW

7 | P a g e
7
Icon
Description
Function Definition
MENU
Menu/Mute
Entry to the MENU functions from idle mode;
USED to Confirm (OK) selections & actions in menu;
During a call, pressing will mute / unmute your microphone;
BOOK
PHONEBOOK
This key is used to enter the phonebook both in standby mode
and in talk mode;
Exiting from a function during menu operation;
ANSWER
MACHINE ON/OFF
Press and hold this key to switch the answering machine ON or
OFF;
With TAM ON in standby mode, press this key to select OGM 1 or
OGM 2;
MEMO
MEMO
Press and hold this key to enter record a voice memo.
Play/Pause
Press this key to play the messages.
Press this key again to suspend the message playing.
DEL
Delete
The key is used to delete voice messages.
When dialling, the key is used to correct / remove numbers.
▲/CID
UP/CID (caller ID)
Scrolling up through lists and menu options;
Increasing the earpiece/Speakerphone volume during a call;
Review the list of incoming phone numbers.
▼/OUT
DOWN/OUT
Scrolling down through lists and menu options;
Decreasing the earpiece / Speakerphone volume during a call;
Review the outgoing phone numbers.
INT
INT
To set up an internal call to handset;
To transfer an incoming call to handset;
To set up a conference call with an external line and an internal
handset.
FLASH
FLASH
Used For PABX phone systems
REDIAL/P
Redial/Pause
To redial the last number either lift the receiver or press the
SPEAKERPHONE button and press REDIAL.
For PABX, press while dialling a number to insert a pause.
SPEAKERPHONE
Press this key to use in hands-free speakerphone mode
M1, M2 and
M3
MEMORY KEYS
One-touch memory keys for your most used contacts

8 | P a g e
8
Making and Answering Calls
To make a call
Pick up the handset and the icon will appear. Or press the hands-free speakerphone key, icon
will appear. Also the display will show “LINE IN USE”.
Use the keypad to enter the number you wish to dial.
When you have finished the call place the handset back on the base.
To make a call by using the pre-dialling function:
Dial the required telephone number first, and you can use the DEL key to delete digits if you make a mistake,
then add the right ones.
Pick up the handset or press the hands-free speakerphone key. The number will be dialled out
automatically through the handset or speakerphone mode selected.
﹡If using a PABX - to insert a pause in the dialling sequence, press the REDIAL/P key, which will then show a
“P” in the number.
To answer a call
When a call is incoming, the phone will ring and flash the IN USE LED*, pick up the handset or press
hands-free speakerphone key to answer the call.
* When there are missed calls, the LED blinks to indicate, the NEW LED will become dim until you reviewed
the missed calls.
FLASH key (PABX)
Press FLASH key to reset the line without leaving the handset.
REDIAL/P key
Pick up handset or press key, then press REDIAL/P key to dial the last dialled out number.
For PABX - press REDIAL/P key will insert a time delay of 3.6 seconds in a dialling sequence.
To change the earpiece or speakerphone volume during a call
While making or answering a call:
1) Press ▲/CID to increase the earpiece or loudspeaker volume, press ▼/OUT to decrease the earpiece or
loudspeaker volume.
2) The display will show the volume level as you adjust it. The earpiece can be adjusted from 1 to 5, and the
loudspeaker can be adjusted from 1 to 6.
9 | P a g e
9
Menu Settings
Whilst the handset is on-hook, pressing the MENU key will make it possible to access and adjust the main
functions and settings. Pressing the ▲/CID or ▼/OUT keys it will be possible to navigate in the Menus.
Pressing MENU key during navigation enters the next setting or confirms the change (OK).
Go back to the previous menu by pressing BOOK key.
Noted: When the unit is powered on initially, the date and time will be blinking, please to set the date
and time first according to use the method of “To set DATE and TIME”
The menu tree as follow:
PHONE BOOK
LIST
NEW ENTRY
EDIT RECORD
DEL RECORD
DELETE ALL
MEM STATUS
CALL LOG
MISSED
RECEIVED
DIALED
SETTINGS
DELETE HS
RING SETUP
INT RING
EXT RING
DIAL MODE
TONE
PULSE
FLASH TIME
100/300/600/1000MS
KEY TONE
ON/OFF
LANGUAGE
8 kinds
DATE&TIME
MODIFY PIN
default 0000
BASE DEFAULT
default 0000
REGISTRATION
TAM (ANSWER
MACHINE)
MESSAGE
DELETE ALL
MEMO
TAM SETTINGS
TAM ON/OFF
SET OGM
TAM ALERT
SET RING
TAM VOICE
TAM PIN
TAM DEFAULT

10 | P a g e
10
Base Menu Function 1: LANGUAGE
To Change the LANGUAGE press the MENU button
1) Press ▼/OUT button twice (2) to select SETTINGS (EINSTELL / ReGLAGES / IMPOSTAZIONI /
AJUSTES)
2) Press MENU key to enter.
3) Use ▼/OUT button 5 times to select LANGUAGE (SPRACHE / LANGE / LINGUA / IDIOMA /
DiL)
4) Press MENU key to enter.
5) Press ▲/CID or ▼/OUT key to select your desired language.
6) Press MENU key to confirm your selection.
7) To exit menu, lift the handset and replace
Note: to change the language of the outgoing message on the ANSWER MACHINE please see
page17. To change the language of the DECT handset please see page 29.
Base Menu Function 2: Phonebook
Each individual phone BASE has its own phonebook, there are 50 phone book memories that can be
viewed and dialled out, and each name has a maximum of 12 characters, each number a maximum of 20
digits and you can allocate on of the 10 melodies to identify the incoming call. Press MENU key to enter
and press ▲/CID or ▼/OUT key to select PHONE BOOK. Then press MENU key to confirm and enter.
LIST
The function allows you to review the phone book record lists by pressing ▲/CID or ▼/OUT key.
If you wish to call one of the list, when the desired number is shown, press or key to dial out
automatically.
To create a contact in your phonebook
1) Press ▲/CID or ▼/OUT key to select NEW ENTRY and Press MENU key to enter, the cursor
for the name flashes.
2) Enter the name through the alphanumeric keys (maximum 12 characters). To correct a mistake,
press DEL key. When you have finished press the MENU key to confirm, and enter the number.
3) Key in the number through the digit keys (maximum 20 digits). To correct a mistake use the DEL
key and re-enter.
4) Press MENU to confirm the name and number and the display will show “MELODY 1”, use the
▲/CID or ▼/OUT to scroll through the melodies. (There are 10 melodies for selection).
5) Press MENU key to confirm your selection. You will hear a confirmation tone, and the display
will return to “NEW ENTRY “.

11 | P a g e
11
Input method for text / names as follows:
press
times
key
1st
2nd
3rd
4th
5th
6th
7th
8th
9th
10th
11th
12th
13th
1
1
.
,
:
;
!
İ
?
¿
*
#
&
%
2
A
B
C
2
3
D
E
F
3
4
G
H
I
4
5
J
K
L
5
6
M
N
O
6
7
P
Q
R
S
7
8
T
U
V
8
9
W
X
Y
Z
9
*
*
0
space
0
–
+
=
_
(
)
“
#
#
To edit a contact in your phonebook
This function allows you to modify a phonebook record.
1) Press ▲/CID or ▼/OUT key to select EDIT RECORD and press MENU key to enter, the first
record in the phone book will be displayed.
2) Press ▲/CID or ▼/OUT key to select the record that you wish to change.
3) Then press MENU key and a flashing cursor will appear at the end of the name. Use the keypad
to enter characters and DEL key to delete letters one by one.
4) Press MENU key to confirm, and the cursor will flash at the end of the current number. Use the
keypad to enter digits or the DEL key to delete, and MENU key to confirm and save.
To store an incoming or outgoing number in your phonebook
1) Scroll ▲/CID or ▼/OUT to find the number you want to store.
2) Press MENU key, the LCD will show “ADD TO PB?”. Press MENU key to confirm, and the LCD
will show a flashing cursor at the beginning of the name position. Key in the name for this number
into the phonebook.
3) Press MENU key to confirm the name. The display will move the flashing cursor to the end of the
number position. If the number needs modifying use the keypad to enter digits or DEL key to
delete.

12 | P a g e
12
4) Press MENU key to confirm and then choose a melody to identify the incoming call, use ▲/CID
or ▼/OUT key to scroll through the melodies, then press MENU key to confirm your selection.
To delete a contact in your phonebook
1) Press ▲/CID or ▼/OUT key to select DEL RECORD, then press MENU key to enter, the LCD
will show the first name and number in your phonebook.
2) Use ▲/CID or ▼/OUT key to scroll through the list until you see the contact you want to delete
3) Press MENU key and the display will show “CONFIRM?”, press MENU again to confirm.
To delete all contacts in your phonebook
This function allows you to delete all phonebook entries, please take extra care.
1) Press ▲/CID or ▼/OUT key to select DELETE ALL, then press MENU key to enter, and the
display will show “CONFIRM?”
2) Press MENU again to confirm.ALL contacts in your phonebook will be erased.
Making calls from the phonebook
In idle mode, either press BOOK key once or the MENU key three times, and you will see the 1st number
and name in the phonebook.
1) Scroll ▲/CID or ▼/OUT to select the name and number of the person you want to call.
2) Then pick up the handset or press the key to make the call.
Note: For a short-cut to finding the name, you can press the digit keys to go directly to the first entry
beginning with the corresponding letters of that key, and then scroll from there.
Reviewing phonebook memory status
This function allows you to see how many records in the phonebook are occupied. The phonebook allows
up to 50 names and numbers.
1) Press ▲/CID or ▼/OUT key to select MEM STATUS. Press MENU key to enter. Then the LCD
will show the phonebook memory space available, e.g. if you have saved 30 names and
numbers in your phonebook, it would display 30/50.
2) Press BOOK until you return to idle mode.

13 | P a g e
13
Base Menu Function 3: Call log
Press MENU key to enter and press ▲/CID or ▼/OUT key to select CALL LOG. There are three items in
this menu, MISSED, RECEIVED and DIALED.
When the LCD displays CALL LOG, you can:
Press MENU key and press ▲/CID or ▼/OUT key to select missed call lists, received call lists or dialled
call lists respectively.
1) The LCD will show the last record. (If no entries are available in the list, LCD will show EMPTY).
2) Press ▲/CID or ▼/OUT key to view other record.
3) When the desired number is show, press or key to dial out the number automatically.
When you locate a CALL record press MENU key and use ▲/CID or ▼/OUT key to choose from the
following options ADD TO PB? DELETE? DELETE ALL? Then press MENU key to confirm:
1) ADD TO PB (this function allows you to add an entry from the caller list to the phone book, the method
please refer to “To store an incoming or outgoing number in your phonebook”)
2) DELETE (the function allows you to delete the currently selected entry from caller list.)
3) DELETE ALL (this function you to delete all numbers)
Note: In idle state, press UP key once to incoming records or press DOWN key to review outgoing records.
Base Menu Function 4: Settings
Press MENU key to enter and press ▲/CID or ▼/OUT key to select SETTINGS. Press MENU key to confirm.
Then you can do below:
DELETE HANDSET
This function allows you to delete a handset registration from the base.
1) DELETE HS Is the first option in the list
2) Press MENU key to enter and you will be prompted to enter the PIN code (the default is 0000).
3) Input the correct 4-digit pin code and press MENU key to confirm
4) Press ▲/CID or ▼/OUT key will scroll the handset names.
5) Press MENU key to confirm.
The delete handset will be deleted from the list on registered handset on the base.
RING SETUP
You are able to change the handset ring to identify internal calls and external calls. There are 10 ringer
melodies and 5 different volume levels can be set.
1) Use ▲/CID or ▼/OUT key to select RING SETUP.
2) Press MENU key to enter.
3) Press ▲/CID or ▼/OUT key to select the INT RING and EXT RING setup.

14 | P a g e
14
4) Press MENU key to confirm.
5) Press ▲/CID or ▼/OUT key to select the MELODY and VOLUME setup.
If selecting a MELODY
a) Press MENU key to confirm.
b) Press ▲/CID or ▼/OUT key to select desired melody, the corresponding melody sound can
be heard with the selection.
c) Press MENU key to confirm your selection.
If selecting a VOLUME
a) Press MENU key to confirm.
b) Press ▲/CID or ▼/OUT key to select the desired ringer volume 1-5, if you do not want an
audible ringer, select VOLUME OFF
c) Press MENU key to confirm your selection.
To set dial mode (Tone/Pulse)
The UK network uses TONE dialling but some older systems use PULSE, if you want to change the mode
in which the base will dial.
1) Use ▲/CID or ▼/OUT key to select DIAL MODE item.
2) Press MENU key to enter.
3) Press ▲/CID or ▼/OUT key to select the TONE or PULSE dialling mode.
4) Press MENU key to confirm your selection.
Note: According to your telephone lines or PABX systems you may need to change the dialling mode
between Tone and Pulse.
To set flash time
You can select the flash time (100ms, 300ms, 600ms and 1000ms) to meet your telephone line or PABX
requirement. The UK network uses the default 100ms.
1) Use ▲/CID or ▼/OUT key to select FLASH TIME
2) Press MENU key to enter.
3) Press ▲/CID or ▼/OUT key to select the 100ms, 300ms, 600ms and 1000ms.
4) Press MENU key to confirm your selection.
To turn on/off key tone
You are able to change the Base tone settings. If you do not want a tone when pressing a key:
1) Use ▲/CID or ▼/OUT key to select KEY TONE
2) Press MENU key to confirm.
3) Press ▲/CID or ▼/OUT key to select the ON or OFF to enable or disable the key beep sound.
4) Press MENU key to confirm your selection.
Noted: If you select ON, a beep sound will be sounded when a key is pressed on the Base in idle mode
except INT and keys.

15 | P a g e
15
To set DATE and TIME
You are able to set the date and time on the base manually by selecting the following option.
1) Use ▲/CID or ▼/OUT key to select DATE&TIME item, press MENU key to enter date and time
setting. The last two digits of the year flashes.
2) Press ▲/CID or ▼/OUT key to edit the flashing value, then use MENU key to confirm and enter
the month value setting.
3) Use the same method for month, date and time setting.
4) Press MENU key to confirm and return to the DATE & TIME menu.
Note: When the unit powered on initially, the date and time setting will blinking, please to set the date and
time first according to above methods.
To change the PIN code (base functions)
Some functions (including handset delete and base default) require a PIN code. The default PIN is 0000,
but you are able to change to your personal 4-digit PIN to ensure these functions are not available to
others. Please make a note of the new PIN.
1) Use ▲/CID or ▼/OUT key to select MODIFY PIN item.
2) Press MENU key to confirm. Enter the PIN code through the keypad (if you haven’t changed it,
the default PIN is 0000).
3) Press MENU key to confirm. Use the keypad to enter the new PIN (4 digits from 0-9).
4) Press MENU key to confirm. Use the keypad to enter the new PIN again and press MENU key to
confirm.
﹡If you enter the wrong PIN at any time you will hear an error tone and the display will return to the
previous menu.
To set base to default settings
This function allows you to restore all of the base settings to the factory default:
The Incoming Calls list and Outgoing Calls list will be erased, but the phonebook memories and Answer
Machine (TAM) settings will remain unchanged.
1) Press MENU key, then use ▲/CID or ▼/OUT key to select BS DEFAULT item.
2) Press MENU key to confirm.
3) You
will be promoted to enter the PIN code. Enter the PIN code through the keypad. (Default PIN is
0000)
4) Press MENU key to confirm, if the PIN code is validated all base settings will be returned to the
factory default.

16 | P a g e
16
Base Menu Function 4: Handset registration
The handset supplied with the base unit is already registered. You don’t need to re-register them,
unless you have a problem. If you are adding an additional handset please follow the process below.
To check whether a handset is registered, make sure main power to the base unit is switched on and the
handset is within range. The handset’s display should show its number, and the “signal strength” symbol on the
screen should show three bars. If the handset show ‘unregistered’, you need to re-register the handset again
using the following process:
Note: You need to operate the base and handset together
1) On the base, press MENU key.
2) Press ▲/CID or ▼/OUT key to select REGISTRATION.
3) Press MENU key to enter. The LCD shows SEARCHING and flashes on the display. If registration is
successful, the base will return to standby mode.
4) On the handset, press SET/OK key
5) Press ∧or ▼key to choose REGISTRATION
6) Press SET/OK key to see BASE 1
If the handset already has a registration to a base there is a “+” on the right side of the display, and
you should choose another base number if you don’t want to lose that one.
7) Press SET/OK key, the display shows PIN?, key in the 4 digit PIN code for the base (the default PIN
code is 0000)
8) Press SET/OK key to confirm, and the display will flash “SEARCHING 1”(or 2,3,4). Once connected
you will hear a tone to confirm and the handset will return to idle.
NOTE: If there are two or more handsets registered with the same base you can page them all to locate them
easily. In idle mode, press INT key, the LCD displays the registered handsets’ number and digit of “9”, then
press “9” on the keypad to page the all the registered handsets will ring.

17 | P a g e
17
Base Menu Function 5: Telephone Answering Machine (TAM) setup
The Answer Machine (TAM) can record messages from incoming callers or voice memos (notes) directly at the
base. Each message and memo can be up to 2 minutes long, and the total recording time available for all
messages / memos is 60 minutes.
Press MENU key, then press ▲/CID or ▼/OUT key to select TAM. Then press MENU key to confirm and enter.
MESSAGE will be displayed
Press MENU key, then again press MENU to enter and to listen to messages.
DELETE ALL
Press ▼/OUT key to DELETE ALL item, then press MENU to enter, the display will show CONFIRM?, you can
press MENU to confirm and you will hear ”All messages deleted”.
Note: You cannot delete New Messages, so you will have to start to play them before trying to delete them.
MEMO
This allows users to record a memo (like a voice note) of up to 120 seconds.
1) Press ▼/OUT key to MEMO item, then press MENU to enter, the display still show MEMO and
you will hear “Please record memo after the beep”. Then the display will show RECORD and the
current recording time.
2) Press to end memo recording.
ANSWER MACHINE (TAM) SETTINGS
Press ▲/CID or ▼/OUT key to select TAM SETTINGS.
To turn the Answer Machine (TAM) ON/OFF
Press MENU key to show TAM ON/OFF, then press MENU, the LCD display ON or OFF, press▼/OUT to
select OFF or ON, and press MENU to confirm. If you have selected ON, the display shows OGM1, press
▼/OUT key to select OGM2 or OGM1, then press MENU to confirm your selection.
Alternatively you can also use the shortcut and press and hold for 2 seconds to turn ON/OFF
To select or set a personal OUT GOING MESSAGE (OGM)
Press ▼/OUT key to select SET OGM item, then press MENU to enter, choosing OGM1 or OGM2 by
pressing ▲/CID or ▼/OUT key, press MENU, then press ▼/OUT to select PLAY, RECORD, DEFAULT,
press MENU key to confirm.
To playback the current OGM
When the LCD displays PLAY, press MENU to select it and to play the OGM
There are two (2) pre-set announcements as for OGM1 and OGM2. These are set as follows:
OGM1 “Sorry we cannot answer your call now, please leave your message after the beep”

18 | P a g e
18
OGM 2 “Sorry we cannot answer your call now, please call later”
To record your PERSONAL outgoing message (OGM)
When the LCD display RECORD, press MENU to hear a voice prompt “please record new announcement
after the beep”. After a beep tone you can start speaking. When you want to end the recording, press ,
It is a good idea to write down your OGM as a script to help you record it correctly.
To delete the personal OGM and set back to the OGM default
When the LCD displays DEFAULT, press MENU to select it and the display will show CONFIRM?, press
the MENU to confirm, after a beep, the display will return to DEFAULT.
To set a NEW MESSAGE alert
You can set a new message alert tone which is normally turned off by default.
When the tone is turned on, you will hear this audible alert tone every 30 seconds when the phone is in idle
mode when you have a new message.
To select alert tone, in TAM SETTINGS, press MENU to enter, press ▼/OUT key twice to show TAM ALERT,
press MENU to enter, and press ▲/CID or ▼/OUT to choose ON or OFF, and press MENU to confirm. You will
hear a beep, then display will return to TAM ALERT.
To set the number of RINGS before ANSWER MACHINE starts
The telephone can answer calls from between 2 and 9 rings to allow you to ignore or answer the call. If you
don’t set a number, the ANSWER MACHINE (TAM) will answer after 5 rings.
If you want to dial in and collect you your messages REMOTELY while you’re away, you can set the number of
rings to TOLL SAVER. If there are new messages, the telephone will answer the call after 2 rings, if there are
no new messages, it will answer after 5 rings. This allows you to end the call after 3 rings if there are no new
messages so that you can hang up and save on call charges.
Press ▼/OUT key to select SET RING, press MENU to enter, press ▲/CID or ▼/OUT to choose 2~9 or TOLL
SAVER rings. Press the MENU to confirm and return to previous menu.
To set ANSWER MACHINE TAM VOICE LANGUAGE
Press ▼/OUT key to select TAM VOICE, press MENU/MUTE to enter, press ▲/CID or ▼/OUT to select from
DEUTSCH (German), ENGLISH (English), FRANÇAIS (French) and ITALIANO (Italian).
To change security code and prevent remote access for others (TAM PIN)
A security code is used to be able to remote access any message and is a 4-digit code. The default code is set
to “0000”. Please change this PIN code as soon as possible as follows:
Press ▼/OUT key to select TAM PIN, press MENU to enter and the display will show the current setting”0000”,
use the keypad to enter the new security PIN code, press MENU to confirm.

19 | P a g e
19
To reset TAM to default settings
You will restore the following settings to default after you select this command.
-Ring setting: 5
-TAM ON
-OGM 1
-Security code: 0000
-TAM alarm: OFF
Press ▼/OUT key to select TAM DEFAULT, press MENU and the display will show PIN?, enter the PIN code
through the keypad (default as 0000), then press MENU to confirm. If the PIN code is validated all TAM
settings will be returned to the factory default.
Short-cut Keys for Answer Machine (TAM) Operation
Switching Answer Machine (TAM) on/off
Switch TAM on to OGM 1 or OGM 2
1) In idle mode, when the display shows TAM OFF, press and hold for over 2 seconds to switch
TAM ON.
2) The display will show OGM 1, and announce “Answer ON, Announcement One”.
3) After this, the display will show the number of messages.
Switch TAM off
If the TAM is already switched on, either with OGM1 or OGM2, press and hold for 2 seconds to switch
the TAM off. Then the display will show TAM OFF.
To playback the OGM
In idle mode, press and hold the numerical key “1” for 3 seconds to listen to the current OGM (OGM1 or
OGM2).
Switch between OGMS
When the TAM is switched ON you can select OGM1 or OGM2.
1) Press the key and if you hear “ANSWER ON, ANNOUNCEMENT1”, you are currently using
OGM1.
2) Press the again to switch to OGM 2, and you will hear “ANSWER ON, ANNOUNCEMENT 2”.
To play/pause/stop messages on TAM
When there are new messages, the display will show e.g. 01/02 MSGS, which means you have 1 new
message/2 messages altogether. In idle mode;
1) Press to listen to messages and memos, press ▲/CID or ▼/OUT to adjust the playing volume.
2) Press the again to pause during a message. The pause time maximum is one minute. If not quit
from pause in one minute, then it will quit the message play after one minute automatically.

20 | P a g e
20
3) Press to stop the message playback.
To delete a message on TAM
Press the DEL while a message is playing. You will hear “MESSAGE DELETED” and the current message will
be deleted, and the next message will start to play if there are more messages.
To delete all messages on TAM
While a message is playing, press and hold DEL for 2 seconds at any time to delete all old messages. Then
announce “ALL MESSAGES DELETED”, and all old messages will be deleted.
Noted: You cannot delete New Messages, so you will have to start to play them before trying to delete them.
To record a memo on TAM
In idle mode, press and hold MEMO key to enter record a memo conveniently, Press key to stop the
message record and back to idle mode.
Incoming Call Messages (ICM)
If the answering machine is ON and set for OGM1, when there is an incoming call, the answering machine will
answer it and play the OGM. Followed by a “beep”, the caller can then leave a message of up to 2 minutes on
the answering machine.
You can use the corded handset, the speakerphone or the cordless handset to intercept the call to speak
to the caller during ICM recording. Then the message that is currently being recorded will be saved as a
new message.
Recording will stop also if silence, busy tone or continuous tone is deleted, and the message will be
saved.
Conversation Recording
During a conversation, press and hold MEMO key until the LCD displays “RECORD”. The conversation will be
recorded until the key is pressed.
The recording of the conversation will be stored like as a voice message and can be played back or deleted
along with other messages retrieved locally or remotely.
Remote answer machine message access
If you are away from home, the Answer Machine messages can be accessed remotely. Please ensure that you
set your own TAM PIN security code for added security.
To use, call your own number and your Answer Machine will start to play to OGM.
1) When you hear the OGM announcement, press * key on the keypad of the phone you are using. The
answering machine will enter the remote control state, and require you to enter the 4-digit security code.
The default security code is “0000” (we recommend that you change this).
Table of contents


