Energy Imports VB204W User manual

VB204W
User Manual

i
Table of Contents
1Safety Precautions......................................................................................1
2Overview.........................................................................................................2
2.1 Packing List.........................................................................................2
2.2 Application ..........................................................................................2
2.3 Features..............................................................................................3
2.4 Standards Compatibility and Compliance............................................4
3Hardware Description and Installation..............................................................5
3.1 LEDs and Interfaces............................................................................5
3.2 Hardware Installation...........................................................................8
4PC Network Configuration and Login...............................................................9
4.1 PC Network Configuration...................................................................9
4.2 Logging in to the DSL Router ............................................................10
5Web-based Management...............................................................................12
5.1 Setup ................................................................................................12
5.1.1 Wizard...............................................................................12
5.1.2 Internet Setup....................................................................20
5.1.3 Wireless ............................................................................23
5.1.4 Local Network....................................................................27
5.1.5 Local IPv6 Network............................................................32
5.1.6 Time and Date...................................................................35
5.1.7 Logout...............................................................................35
5.2 Advanced..........................................................................................36
5.2.1 Advanced Wireless............................................................37
5.2.2 ALG...................................................................................44
5.2.3 Port Forwarding.................................................................45
5.2.4 DMZ..................................................................................47
5.2.5 SAMBA..............................................................................48
5.2.6 Parental Control ................................................................49
5.2.7 Filtering Options................................................................52
5.2.8 QoS Configuration.............................................................57
5.2.9 Anti-Attack Settings...........................................................61
5.2.10 DNS ..................................................................................63
5.2.11 Dynamic DNS....................................................................64

ii
5.2.12 Network Tools....................................................................66
5.2.13 Routing..............................................................................76
5.2.14 NAT...................................................................................81
5.2.15 FTPD.................................................................................81
5.2.16 FTPDAccount...................................................................82
5.2.17 Logout...............................................................................83
5.3 Management.....................................................................................84
5.3.1 System Management.........................................................84
5.3.2 Firmware Update...............................................................85
5.3.3 Access Controls ................................................................86
5.3.4 Diagnosis ..........................................................................92
5.3.5 Log Configuration.................Error! Bookmark not defined.
5.3.6 Logout...............................................................................95
5.4 Status................................................................................................96
5.4.1 Device Info........................................................................97
5.4.2 Wireless Clients.................................................................97
5.4.3 DHCP Clients....................................................................98
5.4.4 IPv6 Status........................... Error! Bookmark not defined.
5.4.5 Logs..................................................................................98
5.4.6 Statistics............................................................................99
5.4.7 Route Info........................................................................100
5.4.8 Logout.............................................................................101
5.5 Help ................................................................................................102
6Trouble Shooting.........................................................................................103

VB204W User Manual
1
1 Safety Precautions
Take the following instructions to prevent the device from risks and damage caused
by fire or electric power.
Use the type of power marked in the volume label.
Use the power adapter in the product package.
Pay attention to the power load of the outlet or prolonged lines. An
overburden power outlet or damaged lines or plugs may cause electric
shock or fire accidents. Check the power cords regularly. If you find any
damage, replace it at once.
Proper space left for heat dissipation is necessary to avoid damage caused
by overheating to the device. The long and thin holes on the device are
designed for heat dissipation to ensure that the device works normally. Do
not cover these heat dissipation holes.
Do not put this device close to a heat source or under a high temperature
occurs. Keep the device away from direct sunshine.
Do not put this device close to an overdamp or watery place. Do not spill
fluid on this device.
Do not connect this device to a PC or electronic product unless instructed
by our customer engineer or your broadband provider. Wrong connection
may cause power or fire risk.
Do not place this device on an unstable surface or support.

VB204W User Manual
2
2 Overview
The VB204W VDSL Wi-Fi Router integrates 802.11n Wireless, LAN and USB
service into one unit. It is designed to provide a simple and cost-effective xDSL
Internet connection for a private Ethernet and 802.11g/802.11b/802.11n wireless
network. The Router combines a high-speed xDSL Internet connection, IP routing
for the LAN, and wireless connectivity in one package.
The Router is easy to install and use. The Router connects to an Ethernet LAN or
computers via standard Ethernet ports. The xDSL connection is made using
ordinary telephone line with standard connectors. Multiple workstations can be
networked and connected to the Internet by a single Wide Area Network (WAN)
interface and single global IP address. The advanced security enhancements,
packet filtering and port redirection, can help protect your network from potentially
devastating intrusions by malicious agents from outside your network.
Network and Router management is done through the web-based management
interface accessed through the local Ethernet using any web browser. You may also
enable remote management to enable configuration of the Router via the WAN
interface.
2.1 Packing List
1 x VB204W
1 x power adapter
1 x telephone cables (RJ-11, more than 1.8m)
1 x Ethernet cable (RJ-45, more than 1.8m)
2.2 Application
Home gateway
Wireless LAN
Higher data rate broadband sharing
Audio and video streaming and transfer
PC file and application sharing
Network and online gaming
USB storage

VB204W User Manual
3
2.3 Features
User-friendly GUI for web configuration
Compatible with all standard Internet applications
Industry standard and interoperable xDSL interface
Simple web-based status page displays a snapshot of system configuration,
and links to the configuration pages
Downloadable flash software updates
Support for up to 8 permanent virtual circuits (PVC)
Support for up to 8 PPPoE sessions
Support RIP v1 & RIP v2
WLAN with high-speed data transfer rates, compatible with IEEE
802.11b/g/n
IP routing and bridging
Asynchronous transfer mode (ATM) , PTM (Packet Transfer mode), and
digital subscriber line (DSL) support
Point-to-point protocol (PPP)
Network/port address translation (NAT/PAT)
Quality of service (QoS)
Wireless LAN security: WPA, 802.1x, RADIUS client
Universal plug-and-play(UPnP)
Web filtering
Management and control
Web-based management (WBM)
Command line interface (CLI)
TR-069 WAN management protocol
Remote update
System statistics and monitoring
DSL router is targeted at the following platforms: DSL modems, wireless
access points and bridge.
Multicast listener discovery (MLD)
Digital living network alliance (DLNA)
Synergy advanced multipurpose bus arbiter (SAMBA)
Internet group management protocol (IGMP)
Application layer gateway (ALG)

VB204W User Manual
4
2.4 Standards Compatibility and Compliance
Support application level gateway (ALG)
ITU G.992.1 (G.dmt)
ITU G.992.2 (G.lite)
ITU G.994.1 (G.hs)
ITU G.992.3 (ADSL2)
ITU G.992.5 (ADSL2+)
ITU G.993.1 (VDSL)
ITU G993.2 (VDSL2)
ANSI T1.413 Issue 2
IEEE 802.3
IEEE 802.3u
IEEE 802.11b
IEEE 802.11g
IEEE 802.11n

GUN4.HT141A-C User
5
3 Hardware Description and Installation
3.1 LEDs and Interfaces
Front Panel
Figure 1 Front panel
The following table describes the indicators on the front panel.
Indicator
Color
Status
Description
Power
Green
On
The device is powered on.
Off
The device is powered off.
Red
On
Self-test fails, or failure occurs, or the device is
starting.
DSL
Green
On
DSL link is established.
Slow
Blink
The DSL line is attempting to detect signals.
Fast Blink
Signals have been detected, and the DSL line
is attempting to establish link.
Internet
Green
On
Physical layer connection and IP connection is
established in routing mode.
Blink
IP connection is established, and messages
are being transmitted.
Off
IP connection or physical layer link is not
established.

VB204W User Manual
6
Indicator
Color
Status
Description
Red
On
IP connection fails.
LAN
1/2/3/4
Green
On
Ethernet link is established.
Blink
Data is being transmitted through a LAN
interface.
Off
Ethernet link is not established.
WLAN
Green
On
WLAN is enabled.
Blink
Data is being transmitted by the wireless
module.
Off
WLAN is disabled.
WPS
Green
On
Negotiation is successful under Wi-Fi protected
setup.
Blink
Negotiation is in progress under Wi-Fi protected
Setup.
Off
Wi-Fi protected setup is disabled.
USB
Green
On
A 3G network card or USB flash disk is
connected.
Blink
Data is being transmitted.
Off
No USB connection.
Rear Panel

VB204W User Manual
7
Figure 2 Rear panel
The following table describes the interface of the device.
Interface/Button
Description
Power Socket
Interface connecting to the power adapter. The power
adapter output is: 12V DC, 2000mA
Power Switch
Press to turn on or off
Reset
Reset to the factory defaults. To restore factory defaults,
keep the device powered on and push a paper clip into the
hole. Press down the button for more than 5 seconds and
then release.
USB
USB port, for connecting USB storage devices.
LAN1/2/3/4
Ethernet RJ-45 interfaces connecting to the Ethernet
interfaces of computers or Ethernet devices
DSL
RJ-11 interface connecting to a telephone set through a
telephone cable
Top Panel
Interface/Button
Description
WPS
This button is used for enabling WPS
PBC mode. If WPS is enabled, press
this button, and then the wireless
router starts to accept the negotiation
of PBC mode.
WLAN
WLAN switch, for enabling or
disabling the WLAN function.

VB204W User Manual
8
3.2 Hardware Installation
Step 1 Connect the DSL port of the device to the socket installed by Chorus
Step 2 Connect a LAN port of the device to the network card of the PC through
an Ethernet cable.
Note:If connecting to ADSL service, make sure ADSL Filters are used.
Step 3 Plug one end of the power adapter to the wall outlet and the other end
to the Power port of the device.
Installing a telephone without using either a Splitter or filter will lead to failure of
xDSL connection, or failure of Internet access, or slow connection speed. If you
really need to add a telephone set, you must add a microfilter or Central Splitter.

GUN4.HT141A-C User
9
4 PC Network Configuration and Login
4.1 PC Network Configuration
Each network interface on the PC should either be configured with a statically
defined IP address and DNS address, or be instructed to automatically obtain an IP
address using the network DHCP server. The VB204W provides a DHCP server on
its LAN and it is recommended to configure your LAN to automatically obtain its IP
address and DNS server IP address.
The configuration principle is identical but should be carried out differently on each
operating system.
The following displays the TCP/IP Properties dialog box on Windows XP.
Figure 3 PC Network Configuration

VB204W User Manual
10
TCP/IP configuration steps for Windows XP are as follows:
Step 1 Choose Start > Control Panel > Network Connections.
Step 1 Right-click the Ethernet connection icon and choose Properties.
Step 2 On the General tab, select the Internet Protocol (TCP/IP) component
and click Properties. The Internet Protocol (TCP/IP) Properties window
appears.
Step 3 Select the Obtain an IP address automatically radio button.
Step 4 Select the Obtain DNS server address automatically radio button.
Step 5 Click OK to save the settings.
4.2 Logging in to the DSL Router
To log in to the DSL router, do as follows.
Step 1 Open a Web browser on your computer.
Step 2 Enter http://192.168.1.1 (default IP address of the DSL router) in the
address bar. The login page appears.
Step 3 Enter the user name and the password. The default username and
password are admin and admin. The username and password of the
common user are user and user. You need not enter the username and the
password again if you select the option Remember my password. It is
recommended to change these default values after logging in to the DSL
router for the first time.
Step 4 Click OK to log in to the Web page. Otherwise, please click Cancel to
exit the login page.

VB204W User Manual
11
Figure 4 Logging in to the DSL Router
After logging in to the DSL router as a admin user, you can query, configure, and
modify all the settings, and diagnose the system.

GUN4.HT141A-C User
12
5 Web-based Management
This chapter describes how to use Web-based management of the VB204W, which
allows you to configure and control all of router features and system parameters in
a user-friendly GUI.
5.1 Setup
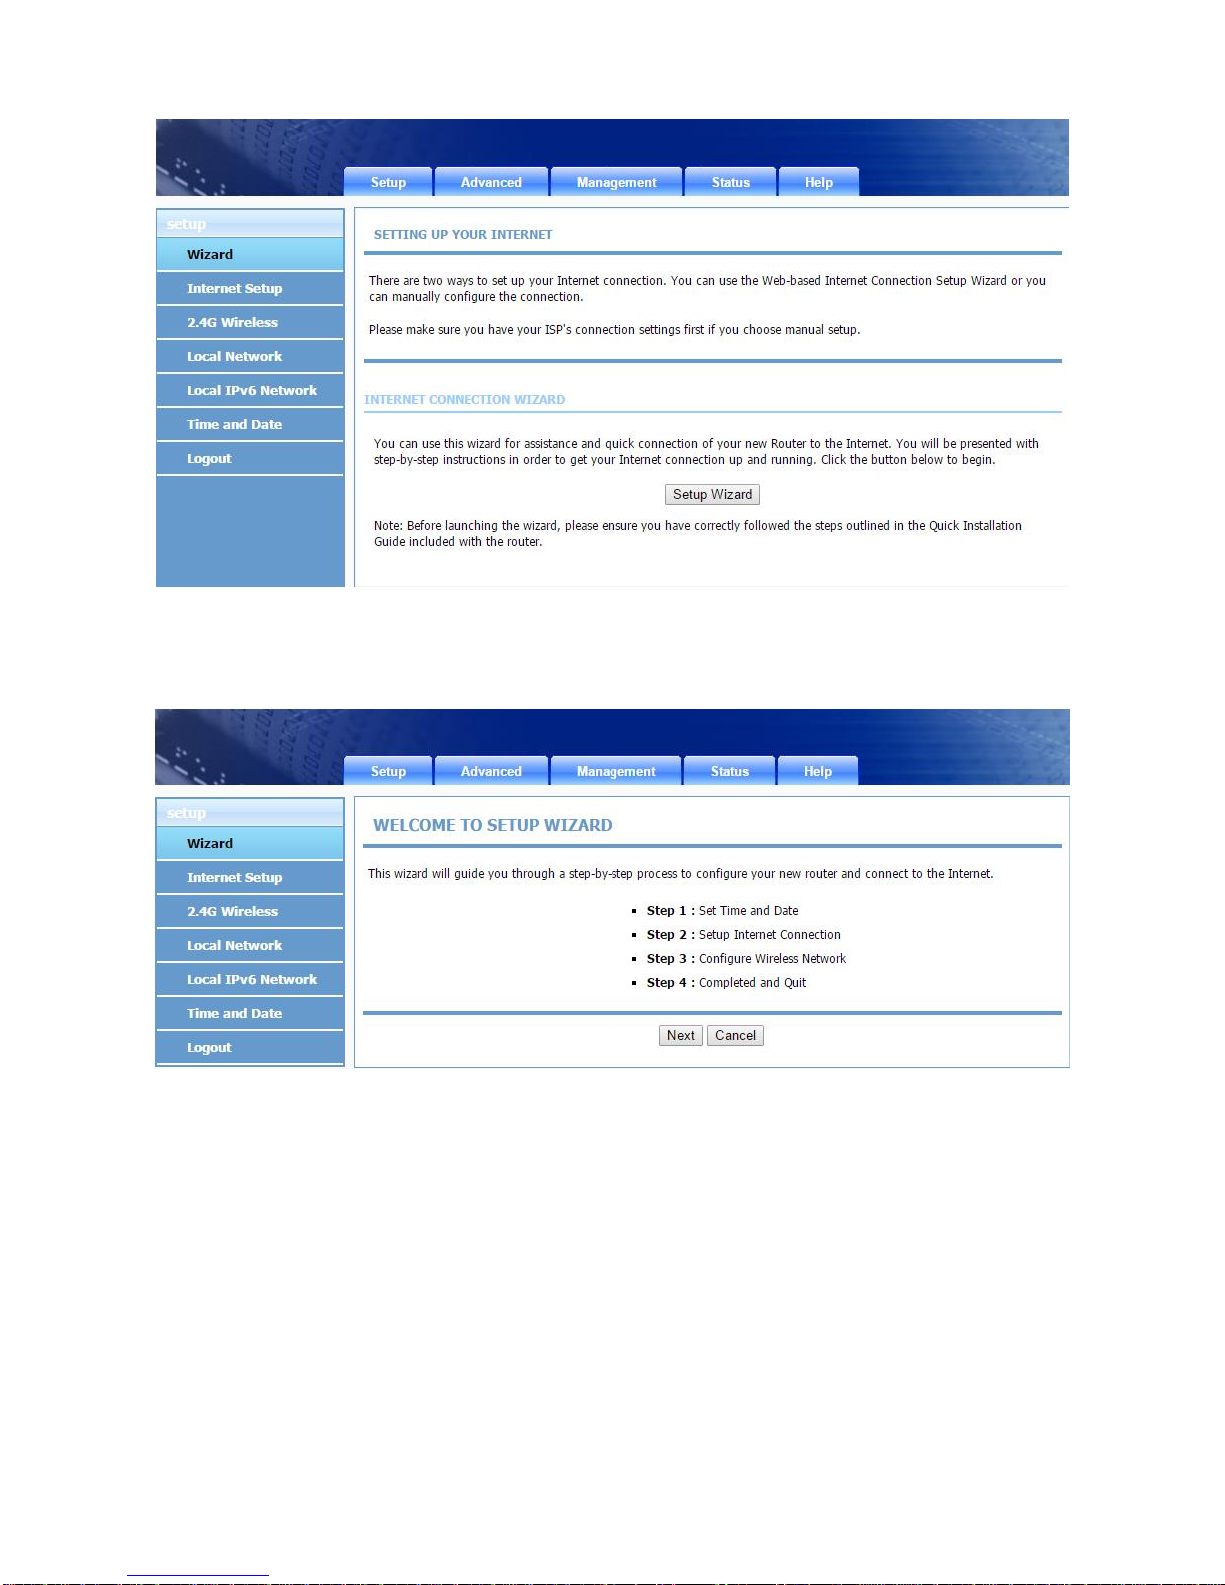
In the main interface, click Setup tab to enter the Setup menu as shown in the
following figure. The submenus are Wizard, Internet Setup, 2.4G Wireless,Local
Network, Local IPv6 Network, Time and Date and Logout.
5.1.1 Wizard
Wizard enables fast and accurate configuration of Internet connection and other
important parameters. The following sections describe configuration parameters.
When subscribing to a broadband service, you should be aware of the method, by
which you areconnected tothe Internet. Your physicalWANdevice can beEthernet,
DSL or both. Technical information about the properties of your Internet connection
is provided by your Internet service provider (ISP). For example, your ISP should
inform you that you are connected to the Internet using a static or dynamic IP
address, or the protocol used for communication over the Internet, such as PPPoA
or PPPoE,.
Choose Setup > Wizard. The page shown in the following figure appears.
VB204W User Manual
13
Click Setup Wizard. The page shown in the following figure appears.
VB204W User Manual
14
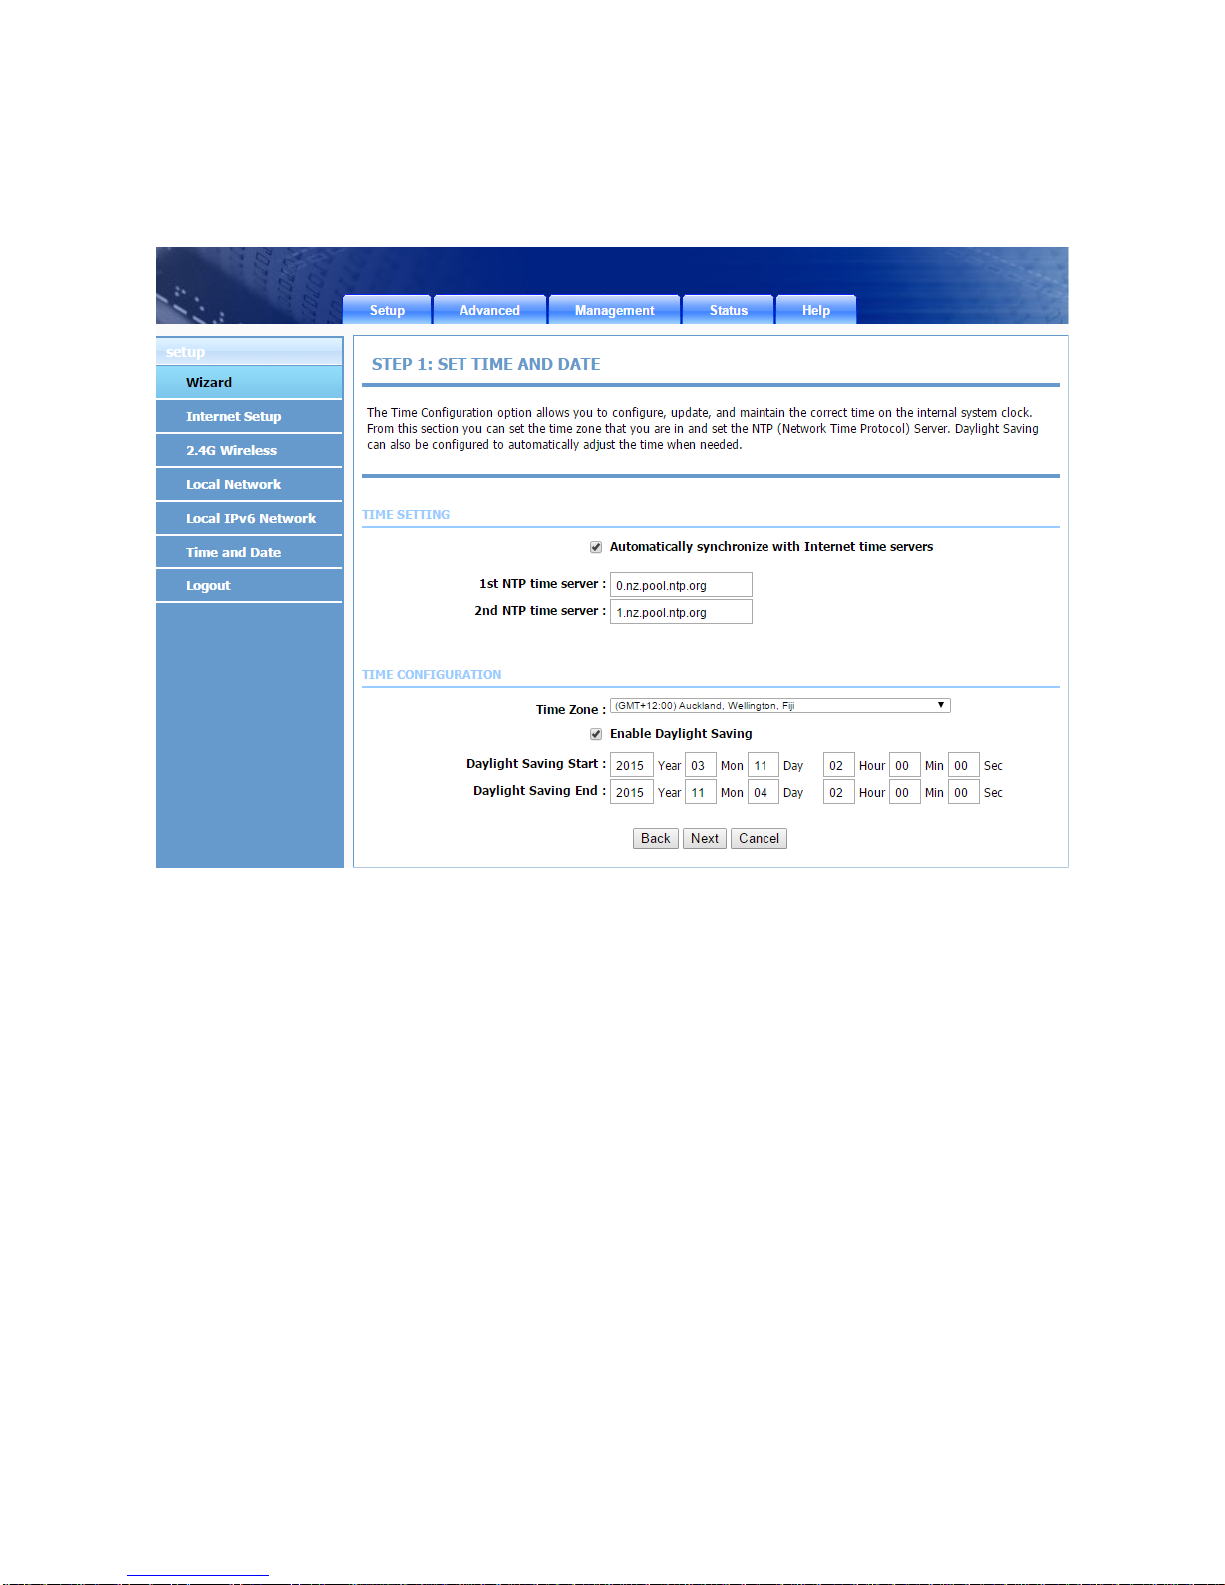
There are four steps to configure the device. Click Next to continue.
Step 1 Set the time and date.
VB204W User Manual
15
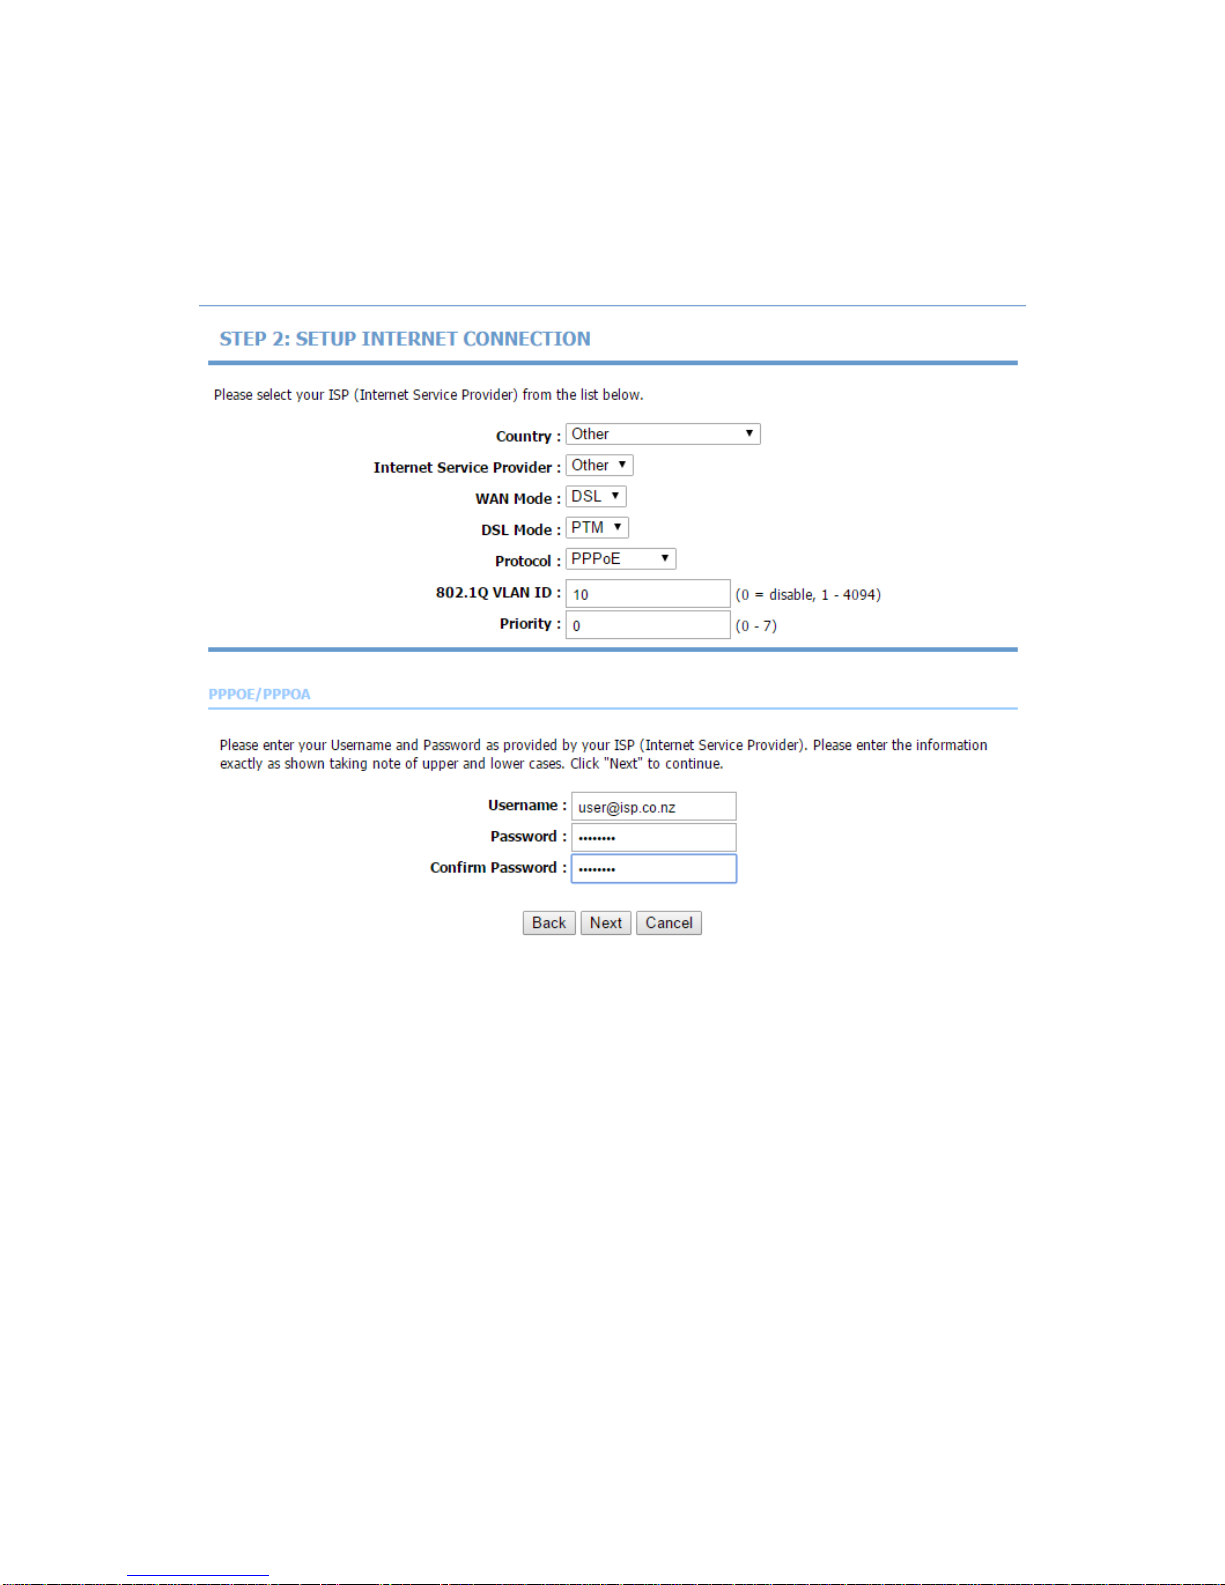
Step 2 Configure the Internet connection:
VDSL Connection
Select Other for Country and PTM as DSL Mode, set VLAN ID as 10 and enter the
user name and password as provided by your ISP :

VB204W User Manual
16
ADSL Connection
Select Other for Country and ATM as DSLMode, set Protocol as PPPoA, set VPI to
0 and VCI to 100. Finally enter the user name and password as provided by your
ISP :
VB204W User Manual
17
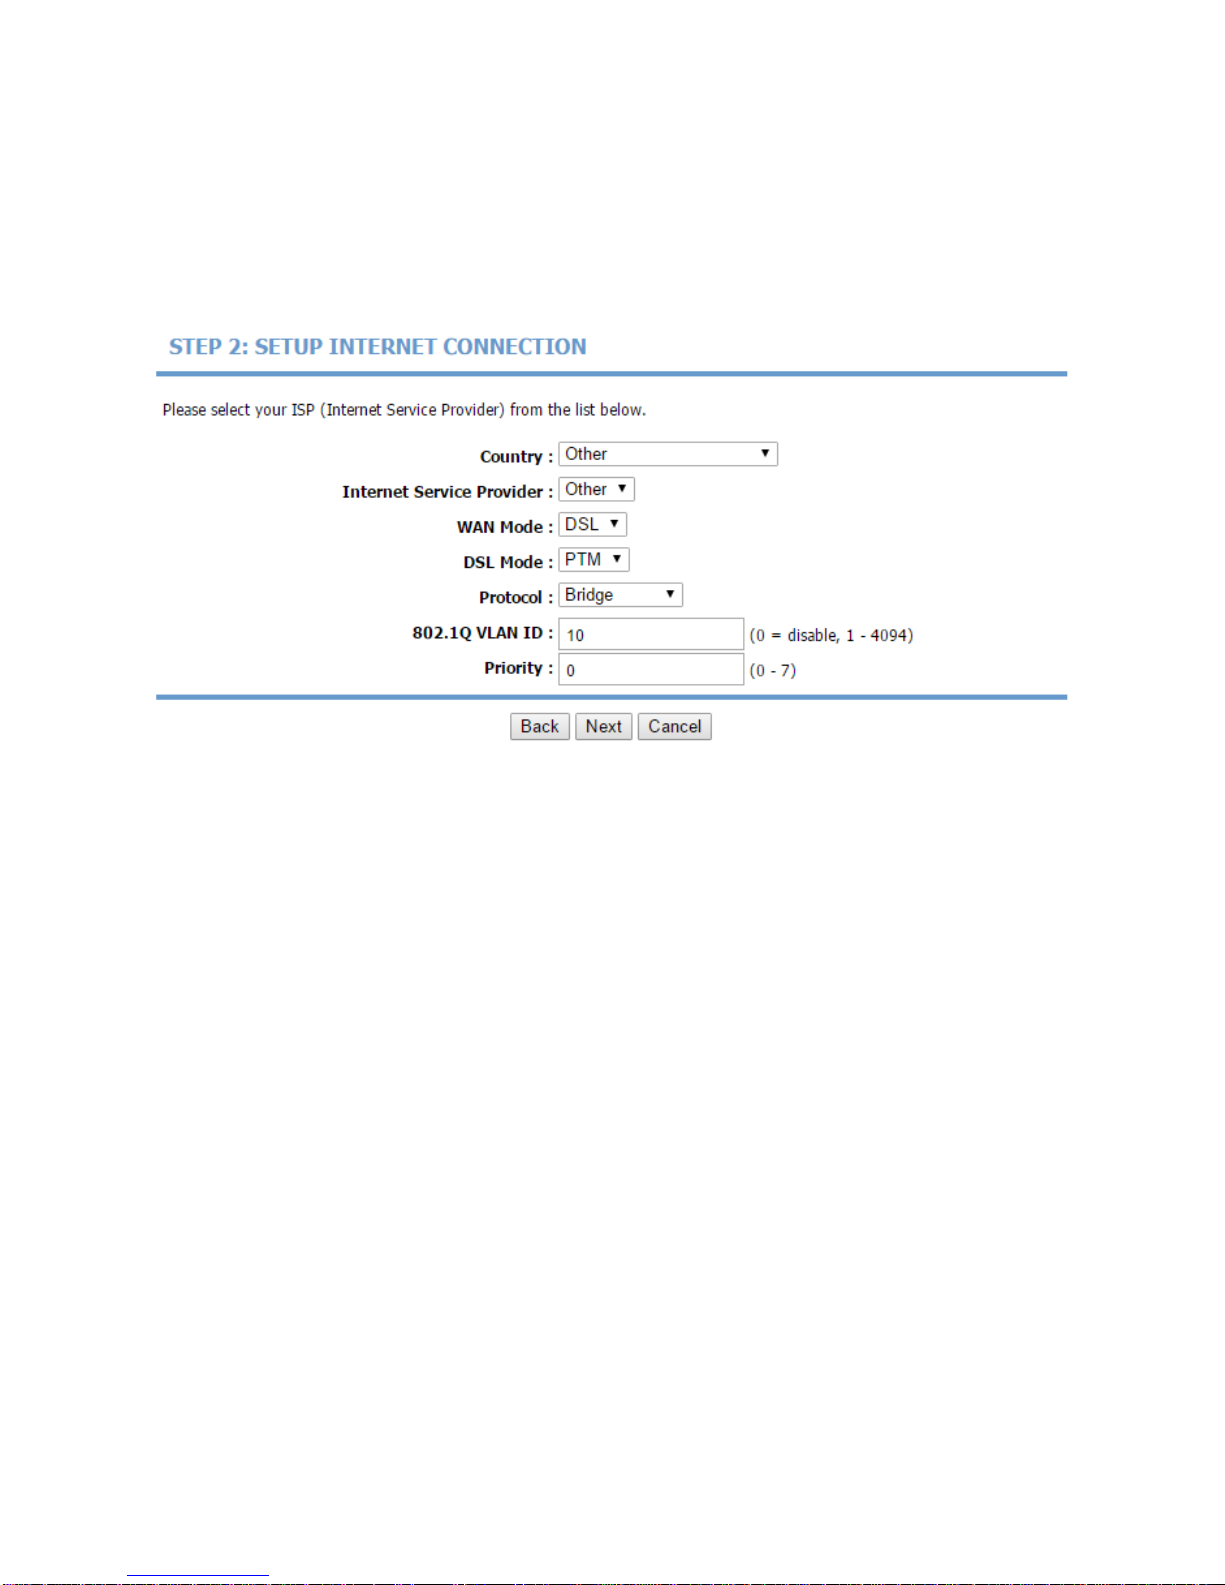
Bridge
When you choose the DSL Mode as PTM and the Protocol as Bridge, the page
shown in the following figure appears.
Note:When you choose the DSL Mode as ATM, please refer to the configurations
under ATM mode for corresponding Internet configurations.
Table of contents


