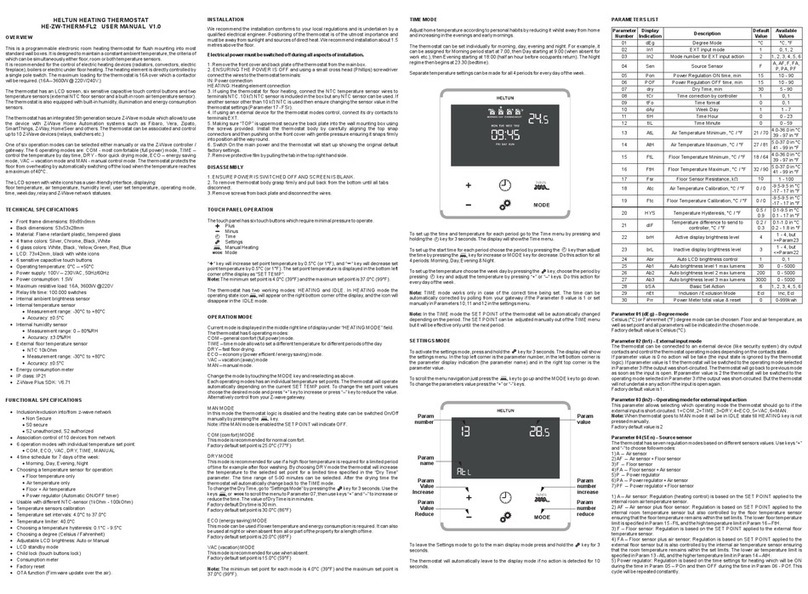
Energy Products Group CZC1 User manual

CZC1 wireless
7 day programmable
thermostat
CLOCK °C/°F PROG
BOOST
SET-BACK
HOLIDAY ADVANCE
208
°C
210
°C
ACTUAL TARGETPROG.
2018
Sat
1
Energy Products
Group
The CZC1 complies with the essential requirements of directive
1999/5/EC. A copy of the declaration of conformity can be
obtained by contacting Energy Products Group.
Legen Heirweg 77
B-9890 Asper (Gavere)
Belguim
Telephone: +32 (0)9 384 83 44
Facsimile: +32 (0)9 384 89 23
E-mail: [email protected]
Website: www.energyproducts.nl
Energy Products
Group
V1
Battery replacement
A pair of good quality alkaline batteries will last at least 2
years. The low battery symbol appears when it is time to
replace them. If you don’t replace them for 2 weeks the
symbol will start to flash. You must reset the clock after
changing batteries but all other settings are unaffected.
To avoid corrosion damage always use new batteries. The
manufacturer is not responsible for damage due to corrosion.
5Fixing your CZC1 to the Wall
Remove the wall plate from the rear of the CZC1 and
mark through the screw holes on the rear (60 mm centres).
Drill and plug the wall to accept No. 6 or No. 8 screws and
mount the wall plate. Clip the CZC1 back onto the wall plate.
4Testing your connection
With the CZC1 in position use and to get the
power bars to appear(See Quick Adjust for more details).
Then check that the heater turns on. If the heater does not
come on you will have to reposition your CZC1.
3Choosing a position in the room
The CZC1 should be positioned in a place where its
temperature will not be changed by local effects. Avoid:
Draughty places near windows, doors and vents.
Places near the heater itself or any other heat sources in
the room.
Places where the sun will shine on it.
Places where, for example, it could be hit by a door.
Places where it may get wet.
Connect your heater
For it to work, you first need to establish a radio
connection between your heater and your CZC1.
1. Switch the heater’s mains supply off.
2. Switch it on for a few seconds then switch it off again.
3. When you next switch it on it will be listening for the
CZC1’s connection signal. The light flashes every 1.6
seconds. This means that a connection can be made to
the heater.
If the light is not flashing no connection can be made,
retry the procedure.
4. Press the button on the back of the CZC1. This causes it
to send a connection signal. The light does a final 1.4
second flash off and then comes on again showing that
the heater is now connected.
If the heater sees no connection signal for 60 seconds it will
return to normal operation with its connection unaffected.
Now that it’s connected you shouldn’t ever have to do it
again, though you may also wish to follow this procedure if
you add more heaters or move your heater to another CZC1.
1.6 seconds
2
Installing your CZC1Installing your CZC1
1Insert 2 AA alkaline batteries
Insert 2 new AA batteries.
See Battery Replacement for further details.
Now proceed to stage 2; Connect your heater.
The Celsia Zone Controller, CZC1, is a wireless (433MHz)
thermostat giving high precision room temperature control. It
is also a seven day programmer with up to six temperature
settings per day. Each CZC1 can control any number of
heaters.
0.5 seconds
A fast flashing red light means your heater
has overheated. Remove anything
covering it. Switch power off and allow it to cool before
switching it back on again.
A slow flashing green light means that, for
5 minutes, no CZC1 radio signals have
been received. Follow the steps in Installing your CZC1 to fix
this.
1.6 seconds
The CZC1 sends a radio signal every minute. When the
heater receives the signal, the light winks off briefly and may
change colour. When you switch the heater on, the light is
always green until the first signal.
Your heater has a control light which may be
green - when no heat is needed
yellow - when some heat is needed to maintain the
room temperature
red - when the heater is on at full power
Once installed, your heater is controlled by a Celsia Zone
Controller, CZC1. The CZC1 is a wireless (433MHz)
thermostat giving high precision room temperature control. It
is also a seven day programmer with up to six temperature
settings per day. Each CZC1 can control any number of
heaters.
Your heaterYour heater

BOOST
SET-BACK
HOLIDAY ADVANCE
208
°C
210
°C
ACTUAL TARGETPROG.
2018
Sat
1
CLOCK °C/°F PROG
Quick AdjustQuick Adjust
210
During normal operation you
can use and to alter the
temperature. The effect is
temporary; it reverts to normal
temperature on the next prog
or when you press other
buttons. You can set it to ---
(no heating), 4°C (frost
protection) or anything from 14°C to 30°C.
If you press and together, it displays
FAN. The heater operates as normal, but, if it
is a fan heater the fan will run continuously. It
reverts to normal on the next prog or when
you press CLEAR.
The and buttons are used to adjust other things when
you are setting the program or the clock. They adjust
whatever is shown flashing on the display.
For economy press SET-BACK. The 7 day program
continues to run but all temperatures (except frost) are
lowered by 5°C. Set-Back continues until you press CLEAR.
Set-Back (economy)Set-Back (economy)
Actual is a thermometer showing
the room temperature. Target is the
temperature you would like. It is set
manually or by the program and
can be --- when no heating is needed.
Actual and Target TemperatureActual and Target Temperature
208
°C
210
°C
ACTUAL TARGET
Advance (early bird)Advance (early bird)
Press ADVANCE if you wish to bring forward the next prog;
for instance if you arrive in or leave the room earlier than
normal. The program stays Advanced until the prog’s normal
time or until you press CLEAR.
Pressing BOOST and SET-BACK
together changes Actual and Target
temperature between Centigrade
and Fahrenheit.
Centigrade or FahrenheitCentigrade or Fahrenheit
208
°C
694
°F
For frost protection, set the Target
temperature to 4°C. There is no frost
protection if you set it to ---. The
snowflake symbol appears if the Actual
temperature ever falls below 4°C.
Frost Protection 4°CFrost Protection 4°C
32
°C
ACTUAL
Setting the Time and DaySetting the Time and Day
To set the clock press HOLIDAY and
BOOST together. The hours will start
to flash and you can adjust them with
and . Using SELECT you can
adjust minutes, day of week or change
from 24 hour clock to 12 hour clock.
When you are finished press OK.
OKSELECT
24h
2022
Sat
OKSELECT
24h
2022
Sat
OKSELECT
24h
2022
Sat
OKSELECT
24h
2022
Sat
You will see the radio transmit symbol whenever the
CZC1 transmits to your heater. This happens about once
a minute.
Transmit SymbolTransmit Symbol
Manual Operation: If you clear all 6 progs in all 7 days,
there is no program at all. The temperature control is done
entirely by Quick Adjust.
OK CLEAR
COPY DAY
To
Sat
Copy Day: Use this to copy all 6 progs from the day you
were adjusting to another day. Press COPY DAY to actually
do the copy. CLEAR returns to stage 1.
1
Clearing A Prog: If you clear a
prog it displays as --:--, --.-°C and the
prog is ignored. From stage 1 press
CLEAR to clear a prog and press it
again to un-clear it.
4When you have finished setting the program press OK
to return to normal operation.
TARGETPROG.
OKSELECT
08:00
Sat
1
210
°C
The temperature flashes. You can adjust it with and
4°C (frost protection) or ---
(no heating).
SELECT
returns to
stage 1.
for room temperature,
3
OKSELECT
210
°C
TARGETPROG.
Sat
1
08:00
The time flashes. You can adjust it with and .
SELECT takes you to stage 3.
2
The prog number and day will flash. You can change it
with and . SELECT takes you to stage 2.
0800
OKSELECT
210
°C
Sat
1
TARGETPROG.
1
To set the program press SET-BACK and ADVANCE together. This will take you to stage 1 below. You can
program the CZC1 with up to 6 temperature progs per day.
Program times cannot overlap, for example if prog.3 Mon is 16:30 then prog.2 Mon can only be set to
times before 16:30.
Note: You might accidentally “lock” the CZC1 while setting the program. To unlock it see Locking the CZC1.
Setting the 7 day programSetting the 7 day program
Mon to Fri Sat and Sun
°C °C
106:30 21.0 08:00 21.0
°C °C
208:30 4.0 23:00 4.0
°C °C
316:30 21.0 --:-- --.-
°C °C
423:00 4.0 --:-- --.-
°C °C
5--:-- --.- --:-- --.-
°C °C
6--:-- --.- --:-- --.-
On each weekday it is 21°C
from 6:30am to 8:30am,
then 4°C (frost protection)
until 4:30pm, then it is 21°C
until 11:00pm and finally
4°C until prog.1 the next
day.
Press and together
from Setting the 7 day program to restore this program.
Factory set programFactory set program
Power and Transmit symbolsPower and Transmit symbols
As your room reaches the target
temperature, heating is reduced
from 100% 4 bars to 0% no bars.
The radio transmit symbol appears whenever the CZC1
transmits to your
heater. This
happens about
once per
minute.
100%25% 50% 75%
You can lock the CZC1 to prevent tampering. When locked
all buttons are disabled. HOLIDAY, BOOST, SET-BACK,
ADVANCE, and are not displayed.
To lock it press SET-BACK and ADVANCE together to enter
program setting, then press the button on the back.
To unlock press SET-BACK and ADVANCE together, release
them, then press the button on the back within 2 seconds.
Locking the CZC1Locking the CZC1
Press BOOST to turn the heater on full power for an hour. If
you press BOOST again it adds another hour up to a
maximum of 4 hours. You can use and to adjust the
minutes. Boost ends when the time runs out, or you can
cancel it by pressing CLEAR.
Boost (full power)Boost (full power)
Holiday (no heating)Holiday (no heating)
Pressing HOLIDAY switches heating to 4°C (frost protection)
or it remains at ‘no heating’ if it was previously showing ---.
It stays like this until you press CLEAR.
Time, Day and ProgramTime, Day and Program
Here you can see the current time and day of the
week. PROG shows which step of the program it
is currently on.
1
V15
Popular Thermostat manuals by other brands
Vive Comfort
Vive Comfort TP-S-955CR installation manual
Daikin
Daikin Premium Mini D2270 Owner's Manual & Installation Instructions
Trane
Trane TZEMT500AB32MAA installation instructions
Vimar
Vimar 2905 user manual
Lauda
Lauda Ecoline RE 204 operating instructions
Grasslin
Grasslin thermio eco C3 Operation manual
Johnson Controls
Johnson Controls TEC2103-1 Product bulletin
Cadet
Cadet EBKA-1-24 installation instructions
Honeywell
Honeywell CT2800 Installation and programming instructions

nest
nest Learning thermostat installation guide
Chromalox
Chromalox GNIT-5 installation instructions
TemperZone
TemperZone TZT-701 Installer manual
