Energy Star Xi3 NUC Lear User manual

Xi3 NUC Lear
Install Everywhere. Manage Anywhere.

Table of Contents
Chapter 1 - Getting Started .................................................3
Introduction
...........................................................................3
What’sInside?
.......................................................................3
Getting Started
......................................................................3
Your Operating System
........................................................4
Move Data onto your Xi3 NUC
............................................4
Chapter2– Get to Know your NUC
..................................5
Processor
..............................................................................5
System Memory
....................................................................5
Memory Configurations..........................................................6
Graphics.................................................................................6
Video Memory Allocation.......................................................6
High-bandwidth Digital Content Protection (HDCP) ..............6
High Definition Multimedia Interface (HDMI) .........................6
USB........................................................................................6
LAN Subsystem .....................................................................7
Hardware Management Subsystem.......................................7
Power Management...............................................................7
Energy Saving Settings..........................................................8
Intel Security and Manageability Technologies
..................8
Intel® vPRO™ Technology................................................8
Intel® Active Management Technology .............................8
Intel® Virtualization Technology (Intel® VT), is a hardware-
assisted technology that, when combined with software-
based virtualization solutions, provides maximum system
utilization by consolidating multiple environments into a
single server or client. ........................................................8
Intel® Virtualization Technology for Directed I/O...............8
Intel® Trusted Execution Technology................................9
Intel® Identity Protection Technology ................................9
Intel® Anti-Theft Technology..............................................9
Trusted Platform Module (TPM).........................................9
The Dangers of Static Electricity
..........................................9
Removing & Replacing Components.....................................9
Turn Off Your Xi3 NUC ..........................................................9
Restarting Your Xi3 NUC
......................................................9
Chapter 3 – BIOS Settings.................................................10
System Management BIOS (SMBIOS)................................10
Legacy USB Support ...........................................................10
BIOS Updates......................................................................10
BIOS Recovery ....................................................................11
Boot Options ........................................................................11
Power Button Menu .............................................................11
BIOS Security Features .......................................................12
Chapter 4 – Troubleshooting ............................................13
Front-panel Power LED Blink Codes...................................13
BIOS Error Messages..........................................................13
Chapter 5 – Legal Stuff......................................................14
Important Safety Information
.............................................14
Important Handling Information
.........................................15
Environmental......................................................................15
Regulatory Information.........................................................15
Glossary...............................................................................16
Corporate Information..........................................................16
Xi3 Corporation’s mission is to provide efficient and
low-maintenance technological solutions that improve lives
with
minimalenvironmentalimpact.We’vedesignedthe
Xi3 NUCto
meetthelatestENERGYSTAR® guidelines for energy
efficiency. ENERGY STAR isa U.S. En
vironmental Protection
Agency voluntary program to reduce
energyconsumptionand
pollution.Xi3 computersareener
gyefficientandcomewith
defaultENERGYSTARsettings
recommended for optimal
energy savings. For specifics, see
“Energy Saving Settings” on
page 8 of this manual.

Introduction
Aside from the stunningly small form factor, the Xi3® NUC Lear features the Intel® Core™ i5 vPro™ processor offering robust
computing capabilities and complete remote management capabilities; allowing for remote management and the ability to
manage/repair systems anytime from anywhere.
What’s Inside?
Whenyou opentheboxcontainingyourXi3NUC,you
should find:
•
Onefully integrated Intel® NUC DC53427HYE including RAM, SSD,
OS, and WiFi (if applicable)
•
One Power Cord
•
OnePowerAdaptor
•
One Vesa Mount
Getting Started
Step One - Connect Your Display
To get started, connect your monitor cable to your display and then connect to either the HDMI or one of the two
DisplayPorts found on your NUC.
The HDMI port supports standard, enhanced, or high definition video, plus multi-channel
digital audio on a single cable. The port is compatible with all ATSCV and DVB HDTV standards and supports eight full
range channels at 24-bit/96 KHz audio of lossless audio formats such as Dolby* TrueHD or DTS* HD Master Audio. The
DisplayPort is designed to support connections between PCs and monitors, projectors, and TV displays. It is suitable for
display connections between consumer electronics devices such as high definition optical disc players, set top boxes, and
TV displays.
Multiple DisplayPort and HDMI configurations feature the following:
• Two independent displays
• Single HDMI 1.4a with 1080P support
• Single DisplayPort 1.2 with 4K support
• Collage Display
Triple Display Configuration Resolutions
Active Display
Active Display
Active Display
DisplayPort
1920 x 1200 @ 60 Hz
DisplayPort
1920 x 1200 at 60 Hz
HDMI
1080P at 60 Hz
Step Two - Connect Your Mouse and Keyboard
Connectyour keyboard cable to anyUSB port on your Xi3 NUC.Next,connectyourComputerMousecable
toadifferentUSBport.
{NOTE:If
your
keyboardandmouseshare acomboUSB cable,connect thistoany USB
port.Additionally,youcanalsouse awirelesskeyboardand/or
mouse;ifyouchoosetodoso,insertthe wireless
USBkeyboardand/ormousemodule(s)intoanyUSBport(s).}
Step Three - Connect Your External Hard Drive
Ifyouwillnotbeusinganexternalharddrive,skipthisstep.If,however,
you willbeusingan externalharddrive,connectthis device into
the
appropriate port on your Xi3 NUC
.{NOTE:Whenwerefertoexternalharddrivesinthisstep, weareNOTreferringtoUSBsticksorthumb
drives.Thisisespecially
noteworthyas a USB thumbdrive cannotbe used to launch aWindows
OperatingSystem.Additionally,althoughit
ispossibletolaunch
openSUSEandotherLinuxOperatingSystemswithaUSBthumbdrive,
westronglyrecommendagainstdoingsoasthis
willseriouslydegrades
theperformanceoftheOperatingSystem.}
Step Four - Connect to the Network
If you intend to surf the World Wide Web or use email, you will need a network connection. For many Xi3 NUC owners, this will involve
plugging an Ethernetcable into the Ethernet Port on the back of your computer.
If,however,youwanttoconnecttoanetworkwirelessly,you
willneedawireless
connection,such as awirelessnetworkadaptor,which can bepluggedinto one of the
unusedUSBPortsonthebackof
yourcomputer.
Chapter 1 - Getting Started
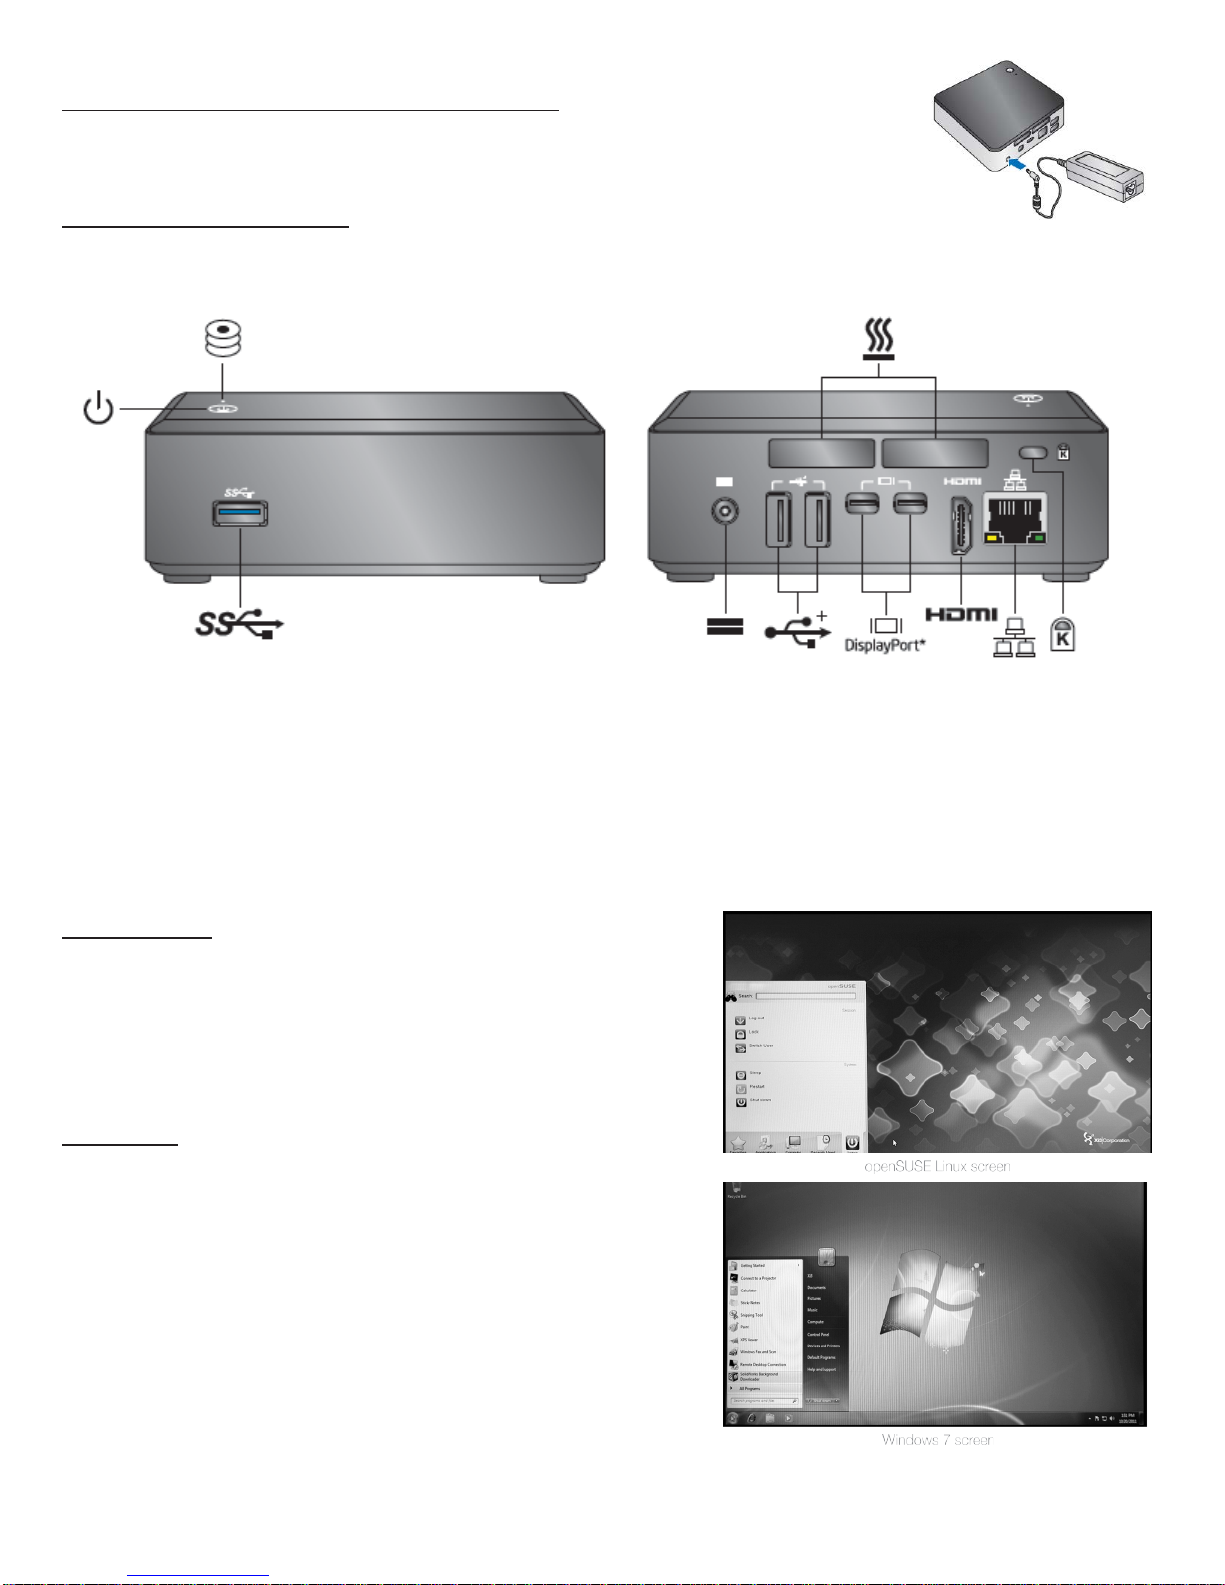
Step Five - Connect the Power Cord and Power Adaptor
FirstjointhePowerCordtothePowerAdaptor.NextconnectthesmallroundendofthePowerCordtothe
PowerCordportfoundonbackoftheXi3 NUC.Then insertthethree-prongACplug directly into anelectrical
wall outlet (or a surge protector/powerstrip).
Step Six - Turn Your Xi3 NUC On
The Power Button is found on the top of the Xi3 NUC. Briefly depress this Power Button to turn on your Xi3 NUC. {NOTE: You
shouldalso turn on your computer monitor/display at this time.}
Your Operating System
ThestandardOperatingSystemfortheNUCisopenSUSELinux.However,baseduponyour
preferences, you may have purchased your
computer with a different Operating System pre-installed,such as Windows
®
.
{NOTE: The Xi3 NUC willwork with any 64-bit Operating
Systemdesignedforx86-basedcomputers,suchasvariantsofUNIX®,AIX®,otherLinuxOperatingSystems,andevenWeb- orCloud-
basedOperatingSystems.}
Listed below are instructions for getting started with the two most common operating systems.
openSUSELinux
AftercompletingStepsOne throughSixabove(includingturningon
yourXi3 NUC
andyourcomputermonitor/display),the
main screen of the openSUSE Linux
operating system should appear
on your computermonitor,signifying that you
arereadytobegin using
yourXi3 NUC.{NOTE: When shipped from the
factory,
theinitialRoot Passwordonan Xi3 NUCpre-loadedwith
openSUSELinuxisxi3password–allinlowercase.Pleaseresetyour
Root
Passwordafterinitialuse.}
Windows 7/8
After completing Steps One through Six on the previous pages
(includingturning
onyour Xi3 NUCandyourcomputer
monitor/display), the main screen of your
Windowsoperating system
shouldappearonyourcomputermonitor,signifying
thatyouareready
to begin using your Xi3 NUC.
Move Data onto your Xi3 NUC
Ifyou purchasedyourXi3 NUC with certainSoftware
Applicationspre-installedon
yourmachine,youshouldbe able tosee
anduse theseprogramsonceyou have
turnedonyourcomputer.
LoadingadditionalSoftwareApplicationsontoyourXi3 NUC canbeaccomplished
eitherbydownloading/installingtheseprogramsviatheInternetorby
transferring/installing
theprogramsfromaDVD/CDdiscorUSBdriveontoyour
Xi3 NUC.

Downloading/Installing Programs from the Internet
Todownload and installSoftwareApplicationsfromthe Internet onto yourXi3 NUC, take the following steps.
1.
MakesureyouareconnectedtotheInternet.
2.
Gototheappropriatepageontheweb.
3.
Followtheinstructionsfordownloadingtheapplication.
4.
Download and install the application.
Installing Programs from a USB Thumb drive
ToinstallSoftwareApplicationsfromaUSBthumbdriveontoyourXi3 NUC,takethefollowingsteps.
1.
InserttheUSBthumbdriveintoanopenUSBportonthebackofyourXi3 NUC.
2.
Within the Operating System, highlight the Software Applications you wish to install onto your Xi3 NUC.
3.
Follow the Operating System instructions and install the Software Applications to your Xi3 NUC hard drive.
Installing Programs from a DVD/CD
Toinstall Software Applications from a DVD or CD onto your Xi3 NUC, take the following steps.
1.
ConnectanexternalDVD/CDdrivetoyourXi3 NUC(typicallythroughanavailableUSBport).
2.
InserttheDVDorCDintoyourDVD/CDdrive.
3.
Within the Operating System, highlight the Software Applications you wish to install onto your Xi3 NUC.
4.
Follow the Operating System instructions and install the Software Applications to your Xi3 NUC hard drive.
Copying Existing Files to the Xi3 NUC from an Older PC
Ifyouhavefiles,photos,videosorotherformsofdataonyourexistingcomputerthatyouwouldliketomoveontoyourXi3 NUC
,there are
several ways to accomplish this. If you have a lotof files to copy and you have access to a DVD
orCDburner,youcancopythesefilesonto
aDVDorCDandthenfollowthestepsoutlinedaboveintheInstallingPrograms fromaDVDorCDorInstallingProgramsfromaUSB
thumbdrivesections above.Youwillbeinstallingfilesinsteadof“programs.”
Thereare also numeroussoftwareapplicationsthat are
free,or fora nominal fee, thatcan beinstalledontoyour Xi3 NUC and will walk you through the file transfer process step by step.
Ifyouhaveonlyafewfilestocopy,however,youmaychoosetoemailthefilestoyourselfasthisisoftentheeasiestway
tomove files
fromone computerto another.Simplysend an email to yourself from yourold computerand attach the files you want to that email.
Thenopen the emailon your Xi3 NUC and save the files onto yournewXi3 NUC
.
Onceyouhavesuccessfullybooted-up/turned-onyourXi3 NUCandhaveinstalledand/ortransferredallofthe
SoftwareApplicationsand
files/dataontoyournewmachine,you’rereadytostartusingyournew Xi3 NUC.
All Xi3 NUCs come pre-built to include the RAM, Intel® SSD, a professionally imaged Operating System and WiFi
(varies by model).
Processor
Intel® Core™ i5-3427 Processor (1.8GHz with turbo capability to achieve 2.8GHz, Dual-Core processor with 3MB
smart cache), supports HyperThreading Technology and Supports Intel® 64 architecture.
The Intel® NUC Board has a soldered-down Intel® Core i5-3427 processor with Integrated Graphics Technology and
integrated memory controller.
System Memory
Dual-Channel DDR3 with two connectors for 1600/1333/1066 MHz memory support (16GB max). Integrated memory
configurations available through Xi3 include 4GB (1x4GB), 8GB (2x4GB), 8GB (1x8GB) and 16GB (2x8GB).
The board has two 204-pin SO-DIMM sockets and support the following memory features:
• 1.5V DDR3 SDRAM SO-DIMMs with gold plated contacts
• Support for 1.35 V Low Voltage DDR3 (new JEDEC specification)
• Two independent memory channels with interleaved mode support
• Unbuffered, single-sided or double-sided SO-DIMMs
• 16GB maximum total system memory (with 4Gb memory technology)
• Minimum recommended total system memory: 1024MB
• Non-ECC SO-DIMMs
• Serial Presence Detect
• DDR3 1600 MHz and DDR3 1333 MHz SDRAM SO-DIMMs
Chapter2– Get to Know your NUC

Memory Configurations
The processor supports the following types of memory configurations:
• Dual Channel (Interleaved) mode. This mode offers the highest throughput for real world applications. Dual
channel mode is enabled when the installed memory capacities of both SO-DIMM channels are equal. Technology
and device width can vary from one channel to the other but the installed memory capacity for each channel must be
equal. If different speed SO-DIMMs are used between channels, the slowest memory timing will be used.
• Single channel (Asymmetric) mode. This mode is equivalent to single channel bandwidth operation for real world
applications. This mode is used when only a single SO-DIMM is installed or the memory capacities are unequal.
Technology and device width can vary from one channel to the other. If different speed SO-DIMMs are used
between channels, the slowest memory timing will be used.
Graphics
All Xi3 NUCs support graphics through Intel® HD Graphics. The Intel® HD graphics controller features the following:
• 3D Features
−DirectX* 10.1 and OpenGL* 3.0 compliant
−DirectX* 11.0 CS4.0 only
−Shader Model 4.0
• Video
−High-Definition content at up to 1080p resolution
−Hardware accelerated MPEG-2, VC-1/WMV and H.264/AVC Hi-Definition video formats
−Intel® HD Technology and Advanced Hardware Video Transcoding
−Blu-ray S3D via HDMI 1.4a
−Dynamic Video Memory Technology (DVMT) 5.0 support
−Support of up to 1.7GB Video Memory with 4GB and above system memory configuration
Video Memory Allocation
Intel® Dynamic Memory Technology (DVMT) is a method for dynamically allocating system memory for use as graphics
memory to balance 2D/3D graphics and system performance. If your computer is configured to use DVMT, graphics
memory is allocated based on system requirements and application demands (up to the configured maximum amount).
When memory is no longer needed by an application, the dynamically allocated portion of memory is returned to the
operating system for other uses.
High-bandwidth Digital Content Protection (HDCP)
HDCP is the technology for protecting high definition content against unauthorized copy or interception between a source
(computer, digital set top boxes, etc.) and the sink (panels, monitor, and TVs). The PCH supports HDCP 1.4a for content
protection over wired displays (Mini HDMI and Mini DisplayPort).
High Definition Multimedia Interface (HDMI)
The HDMI port supports standard, enhanced, or high definition video, plus multi-channel digital audio on a single cable.
Each port is compatible with all ATSC and DVB HDTV standards and supports eight full range channels at 24-bit/96 kHz
audio of lossless audio formats such as Dolby* TrueHD or DTS* HD Master Audio. The maximum supported resolution is
1920 x 1200 (WUXGA). The HDMI port is compliant with the HDMI 1.4a specification.
Integrated Audio provided by the HDMI interface includes:
−AC-3 – Dolby* Digital
−Dolby Digital Plus
−DTS-HD*
−Dolby TrueHD, DTS-HD Master Audio*, (Lossless Blu-ray Disc* Audio Format)
−LPCM, 192 kHz/24-bit, 8 channel
USB
The Xi3 NUC supports USB 2.0/3.0 ports. All USBG 2.0/3.0 ports are high-speed, full-speed, and low-speed capable. The
port arrangement is as follows:
• USB 2.0 ports:
−Two front panel ports are implemented through one dual-port internal header
−Two ports are implemented with vertical back panel connectors
−One port is reserved for the PCI Express Half-Mini Card
−One port is reserved for the PCI Express Full-Mini Card
• One front panel USB 3.0 port is implemented through an external connector.

LAN Subsystem
The LAN subsystem consists of the following:
• Intel® 82579LM Gigabit Ethernet Controller (10/100/1000 Mb/s)
o10/100/1000 BASE-T IEEE 802.3 compliant
oEnergy Efficient Ethernet (EEE) IEEE 802.3az support (Low Power Idle (LPI) mode)
oDual interconnect between the Integrated LAN Controller and the Physical Layer (PHY):
PCI Express-based interface for active state operation (S0) state
SMBUS for host and management traffic (Sx low power state)
oCompliant to IEEE 802.3x flow control support
o802.1p and 802.1q
oTCP, IP, and UDP checksum offload (for IPv4 and IPv6)
oFull device driver compatibility
• Intel® QS77 Express Chipset
• RJ-45 LAN connector with integrated status LEDs
Additional features of the LAN subsystem include:
• CSMA/CD protocol engine
• Jumbo frame support
• LAN connect interface between the PCH and the LAN controller
• Power management capabilities
−ACPI technology support
−LAN wake capabilities
• LAN subsystem software
Two LEDs are built into the RJ-45 LAN connector. The below table describes the LED states when the board is powered up
and the LAN subsystem is operating
LAN Connector LED States
LED
LED Color
LED State
Condition
Link Green
Off
On
Blinking
LAN link is not established
LAN link is established
LAN activity is occurring
Data Rate Green / Yellow
Off
Green
Yellow
10 Mb/s data rate is selected
100 Mb/s data rate is selected
1000 Mb/s data rate is selected
Hardware Management Subsystem
The hardware management features enable the board to be compatible with the Wired for Management (WfM) specification.
The board has several hardware management features, including thermal and voltage monitoring.
The hardware monitoring and fan control subsystem is based on a Nuvoton NCT5577D embedded controller, which support
the following:
• Processor and system ambient temperature monitoring
• Chassis fan speed monitoring
• Voltage monitoring of +12V, +5V, +3.3V, Memory Vcc (V_SM), +Vccp, PCH VCC
• SMBus interface
Fan monitoring can be implemented using third-party software.
Power Management
Power Management is implemented at several levels including:
• Software support through Advanced Configuration and Power Interface (ACPI)
• Hardware support:
−Power Input
−Instantly Available PC technology
−LAN wake capabilities
−Wake from USB
−WAKE# signal wake-up support
−Wake from S5
−Wake from CIR
−+5 V Standby Power Indicator LED

Energy Saving Settings
The Xi3 NUC is designed to be energy efficient in accordance with ENERGY STAR guidelines. It initially has been
configured with default settings intended to provide a good balance between performance and energy consumption. The
default settings are as follows:
Setting
Default Timing
Turn Off display
−Disables video output to the monitor and allows the
monitor to enter a power-saving mode
−Video and monitor will automatically power-on upon
user activity
−Xi3 NUC keeps running while screen is blank
10 minutes (after no keyboard or mouse activity)
Sleep Mode
−The Xi3 NUC enters a power-saving state and stops
running
−Your work, applications and system state remain
saved in memory as long as the power supply is not
disconnected
−The system will resume upon any user input
(keyboard or mouse)
30 minutes (after no keyboard or mouse activity)
Intel Security and Manageability Technologies
Intel® Security and Manageability Technologies provide the tools and resources to help protect and manage assets.
Intel® vPRO™ Technology is a collection of platform capabilities that support enhanced manageability, security,
virtualization and power efficiency. The key platform capabilities include:
• Intel® Active Management Technology (Intel® AMT) 8.0
• Intel® Virtualization (Intel® VT)
• Intel® Virtualization for Directed I/O (Intel® (VT-d)
• Intel® Trusted Execution Technology (Intel® TXT)
• Intel® Identity Protection Technology (Intel® IPT)
• Intel® Anti-Theft Technology (Intel® AT)
• Trusted Platform Module (TPM)
Intel® Active Management Technology, when used with third-party management and security applications, allows for
better discovery, heal, and protection of networked computing assets. Features include:
−Out-of-band (OOB) system access, to discover assets even while PCs are powered off
−Remote trouble-shooting and recovery, which allows remote diagnosis and recovery of systems after OS failures
−Hardware-based agent presence checking that automatically detects and alerts when critical software agents have
been stopped or are missing
−Proactive network defense, which uses filters to block incoming threats while isolating infected clients before they
impact the network
−Remote hardware and software asset tracking, helping to track computer assets and keep virus protection up-to-
date
−Keyboard, video and mouse (KVM) remote control, which allows redirection of managed system’s video to a remote
console which can then interact with it using the console’s own mouse and keyboard
Note: Intel® AMT requires the computer system to have an Intel® AMT-enabled chipset, network hardware and software, as well as
connection with a power source, a corporate network connection, and an Intel® AMT-enabled remote management console. Setup
requires additional configuration of the platform.
Intel® Virtualization Technology (Intel® VT), is a hardware-assisted technology that, when combined with software-based
virtualization solutions, provides maximum system utilization by consolidating multiple environments into a single server or
client.
Note: Intel® VT requires a chipset, BIOS, enabling software and/or operating system, device drivers, and applications designed for this
feature.
Intel® Virtualization Technology for Directed I/O (Intel® VT-d) allows addresses in incoming I/O device memory
transactions to be remapped to different host addresses. This provides Virtual Machine Monitor (VMM) software with:
−Improved reliability and security through device isolation using hardware assisted remapping.
−Improved I/O performance and availability by direct assignment of devices.

Intel® Trusted Execution Technology (Intel® TXT) is a hardware security solution that protects systems against software-
based attacks by validating the behavior of key components at startup against a known good source. It requires that Intel®
VT be enabled and the presence of a TPM.
Intel® Identity Protection Technology (Intel® IPT) provides a simple way for websites and enterprises to validate that a
user is logging in from a trusted computer. This is accomplished by using the Intel® Manageability Engine embedded in the
chipset to generate a six-digit number that, when coupled with a user name and password, will generate a One-Time
Password (OTP) when visiting the Intel® IPT –enabled websites. Intel® IPT eliminates the need for additional token or key
fob required previously for two-factor authentication.
Intel® Anti-Theft Technology (Intel® AT) provides local, tamper-resistant defense that works like a poison pill that disables
the computer and access to its data even if the operating system (OS) is reimaged, a new hard drive is installed, or the
computer is disconnected from the network.
Note: No computer system can provide absolute security under all conditions. Intel® AT requires that computer system to have an Intel®
AT-enabled chipset, BIOS, firmware release, software, and an Intel® AT-capable Service Provider / ISV application and service
subscription. The detection (triggers), response (actions), and recovery mechanisms only work after the Intel® AT functionality has been
activated and configured. Certain functionality may not be offered by some ISVs or service providers and may not be available in all
countries. Intel® assumes no liability for lost or stolen data and/or systems or any other damages resulting thereof.
Trusted Platform Module (TPM). The ST Micro ST33ZP24AR28PVSP version 1.2 revision 116 component is specifically
designed to enhance platform security above-and-beyond the capabilities of today’s software by providing a protected space
for key operations and other security critical tasks. Using both hardware and software, the TPM protects encryption and
signature keys at their most vulnerable stages-operations when the keys are being used unencrypted in plain-text form. The
TPM shields unencrypted keys and platform authentication information from software-based attacks.
The Dangers of Static Electricity
Like all computers, Xi3 NUCs are powered by electricity. As a result, a random static electricity charge can cause serious
damage to your Xi3 NUC (just as it can to any electrical device).
If you choose to open your Xi3 NUC for any reason, you must do everything possible to prevent an accidental static
electrical discharge. Specifically,
• DO ground yourself, while seated, before touching or handling your Xi3 NUC by touching any grounded metallic
object NOT connected to or touching the Xi3 NUC.
• DO NOT open or work on your Xi3 NUC in a carpeted room or a room with a linoleum floor.
• DO NOT work on or open your Xi3 NUC during or prior to an electrical storm.
Removing & Replacing Components
Upgrading, updating and/or replacing components is easy. Simply follow the steps outlined in Intels Integration Guide:
http://downloadmirror.Intel.com/23090/a08/D34010WYKH_IntegrationGuide03.pdf
Turn Off Your Xi3 NUC
HerearethesimplestepstoturnofforshutdownyourXi3 NUC.
1.
Close any open files on your Xi3 NUC.
2.
Close any applicationsin use on yourXi3 NUC.
3.
Close any open web browsers.
4. For openSUSE Linux users:
a.
Find and click on the openSUSE icon found in the bottom left-hand corner of your display screen.
b.
Next click once on the “KickoffApplicationLauncher”icon.Then use yourcursor to mouseoverthe “Leave”icon.
Nextclick
onceonthe“Shutdown”icon.
c.
TheopenSUSELinuxOperatingSystemwillnowautomaticallyshutdownin30seconds.Oryoucanexpeditethe
shutdown by clicking your cursor once on the “Turnoff computer” button.
5. For Windows users:
a.
Click on the Start icon in the bottom left-hand portion of your monitor.
b.
ClickontheShutDownicon.
Restarting Your Xi3 NUC
You can restart your Xi3 NUC by briefly depressing the Power Button on the top of the computer.

The board uses an Intel® Visual BIOS that is stored in the serial Peripheral Interface Flash Memory (SPI Flash) and can be updated using
a disk-based program. The SPI Flash contains the Visual BIOS Setup program, POST, the PCI auto-configuration utility, LAN EEPROM
information, and Plug and Play support.
The BIOS displays a message during POST identifying the type of BIOS and a revision code. The initial production BIOSs
are identified as RKPPT10H.86A.
When the BIOS setup configuration jumper is set to configure mode and the computer is powered-up, the BIOS compares
the CPU version and the microcode version in the BIOS and reports if the two match.
The Visual BIOS Setup program can be used to view and change the BIOS settings for the computer. The BIOS Setup
program is accessed by pressing the <F2> key after the Power-On Self-Test (POST) memory test begins and before the
operating system boot begins. {Note, the maintenance menu is displayed only when the board is in configure mode.}
The Serial Peripheral Interface Flash Memory (SPI Flash) includes a 128Mb (16000 Kb) flash memory device.
System Management BIOS (SMBIOS)
SMBIOS is a Desktop Management Interface (DMI) compliant method for managing computers in a managed network.
The main component of SMBIOS is the Management Information Format (MIF) database, which contains information about
the computing system and its components. Using SMBIOS, a system administrator can obtain the system types,
capabilities, operational status, and installation dates for system components. The MIF database defines the data and
provides the method for accessing this information. The BIOS enables applications such as third-party management
software to use SMBIOS. The BIOS stores and reports the following SMBIOS information:
• BIOS data, such as the BIOS revision level
• Fixed-system data, such as peripherals, serial numbers, and asset tags
• Resource data, such as memory size, cache size, and processor speed
• Dynamic data, such as event detection and error logging
Non-Plug and Play operating systems require an additional interface for obtaining the SMBIOS information. The BIOS
supports an SMBIOS table interface for such operating systems. Using this support, an SMBIOS service-level application
running on a non-Plug and Play operating system can obtain the SMBIOS information. Additional board information can be
found in the BIOS under the Additional Information header under the Main BIOS page.
Legacy USB Support
Legacy USB support enables USB devices to be used even when the operating system’s USB drivers are not yet available.
Legacy USB support is used to access the BIOS Setup program, and to install an operating system that supports USB. By
default, Legacy USB support is set to Enabled.
Legacy USB support operates as follows:
1. When you apply power to the computer, legacy support is disabled.
2. POST begins
3. Legacy USB support is enabled by the BIOS allowing you to use a USB keyboard to enter and configure the BIOS
Setup program and the maintenance menu.
4. POST completes
5. The operating system loads. While the operating system is loading, USB keyboards and mice are recognized and
may be used to configure the operating system. (Keyboards and mice are not recognized during this period if
Legacy USB support was set to Disabled in the BIOS Setup program.)
6. After the operating system loads the USB drivers, all legacy and non-legacy USB devices are recognized by the
operating system, and Legacy USB support from the BIOS is no longer used.
7. Additional USB legacy feature options can be accessed by using Intel® Integrator Toolkit.
To install an operating system that supports USB, verify that Legacy USB support in the BIOS Setup program is set to
Enabled and follow the operating system’s installation instructions.
BIOS Updates
The BIOS can be updated using either of the following utilities, which are available on the Intel® World Wide Web site:
Chapter 3 – BIOS Settings

• Intel® Express BIOS Update utility, which enables automated updating while in the Windows environment. Using
this utility, the BIOS can be updated from a file on a hard disk, a USB drive (a flash drive or a USB hard drive), or a
CD-ROM, or from the file location on the Web.
• Intel® Flash Memory Update Utility, which requires booting from DOS. Using this utility, the BIOS can be updated
from a file on a hard disk, a USB drive (a flash drive or a USB hard drive), or a CD-ROM.
• Intel® F7 switch during POST allows a user to select where the BIOS .bio file is located and perform the update
from that location/device. Similar to performing a BIOS Recovery without removing the BIOS configuration jumper.
Both utilities verify that the updated BIOS matches the target system to prevent accidentally installing an incompatible BIOS.
BIOS Recovery
It is unlikely that anything will interrupt a BIOS update; however, if an interruption occurs, the BIOS could be damaged.
Table 27 lists the drives and media types that can and cannot be used for BIOS recovery. The BOS recovery media does
not need to be made bootable.
Acceptable Drives / Media Types for BIOS Recovery
Media Type
Can be used for BIOS recovery?
Hard disk drive (connected to SATA or USB)
Yes
CD/DVD drive (connected to SATA or USB)
Yes
USB flash drive
Yes
USB diskette drive (with a 1.4 MB diskette)
No (BIOS update file is bigger than 1.4MB size limit)
Note: Support file systems for BIOS recovery: NTFS (sparse, compressed, or encrypted files are not supported), FAT32, FAT16, FAT12,
ISO 9660
Boot Options
In the BIOS Setup program, you can choose to boot from a hard drive, optical drive, removable drive, or the network. The
default setting is for the optical drive to be the first boot device, the hard drive second, removable drive third, and the
network fourth.
The network can be selected as a boot device. This selection allows booting from the onboard LAN or a network add-in card
with a remote boot ROM installed.
Pressing the <F12> key during POST automatically forces booting from the LAN. To use this key during POST, the User
Access Level in the BIOS Setup program’s Security menu must be set to Full.
For use in embedded applications, the BIOS has been designed so that after passing the POST, the operating system
loader is invoked even if the following devices are not present:
• Video adapter
• Keyboard
• Mouse
Pressing the <F10> Key during POST causes a boot device menu to be displayed. This menu displays the list of available
boot devices.
Boot Device Menu Options
Boot Device Menu Function Keys
Description
<↑> or <↓>
Selects a default boot device
<Enter>
Exits the menu, and boots from the selected device
<Esc>
Exits the menu and boots according to the boot priority
defined through BIOS setup
Power Button Menu
As an alternative to Back-to-BIOS Mode or normal POST Hotkeys, you can use the power button to access a menu. The
Power Button Menu is accessible via the following sequence:
1. System is in S4/S5 (Not G3)
2. User pushed the power button and holds it down
3. The system will emit three short beeps from the PC speaker, then stop to signal the user to release the power button
4. User releases the power button before the 4-second shutdown override
If this boot path is taken, the BIOS will use default settings, ignoring settings in VPD where possible.

At the point where Setup Entry/Boot would be in the normal boot path, the BIOS will display the following prompt and wait for
a keystroke:
[ESC] Normal Boot
[F2] Intel® visual BIOS
[F3] Disable Fast Boot
[F4] BIOS Recovery
[F7] Update BIOS
[F9] Remote Assistance
[F10] Enter Boot Menu
[F12] Network Boot
[F2] Enter Setup is displayed instead if Visual BIOS is not supported.
[F3] Disable Fast Boot is only displayed if at least one Fast Boot optimization is enabled.
[F9] Remote Assistance is only displayed if Remote Assistance is supported
If an unrecognized key is hit, then the BIOS will beep and wait for another keystroke. If one of the listed hotkeys is hit, the
BIOS will follow the indicated boot path. Password requirements must still be honored.
If Disable Fast Boot is selected, the BIOS will disable all Fast Boot optimizations and reset the systems.
BIOS Security Features
The BIOS includes security features that restrict access to the BIOS Setup program and who can boot the computer. A
supervisor password and a user password can be set for the BIOS Setup program and for booting the computer, with the
following restrictions:
• The supervisor password gives unrestricted access to view and change all the Setup options in the BIOS Setup
program. This is the supervisor mode.
• The user password gives restricted access to view and change Setup options in the BIOS Setup program. This is
the user mode.
• If only the supervisor password is set, pressing the <Enter> key at the password prompt of the BIOS Setup program
allows the user restricted access to Setup.
• If both the supervisor and user passwords are set, users can enter either the supervisor password of the user
password to access Setup. Users have access to Setup respective to which password is entered.
• Setting the user password restricts who can boot the computer. The password prompt will be displayed before the
computer is booted. If only the supervisor password is set, the computer boots without asking for a password. If
other passwords are set, the user can enter wither password to boot the computer.
• For enhanced security, use different passwords for the supervisor and user passwords.
• Valid password characters are A-Z, a-z, and 0-9. Passwords may be up to 19 characters in length.
• To clear a set password, enter a blank password after entering the existing password.
Supervisor and user Password Functions
Password Set
Supervisor Mode
User Mode
Setup Options
Password to Enter
Setup
Password During
Boot
Neither
Can change all
options*
Can change all
options*
None
None
None
Supervisor only
Can change all
options
Can change a
limited number of
options
Supervisor
password
Supervisor
None
User only
N/A
Can change all
options
Enter password
Clear user
password
User
User
Supervisor and
user set
Can change all
options
Can change a
limited number of
options
Supervisor
password
Enter password
Supervisor or user
Supervisor or user
*Note: If no password is set, any user can change all setup options.

If you want to contact Customer Support at Xi3 Corporation, be sure you have your serial number accessible prior to calling in.
Customer Support
Web:www.Xi3.com/Support
Phone: 1-855-Xi3-HELP (1-855-943-4357)
Xi3 Support Technicians answer all Phone Tech Support calls quickly, efficiently and expertly. These are computer
professionals whoare
intimatelyfamiliarwith all technicalaspectsofthe Xi3 NUC,not individualsreadingoffa
script who don’t really know computers.
Front-panel Power LED Blink Codes
Whenever a recoverable error occurs during POST, the BIOS causes the boards front panel power LED to blink an error
message describing the problem.
Front-panel Power LED Blink Codes
Type
Pattern
Note
BIOS update in progress
Off when the update begins, then on for
0.5 seconds, then off for 0.5 seconds.
The pattern repeats until the BIOS
update is complete.
Video error*
On-Off (1.0 second each) two times,
then 2.5 second pause (off), entire
pattern repeats (blink and pause) until
the system is powered off.
When no VGA option ROM is found
Memory error
On-Off (1.0 second each) three times,
then 2.5 second pause (off), entire
pattern repeats (blinks and pause) until
the system is powered off.
Thermal trip warning
Each beep will be accompanied by the
following blink pattern: .25 seconds on,
.25 seconds off, .25 seconds on, .25
seconds off. This will result in a total of
16 blinks.
*Note: Disabled per default BIOS setup option.
BIOS Error Messages
Below is a listing of common BIOS Error Messages and a brief description of each.
BIOS Error Messages
Error Message
Explanation
CMOS Battery Low
The battery may be losing power. Replace the battery soon.
CMOS Checksum Bad
The CMOS checksum is incorrect. CMOS memory may
have been corrupted. Run Setup to reset values
Memory Size Decreased
Memory size has decreased since the last boot. If no
memory was removed, then memory may be bad.
No Boot Device Available
System did not find a device to boot
Chapter
4 – Troubleshooting

Acopyof the official terms and conditionsof our Limited Warranty
can be found at:
http://www.xi3.com/resource/1410984512000/Legal/TandC/Xi3_Limited_Warranty_Policy.pdf
This product guide applies to only the standard Xi3-NUC Lear.
Xi3 may have patents or pending patent applications, trademarks, copyrights, or other intellectual property rights that relate
to the products and/or information contained in this guide. No transfer of any intellectual property rights (including the
granting of any license, express or implied, by estoppel or otherwise to any such patent(s), trademark(s), copyright(s), or
other intellectual property right(s)) occurs as a result of the furnishing of any Xi3 product, documents, or other materials or
information.
INFORMATION IN THIS DOCUMENT IS PROVIDED IN CONNECTION WITH Xi3 PRODUCTS. NO LICENSE, EXPRESS
OR IMPLIED, BY ESTOPPEL OR OTHERWISE, TO ANY INTELLECTUAL PROPERTY RIGHTS IS GRANTED BY THIS
DOCUMENT. THE PRODUCT(S) IS PROVIDED TO YOU ON AN “AS IS” BASIS, WITHOUT IMPLIED WARRANTIES OF
ANY KIND, INCLUDING THE IMPILED WARRANTIES OF MERCHANTABILITY, SUITABILITY, PERFORMANCE, AND
FITNESS FOR A PARTICULAR PURPOSE (EXCEPT AS EXPRESSLY SET FORTH HEREIN). Xi3 AND ITS AFFILIATES,
EMPLOYEES, AND AGENTS ARE NOT LIABLE FOR ANY CONSEQUENTIAL, SPECIAL, INDIRECT, OR PUNITIVE
DAMAGES, EVEN IF ADVISED OF THE POSSIBILITY OF SUCH DAMAGES, OR FOR ANY CLAIM BY ANY THIRD
PARTY. MOREOVER, Xi3 IS NOT LIABLE BEYOND THE REMEDIES SET FORTH HEREIN, INCLUDING, BUT NOT
LIMITED TO, ANY LIABILITY FOR PRODUCTS NOT BEING AVAILABLE FOR USE, LOST PROFITS, LOSS OF
BUSINESS OR FOR LOST OR CORRUPTED DATA OR SOFTWARE, OR THE PROVISION OF SERVICES AND
SUPPORT. TO THE EXTENT PERMITTED BY APPLICABLE LAW, Xi3 AND ITS AFFILIATES’, EMPLOYEES’, AND
AGENTS’ TOTAL AGGREGATE LIABILITY TO YOU FOR ANY AND ALL CLAIMS ARISING UNDER THIS AGREEMENT
OR YOUR PURCHASE OF THE PRODUCT SHALL NOT EXCEED THE AMOUNT YOU PAID FOR THE PRODUCT. THE
Xi3 PRODUCTS ARE NOT DESIGNED NOR INTENDED FOR ANY APPLICATION IN WHICH THE FAILURE OF THE Xi3
PRODUCT COULD CREATE A SITUATION WHERE PERSONAL INJURY OR DEATH MAY OCCUR.
All Xi3 NUC products are evaluated as Information Technology Equipment (I.T.E.) for use in personal computers (PC) for
installation in homes, offices, schools, computer rooms, and similar locations. The suitability of this product for other PC or
embedded non-PC applications or other environments, such as medical, industrial, alarm systems, test equipment, etc. may
not be supported without further evaluation by Xi3.
Xi3 may make changes to specifications and product descriptions at any time, without notice.
Intel processor numbers are not a measure of performance. Processor numbers differentiate features within each processor
family, not across different processor families: To learn about Intel® Processor Numbers go to:
http://www.intel.com/content/www/us/en/processors/processor-numbers.html
Contact your local Xi3 sales office or your distributor to obtain the latest specifications before placing your product order.
Xi3 and the Xi3 logo are registered trademarks of Xi3 Inc. All other trademarks are property of their respective owners.
Other names and brands may be claimed as the property of others.
Copyright © 2014 Xi3, Inc. All rights reserved.
Important Safety Information
WARNING: Incorrect use of your Xi3 NUC may void the manufacturer’s warranty.
Components– DO NOT remove or replace anyof the individual componentsfound on anyof the boardsinside your Xi3 NUC. Doing so
will void the warranty.
Airflow/Circulation– DONOTpermanentlyorsemi-permanentlyblockorin any waycover oneorbothof thehoneycombed
endcaps of the
Xi3 NUC as this will stop or minimize the potential cooling of the various parts and compo
nents.Doingsowillvoidthewarranty.
Replacement Parts – Only Authorized Replacement Parts may be used on or inside an Xi3 NUC. Using
non-authorized
replacementpartswillvoidthewarranty.
Water & Liquids – Electricity and water/liquids do not mix. Keep your Xi3 NUC away from water and liquids. An
Xi3 NUCsufferingwater
Chapter 5 – Legal Stuff

orliquiddamagevoidsthewarranty.
Important Handling Information
WARNING: If you do not follow these handling instructions, you could damage your Xi3 NUC, other property and void
the warranty.
Transporting or Carrying yourXi3 NUC – If you need to carry your Xi3 NUC from one place to
another,werecommendcarryingitinsidea
paddedbagorcarrying case.Ifyouare shipping yourXi3 NUC,
pleasepackitsecurelyinsideaboxorshipping containerwith an
appropriateamountofpaddingtoprotectitduringshipment. In either instance,please ensure that there are no small loose objects inside
the shipping box, bag or carrying case.
Avoid Powerful Magnets – Your Xi3 NUC contains long- and short-term memory/storage solutions that can be
erasediftheycomein
contactwithorclosetoapowerfulmagnet.
ProtectConnectors&Ports–MakesurethatallportsonyourXi3 NUCDONOTcontainanydebrisbefore
attemptingtoconnectacable
ordevicetotheports.Itisimportantthatyoucorrectlyalignthecorrectcable/connectorwith
theproperport.Andneverattempttoforcea
connectorintoaport.
Environmental
The below table lists the environmental specifications for the board:
Environmental Specifications
Parameter
Specification
Temperature
Non-Operating
-40 °C to +60 °C
Operating
0 °C to +50 °C
Shock
Unpackaged
50 g trapezoidal waveform
Velocity change of 170 inches/s2
Packaged
Half sine 2 millisecond
Product Weight (Pounds)
Free Fall (inches)
Velocity Change
(inches/s
2
)
<20
36
167
21-40
30
152
41-80
24
136
81-100
18
118
Vibration
Unpackaged
5 Hz to 20 Hz: 0.01 g2Hz sloping up to 0.02 g2Hz
20 Hz to 500 Hz: 0.02 g2Hz (flat)
Packaged
5 Hz to 40 Hz: 0.015 g2Hz (flat)
40 Hz to 500 Hz: 0.015 g2Hz sloping down to 0.00015 g2Hz
.
Cleaning your Xi3 NUC – Toremove dust from (or buff the
outer chassis of) your Xi3 NUC chassis, use a clean, lint-free
soft cloth. DO
NOT spray any type of cleaning solution orapply any liquid
cleanerdirectlytoyourXi3 NUCatanytime,butespecially
when the computer
is turned on or running.
Infact,ifyouneedtousealiquidcleanertocleantheouterchassisofyour
Xi3 NUC, turn off your computer first (see Page 8). Then
apply
onlyenoughliquidcleanertoacleanandsoftclothsoastodampen
the cloth,and use this dampened cloth to clean the outer chassis of
your
Xi3 NUC.
Ifyounoticeanaccumulationofdustinsidethechassis
, use a liquid-free, compressed air aerosol can to spray out the
inside of your
computer. DO NOT use liquids of any type to attempt to clean
the Boards or components of your Xi3 NUC. Doing so will voidthewarranty.
Regulatory Information
CAUTION: Risk of explosion if battery is replaced by an incorrect type. Dispose of used batteries according to the
instructions.

ThisdevicehasbeenverifiedtocomplywithPart15oftheFCCRules.Operationissubjecttothefollowingtwoconditions:
1.
Thisdevicemaynotcauseharmfulinterference,and
2.
Thisdevicemustacceptanyinterferencereceived,includinginterferencethatmaycauseundesiredoperation.
The following information is forFCC compliance of Class B devices: This equipment has been tested and verified to comply
withthelimits
foraClassBdigitaldevice,pursuanttoPart15oftheFCCrules.Theselimitsaredesignedtoprovidereason
ableprotectionagainst
harmfulinterferenceinaresidentialinstallation.Thisequipmentgenerates,usesandcanradiateradio
frequencyenergyand,ifnotinstalled
andusedinaccordancewith Xi3’sinstructions,maycause harmfulinterferenceto radio
communications.However,thereisnoguaranteethat
interferencewillnotoccurinaparticularinstallation.
Iftheequipmentcausesinterferencetoradioortelevisionreception,whichcanbedeterminedbyturningtheequipmentoff
and on, usersare
encouraged totryto correct the interference byusing oneor more of the following measures:
•
Reorientorrelocatethereceivingantenna.
•
Increase the separation between the equipment and receiver.
•
Connecttheequipmentintoanoutletonacircuitdifferentfromthattowhich thereceiverisconnected.
•
Consultthedealeroranexperiencedradio/TVtechnicianforhelp.
ModificationstothisproductnotauthorizedbyXi3couldvoidtheFCCapprovalandnegateyourauthoritytooperatethe
product.

Acomplete glossary of names,words and terms associated with the Xi3 NUC can be found at www.Xi3.com/
news/glossary.
Xi3Corporationcanbereachedatourcorporateheadquarters:
299 South Main Street #1300
Salt
LakeCity,UT84111
801-478-3800
www.Xi3.com
CustomerService:
855-Xi3-HELP (855-943-4357)
support@xi3.com
Sales:
877-880-4289
sales@xi3.com
Informationinthisdocumentissubjecttochangewithoutnotice.©2014Xi3Corporation.Allrightsreserved.
Reproduction of these materials in any manner, in whole or in part, without the written permission of Xi3 Corporation is strictly prohibited.
Glossary
Corporate
Information
Table of contents


