EPHREM L'ARTISAN 110 User manual
WARNING: DO NOT USE ALCOHOL, GASOLINE, OR SIMILAR FLAMMABLE LIQUIDS TO IGNITE OR REKINDLE THE FIRE
L’ARTISAN 110
Step 1: Trim elements if needed with a wood rasp.
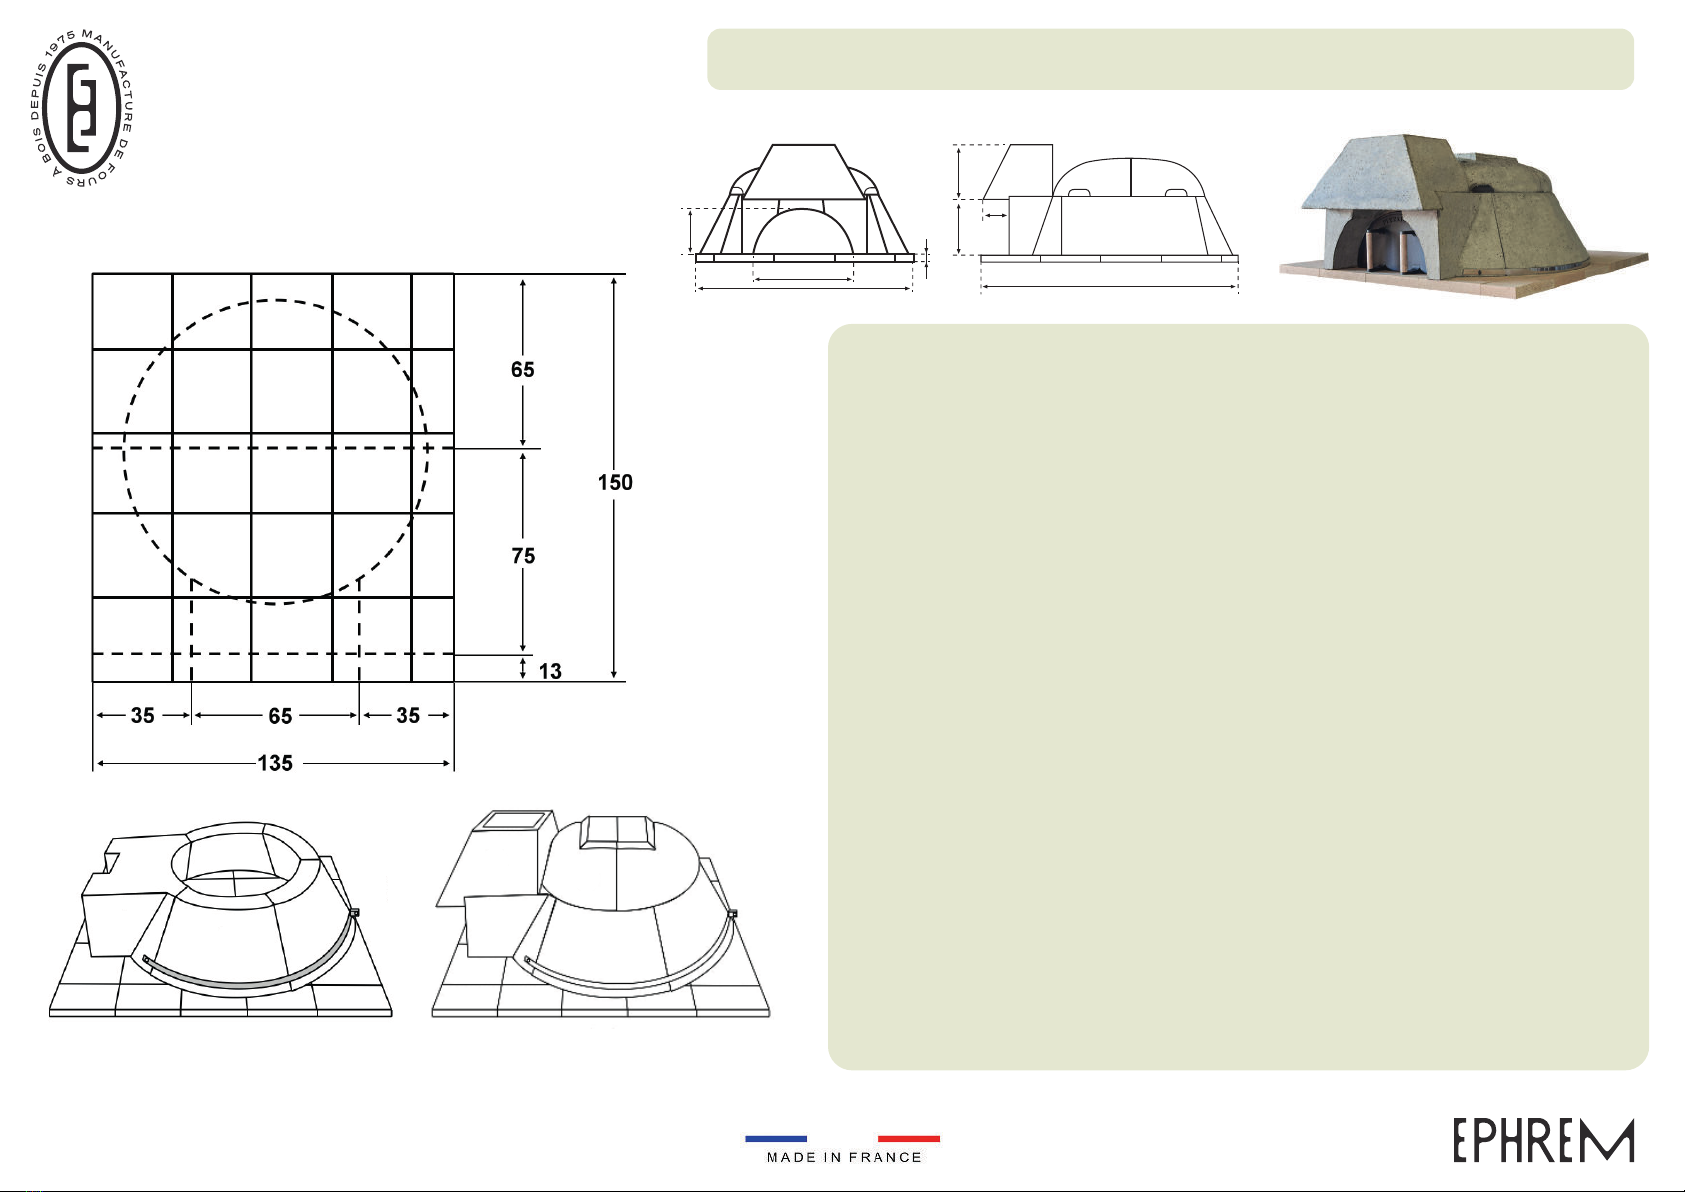
Step 2, figure 1: Build a concrete slab measuring at least 170 (width) x 170 (depth) x 20
(thickness) cm (W165xD165x20 cm for insulation with vermiculite concrete) and let it dry
for at least 28 days. Create a thin bed of lean mortar (2 to 3 cm thick) using standard
cement. Follow the configuration depicted in picture 1 to place the 25 base slabs moistened
beforehand on top of the mortar bed. Make sure they are properly aligned and that the top
surface is leveled. No joint mortar is required. Remove any excess mortar from around the
base. Using string and chalk, create a circular outline with a diameter of 110 cm (as indicated
by the dotted line). Allow the floor to dry for 24 to 48 hours before proceeding.
Step 3, figure 2: Align the front element ① along the dotted line and position the elements
② and ⑤ along the circular outline. Place the elements ③ and ④ without making any joints
beneath or between these 5 elements. Attach the metal strapping to the base of elements
① to ⑤ and tighten it to ensure a snug fit of the oven side elements against each other.
Step 4, figure 3: Position the dome elements ⑩ and ⑪ on a layer of refractory mortar
measuring 1 to 2 cm thick. Ensure that there are no joints between these elements.
Similarly, install the smoke drain ⑫ on the element ①, but this time make sure to create a
refractory mortar joint between elements ⑩ and ⑫to ensure a waterproof seal at the rear.
Step 5: The chimney should be positioned above the element ⑫, it can be created in two
ways:
• Using flue tiles measuring 20x20 cm (for the 3rd tile and upwards, additional support
is required)
• Alternatively, by installing a connection pipe (available as an optional accessory) and
connecting a stainless steel flue with an inside diameter of Ø200 mm.
Step 6: Build a wall around the oven using 15 cm breeze blocks (or 10 cm for vermiculite
concrete insulation on a 165x165x20 cm slab), ensuring a 5 cm gap between the slabs and
the breeze blocks to allow for expansion. Surround the entire oven with a 10 cm flexible roll
of rock/ceramic wool or EPHREM insulating fibre (available as an option). Cover the
insulation with 0/4 dry sand or vermiculite concrete, ensuring it reaches a minimum height
of 20 cm above the dome. Leave an air gap of 20 cm between the roof and the top of the
oven insulation to create a decompression chamber. Additionally, insulate the load-bearing
slab from underneath with a single rigid panel of at least 5 cm thick rock wool. Finally, build
the desired cladding to complete the installation.
ASSEMBLY INSTRUCTIONS
31
4
150
51
135
26 28 12
EXPLODED VIEW
Figure 2
①④
⑪
⑫⑩
③
②
⑤
Figure 3
Figure 1
Total weight: 570kg
Packaged on a pallet
measuring 100×120 cm
A COMPACT AND HIGH-PERFORMANCE
PROFESSIONAL OVEN
Our ovens are covered by a 5-year warranty and are certified to meet the
EN1388/1 standard, ensuring their suitability for use with food.
four-ephrem.com
FOR THE PIZZAS
Preheat the oven for approximately 1 hour using 4 to 7 logs. Once the embers
have formed, distribute them in an even arch along the sides and bottom of
the oven to ensure uniform heat distribution across the hearth. It is
recommended to use dry, hard woods like oak or beech, while avoiding
softwoods that may cause clogging. Clear any debris from the surface, place
the pizza on the floor, and bake for around 2 minutes.
FOR THE GRILLED FOOD
Reduce the number of embers slightly and distribute them to the side(s) of
the oven. Carefully place the grilled food on the barbecue grill, taking note
that it cooks rapidly. Towards the end of the cooking process, move the
embers back to the center to burn off any remaining grease. Additionally, you
have the option to position a cast iron dish beneath the grill to collect any
cooking fat.
FOR THE BREAD
Heat the oven until the dome formed by the arches becomes white. Remove
the embers and let the temperature gradually decrease (bread typically
bakes at a range of 230 to 250°C). Once the desired temperature is reached,
carefully place the bread inside the oven and close the door.
FOR COOKINGS REQUIRING A DISH
Heat the oven until the dome formed by the arches becomes white. Remove
the embers and let the temperature gradually decrease (bread typically
bakes at a range of 230 to 250°C). Once the desired temperature is reached,
carefully place the bread inside the oven and close the door.
NB: Grilled food and pizzas are cooked with an open door. On the contrary,
bread, pies and slow-cooked dishes (such as pot-au-feu, daube, etc.) are
cooked with a closed door and the embers must be removed.
WARRANTY: Our ovens are covered by a 5-year warranty starting from the
delivery date, provided that our assembly instructions have been followed. This
guarantee exclusively covers the replacement of faulty parts (the customer is
responsible for the transportation costs of these parts). We are not liable for
the assembly or disassembly of the oven and cannot provide coverage for any
associated costs. Additionally, we will not be responsible for the expenses
related to the replacement of defective parts or for any damages incurred
during this process, regardless of the cause.
INSTRUCTIONS TO FOLLOW WHEN USING THE OVEN
• During assembly, it is recommended to have two people to carry the components, as they can weigh
up to 60 kg.
• Do not use the oven until the insulation has been installed. During the initial heating of the oven,
ensure that the flame does not reach the arches for a minimum of two days. Start the fire at the rear
of the oven, beginning with a few twigs and gradually adding more. Then, add larger logs to allow the
oven to heat up. Keep the flame from rising into the smoke drain.
• Cracks may occasionally occur, but these are part of the natural expansion process and should not
affect the proper functioning of the oven.
•Only use dry, untreated wood for your fire, avoiding any wood from demolition or industrial sources,
whether painted or unpainted. Do not use any flammable products.
•The oven is specifically designed for cooking food and is certified to standard EN1388/1. Therefore,
EPHREM FUSION cannot be held responsible and will not provide any warranty if the oven is used for
any other purpose. When cooking food in the oven, appropriate oven gloves should be worn to avoid
skin burns.
•Smoke extraction system must be in accordance with NF DTU 24-1 1 P1 (02/2006 + A1 : 12/2011)
standards.
•Flammable materials and equipment should be kept at least 40 cm away from the sides of the oven
or shielded from the heat radiation emitted by the oven. The external walls of the oven should maintain
a surface temperature below 100°C, and they should be inaccessible to the general public. It is
important to limit the amount of wood stored in the room where the oven is located to only what is
required for daily consumption.
L’ARTISAN 110 DIRECTIONS FOR USE
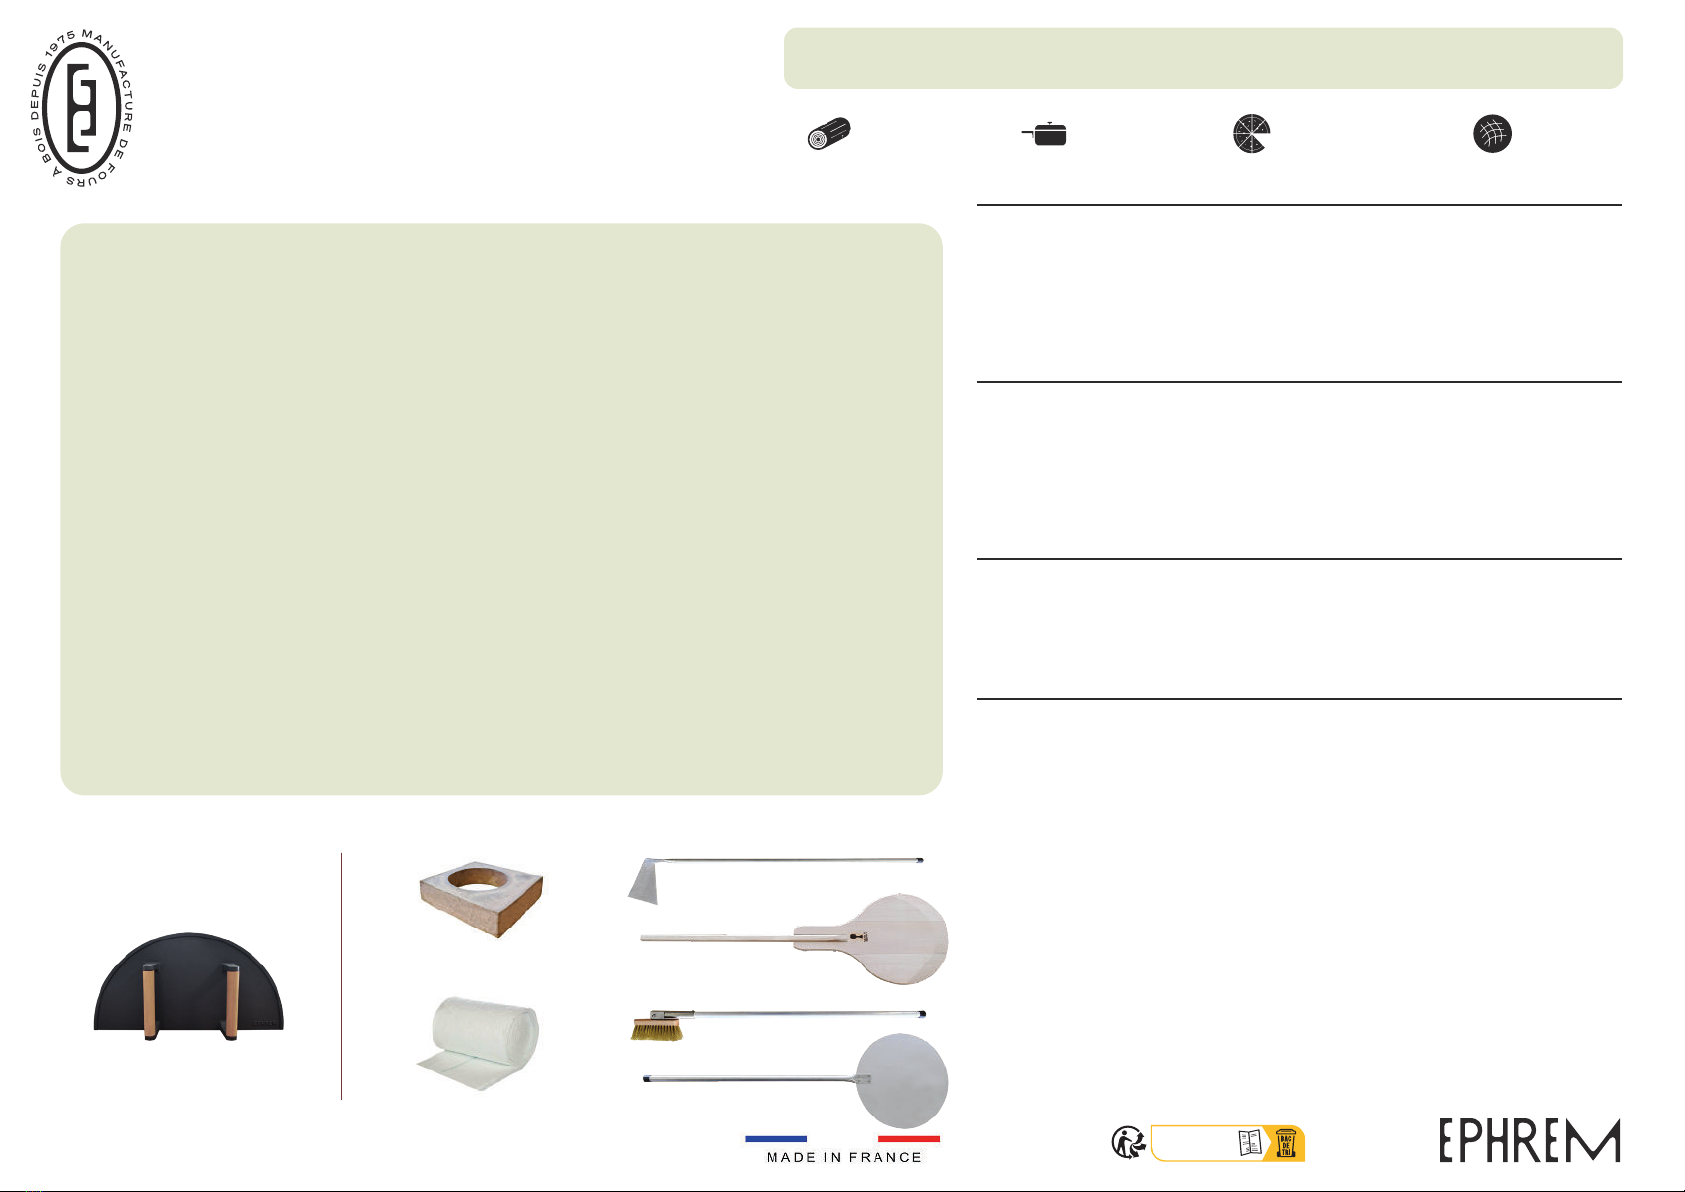
Wooden pizza peel
Stainless-stell pizza peel
Brass bristle brush
Steel scraper
Connection pipe for
stainless-steel conduit Ø 20 cm
ACCESSORIES AVAILABLE FOR PURCHASE AS OPTIONS
Insulating fibre roll
Professional cast iron
door Artisan 110
INCLUDED ACCESSORY
10 kg / heating cycle 3 Ø30 cm dishes
per batch
4 Ø33 cm pizzas per batch
50 per hour 12 kg per batch
PLEASE KEEP THIS DOCUMENT
INSTRUCTIONS
Other EPHREM Kitchen Appliance manuals


